


Kia, THE COMPANY
Thank you for becoming the owner of a new Kia vehicle.
As a global car manufacturer focused on building high-quality, value for money prices, Kia Motors is dedicated to providing you with a customer service experience that exceeds your expectations.
All information contained in this Owner’s Manual is accurate at the time of publication. However, Kia reserves the right to make changes at any time so that our policy of continual product improvement can be carried out.
This manual applies to all Kia models and includes descriptions and explanations of optional as well as standard equipment. As a result, you may encounter material in this manual that is not applicable to your specific Kia vehicle.
Drive safely and enjoy your Kia! 

F o r e w o r d
Thank you for choosing a Kia vehicle.
When you require service, remember that your Kia Dealer knows your vehicle best. Your dealer has factory-trained technicians, recommended special tools, genuine Kia replacement parts and is dedicated to your complete satisfaction.
Because subsequent owners require this important information as well, this publication should remain with the vehicle if it is sold.
This manual will familiarize you with operational, maintenance and safety information about your new vehicle. It is supplemented by a Warranty and Consumer Information manual that provides important information on all warranties regarding your vehicle.
We urge you to read these publications carefully and follow the recommendations to help assure enjoyable and safe operation of your new vehicle.
Kia offers a great variety of options, components and features for its various models. Therefore, some of the equipment described in this manual, along with the various illustrations, may not be applicable to your particular vehicle.
The information and specifications provided in this manual were accurate at the time of printing. Kia reserves the right to discontinue or change specifications or design at any time without notice and without incurring any obligation. If you have questions, always check with your Kia dealer.
We assure you of our continuing interest in your motoring pleasure and satisfaction in your Kia vehicle.
© 2014 Kia Canada Inc.
All rights reserved. Reproduction by any means, electronic or mechanical, including photocopying, recording, or by any information storage and retrieval system or translation in whole or part is not permitted without written authorization from Kia Canada Inc..
Printed in Korea
i

|
|
|
|
|
|
|
|
|
|
|
Introduction |
|
1 |
|
|
|
|
|
|
|
|
|
|
|
Your vehicle at a glance |
|
2 |
|
|
|
|
|
|
|
|
|
|
|
Safety features of your vehicle |
|
3 |
|
|
|
|
|
|
|
|
|
|
|
Features of your vehicle |
|
4 |
|
|
|
|
|
|
|
|
table of contents |
|
|
Driving your vehicle |
|
5 |
|
|
|
||||
|
|
|
|
|
|
|
|
|
|
|
What to do in an emergency |
|
6 |
|
|
|
|
|
|
|
|
|
|
|
Maintenance |
|
7 |
|
|
|
|
|
|
|
|
|
|
|
Specifications & Consumer information |
|
8 |
|
|
|
|
|
|
|
|
|
|
|
Index |
|
I |
|
|
|
|
|
|
|
|
|
|
|
|
|
|
|
|
|
|
|
|
|
|
|
|
|
|
|
|
ii
Introduction |
|
1 |
How to use this manual / 1-2
Fuel requirements / 1-3
Vehicle break-in process / 1-4
Indicator symbols on the instrument cluster / 1-5
Introduction
HOW TO USE THIS MANUAL
We want to help you get the greatest possible driving pleasure from your vehicle. Your Owner’s Manual can assist you in many ways. We strongly recommend that you read the entire manual. In order to minimize the chance of death or injury, you must read the WARNING and CAUTION sections in the manual.
Illustrations complement the words in this manual to best explain how to enjoy your vehicle. By reading your manual, you will learn about features, important safety information, and driving tips under various road conditions.
The general layout of the manual is provided in the Table of Contents. Use the index when looking for a specific area or subject; it has an alphabetical listing of all information in your manual.
Sections: This manual has eight sections plus an index. Each section begins with a brief list of contents so you can tell at a glance if that section has the information you want.
You will find various types of safety instructions in this manual. These instructions were prepared to enhance your personal safety. Carefully read and follow ALL procedures and recommendations provided in these instructions.
WARNING
A WARNING indicates a situation in which harm, serious bodily injury or death could result if the warning is ignored.
CAUTION
A CAUTION indicates a situation in which damage to your vehicle could result if the caution is ignored.
NOTICE
ANOTICE indicates interesting or helpful information is being provided.
1 2
FUEL REQUIREMENTS
Your new Kia vehicle is designed to use only unleaded fuel having a pump octane number ((R+M)/2) of 87 (Research Octane Number 91) or higher.
Your new vehicle is designed to obtain maximum performance with UNLEADED FUEL, as well as minimize exhaust emissions and spark plug fouling.
Never add any fuel system cleaning agents to the fuel tank other than what has been specified. (Consult an authorized Kia dealer for details.)
WARNING - Refueling
•Do not "top off" after the nozzle automatically shuts off when refueling.
•Always check that the fuel cap is installed securely to prevent fuel spillage in the event of an accident.
NOTICE
Tighten the cap until it clicks one time, otherwise the fuel cap open warning indicator 
 will illuminate.
Introduction
Gasoline containing alcohol and methanol
Gasohol, a mixture of gasoline and ethanol (also known as grain alcohol), and gasoline or gasohol containing methanol (also known as wood alcohol) are being marketed along with or instead of leaded or unleaded gasoline.
Pursuant to EPA regulations, ethanol may be used in your vehicle. Do not use gasohol containing more than 10% ethanol, and do not use gasoline or gasohol containing any methanol. Ethanol provides less energy than gasoline and it attracts water, and it is thus likely to reduce your fuel efficiency and could lower your MPG results. Methanol may cause drivability problems and damage to the fuel system. Discontinue using gasohol of any kind if drivability problems occur. Vehicle damage or drivability problems may not be covered by the manufacturer's warranty if they result from the use of:
1.Gasoline or gasohol containing methanol.
2.Leaded fuel or leaded gasohol.
"E85" fuel is an alternative fuel comprised of 85 percent ethanol and 15 percent gasoline, and is manufactured exclusively for use in Flexible Fuel Vehicles. “E85” is not compatible with your vehicle. Use of “E85” may result in poor engine performance and damage to your vehicle's engine and fuel system. Kia recommends that customers do not use fuel with an ethanol content exceeding 10 percent.
NOTICE
Your New Vehicle Limited Warranty does not cover damage to the fuel system or any performance problems caused by the use of “E85” fuel.
Gasoline containing MMT
Some gasoline contains harmful man- ganese-based fuel additives such as MMT (Methylcyclopentadi-enyl Manganese Tricarbonyl).
Kia does not recommend the use of gasoline containing MMT.
This type of fuel can reduce vehicle performance and affect your emission control system.
The malfunction indicator lamp on the cluster may come on.
1 3
Introduction
Use of MTBE
Kia recommends avoiding fuels containing MTBE (Methyl Tertiary Butyl Ether) over 15.0% vol. (Oxygen Content 2.7% weight) in your vehicle.
Fuel containing MTBE over 15.0% vol. (Oxygen Content 2.7% weight) may reduce vehicle performance and produce vapor lock or hard starting.
NOTICE
Your New Vehicle Limited Warranty may not cover damage to the fuel system and any performance problems that are caused by the use of fuels containing methanol or fuels containing MTBE (Methyl Tertiary Butyl Ether) over 15.0% vol. (Oxygen Content 2.7% weight.)
Do not use methanol
Fuels containing methanol (wood alcohol) should not be used in your vehicle. This type of fuel can reduce vehicle performance and damage components of the fuel system.
Fuel Additives
Kia recommends that you use good quality gasolines treated with detergent additives such as TOP TIER Detergent Gasoline, which help prevent deposit formation in the engine. These gasolines will help the engine run cleaner and enhance performance of the Emission Control System. For more information on TOP TIER Detergent Gasoline, please go to the website (www.toptiergas.com). For customers who do not use TOP Tier Detergent Gasoline regularly, and have problems starting or the engine does not run smoothly, additives that you can buy separately may be added to the gasoline. If TOP TIER Detergent Gasoline is not available, one bottle of additive added to the fuel tank at every 12,000 km or every engine oil change is recommended. Additives are available from your authorized Kia dealer along with information on how to use them. Do not mix other additives.
Operation in foreign countries
If you are going to drive your vehicle in another country, be sure to:
•Observe all regulations regarding registration and insurance.
•Determine that acceptable fuel is available
VEHICLE BREAK-IN PROCESS
No special break-in period is needed. By following a few simple precautions for the first 1,000 km (600 miles) you may add to the performance, economy and life of your vehicle.
•Do not race the engine.
•While driving, keep your engine speed (rpm, or revolutions per minute) between 2,000 rpm and 4,000 rpm.
•Do not maintain a single speed for long periods of time, either fast or slow. Varying engine speed is needed to properly break-in the engine.
•Avoid hard stops, except in emergencies, to allow the brakes to seat properly.
•Don't tow a trailer during the first 2,000 km (1,200 miles) of operation.
1 4

INDICATOR SYMBOLS ON THE INSTRUMENT CLUSTER
Air bag warning light
ABS warning light
Seat belt warning light
Turn signal indicator
High beam indicator
Tail light indicator
Front fog light indicator*
Engine oil pressure warning light
Parking brake & Brake fluid warning light
KEY OUT
Charging system warning light
Trunk (tailgate) open ajar warning light
Door ajar warning light
Immobilizer indicator
Key out warning light*
Shift pattern indicator*
Manual transaxle shift indicator*
Low fuel level warning light
Malfunction indicator light
For more detailed explanations, refer to “Instrument cluster” in section 4.
Introduction
ESC indicator
ESC OFF indicator
Electric power steering (EPS) system warning light*
ECO ECO indicator*
Auto stop for ISG system indicator*
Low tire pressure telltale* /
TPMS malfunction indicator*
CRUISE Cruise control indicator*
Cruise SET indicator*
Fuel cap open warning indicator
* : if equipped
1 5

Your vehicle at a glance |
|
2 |
|
|
|
Interior overview / 2-2
Instrument panel overview / 2-3
Engine compartment / 2-4
Your vehicle at a glance
INTERIOR OVERVIEW
1. |
Door lock/unlock button .................... |
4-16 |
2. |
Central door lock switch.................... |
4-17 |
3. Power window switches .................... |
4-22 |
|
4. Power window lock button ................ |
4-25 |
|
5. |
Outside rearview mirror control |
|
|
switch ................................................ |
4-39 |
6. |
Hood release lever............................ |
4-26 |
7. |
Fuel filler lid release lever................. |
4-28 |
8. Trunk lid release lever (4 door) ......... |
4-18 |
|
9. |
Steering wheel .................................. |
4-35 |
10. Steering wheel tilt control lever....... |
4-36 |
|
11. Active ECO button .......................... |
5-41 |
|
12. Instrument panel illumination control |
||
|
switch .............................................. |
4-42 |
13. ESC OFF button ............................. |
5-25 |
|
14. Heated steering wheel switch |
|
|
|
(if equipped).................................... |
4-36 |
15. Idle Stop and Go system OFF button |
||
|
........................................................ |
5-37 |
16. Fuse box ......................................... |
7-49 |
|
17. Brake pedal..................................... |
5-21 |
|
18. Accelerator pedal |
|
|
The actual interior in the vehicle may differ from the illustration.
OUB021001K
2 2
Your vehicle at a glance
INSTRUMENT PANEL OVERVIEW
1. |
Instrument cluster............................. |
4-41 |
|
2. Horn ................................................. |
4-37 |
||
3. |
Driver’s front air bag......................... |
3-41 |
|
4. |
Light control/Turn signals ................. |
4-70 |
|
5. Wiper/Washer................................... |
4-74 |
||
6. Ignition switch or ENGINE START/ |
|||
|
STOP button ................................. |
5-4, 5-6 |
|
7. Hazard warning flasher switch ...... |
4-70, 6-2 |
||
8. Audio .............................................. |
4-102 |
||
9. |
Climate control system..................... |
4-81 |
|
10. |
Shift lever............................... |
5-12, 5-15 |
|
11. |
Steering wheel audio control........ |
4-103 |
|
12. |
Passenger’s front air bag ............... |
3-41 |
|
13. Glove box ....................................... |
4-92 |
||
14. |
Parking brake lever ........................ |
5-22 |
|
15. |
Power outlet ................................... |
4-99 |
|
16. |
Cigarette lighter .............................. |
4-96 |
|
17. Seat warmer ..................................... |
3-7 |
||
The actual instrument panel in the vehicle may differ from the illustration.
OUB021002N
2 3
Your vehicle at a glance
ENGINE COMPARTMENT
1. |
Engine Coolant Reservoir ................ |
7-26 |
2. |
Engine Oil Filler Cap ........................ |
7-25 |
3. |
Brake/Clutch Fluid Reservoir ........... |
7-29 |
4. |
Air Cleaner ....................................... |
7-31 |
5. Fuse Box .......................................... |
7-49 |
|
6. |
Negative Battery Terminal ................ |
7-34 |
7. |
Positive Battery Terminal.................. |
7-34 |
8. Radiator Cap .................................... |
7-27 |
|
9. |
Engine Oil Dipstick ........................... |
7-25 |
10. Windshield Washer Fluid Reservoir..7-30
* The actual engine compartment in the vehicle may differ from the illustration.
OUB071103N
2 4

Seat / 3-2
Seat belts / 3-12
Child restraint system / 3-22
Airbag-advanced supplemental restraint system / 3-30
Safety features of your vehicle |
|
3 |
|
|
|

Safety features of your vehicle
SEAT
■ 5 door |
|
■ 4 door |
The actual seats in the vehicle may differ from the illustration.
Driver’s seat
(1)Forward and rearward
(2)Seatback angle
(3)Seat cushion height
(4)Seat warmer
(5)Headrest
Front passenger’s seat
(6)Forward and rearward
(7)Seatback angle
(8)Seat warmer
(9)Headrest
Rear seat
(10)Headrest
(11)Seatback folding
OUB032001K
3 2
WARNING - Loose objects
Do not place anything in the driver's foot well or under the front seats. Loose objects in the driver's foot area could interfere with the operation of the foot pedals.
WARNING - Uprighting seat
Do not press the release lever on a manual seatback without holding and controlling the seatback. The seatback will spring upright possibly impacting you or other passengers.
WARNING - Driver responsibility for passengers
The driver must advise the passenger to keep the seatback in an upright position whenever the vehicle is in motion. If a seat is reclined during an accident, the occupant's hips may slide under the lap portion of the seat belt, applying great force to the unprotected abdomen.
WARNING- Seat cushion
Occupants should never sit on seat cushions. The passenger's hips may slide under the lap portion of the seat belt during an accident or a sudden stop.
WARNING - Driver’s seat
•Never attempt to adjust the seat while the vehicle is moving. This could result in loss of control of your vehicle.
•Do not allow anything to interfere with the normal position of the seatback. Storing items against a seatback or in any other way interfering with proper locking of a seatback.
•Sit as far back as possible from the steering wheel while still maintaining comfortable control of your vehicle. A distance of at least 10" from your chest to the steering wheel is recommended. Failure to do so can result in airbag inflation injuries to the driver.
Safety features of your vehicle
WARNING - Seat
adjustment
•Do not adjust the seat while wearing seat belts. Moving the seat forward will cause strong pressure on the abdomen.
•Do not place your hand near the seat bottom or seat track while adjusting the seat. Your hand could get caught in the seat mechanism.
3 3
Safety features of your vehicle
OUB031002
Front seat adjustment
Forward and backward
To move the seat forward or backward:
1.Pull the seat slide adjustment lever up and hold it.
2.Slide the seat to the position you desire.
3.Release the lever and make sure the seat is locked in place.
Adjust the seat before driving, and make sure the seat is locked securely by trying to move forward and backward without using the lever. If the seat moves, it is not locked properly.
WARNING - Unexpected seat movement
After adjusting a manual seat, always check that it is locked by shifting your weight to the front and back. Sudden or unexpected movement of the driver's seat could cause you to lose control of the vehicle.
OUB031003
Seatback angle
To recline the seatback:
1. Lean forward slightly and lift up the seatback recline lever.
2. Carefully lean back on the seat and adjust the seatback of the seat to the position you desire.
3. Release the lever and make sure the seatback is locked in place. (The lever MUST return to its original position for the seatback to lock.)
3 4
Safety features of your vehicle
OUB031004
Seat height (for driver’s seat) (if equipped)
To change the height of the seat, move the lever upwards or downwards.
•To lower the seat cushion, push down the lever several times.
•To raise the seat cushion, pull up the lever several times.
OUB031042N
Headrest
The driver's and front passenger's seats are equipped with a headrest for the occupant's safety and comfort.
The headrest not only provides comfort for the driver and front passenger, but also helps protect the head and neck in the event of a collision.
For maximum effectiveness in case of an accident, the headrest should be adjusted so the middle of the headrest is at the same height of the center of gravity of an occupant's head. Generally, the center of gravity of most people's head is similar with the height of the top of their eyes. Also, adjust the headrest as close to your head as possible.
For this reason, the use of a cushion that holds the body away from the seatback is not recommended.
WARNING - Headrest
removal/adjustment
•Do not operate the vehicle with the headrests removed. Headrests can provide critical neck and head support in a crash.
•Do not adjust the headrest height while the vehicle is in motion. Driver may lose control of the vehicle.
3 5
Safety features of your vehicle
OUB031007
Forward and backward adjustment
The headrest may be adjusted forward to 4 different positions by pulling the headrest forward to the desired detent. To adjust the headrest to it’s furthest backwards position, pull it fully forward to the farthest position and release it. Adjust the headrest so that it properly supports the head and neck.
OUB031005
Adjusting the height up and down
To raise the headrest, pull it up to the desired position (1). To lower the headrest, push and hold the release button (2) on the headrest support and lower the headrest to the desired position (3).
OUB034100
Removal and installation
To remove the headrest:
1.Recline the seatback (2) with the recline lever (1).
2.Raise headrest as far as it can go.
3.Press the headrest release button (3) while pulling the headrest up (4).
WARNING
NEVER allow anyone to ride in a seat with the headrest removed.
3 6

Safety features of your vehicle
OUB034101
To reinstall the headrest :
1.Put the headrest poles (2) into the holes while pressing the release button (1).
2.Recline the seatback (4) with the recline lever (3).
3.Adjust the headrest to the appropriate height.
WARNING
Always make sure the headrest locks into position after reinstalling and adjusting it properly.
OUB031008
Seat warmer (if equipped)
The seat warmers are provided to warm the front seats during cold weather. With the ignition switch in the ON position, push either of the switches to warm the driver's seat or the front passenger's seat.
During mild weather or under conditions where the operation of the seat warmer is not needed, keep the switches in the OFF position.
With the seat warmer switch in the ON position, the heating system in the seat turns off or on automatically depending on the seat temperature.
CAUTION - Seat damage
•When cleaning the seats, do not use an organic solvent such as paint thinner, benzene, alcohol and gasoline. Doing so may damage the surface of the heater or seats.
•To prevent overheating the seat warmer, do not place anything on the seats that insulates against heat, such as blankets, cushions or seat covers while the seat warmer is in operation.
•Do not place heavy or sharp objects on seats equipped with seat warmers. Damage to the seat warming components could occur.
3 7

Safety features of your vehicle
WARNING - Seat warmer burns
Passengers should use extreme caution when using seat warmers due to the possibility of excess heating or burns. The occupants must be able to feel if the seat is becoming too warm and to turn the seat warmer off. The seat warmer may cause burns even at low temperatures, especially if used for long periods of time.
In particular, the driver must exercise extreme care for the following types of passengers:
1.Infants, children, elderly or disabled persons, or hospital outpatients
2.Persons with sensitive skin or those that burn easily
3.Fatigued individuals
4.Intoxicated individuals
5.Individuals taking medication that can cause drowsiness or sleepiness (sleeping pills, cold tablets, etc.)
OUB031009
Seatback pocket
The seatback pocket is provided on the back of the front passenger’s seatback.
WARNING - Seatback pocket
Do not put heavy or sharp objects in the seatback pocket. An occupant could contact such objects in a crash. Heavy objects in the front passenger seatback could also interfere with the airbag sensing system.
OUB031043N
Rear seat adjustment
Headrest
The rear seat is equipped with headrests in all the seating positions for the occupant's safety and comfort.
The headrest not only provides comfort for passengers, but also helps protect the head and neck in the event of a collision. For maximum effectiveness in case of an accident, the headrest should be adjusted so the middle of the headrest is at the same height of the center of gravity of an occupant's head. Generally, the center of gravity of most people's head is similar with the height as the top of their eyes.
3 8
Safety features of your vehicle
Also adjust the headrest as close to your head as possible. For this reason, the use of a cushion that holds the body away from the seatback is not recommended.
WARNING - Headrest removal
Do not operate the vehicle with the headrests removed. Headrests can provide critical neck and head support in a crash.
OUB031016N
Adjusting the height up and down (if equipped)
To raise the headrest, pull it up to the desired position (1). To lower the headrest, push and hold the release button (2) on the headrest support and lower the headrest to the desired position (3).
OUB031017N
Removal and installation
To remove the headrest, raise it as far as it can go then press the release button
(1) while pulling the headrest upward (2). To reinstall the headrest, put the headrest poles (3) into the holes while pressing the release button (1). Then adjust it to the appropriate height and ensure that it locks in position.
Make sure the headrest locks in position after adjusting.
3 9
Safety features of your vehicle
Folding the rear seat
The rear seatbacks may be folded to facilitate carrying long items or to increase the luggage capacity of the vehicle.
WARNING
Never allow passengers sit on top of the folded down seatback while the vehicle is moving. This is not a proper seating position and no seat belts are available for use. This could result in serious injury or death in case of an accident or sudden stop.
WARNING - Objects
Objects carried on the folded down seatback should not extend higher than the top of the front seatbacks. This could allow cargo to slide forward and cause injury or damage during sudden stops.
OUB031049K
To fold down the rear seatback:
• 4 door
1.Make sure the rear seat belt webbing is in the guide to prevent the seat belt from being damaged.
2.Set the front seatback to the upright position and if necessary, slide the front seat forward.
3.Lower the rear headrests to the lowest position.
OUB031051K
4.Pull the lock release lever (1) and fold the rear seatback forward and down firmly.
If the seat belt remains extended after returning the seatback to it's upright position, pull the seatbelt outward and release to retract the seatbelt.
3 10
Safety features of your vehicle
OUB032049
• 5 door
1.Make sure the rear seat belt webbing is in the guide to prevent the seat belt from being damaged.
2.Set the front seatback to the upright position and if necessary, slide the front seat forward.
3.Lower the rear headrests to lowest position.
OUB032018N
4.Pull the lock release lever (1) and fold the rear seatback forward and down firmly.
If the seat belt locks after unfolding the rear seatback, pull out the locked seat belt, release it then pull it out again.
To unfold the rear seat
1.To use the rear seat, lift and pull the seatback backward. Pull the seatback firmly until it clicks into place. Make sure the seatback is locked in place. When you return the seatback to its upright position, always be sure it has locked into position by pushing on the top of the seatback.
If you can not see the red line at the bottom of folding lever, it means the seatback is locked completely.
2.Return the rear seat belt to the proper position.
3.When the seatback is completely installed, check the seatback folding lever again.
When returning the rear seatbacks to the upright position, remember to return the rear shoulder belts to their proper position.
3 11
Safety features of your vehicle
WARNING - Rear seatback
When returning the rear seatback from a folded to an upright position, hold the seatback and return it slowly. Ensure that the seatback is completely locked into its upright position by pushing on the top of the seatback. In an accident or sudden stop, the unlocked seatback could allow cargo to move forward with great force and enter the passenger compartment.
WARNING - Cargo
Do not place heavy objects in the rear seats, since they cannot be properly secured and may hit vehicle occupants in a frontal collision.
SEAT BELTS
Seat belt restraint system
Seat belts are designed to bear upon the bony structure of the body, and should be worn low across the front of the pelvis or the pelvis, chest and shoulders, as applicable; wearing the lap section of the belt across the abdominal area must be avoided.
Seat belts should be adjusted as firmly as possible, consistent with comfort, to provide the protection for which they have been designed.
A slack belt will greatly reduce the protection afforded to the wearer.
Care should be taken to avoid contamination of the webbing with polishes, oils and chemicals, and particularly battery acid. Cleaning may safely be carried out using mild soap and water. The belt should be replaced if webbing becomes frayed, contaminated or damaged.
•For maximum restraint system protection, the seat belts must always be used whenever the vehicle is moving. A properly positioned shoulder belt should be positioned midway over your shoulder across your collarbone.
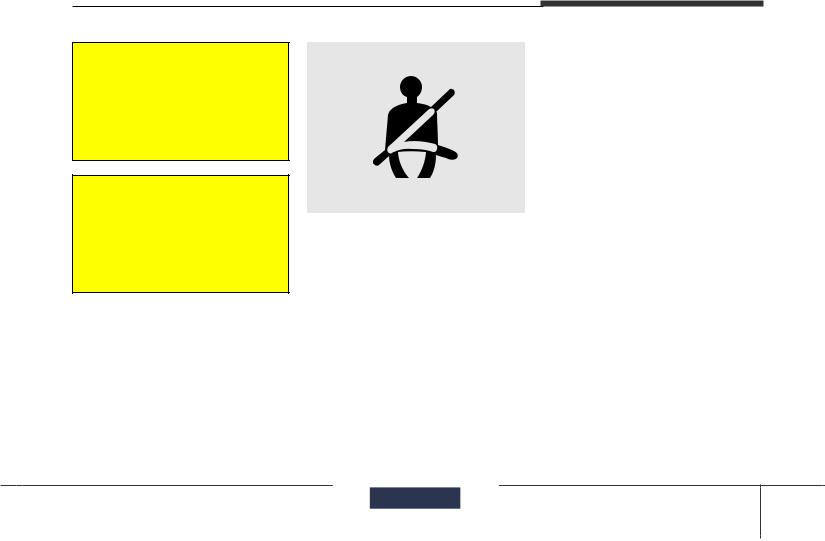
•Never allow children to ride in the front passenger seat. See child restraint system section for further discussion.
WARNING - Shoulder belt
Never wear the shoulder belt under your arm or behind your back. An improperly positioned shoulder belt cannot protect the occupant in a crash.
WARNING - Damaged seat belt
Replace the entire seat belt assembly if any part of the webbing or hardware is damage as you can no longer be sure that a damage seat belt will provide protection in a crash.
3 12
WARNING - Twisted seat belt
Make sure your seat belt is not twisted when worn. A twisted seat belt may not properly protect you in an accident and could even cut into your body.
WARNING - Seat belt buckle
Do not allow foreign material (gum, crumbs, coins, etc.) to obstruct the seat belt buckle. This may prevent the seat belt from fastening securely.
Safety features of your vehicle
1GQA2083
Seat belt warning (for driver’s seat)
The driver's seat belt warning light and chime will activate to the following table when the ignition switch is in "ON" position.
Conditions |
Warning Pattern |
||||
|
|
|
|
|
|
Seat Belt |
Vehicle |
Light-Blink |
|
Chime- |
|
Speed |
|
Sound |
|||
|
|
|
|||
|
|
|
|
||
Unbuckled |
6 seconds |
||||
|
|
|
|
||
Buckled |
6 seconds |
|
None |
||
|
|
|
|
|
|
|
Below 5 km/h |
6 seconds |
|
None |
|
|
(3 mph) |
|
|
|
|
Buckled → |
|
|
|
|
|
5 km/h~ |
6 seconds |
||||
Unbuckled |
10 km/h |
||||
|
|
|
|||
|
|
|
|||
|
Above 10 km/h |
6 sec. on / 24 sec. off |
|||
|
(6 mph) |
(11 times) |
|||
|
|
|
|
|
|
|
Above10 km/h |
|
|
|
|
|
(6 mph) |
6 seconds *1 |
|||
Unbuckled |
↓ |
|
↓ |
||
|
Below 5 km/h |
Stop *2 |
|||
|
(3 mph) |
|
|
|
|
|
|
|
|
|
|
*1 Warning pattern repeats 11 times with an interval of 24 seconds. If the driver's seat belt is buckled, the light will stop within 6 seconds and chime will stop immediately.
*2 The light will stop within 6 seconds and chime will stop immediately.
3 13
Safety features of your vehicle
OUB034014N
Seat belt warning (for front passenger’s seat)
The front passenger's seat belt warning light will activate to the following table when the ignition switch is in "ON" position.
Conditions |
Warning Pattern |
||
|
|
|
|
Seat Belt |
Vehicle |
Light-Blink |
|
Speed |
|||
|
|
||
|
|
|
|
Unbuckled |
6 seconds |
||
|
|
|
|
Unbuckled |
Above 10 km/h |
Continuously |
|
|
(6mph) |
|
|
|
|
|
|
Buckled |
6 seconds |
||
|
|
|
|
|
Above 10 km/h |
Continuously *1 |
|
Buckled → |
(6mph) |
||
|
|||
Unbuckled |
|
|
|
Below 10 km/h |
None |
||
|
(6mph) |
||
|
|
||
|
|
|
|
*1 The seat belt warning light will go off if the vehicle speed decreases below 5 km/h (3 mph). If the vehicle speed increases above 5 km/h (3 mph), the warning light will blink again.
•You can find the front passenger's seat belt warning light on the center fascia panel.
•Although the front passenger seat is not occupied, the seat belt warning light will blink for 6 seconds.
•The seat belt warning light can blink when a briefcase or purse is placed on the front passenger seat.
WARNING
Riding in an improper position adversely affects the front passenger's seat belt warning system. It is important for the driver to instruct the passenger as to the proper seating instructions as contained in this manual.
3 14

B180A01NF-1
Seat belt - Driver's 3-point system with emergency locking retractor
To fasten your seat belt:
To fasten your seat belt, pull it out of the retractor and insert the metal tab (1) into the buckle (2). There will be an audible "click" when the tab locks into the buckle. The seat belt automatically adjusts to the proper length only after the lap belt portion is adjusted manually so that it fits snugly around your hips. If you lean forward in a slow, easy motion, the belt will extend and let you move around. If there is a sudden stop or impact, however, the belt will lock into position. It will also lock if you try to lean forward too quickly.
If you are not able to pull out the seat belt from the retractor, firmly pull the belt out and release it. Then you will be able to pull the belt out smoothly.
Safety features of your vehicle
Front seat
OTA030017
Height adjustment
You can adjust the height of the shoulder belt anchor to one of the 4 positions for maximum comfort and safety.
The height of the adjusting seat belt should not be too close to your neck. The shoulder portion should be adjusted so that it lies across your chest and midway over your shoulder near the door and not your neck.
To adjust the height of the seat belt anchor, lower or raise the height adjuster into an appropriate position.
3 15

Safety features of your vehicle
To raise the height adjuster, pull it up (1). To lower it, push it down (3) while pressing the height adjuster button (2).
Release the button to lock the anchor into position. Try sliding the height adjuster to make sure that it has locked into position.
WARNING - Shoulder belt position
Never position the shoulder belt across your neck or face.
WARNING - Seat belt replacement
Replace your seat belts after being in an accident. Failure to replace seat belts after an accident could leave you with damaged seat belts that will not provide protection in the event of another collision.
B200A01NF
You should place the lap belt portion as low as possible and snugly across your hips. If the lap belt is located too high on your waist, it may increase the chance of injury in the event of a collision.
The arm closest to the seat belt buckle should be over the belt while the other arm should be under the belt as shown in the illustration.
Seat belts - Front passenger and rear seat 3-point system with combination locking retractor
To fasten your seat belt:
Combination retractor type seat belts are installed in the rear seat positions to help accommodate the installation of child restraint systems. Although a combination retractor is also installed in the front passenger seat position, it is strongly recommended that children always be seated in the rear seat. NEVER place any infant restraint system in the front seat of the vehicle.
This type of seat belt combines the features of both an emergency locking retractor seat belt and an automatic locking retractor seat belt. To fasten your seat belt, pull it out of the retractor and insert the metal tab into the buckle. There will be an audible "click" when the tab locks into the buckle. When not securing a child restraint, the seat belt operates in the same way as the driver's seat belt (Emergency Locking Retractor Type). It automatically adjusts to the proper length only after the lap belt portion of the seat belt is adjusted manually so that it fits snugly around your hips.
3 16
Safety features of your vehicle
When the seat belt is fully extended from the retractor to allow the installation of a child restraint system, the seat belt operation changes to allow the belt to retract, but not to extend (Automatic Locking Retractor Type). Refer to “Using a child restraint system” in this section.
To convert from the automatic locking feature to the emergency locking operation mode, allow the unbuckled seat belt to fully retract.
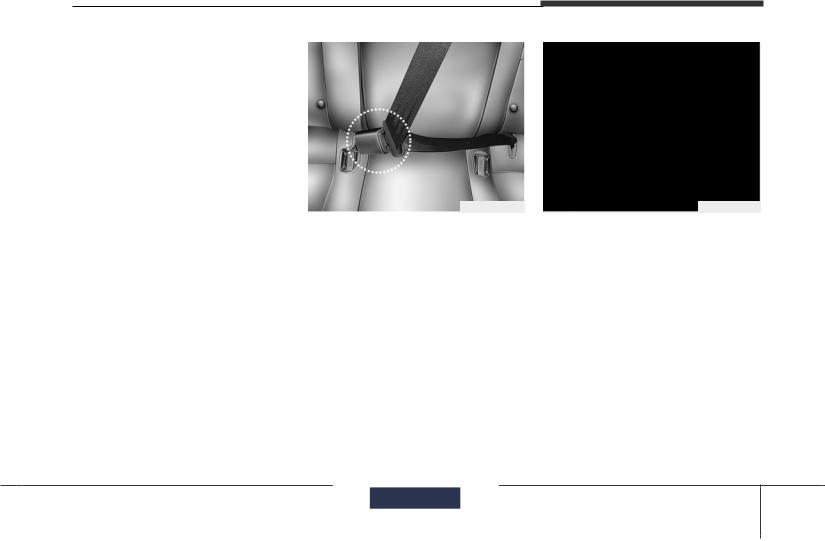
OUB031020N
When using the rear center seat belt, the buckle with the “CENTER” mark must be used.
B210A01NF-1
To release the seat belt:
The seat belt is released by pressing the release button (1) of the locking buckle. When it is released, the belt should automatically draw back into the retractor.
If this does not happen, check the belt to be sure it is not twisted, then try again.
3 17
Safety features of your vehicle
OMG035300
Pre-tensioner seat belt
Your vehicle is equipped with driver's and front passenger's pre-tensioner seat belts. The purpose of the pre-tensioner is to make sure that the seat belts fit tightly against the occupant's body in certain frontal collisions (or side collisions). The pre-tensioner seat belts may be activated in crashes, where the frontal collision is severe enough.
When the vehicle stops suddenly, or if the occupant tries to lean forward too quickly, the seat belt retractor will lock into position. In certain frontal collisions, the pre-tensioner will activate and pull the seat belt into tighter contact against the occupant's body.
If the system senses excessive seat belt tension on the driver or passenger's seat belt when the pre-tensioner activates, the load limiter inside the pre-tensioner will release some of the pressure on the affected seat belt.
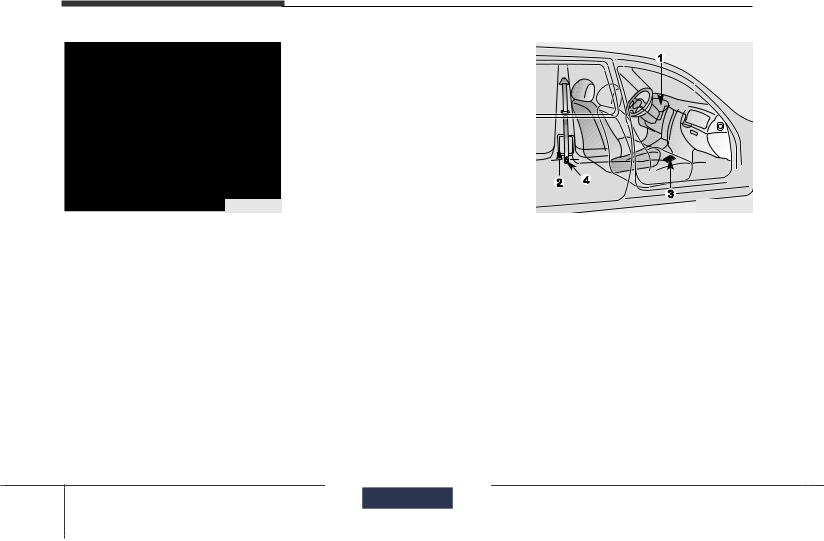
1KMB3311A
The seat belt pre-tensioner system consists mainly of the following components. Their locations are shown in the illustration:
1.SRS air bag warning light
2.Retractor pre-tensioner assembly
3.SRS control module
4.Anchor pre-tensioner assembly
3 18
 Loading...