


Hybrid System Overview
HEV (HYBRID ELECTRIC VEHICLE) SYSTEM / H2
PHEV (PLUG-IN ELECTRIC VEHICLE) SYSTEM / H3
CHARGING THE PLUG-IN HYBRID VEHICLE / H4
DRIVING THE HYBRID/PLUG-IN HYBRID VEHICLE / H28
ENERGY FLOW / H36
PLUG-IN HYBRID ENERGY FLOW / H38
STARTING THE HYBRID/PLUG-IN HYBRID VEHICLE (SMART KEY) / H40 COMPONENTS OF THE HYBRID/PLUG-IN HYBRID VEHICLE / H42
 HEV (HYBRID ELECTRIC VEHICLE) SYSTEM
The Kia Hybrid Electric Vehicle (HEV) uses both the gasoline engine and the electric motor for power. The electric motor is run by a 240V high-voltage HEV battery.
Depending on the driving conditions, the HEV computer selectively operates between the engine and the electric motor or even both at the same time.
Fuel efficiency increases when the engine is at idle, or when the vehicle is driven by the electric motor with the HEV battery.
The HEV battery charge must be maintained because, at times, the engine may come on even at idle to act as a generator. Charging also occurs when decelerating or by regenerative braking.
|
|
|
|
|
|
|
|
|
|
|
|
Engine+ |
|
|
|
|
|
|
|
|
|
|
|
|
|
|
|
|
|
|
|
Electric motor |
|
|
|
Electric motor+Engine |
|
|
|
|
|
|
|
|
|
|
Charging |
|
|
|
|
|
|
Engine OFF |
|
|
|
||
|
|
|
|
|
|
|
|
|
|
Motor or Motor |
|
|
|
|
|
|
|
|
|
|
|
|
|
||||||
|
|
|
|
|
|
|
|
|
|
|
|
|
|
|
|
|
|
|
|
|
|
|
|
|
|
|
|
||
|
|
|
|
|
|
|
|
|
|
|
|
|
|
|
|
|
|
|
|
|
|
|
|
|
|
|
|
|
|
|
|
|
|
|
|
|
|
|
|
|
|
|
|
|
|
|
|
|
|
|
|
|
|
|
|
|
|
|
|
|
|
|
|
|
|
|
|
|
|
|
|
|
|
|
|
|
|
|
|
|
|
|
|
|
|
|
|
|
|
|
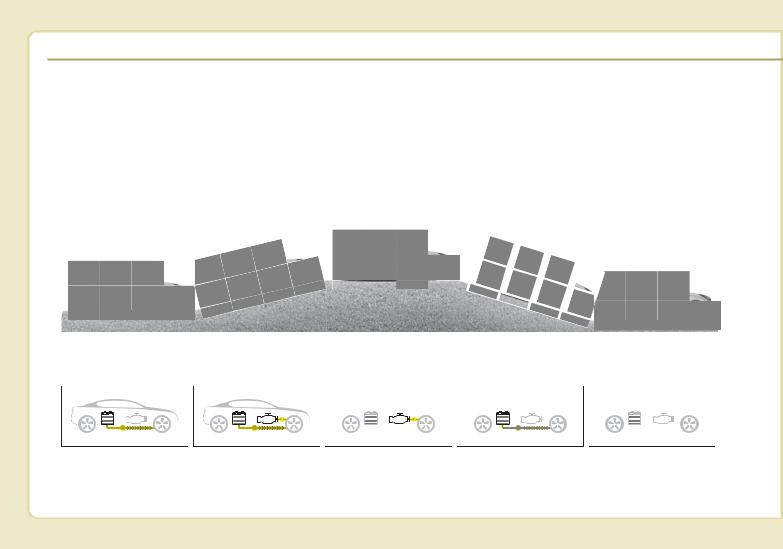
Startup/Low speed cruise |
|
|
Acceleration |
|
|
|
High speed cruise |
|
|
|
Deceleration |
|
|
|
Stop |
|
||||||||||||
|
|
|
|
|
|
|
|
|
|
|
|
|
|
|
|
|
|
|
|
|
|
|
|
|
|
|
|
|
|
|
|
|
|
|
|
|
|
|
|
|
|
|
|
|
|
|
|
|
|
|
|
|
|
|
|
|
|
|
|
|
|
|
|
|
|
|
|
|
|
|
|
|
|
|
|
|
|
|
|
|
|
|
|
|
|
|
|
|
|
|
|
|
|
|
|
|
|
|
|
|
|
|
|
|
|
|
|
|
|
|
|
|
|
|
|
|
|
|
|
ODEP057140L
H2

 PHEV (PLUG-IN ELECTRIC VEHICLE) SYSTEM
The Kia Plug-in Hybrid Electric Vehicle (PHEV) shares the characteristics of both a conventional hybrid electric vehicle and an all-electric vehicle.
When used as a conventional hybrid electric vehicle, the HEV computer selectively operates between the engine and the electric motor or even both at the same time.
When it is operating in the electric vehicle mode, the vehicle is driven only using the electric motor over a certain distance until the hybrid battery becomes low. The driving distance in EV mode depends on customer driving style and road conditions. Aggressive driving maneuvers may at times temporarily enable the engine to operate for maximum power.
The hybrid battery can be fully charged by connecting a plug to an external electric power source.
The engine can be turned on based on a number of factors such as heater usage and a frequent operation of the accelerator pedal by a driver in Charge Depleting mode.
|
CD (Charge Depleting) Mode |
|
|
|
|
CS (Charge Sustaining) Mode |
|
|
|
|
|
|
|
|
|
|
|
|||||||||
|
|
|
|
|
|
|
|
|
|
|
|
Charging |
||||||||||||||
|
|
|
|
|
|
|
|
|
|
|
|
|
|
|
|
|
|
|
|
|
|
|
|
|
|
|
|
|
|
|
|
|
|
|
|
|
|
|
Engine+Motor |
|
|
|
|
|
|
|
|
|
|
|
|
|
|
|
|
Electric motor |
|
|
|
|
Motor |
|
|
Engine+Motor |
|
|
|
|
Charging |
|
|
|
|
|
Battery charging |
|
|
|||
|
|
|
|
|
|
|
|
|
or Motor |
|
|
|
|
|
|
|
|
|||||||||
|
|
|
|
|
|
|
|
|
|
|
|
|
|
|
|
|||||||||||
|
|
|
|
|
|
|
|
|
|
|
|
|
|
|
|
|
|
|
|
|
|
|
|
|
||
|
|
|
|
|
|
|
|
|
|
|
|
|
|
|
|
|
|
|
|
|
|
|
|
|
||
|
|
|
|
|
|
|
|
|
|
|
|
|
|
|
|
|
|
|
|
|
|
|
|
|
|
|
|
|
|
|
|
|
|
|
|
|
|
|
|
|
|
|
|
|
|
|
|
|
|
|
|
|
|
|
|
|
|
|
|
|
|
|
|
|
|
|
|
|
|
|
|
|
|
|
|
|
|
|
|
|
|
|
|
|
|
|
|
|
|
|
|
|
|
|
|
|
|
|
|
|
|
|
|
|
|
|
|
|
|
|
|
|
|
|
|
|
|
|
|
|
|
|
|
|
|
|
|
|
|
|
|
|
|
|
|
|
|
|
|
|
|
|
|
|
|
|
|
|
|
|
|
|
|
|
|
|
|
|
|
|
|
|
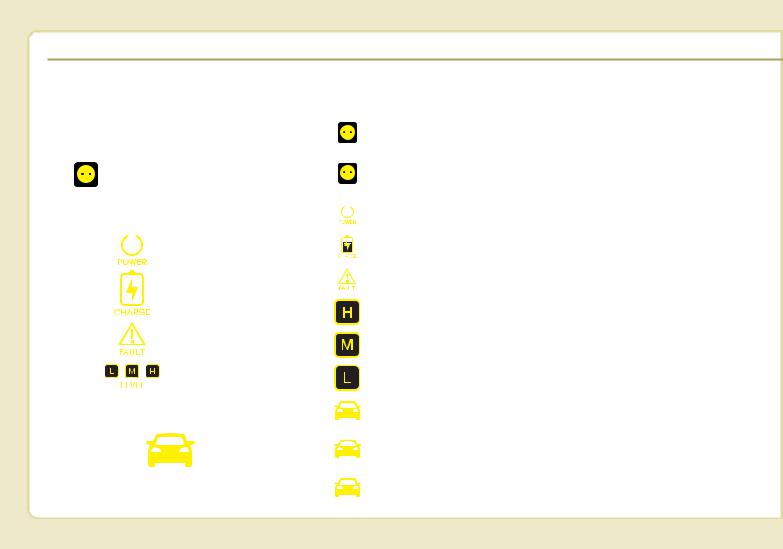
Electric Vehicle Mode |
|
Start up/Low speed |
|
Acceleration |
|
High speed |
|
|
Deceleration |
|
6 |
External charging |
|||||||||||||
|
|
|
|
|
|
|
|
|
|
|
|
|
|
|
|
|
|
|
|
|
|
|
|
|
|
|
|
|
|
|
|
|
|
|
|
|
|
|
|
|
|
|
|
|
|
|
|
|
|
|
|
|
|
|
|
|
|
|
|
|
|
|
|
|
|
|
|
|
|
|
|
|
|
|
|
|
|
|
|
|
|
|
|
|
|
|
|
|
|
|
|
|
|
|
|
|
|
|
|
|
|
|
|
|
|
|
|
ODEP057141L
H3

 CHARGING THE PLUG-IN HYBRID VEHICLE
Charging Information
•AC Charger: The plug-in hybrid vehicle is charged by plugging into a AC Charger installed in your home or a public charging station. (For further details, refer to the 'AC Charge'.)
•Trickle Charger: The plug-in hybrid vehicle can be charged by using household electricity.
Charging Types
The electrical outlet in your home must comply with regulations and can safely accommodate the Voltage / Current (Amps) / Power (Watts) ratings specified on the trickle charge. Use only as a backup charger.
Charging Time
•AC Charger: Takes about 2 hours 15 minutes at room temperature (Can be charged to 100%.).
Depending on the condition and durability of the high-voltage battery, charger specifications, and ambient temperature, the time required for charging the high-volt- age battery may vary.
•Trickle Charger: For charging at home. Please note that the Trickle Charger is slower than the AC Charger.
Category |
Charging Inlet |
Charging Connector |
Charging Outlet |
Charging Method |
Charging Time |
|
(Vehicle) |
||||||
|
|
|
|
|
||
|
|
|
|
|
|
|
|
|
|
|
AC Charger |
Approximately 2 hours |
|
AC Charger |
|
|
|
installed in homes |
15 minutes (to fully |
|
|
|
|
or public charging |
charge the plug-in |
||
|
|
|
|
|||
|
ODEPQ017018 |
ODEPQ017019 |
OJFHPQ016021L |
stations |
hybrid,100%) |
|
|
|
|
||||
|
|
|
|
|
For charging at home. |
|
|
|
|
|
|
The included Trickle |
|
Trickle |
|
|
|
Household current |
charger takes about 9 |
|
Charger |
|
|
|
hours at room tempera- |
||
|
|
|
|
|||
|
|
|
|
|
ture (Can be charged to |
|
|
ODEPQ017018 |
ODEPQ017019 |
OAEEQ016024 |
|
100%.). |
|
|
|
|
|
|
|
•Depending on the condition and durability of the high voltage battery, charger specifications, and ambient temperature, the time required for charging the high voltage battery may vary.
•Actual charger image and charging method may vary in accordance with the charger manufacturer.
H4

Charging Status
ODEP047020N
You can check the charging status from the outside of vehicle when charging or using (it is not driving status) the high-voltage battery.
: Charging indicator lamp
Operation of
Charging Indicator Charging Status
Lamp (1)
Turns on (Green)
Charging in
progress
Turns off
Not Charging or fully charged
Reserved charging
Slowly blinks
is operating (turns
(Green) and then
OFF after 3 min-
turns off (repeat
utes) or interrup-
for 3 minutes)
tions that temporarily prevent charging (e.g. power failure)
Quickly |
|
blinks(Green) and |
Aux. Battery Saver |
then turns off |
+ operating in |
(repeats during |
progress |
operation) |
|
|
|
Slowly blinks (Red) |
Malfunction |
Charging Connector
AUTO/LOCK Mode
ODEPQ019021L
You may select when the charging connector can be locked and unlocked in the charging inlet.
Press the button  to change between AUTO mode and LOCK mode.
H5

 CHARGING THE PLUG-IN HYBRID VEHICLE (CONT.)
When the Charging Connector is Locked
|
LOCK |
AUTO |
AUTO/LOCK mode button indi- |
||
Before charging |
O |
X |
cator |
|
|
While charging |
O |
O |
Finished charging |
O |
X |
AUTO/LOCK mode button indicator
LAMP OFF |
LAMP ON |
|
|
LOCK mode |
AUTO mode |
|
|
|
|
•LOCK mode (button indicator off) :
The connector locks when the charging connector is plugged into the charging inlet. The connector is locked until all doors are unlocked by the driver.This mode can be used to prevent charging cable theft.
-If the charging connector is unlocked when all doors are unlocked, but the charging cable is not disconnected within 15 seconds, the connector will be automatically locked again.
-If the charging connector is unlocked when all doors are unlocked, but all doors are locked again, immediately, the connector will be automatically locked again.
•AUTO mode (button indicator on) :
The connector locks when charging starts. The connector unlocks when charging is complete. This mode can be used when charging in a public charging station.
If the connector does not unlock automatically after the charging is completed in AUTO mode, the connector will unlock when all the doors are unlocked.
Charging connector AUTO/LOCK mode
When the charging connector is plugged into the charging inlet, the connector lock timing varies with the modes selected by pressing the button.
•LOCK mode : The connector locks automatically when the charging connector is connected normally.
•AUTO mode : The connector locks when charging and automatically unlocks when charging is completed.
For more details, refer to the “Charging connector AUTO/LOCK mode”.
Locking/unlocking the charging door
H6

The charging door lock/unlock function works only when the following conditions are satisfied with the charging door closed.
If the unlock function does not work, use the emergency charging door unlock method to unlock the charging door. (For more details, refer to the “Unlock charging door in emergency”)
1.Conditions for lock :
: When locking doors from outside the vehicle with the charging door closed.
: When locking the driver’s door using a mechanical key
: When locking doors using a smart key
: When pressing the door lock/unlock button on the front door outside handle while the smart key is detected and doors are unlocked
: When locking all vehicle doors with the charging door closed. (When locking doors with functions such as spare key, smart key, door lock button on the outside door handle, central door lock switch, auto door lock.)
2.Conditions for unlock :
: When unlocking doors from outside the vehicle with the charging door closed.
: When unlocking the driver’s door using a mechanical key
: When unlocking doors using a smart key
: When pressing the door lock/unlock button on the front door outside handle while the smart key is detected and doors are locked
: When unlocking all vehicle doors with the charging door closed. (When unlocking doors with functions such as spare key, smart key, door lock button on the outside door handle, central door lock switch, auto door lock.)
H7

 CHARGING THE PLUG-IN HYBRID VEHICLE (CONT.)
Scheduled Charging (if equipped)
•You can set reserved charging using the Infotainment System.
Refer to the Infotainment System for detailed information about setting reserved charging.
•Scheduled charging can only be done when using a AC Charger or the portable charging cable (ICCB: In-Cable Control Box).
ODEPQ017023
•When scheduled charging is set and the AC Charger or the portable charging cable (ICCB: In-Cable Control Box) is connected for charging, the indicator lamp blinks (for 3 minutes) to indicate that scheduled charging is set.
•When scheduled charging is set, charging is not initiated immediately when the AC Charger or portable charging cable (ICCB: InCable Control Box) is connected.
•If charging is required immediately, turn off the scheduled charge using the Infotainment System or UVO eco smartphone application or press the vehicle's scheduled charge release button(  ).
).
•When the scheduled charge is set, the charge start time is calculated by itself. In some cases, charging may start immediately after connecting the charger.
H8
ODEPQ019022
•If you press the scheduled charging
deactivation (  ) button to immediately charge the battery, charging must be initiated 3 minutes after the charging cable has been connected.
When you press the scheduled
charging deactivation (  ) button for immediate charging, the scheduled charge setting is not completely deactivated. If you need to completely deactivate the scheduled charge setting, use the Infotainment System to finalize the deactivation.
Refer to "AC Charge or Trickle Charge" for details about connecting the AC Charger and the portable charger (ICCB: In-Cable Control Box).
Charging Precautions
■ AC Charger
OJFHPQ016021L
 WARNING
-Fires caused by dust or water
Do not connect the charging cable connector plug to the vehicle if there is water or dust on the charging inlet. Connecting while there is water or dust on the charging cable connector and plug may cause a fire or electric shock.
H9

 CHARGING THE PLUG-IN HYBRID VEHICLE (CONT.)
 WARNING
-Interference with electronic medical devices
When using medical electric devices such as an implantable cardiac pacemaker, make sure to ask the medical team and manufacturer whether charging your electric vehicle will impact the operation of the medical devices. In some instances, electromagnetic waves that are generated from the charger can seriously impact medical electric devices such as an implantable cardiac pacemaker.
 WARNING
-Old or Worn out Electric Outlets
Do not use old or worn out electric outlets to charge your vehicle. There may be a risk of fire and injury when using old worn out public electrical outlets.
 WARNING
-Touching the charging connector
Do not to touch the charging connector, charging plug, or the charging inlet when connecting the charger connecting cable to the charging outlet and the charging inlet on the vehicle. Doing so may result in electrocution.
•Comply with the following in order to prevent electrical shock when charging:
-Use a waterproof charger
-Make sure to not touch the charging connector and charging plug when your hand is wet
-Do not charge when there is lightning
-Do not charge when the charging connector and plug is wet
 WARNING - Charging
cable
•Immediately stop charging when you discover abnormal symptoms (smell, smoke).
•Replace the charging cable if the cable coating is damaged to prevent electrical shock.
•When connecting or removing the charging cable, make sure to hold the charging connector handle.
(Continued)
H10

(Continued)
If you pull the cable itself (without using the handle), the internal wires may disconnect or get damaged.This may lead to electric shock or fire.
 WARNING - Cooling fan
Do not touch the cooling fan while vehicle is charging. When the vehicle is switched OFF while charging, the cooling fan inside the engine compartment or interior rear seat may automatically operate.
 WARNING
Make sure to use the designated charger for charging the vehicle.Using any other charger may cause failure or lead to electric shock or fire.
•Always keep the charging connector and charging plug clean and dry. Be sure to keep the charging cable in a condition where there is no water or moisture.
•Before charging the battery, turn the vehicle OFF.
•Be careful not to drop the charging connector. The charging connector can be damaged.
•Always inspect the charging connector terminals for damage or overheating. Do not use if damaged, as this may damage the vehicle side charge connector and is not a warrantable repair.
AC Charge
■ AC Charger
OJFHPQ016021L
■ AC Charger cable
OAEEQ016028
You can charge your vehicle by plugging into a public charger at a charging station.
H11

 CHARGING THE PLUG-IN HYBRID VEHICLE (CONT.)
How to Connect to an AC charger
ODEPQ019025
1.Depress the brake pedal and apply the parking brake.
2.Turn OFF all switches, move the shift lever to P (Park), and turn OFF the vehicle.
3.After unlocking doors, open the charging door by pressing it.
4.Open the charging door by pressing circle mark (o) area on the right edge of the charging door.
If the vehicle doors are locked, the charging door will not open.
NOTICE
The charging door does not open if the door are locked/theft alarm system is armed.
ODEPQ017026
5.Remove any dust on the charging connector and charging inlet.
6.Hold the charging connector handle. Then, insert it into the charging inlet, until you hear a click sound. If it is not fully connected, a bad connection between the charging connector and the charging terminals may cause a fire.
H12

■ Type A
ODEPQ019027
■ Type B
ODEPQ019125
7.Check if the charging cable connection indicator of the high voltage battery in the instrument cluster is turned ON.
Charging does not occur when the indicator is OFF. When the charging connector is not connected properly, reconnect the charging cable to charge.
NOTICE
•Charging is in progress only when the shift lever is in P (Park). Charging the battery with the Engine Start/Stop button in the ACC position is possible. However, it may discharge the 12-V battery. Thus, if possible, charge the battery with the Engine Start/Stop button in the OFF position.
•The charging process is interrupted temporarily when the shift lever is moved from P (Park) to Not P(R (Reverse)/N (Neutral)/D (Drive)) during charging. To resume(restart) charging, move the shift lever to the P(park) position. Then, the charging process is resumed(restarted).
ODEPQ017028L
8.After charging has started, the estimated charging time is displayed on the instrument cluster for about 1 minute. It is also displayed, when the driver’s door is opened with charging in progress. When scheduled charging is set, the estimated charging time is displayed as “--” .
H13

 CHARGING THE PLUG-IN HYBRID VEHICLE (CONT.)
Unlock Connector in Emergency |
In that case, the charging cable may |
|
not be disconnected or locked, or the |
|
vehicle may not be charged. If this |
|
happens, open the hood and pull the |
|
emergency cable lightly 2 to 3 times |
|
and then try to disconnect the charg- |
|
ing cable or start recharging. |
Charging Status
Checking Charging Status
ODEPQ017029
If the charging connector does not unlock for some reason, open the hood and slightly pull the emergency cable as shown above. The charging door will then open.
If the charging door does not opened immediately after pulling the emergency cable in, press the charging door lightly and pull the emergency cable again.
The charging cable lock may not work properly when foreign materials such as dust enter the cable or the cable is encrusted with ice.
ODEP047020N
You can check the charging status from outside of vehicle when charging the high-voltage battery.
H14

Operation of |
|
|
Charging Indicator |
Charging Status |
|
Lamp (1) |
|
|
Turns on (Green) |
Charging in |
|
progress |
||
|
||
Turns off |
Not Charging or |
|
fully charged |
||
|
||
|
|
|
Slowly blinks |
Waiting for sched- |
|
(Green) and then |
uled charging |
|
turns off (repeat |
(turns off after 3 |
|
for 3 minutes) |
minutes) |
|
|
|
|
Quickly |
|
|
blinks(Green) and |
Aux. Battery Saver |
|
then turns off |
+ operating in |
|
(repeats during |
progress |
|
operation) |
|
|
|
|
|
Slowly blinks (Red) |
Malfunction |
|
|
|
How to Disconnect an AC charger
1.The vehicle must be in the AUTO mode or the doors must be unlocked in order to be able to disconnect the charging connector. A lock system prevents charger cable disconnection when the vehicle's doors are locked.
 CAUTION
In order to disconnect the charging connector, unlock the doors to unlatch the charging connector lock system. If not, the charging connector and the vehicle's charging inlet may be damaged.
ODEPQ017031
2.While holding the charging connector, pressing the locking release button (1) and then pull it out.
To prevent charging cable theft, the charging connector cannot be disconnected from the inlet when the doors are locked. Unlock all doors to disconnect the charging connector from the inlet.
However, if the vehicle is in the charging connector AUTO mode, the charging connector automatically unlocks from the inlet when charging is completed.
H15

 CHARGING THE PLUG-IN HYBRID VEHICLE (CONT.)
If the connector does not unlock automatically after the charging is completed in AUTO mode, the connector will unlock when all the doors are unlocked.
For more details, refer to “Charging Connector AUTO/ LOCK Mode” in this chapter.
 CAUTION
When disconnecting the charging connector, do not try to disconnect it by force while not pressing the release button. This may damage the charging connector and vehicle charging inlet.
ODEPQ019032
3.Make sure to securely close the charging door.
 WARNING
Do not modify or disassemble the charging cable components. Doing so may cause a fire or electric shock resulting in personal injuries.
NOTICE
•Keep the charging connector and the charging plug clean and dry. The charging cable should also be kept dry.
•Use an air gun to blow any foreign substances from the charging connector and the charging plug.
H16

Trickle Charger |
How to Connect Portable |
(Portable Charging Cable) |
Charging Cable |
|
(ICCB: In-Cable Control Box) |
OAEEQ016042
Trickle charger can be used if AC Charger is unavailable.
: Plug and cable
: Control box (ICCB)
: Charging connector/cable
OJFHPQ016015N
1.Turn OFF all switches, move the shift lever to P (Park), and turn OFF the vehicle.
2.Depress the brake pedal and apply the parking brake.
ODEPQ019025
3.After unlocking doors, open the charging door by pressing it.
4.Open the charging door by pressing circle mark (o) area on the right edge of the charging door.
If the vehicle doors are locked, the charging door will not open.
H17

 CHARGING THE PLUG-IN HYBRID VEHICLE (CONT.)
ODEPQ017047
5.Connect the plug to a household electric outlet.
6.Make sure that the power connection indicator (green) lights in the control box.
NOTICE
The charging door does not open when the theft alarm system is armed.
ODEPQ017049
■ Vehicle connection
ODEPQ017048
7.Remove any dust on the charging connector and charging inlet.
8.Hold the charging connector handle. Then, insert it into the charging inlet, until you hear a click sound. If it is not fully connected, improper connection between the charging connector and the charging terminals are a potential fire hazard.
■ Charge
ODEPQ017035
9.Charging starts automatically and the charging light blinks.
H18
■ Type A
ODEPQ019027
■ Type B
ODEPQ019125
10.Check if the charging cable connection indicator of the high voltage battery in the instrument cluster is turned ON.
Charging does not occur when the indicator is OFF. When the charging connector is not connected properly, reconnect the charging cable to charge.
NOTICE
•The charging is in progress only with the shift lever is in P (Park). Charging the battery with the Engine Start/Stop button in the ACC position is possible. However, it may discharge the 12-V battery. Thus, if possible, charge the battery with the Engine Start/Stop button in the OFF position.
•Moving the shift lever from P (Park) to R (Reverse)/N(Neutral)/D (Drive) stops the charging process. To restart the charging process, move the shift lever to P (Park), press the Engine Start/Stop button to the OFF position, and disconnect the charging cable. Then, connect the charging cable and restart the vehicle again.
ODEPQ017028L
11.After charging has started, the estimated charging time is displayed on the instrument cluster for about 1 minute. It is also displayed, when the driver’s door is opened with charging in progress. When scheduled charging is set, the estimated charging time is displayed as "--".
H19

 CHARGING THE PLUG-IN HYBRID VEHICLE (CONT.)
Unlock Connector in Emergency
ODEPQ017029
If the charging connector does not unlock for some reason, open the hood and slightly pull the emergency cable as shown above. The charging door will then open.
If the charging door does not opened immediately after pulling the emergency cable, press the charging door lightly and pull the emergency cable again.
The charging cable lock may not work properly when foreign materials such as dust enter the cable or the cable is encrusted with ice.
In that case, the charging cable may not be disconnected or locked, or the vehicle may not be charged. If this happens, open the hood and pull the emergency cable lightly 2 to 3 times and then try to disconnect the charging cable or start recharging.
Charging Status
ODEP047020N
You can check the charging status from outside of vehicle when charging the high-voltage battery.
H20

Operation of |
|
|
Charging Indicator |
Charging Status |
|
Lamp (1) |
|
|
Turns on (Green) |
Charging in |
|
progress |
||
|
||
Turns off |
Not charged or |
|
fully charged |
||
|
||
Slowly blinks |
Waiting for sched- |
|
(Green) and then |
uled charging |
|
turns off (repeat |
(turns off after 3 |
|
for 3 minutes) |
minutes) |
|
|
|
|
Quickly |
|
|
blinks(Green) and |
Aux. Battery Saver |
|
then turns off |
+ operating in |
|
(repeat during |
progress |
|
operation) |
|
|
|
|
|
Slowly blinks (Red) |
Malfunction |
|
|
|
Charge cable storage
ODEPQ017033
We recommend that the trickle charger cable be put in a storage box after use.
H21
 CHARGING THE PLUG-IN HYBRID VEHICLE (CONT.)
Charging Status Indicator Lamp for Portable Charging Cable
|
Control Box |
Indicator |
|
|
Details |
|||
|
|
|
|
|
|
|
|
On : Power on |
|
|
|
|
|
|
|
|
Blink : Plug temperature sensor failure |
|
|
|
|
PLUG |
|
(Green) |
|
|
|
|
|
|
|
|
|
On : Plug high temperature protection |
|
|
|
|
|
|
|
|
|
|
|
|
|
|
|
|
|
|
Blink : Plug high temperature warning |
|
|
|
|
|
|
(Red) |
||
|
|
|
|
|
|
|
||
|
|
|
|
POWER |
|
|
|
On : Power on |
|
|
|
|
|
|
|
||
|
|
|
|
|
|
|
||
|
|
|
|
|
|
|
|
|
|
|
|
|
CHARGE |
|
|
|
Blink : Charging In power saving mode, only the CHARGE |
|
|
|
|
|
|
|
indicator is illuminated. |
|
|
|
|
|
|
|
|
|
|
|
|
|
|
FAULT |
|
|
|
Blink : Charging interrupted |
|
|
|
|
|
|
|
|
|
|
|
|
|
|
|
|
|
Charging current 12A |
|
|
|
|
|
|
|
|
|
|
|
|
|
CHARGE LEVEL |
|
|
|
Charging current 10A |
|
|
|
|
|
|
|
|
|
|
|
|
|
|
|
|
|
Charging current 8A |
|
|
|
|
|
|
|
|
|
|
|
|
|
|
|
|
|
Charging connector plugged |
|
|
|
|
|
|
|
|
|
|
|
|
|
|
|
(Green) |
|
|
|
|
|
|
VEHICLE |
|
|
|
Charging |
|
|
|
|
|
|
|
|
|
|
|
|
|
|
|
(Blue) |
|
|
|
|
|
|
|
|
|
|
Blink : Not charging |
|
|
|
|
|
|
|
|
|
|
|
|
|
|
|
(Red) |
|
|
H22

Charging Status Indicator Lamp for Portable Charging Cable
NO Control Box |
Status / Diagnosis / Countermeasure |
NO Control Box Status / Diagnosis / Countermeasure |
|
|
|
Have your vehicle inspected by an authorized
Kia dealer if any of the following occur:
|
• |
Charging connector plugged into vehicle |
|
|
|
|
|
(Green ON) |
|
- Charging connector plugged into the |
|
1 |
• |
Plug temperature sensor failure |
2 |
||
vehicle (Green ON) |
|||||
|
|
(Green blink) |
|
||
|
|
|
|
||
|
• |
Plug high temperature protection |
|
|
|
|
|
(Red blink) |
|
|
|
|
• |
Plug high temperature warning (Red ON) |
|
|
|
|
|
|
Have your vehicle inspected by an |
|
|
|
|
authorized Kia dealer if any of the fol- |
|
- |
While charging |
|
lowing occur: |
3 |
|
• Charge indicator (Green blink) |
4 |
- Before plugging charging connector |
|
|
• Vehicle indicator (Blue ON) |
|
into the vehicle (Red blink) |
|
|
|
• Abnormal temperature |
|
|
|
|
|
|
|
|
|
|
• ICCB (In-Cable Control Box) failure |
|
|
|
|
|
H23
 CHARGING THE PLUG-IN HYBRID VEHICLE (CONT.)
NO Control Box |
Status / Diagnosis / Countermeasure |
NO Control Box Status / Diagnosis / Countermeasure |
|
|
|
|
Have your vehicle inspected by an authorized |
|
- After plugging charging connector |
|
Kia dealer if any of the following occur: |
|
into vehicle (Red blink) |
5 |
- Plugged into the vehicle (Red blink) |
6 |
• Communication failure |
• Diagnostic device failure |
|
||
|
|
|
|
|
• Current leakage |
|
Have your vehicle inspected by an |
|
• Abnormal temperature |
|
authorized Kia dealer. |
|
|
|
|
Have your vehicle inspected by an authorized
Kia dealer if any of the following occur:
• |
Plug temperature sensor failure |
|
- Power saving mode |
7 |
(Green blink) |
8 |
• 3 minutes after charging starts |
• |
Plug high temperature protection |
|
(Green blink) |
|
(Red blink) |
|
|
• |
Plug high temperature warning (Red ON) |
|
|
H24

How to Disconnect the Portable Charging Cable (ICCB: In-Cable Control Box)
1.Before disconnecting the charging connector, make sure the doors are unlocked. When the door is locked, the charging connector lock system will not allow disconnection. To prevent charging cable theft, the charging connector cannot be disconnected from the inlet when the doors are locked. Unlock all doors to disconnect the charging connector from the inlet. However, if the vehicle is in the charging connector AUTO mode, the charging connector automatically unlocks from the inlet when charging is completed. For more details, refer to “Charging Connector AUTO/LOCK Mode” in this chapter.
 CAUTION
In order to disconnect the charging connector, unlock the doors to release the charging connector lock system. If not, the charging connector and the vehicle's charging inlet may be damaged.
ODEPQ017031
2.While holding the charging connector, pressing the locking release button(1) and then pull it out.
3.Make sure to securely close the charging door.
OJFHPQ016015N
4.Disconnect the plug from the household electric outlet. Do not pull the cable when disconnecting the plug.
5.Close the protective cover for the charging connector so that foreign material cannot get into the terminal.
6.Put the charging cable inside the storage bag to protect it.
H25

 CHARGING THE PLUG-IN HYBRID VEHICLE (CONT.)
Precautions for Portable Charging Cable
(ICCB: In-Cable Control Box)
•Use a portable charging cable that is certified by Kia.
•Do not try to repair, disassemble, or adjust the portable charging cable.
•Do not use an extension cord or adapter.
•Stop using immediately if failure warning light occurs.
•Do not touch the plug and charging connector with wet hands.
•Do not touch the terminal part of the AC Charging connector and the AC Charging inlet on the vehicle.
•Do not connect the charging connector to voltage that does not comply with regulations.
•Do not use the portable charging cable if it is worn out, exposed, or there exists any type of damage on the portable charging cable.
•If the ICCB case and AC Charging connector is damaged, cracked, or the wires are exposed in any way, do not use the portable charging cable.
•Do not let children operate or touch the portable charging cable.
•Keep the control box free of water.
•Keep the AC Charging connector or plug terminal free of foreign substances.
•Do not step on the cable or cord. Do not pull the cable or cord and do not twist or bend it.
•Do not charge when there is lightning.
•Do not drop the control box, charging connector, or place a heavy object on the control box.
•Do not place an object that can generate high temperatures near the charger when charging.
•Charging with a worn out or damaged household electric outlet can result in a risk of electric shock. If you are unsure about the condition of a household electric outlet, have it checked by a licensed electrician.
•Stop using the portable charging cable immediately if the household electric outlet or any components are overheating or you smell burning.
H26

Action to be taken when charging stops abruptly
When the high voltage battery does not charge, check the followings:
1.Check the charging setting for the vehicle.
(e.g. When scheduled charging is set, charging is not initiated immediately when the AC charger or portable charger (ICCB: In-Cable Control Box) is connected.)
2.Check the operation status of AC charger, portable charger.
(Charging Status Indicator Lamp for Portable Charger, refer to “Checking Charging Status” for trickle charge in this chapter.)
Actual method for indicating the charging status may vary in accordance with the charger manufacturer.
3.When the vehicle does not charge and a warning message appears on the cluster, check the corresponding message. Refer to “LCD Display Messages”, in this chapter.
4.If the vehicle is properly charged when charged with another normally working charger, contact the charger manufacturer.
5.If the vehicle does not charge when charged with another normally working charger, we recommend that you contact an authorized Kia dealer.
H27

 DRIVING THE HYBRID/PLUG-IN HYBRID VEHICLE
Changing plug-in hybrid mode (Plug-in hybrid vehicle)
ODEP059110N
■ EV/HEV Button
Whenever you press the [EV/HEV] button, Plug-in hybrid system drive mode will be changed as follows:
Electric (CD) mode - Automatic (AUTO) mode - Hybrid (CS) mode.
Each time the mode is changed a corresponding LED is displayed on the instrument cluster as follows;
Automatic (AUTO) mode |
Hybrid (CS) mode |
|||
|
|
|
|
|
■ Type A |
||||
|
■ Type A |
|||
|
|
|
|
|
|
|
ODEP059301N |
|
|
|
ODEP059303N |
■ Type B |
|
|
|
■ Type B |
|
|
|
|
|
|
|
|
|
ODEP059302 |
ODEP059304 |
H28
 Loading...