


Kenwood KDC-3029, KDC-3029R, KDC-2029, KDC-MP4029, KDC-MP3029 User Manual
...KDC-MP4029 KDC-MP4029G KDC-MP3029 KDC-3029 KDC-3029R KDC-2029
CD-RECEIVER
INSTRUCTION MANUAL
© B64-2928-00/00 (MW)

Contents
Safety precautions |
3 |
Notes |
4 |
About CDs |
5 |
About MP3 and WMA |
6 |
General features |
7 |
Power
Selecting the Source
Volume
Attenuator
System Q
Audio Control
Audio Setup
Speaker Setting
Switching Display
Dimmer Control
Theft Deterrent Faceplate
TEL Mute
Tuner features |
11 |
Tuning |
|
Tuning Mode |
|
Station Preset Memory |
|
Auto Memory Entry |
|
Preset Tuning |
|
Frequency Step Setting |
|
Tuner features (KDC-3029R) |
13 |
Tuning |
|
Station Preset Memory |
|
Auto Memory Entry |
|
Preset Tuning |
|
RDS features (KDC-3029R) |
15 |
Traffic Information |
|
Radio Text Scroll |
|
PTY (Program Type) |
|
Program Type preset |
|
Changing Language for PTY Function |
|
CD/Audio file/External disc control |
|
features |
18 |
Playing CD & Audio file
Playing External Disc
Fast Forwarding and Reversing
Track/File Search
Disc Search/Folder Search
Direct Track/File Search
Direct Disc Search
2 | English
Track/File/Disc/Folder Repeat
Scan Play
Random Play
Magazine Random Play
Folder Select
Text/Title Scroll
Menu system |
21 |
Menu System |
|
Security Code |
|
Touch Sensor Tone |
|
Manual Clock Adjustment |
|
Synchronize Clock |
|
DSI (Disabled System Indicator) |
|
News Bulletin with Timeout Setting |
|
Local Seek |
|
Tuning Mode |
|
CRSC (Clean Reception System Circuit) |
|
AF (Alternative Frequency) |
|
Restricting RDS Region (Region Restrict |
|
Function) |
|
Auto TP Seek |
|
Monaural Reception |
|
Auxiliary Input Display Setting |
|
Text Scroll |
|
CD Read Setting |
|
Basic Operations of remote |
26 |
Accessories/ Installation Procedure 28 |
|
Connecting Wires to Terminals |
29 |
Accessories/ Installation Procedure |
|
(KDC-3029R) |
30 |
Connecting Wires to Terminals |
|
(KDC-3029R) |
31 |
Installation |
33 |
Removing the Unit |
35 |
Troubleshooting Guide |
36 |
Specifications |
39 |

Safety precautions
2WARNING
To prevent injury or fire, take the following precautions:
•To prevent a short circuit, never put or leave any metallic objects (such as coins or metal tools) inside the unit.
2CAUTION
To prevent damage to the machine, take the following precautions:
•Make sure to ground the unit to a negative 12V DC power supply.
•Do not install the unit in a spot exposed to direct sunlight or excessive heat or humidity. Also avoid places with too much dust or the possibility of water splashing.
•Do not set the removed faceplate or the faceplate case in areas exposed to direct sunlight, excessive heat or humidity. Also avoid places with too much dust or the possibility of water splashing.
•To prevent deterioration, do not touch the terminals of the unit or faceplate with your fingers.
•Do not subject the faceplate to excessive shock, as it is a piece of precision equipment.
•When replacing a fuse, only use a new one with the prescribed rating. Using a fuse with the wrong rating may cause your unit to malfunction.
•Do not use your own screws. Use only the screws provided. If you use the wrong screws, you could damage the unit.
Do Not Load 8 cm (3 in.) CDs in the CD slot
If you try to load a 8 cm (3 in.) CD with its adapter into the unit, the adapter might separate from the CD and damage the unit.
About CD players/disc changers connected to this unit
KENWOOD disc changers/ CD players released in 1998 or later can be connected to this unit. Refer to the catalog or consult your Kenwood dealer for connectable models of disc changers/ CD players.
Note that any KENWOOD disc changers/ CD players released in 1997 or earlier and disc changers made by other makers cannot be connected to this unit.
Unsupported connection may result in damage. Setting the "O-N" Switch to the "N" position for the applicable KENWOOD disc changers/ CD players. The functions that can be used and the information that can be displayed will differ depending on the models being connected.
•You can damage both your unit and the CD changer if you connect them incorrectly.
Lens Fogging
Right after you turn on the car heater in cold weather, dew or condensation may form on the lens in the CD player of the unit. Called lens fogging, CDs may be impossible to play. In such a situation, remove the disc and wait for the condensation to evaporate. If the unit still does not operate normally after a while, consult your Kenwood dealer.
English | 3
Notes
•If you experience problems during installation, consult your Kenwood dealer.
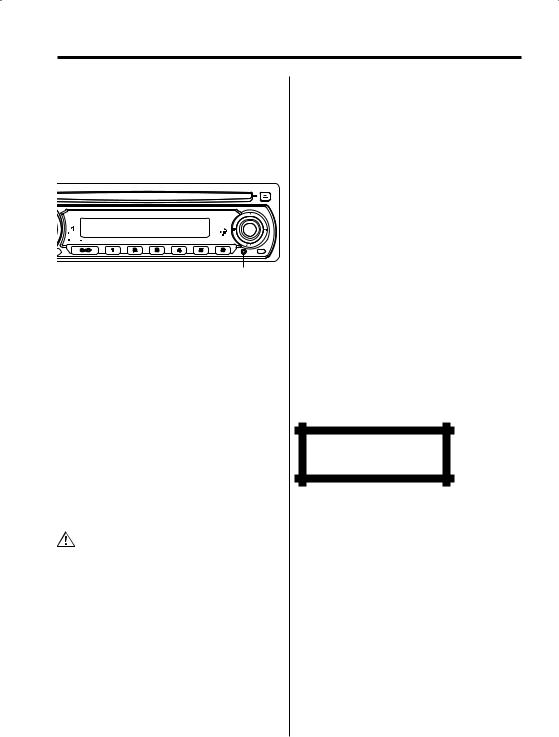
•If the unit fails to operate properly, press the Reset button. The unit returns to factory settings when the Reset button is pressed.
•Press the reset button if the disc auto changer fails to operate correctly. Normal operation should be restored.
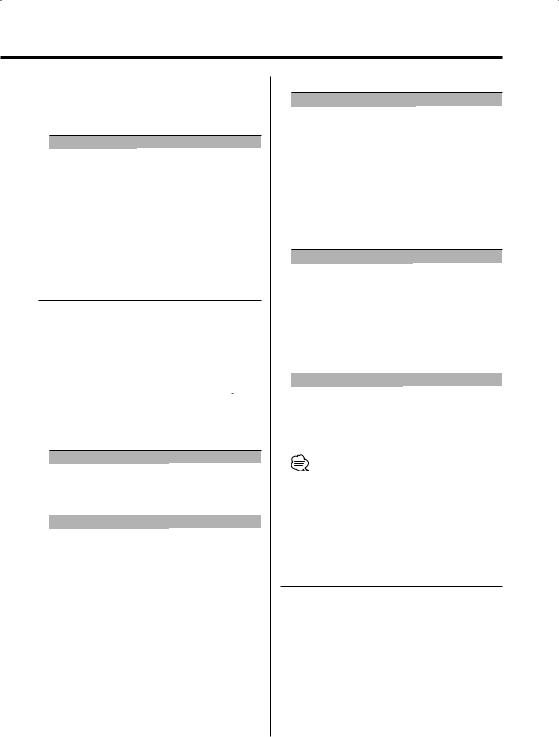
 SCRL
SCRL
+
VOL
AUD
SET UP
Q |
|
|
DISP |
|
|
|
|
MENU OFF |
SCAN |
RDM |
REP |
|
|
|
- |
AUTO
 AME
AME
Reset button
•The characters which can be displayed by this unit are A-Z 0-9 @ " ‘ ` % & * + – = , . / \ < > [ ] ( ) : ; ^ - { } | ~ .
•The illustrations of the display and the panel appearing in this manual are examples used to explain more clearly how the controls are used. Therefore, what appears on the display in the illustrations may differ from what appears on the display on the actual equipment, and some of the illustrations on the display may represent something impossible in actual operation.
Cleaning the Unit
If the faceplate of this unit is stained, wipe it with a dry soft cloth such as a silicon cloth.
If the faceplate is stained badly, wipe the stain off with a cloth moistened with neutral cleaner, then wipe neutral detergent off.
•Applying spray cleaner directly to the unit may affect its mechanical parts. Wiping the faceplate with a hard cloth or using a volatile liquid such as thinner or alcohol may scratch the surface or erases characters.
Cleaning the Faceplate Terminals
If the terminals on the unit or faceplate get dirty, wipe them with a dry, soft cloth.
About DAB Tuner control
(KDC-MP4029/MP4029G/3029/3029R/2029)
Refer to A group on the Instruction manual of DAB Tuner KTC-9090DAB (optional accessory) for the control method of DAB Tuner function.
However, the following control methods of the function for this unit may be differed from the Instruction manual; therefore, refer to the following supplemental instruction.
<Auto Ensemble Memory Entry>
1.Select the preset band for Auto Ensemble Memory Entry.
2.Press the [AME] button for at least 2 seconds. Open Auto Ensemble Memory Entry.
After storing in the memory finishes, the number of the pre-set buttons and the ensemble label are displayed.
<Searching by programme type and language> and <Languages to be displayed>
At the operation to press [DISP] button, press [AUTO]/ [TI] button.
<Automatic Switching DAB priority>
This function cannot be used.
The marking of products using lasers (Except for some areas)
CLASS 1
LASER PRODUCT
The label is attached to the chassis/case and says that the component uses laser beams that have been classified as Class 1. It means that the unit is utilizing laser beams that are of a weaker class. There is no danger of hazardous radiation outside the unit.
4 | English
About CDs
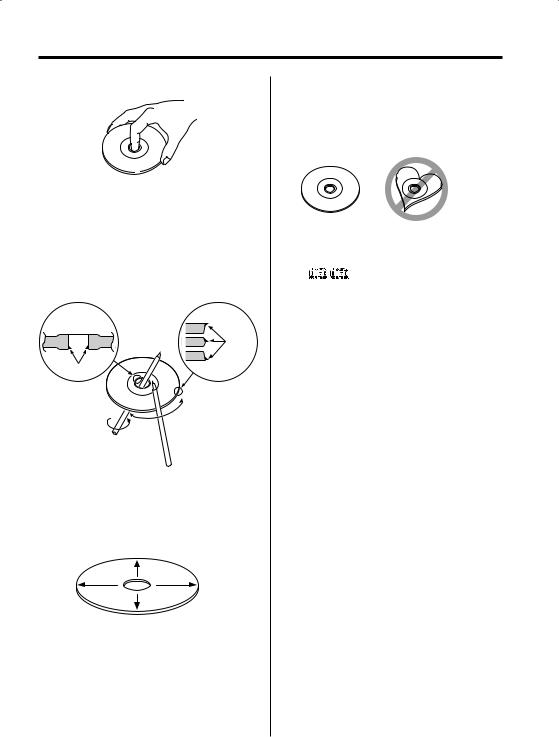
Handling CDs
• Don’t touch the recording surface of the CD.
•CD-R and CD-RW are easier to damage than a normal music CD. Use a CD-R or a CD-RW after reading the caution items on the package etc.
•Don’t stick tape etc. on the CD.
Also, don’t use a CD with tape stuck on it.
When using a new CD
If the CD center hole or outside rim has burrs, use it after removing them with a ball pen etc.
Burrs
Burrs
CD accessories
Don’t use disc type accessories.
CD cleaning
Clean from the center of the disc and move outward.
Removing CDs
When removing CDs from this unit pull them out horizontally.
CDs that can’t be used
• CDs that aren’t round can’t be used.
•CDs with coloring on the recording surface or that are dirty can’t be used.
•This unit can only play the CDs with


 .
.
It may not correctly play discs which do not have the mark.
•A CD-R or CD-RW that hasn’t been finalized can’t be played. (For the finalization process refer to your CD-R/CD-RW writing software, and your CD- R/CD-RW recorder instruction manual.)
CD storage
•Don’t place them in direct sunlight (On the seat or dashboard etc.) and where the temperature is high.
•Store CDs in their cases.
English | 5
About MP3 and WMA
The playable MP3/WMA file (hereafter called Audio file) and the media format has the following limitation. The Audio file, which is out of the specification, may not able to be played normally, or the file and folder names may not be displayed correctly.
Playable Audio file
•MP3, WMA: KDC-MP4029/MP4029G/MP3029
•Attach the correct extension for the Audio file (MP3: ".MP3", WMA: ".WMA")
•Do not attach the extensisons to the other files besides the Audio file. If it is attached, the file, which is not the Audio file, will be played and outputs the loud noise, and then the speaker will be damaged.
•The files with copy protection cannot be played.
Playable MP3 file
•MPEG 1/2 Audio Layer 3 file
•Transfer bit rate: 8-320 kbps
•Sampling frequency
: 8, 11.025, 12, 16, 22.05, 24, 32, 44.1, 48 kHz
Playable WMA file
•The file in accordance with Windows Media Audio (Except for the file for Windows Media Player 9 or after which applies the new functions)
•Transfer bit rate: 48-192 kbps
•Sampling frequency: 32, 44.1, 48 kHz
Playable media
•CD-ROM, CD-R, CD-RW (CD-RW with quick format cannot be used.)
•When recording to the media up to the maximum capacity at once, the writing soft is set to "Disc at once".
Playable disc format
•ISO 9660 Level 1/2
•Joliet
•Romeo
•Long file name.
The maximum number of characters for this unit
File/Folder name: 64 (Joliet: 32) characters
ID3 Tag/Contents property (WMA): 30 characters
•File/Folder name is the number of the characters including the extensions
•ID3 Tag can only display the tag of Ver1.X.
Limitation of structure for the file and the folder
•Maximum number of directory levels: 8
•Maximum number of folders: 50
•Maximum number of files per folder: 255
•Maximum number of files and folders: 512
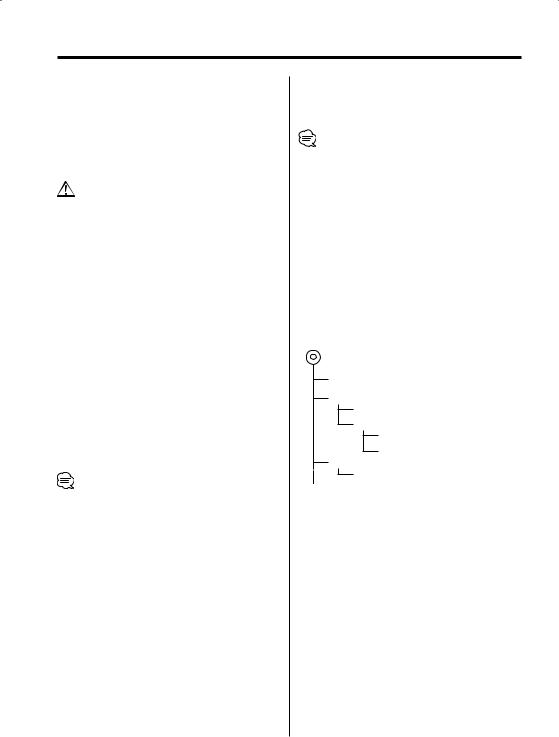
Playing order of the Audio file
The Audio file is played in the order which is written by writing soft. You may be able to set the playing order by writing the play sequence numbers such as "01" to "99" at the beginning of the file name.
Example
CD (1) 0: Folder
¡: Audio file
¡!
2¡" 3 ¡#
¡$
4¡%
•Playing order after ¡! play
¡" ¡# ¡$ ¡%...
•Forward file search during ¡# play (Push the Control knob to [¢])
¡$
•Forward folder search during ¡" play (Push the Control knob to [FM])
:3 4...
•When it is set to directory 4, skip to the folder before the same level by folder select (Push the Control knob to [4])
:2
•When it is set to directory 3, makes the level up by folder select (Push the Control knob to [AM])
:2
6 | English

General features
Release button |
VOL |
Control knob |
 SCRL
SCRL
|
|
|
|
+ |
VOL |
|
|
|
|
AUD |
|
|
|
|
SET UP |
|
|
|
DISP |
|
|
|
|
|
Q |
|
|
|
|
MENU |
OFF |
SCAN |
RDM |
REP |
ATT |
|
|
|
- |
DIM |
|
|
|
AUTO
 AME
AME
ATT/DIM |
Q |
SRC |
||
LOUD indicator |
|
|
||
|
|
|
|
|
|
|
|
|
|
|
|
|
|
|
ATT indicator |
Clock display |
Power
Turning ON the Power
Press the [SRC] button.
Turning OFF the Power
Press the [SRC] button for at least 1 second.
Selecting the Source
Press the [SRC] button.
Source required |
Display |
Tuner |
"TUNER" |
CD |
"CD" |
External disc (Optional accessory) |
"CD CH" |
Auxiliary input (Optional accessory) |
"AUX EXT" |
Standby (Illumination only mode) |
"STANDBY" |
Volume
Increasing Volume
Turn the [VOL] knob clockwise.
Decreasing Volume
Turn the [VOL] knob counterclockwise.
Attenuator
Turning the volume down quickly.
Press the [ATT] button.
Each time the button is pressed, the Attenuator turns ON and OFF.
When it’s ON, the "ATT" indicator blinks.
English | 7
General features
System Q
You can recall the best sound setting preset for different types of music.
1Select the source to set
Press the [SRC] button.
2Select the Sound type
Press the [Q] button.
Each time the button is pressed, the sound setting switches.
Sound setting |
Display |
Natural |
"NATURAL" |
Rock |
"ROCK" |
Pops |
"POPS" |
Easy |
"EASY" |
Top 40 |
"TOP40" |
Jazz |
"JAZZ" |
•When the System Q setting is changed, the Bass, Middle, and Treble set in audio control replace the System Q values.
•"USER" : The values set on the <Audio Control> (page 8).
•Each setting value is changed with the <Speaker Setting> (page 8).
First, select the speaker type with the Speaker setting.
Audio Control
1Select the source for adjustment
Press the [SRC] button.
2Enter Audio Control mode
Press the [VOL] knob.
3Select the Audio item for adjustment
Press the [VOL] knob.
Each time the knob is pressed, the items that can be adjusted switch as shown below.
4Adjust the Audio item
Turn the [VOL] knob.
|
Adjustment Item |
Display |
Range |
|
Bass level |
"BAS L" |
–8 — +8 |
|
Middle level |
"MID L" |
–8 — +8 |
|
Treble level |
"TRE L" |
–8 — +8 |
|
Balance |
"BAL" |
Left 15 — Right 15 |
|
Fader |
"FAD" |
Rear 15 — Front 15 |
8 | English |
|
|
|
5Exit Audio Control mode
Press any button.
Press the button which is not [VOL] knob and [ATT] button.
Audio Setup
Setting the Sound system, such as Volume offset and Loudness.
1Select the source for adjustment
Press the [SRC] button.
2Enter Audio Setup mode
Press the [VOL] knob for at least 1 second.
3Select the Audio Setup item for adjustment
Press the [VOL] knob.
Each time the knob is pressed, the items that can be adjusted switch as shown below.
4Adjust the Audio setup item
Turn the [VOL] knob.
Adjustment Item |
Display |
Range |
Volume offset |
"V-OFF" |
–8 — ±0 |
Loudness |
"LOUD" |
ON/OFF |
• Volume offset: Each source’s volume can be set as a difference from the basic volume.
• Loudness: Compensating for low and high tones during low volume.
When it's ON, "LOUD" indicator is ON.
5Exit Audio Setup mode
Press the [VOL] knob for at least 1 second.
Speaker Setting
Fine-tuning so that the System Q value is optimal when setting the speaker type.
1Enter Standby
Press the [SRC] button.
Select the "STANDBY" display.
2Enter Speaker Setting mode
Press the [VOL] knob.
3Select the Speaker type
Turn the [VOL] knob.
Each time the knob is turned, the setting switches as shown below.
Speaker type |
Display |
OFF |
"SP OFF" |
For 5 & 4 in. speaker |
"SP 5/4" |
For 6x9 &6 in. speaker |
"SP 6x9/6" |
For the OEM speaker |
"SP OEM" |
4Exit Speaker Setting mode
Press the [VOL] knob.
Switching Display
Switching the information displayed.
1Enter Switching Display mode
Press the Control knob for at least 1 second.
"DISP SEL" is displayed.
2Select the Display item
Push the Control knob to [4] or [¢].
In Tuner source (KDC-MP4029/MP4029G/MP3029/3029/ 2029)
Information |
Display |
|
Frequency |
"FREQ" |
|
Clock |
"CLOCK" |
|
(KDC-3029R) |
|
|
|
|
|
Information |
Display |
|
Program Service name or Frequency |
"FREQ"(AM), |
|
"FREQ/PS"(FM) |
||
|
||
Radio text, Program Service name or |
"R-TEXT"(FM) |
|
Frequency |
|
|
Clock |
"CLOCK" |
The frequency is displayed during Program Service name reception
Press the Control knob for at least 1 second.
The frequency for the RDS station will be displayed for 5 seconds instead of the Program Service name.
In CD & External disc source
Information |
Display |
Disc title (In External disc source or KDC- |
"D-TITLE" |
MP4029/MP4029G/MP3029 |
|
internal CD source) |
|
Track title (In External disc source or KDC- |
"T-TITLE" |
MP4029/MP4029G/MP3029 |
|
internal CD source) |
|
Track number & Play time |
"P-TIME" |
Clock |
"CLOCK" |
In Audio file source (KDC-MP4029/MP4029G/ MP3029)
|
Information |
Display |
|
|
Song title & Artist name |
"TITLE" |
|
|
Album name (MP3 only) & Artist name "ALBUM" |
||
|
Folder name |
"FOLDER" |
|
|
File name |
"FILE" |
|
|
Track number & Play time |
"P-TIME" |
|
|
Clock |
"CLOCK" |
|
|
|
|
|
In Auxiliary input source |
|
||
|
|
|
|
|
Information |
Display |
|
|
Auxiliary input name |
"SRC NAME" |
|
|
Clock |
"CLOCK" |
|
3Exit Switching Display mode
Press the Control knob.
•If the Disc title, Track title, Song title & Artist name, or Album name & Artist name is selected when the disc which does not have Disc title, Track title, Song title, Album name, or Artist name is played, track number and play time are displayed.
Dimmer Control
You can change the unit's display to dimmer.
Press the [DIM] button for at least 1 second.
Each time the button is pressed for 1 second, the Dimmer contol turns ON and OFF.
English | 9

General features
Theft Deterrent Faceplate
The faceplate of the unit can be detached and taken with you, helping to deter theft.
Removing the Faceplate
Press the Release button.
The faceplate is unlocked, allowing you to detach it.
•The faceplate is a precision piece of equipment and can be damaged by shocks or jolts. For that reason, keep the faceplate in its special storage case while detached.
•Do not expose the faceplate or its storage case to direct sunlight or excessive heat or humidity. Also avoid places with too much dust or the possibility of water splashing.
Reattaching the Faceplate
1Align the projections on the unit with the grooves on the faceplate.
Projections
Grooves
2Push the faceplate in until it clicks.
The faceplate is locked in place, allowing you to use the unit.
TEL Mute
The audio system automatically mutes when a call comes in.
When a call comes in
"CALL" is displayed.
The audio system pauses.
Listening to the audio during a call
Press the [SRC] button.
The "CALL" display disappears and the audio system comes back ON.
When the call ends
Hang up the phone.
The "CALL" display disappears and the audio system comes back ON.
10 | English
Function of the KDC-MP4029/MP4029G/MP3029/3029/2029
Tuner features
 SCRL
SCRL
|
|
|
|
+ |
VOL |
|
|
|
|
AUD |
|
|
|
|
SET UP |
|
|
|
DISP |
|
|
|
|
|
Q |
|
|
|
|
MENU |
OFF |
SCAN |
RDM |
REP |
ATT |
|
|
|
- |
DIM |
|
|
|
|
|
|
|
|
AUTO |
|
|
|
|
AME |
SRC |
1 - 6 |
AUTO/ |
Control |
|
|
AME |
knob |
ST indicator
|
|
|
|
|
|
|
|
|
Band display |
Frequency display Preset station number |
|
Tuning
Selecting the station.
1Select tuner source
Press the [SRC] button.
Select the "TUNER" display.
2Select the band
Push the Control knob to [FM] or [AM].
Each time the knob is pushed to [FM], it switches between the FM1, FM2, and FM3 bands.
3Tune up or down band
Push the Control knob to [4] or [¢].
•During reception of stereo stations the "ST" indicator is ON.
Tuning Mode
Choose the tuning mode.
Press the [AUTO] button.
Each time the button is pressed, the Tuning mode switches as shown below.
Tuning mode |
Display |
Operation |
Auto seek |
"AUTO 1" |
Automatic search for a station. |
Preset station seek |
"AUTO 2" |
Search in order of the stations |
|
|
in the Preset memory. |
Manual |
"MANUAL" |
Normal manual tuning control. |
English | 11

Function of the KDC-MP4029/MP4029G/MP3029/3029/2029
Tuner features
Station Preset Memory
Putting the station in the memory.
1Select the band
Push the Control knob to [FM] or [AM].
2Select the frequency to put in the memory
Push the Control knob to [4] or [¢].
3Put the frequency in the memory
Press the desired [1] — [6] button for at least 2 seconds.
The preset number display blinks 1 time. On each band, 1 station can be put in the memory on each [1] — [6] button.
Auto Memory Entry
Putting stations with good reception in the memory automatically.
1Select the band for Auto Memory Entry
Push the Control knob to [FM] or [AM].
2Open Auto Memory Entry
Press the [AME] button for at least 2 seconds.
When 6 stations that can be received are put in the memory Auto Memory Entry closes.
Preset Tuning
Calling up the stations in the memory.
1Select the band
Push the Control knob to [FM] or [AM].
2Call up the station
Press the desired [1] — [6] button.
Frequency Step Setting
Changing the tuning frequency step.
The original setting is FM band 50 kHz, and AM band 9 kHz.
1Turn the power OFF
Press the [SRC] button for at least 1 second.
2Switch the frequency step
While pressing the [1] and [5] button, press the [SRC] button.
Release your fingers from the button after the display is appeared.
The frequency step changes to FM band 200 kHz, and AM band 10 kHz.
•When the same operation is repeated, it returns to the original setting.
•When the frequency step is switched, the frequencies in the memory are deleted.
12 | English
 Loading...