


KDC-300UVM
CD-RECEIVER
INSTRUCTION MANUAL
CD-PECИBEP
ИHCTPУKЦИЯ ПO ЭKCПЛУATAЦИИ
CD RECEİVER
KULLANIM KILAVUZU
•“Made for iPod,” and “Made for iPhone” mean that an electronic accessory has been designed to connect specifically to iPod, or iPhone, respectively, and has been certified by the developer to meet Apple performance standards. Apple is not responsible for the operation of this device or its compliance with safety and regulatory standards. Please note that the use of this accessory with iPod or iPhone may affect wireless performance.
•iPhone, iPod, iPod classic, iPod nano, iPod touch and iTunes are trademarks of Apple Inc., registered in the U.S. and other countries.
•Lightning is a trademark of Apple Inc.
•The “AAC” logo is a trademark of Dolby Laboratories.
•Android is trademark of Google Inc.
© 2015 JVC KENWOOD Corporation |
B5A-0876-00 (M2N) |
CONTENTS |
|
|
|
BEFORE USE |
|
|
BEFORE USE |
2 |
|
|
IMPORTANT |
|
BASICS |
3 |
|
|
• To ensure proper use, please read through this manual before using this product. It is especially important |
|
|
|
|
|
that you read and observe Warning and Caution in this manual. |
|
GETTING STARTED |
4 |
|
|
|
|
|
|
• Please keep the manual in a safe and accessible place for future reference. |
||
|
1 Select the display language |
|
Warning |
||
|
and cancel the demonstration |
|
|||
|
2 Set the clock and date |
|
|
|
Do not operate any function that takes your attention away from safe driving. |
|
3 Set the initial settings |
|
|
|
Caution |
|
RADIO |
6 |
|
|
Volume setting: |
|
|
|
|
|
• Adjust the volume so that you can hear sounds outside the car to prevent accidents. |
|
AUX |
7 |
|
|
|
|
|
|
• Lower the volume before playing digital sources to avoid damaging the speakers by the sudden increase of |
||
|
CD / USB / iPod / ANDROID |
8 |
|
|
the output level. |
|
|
|
|
|
General: |
|
AUDIO SETTINGS |
10 |
|
|
|
|
|
|
• Avoid using the external device if it might hinder safe driving. |
||
|
DISPLAY SETTINGS |
13 |
|
|
• Make sure all important data has been backed up. We shall bear no responsibility for any loss of recorded data. |
|
|
|
• Never put or leave any metallic objects (such as coins or metal tools) inside the unit to prevent a short circuit. |
||
|
TROUBLESHOOTING |
14 |
|
|
|
|
|
|
• If a disc error occurs due to condensation on the laser lens, eject the disc and wait for the moisture to |
||
|
REFERENCES |
15 |
|
|
evaporate. |
|
|
|
• USB rating is indicated on the main unit. To view, detach the faceplate. ( 3) |
||
|
Maintenance |
|
|
|
|
|
|
|
|
USB rating for the USB cable from the rear of the unit is indicated on a label. ( 19) |
|
|
More information |
|
|
|
|
|
|
|
|
• Depending on the types of cars, the antenna will automatically extend when you turn on the unit with the |
|
|
INSTALLATION / |
|
|
|
|
|
|
|
|
antenna control wire connected ( 19). Turn off the unit or change the source to STANDBY when parking at |
|
|
CONNECTION |
17 |
|
|
a low ceiling area. |
|
SPECIFICATIONS |
20 |
|
|
Remote control (RC-406): |
|
|
|
• Do not leave the remote control in hot places such as on the dashboard. |
||
|
|
|
|
|
|
|
|
|
|
|
• The Lithium battery is in danger of explosion if replaced incorrectly. Replace it only with the same or |
|
|
|
|
|
equivalent type. |
|
|
|
|
|
• The battery pack or batteries shall not be exposed to excessive heat such as sunshine, fire or the like. |
|
|
|
|
|
• Keep the battery out of reach of children and in its original packaging when not in used. Dispose of used |
|
|
|
|
|
batteries promptly. If swallowed, contact a physician immediately. |
How to read this manual
•Operations are explained mainly using buttons on the faceplate.
•English indications are used for the purpose of explanation. You can select the display language from the [FUNCTION] menu. ( 5)
5)
•[XX] indicates the selected items.
•( XX) indicates references are available on the stated page.
2
BASICS
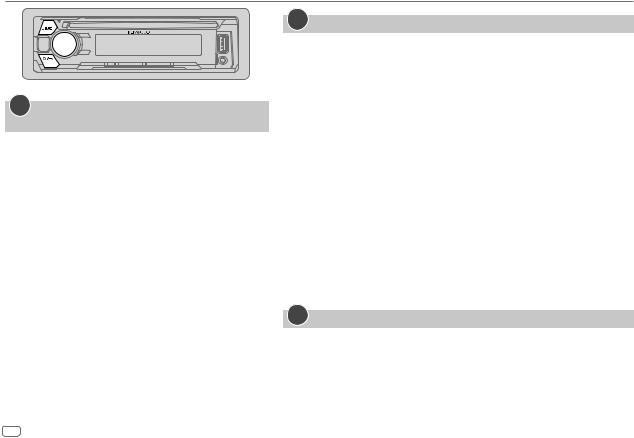
Faceplate
Volume knob |
Loading slot |
Display window |
Detach button |
Flashes when the unit |
|
|
USB cable from the |
enters searching status. |
|
|
|
|
rear of the unit |
|
Attach |
Detach |
How to reset |
|
|
Press the switch twice |
|
|
within 5 seconds |
|
|
after detaching the |
|
|
faceplate. |
Remote control (RC-406)
Remote sensor (Do not expose to bright sunlight.)
Pull out the insulation sheet when using for the


 first time.
* Not used
How to replace the battery
To |
On the faceplate |
On the remote control |
|
||
Turn on the power |
Press |
. |
Press and hold SRC to turn off the power. |
||
|
• Press and hold to turn off the power. |
( Pressing SRC does not turn on the power. ) |
|||
|
|
|
|
|
|
Adjust the volume |
Turn the volume knob. |
Press |
or |
. |
|
|
|
|
|
||
|
|
|
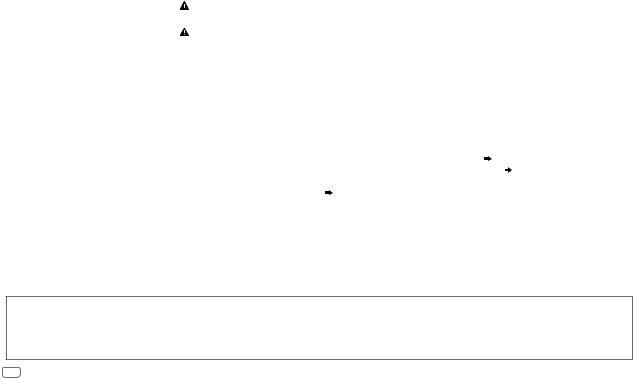
Press ATT during playback to attenuate the sound. |
||
|
|
|
• Press again to cancel. |
|
|
|
|
|
|
|
|
Select a source |
Press |
repeatedly. |
Press SRC repeatedly. |
|
|
|
|
|
|
||
Change the display information |
Press DISP repeatedly. ( 16) |
( Not available ) |
|
||
|
|
|
|
|
|
ENGLISH 3

GETTING STARTED
1Select the display language and cancel the demonstration
When you turn on the power for the first time (or [FACTORY RESET] is set to [YES],  5), the display shows: “SEL LANGUAGE”
  “PRESS”
  “VOLUME KNOB”
1Turn the volume knob to select [EN] (English), [RU] (Russian), [TU] (Turkish) or [SP] (Spanish), then press the knob.
[EN] is selected for the initial setup.
Then, the display shows: “CANCEL DEMO”  “PRESS”
  “VOLUME KNOB”.
2Press the volume knob.
[YES] is selected for the initial setup.
3Press the volume knob again.
“DEMO OFF” appears.
Then, the display shows the selected crossover type: “2-WAY X ’ OVER” or “3-WAY X ’ OVER”
•To change the crossover type, see “Change the crossover type” ( 5).
5).
2Set the clock and date
1 Press the volume knob to enter [FUNCTION].
2 Turn the volume knob to select [CLOCK], then press the knob.
To adjust the clock
3 Turn the volume knob to select [CLOCK ADJUST], then press the knob.
4Turn the volume knob to make the settings, then press the knob.
Hour  Minute
5 Turn the volume knob to select [CLOCK FORMAT], then press the knob. 6 Turn the volume knob to select [12H] or [24H], then press the knob.
To set the date
7 Turn the volume knob to select [DATE FORMAT], then press the knob.
8 Turn the volume knob to select [DD/MM/YY] or [MM/DD/YY], then press the knob. 9 Turn the volume knob to select [DATE SET], then press the knob.
10Turn the volume knob to make the settings, then press the knob.
Day  Month
Month  Year or Month
  Day
Day  Year
Year
11Press and hold 
 to exit.
To return to the previous setting item, press 
 .
.
3Set the initial settings
1 Press  repeatedly to enter STANDBY. 2 Press the volume knob to enter [FUNCTION].
3 Turn the volume knob to select an item ( 5), then press the knob.
4 Repeat step 3 until the desired item is selected or activated. 5 Press and hold 
 to exit.
To return to the previous setting item, press 
 .
.
4
GETTING STARTED
|
|
|
|
Default: XX |
DISPLAY |
|
|||
|
|
|
|
|
|
EASY MENU |
ON: Both display and button illuminations change to white color when |
||
|
|
|
|
entering [FUNCTION]. ; OFF: Both display and button illuminations remain as |
|
|
|
|
[COLOR SELECT] color. ( 13) |
TUNER SETTING |
|
|||
|
|
|
|
|
|
PRESET TYPE |
NORMAL: Memorizes one station for each preset button in each band (FM1/ |
||
|
|
|
|
FM2/ FM3/ MW/ LW). ; MIX: Memorizes one station for each preset button, |
|
|
|
|
regardless of the selected band. |
|
|
|
|
|
SYSTEM |
|
|||
|
KEY BEEP* |
ON: Activates the keypress tone. ; OFF: Deactivates. |
||
|
|
|
|
|
|
SOURCE SELECT |
|
||
|
|
|
|
|
|
|
BUILT-IN AUX |
ON: Enables AUX in source selection. ; OFF: Disables. ( 7) |
|
|
|
|
|
|
|
P-OFF WAIT |
Applicable only when the demonstration mode is turned off. |
||
|
|
|
|
Sets the duration when the unit will automatically turn off (while in standby |
|
|
|
|
mode) to save the battery. |
|
|
|
|
20M: 20 minutes ; 40M: 40 minutes ; 60M: 60 minutes ; – – –: Cancels |
|
|
|
|
|
|
CD READ |
1: Automatically distinguishes between audio file disc and music CD. ; 2: Forces |
||
|
|
|
|
to play as a music CD. No sound can be heard if an audio file disc is played. |
|
|
|
|
|
|
F/W UPDATE |
|
||
|
|
UPDATE SYSTEM |
|
|
|
|
|
|
|
|
|
|
F/W UP xx.xx |
YES: Starts upgrading the firmware. ; NO: Cancels (upgrading is not activated). |
|
|
|
|
For details on how to update the firmware, see: www.kenwood.com/cs/ce/ |
|
|
|
|
|
|
FACTORY RESET |
YES: Resets the settings to default (except the stored station). ; NO: Cancels. |
||
|
|
|
|
|
* Not applicable if 3-way crossover is selected.
CLOCK
|
CLOCK DISPLAY |
ON: The clock time is shown on the display even when the unit |
|
|
|
is turned off. ; OFF: Cancels. |
|
|
|
|
|
ENGLISH |
|
||
|
|
Select the display language for [FUNCTION] menu and music |
|
РУССКИЙ |
|||
information if applicable. |
|||
|
|
||
TURKCE |
|||
By default, [ENGLISH] is selected. |
|||
ESPANOL |
|
||
Change the crossover type
1 Press  repeatedly to enter STANDBY.
2Press and hold number buttons 4 and 5 to enter crossover select.
The current crossover type appears.
3Turn the volume knob to select “2WAY” or “3WAY”, then press the knob.
4Turn the volume knob to select “YES” or “NO”, then press the knob.
The selected crossover type appears.
•To cancel, press and hold 
 .
.
•To adjust the selected crossover settings, ( 11).
11).
 Caution
Select a crossover type according to how the speakers are connected. ( 19)
19)
If you select a wrong type:
•The speakers may damage.
•The output sound level may be extremely high or low.
ENGLISH 5
RADIO
Search for a station
1 Press  repeatedly to select TUNER.
2Press  repeatedly (or press
 on RC-406) to select FM1/ FM2/ FM3/ MW/ LW.
3Press 
 (or press


 on RC-406) to search for a station.
•To change the searching method for 
 : Press
  repeatedly.
AUTO1 : Automatically search for a station. AUTO2 : Search for a preset station. MANUAL : Manually search for a station.
•To store a station: Press and hold one of the number buttons (1 to 6).
•To select a stored station: Press one of the number buttons (1 to 6) (or press one of the number buttons (1 to 6) on RC-406).
Direct Access Tuning (using RC-406)
1 Press DIRECT to enter Direct Access Tuning.
2 Press the number buttons to enter a frequency.
3 Press  to search for a station.
•To cancel, press  or DIRECT.
•If no operation is done for 10 seconds after step 2, Direct Access Tuning is automatically canceled.
Other settings
1 Press the volume knob to enter [FUNCTION].
2Turn the volume knob to select an item (see the following table), then press the knob.
3 Repeat step 2 until the desired item is selected or activated. 4 Press and hold 
 to exit.
To return to the previous setting item, press 
 .
.
Default: XX
TUNER SETTING
|
LOCAL SEEK |
ON: Searches only stations with good reception. ; OFF: Cancels. |
|
|
• Settings made are applicable only to the selected source/station. Once |
|
|
you change the source/station, you need to make the settings again. |
|
AUTO |
YES: Automatically starts memorizing 6 stations with good reception. ; |
|
MEMORY |
NO: Cancels. |
|
|
• Selectable only if [NORMAL] is selected for [PRESET TYPE]. ( 5) |
|
|
|
|
MONO SET |
ON: Improves the FM reception, but the stereo effect may be lost. ; |
|
|
OFF: Cancels. |
|
NEWS SET |
ON: The unit will temporarily switch to News Programme if available. ; |
|
|
OFF: Cancels. |
|
REGIONAL |
ON: Switches to another station only in the specific region using the “AF” |
|
|
control. ; OFF: Cancels. |
|
AF SET |
ON: Automatically searches for another station broadcasting the same |
|
|
program in the same Radio Data System network with better reception |
|
|
when the current reception is poor. ; OFF: Cancels. |
|
|
|
|
TI |
ON: Allows the unit to temporarily switch to Traffic Information if available |
|
|
(“TI” lights up). ; OFF: Cancels. |
6

RADIO
|
PTY SEARCH |
1 Press the volume knob to enter PTY language selection. |
||
|
|
2 |
Turn the volume knob to select the PTY language (ENGLISH/ FRENCH/ |
|
|
|
3 |
GERMAN), then press the knob. |
|
|
|
Turn the volume knob to select the available Program Type (see the |
||
|
|
4 |
following). |
|
|
|
Press |
to start searching. |
|
|
|
|
|
|
CLOCK |
|
|
|
|
|
TIME SYNC |
ON: Synchronizes the unit’s time to the Radio Data System station time. ; |
||
|
|
OFF: Cancels. |
|
|
AUX
Preparation:
Select [ON] for [BUILT-IN AUX]. ( 5)
5)
Start listening
1 Connect a portable audio player (commercially available).
Auxiliary input jack
Portable audio player
Available Program Type for PTY SEARCH
SPEECH : NEWS, AFFAIRS, INFO (information), SPORT, EDUCATE, DRAMA, CULTURE, SCIENCE, VARIED, WEATHER, FINANCE, CHILDREN, SOCIAL, RELIGION, PHONE IN, TRAVEL, LEISURE, DOCUMENT
MUSIC : POP M (music), ROCK M (music), EASY M (music), LIGHT M (music),
CLASSICS, OTHER M (music), JAZZ, COUNTRY, NATION M (music), OLDIES, FOLK M (music)
The unit will search for the Program Type categorized under [SPEECH] or [MUSIC] if selected.
•[LOCAL SEEK]/ [MONO SET]/ [NEWS SET]/ [REGIONAL]/ [AF SET]/ [TI]/ [PTY SEARCH] is selectable only when the band is FM1/ FM2/ FM3.
•If the volume is adjusted during reception of traffic information or news bulletin, the adjusted volume is memorized automatically. It will be applied the next time traffic information or news bulletin is turned on.
3.5 mm stereo mini plug with “L” shaped connector (commercially available)
2 Press  repeatedly to select AUX.
3 Turn on the portable audio player and start playback.
Set the AUX name
While listening to a portable audio player connected to the unit...
1 |
Press the volume knob to enter [FUNCTION]. |
|
2 |
Turn the volume knob to select [SYSTEM], then press the knob. |
|
3 |
Turn the volume knob to select [AUX NAME SET], then press the knob. |
|
4 |
Turn the volume knob to select an item, then press the knob. |
|
5 |
AUX (default)/ DVD/ PORTABLE/ GAME/ VIDEO/ TV |
|
Press and hold |
to exit. |
|
To return to the previous setting item, press 
 .
.
ENGLISH 7
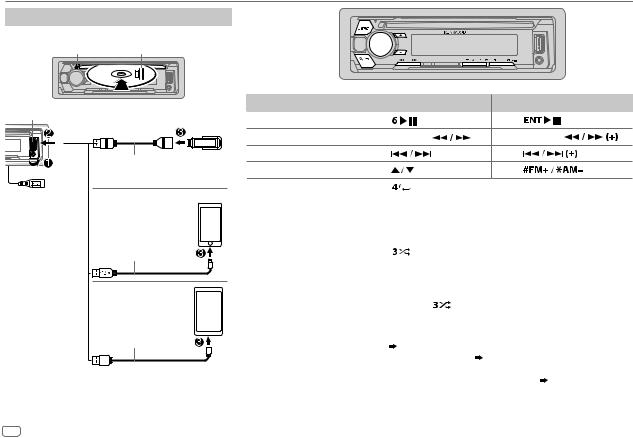
CD / USB / iPod / ANDROID
Start playback
The source changes automatically and playback starts.
MEject disc |
Label side |
USB input terminal
|
|
USB |
|
|
CA-U1EX (max.: 500 mA) |
|
|
(optional accessory) |
You can also connect |
iPod/iPhone |
|
to the USB cable from |
KCA-iP102 / KCA-iP103 |
|
the rear of the unit. |
||
|
|
(optional accessory)*1 |
|
|
or accessory cable of the |
|
|
iPod/iPhone*2 |
|
|
ANDROID*3 |
|
|
Micro USB 2.0 cable*2 |
|
|
(commercially available) |
*1 |
KCA-iP102 : 30-pin type, KCA-iP103 : Lightning type |
|
*2 |
Do not leave the cable inside the car when not using. |
|
To |
On the faceplate |
|
On the remote control |
|||
Playback / pause |
Press |
. |
|
Press |
. |
|
Reverse / Fast-forward*4 |
Press and hold |
. |
Press and hold |
. |
||
Select a track/file |
Press |
. |
|
Press |
|
. |
Select a folder*5 |
Press |
. |
|
Press |
|
. |
Repeat play*6 |
Press |
repeatedly. |
|
||
|
|
TRACK REPEAT/ ALL REPEAT |
: Audio CD |
||
|
|
FILE REPEAT/ FOLDER REPEAT/ ALL REPEAT : MP3/WMA/AAC/WAV/ |
|||
|
|
|
|
|
FLAC file |
|
|
FILE REPEAT/ FOLDER REPEAT/ REPEAT OFF : iPod or ANDROID |
|||
Random play*6 |
Press |
repeatedly. |
|
||
|
|
DISC RANDOM/ RANDOM OFF |
: Audio CD |
||
|
|
FOLDER RANDOM/ RANDOM OFF : MP3/WMA/AAC/WAV/FLAC file, |
|||
|
|
|
|
|
iPod or ANDROID |
|
|
|
|
||
|
|
Press and hold |
to select ALL RANDOM.*7 |
||
*3 |
When connecting an Android device, “Press [VIEW] to install KENWOOD MUSIC PLAY APP” is shown. Follow the |
||||
|
instructions to install the application. You can also install the latest version of KENWOOD MUSIC PLAY application on |
||||
*4 |
your Android device before connecting. ( |
15) |
|
|
|
For ANDROID: Applicable only when [BROWSE MODE] is selected. ( |
9) |
||||
*5 |
For CD: Only for MP3/WMA/AAC files. This does not work for iPod/ ANDROID. |
||||
*6 |
For iPod/ ANDROID: Applicable only when [MODE OFF]/ [BROWSE MODE] is selected. ( 9) |
||||
*7 |
For CD: Only for MP3/WMA/AAC files. |
|
|
|
|
8
CD / USB / iPod / ANDROID
Select control mode
While in iPod FRONT/ iPod REAR source, press 5 repeatedly.
MODE ON : Control iPod using the iPod itself. However, you can still play/pause, file skip, fast-forward or reverse from this unit.
MODE OFF : Control iPod from this unit.
While in ANDROID FRONT/ ANDROID REAR source, press 5 repeatedly.
BROWSE MODE : Control Android device from this unit via KENWOOD MUSIC PLAY application installed in the Android device.
HAND MODE : Control Android device using the Android device itself via other media player applications installed in the Android device. However, you can still play/pause and file skip from this unit.
Select music drive
Press 5 repeatedly.
Stored songs in the following drive will be played back.
•Selected internal or external memory of a smartphone (Mass Storage Class).
•Selected drive of a multiple drives device.
Listen to TuneIn Radio/ TuneIn Radio Pro/ Aupeo
While listening to TuneIn Radio, TuneIn Radio Pro or Aupeo, connect the iPod/iPhone to the USB input terminal of the unit.
• The unit will output the sound from these applications.
Select a file from a folder/list
1 |
Press |
. |
2 |
Turn the volume knob to select a folder/list, then press the knob. |
|
3 |
Turn the volume knob to select a file, then press the knob. |
|
|
|
|
|
Quick Search |
|
|
If you have many files, you can search through them quickly. |
|
|
Turn the volume knob quickly to browse through the list quickly. |
|
–Not applicable for iPod.
(or)
Press 
 to search at a preset skip search ratio. (
 10, [SKIP SEARCH])
• Pressing and holding 
 searches at a 10% ratio.
–Not applicable for audio CD and MP3/ WMA/ AAC/ WAV/ FLAC files.
(or)
Alphabet search (applicable only for iPod)
If you have many files in the iPod, you can search through them quickly according to the first character of the file name.
Turn the volume knob quickly to enter character search.
Turn the volume knob to select the character.
To search for a character other than A to Z and 0 to 9, enter only “*”. Press S / T to move to the entry position.
• You can enter up to 3 characters.
Press the volume knob to start searching.
•To return to the root folder/ first file/ top menu, press 5.
•To return to the previous setting item, press 
 .
.
•To cancel, press and hold 
 .
.
•For iPod, applicable only when [MODE OFF] is selected.
•For ANDROID, applicable only when [BROWSE MODE] is selected.
ENGLISH 9

CD / USB / iPod / ANDROID
Direct Music Search (using RC-406)
1 Press DIRECT.
2 Press the number buttons to enter a track/file number. 3 Press  to search for music.
•To cancel, press  or DIRECT.
•Not available if Random Play is selected.
•Not applicable for iPod and ANDROID.
Other settings
1 Press the volume knob to enter [FUNCTION].
2Turn the volume knob to select an item (see the following table), then press the knob.
3Repeat step 2 until the desired item is selected or activated.
4 Press and hold 
 to exit.
To return to the previous setting item, press 
 .
.
|
|
Default: XX |
USB |
|
|
|
MUSIC DRIVE |
DRIVE CHANGE: The next drive ([DRIVE 1] to [DRIVE 4]) is |
|
|
selected automatically and playback starts. |
|
|
Repeat steps 1 to 3 to select the following drives. |
|
SKIP SEARCH |
0.5%/ 1%/ 5%/ 10%: While listening to iPod or ANDROID, |
|
|
selects the skip search ratio over the total files. |
|
|
|
AUDIO SETTINGS
While listening to any source...
1 Press AUD to enter [AUDIO CONTROL] directly.
2Turn the volume knob to select an item (see the following table), then press the knob.
3 Repeat step 2 until the desired item is selected or activated. 4 Press and hold 
 to exit.
(or using RC-406)
1 Press AUD to enter [AUDIO CONTROL].
2 Press 
 to select an item, then press
  .
.
To return to the previous setting item, press 
 .
.
|
|
|
Default: XX |
SUB-W LEVEL |
–50 to +10 (0): Adjusts the subwoofer output level. |
||
|
|
|
|
MANUAL EQ |
|
|
|
|
|
|
|
|
BAND1 LEVEL |
LEVEL |
–9 to +9 (0): (Refer to BAND2 LEVEL below.) |
|
|
|
|
|
|
BASS EXTEND |
ON: Turns on the extended bass. ; OFF: Cancels. |
|
|
|
|
|
BAND2 LEVEL to |
–9 to +9 (0): The sound elements (frequency level, tone level, Q factor) are preset |
|
|
BAND13 LEVEL |
into each selection (BAND1 LEVEL to BAND13 LEVEL). |
|
|
|
Adjusts the level to memorize for each source. (Before making an adjustment, |
|
|
|
select the source you want to adjust.) |
|
|
|
|
|
|
Q FACTOR |
1.35/ 1.50/ 2.00: Adjust the quality factor. |
|
|
|
|
|
PRESET EQ |
NATURAL/ ROCK/ POPS/ EASY/ TOP40/ JAZZ/ POWERFUL/ USER: Selects a |
||
|
|
preset equalizer suitable to the music genre. (Select [USER] to use the settings |
|
|
|
made in [MANUAL EQ].) |
|
|
|
||
BASS BOOST |
LEVEL1/ LEVEL2/ LEVEL3/ LEVEL4/ LEVEL5: Selects your preferred bass boost |
||
|
|
level. ; OFF: Cancels. |
|
|
|
|
|
10
AUDIO SETTINGS
LOUDNESS |
LEVEL1/ LEVEL2: Selects your preferred low and high frequencies |
||
|
|
boost to produce a well-balanced sound at a low volume level. ; |
|
|
|
OFF: Cancels. |
|
SUBWOOFER SET |
ON: Turns on the subwoofer output. ; OFF: Cancels. |
||
|
|
||
FADER |
(Not applicable if 3-way crossover is selected.) |
||
|
|
R15 to F15 (0): Adjusts the rear and front speaker output balance. |
|
|
|
||
BALANCE |
L15 to R15 (0): Adjusts the left and right speaker output balance. |
||
|
|
||
VOLUME OFFSET |
–15 to +6 (0): Preset the initial volume level of each source. (Before |
||
|
|
adjustment, select the source you want to adjust.) |
|
|
|
||
SOUND EFFECT |
|
||
|
|
|
|
|
SOUND RECNSTR |
(Not applicable for TUNER source and AUX source.) |
|
|
(Sound |
ON: Creates realistic sound by compensating the high-frequency |
|
|
reconstruction) |
components and restoring the rise-time of the waveform that are lost |
|
|
|
in audio data compression. ; OFF: Cancels. |
|
|
|
|
|
|
SPACE ENHANCE |
(Not applicable for TUNER source.) |
|
|
|
SMALL/ MEDIUM/ LARGE: Virtually enhances the sound space. ; |
|
|
|
OFF: Cancels. |
|
|
SND REALIZER |
LEVEL1/ LEVEL2/ LEVEL3: Virtually makes the sound more realistic. ; |
|
|
|
OFF: Cancels. |
|
|
STAGE EQ |
LOW/ MIDDLE/ HIGH: Virtually adjust the sound position heard from |
|
|
|
the speakers. ; OFF: Cancels. |
|
|
|
|
|
|
DRIVE EQ |
ON: Boosts the frequency to reduce the noise heard from outside the |
|
|
|
car or running noise of the tyres. ; OFF: Cancels. |
|
|
|
|
|
SPEAKER SIZE |
Depending on the crossover type you have selected ( 5), 2-way |
||
|
|
crossover or 3-way crossover setting items will be shown. ( 12) |
|
X ‘ OVER |
|||
By default, 2-way crossover type is selected. |
|||
|
|
|
|
[SUB-W LEVEL] is selectable only if [SUBWOOFER SET] is set to [ON].
Crossover settings
Below are the available setting items for 2-way crossover and 3-way crossover.
SPEAKER SIZE
Selects according to the connected speaker size for optimum performance.
•The frequency and slope settings are automatically set for the crossover of the selected speaker.
•If [NONE] is selected for [TWEETER] of [FRONT], [REAR] and [SUBWOOFER] for [SPEAKER SIZE], the [X ‘ OVER] setting of the speaker is not available.
X ‘ OVER
[FRQ]/ [F - HPF FRQ]/ [R - HPF FRQ]/ [SW LPF FRQ]/ [HPF FRQ]/ [LPF FRQ]: Adjusts the crossover frequency for the selected speakers (high pass filter or low pass filter).
• If [THROUGH] is selected, all signals are sent to the selected speakers.
[F - HPF SLOPE]/ [R - HPF SLOPE]/ [SW LPF SLOPE]/ [HPF SLOPE]/ [LPF SLOPE]/ [SLOPE]:
Adjusts the crossover slope.
•Selectable only if a setting other than [THROUGH] is selected for the crossover frequency.
[SW LPF PHASE]/ [PHASE]:
Selects the phase of the speaker output to be in line with the other speaker output.
[GAIN LEFT]/ [GAIN RIGHT]/ [F - HPF GAIN]/ [R - HPF GAIN]/ [SW LPF GAIN]/ [GAIN]:
Adjusts the output volume of the selected speaker.
The following items is selectable only if [SUBWOOFER SET] is set to [ON]:
–[SUBWOOFER]/ [WOOFER] of [SPEAKER SIZE]
–[SUBWOOFER LPF]/ [WOOFER] of [X ‘ OVER]
ENGLISH 11

AUDIO SETTINGS
 2-way crossover setting items
SPEAKER SIZE
|
FRONT |
SIZE |
8CM/ 10CM/ 12CM/ 13CM/ 16CM/ 17CM/ 18CM/ |
|
|
|
4×6/ 5×7/ 6×8/ 6×9/ 7×10 |
|
|
|
|
|
|
TWEETER |
SMALL/ MIDDLE/ LARGE/ NONE (not connected) |
|
|
|
|
|
REAR |
8 CM/ 10 CM/ 12 CM/ 13 CM/ 16 CM/ 17 CM/18 CM/ 4×6/ 5×7/ 6×8/ |
|
|
|
6×9/ 7×10/ NONE (not connected) |
|
|
SUBWOOFER |
16CM/ 20CM/ 25CM/ 30CM/ 38CM OVER/ NONE (not connected) |
|
|
|
|
|
X ' OVER |
|
|
|
|
|
|
|
|
TWEETER |
FRQ |
1KHZ/ 1.6KHZ/ 2.5KHZ/ 4KHZ/ 5KHZ/ 6.3KHZ/ |
|
|
|
8KHZ/ 10KHZ/12.5KHZ |
|
|
|
|
|
|
GAIN LEFT |
–8 to 0 |
|
|
|
|
|
|
GAIN RIGHT |
–8 to 0 |
|
|
|
|
|
FRONT HPF |
F - HPF FRQ |
30HZ/40HZ/ 50HZ/ 60HZ/ 70HZ/ 80HZ/ 90HZ/ |
|
|
|
100HZ/ 120HZ/ 150HZ/ 180HZ/ 220HZ/ 250HZ/ |
|
|
|
THROUGH |
|
|
|
|
|
|
F - HPF SLOPE |
–6DB/ –12DB/ –18DB/ –24DB |
|
|
|
|
|
|
F - HPF GAIN |
–8 to 0 |
|
|
|
|
|
REAR HPF |
R - HPF FRQ |
|
|
|
|
(Refer FRONT HPF settings above.) |
|
|
R - HPF SLOPE |
|
|
|
|
|
|
|
R - HPF GAIN |
|
|
|
|
|
|
SUBWOOFER |
SW LPF FRQ |
30HZ/ 40HZ/ 50HZ/ 60HZ/ 70HZ/ 80HZ/ 90HZ/ |
|
LPF |
|
100HZ/ 120HZ/ 150HZ/ 180HZ/ 220HZ/ 250HZ/ |
|
|
|
THROUGH |
|
|
|
|
|
|
SW LPF SLOPE |
–6DB/ –12DB/ –18DB/ –24DB |
|
|
SW LPF PHASE |
REVERSE (180°)/ NORMAL (0°) |
|
|
|
|
|
|
SW LPF GAIN |
–8 to 0 |
|
|
|
|
 3-way crossover setting items
SPEAKER SIZE
|
TWEETER |
SMALL/ MIDDLE/ LARGE |
|
|
|
|
|
|
MID RANGE |
8CM/ 10CM/ 12CM/ 13CM/ 16CM/ 17CM/ 18CM/ 4×6/ 5×7/ 6×8/ |
|
|
|
6×9 |
|
|
|
|
|
|
WOOFER |
16CM/ 20CM/ 25CM/ 30CM/ 38CM OVER/ NONE (not connected) |
|
|
|
|
|
X ' OVER |
|
|
|
|
|
|
|
|
TWEETER |
FRQ |
1KHZ/ 1.6KHZ/ 2.5KHZ/ 4KHZ/ 5KHZ/ 6.3KHZ/ 8KHZ/ |
|
|
|
10KHZ/12.5KHZ |
|
|
|
|
|
|
SLOPE |
–6DB/ –12DB |
|
|
|
|
|
|
PHASE |
REVERSE (180°)/ NORMAL (0°) |
|
|
|
|
|
|
GAIN |
–8 to 0 |
|
|
|
|
|
MID RANGE |
HPF FRQ |
30HZ/ 40HZ/ 50HZ/ 60HZ/ 70HZ/ 80HZ/ 90HZ/ |
|
|
|
100HZ/ 120HZ/ 150HZ/ 180HZ/ 220HZ/ 250HZ/ |
|
|
|
THROUGH |
|
|
|
|
|
|
HPF SLOPE |
–6DB/ –12DB |
|
|
|
|
|
|
LPF FRQ |
1KHZ/ 1.6KHZ/ 2.5KHZ/ 4KHZ/ 5KHZ/ 6.3KHZ/ 8KHZ/ |
|
|
|
10KHZ/12.5KHZ/ THROUGH |
|
|
|
|
|
|
LPF SLOPE |
–6DB/ –12DB |
|
|
|
|
|
|
PHASE |
REVERSE (180°)/ NORMAL (0°) |
|
|
|
|
|
|
GAIN |
–8 to 0 |
|
WOOFER |
LPF FRQ |
30HZ/ 40HZ/ 50HZ/ 60HZ/ 70HZ/ 80HZ/ 90HZ/ |
|
|
|
100HZ/ 120HZ/ 150HZ/ 180HZ/ 220HZ/ 250HZ/ |
|
|
|
THROUGH |
|
|
|
|
|
|
SLOPE |
–6DB/ –12DB |
|
|
|
|
|
|
PHASE |
REVERSE (180°)/ NORMAL (0°) |
|
|
|
|
|
|
GAIN |
–8 to 0 |
|
|
|
|
12
DISPLAY SETTINGS
Set the dimmer
Press and hold


 to turn on or off the dimmer.
•If you have set [DIMMER TIME], it will be canceled once you press and hold this button.
Other settings
1 Press the volume knob to enter [FUNCTION].
2 Turn the volume knob to select [DISPLAY], then press the knob.
3Turn the volume knob to select an item (see the following table), then press the knob.
4Repeat step 3 until the desired item is selected/activated or follow the instructions stated on the selected item.
5 Press and hold |
to exit. |
To return to the previous setting item, press 
 .
.
Default: XX
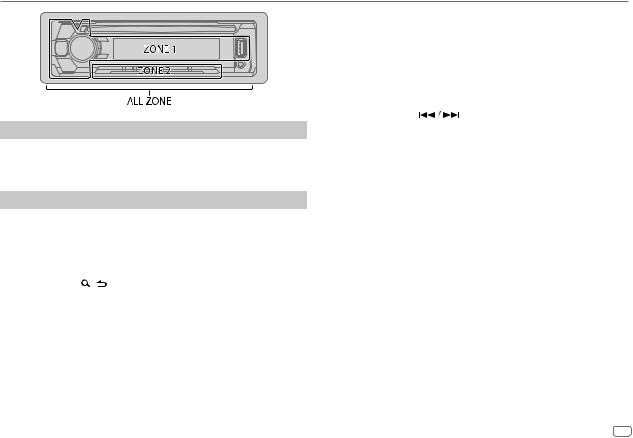
COLOR SELECT |
Select color for ALL ZONE, ZONE 1 and ZONE 2 separately. |
||
|
1 |
Select a zone. (See the illustration on the left column.) |
|
|
2 |
Select a color for the selected zone. |
|
|
|
VARIABLE SCAN/ CUSTOM R/G/B/ preset colors* |
|
|
To make your own color, select [CUSTOM R/G/B]. The color you have |
||
|
made will be stored in [CUSTOM R/G/B]. |
||
|
1 |
Press the volume knob to enter the detailed color adjustment. |
|
|
2 |
Press |
to select the color (R/ G/ B) to adjust. |
|
3 |
Turn the volume knob to adjust the level (0 — 9), then press the |
|
|
|
knob. |
|
|
|
||
DIMMER |
Dim the display illumination and button illumination. |
||
|
ON: Dimmer is turned on. ; OFF: Cancels. |
||
|
DIMMER TIME: Set the dimmer on and off time. |
||
|
1 |
Turn the volume knob to adjust the [ON] time, then press the knob. |
|
|
2 |
Turn the volume knob to adjust the [OFF] time, then press the knob. |
|
|
(Default: [ON]: 18:00; [OFF]: 6:00) |
||
|
|
||
BRIGHTNESS |
1 Select a zone. (See the illustration on the left column.) |
||
|
2 |
0 — 31: Select your preferred brightness level for display illumination |
|
|
|
and button illumination. |
|
|
|
||
TEXT SCROLL |
AUTO/ ONCE: Select whether to scroll the display information |
||
|
automatically, or scroll only once. ; OFF: Cancels. |
||
|
|
|
|
*Preset colors: RED1/ RED2/ RED3/ PURPLE1/ PURPLE2/ PURPLE3/ PURPLE4/ BLUE1/ BLUE2/ BLUE3/ SKYBLUE1/ SKYBLUE2/ LIGHTBLUE/ AQUA1/ AQUA2/ GREEN1/ GREEN2/ GREEN3/ YELLOWGREEN1/ YELLOWGREEN2/ YELLOW/ ORANGE1/ ORANGE2/
ORANGERED
ENGLISH 13

TROUBLESHOOTING
Symptom |
Remedy |
||
|
Sound cannot be heard. |
• Adjust the volume to the optimum level. |
|
|
|
• Check the cords and connections. |
|
|
|
|
|
|
“MISWIRING CHECK WIRING |
Turn the power off, then check to be sure the |
|
|
THEN PWR ON” appears. |
terminals of the speaker wires are insulated properly. |
|
|
|
Turn the power on again. |
|
General |
|
|
|
appears. |
Send the unit to the nearest service center. |
||
|
“PROTECTING SEND SERVICE” |
||
|
|
|
|
|
• Sound cannot be heard. |
Clean the connectors. ( 15) |
|
|
• The unit does not turn on. |
|
|
|
• Information shown on the |
|
|
|
display is incorrect. |
|
|
|
The unit does not work at all. |
Reset the unit. ( 3) |
|
|
|
|
|
Radio |
• Radio reception is poor. |
Connect the antenna firmly. |
|
• Static noise while listening |
|
||
|
|
||
|
to the radio. |
|
|
|
|
|
|
|
Disc cannot be ejected. |
Press and hold M to forcibly eject the disc. Be careful |
|
|
|
not to drop the disc when it is ejected. If this does not |
|
|
|
solve the problem, reset the unit. ( 3) |
|
|
|
|
|
|
Noise is generated. |
Skip to another track or change the disc. |
|
iPod/ |
|
|
|
Tracks do not play back as you |
Playback order is determined when files are recorded. |
||
|
|||
/ USB |
intended them to play. |
|
|
|
|
||
“READING” keeps flashing. |
Do not use too many hierarchical levels or folders. |
||
CD |
|
|
|
Elapsed playing time is not |
This is caused by how the tracks are recorded. |
||
|
|||
|
correct. |
|
|
|
|
|
|
|
“LOADING” appears when you |
This unit is still preparing the iPod/iPhone music list. |
|
|
enter search mode by pressing |
It may take some time to load, try again later. |
|
|
. |
|
|
|
|
|
|
Symptom |
Remedy |
|||
|
Correct characters are not |
• This unit can only display uppercase letters, numbers, |
||
|
displayed (e.g. album |
|
and a limited number of symbols. |
|
|
name). |
• Depending on the display language you have selected |
||
|
|
|
( 5), some characters may not be displayed correctly. |
|
|
|
|
||
|
“NA FILE” |
Make sure the disc contains supported audio files. |
||
|
|
( |
15, 16) |
|
|
|
|
||
|
“NO DISC” |
Insert a playable disc into the loading slot. |
||
|
|
|
||
|
“TOC ERROR” |
Make sure the disc is clean and inserted properly. |
||
iPod |
|
|
||
“PLEASE EJECT” |
Reset the unit. If this does not solve the problem, consult |
|||
/ |
|
your nearest service center. |
||
/ USB |
|
|
|
|
“READ ERROR” |
Copy the files and folders onto the USB device again. If this |
|||
CD |
||||
|
does not solve the problem, reset the USB device or use |
|||
|
|
|||
|
|
another USB device. |
||
|
|
|
||
|
“NO DEVICE” |
Connect a USB device, and change the source to USB again. |
||
|
|
|
||
|
“COPY PRO” |
A copy-protected file is played. |
||
|
|
|
||
|
“NA DEVICE” |
Connect a supported USB device, and check the connections. |
||
|
|
|
||
|
“NO MUSIC” |
Connect a USB device that contains playable audio files. |
||
|
|
|
|
|
|
“iPod ERROR” |
• |
Reconnect the iPod. |
|
•Reset the iPod.
•Sound cannot be heard • Reconnect the Android device.
during playback. • If in [HAND MODE], launch any media player
ANDROID |
• Sound output only |
• |
application on the Android device and start playback. |
from the Android |
Restart the Android device. |
||
|
• |
If in [HAND MODE], relaunch the current media player |
|
|
device. |
|
application or use another media player application. |
|
|
• If this does not solve the problem, the connected |
|
|
|
|
Android device is unable to route the audio signal to |
|
|
|
unit. ( 16) |
14
TROUBLESHOOTING
Symptom |
Remedy |
|
|
|
Cannot playback at |
• Make sure KENWOOD MUSIC PLAY APP is installed on the |
|
|
[BROWSE MODE]. |
Android device. ( 8) |
|
|
|
• Reconnect the Android device and select the appropriate |
|
|
|
control mode. |
|
|
|
• If this does not solve the problem, the connected Android |
|
|
|
device does not support [BROWSE MODE]. ( |
16) |
ANDROID |
|
|
|
“NO DEVICE” or |
• Switch off the developer options on the Android device. |
||
|
“READING” keeps |
• Reconnect the Android device. |
|
|
flashing. |
• If this does not solve the problem, the connected Android |
|
|
|
device does not support [BROWSE MODE]. ( |
16) |
|
Playback is intermittent |
Turn off the power saving mode on the Android device. |
|
|
or sound skips. |
|
|
|
“ANDROID ERROR” / |
• Reconnect the Android device. |
|
|
“NA DEVICE” |
• Restart the Android device. |
|
|
|
|
|
Muting upon the reception of a phone call
Connect the MUTE wire to your telephone using a commercial telephone accessory. ( 19)
19)
When a call comes in, “CALL” appears. (The audio system pauses.)
• To continue listening to the audio system during a call, press  . “CALL” disappears and the audio system resumes.
When the call ends, “CALL” disappears. (The audio system resumes.)
REFERENCES
 Maintenance
Cleaning the unit
Wipe off dirt on the faceplate with a dry silicone or soft cloth.
Cleaning the connector
Detach the faceplate and clean the connector gently with a cotton swab, being careful not to damage the connector.
Handling discs
•Do not touch the recording surface of the disc.
•Do not stick tape etc. on the disc, or use a disc with tape stuck on it.
•Do not use any accessories for the disc.
•Clean from the center of the disc and move outward.
•Clean the disc with a dry silicone or soft cloth. Do not use any solvents.
•When removing discs from this unit, pull them out horizontally.
•Remove burrs from the center hole and disc edge before inserting a disc.
 More information
Visit also the following website <www.kenwood.com/cs/ce/> for:
–Latest firmware updates and latest compatible item list
–Android™ application KENWOOD MUSIC PLAY
–Any other latest information
General
•This unit can only play the following CDs:
•Detailed information and notes about the playable audio files are stated in an online manual on the following website: www.kenwood.com/cs/ce/audiofile/
ENGLISH 15

REFERENCES
Playable files
•Playable audio file: MP3 (.mp3), WMA (.wma), AAC (.aac)
•Playable disc media: CD-R/CD-RW/CD-ROM
•Playable disc file format: ISO 9660 Level 1/2, Joliet, Long file name.
•Playable USB device file system: FAT12, FAT16, FAT32
Even when audio files comply with the standards listed above, playback may be impossible depending on the types or conditions of media or device.
The AAC (.m4a) file in a USB device or a CD encoded by iTunes cannot be played on this unit.
Unplayable discs
•Discs that are not round.
•Discs with coloring on the recording surface or discs that are dirty.
•Recordable/ReWritable discs that have not been finalized.
•8 cm CD. Attempting to insert using an adapter may cause malfunction.
About USB devices
•This unit can play MP3/WMA/AAC/WAV/FLAC files stored on a USB mass storage class device.
•You cannot connect a USB device via a USB hub.
•Connecting a cable whose total length is longer than 5 m may result in abnormal playback.
•This unit cannot recognize a USB device whose rating is other than 5 V and exceeds 1.5 A.
About iPod/iPhone
Made for
-iPod touch (2nd, 3rd, 4th, and 5th generation)
-iPod classic
-iPod nano (3rd, 4th, 5th, 6th, and 7th generation)
-iPhone 3G, 3GS, 4, 4S, 5, 5S, 5C, 6, 6 Plus
•You cannot operate iPod if “KENWOOD” or “ ” is displayed on iPod.
•Depending on the version of the operating system of the iPod/iPhone, some functions may not operate on this unit.
About Android device
•This unit supports Android OS 4.1 and above.
•Some Android devices (with OS 4.1 and above) may not fully support Android Open Accessory (AOA) 2.0.
•If the Android device supports both mass storage class device and AOA 2.0, this unit always playback via AOA 2.0 as priority.
Change the display information
Each time you press DISP, the display information changes.
•If the information is unavailable or not recorded, “NO TEXT”, “NO INFO”, or other information (eg. station name, playing time) appears.
Source name |
|
|
Display information |
|
|
|
|
|
|
|
|
STANDBY |
Source name (Date/Clock) |
|
|
|
|
TUNER |
Frequency (Date/Clock) |
|
|
|
|
|
(For FM Radio Data System stations only) |
|
|||
|
Station name (Date/Clock) |
Radio text (Date/Clock) |
Radio text+ (R.TEXT+) |
||
|
Title (Artist) |
Title (Date/Clock) Frequency (Date/Clock) |
|||
|
(back to the beginning) |
|
|
|
|
CD or |
(For CD-DA) |
|
|
|
|
USB FRONT/ USB REAR |
Track title (Artist) |
Track title (Disc name) |
Track title (Date/Clock) |
||
|
Playing time (Date/Clock) |
(back to the beginning) |
|
||
|
(For MP3/WMA/AAC/WAV/FLAC files) |
|
|
||
|
Track title (Artist) |
Track title (Album title) |
Track title (Date/Clock) |
||
|
File name (Folder name) |
File name (Date/Clock) |
Playing time |
||
|
(Date/Clock) (back to the beginning) |
|
|
||
iPod FRONT/ iPod REAR |
Track title (Artist) |
Track title (Album name) |
Track title (Date/Clock) |
||
or ANDROID FRONT/ |
Playing time (Date/Clock) |
(back to the beginning) |
|
||
ANDROID REAR |
|
|
|
|
|
AUX |
Source name (Date/Clock) |
|
|
|
|
16
INSTALLATION / CONNECTION
 Warning
•The unit can only be used with a 12 V DC power supply, negative ground.
•Disconnect the battery’s negative terminal before wiring and mounting.
•Do not connect Battery wire (yellow) and Ignition wire (red) to the car chassis or Ground wire (black) to prevent a short circuit.
•Insulate unconnected wires with vinyl tape to prevent a short circuit.
•Be sure to ground this unit to the car’s chassis again after installation.
 Caution
•For safety’s sake, leave wiring and mounting to professionals. Consult the car audio dealer.
•Install this unit in the console of your vehicle. Do not touch the metal parts of this unit during and shortly after use of the unit. Metal parts such as the heat sink and enclosure become hot.
•Do not connect the [wires of speakers to the car chassis or Ground wire (black), or connect them in parallel.
•Mount the unit at an angle of less than 30º.
•If your vehicle wiring harness does not have the ignition terminal, connect Ignition wire (red) to the terminal on the vehicle’s fuse box which provides 12 V DC power supply and is turned on and off by the ignition key.
•Keep all cables away from heat dissipate metal parts.
•After the unit is installed, check whether the brake lamps, blinkers, wipers, etc. on the car are working properly.
•If the fuse blows, first make sure the wires are not touching car’s chassis, then replace the old fuse with one that has the same rating.
Basic procedure
1Remove the key from the ignition switch, then disconnect the [ terminal of the car battery.
2Connect the wires properly.
See Wiring connection. ( 19)
19)
3Install the unit to your car.
See Installing the unit (in-dash mounting).
4 Connect the [terminal of the car battery.
5 Press  to turn on the power.
6 Detach the faceplate and reset the unit within 5 seconds. ( 3)
3)
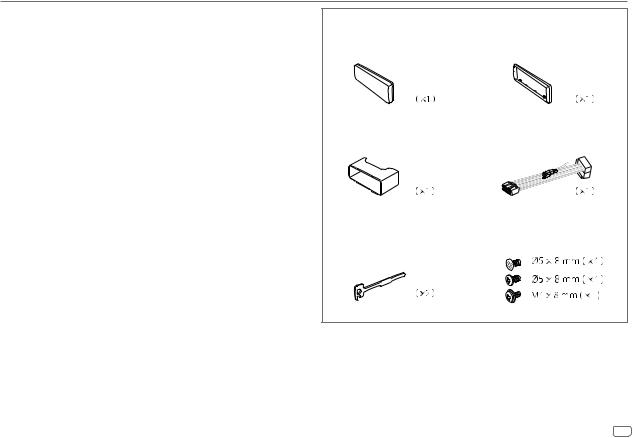
Part list for installation
(A) Faceplate
(B) Trim plate
(C) Mounting sleeve |
(D) Wiring harness |
(E) Extraction key |
(F) Screws |
ENGLISH 17

Installing the unit (in-dash mounting)
Hook on the top side
Orientate the trim plate as illustrated before fitting.
Do the required wiring. ( 19)
19)
Dashboard of your car
Bend the appropriate tabs to hold the mounting sleeve firmly in place.
When installing without the mounting sleeve |
How to remove the unit |
||||||||||
1 |
Remove the mounting sleeve and trim plate from the unit. |
1 |
Detach the faceplate. |
||||||||
2 |
Align the holes in the unit (on both sides) with the vehicle |
2 |
Fit the catch pin on the extraction keys into the holes on both |
||||||||
|
mounting bracket and secure the unit with screws (supplied). |
3 |
sides of the trim plate, then pull it out. |
||||||||
|
|
|
|
|
|
|
|
|
|
Insert the extraction keys deeply into the slots on each side, |
|
|
|
|
|
|
|
|
|
|
|
|
then follow the arrows as shown below. |
|
|
|
|
|
|
|
|
|
|
|
|
|
|
|
|
|
|
|
|
|
|
|
|
|
|
|
|
|
|
|
|
|
|
|
|
|
|
|
|
|
|
|
|
|
|
|
|
|
|
|
|
|
|
|
|
|
|
|
|
|
|
|
|
|
|
|
|
|
|
|
|
 Use only the specified screws. Using wrong screws might damage the unit.
18
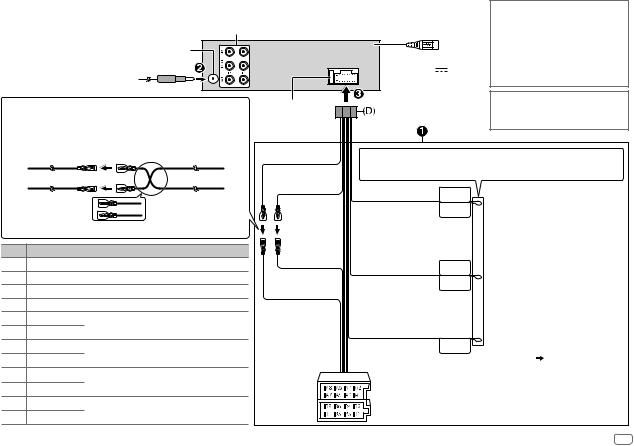
Wiring connection |
Rear/ Front/ Subwoofer output |
|
|
If your car does not have an ISO |
||||
|
|
|
|
|
||||
|
|
|
|
|
terminal : |
|||
|
|
|
For 3-way crossover: Tweeter/ Mid Range/ Woofer output |
|
||||
|
|
|
|
We recommend installing the unit with |
||||
|
|
|
|
|
|
|
||
|
|
|
Antenna terminal |
|
|
|
a commercially available custom wiring |
|
|
|
|
|
USB cable |
harness specific for your car and leave |
|||
|
|
|
|
|
||||
|
|
|
|
|
this job to professionals for your safety. |
|||
|
|
|
|
|
(DC 5 V |
1.5 A) |
||
|
|
|
|
|
Consult your car audio dealer. |
|||
|
|
|
|
|
|
|
||
Connecting the ISO connectors on some VW/Audi or Opel |
Fuse (10 A) |
|
|
When connecting to an external |
||||
|
|
amplifier, connect its ground wire to the |
||||||
(Vauxhall) automobiles |
|
|
|
|
||||
|
|
|
|
car’s chassis to avoid damaging the unit. |
||||
You may need to modify the wiring of the supplied wiring harness as |
|
|
|
|||||
|
|
|
|
|||||
illustrated below. |
|
|
|
|
|
|
||
|
A7 (Red) |
|
Ignition wire (Red) |
Yellow (Battery wire) |
If no connections are made, do not let the wire come out from the tab. |
|||
|
|
|
|
|
||||
Vehicle |
|
Unit |
Red (Ignition wire) |
|
|
|
||
|
A4 (Yellow) |
|
Battery wire (Yellow) |
Light blue/yellow |
STEERING WHEEL |
|
||
|
|
|
To the steering wheel remote control |
|||||
|
|
|
REMOTE INPUT |
|||||
|
|
|
|
|
|
|
||
|
|
|
|
|
(Steering remote control |
REMOTE CONT |
adapter |
|
|
|
|
Default wiring |
|
wire) |
|
|
|
|
|
|
|
|
|
|
||
Pin |
|
|
Color and function |
Red (A7) |
|
|
To the power control terminal when |
|
A4 |
Yellow |
: |
Battery |
Blue/White |
ANT CONT |
|||
A5 |
Blue/White |
: |
Power control |
|
(Power control wire/ |
|
using the optional power amplifier or |
|
|
P. CONT |
to the antenna control terminal in the |
||||||
A7 |
Red |
: |
Ignition (ACC) |
Yellow (A4) |
||||
Antenna control wire) |
|
vehicle |
||||||
A8 |
Black |
: |
Earth (ground) connection |
|
|
|
|
|
B1 |
Purple ] |
: |
Rear speaker (right) |
|
Brown |
|
|
|
B2 |
Purple/black [ |
: |
For 3-way crossover: Tweeter (right) |
|
|
To the terminal that is grounded |
||
B3 |
Gray ] |
Front speaker (right) |
|
(Mute control wire) |
MUTE |
when the telephone rings or during |
||
B4 |
Gray/black [ |
|
For 3-way crossover: Mid range speaker (right) |
|
|
|
conversation ( 15) |
|
B5 |
White ] |
: |
Front speaker (left) |
|
|
|
(To connect the Kenwood navigation |
|
|
|
|
system, refer your navigation manual.) |
|||||
B6 |
White/black [ |
|
For 3-way crossover: Mid range speaker (left) |
|
|
|
||
|
ISO connectors |
|
|
|
||||
B7 |
Green ] |
: |
Rear speaker (left) |
|
|
|
||
|
|
|
|
|||||
B8 |
Green/black [ |
|
For 3-way crossover: Tweeter (left) |
|
|
|
|
|
ENGLISH 19

SPECIFICATIONS
|
FM |
Frequency Range |
87.5 MHz — 108.0 MHz (50 kHz space) |
|
|
|
|
|
|
|
|
Usable Sensitivity (S/N = 26 dB) |
0.71 μV/75 Ω |
|
|
|
|
|
|
|
|
Quieting Sensitivity |
2.0 μV/75 Ω |
|
|
|
(DIN S/N = 46 dB) |
|
|
|
|
|
|
|
Tuner |
|
Frequency Response (±3 dB) |
30 Hz — 15 kHz |
|
|
|
|
||
|
Signal-to-Noise Ratio (MONO) |
64 dB |
||
|
|
|||
|
|
|
|
|
|
|
Stereo Separation (1 kHz) |
40 dB |
|
|
|
|
|
|
|
MW |
Frequency Range |
531 kHz — 1 611 kHz (9 kHz space) |
|
|
|
|
|
|
|
|
Usable Sensitivity (S/N = 20 dB) |
28.2 μV |
|
|
|
|
|
|
|
LW |
Frequency Range |
153 kHz — 279 kHz (9 kHz space) |
|
|
|
|
|
|
|
|
Usable Sensitivity (S/N = 20 dB) |
50.0 μV |
|
|
|
|
||
|
Laser Diode |
GaAIAs |
||
|
|
|
||
|
Digital Filter (D/A) |
8 times over sampling |
||
|
|
|
||
|
Spindle Speed |
500 rpm — 200 rpm (CLV) |
||
|
|
|
||
|
Wow & Flutter |
Below measurable limit |
||
|
|
|
||
player |
Frequency Response (±1 dB) |
20 Hz — 20 kHz |
||
|
|
|
||
Total Harmonic Distortion (1 kHz) |
0.01 % |
|||
|
||||
|
|
|
||
CD |
Signal-to-Noise Ratio (1 kHz) |
105 dB |
||
Dynamic Range |
90 dB |
|||
|
||||
|
|
|
||
|
Channel Separation |
85 dB |
||
|
|
|
||
|
MP3 Decode |
Compliant with MPEG-1/2 Audio Layer-3 |
||
|
|
|
||
|
WMA Decode |
Compliant with Windows Media Audio |
||
|
|
|
||
|
AAC Decode |
AAC-LC “.aac” files |
||
|
|
|
|
|
|
USB Standard |
USB 1.1, USB 2.0 Full Speed |
||||
|
|
|
|
|
||
|
File System |
FAT12/ 16/ 32 |
||||
|
|
|
|
|
|
|
|
Maximum Supply Current |
DC 5 V |
|
|
1.5 A |
|
|
|
|||||
USB |
MP3 Decode |
Compliant with MPEG-1/2 Audio Layer-3 |
||||
|
|
|
|
|
||
WMA Decode |
Compliant with Windows Media Audio |
|||||
|
||||||
|
|
|
|
|
||
|
AAC Decode |
AAC-LC “.aac” files |
||||
|
|
|
|
|
||
|
WAV Decode |
Linear-PCM |
||||
|
|
|
|
|
||
|
FLAC Decode |
FLAC file (Up to 48 kHz / 16 bit) |
||||
|
|
|
|
|||
|
Maximum Output Power |
50 W × 4 |
|
|||
|
|
|
||||
|
Full Bandwidth Power |
22 W × 4 (at less than 1 % THD) |
||||
|
|
|
|
|||
|
Speaker Impedance |
4 Ω — 8 Ω |
|
|||
|
|
|
|
|||
|
Tone Action |
Band 1: |
62.5 Hz ±9 dB |
|||
|
|
Band 2: |
100 Hz ±9 dB |
|||
|
|
Band 3: |
160 Hz ±9 dB |
|||
|
|
Band 4: |
250 Hz ±9 dB |
|||
Audio |
|
Band 5: |
400 Hz ±9 dB |
|||
|
Band 7: |
1 kHz ±9 dB |
||||
|
|
Band 6: |
630 Hz ±9 dB |
|||
|
|
Band 8: |
1.6 kHz ±9 dB |
|||
|
|
Band 9: |
2.5 kHz ±9 dB |
|||
|
|
Band 10: |
4 kHz ±9 dB |
|||
|
|
Band 11: |
6.3 kHz ±9 dB |
|||
|
|
Band 12: |
10 kHz ±9 dB |
|||
|
|
Band 13: |
16 kHz ±9 dB |
|||
|
Preout Level/Load (CD) |
4 000 mV/10 kΩ |
||||
|
|
|
|
|||
|
Preout Impedance |
≤ 600 Ω |
|
|||
|
|
|
|
|
|
|
20
SPECIFICATIONS
Auxiliary |
Frequency Response (±3 dB) |
20 Hz — 20 kHz |
|
|
|
||
Input Maximum Voltage |
1 000 mV |
||
|
|||
|
|
|
|
|
Input Impedance |
30 kΩ |
|
|
|
|
|
|
Operating Voltage |
14.4 V (10.5 V — 16 V allowable) |
|
|
|
|
|
General |
Maximum Current Consumption |
10 A |
|
|
|
||
Operational Temperature Range |
–10°C — +60°C |
||
|
|||
|
|
|
|
|
Installation Size (W × H × D) |
182 mm × 53 mm × 159 mm |
|
|
|
|
|
|
Weight |
1.3 kg |
|
|
|
|
Subject to change without notice.
libFLAC
Copyright (C) 2000,2001,2002,2003,2004,2005,2006,2007,2008,2009 Josh Coalson Redistribution and use in source and binary forms, with or without modification, are permitted provided that the following conditions are met:
-Redistributions of source code must retain the above copyright notice, this list of conditions and the following disclaimer.
-Redistributions in binary form must reproduce the above copyright notice, this list of conditions and the following disclaimer in the documentation and/or other materials provided with the distribution.
-Neither the name of the Xiph.org Foundation nor the names of its contributors may be used to endorse or promote products derived from this software without specific prior written
permission.
THIS SOFTWARE IS PROVIDED BY THE COPYRIGHT HOLDERS AND ONTRIBUTORS “AS IS” AND ANY EXPRESS OR IMPLIED WARRANTIES, INCLUDING, BUT NOT LIMITED TO, THE IMPLIED WARRANTIES OF MERCHANTABILITY AND FITNESS FOR A PARTICULAR PURPOSE ARE DISCLAIMED. IN NO EVENT SHALL THE FOUNDATION OR CONTRIBUTORS BE LIABLE FOR ANY DIRECT, INDIRECT, INCIDENTAL, SPECIAL, EXEMPLARY, OR CONSEQUENTIAL DAMAGES (INCLUDING, BUT NOT LIMITED TO, PROCUREMENT OF SUBSTITUTE GOODS OR SERVICES; LOSS OF USE, DATA, OR PROFITS; OR BUSINESS INTERRUPTION) HOWEVER CAUSED AND ON ANY THEORY OF LIABILITY, WHETHER IN CONTRACT, STRICT LIABILITY, OR TORT (INCLUDING NEGLIGENCE OR OTHERWISE) ARISING IN ANY WAY OUT OF THE USE OF THIS SOFTWARE, EVEN IF ADVISED OF THE POSSIBILITY OF SUCH DAMAGE.
For Kazakhstan
Дата изготовления (месяц/год) находится на этикетке устройства.
Declaration of Conformity with regard to the EMC Directive Declaration of Conformity with regard to the RoHS Directive 2011/65/EU
Manufacturer:
JVC KENWOOD Corporation
3-12, Moriya-cho, Kanagawa-ku, Yokohama-shi, Kanagawa, 221-0022, Japan
EU Representative:
JVCKENWOOD NEDERLAND B.V.
Amsterdamseweg 37, 1422 AC UITHOORN, The Netherlands
The marking of products using lasers
The label is attached to the chassis/case and says that the component uses laser beams that have been classified as Class 1. It means that the unit is utilizing laser beams
that are of a weaker class. There is no danger of hazardous radiation outside the unit.
For Turkey
Bu ürün 28300 sayılı Resmi Gazete’de yayımlanan Atik Elektrikli ve Elektronik Eşyalarin Kontrolü Yönetmeliğe uygun olarak üretilmiştir.
Eski Elektrik ve Elektronik Ekipmanların İmha Edilmesi Hakkında Bilgi (atık yan ürün toplama sistemlerini kullanan ülkeleri için uygulanabilir)
Sembollü (üzerinde çarpı işareti olan çöp kutusu) ürünler ev atıkları olarak
atılamaz.
Eski elektrik ve elektronik ekipmanlar, bu ürünleri ve ürün atıklarını geri dönüştürebilecek bir tesiste değerlendirilmelidir. Yaşadığınız bölgeye en yakın geri dönüşüm tesisinin yerini öğrenmek için yerel makamlara müracaat edin. Uygun geri dönüşüm ve atık imha yöntemi sağlığımız ve çevremiz üzerindeki zararlı etkileri önlerken kaynakların korunmasına da yardımcı olacaktır.
ENGLISH 21

CОДЕРЖАНИЕ
ПОДГОТОВКА К |
|
ЭКСПЛУАТАЦИИ |
2 |
ОСНОВНЫЕ СВЕДЕНИЯ |
3 |
НАЧАЛО ЭКСПЛУАТАЦИИ |
4 |
1Выбор языка отображения и отмена демонстрации
2 Установка часов и даты
3 Установка начальных настроек
РАДИОПРИЕМНИК |
6 |
AUX |
7 |
CD / USB / iPod / ANDROID |
8 |
ЗВУКОВЫЕ НАСТРОЙКИ |
10 |
НАСТРОЙКИ ДИСПЛЕЯ |
13 |
УСТРАНЕНИЕ ПРОБЛЕМ |
14 |
СПРАВОЧНЫЕ |
|
МАТЕРИАЛЫ |
15 |
Обслуживание Дополнительная информация
УСТАНОВКА И ПОДКЛЮЧЕНИЕ 17
ТЕХНИЧЕСКИЕ ХАРАКТЕРИСТИКИ 20
ПОДГОТОВКА К ЭКСПЛУАТАЦИИ
ВАЖНО
•В целях обеспечения надлежащей эксплуатации, пожалуйста, перед тем как приступить к эксплуатации данного изделия, внимательно прочтите настоящее руководство. Особенно важно, чтобы вы прочли и соблюдали все указания в данном руководстве, отмеченные словами Предупреждение и Внимание.
•Пожалуйста, держите данное руководство в надежном и доступном месте для обращения к нему за справками в будущем.
 Предупреждение
Не используйте функции, которые отвлекают внимание и мешают безопасному вождению.
 Внимание
Настройка громкости:
•Отрегулируйте громкость таким образом, чтобы слышать звуки за пределами автомобиля для предотвращения аварий.
•Уменьшите громкость перед воспроизведением, чтобы предотвратить повреждение динамиков из-за внезапного повышения уровня громкости на выходе.
Общие характеристики:
•Не используйте внешние устройства, если это может отрицательно повлиять на безопасность движения.
•Убедитесь в том, что созданы резервные копии всех важных данных. Мы не несем ответственность за потерю записанных данных.
•Никогда не оставляйте металлические предметы (например, монеты или металлические инструменты) внутри устройства во избежание коротких замыканий.
•Если ошибка чтения диска возникла из-за образования конденсата на лазерных линзах, извлеките диск и дождитесь, пока влага испарится.
•Напряжение USB указано на главном устройстве. Для просмотра снимите переднюю панель. ( 3) Характеристики USB для кабеля USB, идущего от задней части устройства, указаны на этикетке. (
 19)
19)
•В зависимости от типа автомобиля антенна может автоматически выдвигаться при включении устройства, если
подключен провод управления антенной ( 19). При парковке в месте с низким потолком выключайте устройство или переключайте источник в режим STANDBY.
Пульт дистанционного управления (RC-406):
•Не оставляйте пульт дистанционного управления в нагреваемых местах, таких как приборная панель.
•Литиевый аккумулятор может быть взрывоопасным при неправильной замене. Заменяйте только аккумулятором такого же или эквивалентного типа.
•Блок аккумуляторов или аккумуляторы нельзя подвергать избыточному нагреванию в солнечных лучах, огне и т.п.
•Храните батареи в местах, недоступных для детей, и в оригинальной упаковке, если они не используются. Немедленно утилизировать использованные батареи. В случае проглатывания немедленно обратиться к врачу.
Как пользоваться данным руководством
•Операции объясняются в основном с использованием кнопок на передней панели.
•В объяснительных целях используются индикации на английском языке. Вы можете выбрать язык отображения из меню [FUNCTION]. ( 5)
5)
•[XX] обозначает выбранные элементы.
•( XX) означает, что материалы доступны на указанной странице.
2

ОСНОВНЫЕ СВЕДЕНИЯ
Передняя панель
Ручка регулировки |
Загрузочный отсек |
|
громкости |
Дисплей |
Кнопка |
|
Мигает, когда устройство |
отсоединения |
Кабель USB, идущий от |
переходит в состояние поиска. |
|
|
|
|
задней панели устройства |
|
Прикрепление |
Отсоединение |
Порядок сброса |
|
|
Дважды нажмите |
|
|
переключатель в течение 5 |
|
|
секунд после отсоединения |
|
|
передней панели. |
Пульт дистанционного управления (RC-406)
Телеметрический датчик (Не подвергайте воздействию прямых солнечных лучей.)
Перед первым использованием снимите защитную пленку.
* Не используется
Замена аккумулятора
Задача |
На передней панели |
|
На пульте дистанционного управления |
||
Включение питания |
Нажмите кнопку |
. |
Нажмите и удерживайте нажатой кнопку SRC, чтобы отключить |
||
|
• Нажмите и удерживайте нажатой, чтобы отключить |
питание. |
|
|
|
|
питание. |
|
( Нажатие кнопки SRC не включает питание. ) |
||
|
|
|
|
|
|
Настройка громкости |
Поверните ручку регулировки громкости. |
Нажмите кнопку |
или |
. |
|
|
|
|
Нажмите кнопку ATT во время проигрывания для уменьшения |
||
|
|
|
звука. |
|
|
|
|
|
• Нажмите кнопку еще раз, чтобы отменить действие. |
||
|
|
|
|
|
|
Выберите источник |
Нажмите кнопку |
несколько раз. |
Нажмите кнопку SRC несколько раз. |
|
|
|
|
|
|
|
|
Изменение отображаемой информации |
Нажмите кнопку DISP несколько раз. ( 16) |
( Недоступно ) |
|
|
|
РУССКИЙ 3
НАЧАЛО ЭКСПЛУАТАЦИИ
1Выбор языка отображения и отмена демонстрации
При первом включении питания (или если для параметра [FACTORY RESET] установлено значение [YES],  5) на дисплее отображается следующая информация: “SEL LANGUAGE”
 “PRESS”
 “VOLUME KNOB”
1Поверните ручку регулировки громкости для выбора [EN] (Aнглийский), [RU] (Pусский), [TU] (Турецкий) или [SP] (Испанский), а затем нажмите ее.
В качестве начальной настройки выбрано значение [EN]. Затем на дисплее отображается: “CANCEL DEMO” “PRESS”
 “VOLUME KNOB”.
2Нажмите ручку регулировки громкости.
Вкачестве начальной настройки выбрано значение [YES].
3 Нажмите ручку регулировки громкости еще раз.
Отображается надпись “DEMO OFF”.
Затем дисплей отображает тип выбранного кроссовера: “2-WAY X’OVER” или “3-WAY X’OVER”
•Чтобы изменить тип кроссовера, см. “Изменение типа кроссовера” ( 5).
5).
2Установка часов и даты
1 Нажмите ручку регулировки громкости для перехода в режим [FUNCTION].
2Поверните ручку регулировки громкости для выбора элемента [CLOCK], а затем нажмите ее.
Чтобы настроить часы
3Поверните ручку регулировки громкости для выбора элемента [CLOCK ADJUST], а затем нажмите ее.
4Поворачивайте ручку регулировки громкости, чтобы выбрать значения параметров, а затем нажмите ее.
Час  Минута
5Поверните ручку регулировки громкости для выбора элемента [CLOCK FORMAT], а затем нажмите ее.
6Поверните ручку регулировки громкости для выбора [12H] или [24H], а затем нажмите ее.
Чтобы установить дату
7Поверните ручку регулировки громкости для выбора элемента [DATE FORMAT], а затем нажмите ее.
8Поверните ручку регулировки громкости для выбора [DD/MM/YY] или [MM/DD/YY], а затем нажмите ее.
9Поверните ручку регулировки громкости для выбора элемента [DATE SET], а затем нажмите ее.
10Поворачивайте ручку регулировки громкости, чтобы выбрать значения параметров, а затем нажмите ее.
День  Месяц
Месяц  Год или Месяц
  День
День  Год
Год
11Нажмите кнопку 
 и удерживайте ее нажатой для выхода.
Для возврата к предыдущему элементу настройки нажмите кнопку
 .
.
3Установка начальных настроек
1 Нажмите  несколько раз для перехода в режим STANDBY.
2 Нажмите ручку регулировки громкости для перехода в режим [FUNCTION].
3Поверните ручку регулировки громкости для выбора элемента ( 5), а затем
нажмите ручку.
4Повторяйте действие 3 до тех пор, пока не будет выбран или активирован необходимый элемент.
5 Нажмите кнопку 
 и удерживайте ее нажатой для выхода.
Для возврата к предыдущему элементу настройки нажмите кнопку
 .
.
4
НАЧАЛО ЭКСПЛУАТАЦИИ
|
|
|
|
По умолчанию: XX |
DISPLAY |
|
|||
|
|
|
|
|
|
EASY MENU |
ON: При переходе в режим [FUNCTION] цвет подсветки дисплея и кнопки становится |
||
|
|
|
|
белым. ; OFF: Цвет подсветки дисплея и кнопки остается таким, как выбран в меню |
|
|
|
|
[COLOR SELECT]. ( 13) |
|
|
|
|
|
TUNER SETTING |
|
|||
|
|
|
|
|
|
PRESET TYPE |
NORMAL: Запоминание одной радиостанции для каждой запрограммированной |
||
|
|
|
|
кнопки в каждом диапазоне частот (FM1/ FM2/ FM3/ MW/ LW). ; MIX: Запоминание одной |
|
|
|
|
радиостанции для каждой запрограммированной кнопки вне зависимости от выбранного |
|
|
|
|
диапазона частот. |
|
|
|
|
|
SYSTEM |
|
|||
|
KEY BEEP* |
ON: Включение звука нажатия кнопки. ; OFF: Выключение. |
||
|
|
|
|
|
|
SOURCE SELECT |
|
||
|
|
BUILT-IN AUX |
ON: Включение варианта AUX при выборе источника. ; OFF: Отключение. ( 7) |
|
|
|
|
|
|
|
P-OFF WAIT |
Применимо, только если выключен демонстрационный режим. |
||
|
|
|
|
Выбор времени автоматического выключения устройства (в режиме ожидания) в целях |
|
|
|
|
экономии аккумулятора. |
|
|
|
|
20M: 20 минут ; 40M: 40 минут ; 60M: 60 минут ; – – –: Отмена |
|
CD READ |
1: Автоматическое распознавание диска с аудиофайлами и музыкального компакт-диска. ; |
||
|
|
|
|
2: Принудительное воспроизведение в качестве музыкального компакт-диска. Во время |
|
|
|
|
воспроизведения диска с аудиофайлами звук не слышен. |
|
F/W UPDATE |
|
||
|
|
|
|
|
|
|
UPDATE SYSTEM |
|
|
|
|
|
|
|
|
|
|
F/W UP xx.xx |
YES: Запуск обновления встроенного программного обеспечения. ; NO: Отмена |
|
|
|
|
(обновление не запущено). |
|
|
|
|
Подробнее об обновлении встроенного программного обеспечения см.: |
|
|
|
|
www.kenwood.com/cs/ce/ |
|
|
|
|
|
|
FACTORY RESET |
YES: Сброс всех настроек на значения по умолчанию (кроме сохраненных радиостанций). ; |
||
|
|
|
|
NO: Отмена. |
* Не применимо, если выбран 3-полосный кроссовер.
CLOCK
|
CLOCK DISPLAY |
ON: Даже в выключенном состоянии на дисплее отображается текущее |
|
|
|
время. ; OFF: Отмена. |
|
|
|
|
|
ENGLISH |
|
||
РУССКИЙ |
Выберите язык отображения для меню [FUNCTION] и в применимы |
||
|
|
случая информации о музыке. |
|
TURKCE |
|||
По умолчанию выбрано значение [ENGLISH]. |
|||
ESPANOL |
|
||
Изменение типа кроссовера
1Нажмите  несколько раз для перехода в режим STANDBY.
2Нажмите и удерживайте нажатыми нумерованные кнопки 4 и 5, чтобы перейти в режим выбора кроссовера.
Отобразится текущий тип кроссовера.
3Поверните ручку регулировки громкости для выбора “2WAY” или “3WAY”, а затем нажмите ее.
4Поверните ручку регулировки громкости для выбора “YES” или “NO”, а затем нажмите ручку.
Отобразится выбранный тип кроссовера.
•Для отмены нажмите и удерживайте нажатой кнопку
 .
.
•Чтобы отрегулировать настройки выбранного кроссовера, см. ( 11).
11).
 Внимание
Выбирайте тип кроссовера в соответствии с конфигурацией подключения динамиков. ( 19)
19)
Если вы выберите неправильный тип:
•Динамики могут повредиться.
•Уровень выходного звука может быть чрезмерно высоким или низким.
РУССКИЙ 5
РАДИОПРИЕМНИК
Поиск радиостанции
1 Нажмите кнопку |
несколько раз для выбора TUNER. |
2Нажмите кнопку  несколько раз (или
 на RC-406) для выбора FM1/ FM2/ FM3/ MW/ LW.
3Для поиска станции нажмите кнопку 
 (или
(или 


 на RC-406).
•Порядок изменения метода поиска для 
 : Нажмите кнопку
  несколько раз.
AUTO1 : Автоматический поиск станции.
AUTO2 : Поиск запрограммированной радиостанции. MANUAL : Поиск станции вручную.
•Порядок сохранения радиостанции: Нажмите и удерживайте нажатыми нумерованные кнопки (1 – 6).
•Порядок выбора сохраненной радиостанции: Нажмите одну их нумерованных кнопок (1 – 6) (или нажмите одну из нумерованных кнопок (1 – 6) на RC-406).
Режим настройки посредством прямого доступа (с помощью RC-406)
1Нажмите кнопку DIRECT для перехода в режим настройки посредством прямого доступа.
2 Нажимайте нумерованные кнопки для ввода частоты.
3 Нажмите  , чтобы выполнить поиск радиостанции.
•Для отмены нажмите кнопку  или DIRECT.
•Режим настройки посредством прямого доступа автоматически выключается, если в течение 10 секунд после действия 2 не выполнено ни одной операции.
Другие настройки
1Нажмите ручку регулировки громкости для перехода в режим [FUNCTION].
2Чтобы выбрать элемент, поверните ручку регулировки громкости (см. следующую таблицу), затем нажмите ее.
3Повторяйте действие 2 до тех пор, пока не будет выбран или активирован необходимый элемент.
4 Нажмите кнопку 
 и удерживайте ее нажатой для выхода.
Для возврата к предыдущему элементу настройки нажмите кнопку
 .
.
По умолчанию: XX
TUNER SETTING
LOCAL SEEK ON: Поиск только станций с хорошим качеством приема. ; OFF: Отмена.
•Выполняемые настройки применяются только к выбранному источнику/ радиостанции. После переключения источника/радиостанции, настройки требуется выполнить еще раз.
AUTO |
YES: Aвтоматический запуск запоминания 6 станций с хорошим качеством приема. ; |
MEMORY |
NO: Отмена. |
|
• Доступно только в том случае, если для параметра [PRESET TYPE] выбрано |
|
значение [NORMAL]. ( 5) |
MONO SET |
ON: Улучшение качества приема в FM-диапазоне (при этом стереоэффект может быть |
|
утрачен). ; OFF: Отмена. |
NEWS SET |
ON: Устройство временно переключается на программу новостей, если она доступна. ; |
|
OFF: Отмена. |
REGIONAL |
ON: Переключение на другую станцию только в определенном регионе с помощью |
|
элемента управления“AF”. ; OFF: Отмена. |
|
|
AF SET |
ON: Автоматический поиск другой станции, транслирующей эту же программу в данной |
|
сети Radio Data System с более высоким качеством приема, если текущее качество |
|
приема является неудовлетворительным. ; OFF: Отмена. |
TI |
ON: Позволяет устройству временно переключаться в режим приема сообщений о |
|
движении на дорогах, когда эти сообщения доступны (загорается индикатор“TI”). ; |
|
OFF: Отмена. |
6
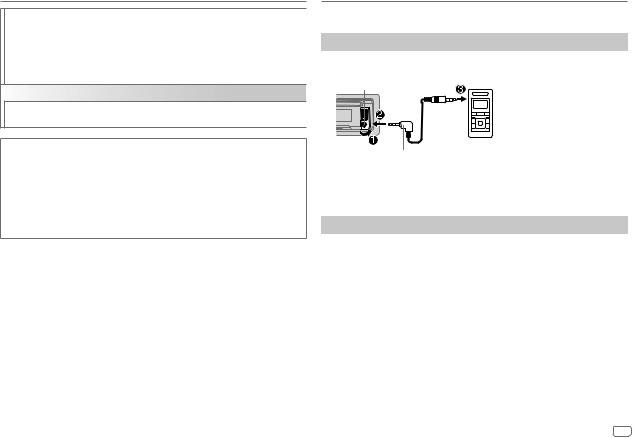
РАДИОПРИЕМНИК
PTY SEARCH 1 Нажмите ручку регулировки громкости для входа в меню выбора языка функции PTY.
2Поверните ручку регулировки громкости для выбора языка функции PTY (ENGLISH/ FRENCH/ GERMAN), а затем нажмите ее.
3Поверните ручку регулировки громкости для выбора доступного типа программы (смотрите ниже).
4 Нажмите 
 , чтобы начать поиск.
CLOCK
TIME SYNC |
ON: Синхронизация времени устройства со временем станции Radio Data System. ; |
|
OFF: Отмена. |
Доступные типы программ для PTY SEARCH
SPEECH : NEWS, AFFAIRS, INFO (информация), SPORT, EDUCATE, DRAMA, CULTURE, SCIENCE, VARIED, WEATHER, FINANCE, CHILDREN, SOCIAL, RELIGION, PHONE IN, TRAVEL, LEISURE, DOCUMENT
MUSIC : POP M (музыка), ROCK M (музыка), EASY M (музыка), LIGHT M (музыка),
CLASSICS, OTHER M (музыка), JAZZ, COUNTRY, NATION M (музыка), OLDIES, FOLK M (музыка)
Устройство выполняет поиск типа программы, выбранного в функциях [SPEECH] или [MUSIC] (если тип выбран).
•Параметр [LOCAL SEEK]/ [MONO SET]/ [NEWS SET]/ [REGIONAL]/ [AF SET]/ [TI]/ [PTY SEARCH] доступен для выбора, только когда используется диапазон частот FM1/ FM2/ FM3.
•В случае регулировки громкости в процессе приема информации о дорожной ситуации или новостей настроенная громкость фиксируется в памяти автоматически. Настройка будет применена при следующем включении информирования о дорожной ситуации или новостях.
AUX
Подготовка:
Выберите [ON] для [BUILT-IN AUX]. ( 5)
5)
Начало прослушивания
1Подключите портативный аудиопроигрыватель (имеется в продаже).
Дополнительный входной разъем
Портативный аудиопроигрыватель
Мини-стереоразъем 3,5 мм с разъемом в форме буквы“L”(имеется в продаже)
2 Нажмите кнопку  несколько раз для выбора AUX.
3Включите портативный аудиопроигрыватель и начните воспроизведение.
Настройка имени AUX
Во время прослушивания портативного аудиопроигрывателя, подключенного к
устройству...
1Нажмите ручку регулировки громкости для перехода в режим [FUNCTION].
2Поверните ручку регулировки громкости для выбора элемента [SYSTEM], а затем нажмите ее.
3Поверните ручку регулировки громкости для выбора элемента [AUX NAME SET], a затем нажмите ее.
4Поверните ручку регулировки громкости для выбора элемента, а затем нажмите ручку.
AUX (по умолчанию)/ DVD/ PORTABLE/ GAME/ VIDEO/ TV
5 Нажмите кнопку 
 и удерживайте ее нажатой для выхода.
Для возврата к предыдущему элементу настройки нажмите кнопку
 .
.
РУССКИЙ 7
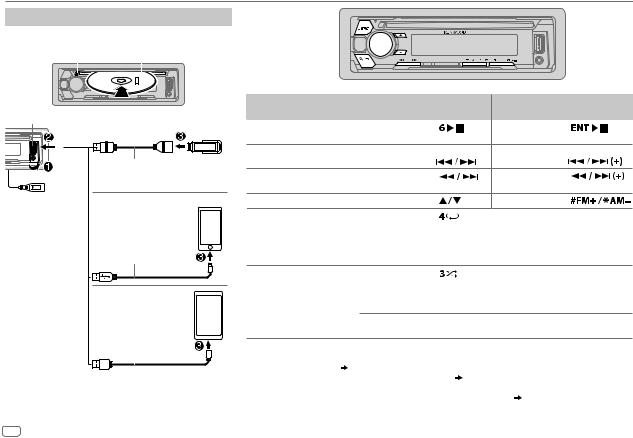
CD / USB / iPod / ANDROID
Начало воспроизведения
Происходит автоматическая смена источника, и начинается воспроизведение.
MИзвлечение диска |
|
Верхняя сторона |
||||||||||
|
|
|
|
|
|
|
|
|
|
|
|
|
|
|
|
|
|
|
|
|
|
|
|
|
|
|
|
|
|
|
|
|
|
|
|
|
|
|
|
|
|
|
|
|
|
|
|
|
|
|
|
Входной USB-разъем
Вы также можете выполнить подключение к кабелю USB, идущему от задней части устройства.
USB
CA-U1EX (макс.: 500 мА) (дополнительный аксессуар)
iPod/iPhone
KCA-iP102 / KCA-iP103 (дополнительный аксессуар)*1 или кабель, прилагаемый к iPod/iPhone*2
ANDROID*3
Кабель Micro USB 2.0*2 (имеется в продаже)
*1 |
|
|
|
|
|
|
|
|
|
KCA-iP102 : 30-контактного типа, KCA-iP103 : типа Lightning |
||||
*2 |
Не оставляйте кабель в автомобиле, когда он не используется. |
|||
Задача |
На передней панели |
|
|
На пульте дистанционного |
|
|
|
|
управления |
|
|||
|
|
|
|
|
||
Воспроизведение / |
Нажмите кнопку |
. |
|
Нажмите кнопку |
. |
|
пауза |
|
|
|
|
|
|
Перемотка назад или |
Нажмите и удерживайте |
|
Нажмите и удерживайте |
|
||
вперед*4 |
нажатой кнопку |
|
. |
нажатой кнопку |
. |
|
Выбор дорожки или |
Нажмите кнопку |
|
. |
Нажмите кнопку |
. |
|
файла |
|
|
|
|
|
|
Выбор папки*5 |
Нажмите кнопку |
. |
|
Нажмите кнопку |
. |
|
Воспроизведение в |
Нажмите кнопку |
несколько раз. |
|
|||
режиме повтора*6 |
TRACK REPEAT/ ALL REPEAT |
|
|
: Звуковой компакт-диск |
||
|
FILE REPEAT/ FOLDER REPEAT/ ALL REPEAT |
: Файл MP3/WMA/AAC/WAV/ |
||||
|
|
|
|
|
FLAC |
|
|
FILE REPEAT/ FOLDER REPEAT/ REPEAT OFF |
: iPod или ANDROID |
|
|||
Воспроизведение в |
Нажмите кнопку |
несколько раз. |
|
|||
случайном порядке*6 |
DISC RANDOM/ RANDOM OFF |
|
: Звуковой компакт-диск |
|
||
|
FOLDER RANDOM/ RANDOM OFF : Файл MP3/WMA/AAC/WAV/FLAC, iPod |
|||||
|
|
|
|
или ANDROID |
|
|
Нажмите и удерживайте нажатой кнопку 
 для выбора элемента ALL RANDOM.*7
*3 |
При подключении устройства Android отобразится“Press [VIEW] to install KENWOOD MUSIC PLAY APP”. Следуйте инструкциям на экране, |
|
чтобы установить приложение. Вы также можете установить последнюю версию приложения KENWOOD MUSIC PLAY на ваше устройство |
*4 |
Android до его подключения. ( 15) |
Для ANDROID: Применимо, только если выбрано [BROWSE MODE]. ( 9) |
|
*5 |
Для CD: Только для файлов MP3/WMA/AAC. Эта функция не работают для устройства iPod/ ANDROID. |
*6 |
Для iPod/ ANDROID: Применимо, только если выбрано [MODE OFF]/ [BROWSE MODE]. ( 9) |
*7 |
Для CD: Только для файлов MP3/WMA/AAC. |
8
CD / USB / iPod / ANDROID
Выбор режима управления
Когда источником является iPod FRONT/ iPod REAR, последовательно нажимайте 5.
MODE ON : Управление устройством iPod с самого iPod. Однако с помощью устройства по-прежнему можно управлять паузой/воспроизведением, пропуском файлов, быстрой перемоткой вперед или назад.
MODE OFF : Управление устройством iPod с данного устройства.
Когда источником является ANDROID FRONT/ ANDROID REAR, последовательно нажимайте 5.
BROWSE MODE : Управление устройством Android с данного устройства через приложение KENWOOD MUSIC PLAY, установленное на устройстве Android.
HAND MODE : Управление устройством Android с помощью самого устройства Android через другие программные медиаплееры, установленные на устройстве Android. Однако вы по-прежнему можете запускать
воспроизведение/ставить на паузу и пропускать файл с данного устройства.
Выбор музыкального диска
Нажмите кнопку 5 несколько раз.
Будут воспроизводиться песни, сохраненные на следующем диске.
•Выбранная внутренняя или внешняя память смартфона (запоминающее устройство большой емкости).
•Выбранный привод устройства с несколькими дисками.
Прослушивание TuneIn Radio/ TuneIn Radio Pro/ Aupeo
При прослушивании TuneIn Radio, TuneIn Radio Pro или Aupeo подсоедините iPod/iPhone к входному USB-разъему устройства.
• Устройство будет выводить звук из этих приложений.
Выбор файла из папки/списка
1 Нажмите кнопку 
 .
.
2Поверните ручку регулировки громкости для выбора папки/списка, а затем нажмите ручку.
3Поверните ручку регулировки громкости для выбора файла, а затем нажмите ручку.
Быстрый поиск
Если у вас имеется большое количество файлов, вы можете выполнить быстрый поиск по ним.
Для быстрого просмотра списка быстро поворачивайте ручку регулировки громкости.
–Неприменимо для iPod.
(или)
Нажмите 
 для поиска с предварительно заданным коэффициентом пропуска при поиске. (
 10, [SKIP SEARCH])
•При нажатии и удержании нажатой кнопки 
 поиск выполняется с коэффициентом 10%.
–Не применимо для звуковых компакт-дисков и файлов MP3/ WMA/ AAC/ WAV/ FLAC.
(или)
Поиск по алфавиту (применимо только для iPod)
Если на устройстве iPod имеется много файлов, вы можете выполнить по ним быстрый поиск по первому знаку в имени файла.
Быстро поверните ручку регулировки громкости для перехода к поиску по символу.
Поверните ручку регулировки громкости для выбора символа.
Для поиска по символам, отличным от A–Z и 0–9, введите только “*”. Нажмите S / T для перемещения положения записи.
• Предусмотрен ввод не более трех символов.
Нажмите ручку регулировки громкости, чтобы запустить поиск.
•Для возврата к корневой папке/ первому файлу/ верхнему меню нажмите кнопку 5.
•Для возврата к предыдущему элементу настройки нажмите кнопку 
 .
.
•Для отмены нажмите и удерживайте нажатой кнопку 
 .
.
•Для iPod применимо, только когда выбрано [MODE OFF].
•Для ANDROID применимо, только когда выбрано [BROWSE MODE].
РУССКИЙ 9

CD / USB / iPod / ANDROID
Режим непосредственного поиска музыки (с помощью RC-406)
1 Нажмите кнопку DIRECT.
2Чтобы ввести номер дорожки или файла, используйте нумерованные кнопки.
3 Нажмите кнопку  для поиска музыки.
•Для отмены нажмите кнопку  или DIRECT.
•Недоступно, если выбрано воспроизведение в произвольном порядке.
•Неприменимо для iPod и ANDROID.
Другие настройки
1Нажмите ручку регулировки громкости для перехода в режим [FUNCTION].
2Чтобы выбрать элемент, поверните ручку регулировки громкости (см. следующую таблицу), затем нажмите ее.
3Повторяйте действие 2 до тех пор, пока не будет выбран или активирован необходимый элемент.
4Нажмите кнопку 
 и удерживайте ее нажатой для выхода.
Для возврата к предыдущему элементу настройки нажмите кнопку 
 .
.
|
|
По умолчанию: XX |
USB |
|
|
|
MUSIC DRIVE |
DRIVE CHANGE: Следующий диск (с [DRIVE 1] по [DRIVE 4]) |
|
|
выбирается автоматически, и начинается воспроизведение. |
|
|
Для выбора следующих дисков повторите действия 1– 3. |
|
SKIP SEARCH |
0.5%/ 1%/ 5%/ 10%: При прослушивании с iPod или ANDROID, |
|
|
выбор коэффициента пропуска при поиске по всем файлам. |
|
|
|
ЗВУКОВЫЕ НАСТРОЙКИ
При прослушивании любого источника звука...
1 Нажмите кнопку AUD для прямого перехода в режим [AUDIO CONTROL].
2Чтобы выбрать элемент, поверните ручку регулировки громкости (см. следующую таблицу), затем нажмите ее.
3Повторяйте действие 2 до тех пор, пока не будет выбран или активирован необходимый элемент.
4Нажмите кнопку 
 и удерживайте ее нажатой для выхода.
(или с помощью RC-406)
1 Нажмите кнопку AUD для перехода в режим [AUDIO CONTROL].
2Нажмите 
 , чтобы выбрать элемент, затем нажмите
  .
.
Для возврата к предыдущему элементу настройки нажмите кнопку
 .
.
|
|
|
По умолчанию: XX |
SUB-W LEVEL |
От –50 до +10 (0): Настройте уровень выходного сигнала низкочастотного динамика. |
||
|
|
|
|
MANUAL EQ |
|
|
|
|
BAND1 LEVEL |
LEVEL |
От –9 до +9 (0): (См. BAND2 LEVEL ниже.) |
|
|
|
|
|
|
BASS EXTEND |
ON: Включение усиленных нижних частот. ; OFF: Отмена. |
|
|
|
|
|
От BAND2 LEVEL до |
От –9 до +9 (0): Элементы звучания (уровень частоты, уровень тона, добротность) |
|
|
BAND13 LEVEL |
предустановлены для каждого выбора (с BAND1 LEVEL по BAND13 LEVEL). |
|
|
|
Настройте уровень для сохранения в каждом источнике. (Перед выполнением настройки |
|
|
|
выберите источник, который необходимо настроить.) |
|
|
|
|
|
|
Q FACTOR |
1.35/ 1.50/ 2.00: Настройка коэффициента качества. |
|
|
|
|
|
PRESET EQ |
NATURAL/ ROCK/ POPS/ EASY/ TOP40/ JAZZ/ POWERFUL/ USER: Выберите |
||
|
|
предварительно установленный режим эквалайзера, соответствующего музыкальному жанру. |
|
|
|
(Чтобы использовать настройки, заданные в [MANUAL EQ], выберите [USER].) |
|
|
|
||
BASS BOOST |
LEVEL1/ LEVEL2/ LEVEL3/ LEVEL4/ LEVEL5: Выбор предпочитаемого уровня подъема |
||
|
|
нижних частот. ; OFF: Отмена. |
|
10
 Loading...