


F616
USER GUIDE

Copyright © Huawei Technologies Co., Ltd. 2013. All rights reserved.
No part of this manual may be reproduced or transmitted in any form or by any means without prior written consent of Huawei Technologies Co., Ltd. and its affiliates ("Huawei").
The product described in this manual may include copyrighted software of Huawei and possible licensors. Customers shall not in any manner reproduce, distribute, modify, decompile, disassemble, decrypt, extract, reverse engineer, lease, assign, or sublicense the said software, unless such restrictions are prohibited by applicable laws or such actions are approved by respective copyright holders.
Trademarks and Permissions


 ,
, 


 , and
, and 
 are trademarks or registered trademarks of Huawei Technologies Co., Ltd.
Other trademarks, product, service and company names mentioned may be the property of their respective owners.
Notice
Some features of the product and its accessories described herein rely on the software installed, capacities and settings of local network, and therefore may not be activated or may be limited by local network operators or network service providers.
Thus, the descriptions herein may not exactly match the product or its accessories which you purchase.
Huawei reserves the right to change or modify any information or specifications contained in this manual without prior notice and without any liability.
DISCLAIMER
ALL CONTENTS OF THIS MANUAL ARE PROVIDED "AS IS". EXCEPT AS REQUIRED BY APPLICABLE LAWS, NO WARRANTIES OF ANY KIND, EITHER EXPRESS OR IMPLIED, INCLUDING BUT NOT LIMITED TO, THE IMPLIED WARRANTIES OF MERCHANTABILITY AND FITNESS FOR A PARTICULAR PURPOSE, ARE MADE IN RELATION TO THE ACCURACY, RELIABILITY OR CONTENTS OF THIS MANUAL.
TO THE MAXIMUM EXTENT PERMITTED BY APPLICABLE LAW, IN NO EVENT SHALL HUAWEI BE LIABLE FOR ANY SPECIAL, INCIDENTAL, INDIRECT, OR CONSEQUENTIAL DAMAGES, OR LOSS OF PROFITS, BUSINESS, REVENUE, DATA, GOODWILL SAVINGS OR ANTICIPATED SAVINGS REGARDLESS OF WHETHER SUCH LOSSES ARE FORSEEABLE OR NOT.
THE MAXIMUM LIABILITY (THIS LIMITATION SHALL NOT APPLY TO LIABILITY FOR PERSONAL INJURY TO THE EXTENT APPLICABLE LAW PROHIBITS
SUCH A LIMITATION) OF HUAWEI ARISING FROM THE USE OF THE PRODUCT DESCRIBED IN THIS MANUAL SHALL BE LIMITED TO THE AMOUNT PAID BY CUSTOMERS FOR THE PURCHASE OF THIS PRODUCT.
Import and Export Regulations
Customers shall comply with all applicable export or import laws and regulations and be responsible to obtain all necessary governmental permits and licenses in order to export, re-export or import the product mentioned in this manual including the software and technical data therein.
Privacy Policy
To better understand how we protect your personal information, please see the privacy policy at http://consumer.huawei.com/privacy-policy.

Table of Contents |
|
1 Introduction ........................................................................................................... |
1 |
Appearance .................................................................................................... |
1 |
Installation....................................................................................................... |
5 |
Text input ........................................................................................................ |
9 |
2 Basic operations.................................................................................................. |
10 |
Powering on the phone................................................................................. |
10 |
Making or answering calls ............................................................................ |
10 |
3 Contacts ............................................................................................................... |
11 |
Making calls from Contacts............................................................................ |
11 |
Searching for a contact.................................................................................. |
11 |
Groups ........................................................................................................... |
11 |
4 Messages............................................................................................................ |
13 |
Creating a text message............................................................................... |
13 |
Viewing a text message................................................................................ |
13 |
Message settings.......................................................................................... |
14 |
Delete all....................................................................................................... |
14 |
5 Call log ................................................................................................................ |
15 |
Viewing the call records................................................................................ |
15 |
Other operations ........................................................................................... |
15 |
6 Tools .................................................................................................................... |
16 |
Alarms........................................................................................................... |
16 |
Calendar ....................................................................................................... |
16 |
Calculator...................................................................................................... |
16 |
World time..................................................................................................... |
16 |
7 Profiles ................................................................................................................ |
17 |
Selecting a profile ......................................................................................... |
17 |
Editing a profile ............................................................................................. |
17 |
8 Settings ............................................................................................................... |
18 |
Phone settings .............................................................................................. |
18 |
|
i |

Display settings............................................................................................. |
18 |
Call settings .................................................................................................. |
18 |
Network......................................................................................................... |
19 |
Security......................................................................................................... |
19 |
9 Wireless data service .......................................................................................... |
21 |
Installing management program ................................................................... |
21 |
Applying the data service.............................................................................. |
22 |
10 Safety information ............................................................................................. |
23 |
ii

1 Introduction
Appearance
Note:
The figures in this document are provided only for your reference. The fixed wireless terminal (FWT) that you have purchased may differ from that shown.
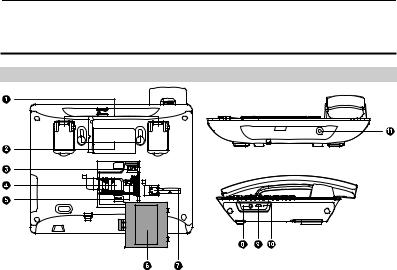
Front view
Main unit
Keypad (Number and function keys)
1
No. |
|
|
Item |
|
Description |
|||||
1 |
Left |
|
Access the main Menu in standby mode. |
|||||||
|
function |
|
Select the option displayed on the lower left corner of |
|||||||
|
key |
|
the screen. |
|||||||
|
|
|
|
|
|
|
|
|
|
|
|
|
|
|
|
|
|
|
|
|
|
|
|
|
|
|
|
|
||||
2 |
Navigation |
|
Access the main menu by pressing the OK key in |
|||||||
|
keys |
|
standby mode. |
|||||||
|
|
|
|
|
|
|
|
|
|
Access a shortcut menu by pressing the corresponding |
|
|
|
|
|
|
|
|
|
||
|
|
|
|
|
|
|
|
|
||
|
|
|
|
|
|
|
|
|
|
navigation key in standby mode. |
|
|
|
|
|
|
|
|
|
|
|
|
|
|
|
|
|
|
|
|
|
|
|
|
|
|
|
|
|
|
|
|
Adjust the volume by pressing the navigation keys |
|
|
|
|
|
|
|
|
|
||
|
|
|
|
|
|
|
|
|
||
|
|
|
|
|
|
|
|
|
|
during a call. |
3 |
Right |
|
Access the Contacts screen in standby mode. |
|||||||
|
function |
|
Select the option displayed on the lower right corner of |
|||||||
|
key |
|
the screen. |
|||||||
|
|
|
|
|
|
|
|
|
|
|
|
|
|
|
|||||||
4 |
End key |
|
End a call or reject an incoming call. |
|||||||
|
|
|
|
|
|
|
|
|
|
Press and hold it to power on or off. |
|
|
|
|
|
|
|
|
|
|
Return to the standby mode. |
5 |
Status |
|
Blinking green: normal state |
|||||||
|
indicator |
|
Steady red: The handset is off-hook. |
|||||||
|
|
|
|
|
|
|
|
|
|
Blinking red: The battery is low, or there are missed |
|
|
|
|
|
|
|
|
|
|
calls, unread messages, or new voicemails. |
6 |
LND/LNR |
In standby mode: |
||||||||
|
keys |
|
Press and hold the Last Number Dialed (LND) key to |
|||||||
|
|
|
|
|
|
|
|
|
|
quickly dial the last dialed number. |
|
|
|
|
|
|
|
|
|
|
Press and hold the Last Number Received (LNR) key to |
|
|
|
|
|
|
|
|
|
|
quickly dial the last number that called you. |
|
|
|
|
|
|
|
|
|
|
Press the LND/LNR keys once to display the number. |
|
|
|
|
|
|
|
|
|
|
Press again or the Call key to call that number. |
7 |
Shortcut |
|
Speed dial a phone number. |
|||||||
|
keys |
|
Select Settings > Phone settings > Shortcuts to |
|||||||
|
|
|
|
|
|
|
|
|
|
assign a shortcut key to a phone number. |
8 |
Volume |
Adjust the ringtone volume or in-call volume. |
||||||||
|
keys |
|
|
|||||||
9 |
LINE 1/2 |
Switch between line 1 and 2. |
||||||||
|
keys |
|
|
|||||||
10CLIP/CLIR key
In standby mode, set whether to display or hide your number for outgoing calls. Calling Line Identification Presentation (CLIP) displays your number; Calling Line Identification Restriction (CLIR) hides your number.
2

No. |
Item |
|
Description |
|
11 |
Headset |
Enable or disable headset mode. To use headset mode, |
||
|
key |
connect a headset to the phone. |
||
|
|
|
|
|
|
|
|
|
|
12 |
Hands-free |
|
Make or answer a call without lifting the handset. |
|
|
key |
Cancel the dialing that is in hands-free mode. |
||
|
|
|
|
End the call that is in hands-free mode. |
|
|
|
||
|
|
|
|
|
|
|
|
|
|
13 |
Call/Redial |
|
Make or answer a call. |
|
|
key |
View dialed calls in standby mode. |
||
|
|
|
|
|
|
|
|
||
14 |
Number |
# key: |
||
|
and symbol |
Press and hold it to switch between the silent and |
||
|
keys |
|
normal profiles in standby mode. |
|
|
|
|
|
Switch on or off the input mode of T9 in editing mode. |
|
|
|
|
Mark or unmark a record. |
* key:
|
|
|
|
|
|
|
Press and hold it to lock the keyboard in standby mode. |
|
|
|
|
|
|
|
Switch between different input methods in editing mode. |
|
|
|
|
|
|
Number keys: |
|
|
|
|
|
|
|
Enter numbers and characters. |
|
15 |
Mute |
On: Your microphone is inactive and others cannot hear |
|||||
|
indicator |
you. |
|||||
|
|
|
|
|
|
Off: Your microphone is active and others can hear you. |
|
16 |
Mute key |
Mute or unmute a call. |
|||||
|
|
|
|
|
|
|
|
|
|
|
|
|
|||
|
|
|
|||||
17 |
CONF key |
When you are in a call, set up another call with another |
|||||
|
|
|
|
|
|
number, and then press the CONF key to start a |
|
|
|
|
|
|
|
conference call among all calling parties. A conference call |
|
|
|
|
|
|
|
can have a maximum of five participants. |
|
18 |
TRANS |
If you receive a call when you are already in another call, |
|||||
|
key |
you can press the TRANS key to transfer the incoming call |
|||||
|
|
|
|
|
|
to another number. |
|
19 |
HOLD key |
Hold or resume the call. |
|||||
3
No. |
Item |
|
Description |
20 |
SOS key |
In standby mode: |
|
|
|
|
Press the SOS key once to display the preset |
|
|
|
emergency number. You can dial another emergency |
|
|
|
number supported by the local network instead. Then |
|
|
|
press the SOS key again or the Call key to call that |
|
|
|
number. |
|
|
|
Press and hold the SOS key to directly call the preset |
|
|
|
emergency number. |
21 |
DND key |
Enable call forwarding. Missed calls will be forwarded to |
|
|
|
the voicemail you set in Message Settings. |
|
22Key indicators
The indicators blink when the corresponding functions are enabled:
If you press the LINE 1 or LINE 2 key, the LINE 1 or LINE 2 indicator blinks green.
Back and side view
No. |
Item |
No. |
Item |
1 |
Flip-out feet |
2 |
Wall-mounting brackets |
|
|
|
|
3 |
Battery cord jack |
4 |
SIM card slot |
|
|
|
|
5 |
Battery container |
6 |
Battery container cover |
|
|
|
|
7 |
Coiled cord jack on main |
8 |
Headset jack |
|
unit |
|
|
4
No. |
|
Item |
No. |
Item |
9 |
Data port |
|
10 |
* Reset |
11 Power jack
* Note:
To restart the FWT if it is connected to a power supply, press the Reset key.
Icons
Icon |
Description |
Icon |
Description |
||
|
Network signal strength |
|
|
|
Calling |
|
|
|
|
|
|
|
Alarm clock is on |
|
|
|
No service |
|
|
|
|
|
|
|
Message received |
|
|
|
Hands-free mode |
|
|
|
|
|
|
|
Voice message received |
|
|
|
Powered by power adapter |
|
|
|
|
|
|
|
Keypad lock |
|
|
|
Battery power level |
|
|
|
|
|
|
|
In silent profile |
|
|
|
Line 2 is selected |
|
|
|
|
|
|
|
2G network |
|
|
|
3G network |
|
|
|
|
|
|
|
Headset mode |
|
|
|
Earphone mode |
|
|
|
|
|
|
Installation
Installing the SIM card
Caution:
The SIM card and its golden contact can be easily damaged by a scratch or bend. Be careful when installing or removing the SIM card.
Power off the FWT and remove the power supply cable. Install the SIM card according to the following figure. Make sure that the golden contact on the SIM card is facing downwards.
5
 Loading...