


HA35 Hybrid Access Gateway
User Guide
Version 2.1 (May 2016)
Contents |
|
1. Product Overview............................................................. |
6 |
1.1. Supported Features .................................................................... |
6 |
1.2. Ports and Buttons........................................................................ |
7 |
1.3. Indicators .................................................................................... |
8 |
2. Hardware Installation..................................................... |
11 |
2.1. Selecting an Installation Location.............................................. |
11 |
2.2. Installing the HA35 on a Hybrid Broadband Network ................ |
12 |
2.2.1. PSTN or Broadband Telephone Line with one voice |
|
channel and a 3G/4G connection.................................... |
12 |
2.2.2. ISDN Line and 3G/4G connection .................................... |
13 |
2.2.3. Broadband Telephone Line with the intervention of an |
|
electrician in the internal home wiring (i.e. legacy ISDN |
|
wiring) and a 3G/4G connection...................................... |
14 |
2.3. Installing the HA35 on a DSL Broadband Network.................... |
15 |
2.3.1. PSTN or Broadband Telephone Line with one voice |
|
channel ........................................................................... |
15 |
2.3.2. ISDN Line ......................................................................... |
16 |
2.3.3.Broadband Telephone Line with the ntervention of an electrician in the internal home wiring (i.e. legacy ISDN
wiring) ............................................................................. |
17 |
2.4. Installing the HA35 on a 3G/4G Network .................................. |
18 |
2.5. Powering On ............................................................................. |
19 |
3. Setting Network Parameters ......................................... |
20 |
3.1. Setting the Computer IP Address.............................................. |
20 |
3.1.1. Obtain an IP address automatically.................................. |
20 |
3.1.2. Set a static IP address...................................................... |
22 |
3.2. Logging In to the Web Management Page................................ |
23 |
3.3. Setting Network Access Parameters......................................... |
24 |
3.3.1. Accessing the Network through the Hybrid gateway......... |
24 |
3.3.2. Accessing the Network through DSL ................................ |
28 |
Version 2.1 (May 2016) |
2 |
3.3.3. Accessing the Network through the SIM card................... |
29 |
3.4. Configuring a Wireless Account ................................................ |
31 |
3.5. Check My Network Status......................................................... |
31 |
4. Wireless Connection Setup........................................... |
33 |
4.1. Setting Up a Wireless Connection Using the WPS Button........ |
33 |
4.2. Manually Setting Up a Wireless Connection ............................. |
34 |
4.2.1. On Windows 7 .................................................................. |
34 |
5. WLAN Configuration...................................................... |
35 |
5.1. Enabling and Disabling the WLAN on the HA35 ....................... |
35 |
5.1.1. Using the WLAN Button.................................................... |
35 |
5.1.2. Using the Web Management Page................................... |
35 |
5.2. Changing Your WLAN Name and Password ............................. |
35 |
5.3. WLAN Advanced Settings......................................................... |
36 |
6. Network Security............................................................ |
37 |
6.1. Improving WLAN Security......................................................... |
37 |
6.1.1. Hiding the WLAN Name ................................................... |
37 |
6.1.2. Using High Security Encryption Modes ............................ |
38 |
6.1.3. Enable the WPS Function ................................................ |
38 |
6.2. Allowing Only Specified Computers to Access Your WLAN....... |
41 |
6.3. Controlling Computer Internet Access....................................... |
42 |
6.4. Filtering Out Inappropriate Websites......................................... |
43 |
6.5. Configuring the Firewall ............................................................ |
45 |
6.5.1. Recommended Firewall Level .......................................... |
45 |
6.5.2. Configuring the Firewall.................................................... |
45 |
6.6. Configure an ACL...................................................................... |
46 |
6.7. Configure DMZ.......................................................................... |
48 |
6.8. Configure Application Filter ....................................................... |
48 |
6.9. Configure Port Forwarding ........................................................ |
50 |
6.9.1. Configure Port Mapping.................................................... |
50 |
6.9.2. Configure Port Trigger ...................................................... |
52 |
Version 2.1 (May 2016) |
3 |
7. Internet Services ............................................................ |
53 |
7.1. Dynamic DNS ........................................................................... |
53 |
7.2. Simple Network Time Protocol .................................................. |
54 |
7.3. Multicast management.............................................................. |
55 |
8. IP Telephony ................................................................... |
56 |
8.1. Introduction to IP Telephony...................................................... |
56 |
8.2. Configuring VoIP ....................................................................... |
56 |
8.3. Placing a VoIP Call.................................................................... |
58 |
9. USB Device ..................................................................... |
59 |
9.1. USB Storage Device ................................................................. |
59 |
9.2. You can connect a USB storage device to your HA35 and access |
|
the USB device from your computer........................................ |
59 |
9.3. Connecting a USB Device......................................................... |
59 |
9.3.1. Setting the FTP Access Permission.................................. |
59 |
9.3.2. Accessing to FTP Server Through the User Name and |
|
Password ........................................................................ |
59 |
9.3.3. Accessing a USB Storage Device Using FTP................... |
61 |
9.3.4. Setting the Samba Access Permission............................. |
61 |
9.3.5. Accessing Data Using Samba .......................................... |
63 |
9.4. Configuring Multimedia Sharing ................................................ |
63 |
9.5. Sharing a USB Printer............................................................... |
64 |
9.5.1. On Windows 7 .................................................................. |
64 |
10. Maintenance Guide ...................................................... |
65 |
10.1. Changing the IP Address Used to Log In to the Web |
|
Management Page .................................................................. |
65 |
10.2. Setting the DHCP Server IP range.......................................... |
65 |
10.3. RA Settings ............................................................................. |
66 |
10.4. IPv6 DHCP Server .................................................................. |
67 |
10.5. Changing the Web Management Page Password................... |
67 |
10.6. Rebooting Device.................................................................... |
68 |
10.7. Restoring Default Settings ...................................................... |
69 |
Version 2.1 (May 2016) |
4 |
10.7.1. Using the Reset Button................................................... |
69 |
10.7.2. Using the Configuration Tool........................................... |
69 |
10.8. Upgrading Firmware................................................................ |
69 |
10.9. Using Ping Tool Diagnose Network ......................................... |
70 |
10.10. Using Tracert Tool Diagnose Network ................................... |
71 |
11. Reference Operations.................................................. |
72 |
11.1. Setting Dial-Up Connection Parameters.................................. |
72 |
11.2. Enabling Wireless Configuration on Windows......................... |
75 |
11.3. Checking the Computer MAC Address.................................... |
75 |
12. FAQs .............................................................................. |
77 |
12.1. What Can I Do If I Cannot Open the Web Management Page? |
|
................................................................................................ |
77 |
12.2. What Can I Do If the HA35 Cannot Access the Internet through |
|
a Wireless Network Adapter Sometimes or If the WLAN |
|
Connection Is Unsteady? ........................................................ |
77 |
12.3. What Can I Do If I Cannot Access the Internet?...................... |
77 |
12.4. I Often Need to Restart the HA35 to Display Web Pages. What |
|
Can I Do? ................................................................................ |
79 |
12.5. What Is the Difference Between Wireless MAC Address |
|
Filtering and MAC Address Filtering? ...................................... |
79 |
12.6. Can I Change the WLAN Password?...................................... |
79 |
13. Appendix ....................................................................... |
80 |
13.1. Technical Specifications .......................................................... |
80 |
13.2. Default Settings....................................................................... |
81 |
14. For More Help ............................................................... |
82 |
15. Legal Notice.................................................................. |
83 |
16. Acronyms and Abbreviations ..................................... |
85 |
17. List of Pictures ............................................................. |
87 |
18. List of Tables ................................................................ |
92 |
Version 2.1 (May 2016) |
5 |
1. Product Overview
1.1. Supported Features
The HA35 Hybrid Access Gateway (HA35 for short) is a high-speed wireless router designed for home and small office use. This chapter describes the features supported by the HA35.
Digital subscriber line (DSL) provides rugged stability, and with the Wi-Fi Protected Setup (WPS) button, zero configuration is required for connections to multiple devices.
Network range allows any device in a home to be connected with a wireless transmission rate of up to 300 Mbps.
A powerful firewall is provided with a flexible network configuration and quality of service (QoS) strategy, enabling different home devices to enjoy high-speed and highquality broadband services.
High-Bandwidth DSL Connectivity
The HA35 incorporates a high-performance ADSL2+/VDSL2 processor and provides highspeed Internet access and abundant services to be delivered through the digital subscriber line (DSL).
Routing
The HA35 supports routing. It can obtain an IP address through PPP dial-up or Dynamic Host Configuration Protocol (DHCP), which provides simultaneous access for multiple devices.
WLAN
The HA35 supports multiple WLAN protocols, including 802.11b/g/n (2.4 GHz). Adopting 802.11n multiple-input multiple-output antennas (MIMO) technology, the HA35 delivers a wireless transmission rate of up to 300 Mbps with its dual antennas. In addition, the HA35 supports multiple wireless encryption modes to provide a secure, reliable, and high-speed WLAN.
Bandwidth Control
The HA35 supports bandwidth control and allocates bandwidth to different computers within your home based on Internet access requirements. Your family can then access the Internet, play online games, and watch videos without interfering with each other.
Wi-Fi Protected Setup
You can set up wireless connections between the HA35 and Wi-Fi enabled devices by pressing the WPS button.
Firewall
The powerful built-in firewall effectively protects against viruses and malicious attacks.
Version 2.1 (May 2016) |
6 |
Parental Controls
Parents can control their children's computer usage by placing time limits on usage duration or forbidding access to certain websites.
Easy Configuration and Management
The HA35 provides password-protected web-based management pages to protect your personal data.
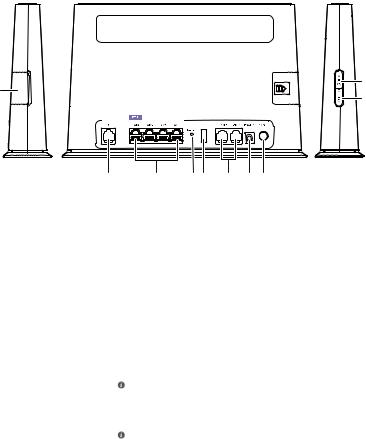
1.2. Ports and Buttons
1 |
10 |
|
9 |
||
|
|
2 |
3 |
4 5 |
6 |
7 |
8 |
|
Picture 1-1 ports and buttons |
|||||
|
|
|
|
|
|
|
No. |
Item |
Description |
|
|
|
|
|
|
|
|
|
|
|
1 |
SIM |
Inserts a SIM card. |
|
|
|
|
|
|
|
||||
2 |
DSL |
Connects to a DSL filter or phone socket. |
||||
|
|
|
||||
3 |
LAN1–LAN4 |
Connects to Ethernet devices, such as computers, set-top |
||||
|
|
boxes (STBs), and switches. |
|
|
||
|
|
|
||||
4 |
RESET |
Restores the HA35 to its default settings after you press |
||||
|
|
and hold this button for 6 seconds or more while the HA35 |
||||
|
|
is powered on. |
|
|
|
|
|
|
A reset will result in all custom data and settings being lost. |
||||
|
|
Use with caution. |
|
|
|
|
|
|
|
|
|
||
5 |
USB |
Connects to a USB 2.0 device. |
|
|
||
|
|
If you connect a USB device to the HA35, verify that the |
||||
|
|
input voltage and current of the USB device does not exceed |
||||
|
|
5 V/0.5 A. Otherwise, the HA35 may malfunction. |
||||
|
|
|
|
|
|
|
Version 2.1 (May 2016) |
|
|
|
|
7 |
|

No. |
Item |
Description |
|
|
|
6 |
PHONE1– |
Connects to a telephone. |
|
PHONE2 |
|
|
|
|
7 |
POWER |
Connects to a power adapter. |
|
|
|
8 |
ON/OFF |
Powers the HA35 on or off. |
|
|
|
9 |
WLAN |
Enables or disables the WLAN function. |
|
|
|
10 |
WPS |
Starts Wi-Fi protected setup (WPS) negotiation. |
|
|
|
Table 1-1 ports and buttons
1.3. Indicators
Picture 1-2 front side
Indicator |
Status |
Description |
|
|
|
POWER |
Green on |
The HA35 is powered on. |
|
|
|
|
Red Blinking |
Self-checking failed after the HA35 is powered on. |
|
|
|
|
Off |
The HA35 is powered off or faulty. |
|
|
|
DSL |
Green on |
The HA35 is activated through DSL. |
|
|
|
|
Green Blinking |
The HA35 is being activated through DSL. |
|
|
|
Version 2.1 (May 2016) |
8 |
|
Indicator |
Status |
Description |
|
|
|
|
Off |
The DSL port is not activated successfully. |
|
|
The HA35 is powered off. |
|
|
|
INTERNET |
Green on |
The HA35 is working in routing mode. |
|
|
No data is being transmitted. |
|
|
|
|
Green Blinking |
The HA35 is connected to the Internet, and data is |
|
|
being transmitted. |
|
|
|
|
Off |
The HA35 is working in routing mode, but the |
|
|
connection has not been set up. |
|
|
The HA35 is powered off. |
|
|
|
MODE |
Steady on |
Cyan: the HA35 is registered to the LTE network. |
|
|
Blue: the HA35 is registered to the WCDMA network. |
|
|
|
|
Red Blinking |
There is no SIM card or the SIM card is faulty. |
|
|
The SIM card is locked. |
|
|
The SIM card is unavailable. |
|
|
|
|
Off |
There is no wireless service. |
|
|
The HA35 is powered off. |
|
|
|
WLAN |
Green on |
The WLAN connection is set up, but no data is being |
|
|
transmitted. |
|
|
|
|
Green Blinking |
The WLAN connection is set up, and data is being |
|
|
transmitted. |
|
|
The WPS is in InProgress or Error status. |
|
|
|
|
Off |
The WLAN function is disabled. |
|
|
The HA35 is powered off. |
|
|
|
LAN1–LAN4 |
Green on |
The HA35 is connected to a device properly. |
|
|
|
|
Green Blinking |
Data is being transmitted between the HA35 and the |
|
|
connected device. |
|
|
|
|
Off |
No connection is set up on the port. |
|
|
The HA35 is powered off. |
|
|
|
VoIP |
Green on |
The HA35 is registered with a SIP (Session Initiation |
|
|
Protocol) server, but no data is being transmitted. |
|
|
|
|
Green Blinking |
The HA35 is registering with a SIP server. |
|
|
The VoIP connection is set up, and data is being |
|
|
transmitted. |
|
|
|
Version 2.1 (May 2016) |
9 |
|
Indicator |
Status |
Description |
|
|
|
|
Off |
The HA35 is not registered with a SIP server. |
|
|
The HA35 is powered off. |
|
|
|
SIGNAL |
Green on |
Indicates the WCDMA/LTE signal strength of the |
|
|
HA35. |
|
|
|
|
Off |
There is no WCDMA/LTE signal. |
|
|
The HA35 is powered off. |
|
|
|
|
|
Table 1-2 indicators |
Version 2.1 (May 2016) |
10 |
2. Hardware Installation
2.1. Selecting an Installation Location
Place the HA35 on a well-ventilated even surface without exposure to direct sunlight. For the best possible performance, take note of the following:
Make sure there are no obstacles, such as concrete or wooden walls, between the computer and HA35.
Ensure that the computer and HA35 are far from electric appliances that generate strong magnetic or electric fields, such as microwave ovens.
Version 2.1 (May 2016) |
11 |
2.2.Installing the HA35 on a Hybrid Broadband Network
2.2.1.PSTN or Broadband Telephone Line with one voice channel and a 3G/4G connection
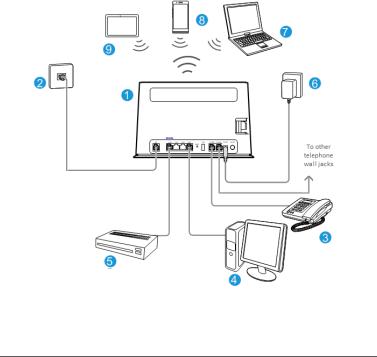
Connect your devices in the sequence indicated in the following figure.
Picture 2-1 connect devices in hybrid broadband network (PSTN Line)
1 |
HA35 |
2 |
Telephone wall jack & |
3 |
Splitter |
|
|
|
1 to 2 RJ-11 Y adapter |
|
|
|
|
|
|
|
|
4 |
SIM card |
5 |
Telephone & Filter |
6 |
Desktop computer |
|
|
|
|
|
|
7 |
Set-top Box |
8 |
Power adapter |
9 |
Laptop computer |
|
|
|
|
|
|
10 |
Smart Phone |
11 |
Pad |
|
|
|
|
|
|
|
|
a |
LINE port |
b |
PHONE port |
c |
MODEM port |
 When configuring the HA35 for the first time, use an Ethernet cable to connect the HA35 to a computer.
Version 2.1 (May 2016) |
12 |

2.2.2. ISDN Line and 3G/4G connection
Connect your devices in the sequence indicated in the following figure.
Picture 2-2 connect devices in hybrid broadband network (ISDN Line)
1 |
HA35 |
2 |
Telephone wall jack |
3 |
Splitter |
|
|
|
|
|
|
|
|
4 |
SIM card |
5 |
Telephone |
6 |
ISDN (NT1) Device |
|
|
|
|
|
|
|
|
7 |
Desktop computer |
8 |
Set-top Box |
9 |
Power adapter |
|
|
|
|
|
|
|
|
10 |
Laptop computer |
11 |
Smart Phone |
12 |
Pad |
|
|
|
|
|
|
|
|
a |
LINE port |
b |
PHONE port |
c |
MODEM port |
|
|
|
|
|
|
|
|
 When configuring the HA35 for the first time, use an Ethernet cable to connect the HA35 to a computer.
Version 2.1 (May 2016) |
13 |
2.2.3.Broadband Telephone Line with the intervention of an electrician in the internal home wiring (i.e. legacy ISDN wiring) and a 3G/4G connection
Picture 2-3 connect devices in hybrid broadband network (intervention of an electrician in the internal home wiring)
1 |
HA35 |
2 |
Telephone wall jack |
3 |
SIM card |
|
|
|
|
|
|
4 |
Telephone |
5 |
Desktop computer |
6 |
Set-top Box |
|
|
|
|
|
|
7 |
Power adapter |
8 |
Laptop computer |
9 |
Smart Phone |
|
|
|
|
|
|
10 |
Pad |
|
|
|
|
|
|
|
|
|
|
Version 2.1 (May 2016) |
14 |
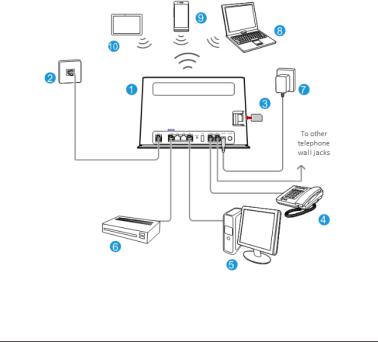
2.3.Installing the HA35 on a DSL Broadband Network
2.3.1.PSTN or Broadband Telephone Line with one voice channel
In some communities, Internet service providers use telephone lines to provide broadband access services.
If you have subscribed to digital subscriber line (DSL) broadband, you can connect the HA35 to a telephone port for Internet access.
Connect your devices in the sequence indicated in the following figure.
Picture 2-4 connect devices in DSL broadband network (PSTN Line)
1 |
HA35 |
2 |
Telephone wall jack & |
3 |
Splitter |
|
|
|
1 to 2 RJ-11 Y adapter |
|
|
4 |
Telephone & Filter |
5 |
Desktop computer |
6 |
Set-top Box |
|
|
|
|
|
|
7 |
Power adapter |
8 |
Laptop computer |
9 |
Smart Phone |
|
|
|
|
|
|
10 |
Pad |
|
|
|
|
|
|
|
|
|
|
a |
LINE port |
b |
PHONE port |
c |
MODEM port |
|
|
|
|
|
|
Version 2.1 (May 2016) |
|
|
|
15 |
|

2.3.2. ISDN Line
Picture 2-5 connect devices in DSL broadband network (ISDN Line)
1 |
HA35 |
2 |
Telephone wall jack |
3 |
Splitter |
|
|
|
|
|
|
4 |
ISDN (NT1) Device |
5 |
Telephone |
6 |
Desktop computer |
|
|
|
|
|
|
7 |
Set-top Box |
8 |
Power adapter |
9 |
Laptop computer |
|
|
|
|
|
|
10 |
Smart Phone |
11 |
Pad |
|
|
|
|
|
|
|
|
a |
LINE port |
b |
PHONE port |
c |
MODEM port |
|
|
|
|
|
|
Version 2.1 (May 2016) |
16 |
2.3.3.Broadband Telephone Line with the ntervention of an electrician in the internal home wiring (i.e. legacy ISDN wiring)
Picture 2-6 connect devices in DSL broadband network (with the intervention of electrician in the internal wiring)
1 |
HA35 |
2 |
Telephone wall jack |
3 |
Telephone |
|
|
|
|
|
|
4 |
Desktop computer |
5 |
Set-top Box |
6 |
Power adapter |
|
|
|
|
|
|
7 |
Laptop computer |
8 |
Smart Phone |
9 |
Pad |
|
|
|
|
|
|
Version 2.1 (May 2016) |
17 |
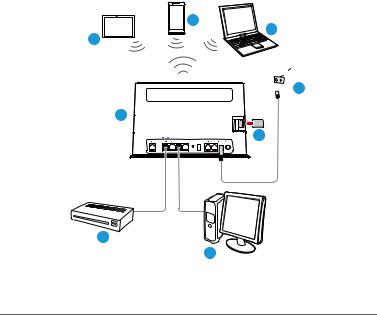
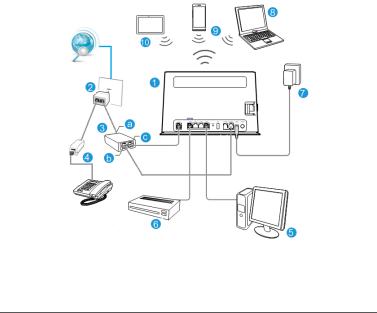
2.4. Installing the HA35 on a 3G/4G Network
If you use the SIM card to access the Internet, you can insert the SIM card into the SIM card slot on the HA35.
Connect your devices in the sequence indicated in the following figure.
|
7 |
6 |
8 |
|
|
|
|
 5
5
1
4
3
2
Picture 2-7 connect devices in 3G/4G network
1 |
HA35 |
2 |
Desktop computer |
3 |
Set-top Box |
|
|
|
|
|
|
4 |
SIM card |
5 |
Power adapter |
6 |
Laptop computer |
|
|
|
|
|
|
7 |
Smart Phone |
8 |
Pad |
|
|
|
|
|
|
|
|
 • Insert and remove the SIM card when the HA35 is powered off.
•Do not connect the HA35 to the telephone wall outlet (or any Public Switched Telephone Network), because doing so could damage the HA35 due to excessive heat.
Version 2.1 (May 2016) |
18 |
2.5. Powering On
To power on the HA35, press the POWER button.
After the HA35 is powered on, the POWER indicator turns on. If the indicators do not behave as expected, ensure that everything is plugged in correctly.
Version 2.1 (May 2016) |
19 |
3. Setting Network Parameters
3.1. Setting the Computer IP Address
Before logging in to the HA35 web management page, set the IP address of the computer that will be used for the login.
3.1.1. Obtain an IP address automatically
1.Click  in the lower right corner of your desktop. Choose Open Network and Sharing Center.
2.Choose Change adapter settings. Right-click Local Area Connection and choose Properties.
Picture 3-1 local area connection
Version 2.1 (May 2016) |
20 |
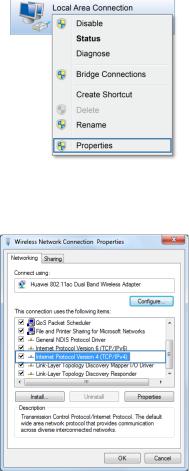
3. Double-click Internet Protocol Version 4 (TCP/IPv4).
Picture 3-2 wireless network connection properties
4.Select Obtain an IP address automatically and Obtain DNS server address automatically. Click OK.
Picture 3-3 internet protocol version 4 properties
Version 2.1 (May 2016) |
21 |
3.1.2. Set a static IP address
1.Click  in the lower right corner of your desktop. Choose Open Network and
Sharing Center.
2.Choose Change adapter settings. Right-click Local Area Connection and choose Properties.
Picture 3-4 local area connection
3. Double-click Internet Protocol Version 4 (TCP/IPv4).
Picture 3-5 wireless network connection properties
Version 2.1 (May 2016) |
22 |
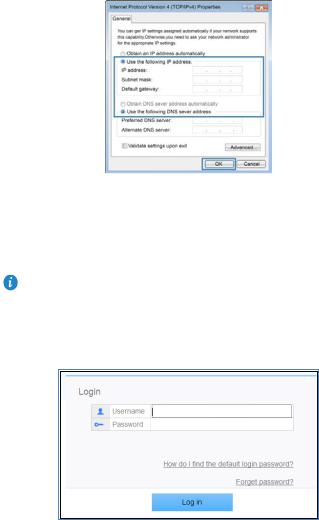
4.Select Use the following IP address. Set IP address to 192.168.1.*, Subnet mask to
255.255.255.0, and Default gateway to admi. Click OK to return to the previous dialog box and click OK.
Picture 3-6 internet protocol version 4 properties
3.2. Logging In to the Web Management Page
The HA35 provides an intuitive web management page where you can view or set the HA35 parameters.
Before you log in to the HA35 web management page, ensure that the computer used
for the login is connected to the HA35 and has been configured to automatically obtain an IP address or assigned with a static IP address.
1.Open a browser. In the address box, enter 192.168.1.1. Press Enter.
2.Enter the login user name (admin by default) and password (the password printed on the HA35's cover). Click Log in.
Picture 3-7 log in to the Web Management Page
Version 2.1 (May 2016) |
23 |
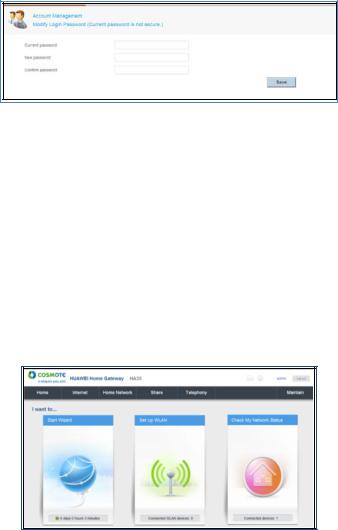
3.Enter your current password, and a new password. Re-enter the new password to confirm it, and click Save.
Picture 3-8 account management
 • To protect against unauthorized access, change the password after the first login. After modifying the password successfully, this page will jump to the login page, where you can use the new password to log in.
•The system will be locked if you enter incorrect user name or password three consecutive times. One minute later, it will be unlocked.
•If you do not perform any operations after logging in to the system for five minutes, you will exit the system and the system automatically returns to the login interface.
3.3. Setting Network Access Parameters
3.3.1. Accessing the Network through the Hybrid gateway
When you install the HA35 for the first time, you need to configure the HA35. To configure the HA35 through the setup wizard, do as follows:
1.Log in to the web management page.
2.Choose Home tab, click Start Wizard.
Picture 3-9 home
3. Enter the parameters provided by your ISP and click Next
Version 2.1 (May 2016) |
24 |
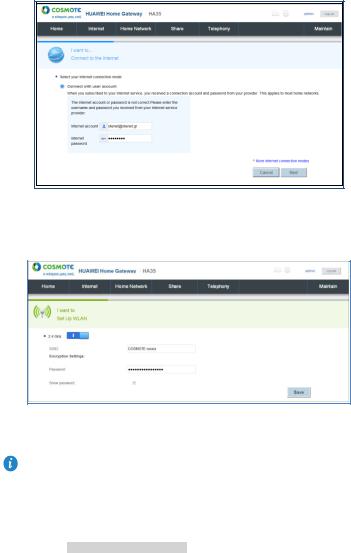
Picture 3-10 set internet connection
4. Enter your desired SSID (WLAN name) and key and click Save.
Picture 3-11 set SSID and key
If your SIM card does not need to verify the PIN for Internet access (in the case where the customer does not receive any PIN from the operator), skip step 5 - step 9. Just jump to step 10.
5.Insert a SIM card into the HA35's SIM card slot.
6.Choose Internet tab, click Internet Settings.The different usage scenarios will appear, as shown in Picture 3-12 internet settings.
Version 2.1 (May 2016) |
25 |

Picture 3-12 internet settings
7.Scroll down to find the INTERNET_R_UMTS1 usage scenario, as shown in Picture 3-13 internet settings 2.
Picture 3-13 internet settings 2
8. Choose INTERNET_R_UMTS1 tab, click Edit.
Version 2.1 (May 2016) |
26 |
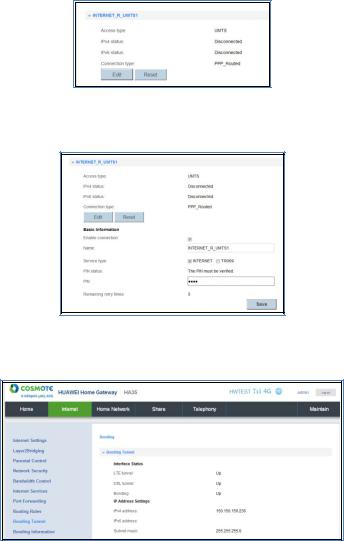
Picture 3-14 3G/4G vlan
9.Enter the PIN that was provided by your SIM card operator in the PIN text box. Click
Save.
Picture 3-15 set PIN
10.Choose Home tab, click Internet > Bonding Tunnel. If LTE\DSL\Bonding all displayed UP, it means that your HA35 is working in Hybrid mode.
Picture 3-16 bonding tunnel
Version 2.1 (May 2016) |
27 |

3.3.2. Accessing the Network through DSL
When you install the HA35 for the first time, you need to configure the HA35. To configure the HA35 through the setup wizard, do as follows:
1.Log in to the web management page.
2.Choose Home tab, click Start Wizard.
Picture 3-17 home
3. Enter the parameters provided by your ISP and click Next.
Picture 3-18 set internet connection
4. Enter your desired SSID (WLAN name) and key and click Save
Version 2.1 (May 2016) |
28 |
 Loading...