


 Loading...
User Guide
Contents
Exciting Features
Featured Usage Tips |
1 |
Camera Tips |
3 |
Working with Ease |
8 |
More Features |
17 |
New Device
New Device onfiguration |
21 |
Smart Charging: Charge Your Device Faster and Safer |
23 |
Gestures and Operations
HiVision |
25 |
Press Power Button to Wake Up Google Assistant |
27 |
HiSearch: Search for Matching Text and Images |
27 |
Use Your Phone with Your Knuckles |
27 |
Screenshots and Screen Recording |
28 |
Split-screen |
32 |
Navigation Bar |
34 |
Use Shortcut Switches to Quickly Enable Frequently Used Features |
35 |
Notification Panel and Status Bar |
35 |
Screen Lock and Unlock |
38 |
Go Back to Basics with Simple Mode |
40 |
Home Screen Management |
40 |
Managing Business Cards |
43 |
Search Contacts |
44 |
Managing Contacts |
45 |
Merging Third-party App Contacts |
47 |
Basic Calling Functions |
48 |
VoLTE |
49 |
Use VoWi-Fi for a New Calling Experience |
50 |
Basic Messaging Functions |
51 |
Basic Camera Functions |
53 |
Master AI, Intelligent Photo Scene dentification |
56 |
Home Screen |
|
Contacts |
|
Dialing
Message
Camera
i
|
Contents |
Use Portrait Mode to Take Stunning Portraits |
56 |
Use AR lens to Shoot Interesting Photos |
57 |
Use Wide Aperture Mode to Highlight Your Shooting Subjects |
57 |
Panorama |
58 |
Pro Mode |
59 |
Take Black and White Photos |
61 |
Light Painting Mode |
61 |
More Capture Modes |
66 |
Gallery
Highlights |
68 |
Photo Management |
69 |
Phone Manager
Use Optimize |
73 |
|
Manage Mobile Data Usage |
73 |
|
Enable Smart Power Saving Management to Optimize Power |
73 |
|
Consumption |
||
|
||
Use Auto-launch to Prevent Unwanted App Activities |
74 |
|
Enable Virus Scanner |
74 |
Add Email Accounts |
76 |
Manage Email Accounts |
76 |
Manage VIP Email Contacts |
77 |
Create Smart Groups |
77 |
Import Important Events to Calendar |
77 |
Set Auto Response for Exchange Email |
77 |
Navigate the Calendar |
78 |
Import To-Dos to Keep Your Work Organized |
78 |
View Global Holidays |
78 |
Use the Clock |
80 |
Manage Your Notes to Keep Your Records in Order |
81 |
Calendar |
|
Clock |
|
Notepad |
|
Utilities |
|
Check Your Screen Time |
82 |
Use Recorder to Make Audio Notes |
82 |
Phone Clone |
82 |
Multiple Users
ii
|
Contents |
Set and Use Multiple Users |
86 |
Device Connection
Bluetooth |
88 |
NFC |
90 |
Desktop Mode |
94 |
Transfer Data between Your Phone and Computer |
98 |
Huawei Share |
99 |
Security and Privacy
Face Unlock |
104 |
Fingerprint |
105 |
Enable or Disable Location Services |
107 |
PrivateSpace |
108 |
Enable App Lock |
110 |
More Security Settings |
111 |
Introduction to User Data Protection |
112 |
Wi-Fi and Network
Wi-Fi |
114 |
Connecting to the Internet |
118 |
Share Your Mobile Network with Other Devices |
118 |
Apps and otific tions
App Twin: Log In to Two Social Media Accounts at Once |
120 |
Customize App Permissions to Use Your Phone Your Way |
120 |
Sound and Display
Set Up Do Not Disturb Mode |
121 |
onfigure Your Sound Settings |
121 |
Enable Eye Comfort Mode to Prevent Eye Strain |
122 |
More Display Settings |
122 |
Storage
Enable Memory Cleanup |
124 |
Smart Assistance
Access Phone Functions from Anywhere with Navigation Dock |
125 |
Use a Flip Cover to Protect Your Phone |
125 |
Enable or Disable Mistouch Prevention |
126 |
System
Change Input Method |
127 |
Accessibility |
127 |
General Settings |
130 |
System Update
iii
|
Contents |
Update the Phone System Online |
133 |
Legal Notice
Laser safety information |
134 |
Water and Dust Resistance |
134 |
Legal Notice |
135 |
Personal Information and Data Security |
137 |
Obtaining help |
138 |
Get More Information |
138 |
iv

Exciting Features
Featured Usage Tips
HiVision: Start Scanning to Learn More
Want to stick to a healthy diet and keep fit Wish you could understand foreign logos, road signs, and restaurant menus while traveling abroad? Want to quickly get product information for comparisons and to make purchases faster? Use HiVision to get all these done fast and easily.
HiVision can provide you with the following features:
• Scan food: You can scan food to determine the weight, calories, and nutrition facts.
• Identify objects: Scan to identify road signs or famous paintings. A card with relevant information about the geographical locations or the painting will be generated for you.
• Shop: Scan the objects you like to get purchase recommendations.
• Translate: Scan words or phrases in a foreign language for a quick online translation, making your trip abroad a breeze.
• Scan codes: Scan QR codes or bar codes to add contacts or acquire product information.
 • This feature requires access to the Internet to identify objects, scan codes, determine calories in food, shop, and translate.
• This feature is only supported in some countries and regions.
Enroll Your Facial Information and Enable Face Unlock
Face unlock allows you to unlock your Phone quickly and securely, without the need of a password.  • Face unlock can only be used when the owner account is logged in. It is not supported by
PrivateSpace.
•Face unlock is not available if the lock screen password has not been entered for three or more days in a row, or if your Phone has been remotely locked or restarted.
•When using Face unlock, keep your eyes open, and face your Phone straight on from a distance of 20–50 cm (about 8–20 in.). In order to scan your face accurately, avoid using this feature when you are in a dark environment or facing direct light.
•Currently, only one face can be enrolled. Delete the current facial data to enroll again.
1 Open  Settings. Go to Security & privacy > Face recognition and enter your lock screen password.
 If you haven't set up a lock screen password, set one first. Besides the 6-digit PIN, you can set up other types of passwords: Pattern, 4-digit PIN, Custom PIN, or Password.
2Selecting Enable Pick up to wake device to enhance the Face unlock experience will allow the screen to turn on and unlock when you pick up your Phone and hold it to your face. If you do not need this feature, leave it deselected. Touch Enroll face, and enroll your face.
3 Face unlock modes:
1
Exciting Features
•Select an unlock method: On the Face recognition screen, touch Unlock device. If you select Direct unlock, your Phone identifies your facial features and unlocks your screen when the screen is on. If you select Slide to unlock, after your Phone identifies your facial features, you can slide the lock screen to unlock. Selecting Off will disable Face unlock.
•Smart display of lock screen notific tions: Enable Show notific tions. On the lock screen, your Phone hides notification details and displays them only after recognizing the owner's face.
•Access App lock: Enable Access app lock to access App lock and locked apps using Face unlock.
Pick Up to Unlock
Open  Settings, and go to Security & privacy > Face recognition. When enrolling facial data, select Enable Pick up to wake device to enhance the Face unlock experience, and set the Face unlock method to Direct unlock. Once the setup is complete, you can simply raise your Phone to unlock the screen, without a password or fingerprint.
If you haven't selected Enable Pick up to wake device to enhance the Face unlock experience when enrolling facial data, you can open  Settings, go to Security & privacy > Face
recognition, and set the Face unlock method to Direct unlock. Then, open  Settings, go to
Smart assistance > Shortcuts & gestures > Wake screen, and select Pick up to wake.
HiSearch: Search for Matching Text and Images
HiSearch can be a handy search tool to locate the apps and files you want.
HiSearch allows you to search through settings, files, contacts and notes while keeping a record of your search history.
1Once your Phone is unlocked, swipe down from the middle part of the home screen to open
HiSearch.
2Enter an app or file name to run a search, then touch  in the search results to easily find the location of the app on the home screen.
3Touch the  icon on the HiSearch interface to review Search scope or Check for updates here.
Access Phone Functions from Anywhere with Navigation Dock
In order to close an app or return to the home screen, you must use the navigation bar at the bottom of your Phone. You can enable the Navigation dock feature on your Phone to avoid using navigation buttons and to comfortably operate your device with one hand.
Open  Settings. Go to System > System navigation > Navigation dock and enable
Navigation dock. The Navigation dock will appear on the screen. You can then drag it to your preferred location. The Navigation dock can perform the following actions:
• Back: Touch the Navigation dock once to go back one step, or touch it twice to go back two steps. • Home: Touch and hold the Navigation dock and then release it to go to the home screen.
2

Exciting Features • View background apps: Touch and hold the Navigation dock and then swipe left or right to view
any apps that are running in the background.
Use Shortcut Switches to Quickly Enable Frequently Used Features
Want to quickly enable or disable mobile data or hotspot? You can enable frequently used features by using shortcut switches.
|
|
|
|
|
|
Organize shortcuts |
Touch and hold to |
|
|
|
|
|
Touch to enable |
|
|
|
|
|||
enter Settings |
|
|
|
this feature |
||
|
|
|
|
|
|
View all shortcuts |
|
|
|
|
|
||
Camera Tips
Master AI, Intelligent Photo Scene dentific tion
Master AI can automatically identify your current photography scene and intelligently adjust the color and brightness of the photo, so you don't need to repeatedly adjust your camera for the perfect shot.
Master AI is a preset camera feature on your Phone that intelligently identifies your current photography scene and automatically adjusts the color and brightness of your photo to help you achieve better effects.
Master AI provides you with the following features:
• Intelligently identifies photographing scenes and improves photo effects: Master AI supports multiple scenes, such as the stage, beach, blue sky, greenery, and text scenes. After smart identification, Master AI automatically adjusts the color and brightness of the camera and recommends an optimal mode (such as the portrait, greenery, or text mode) to improve photo effects.
• Enable Master AI to automatically configure and adjust camera settings: When you open the
camera and enter Standard camera mode, touch  to enable Master AI as required. Once enabled, this feature will intelligently identify the photography scene, which saves you the trouble of repeated manual adjustments.
3

Exciting Features
 • Master AI is only available when you take photos using the rear camera.
•Master AI is automatically disabled when you switch to Portrait mode, Wide aperture mode, or Moving picture mode.
•When you set the color mode to Vivid, the identification of the following photography scenes is not supported: blue sky, greenery, flowers, beach, snow, and autumn leaves. For other scenes, Master AI is still available.
Take Black and White Photos
The world is an amazingly colorful place. But sometimes too many colors can be distracting. Monochrome mode filters out color, helping to bring out light and shadows, and give photos more mood and atmosphere.
Open  Camera > More > Monochrome, and then touch
  to take photos in black and white.
Use Portrait Mode to Take Stunning Portraits
Go to |
Camera > Portrait, select one of the effects, then touch |
to take a portrait. |
|
• Blurred effect: Touch the |
icon in the viewfinder and select a blurred effect. |
||
 A light source (such as neon light or street light) in a relatively well-lit background will contribute to a better blurred effect. Taking a photo from afar will reduce the stage lighting effect.
4

Exciting Features
• Beauty effect:
–Shoot using the rear camera: Touch  in the viewfinder and drag the slider to adjust the beautification settings.
–Shoot using the front camera: Touch  in the viewfinder. Adjust settings as desired for better selfies.
 To disable the beauty effect, touch the
  icon in the viewfinder and drag each setting to its minimum value.
Use Panorama Mode to Take Panoramic Photos
Panoramas provide a wider viewing angle than ordinary photos, letting you take sweeping landscape shots.
To capture a panorama shot, the camera takes multiple photos of objects within our visual field and stitches them together into a single photo.
 When taking a panorama, find a wide, open space that is some distance away from the subject and try to avoid backgrounds that are all in one color.
1
2
Go to  Camera > More > Panorama.
Touch 

 at the bottom of the screen to configure the shooting direction.
3Hold your Phone steady, and then touch  to start shooting. Slowly move the Phone in the direction indicated, holding the device steady and ensuring that the arrow stays level with the center line.
4Touch  when you are finished. The camera will automatically stitch the photos together to create a panorama.
Custom Shooting Modes
Want to discover new ways of using your camera besides the preset functions? You can download or delete shooting modes based on your needs.
5
Exciting Features
Download more shooting modes: Open  Camera > More > Download. Select the shooting modes to download, and touch ADD.
Update shooting modes: To update shooting modes, go to the More screen. The shooting modes with available updates will have red dots next to them. You can follow the onscreen prompts to update them.
Delete shooting modes: Go to More >  , and touch
  to delete unneeded shooting modes.
  To ensure that Camera works normally, preset shooting modes cannot be deleted.
Use AR lens to Shoot Interesting Photos
Use AR lens to make your photos fun and stand out.
Go to  Camera > More > AR lens.
There are several effects to choose from to make your photos stand out:
• 3D Qmoji: Touch 3D Qmoji, and select an animated Qmoji. The Qmoji will then mimic and act out your facial expressions and actions accordingly. Touch  to record, or touch GIF , then touch and hold
  to create your own personalized Qmoji.
Use Pro Mode to Take Scenic Photos
Go to  Camera > Pro.
Adjust metering based on the subject of the shot: On the Pro mode screen, touch 

 and select a metering mode accordingly.
Metering Mode |
Application Scenario |
Matrix |
The subjects are broad landscapes and seas. |
|
|
Center |
The subject is in the center and stands out from the background. |
|
|
Spot |
The subject to be highlighted is relatively small, such as a flower or |
|
a tree. |
|
|
Adjust brightness based on the shooting environment:
• Adjust ISO: On the Pro mode screen, touch |
|
and adjust the slider. |
|
 To avoid excessive image noise, an ISO value below 400 is recommended. The recommended ISO value for the daytime is between 100 to 200, but may exceed 400 for some night scenes.
• Adjust shutter speed: On the Pro mode screen, touch  (shutter speed) and adjust the slider.
  The recommended shutter speed for static scenes (such as mountains) is between 1/80 and 1/125 of a second. For moving scenes (such as waves), select a relatively fast shutter speed and use a tripod for best results.
• Adjust EV compensation: On the Pro mode screen, touch &7 and adjust the slider.
6

|
|
|
|
|
|
|
|
|
|
Exciting Features |
|||
Adjust AWB: On the Pro mode screen, touch "8# and adjust the slider. |
|
|
|||||||||||
• When shooting in bright sunlight, select |
. In low light environments, select |
|
|
|
|
|
|
|
|
. |
|
||
|
|
|
|
|
|
|
|
|
|
||||
|
|
|
|
||||||||||
|
|
|
|
|
|
|
|
|
|||||
|
|
|
|
|
|
|
|
|
|||||
• Touch |
to adjust the color temperature. If you want to give your photo a warm, cozy, |
||||||||||||
nostalgic tone, increase the K value. For a cool, calm, or futuristic tone, reduce the K value. |
|||||||||||||
Select Focus mode based on the subject of the shot: On the Pro mode screen, touch |
"' and |
||||||||||||
adjust the slider. |
|
|
|
|
|
|
|
|
|
|
|
|
|
|
|
|
|
|
|
|
|
|
|
|
|
|
|
Focus Mode |
Application Scenario |
|
|
|
|
|
|
|
|
|
|
|
|
|
|
|
|
||||||||||
AF-S mode |
Static scenes (such as mountains) |
|
|
||||||||||
|
|
|
|
||||||||||
AF-C mode |
Moving scenes (such as flowing water and waves) |
|
|
||||||||||
|
|
|
|
||||||||||
MF mode |
Protruding objects (such as a close-up of a flower |
|
|
||||||||||
|
|
|
|
|
|
|
|
|
|
|
|
|
|
Keep your device steady when shooting: On the Pro mode screen, touch  and enable Horizontal level. A horizontal guiding line will appear on the viewfinder. If a dotted line appears, the camera is not yet parallel with the horizontal level. When the dotted line overlaps with the solid line, the camera is now parallel with the horizontal level.
Save RAW format pictures: Go to  > Resolution, and enable RAW format. After this feature is enabled, pictures taken in Pro mode will be saved in both RAW and standard JPG formats.
 • In Pro mode, changing a specific setting will sometimes cause other settings to change as well. Adjust them according to your actual requirements.
•The recommended settings above are for reference only. Adjust them according to actual usage conditions to achieve your desired effect.
Use Pro Mode to Shoot Portraits
Go to  Camera > Pro.
Select a Metering mode: 

 or
or 

 mode is recommended for taking portraits. Place your shooting subject (for example, a person's face) in the center of the viewfinder.
Adjust brightness based on the shooting environment:
• Adjust ISO: To avoid excessive image noise, it is recommended that you adjust the ISO to a low level when shooting portraits. You may adjust the ISO based on the actual shooting environment.
Shooting Environment |
Recommended ISO |
Outdoors |
Between 100 and 200 |
|
|
Indoors |
Around 400 |
|
|
Night scenes |
Between 400 and 800 |
|
|
7

Exciting Features • Adjust shutter speed: Reduce the shutter speed in low light conditions, and increase it in bright
light conditions. The recommended shutter speed for static portraits is between 1/80 and 1/125 of a second. To shoot moving subjects, select a shutter speed at or above 1/125 of a second.
• Adjust EV compensation: Increase the EV compensation in low light conditions, and decrease it in bright light conditions.
Adjust AWB: Select AWB depending on the lighting conditions. When shooting in bright sunlight,
select |
. In low light environments, select |
|
|
|
|
|
|
|
|
|
. |
|
|
|
|
||||||||
|
|
|
|
|
|
|
|
|
|||
|
|
|
|
|
|
|
|
|
Adjust focus: To better highlight a subject, use manual focus (MF) when shooting portraits. In the viewfinder, touch to focus on the part you want to highlight (the subject's face, for example).
 • In Pro mode, changing a specific setting will sometimes cause other settings to change as well. Adjust them according to your actual requirements.
•The recommended settings above are for reference only. Adjust them according to actual usage conditions to achieve your desired effect.
Working with Ease
Use NFC to Quickly Establish Connections between Devices.
Place the NFC detection areas of two devices close together to quickly establish a Bluetooth or Wi-Fi connection between them. You can also use this method to establish a Wi-Fi Direct connection or share a Wi-Fi hotspot without searching for devices, pairing and entering connection details manually.
8
Exciting Features
NFC
Using Bluetooth pairing as an example, enable NFC, Huawei Beam, and Bluetooth on both devices. Open the Bluetooth pairing screen on both devices and place the NFC detection areas of devices close together. When the sending device plays an audio prompt and content on the screen shrinks, follow the onscreen instructions and touch the screen on the sending device to establish a Bluetooth connection
 • If there is a Read and write/P2P switch on the NFC screen, ensure it is also enabled. Features may vary depending on your carrier.
• Not all devices support NFC.
Transfer Data between Your Phone and Computer
Use a USB cable to connect your Phone to your computer and transfer data.
Select USB connection mode
Use a USB cable to connect your Phone to the computer, you can then select a default connection method. You can transfer photos and files between your Phone and computer, or charge your Phone through the USB connection to your computer.
Swipe down from the status bar to open the notification panel, then touch Settings > Touch for more options and select a method for connecting your device and your computer.
• Transfer photos: Transfer photos between your Phone and computer. • Transfer files: Transfer files between your Phone and computer.
• Charge only: Charge your Phone with just a USB cable.
9
Exciting Features
• Input MIDI: Use your Phone as a MIDI input device and play music on your computer.
Transfer data over a USB port
Connect your Phone to your Computer using a USB cable to transfer data and perform other tasks.
• Transfer files: Media Transfer Protocol (MTP) is a type of transmission protocol for media files. You can transfer files between your Phone and computer using this connection method. First, install Windows Media Player 11 or later on your computer.
Swipe down from the status bar to open the notification panel, and then set your USB connection method to Transfer files. Your computer will automatically install the necessary drivers. After the installation is complete, click the new drive icon named Phone on the computer to view the files on your Phone. You can use Windows Media Player to view the media files on your Phone.
• Transfer images: Picture Transfer Protocol (PTP) is a protocol that allows you to transfer images. You can upload and share photos between your Phone and computer using this connection method.
Swipe down from the status bar to open the notification panel, and then set your USB connection method to Transfer photos. Your computer will automatically install the necessary drivers. After the installation is complete, click the new drive icon named Phone on the computer to view the images on your Phone.
• Transfer MIDI data to your Phone: MIDI (Musical Instrument Digital Interface) is an industry standard audio format for composing music established by electronic instrument manufacturers. Swipe down from the status bar to open the notification panel, and then set your USB connection method to Input MIDI. You can then use Phone to receive and process MIDI messages transmitted by other devices.
Use Huawei Share to Quickly Share Files Between Huawei Devices
You can use Huawei Share to quickly transfer photos, videos and other files between Huawei devices. Huawei Share uses Bluetooth to detect other nearby Huawei devices and then uses Wi-Fi Direct to quickly transfer files without using mobile data.
 Huawei Share uses Wi-Fi and Bluetooth to transfer data. When Huawei Share is enabled, both WiFi and Bluetooth are automatically enabled.
10

Exciting Features
 Huawei Share
Use Huawei Share to send files: Select the files you want to share and then touch Share. To send files, select a receiving device from the list of nearby devices and confirm.
Use Huawei Share to receive files: Swipe down from the status bar to open the notification panel,
and then touch 

 to enable Huawei Share. Touch ACCEPT when the file transfer notification is displayed. Received files are saved by default to your Huawei Share folder in Files.
 No confirmation is required if the two Huawei devices have been logged in using the same HUAWEI ID.
Transfer Files Between Your Phone and Computer with Huawei Share
Want to quickly transfer pictures and videos from your Phone to computer (Windows PC or Mac)? Huawei Share makes it simpler than before, without even needing a USB cable.
From your Phone to your Windows PC
1To start, make sure your Phone is connected to the same network (for example, the same Wi-Fi network) as your computer.
2Open  Settings on your Phone, go to Device connectivity > Huawei Share, then enable Huawei Share and Computer share.
3 On the same screen, check and record the Name shown on computers, then touch erific tion on computers to view and record the username and password.
4On your Windows PC, go to Computer > Network, double click Name shown on computers, and enter the username and password you recorded in the previous step. The Internal storage or Albums folders on your Phone are then displayed on your computer.
11
Exciting Features
 The content of these folders is not automatically saved to your Windows PC, but can be accessed, copied, and saved locally as needed on the computer.
5You can also edit the files or photos in Internal storage or Albums on your Windows PC, and the changes will be synced to your Phone automatically. Similarly, if you edit any files or photos on your Phone, the changes will be synced to your computer as well.
From your Phone to Mac
1To start, make sure your Phone is connected to the same network (for example, the same Wi-Fi network) as your computer.
2Open  Settings on your Phone, go to Device connectivity > Huawei Share, then enable Huawei Share and Computer share.
3 On the same screen, check and record the Name shown on computers, then touch erific tion on computers to view and record the username and password.
4On the Mac, go to Finder > Go to > Network, double-click Name shown on computers, choose to register a user account, and enter the username and password you recorded in the previous step. The Internal storage or Albums folders are then displayed on your Mac.
 The content in these folders is not automatically saved to your Mac, but can be accessed, copied, and saved locally as needed on your computer.
5You can also edit the files or photos in Internal storage or Albums on your Mac, and the changes will be synced to your Phone automatically. Similarly, if you edit any files or photos on your Phone, the changes will be synced to your Mac as well.
 This function is supported on Mac computers running iOS 10.8 or later.
One-Touch Printing with Huawei Share
How do I quickly print travel photos, work files, or my children's homework from my Phone? Experience the ease of one-touch printing with Huawei Share.
 • Huawei Share now supports one-touch printing for images and PDF files.
•For a list of supported printers, touch Learn more in the Huawei Share section (access this section by touching the Share icon on the picture or PDF you want to share), swipe left on the screen, then touch What printers are supported? to see the list.
Huawei Share's one-touch printing feature is convenient and easy to use. To start using it, swipe down from the status bar to display all shortcuts, and enable Huawei Share, then follow the steps below to pair with different types of printers:
• Wi-Fi printer/Wi-Fi Direct printer:
1Power on the printer, and make sure that it connects to the same network as your Phone, or that Wi-Fi Direct is enabled.
2Preview the file you want to print on your Phone, and then touch Share. Once the printer has been discovered, touch its name, and adjust specifications on the preview screen. Then simply touch PRINT to print.
12

Exciting Features • Bluetooth printer: Power on the printer, preview the file you want to print on your Phone, and
then touch Share. Once the printer has been discovered, touch its name, and adjust specifications on the preview screen. Then simply touch PRINT to print.
 When pairing the Bluetooth printer for the first time, start by making sure your Phone can find the printer, then press the power button on the printer for 1 second to ensure successful pairing.
Quickly Share Files Between Your Phone and Computer with Huawei Share OneHop
Huawei Share OneHop allows you to quickly transfer files between your Phone and computer without a cable or third-party app.
 • This feature is supported by HUAWEI MateBooks and Honor MagicBooks running PC Manager 9.1 or later and with the Huawei Share label or Magic-link label.
•Huawei Share OneHop is supported on NFC-enabled devices only. The NFC area is located near the rear camera on the Phone. Locations vary slightly between device models.
Transfer files photos, videos, or recordings with Huawei Share OneHop
1 Swipe down on the notification panel and enable NFC.
 Alternatively, open
  Settings, go to Device connectivity > NFC, and enable NFC.
13
Exciting Features
2Hold the NFC area of your Phone against the Huawei Share label  (or Magic-link label
  ) on your computer until your Phone sounds or vibrates. In the pop-up box on your Phone, touch CONNECT, and follow the instructions to connect your Phone with your computer.
 After your Phone is successfully paired with your computer, the next time you enable NFC and Bluetooth on your Phone, the two devices will be automatically paired when they are within range.
Huawei Share OneHop allows you to do the following:
Share photos and videos
• From your Phone to computer: Open Gallery on your Phone and select up to 500 photos or
videos. Hold the NFC area of your Phone against the Huawei Share label  (or Magic-link label
  ) on your computer until your Phone sounds or vibrates. The selected photos or videos can then be
transferred to your computer. Touch  to identify text in the images sent to your computer and to generate a text file.
• From your computer to Phone: If you exit Gallery or are on the home screen of your Phone, the image opened with Windows Photo Viewer on your computer or your computer's current screenshot will be transferred to your Phone when you tap the NFC area of your Phone against the Huawei Share label on your computer.
Share screen recordings
1Shake your Phone, then hold the NFC area of your Phone against the Huawei Share label  (or
(or
Magic-link label  ) on your computer until your Phone sounds or vibrates. When the computer screen is projected to your Phone, recording starts automatically (for up to 60 seconds).
2Touch  to stop recording on your Phone. The recorded content will be automatically saved to Gallery.
Share files
• From your Phone to computer: Open an Office file on your Phone. Hold the NFC area of your
Phone against the Huawei Share label  (or Magic-link label
  ) on your computer until your Phone sounds or vibrates.
• From your computer to Phone: If you exit Office or are on the home screen of your Phone, the file opened with an Office tool on your computer will be transferred to your Phone when you tap the NFC area of your Phone against the Huawei Share label on your computer.
Share clipboard content: If your Phone is paired with your computer, when browsing a web page or reading an article on your Phone or computer, copy the content you need to the clipboard. The copied content will be shared to the clipboard on both devices.
14

Exciting Features
Share Your Mobile Network with Other Devices
You can share your mobile data with your friends.
15
Exciting Features
-
Use personal hotspot to share mobile data: Open  Settings and go to Wireless & networks
> Personal hotspot. Set Device name and Password, then enable the hotspot to use it.
 Set data limit for shared mobile data: Go to Settings > Wireless & networks > Personal hotspot > More, and touch Data limit to set the data limit for a single session. When this limit is reached, your device will automatically disable the hotspot.
Use Bluetooth to share mobile data: Connect your device to another device using Bluetooth, then
enable Bluetooth tethering to share your mobile data. Open  Settings, go to Wireless & networks > Personal hotspot > More, and enable Bluetooth tethering. On the Bluetooth
settings screen of the paired device, touch  next to the paired device, then enable Internet access to establish an Internet connection and share your mobile data.
Use USB to share mobile data: Use a USB cable to connect your device to a computer. Open 
Settings, go to Wireless & networks > Personal hotspot > More, and enable USB tethering to start sharing your mobile data.
 Depending on your computer's operating system, you may need to install device drivers or establish the relevant network connection on your computer before using this feature. Refer to your computer's operating system guide for more information.
16
Exciting Features
More Features
Use Password Vault
Password vault saves and fills in your passwords, allowing you to log in to apps on your Phone more conveniently and securely.
Enable or disable Password vault: Password vault is enabled by default. After you update your Phone, enable Password vault by performing the following operations:
1Enter the lock screen password to access the Password vault settings. Open  Settings, and go to Security & privacy > Password vault.
2 Enter your lock screen password to access the Password vault screen.
3Enable Password vault. When you log in to an app for the first time or after logging out, select SAVE, and your username and password will be saved. Next time you log in, use the method you picked, for example Face unlock, to automatically fill in your username and password to log in to the app.
4Enable or disable utofill settings for individual apps. If the autofill feature is enabled for an app, you can use your face, fingerprint, or lock screen password to fill in the password when you log in. If this feature is disabled, your username and password must be entered manually.
Enable App Lock
App lock allows you to set a password for your important apps. Once you restart your Phone or unlock the screen, you will be asked to enter your App lock password when opening these apps. App lock adds an extra layer of protection for your private information and prevents unauthorized access to important apps on your Phone.
Enable App lock: Open  Settings. Go to Security & privacy > App lock. When you first access App lock, select Lock screen password or Custom PIN as your App lock verification password. Enter your password as prompted and on the App lock screen, toggle on the switch for the apps you want to lock.
Set your App lock password: Touch  on the App lock screen, then touch Password type. Select Lock screen password or Custom PIN.
Enable PrivateSpace
Do you worry that potentially embarrassing information might be seen by your friends and co-workers when you are showing them photos and other things on your Phone? PrivateSpace lets you store private information in a hidden space within your device that can only be accessed with your fingerprint or password.
 You can add up to three users to Users and PrivateSpace on your Phone. If you have already added three users under Settings > Users & accounts > Users > Add user, you cannot add more users to PrivateSpace.
17

Exciting Features
Enable PrivateSpace: If you are using PrivateSpace for the first time, open  Settings, go to Security & privacy > PrivateSpace > Enable, and follow the onscreen instructions to create your PrivateSpace.
 You can only create one PrivateSpace.
Quickly switch between MainSpace and PrivateSpace: From the lock screen, you can quickly switch between spaces using your fingerprint or password. After you restart your Phone, you are required to first enter the MainSpace using your password. You can then switch between spaces from your lock screen.
Enter PrivateSpace: You can enter your PrivateSpace directly from the lock screen using your
fingerprint or password. Alternatively, open  Settings in MainSpace, and go to Security & privacy > PrivateSpace > Log in to enter your PrivateSpace.
Exit PrivateSpace: After entering your PrivateSpace, open  Settings, and go to Security & privacy > PrivateSpace > Exit. When you exit your PrivateSpace, all system memory used by the PrivateSpace will be freed. You can still switch back to your PrivateSpace when you need it.
Delete PrivateSpace: Deleting your PrivateSpace will permanently delete all apps and data stored within your PrivateSpace and this data will be unable to be restored. You can delete your PrivateSpace in the following ways:
• From the MainSpace, open  Settings, then go to Security & privacy > PrivateSpace and
touch  > Delete PrivateSpace.
• In PrivateSpace, open  Settings, and go to Security & privacy > PrivateSpace > Delete.
Set Your Home Screen Wallpaper
Tired of default wallpapers? Set a photo you like as your home screen wallpaper to personalize your home screen.
Open  Settings, and then go to Home screen & wallpaper > Wallpaper. You can:
Set a picture as your home screen wallpaper: Touch Gallery or select a preset wallpaper in your device, and follow the onscreen instructions to select Lock screen, Home screen or Both.
Set a photo as your wallpaper from Gallery: Have a great photo you want to set as your
wallpaper? In  Gallery, open the photo that you like, go to
  > Set as > Wallpaper, and follow the onscreen instructions to set the photo as your home screen wallpaper.
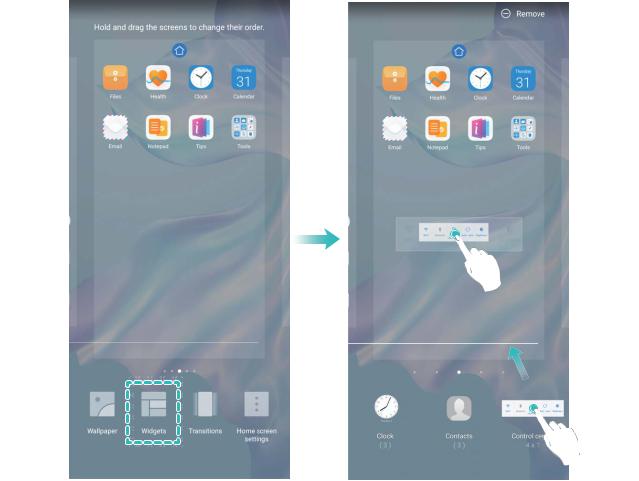
Manage Your Home Screen Widgets
Want to quickly add widgets such as screen lock, weather, notepad, clock, contacts, or calendar to your home screen? You can add, move or delete home screen widgets to tidy up your home screen and ease your usage experience.
18
Exciting Features
Add widgets: Touch and hold an empty area on the home screen to enter home screen editing mode. Touch Widgets, touch and hold a widget and drag it to an empty area on the home screen, or touch the widget you want.
 Check that there are enough empty spaces on the home screen for the widget. If there is not enough space, add an empty screen page or free up some space on the current home screen page.
Delete widgets: Touch and hold a widget on the home screen until your Phone vibrates, and then select Remove.
Move widgets: Touch and hold a widget on the home screen until your Phone vibrates. Drag the widget to any position on the screen.
Use App Drawer to Store Apps
Want to store your apps in one location on your home screen to make your home screen look cleaner? You can enable app drawer on your home screen to store all your apps and free up space on your home screen.
Open  Settings, go to Home screen & wallpaper > Home screen style, and select Drawer. If you want to switch back to a standard home screen, select Standard.
19

Exciting Features
 Add an app icon from app drawer to the home screen: After you enable app drawer, touch
 on the home screen to enter the app list. From the app list, touch and hold the app icon that you want to add until your Phone vibrates, and then drag it to the desired position on the home screen.
Enable TalkBack to Have Onscreen Content Read Aloud
Your Phone reads aloud content on the screen that you touch, select, or activate, helping you interact with your Phone when you can't read content on your screen clearly.
1Open  Settings and go to Smart assistance > Accessibility > TalkBack >
  to enter the TalkBack settings screen.
2Enable TalkBack and touch OK. Your device will launch a tutorial when you enable TalkBack for
the first time. If you need to listen to the tutorial again, touch  to enter the TalkBack settings screen, and launch the tutorial.
3 Touch  and enable Explore by touch. Your device will read aloud content that you touch.
You may have enabled TalkBack by accident. To disable TalkBack, press and hold the Volume up and down buttons for at least three seconds, or press and hold the Power button until your device vibrates, then touch the screen with two fingers for at least three seconds.
Enable Memory Cleanup
Your Phone may slow down over time as your storage space gets smaller. Use Memory cleanup to free up storage space, improve system performance, and keep your Phone running smoothly.
Open  Phone Manager, then touch Cleanup to clean up memory and clear the cache to optimize performance. If your storage space is still low, perform a deep clean to free up additional storage space.
20

New Device
New Device onfigur tion
Connecting to the Internet
Connect to Wi-Fi networks effortlessly with your device.
Connecting to a Wi-Fi network
1 |
Swipe down from the status bar to open the notification panel. |
|
2 |
Touch and hold |
to open the Wi-Fi settings screen. |
3 |
Switch on Wi-Fi. Your device will list all available Wi-Fi networks at your location. |
|
4Select the Wi-Fi network you want to connect to. If you select an encrypted network, you will also need to enter the Wi-Fi password.
Connecting using mobile data
 Before using mobile data, ensure that you have a data plan with your carrier to avoid incurring excessive data charges.
1 Swipe down from the status bar to open the notification panel.
2 Touch  to enable mobile data.
 To save battery power and reduce data usage, disable your mobile data connection when you don't need it.
Enroll Your Facial Information and Enable Face Unlock
Face unlock allows you to unlock your Phone quickly and securely, without the need of a password.  • Face unlock can only be used when the owner account is logged in. It is not supported by
PrivateSpace.
•Face unlock is not available if the lock screen password has not been entered for three or more days in a row, or if your Phone has been remotely locked or restarted.
•When using Face unlock, keep your eyes open, and face your Phone straight on from a distance of 20–50 cm (about 8–20 in.). In order to scan your face accurately, avoid using this feature when you are in a dark environment or facing direct light.
•Currently, only one face can be enrolled. Delete the current facial data to enroll again.
1 Open  Settings. Go to Security & privacy > Face recognition and enter your lock screen password.
 If you haven't set up a lock screen password, set one first. Besides the 6-digit PIN, you can set up other types of passwords: Pattern, 4-digit PIN, Custom PIN, or Password.
21

New Device
2Selecting Enable Pick up to wake device to enhance the Face unlock experience will allow the screen to turn on and unlock when you pick up your Phone and hold it to your face. If you do not need this feature, leave it deselected. Touch Enroll face, and enroll your face.
3Face unlock modes:
• Select an unlock method: On the Face recognition screen, touch Unlock device. If you select Direct unlock, your Phone identifies your facial features and unlocks your screen when the screen is on. If you select Slide to unlock, after your Phone identifies your facial features, you can slide the lock screen to unlock. Selecting Off will disable Face unlock.
•Smart display of lock screen notific tions: Enable Show notific tions. On the lock screen, your Phone hides notification details and displays them only after recognizing the owner's face.
•Access App lock: Enable Access app lock to access App lock and locked apps using Face unlock.
Pick Up to Unlock
Open  Settings, and go to Security & privacy > Face recognition. When enrolling facial data, select Enable Pick up to wake device to enhance the Face unlock experience, and set the Face unlock method to Direct unlock. Once the setup is complete, you can simply raise your Phone to unlock the screen, without a password or fingerprint.
If you haven't selected Enable Pick up to wake device to enhance the Face unlock experience when enrolling facial data, you can open  Settings, go to Security & privacy > Face
recognition, and set the Face unlock method to Direct unlock. Then, open  Settings, go to
Smart assistance > Shortcuts & gestures > Wake screen, and select Pick up to wake.
Enroll a Fingerprint
You can enroll a fingerprint on your Phone and then use your fingerprint to unlock your screen and access your Safe or App lock without a password.
 • When your Phone restarts or your fingerprint is not recognized, you will need to use your lock screen password to unlock.
• Before enrolling a fingerprint, make sure your finger is clean and dry.
1 Open  Settings.
2Go to Security & privacy > Fingerprint ID and follow the instructions to set or enter the lock screen password.
3 Go to New in-screen fingerprint > ENROLL FINGERPRINT to enroll your fingerprint.
4Place your fingertip on the fingerprint sensor and hold until your device vibrates. Repeat this step using different parts of your fingertip.
5 After enrollment is complete, touch OK.
To unlock the screen, simply place your finger on the fingerprint sensor.
22

New Device
Connect to Wi-Fi
By connecting your device to a Wi-Fi network, you can effectively save mobile data.
 To avoid potential security risks (such as unauthorized access to your personal data and financial information), please exercise caution when connecting to a public Wi-Fi network.
Connect to a Wi-Fi Network: Open  Settings, go to Wireless & networks > Wi-Fi, and enable
Wi-Fi. Touch a Wi-Fi network to access it, and enter the network password or complete the authentication if required. Alternatively, you can scroll to the bottom of the menu, touch Add network, and follow the onscreen instructions to add a network hotspot by entering its name and password.
Smart Charging: Charge Your Device Faster and Safer
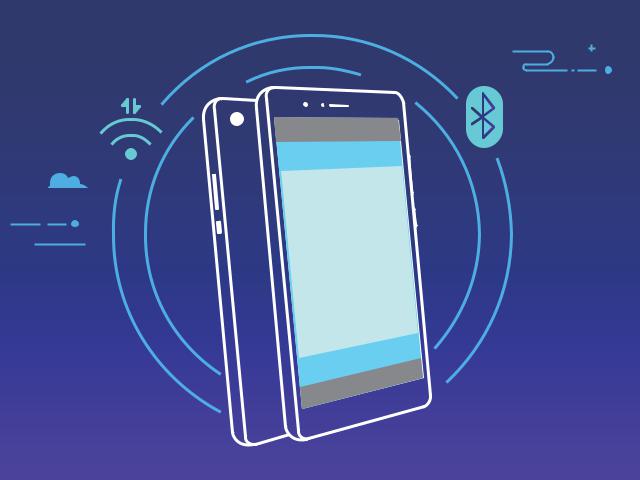
Many people find ordinary charging too slow, but worry about the safety of fast-charging. Worry no more: SmartCharge has you covered. SmartCharge establishes a direct connection between the Phone and the charger and intelligently coordinates the charging voltage and current based on the battery power of the Phone to provide a smarter, faster, and safer charge.
 Make sure you are using the original charger and USB cable when charging your Phone. Using a third-party charger or USB cable may cause repeated restarts, longer charges, overheating, and in extreme cases, Phone battery damage or even explosion.
23

New Device
24

Gestures and Operations
HiVision
HiVision: Start Scanning to Learn More
Want to stick to a healthy diet and keep fit Wish you could understand foreign logos, road signs, and restaurant menus while traveling abroad? Want to quickly get product information for comparisons and to make purchases faster? Use HiVision to get all these done fast and easily.
HiVision can provide you with the following features:
• Scan food: You can scan food to determine the weight, calories, and nutrition facts.
• Identify objects: Scan to identify road signs or famous paintings. A card with relevant information about the geographical locations or the painting will be generated for you.
• Shop: Scan the objects you like to get purchase recommendations.
• Translate: Scan words or phrases in a foreign language for a quick online translation, making your trip abroad a breeze.
• Scan codes: Scan QR codes or bar codes to add contacts or acquire product information.
 • This feature requires access to the Internet to identify objects, scan codes, determine calories in food, shop, and translate.
• This feature is only supported in some countries and regions.
Read QR Codes and Barcodes
Want to quickly read QR code and barcode information? You can use HiVision to quickly read QR codes or barcodes, and get purchase information, add contacts, and more based on the results.  This feature requires an Internet connection. Connect to a Wi-Fi network to avoid incurring
unnecessary data charges.
Scan QR codes or barcodes: Once your Phone is unlocked, swipe down on the home screen, and
touch  to open HiVision. On the HiVision screen, touch
  and place the QR code or barcode within the scan frame to acquire information. From the results screen, you can:
• Touch |
to copy the information to the clipboard. |
|
• If the QR code contains contact information, touch |
to add the information to your Contacts. |
|
Scan to Translate Effortlessly
HiVision can help you quickly translate foreign text.
 • This feature requires an Internet connection. Connect to a Wi-Fi network to avoid incurring unnecessary data charges.
•This translation feature currently supports Chinese, English, Japanese, Korean, French, Russian, Spanish, Italian, German, and Portuguese.
25
Loading...