


 Loading...
HUAWEI HG533 Home Gateway
User Guide
HUAWEI TECHNOLOGIES CO., LTD.

HUAWEI HG533 Home Gateway
V100R001
User Guide
202466_02
Huawei Technologies Co., Ltd. provides customers with comprehensive technical support and service. Please feel free to contact our local office or company headquarters.
Huawei Technologies Co., Ltd.
Address: |
Huawei Industrial Base |
|
Bantian, Longgang |
|
Shenzhen 518129 |
|
People's Republic of China |
Website: |
http://www.huawei.com |
Email: |
mobile@huawei.com |

Copyright © Huawei Technologies Co., Ltd. 2013. All rights reserved.
No part of this document may be reproduced or transmitted in any form or by any means without prior written consent of Huawei Technologies Co., Ltd.
The product described in this manual may include copyrighted software of Huawei Technologies Co., Ltd and possible licensors. Customers shall not in any manner reproduce, distribute, modify, decompile, disassemble, decrypt, extract, reverse engineer, lease, assign, or sublicense the said software, unless such restrictions are prohibited by applicable laws or such actions are approved by respective copyright holders under licenses.
Trademarks and Permissions
 ,
, 


 , and are trademarks or registered trademarks of Huawei Technologies Co., Ltd.
Other trademarks, product, service and company names mentioned are the property of their respective owners.
Notice
Some features of the product and its accessories described herein rely on the software installed, capacities and settings of local network, and may not be activated or may be limited by local network operators or network service providers. Thus the descriptions herein may not exactly match the product or its accessories you purchase.
Huawei Technologies Co., Ltd reserves the right to change or modify any information or specifications contained in this manual without prior notice or obligation.
NO WARRANTY
THE CONTENTS OF THIS MANUAL ARE PROVIDED “AS IS’’. EXCEPT AS REQUIRED BY APPLICABLE LAWS, NO WARRANTIES OF ANY KIND, EITHER EXPRESS OR IMPLIED, INCLUDING BUT NOT LIMITED TO, THE IMPLIED WARRANTIES OF MERCHANTABILITY AND FITNESS FOR A PARTICULAR PURPOSE, ARE MADE IN RELATION TO THE ACCURACY, RELIABILITY OR CONTENTS OF THIS MANUAL.
TO THE MAXIMUM EXTENT PERMITTED BY APPLICABLE LAW, IN NO CASE SHALL HUAWEI TECHNOLOGIES CO., LTD BE LIABLE FOR ANY SPECIAL, INCIDENTAL, INDIRECT, OR CONSEQUENTIAL DAMAGES, OR LOST PROFITS, BUSINESS, REVENUE, DATA, GOODWILL OR ANTICIPATED SAVINGS.
Import and Export Regulations
Customers shall comply with all applicable export or import laws and regulations and will obtain all necessary governmental permits and licenses in order to export, re-export or import the product mentioned in this manual including the software and technical data therein.
Privacy Policy
Please refer to our privacy policy on our websites for the information about how we protect your personal information.
|
Contents |
|
1 Connecting the Cables and Getting Started ........................... |
1 |
|
1.1 |
Connecting Cables Using the ADSL Interface ........................... |
1 |
|
1.1.1 Connecting cables............................................................ |
1 |
|
1.1.2 Getting started .................................................................. |
2 |
1.2 |
Connecting Cables Using the WAN Interface............................ |
2 |
|
1.2.1 Connecting the Cables ..................................................... |
2 |
|
1.2.2 Getting Started.................................................................. |
3 |
1.3 |
Connecting Cables Using the USB Interface............................. |
3 |
|
1.3.1 Connecting the Cables ..................................................... |
3 |
|
1.3.2 Getting Started.................................................................. |
4 |
2 Setting Network-Access Parameters....................................... |
5 |
|
2.1 |
Logging In to Web-based Configuration Utility .......................... |
5 |
2.2 Setting the Parameters When Accessing Network through ADSL |
||
......................................................................................................... |
|
6 |
|
2.2.1 Accessing the Network through the Embedded PPP |
|
|
Dial-Up Software on the HG533................................................ |
6 |
|
2.2.2 Accessing the Network through the PPP Dial-Up Software |
|
|
on Your Computer...................................................................... |
7 |
2.3 |
Setting the parameters When Accessing Network through |
|
Ethernet............................................................................................ |
9 |
|
|
2.3.1 Accessing the Network through the Embedded PPP |
|
|
Dial-Up Software on the HG533................................................ |
9 |
|
2.3.2 Accessing the Network through the PPP Dial-Up Software |
|
|
on Your Computer.................................................................... |
10 |
2.4 |
Setting the parameters When Accessing Network through Data |
|
card ................................................................................................ |
11 |
|
3 Accessing the Network Wirelessly ........................................ |
14 |
|
i
3.1 |
Setting Up a Wireless Connection by Pressing Buttons.......... |
14 |
3.2 |
Setting Up a Wireless Connection Manually............................ |
15 |
4 Configuring the Commonly Used Functions ........................ |
18 |
|
4.1 |
Enabling or Disabling the Wireless Network Function............. |
18 |
|
4.1.1 Enable or disable the wireless network function by press |
|
|
button....................................................................................... |
18 |
|
4.1.2 Enable or disable the wireless network function through |
|
|
Web-based configuration utility ............................................... |
18 |
4.2 |
Using the Home Storage Function........................................... |
19 |
|
4.2.1 Reading and Writing Files on the Portable Storage Device |
|
|
................................................................................................. |
19 |
|
4.2.2 Playing Media Files on a Portable Storage Device ........ |
20 |
4.3 |
Power Saving........................................................................... |
21 |
5 Maintenance Guide ................................................................. |
22 |
|
5.1 Changing the Administrator Password Used for Logging in to the |
||
Web-based Configuration Utility .................................................... |
22 |
|
5.2 |
Changing the Wireless Network Name and the Access |
|
Password ....................................................................................... |
23 |
|
5.3 |
Changing the PIN code for your SIM card ............................... |
23 |
5.4 |
Changing the IP Address Used for Logging in to the Web-based |
|
Configuration Utility........................................................................ |
24 |
|
5.5 |
Restoring Default Settings ....................................................... |
25 |
6 FAQs......................................................................................... |
26 |
|
7 Appendix.................................................................................. |
30 |
|
7.1 |
Indicators.................................................................................. |
30 |
7.2 |
Interfaces and Buttons ............................................................. |
32 |
7.3 |
Default Settings........................................................................ |
33 |
7.4 Technical Specifications ........................................................... |
34 |
|
ii
1 Connecting the Cables and Getting
Started
Thank you for purchasing the HUAWEI HG533 Home Gateway (hereinafter referred to as the HG533).
You can go online using the ADSL, LAN, and data card services. However, you can only use one type of service at one time. The default way of going online is using the ADSL service, though you can go online using the data card service when you cannot access the network using the ADSL or Ethernet services.
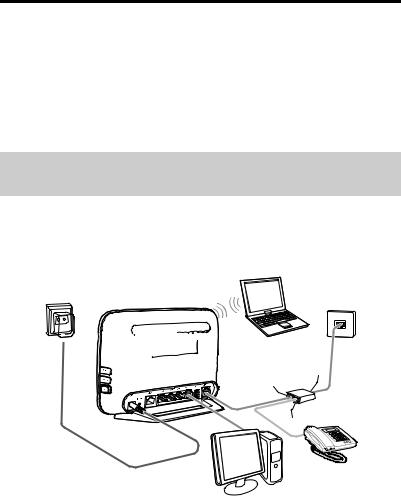
1.1Connecting Cables Using the ADSL Interface
1.1.1 Connecting cables
If there is at least one available telephone jack in your home, you can go online using the ADSL service.
5


 6 1
6 1 
c
a 4
b


 3
3
 2
2
1
1. |
Power adapter |
2. |
Desktop Computer |
3. |
Telephone |
4. |
Splitter |
5. |
Telephone wall jack |
6. |
Laptop Computer |
a. |
MODEM interface |
b. |
PHONE interface |
c. |
LINE interface |
1.1.2 Getting started
After connecting the cables, press the On/Off button on the side panel to power on the HG533.
The ADSL indicator lights up and starts blinking. This indicates that the ADSL port activation is in progress. The blinking may last less than 3 minutes. When the ADSL indicator stops blinking and remains on, the HG533 is working properly.
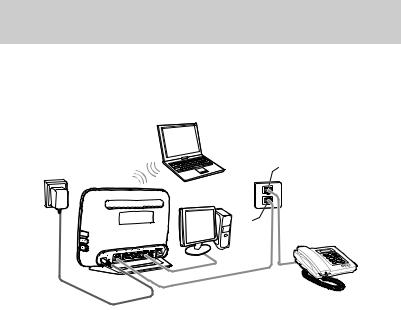
1.2Connecting Cables Using the WAN Interface
1.2.1 Connecting the Cables
If there is at least one available network wall jack in your home, you can go online using the Ethernet service.
|
5 |
1 |
b |
3
|
|
|
a |
2 |
|
|
|
|
|
|
|
|
4 |
|
1. |
Power adapter |
2. |
Telephone |
3. Wall jack |
4. |
Desktop Computer |
5. |
Laptop Computer |
|
a. |
Ethernet wall jack |
b. |
Telephone wall jack |
|
2
1.2.2 Getting Started
After connecting the cables, press the On/Off button on the side panel to power on the HG533.
The WAN indicator light turns on. This indicates that the HG533 is working properly. When the WAN indicator light starts blinking, data is being transmitted between the HG533 and the connected device.
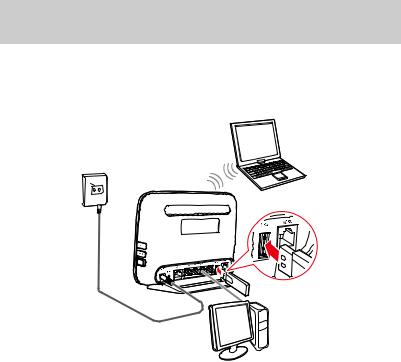
1.3Connecting Cables Using the USB Interface
1.3.1 Connecting the Cables
If there are no available telephone or network jacks in your home, you can go online using the data card service.
4
 1
1
3
 2
2
1. Power adapter 2. Desktop Computer 3. Data card 4. Laptop Computer
3
1.3.2 Getting Started
Press down the On/Off button on the side of the HG533 to power on the HG533.
The USB indicator light turns on, this indicates that the HG533 is working properly. When the USB indicator light starts blinking, data is being transmitted between the HG533 and the connected device.
4
2 Setting Network-Access Parameters
2.1Logging In to Web-based Configuration Utility
The HG533 provides an easy-to-use web-based configuration utility. You can view and set the parameters of the HG533 through this utility. The following example uses a computer running the Windows XP operating system to describe how to log in to the web-based configuration utility:
Step 1 Set the network connection of your PC and ensure that your PC obtains an IP address automatically, do as follows:
1.Choose Start > All Programs > Accessories > Communications > Network Connections.
2.In the Network Connections window, right-click the working
Local Area Connection and choose Properties.
3.In the This connection uses the following items group box of the Local Area Connection Properties dialog box, select Internet Protocol (TCP/IP). Click Properties.
4.Ensure that your PC select Obtain an IP address automatically.
By default, the DHCP function of the HG533 is enabled. In this case, the HG533 assigns an IP address to your PC automatically and you do not need to configure the IP address of your PC.
Step 2 Start the Internet Explorer on your PC and ensure that the Internet Explorer does not use any proxy server.
Take the Internet Explorer 6.0 as an example. To ensure that the Internet Explorer does not use any proxy server, do as follows:
1.Start the Internet Explorer. Choose Tools > Internet Options.
2.On the Connections tab of the Internet Options dialog box, click
LAN Settings.
3.In the Proxy Server area, ensure that Use the proxy server for your LAN is cleared. If Use the proxy server for your LAN is
5
selected, clear Use the proxy server for your LAN, and then click OK.
4. In Internet Options window, click OK to close the window.
Step 3 Launch a browser on your computer. Enter http://192.168.1.1 in the address box, and press Enter.
Step 4 On the login page, enter your user name and password.
By default, both the user name and password are admin. In order to prevent unauthorized users from modifing your configuration parameters, please change the password for login.
If the password has been changed, use the correct password to log in.
Step 5 Click Login.
After the verification, the web-based configuration utility is displayed.
2.2Setting the Parameters When Accessing Network through ADSL
By configuring the HG533 and your computer, you can choose any of the following methods to surf the Internet:
Accessing the Network through the Embedded PPP Dial-Up Software on the HG533
Accessing the Network through the PPP Dial-Up Software on Your Computer
2.2.1Accessing the Network through the Embedded PPP Dial-Up Software on the HG533
If you select this method for accessing the network, the HG533 starts to set up a dial-up connection automatically after starting up. You can access the network after you power on your computer. You do not need to install any special dial-up software on your computer or perform dial-up operations on your computer.
To configure the HG533 and your computer for the network access, do as follows:
6
Step 1 Verify the HG533 and the PC have connected properly, and the PC has obtained the IP address.
Step 2 Log in to the web-based configuration utility of the HG533. Step 3 Enable the embedded dial-up function.
1.In the navigation tree on the left of the web-based configuration utility, choose Basic > WAN.
2.Select Enable for WAN connection.
3.Enter the VPI and VCI parameters that are provided by the network operator in the VPI/VCI text boxes.
4.Select INTERNET from the Service list.
5.Select PPPoE from the Connection type drop-down combo box.
6.Enter the user name and password that are provided by the network operator in the User name and Password text boxes.
7.Keep the default settings of other parameters.
8.Click Submit.
After completing the preceding configuration steps, you can begin browsing the Internet.
You only need to perform the preceding operations on a computer once. The next time you boot up your computer, you can browse the Internet without performing the same configurations.
2.2.2Accessing the Network through the PPP Dial-Up Software on Your Computer
If you select this method for accessing the network, you need to install and configure the dial-up software on your computer. In addition, you need to perform dial-up operations on your computer upon each startup.
To configure the HG533 and your computer for the network access, do as follows:
Step 1 Set the working mode of the HG533 to Bridge.
1.Log in to the web-based configuration utility of the HG533.
2.In the navigation tree on the left of the web-based configuration utility, choose Basic > WAN.
7
Loading...