


 Loading...
 GT3
GT3
User Guide
Contents
Exciting New Features
Pro camera mode |
1 |
Screen recorder |
2 |
Unboxing your Phone
Inserting a SIM card and microSD card |
3 |
Charging your phone |
3 |
Turning your phone on and off |
4 |
Transferring Data
Using the Backup application to transfer data |
5 |
Transferring data between your phone and a computer |
7 |
Copying contacts from an old phone to a new phone |
7 |
First Use and Initial Setup
Initial setup |
8 |
Dual SIM settings |
8 |
Connecting to the Internet |
10 |
Configuring your fingerprint ID |
11 |
Installing Applications
Sharing applications using a microSD card |
12 |
Uninstalling an application |
12 |
Getting Started
Locking and unlocking the screen |
13 |
Touchscreen gestures |
14 |
Status and notification icons |
16 |
Home screen |
17 |
Taking a screenshot |
22 |
Notifications |
23 |
Using fingerprint recognition |
26 |
Accessing applications |
28 |
Personalizing your phone |
31 |
Entering text |
33 |
Tips and Tricks
High volume mode |
34 |
Searching for settings |
34 |
Quickly returning a call |
34 |
Sharing your QR card |
35 |
Calling contacts when the screen is off |
35 |
i
|
Contents |
Pocket mode |
35 |
Taking snapshots when the screen is off |
36 |
Perfect selfie |
36 |
Using time-lapse mode to fast forward the action |
37 |
Taking photos while recording video |
37 |
Finding applications quickly |
38 |
Connecting to the Wi-Fi network with the strongest signal |
39 |
Using your phone while wearing gloves |
39 |
Adjusting the system volume rapidly |
40 |
Using the floating dock |
40 |
Aligning home screen applications automatically |
41 |
Touch-disable mode |
41 |
Calls and Contacts
Making calls |
42 |
Answering or rejecting a call |
44 |
Functions available during a call |
45 |
Answering a third-party call |
46 |
Making a conference call |
46 |
Viewing the call log |
47 |
Turning on pocket mode |
47 |
Call settings |
48 |
Creating a contact |
49 |
Importing or exporting contacts |
50 |
Managing contacts |
52 |
Finding a contact |
53 |
Viewing contacts from different accounts |
53 |
Adding a contact to your favorites |
53 |
Contact groups |
54 |
Messaging and Email
Sending a message |
56 |
Replying to a message |
57 |
Searching for messages |
57 |
Deleting threads |
57 |
Managing messages |
57 |
Blocking spam messages |
58 |
Managing common phrases |
58 |
Adding a message signature |
58 |
Adding an email account |
59 |
Sending an email |
60 |
Checking your emails |
61 |
Managing VIP contacts |
61 |
ii
|
Contents |
Account settings |
61 |
Camera and Gallery
Accessing the viewfinder |
63 |
Taking a photo |
63 |
Shooting modes |
64 |
Beauty mode |
64 |
Perfect Selfie mode |
65 |
Ultra Snapshot |
66 |
Burst shooting |
67 |
Voice activated shooting |
67 |
Launching the camera from Gallery |
68 |
Object tracking |
68 |
Audio notes |
69 |
HDR mode |
69 |
Pro camera mode |
70 |
Light Painting mode |
72 |
Panoramic shots |
75 |
Adding watermarks to photos |
77 |
Shooting a video |
78 |
Time-lapse mode |
78 |
Slow motion recording |
79 |
Document correction |
79 |
Camera and video settings |
80 |
Viewing photos and videos |
82 |
Adding photos or videos to a new album |
83 |
Moving photos or videos to other albums |
84 |
Deleting images or videos |
84 |
Sharing images or videos |
84 |
Managing albums |
84 |
Adding notes to an image |
84 |
Editing an image |
85 |
Using Camera or Gallery to scan a QR code |
86 |
Music and Video
Adding songs to your phone |
87 |
Searching for local music |
87 |
Listening to music |
87 |
Controlling playback using a smart headset |
88 |
Creating a playlist |
89 |
Playing a playlist |
90 |
Setting a song as the ringtone |
90 |
Playing a video |
90 |
iii
|
Contents |
Accessing the Internet |
|
Connecting to the Internet using mobile data |
91 |
Connecting to the Internet using Wi-Fi |
91 |
Sharing your mobile Internet with other devices |
93 |
Transferring data using Bluetooth |
95 |
Transferring data using Wi-Fi Direct |
96 |
Streaming multimedia content to your TV |
98 |
NFC and payment |
98 |
Backup and Restore |
|
Using the Backup application to back up and restore data |
100 |
Restoring factory settings |
101 |
Updating your phone |
101 |
OTA updates |
102 |
File Management |
|
Viewing files |
103 |
Sharing files |
103 |
Creating folders |
104 |
Renaming files |
104 |
Copying, moving, or deleting files |
104 |
Creating or extracting archives |
104 |
Excluding small images |
105 |
Storing private files in a safe |
105 |
Power Management |
|
Viewing battery usage statistics |
106 |
Reducing power consumption |
106 |
Enabling the Ultra power plan |
107 |
Closing background applications when the screen is locked |
107 |
Preventing background applications from accessing the Internet |
107 |
Configuring display and sound settings |
108 |
Phone Manager |
|
Optimizing your system |
109 |
Managing data usage |
109 |
Harassment filter |
109 |
Battery management |
110 |
Tools |
|
Calendar |
111 |
Clock |
112 |
Weather |
115 |
Notepad |
116 |
|
iv |
|
Contents |
Calculator |
117 |
Sound recorder |
117 |
Mirror |
119 |
Settings
Enabling location access |
120 |
Increasing indoor positioning accuracy |
120 |
Configuring the display settings |
121 |
Sound settings |
122 |
Changing the screen unlock method |
122 |
Gestures and navigation settings |
123 |
Airplane mode |
123 |
Using the floating dock |
124 |
Setting your SIM card PIN |
125 |
Setting up an account |
126 |
Setting the date and time |
127 |
Changing the system language |
127 |
Viewing your phone's specifications |
127 |
Viewing the available storage space |
127 |
Formatting the microSD card |
127 |
Accessibility Features
About your phone's accessibility features |
128 |
TalkBack |
128 |
Magnification gestures |
130 |
Using the power button to end a call |
131 |
Adjusting the screen response time |
132 |
Color correction |
132 |
Appendix
Obtaining help |
133 |
Personal Information and Data Security |
133 |
List of safety features |
135 |
Legal Notice |
135 |
v
Exciting New Features
Exciting New Features
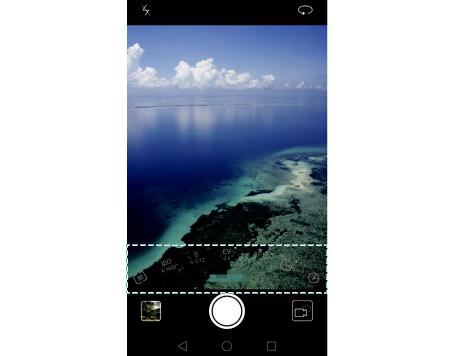
Pro camera mode
Pro camera mode lets you fine-tune photos and gives you full control over composition, exposure, and shutter speed.
1Open  Camera. Swipe right on the screen, and then select Pro photo. Touch
  to take a photo.
2Configure the camera settings, such as exposure and shutter speed.
•Add overlay: Swipe left on the screen and touch Assistive grid. You can choose from a 3 x 3 grid or spiral overlay to help you compose your image. For more information, see Adding an overlay.
•Shutter speed and exposure control: Adjust the parameters at the bottom of the screen to produce a perfectly-exposed shot. You can set the ISO, shutter speed, white balance, exposure compensation, focus mode, and metering mode.
For more information, see Pro camera mode.
1
Exciting New Features
Screen recorder
Use the screen recorder feature to record video game footage or teach friends and family how to use phone features.
 To protect your privacy, unlock your phone before recording your screen.
Starting the recording
Press the volume up and power buttons simultaneously and select the desired recording mode.
You can choose from HD mode or Mini mode. Mini mode records in a lower resolution, resulting in smaller file sizes and faster upload speeds.
 •Audio will also be recorded, therefore make sure that you are in a quiet environment.
•Recording will stop automatically when you make or receive a call.
•When making a screen recording, you will not be able to use the recording feature in other applications.
•Longer recordings will take up more space on your phone's internal storage, so ensure there is enough space before recording.
Stopping the recording
Stop recording the screen using one of the following methods:
•
•
Press the volume up and power buttons simultaneously.
Touch the screen recording icon in the upper left corner of the status bar.
Open the notification panel and touch  to share your screen recording.
By default, screen recordings are stored in Gallery, within the Screen recordings folder.
2
Unboxing your Phone
Unboxing your Phone
Inserting a SIM card and microSD card
Your phone's 2-in-1 card slot is located on the upper left side of the phone. You can insert 2 nano-SIM cards, or 1 nano-SIM card and 1 microSD card.
Tips:
•Your phone only supports nano-SIM cards. Contact your carrier for a new or replacement nanoSIM card.
•Only use standard nano-SIM cards to avoid damaging the SIM card tray.
•Ensure that the card is in the correct position and keep the card tray level when inserting it into your phone.
•Be careful not to hurt yourself or damage your phone when using the SIM eject pin.
•Store the SIM eject pin out of the reach of children to prevent accidental swallowing or injury.
1Press and hold the power button, and then select  to turn off your phone.
2To remove the card tray, insert the SIM eject PIN included with your phone into the small hole next to the card tray.
3Insert a SIM card or microSD card into the card tray.
4Insert the card tray back into your phone in the correct orientation.
Charging your phone
Your phone comes with a long-lasting battery and efficient power-saving technology. This section outlines how to care for your battery in order to maximize its lifespan.
Using your battery
•You can recharge your battery many times, but all batteries have a limited lifespan. If you notice a significant deterioration in your phone's battery life, contact an authorized Huawei service center for a replacement battery. The battery is built into the phone and is not removable. Do not attempt to remove the battery yourself.
•Your phone may become warm after prolonged use or when exposed to high ambient temperatures. This is entirely normal. If your phone becomes hot to the touch, stop charging it and disable unnecessary features. Place your phone in a cool location and allow it to cool down to room temperature. Avoid prolonged contact with the surface of your phone if it becomes hot.
3
Unboxing your Phone
•When charging your phone, only use genuine Huawei batteries, chargers, and USB cables. Third-party accessories are a potential safety hazard and may impair your phone's performance. Avoid using your phone when it is charging. Do not cover your phone or the power adapter.
•Charging times may vary depending on the ambient temperature and the remaining battery level.
•A low battery warning will be displayed when the battery level is low.
•Your phone will switch off automatically when the battery is nearly empty.
Visit the official Huawei website and download the user guide for your device for information on how to care for your battery.
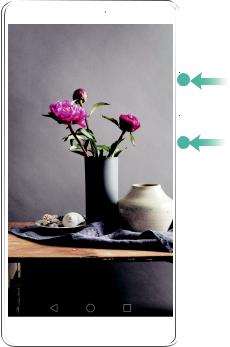
Battery status indicator
The battery status is indicated by your phone's indicator light and the battery icon in the status bar.
•If the status indicator blinks red and the battery icon changes to  the battery level is below 10%.
•The status indicator and the battery icon indicate the battery status during charging. A red
status indicator and a  battery icon indicate that the battery level is below 10%. A yellow
status indicator and a  battery icon indicate that the battery level is between 10% and 80%.
A green status indicator and a  battery icon indicate that the battery level is between 80%
and 100%. A green status indicator and a  battery icon indicate that the battery is fully charged and you can unplug the charging cable from your phone.
If your phone does not respond when you press the power button, this indicates that the battery is empty. Charge your battery for at least 10 minutes using a genuine Huawei charger, and then turn on your phone.
Turning your phone on and off
•To turn on your phone, press and hold the power button until your phone vibrates and the screen turns on.
•To turn off your phone, press and hold the power button, and then touch  .
.
 If your phone does not respond after holding down the power button for 20 seconds, the battery may be empty. If so, connect your phone to a charger to charge the battery.
4
Transferring Data
Transferring Data
Using the Backup application to transfer data
Use the Backup application to transfer data from your old phone to your new phone.
 Features may vary depending on your carrier.
Back up new data
Restore previously backed up data
More settings
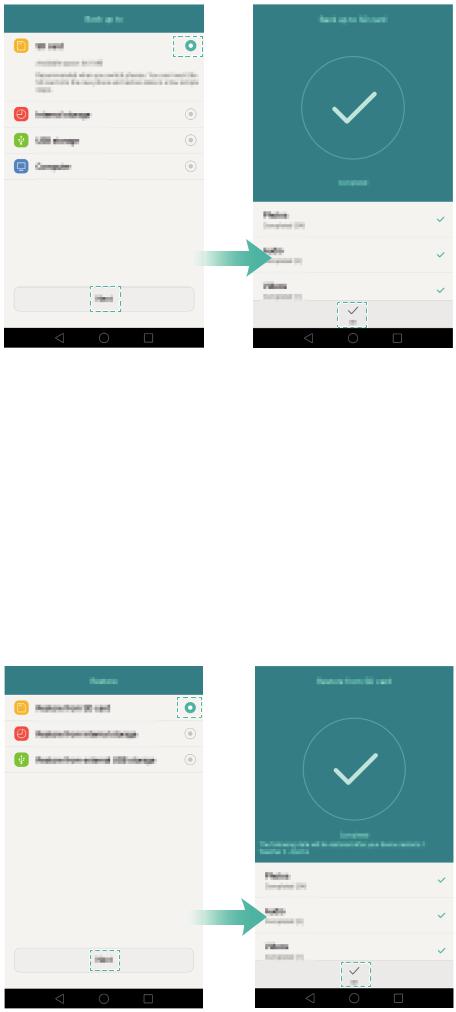
Backing up data to a microSD card
You can back up data on your old phone to a microSD card. For more information on inserting or removing a microSD card, see Inserting a SIM card and microSD card.
 Date that can be backed up: contacts, messages, call log, photos, audio, videos, files, and applications.
1Open  Backup.
2Touch Backup > SD card > Next.
3Select the data you want to back up. No backup password is required if you back up photos, audio, videos, and documents. To back up other types of data, follow the onscreen instructions to set a backup password.
5
Transferring Data
 By default, backup data is saved to the HuaweiBackup folder in Files.
Restoring data from a microSD card
1Insert the microSD card containing the backup files into your new phone. For more information on inserting microSD cards, see Inserting a SIM card and microSD card.
2Open  Backup.
3Touch Restore > Restore from SD card > Next.
4Select the backup you want to restore.
 If the backup data is encrypted, enter the encryption password when prompted.
5 Select the data you want to restore, and then touch Restore.
6

Transferring Data
Transferring data between your phone and a computer
Transfer the data on your old phone to your computer, and then transfer it to your new phone.
Connect your phone to a computer using a USB cable. Select Photos or Files. Your computer will automatically install any necessary drivers. Once installed, double-click on the new disk drive to manage files. The drive name should be your phone's model number.
•Photos: View photos that are stored on your phone.
•Files: Transfer files between your phone and a computer.
•If no connection type is specified, your phone will remain in charging mode.
Copying contacts from an old phone to a new phone
Use any of the following methods to copy contacts from your old phone to your new phone.
SIM card
Use the SIM import feature to copy SIM card contacts to your new phone. For more information, see Importing contacts from a SIM card.
If both phones have a microSD slot, export your contacts to a microSD card in Storage device vCard format on the old phone, and then copy the contacts to the new phone.
For more information, see Importing contacts from a storage device.
Bluetooth
Enable Bluetooth on both your old and new phones, and import your contacts using Bluetooth. For more information, see Importing contacts using Bluetooth.
If your old phone supports Backup, back up your contacts, and restore them to Backup your new phone. For more information, see Using the Backup application to
back up and restore data.
Computer
Sync contacts on your old phone to a computer, and then sync these to a new phone using a phone management application (such as HiSuite).
Other methods
•Install social networking applications and synchronize your contacts.
•Log in to your Exchange account and synchronize your contacts.
7
First Use and Initial Setup
First Use and Initial Setup
Initial setup
Ensure that the SIM card is inserted correctly before using your phone for the first time. Read the Quick Start Guide for more information on how to set up your phone.
Press and hold the power button to turn on your phone, and then follow the onscreen instructions to complete the initial setup.
1Select your language and region, and then touch Next.
2Proceed to the Wi-Fi settings screen. Your phone will automatically list available Wi-Fi networks. Select the network you want to connect to, and then enter the password to access the Internet.
3Proceed to the Terms and Conditions screen. Read the content carefully, accept the user terms and Huawei Privacy Policy, and then touch Next.
4Follow the onscreen instructions to enable Wi-Fi+.
5Your phone has a fingerprint sensor. Follow the onscreen instructions to add your fingerprint. You also need to set a PIN or password in order to unlock the screen when your phone fails to recognize your fingerprint.
6On the Configuration successful screen, touch Begin to complete the settings. Wait for a moment and the EMUI interface should launch. You can now start using your phone.
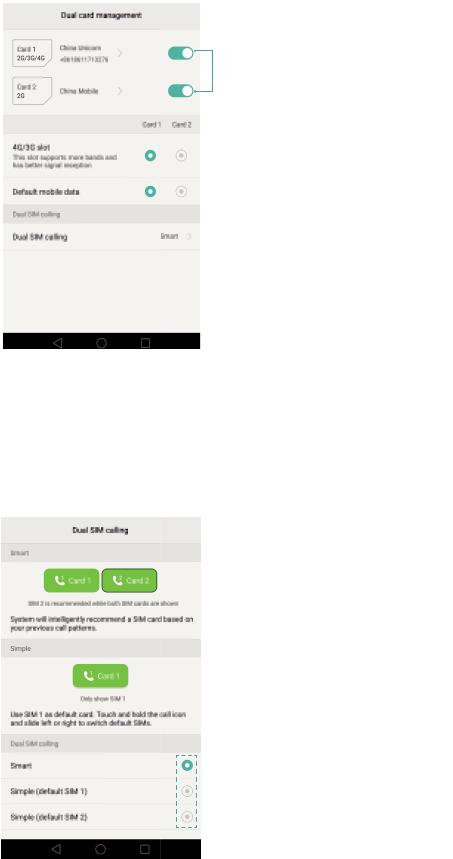
Dual SIM settings
When two SIM cards are inserted, only one SIM card can be set as the 4G/3G/2G SIM. The other SIM card slot only supports 2G networks. You can also configure the default card for mobile data and phone calls according to your monthly plan.
 This feature only applies to dual SIM phones.
Open  Settings and touch Dual card management. You can configure both SIM cards as desired.
8
First Use and Initial Setup
 Enable or disable a SIM card
 Select 4G/3G SIM
 Select default SIM for data services
 Configure SIM settings for phone calls
 •If you disable a SIM card, you will be unable to use it to make calls, send messages, or access the Internet.
•Select Dual SIM calling. You can configure whether you want to select a SIM card manually or use the default SIM card each time you make a call. If you choose to use the default SIM card, your phone will use that SIM card for all outgoing calls.
 Select SIM display mode for phone calls
9
First Use and Initial Setup
Connecting to the Internet
Connect to the Internet using Wi-Fi or mobile data to surf the web, play games, and use instant messaging applications.
Connecting to a Wi-Fi network
1Swipe down from the status bar to open the notification panel.
2In the Shortcuts tab, touch and hold  to open the Wi-Fi settings screen.
3Turn on the Wi-Fi switch. Your phone will list available Wi-Fi networks.
4Select the Wi-Fi network you want to connect to. If the Wi-Fi network is encrypted, enter the password when prompted.
Using mobile data
 Before using mobile data, ensure that you have a data plan with your carrier.
1Swipe down from the status bar to open the notification panel.
2In the Shortcuts tab, touch  to enable mobile data.
10
First Use and Initial Setup
 Disable mobile data when not required in order to save battery power and reduce data usage.
Configuring your fingerprint ID
Use the fingerprint sensor to unlock the screen, access the Safe and App Lock, and authorize payments in third-party applications.
 •fingerprint ID may not be available on all phones.
•For added security and to ensure that you can still access your data if your phone fails to recognize your fingerprint, you will need to set a backup password when configuring fingerprint unlock.
1Open  Settings and touch Fingerprint ID > Fingerprint management.
2Select PIN or Password, and then follow the onscreen instructions to set a screen lock password.
3Once you have configured the password, touch New fingerprint to add your fingerprint.
4Place your fingertip on the fingerprint sensor. Press down lightly on the sensor until your phone vibrates. Repeat this step using different parts of your fingertip until your phone has successfully added your fingerprint.
5Once you have added your fingerprint, touch OK.
On the Fingerprint management screen, turn off the Unlock screen switch to disable fingerprint unlock.
 To delete a fingerprint, select the desired fingerprint on the Fingerprint management screen, touch Delete, and then follow the onscreen instructions.
11

Installing Applications
Installing Applications
Sharing applications using a microSD card
Save installation packages to a microSD card to share them with other phones.
 Installation packages from third-party sources may contain viruses or malicious software and should be installed with caution. Only install applications from trusted sources.
1Insert the microSD card containing the installation package into your phone.
2Open  Files, locate the installation package on the microSD card, and then touch to install.
A warning message may be displayed during the installation process. Always read these messages carefully. If you wish to proceed with the installation, touch Settings and then turn on the Unknown sources switch to allow your phone to install third-party applications. After you have finished installing the application, touch Settings > Advanced settings > Security and deselect Unknown sources to prevent your phone from installing applications downloaded from unofficial sources.
After installation, the application will be visible on your home screen.
Uninstalling an application
Free up space on your phone and boost performance by removing unused applications.
 Some pre-installed system applications cannot be removed.
•On the home screen, touch and hold the application you want to uninstall and drag it to the
 icon.
icon.
•Touch Settings > Apps, select the application you want to uninstall, and then touch Uninstall.
12
Getting Started
Getting Started
Locking and unlocking the screen
Locking the screen
•Press the power button to manually lock the screen.
•The screen will lock automatically and enter sleep mode after it has been idle for a certain period to reduce power consumption and prevent unintended operations.
 To change the screen sleep time, open
  Settings, touch Display > Sleep, and then select a time.
Your phone will continue to receive messages, notifications, and incoming calls when the screen is locked. The status indicator will flash green when you receive new notifications. When you receive an incoming call, the screen will turn on and display the caller information.
Unlocking the screen
When the screen is off, press the power button to wake the screen. Slide your finger in any direction to unlock the screen.
13
Getting Started
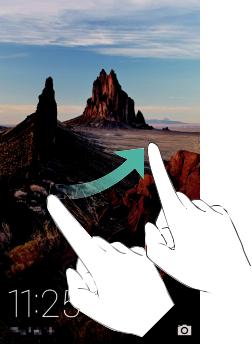
Magazine Unlock
Use Magazine Unlock to create your own selection of lock screen images and bring your lock screen to life.
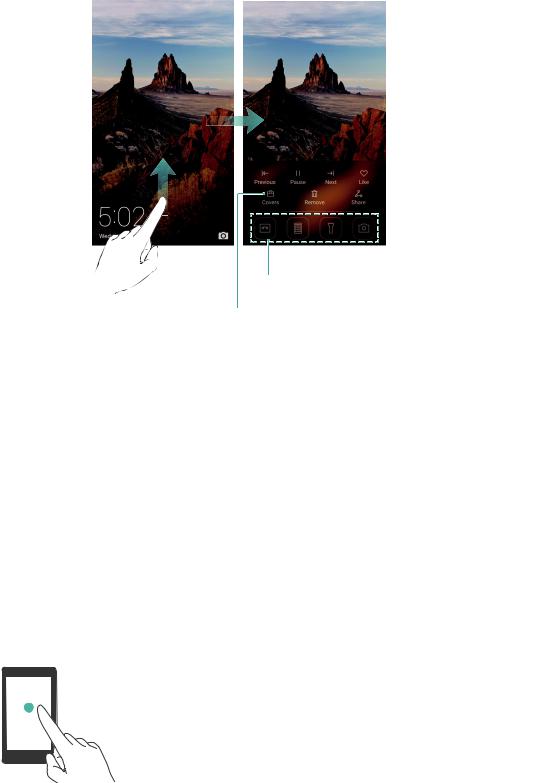
Swipe up from the bottom of the lock screen to display the Magazine Unlock options.
App shortcuts
View, add, or delete images from your Magazine
Unlock covers
Manage Magazine Unlock covers: Touch  , and then touch
  . Select the desired images
to add them to the viewing list. To delete covers from the viewing list, touch  , and then touch and hold the desired image and select Remove.
Add covers to favorites: Touch  to add the current cover to your favorites. Images that have been added to your favorites will not be deleted from the viewing list after an online update.
Touchscreen gestures
Use simple touchscreen gestures to perform a variety of tasks, such as open applications, scroll through lists, and zoom images.
Touch: Touch an item once. For example, touch to select an option or open an application.
14
Getting Started
Double touch: Touch the target area of the screen twice in quick succession. For example, double touch an image in full screen mode to zoom in or out.
Touch and hold: Touch and hold the target area of the screen for at least 2 seconds. For example, touch and hold a blank area on the home screen to access the home screen editor.
Swipe: Swipe your fingers on the screen. For example, in the Notifications tab, swipe left or right on a notification to dismiss it. Swipe vertically or horizontally to go to other home screens, scroll through a document, and more.
Drag: Touch and hold an item, and then move it to another position. For example, use this gesture to rearrange applications and widgets on the home screen.
Spread fingers apart: Spread two fingers apart on the screen. For example, spread two fingers apart to zoom in on a picture or web page.
Pinch fingers together: Pinch two fingers together on the screen. For example, pinch two fingers together to zoom out on an image.
15
Getting Started
Status and notification icons
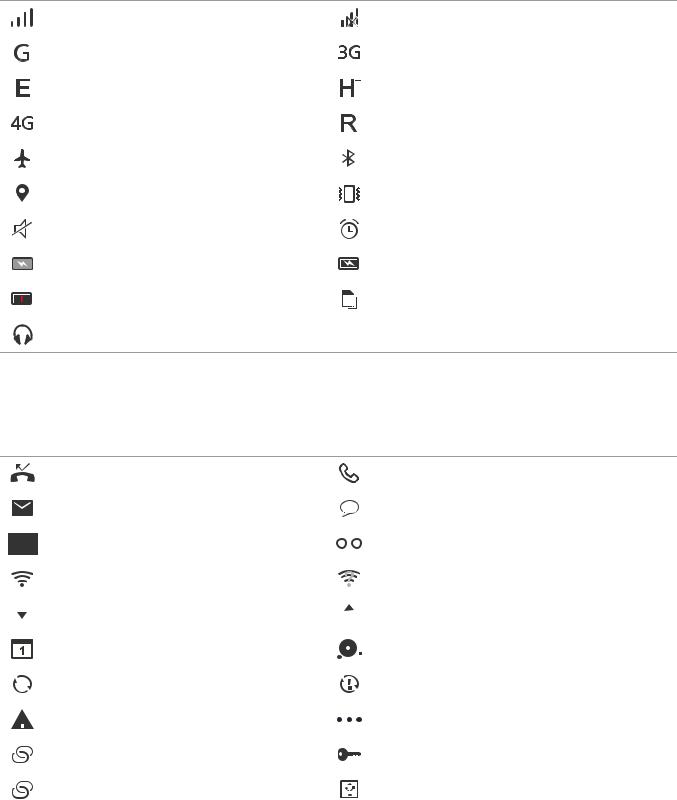
Status icons
Status icons are displayed on the right-hand side of the status bar. Status icons display information about your phone's status, such as network connection information, signal strength, battery level, and time.
 Status icons may vary according to your region or carrier.
|
|
|
Signal strength |
|
|
|
No signal |
|
|
|
|
|
|
|
|
|
|
|
Connected over GPRS |
|
|
|
Connected over 3G |
|
|
|
|
|
|
|
|
|
|
|
Connected over EDGE |
|
|
|
Connected over HSPA+ |
|
|
|
|
|
|
|
|
|
|
|
Connected over LTE |
|
|
|
Roaming |
|
|
|
|
|
|
|
|
|
|
|
Airplane mode enabled |
|
|
|
Bluetooth enabled |
|
|
|
|
|
|
|
|
|
|
|
Receiving location data from GPS |
|
|
|
Vibration mode enabled |
|
|
|
|
|
|
|
|
|
|
|
Silent mode enabled |
|
|
|
Alarm enabled |
|
|
|
|
|
|
|
|
|
|
|
Charging |
|
|
|
Battery full |
|
|
|
|
|
|
||
|
|
|
|
|
|
|
|
|
|
|
Battery low |
|
|
|
No SIM card found |
|
|
|
|
|
|
||
|
|
|
|
|
|
|
|
|
|
|
|
|
|
|
|
|
|
|
Headset inserted |
|
|
|
|
Notification icons
Notification icons are displayed on the left-hand side of the status bar when you receive a new message, notification, or reminder.
|
|
|
|
|
|
|
|
|
Missed calls |
|
|
|
|
|
Call in progress |
|
|
|
|
|
|
|
|
|
|
|
|
|
|
|
|
|
|
|
|
|
|
|
|
|
New emails |
|
|
|
|
|
New messages |
|
|
|
|
|
|
|
|
|
|
|
|
|
|
|
|
|
|
|
|
|
|
|
|
|
Select an input method |
|
|
|
|
|
New voicemail |
|
|
|
|
||||||||||||
|
|
|
|
|
|
|
|
|
|
|
|
|
|
|
|
|
|
|
|
|
|
|
|
|
|
|
|
|
|
|
|
|
|
|
|
|
|
|
|
|
Connected over Wi-Fi |
|
|
|
|
|
Wi-Fi network available |
|
|
|
|
|
|
|
|
|
|
|
|
|
|
|
|
|
|
|
|
|
|
|
|
|
Downloading data |
|
|
|
|
|
Uploading data |
|
|
|
|
|
|
|
|
|
|
|
|
|
|||
|
|
|
|
|
|
|
|
|
|
|
|
|
|||
|
|
|
|
|
|
|
|
|
|
|
|
|
|
|
|
|
|
|
|
|
|
|
|
|
|
|
|
|
|
|
|
|
|
|
|
|
|
|
|
|
Upcoming events |
|
|
|
|
|
Phone memory full |
|
|
|
|
|
|
|
|
|
|
|
|
|
|
||
|
|
|
|
|
|
|
|
|
|
|
|
|
|
||
|
|
|
|
|
|
|
|
|
|
|
|
|
|
|
|
|
|
|
|
|
|
|
|
|
Synchronizing data |
|
|
|
|
|
Synchronization failed |
|
|
|
|
|
|
|
|
|
|
|
|
|
|
|
|
|
|
|
|
|
|
|
|
|
Login or synchronization problem |
|
|
|
|
|
More notifications |
|
|
|
|
|
|
|
|
|
|
|
|
|
|
||
|
|
|
|
|
|
|
|
|
|
|
|
|
|
|
|
|
|
|
|
|
|
|
|
|
Portable Wi-Fi hotspot enabled |
|
|
|
|
|
Connected to a VPN |
|
|
|
|
|
|
|
|
|
|
|
|
|
|
|
|
|
|
|
|
|
|
|
|
|
USB tethering enabled |
|
|
|
|
|
USB debugging enabled |
|
|
|
|
|
|
|
|
|
|
|
|
|
|
||
|
|
|
|
|
|
|
|
|
|
|
|
|
|
|
|
16
Getting Started
Home screen
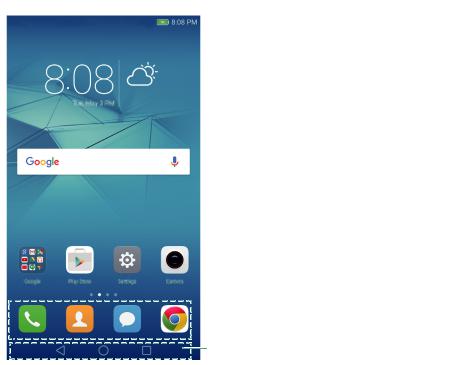
Getting to know your home screen
Your home screens are where you can find your favorite widgets and all your applications. The application list has been removed to give you a more convenient and direct path to your applications.
 Status bar: Displays notifications and status icons
Screen position indicator: Indicates
 which home screen is displayed
 Dock: Displays frequently used applications
Navigation bar: Displays virtual navigation keys
Virtual navigation bar keys:
•  Back: Touch to return to the previous screen or close an application. When entering text, touch to close the onscreen keyboard.
• Home: Touch to return to the home screen.
• Recent: Touch to access the list of recently used applications, or touch and hold to enable
dual windows mode.
17

Getting Started
Switching between home screens
Swipe left or right to view the extended home screens. Touch  Home to return to the default home screen.
On the home screen, pinch two fingers together or touch and hold a blank area on the screen to access the home screen editor. You can:
•Set the default home screen: Touch  at the top of the home screen to set the chosen home screen as the default home screen.
•Move a home screen: Drag the home screen to the desired location.
•Add a home screen: Touch  on the home screen furthest to the left or right.
•Delete a blank home screen: Touch  at the bottom of a blank screen.
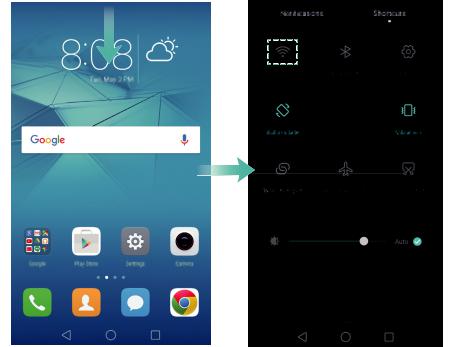
Automatic screen rotation
When you rotate your phone, some applications will automatically adjust the screen orientation to make them easier to use. This feature also lets you use tilt-controlled applications.
Swipe down from the status bar to open the notification panel, and then touch Auto-rotate in the Shortcuts tab to enable or disable automatic screen rotation.
18

Getting Started
Organizing applications and widgets on the home screen
Adding a widget to the home screen
Add frequently used widgets to the home screen for quick access.
On the home screen, pinch two fingers together to open the home screen editor. Touch Widgets and select a widget. Touch and hold the widget and drag it to a blank area on the home screen.
 You must have enough space on the home screen to add widgets. If there is not enough space, add another home screen or free up some space.
Moving a widget or icon
On the home screen, touch and hold an application icon or widget until your phone vibrates. You can then drag the application icon or widget to the desired location.
19

Getting Started
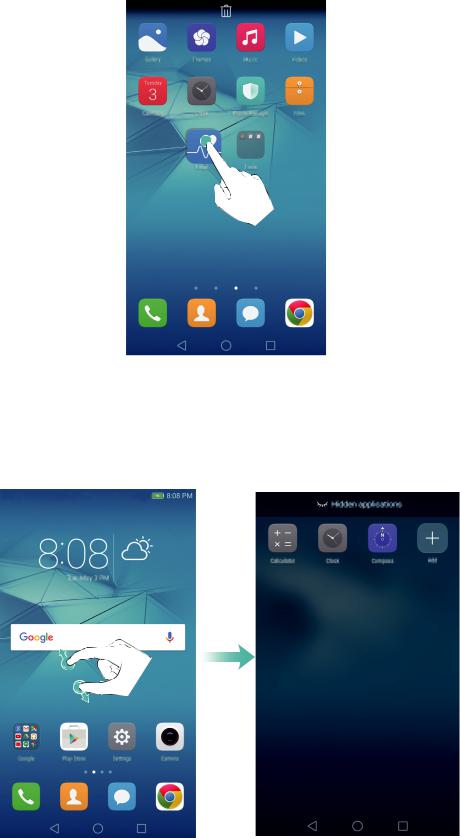
Deleting a widget or icon
On the home screen, touch and hold the application icon or widget you want to delete until  is displayed at the top of the screen. Drag the unwanted application icon or widget to
  .
.
 After you have moved/deleted an application icon, a blank space will appear on the home screen. You can sort application icons automatically; for more information, see Aligning home screen applications automatically.
20
Getting Started
Creating a folder
Create home screen folders to organize your applications by type. For example, you can create a Games folder that contains all of your game applications.
On the home screen, drag an icon on top of another icon to create a folder containing both applications. To rename the folder, open the folder, and then touch the folder name.
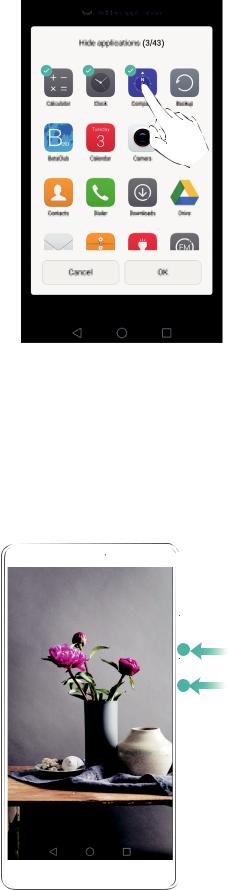
Hiding applications
On the home screen, spread two fingers apart. Touch  Add, select the applications you want to hide, and then touch OK. Applications will not appear on the home screen after they have been hidden.
21
Getting Started
 To restore a hidden application to the home screen, touch
  Add on the hidden applications screen, deselect the desired application, and then touch OK.
Taking a screenshot
Your phone comes with a range of screenshot options. Capture the entire screen or draw a shape on the screen to take a partial screenshot.
Using the power and volume down buttons
Press the power and volume down buttons at the same time to take a full screenshot.
22

Getting Started
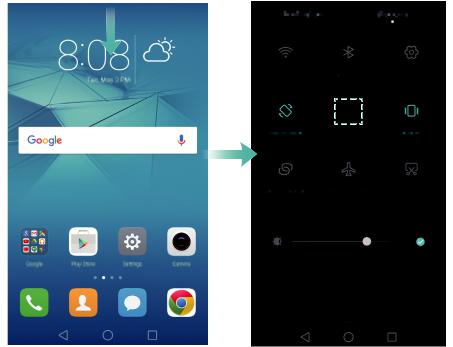
Using the screenshot shortcut switch
Open the notification panel, and then touch  in the Shortcuts tab to take a full screenshot.
By default, screenshots are saved to the Screenshots folder in Gallery.
Notifications
Status indicator
The status indicator changes color and flashes to indicate the following:
•Steady red (not charging): The battery level is critically low and the phone will turn off automatically.
•Steady red (when charging): The battery level is critically low.
•Steady yellow (when charging): The battery level is medium.
•Steady green (when charging): The battery is almost full or already full. Unplug the charger when the battery level reaches 100%.
•Flashing green (not charging): You have unread messages, notifications, or missed calls.
Notification badges
Notification badges appear in the top right corner of application icons.
The badge number indicates the number of new notifications. Open the corresponding application to view more details about the notifications.
23

Getting Started
 To disable notification badges for an application, pinch two fingers together on the home screen to open the home screen editor, and then touch More settings > Badge app icons and turn off the switch next to the corresponding application.
Notification panel
Swipe down from the status bar and open the notification panel to view notifications. Swipe left on the notification panel to go to the shortcuts tab.
Swipe up on the screen, or touch  Back or
  Home to close the notification panel.
 Customize shortcut switches: Swipe up on the shortcuts tab, and then touch Edit. Drag the shortcut switch to the desired location for easier access.
24
Loading...