


Owner’s Guide
TrueIAQ®
Digital IAQ Control
69-2072-09

Table of contents |
|
User Information |
|
About TrueIAQ®............................... |
1 |
Operation..................................... |
2 |
Display screen reference............ |
3 |
Adjusting IAQ settings |
|
Changing humidifier settings..... |
4 |
Changing dehumidifier settings... |
6 |
Changing ventilation settings....... |
6 |
Changing time of day................. |
7 |
Service timers............................. |
7 |
Installer Information |
|
Installation................................... |
8 |
Wiring........................................ |
10 |
Mounting the outdoor sensor..... |
17 |
Advanced programming........... |
18 |
Appendices |
|
Standards.................................. |
22 |
Warranty information................ |
23 |
Need Help?
For assistance with this product please visit http://yourhome.honeywell.com or call Honeywell Customer Care toll-free at 1-800-468-1502
Read and save these instructions.
® U.S. Registered Trademark. Patents pending. Part number DG115EZIAQ. Copyright © 2011 Honeywell International Inc. All rights reserved.

About TrueIAQ®
The TrueIAQ® monitors and automatically adjusts operation of your whole-house humidifier, dehumidifier, ventilator, or bath fan.
Maintaining proper indoor humidity minimizes the potential for unhealthy airborne pollutants to grow. Having too little humidity can leave you vulnerable to infections and uncomfortable dry skin. Too much humidity creates ideal breeding grounds for mold, mildew and dust mites. Humidified air also feels warmer in the winter, and dry air feels cooler in the summer.
TrueIAQ can adjust humidity with or without dependency on HVAC equipment operation. If you have both a humidifier and dehumidifier installed, the TrueIAQ can automatically change over to the appropriate equipment based on your comfort settings and the changing outdoor conditions.
TrueIAQ can also deliver fresh air with or without dependency on HVAC equipment operation. Today’s building codes require homes to be built more tightly for energy efficiency, but that tightness can also trap indoor air pollutants, such as cooking odors, cleaning agents, radon, and carbon dioxide/monoxide. TrueIAQ provides cost-effective ventilation in accordance to industry standards. In addition, the TrueIAQ can be programmed to deliver ventilation during set times of the day or night.
1 |
69-2072—09 |

Operation
TrueIAQ® can be used to control the humidity levels in your home, and control fresh air intake in accordance to industry recommendations (ASHRAE 62.2-2010).
Comfort Settings: Feedback on your indoor IAQ conditions.
Outdoor Conditions1: Actual outdoor temperature and humidity.
Equipment Operation:
Displays what equipment is operating at a given time.
More: Advances between  installed IAQ equipment control
options.
6840In
%
7655Out
%
PM12:15
Indoor Conditions: Actual indoor temperature and humidity.
Programmable Clock:
Displays time and allows IAQ equipment programming based on time.
Maintenance Reminders:
Notifies you when your equipment needs service.
Done: Saves changes.
Toggle Arrows: Changes the comfort levels of your IAQ equipment operation.
M24931
1 Actual outdoor temperature and humidity will only be displayed if the outdoor sensor is installed.
69-2072—09 |
2 |
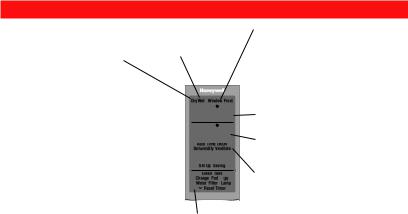
Display screen reference
Wet: Indoor humidity levels are
Dry: Indoor humidity levels above 60% RH. are below 20% relative
humidity (RH.)
6840In
%
7655Out
%
De Humidify: If “Humidify” is dis-  played, the control is calling for PM12:15 more humidity. If “DeHumidify” is
displayed, the control is calling for humidity removal.
M24932
Window Frost: The control is protecting your home against too much humidity based on outdoor conditions. Humidity levels in your home may not reach your desired RH% setting as a result.
Indoor temperature and humidity.
Outdoor temperature and humidity.
Ventilate: Fresh air ventilation is on.
Service Reminders: All are timer-based and will be displayed to indicate what service is needed.
3 |
69-2072—09 |

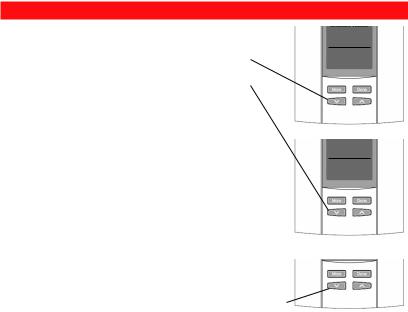
Changing humidifier settings
Note: These items will appear only if a humidifier is installed on your system.
1. Set humidifier by pressing UP/DOWN arrows. |
35 % |
|
|||
Tables below are recommended initial humidity settings based on |
|
|
|
||
|
|
|
|||
outdoor temperature. If window frost setting (see next page) is not |
|
Humidify |
|||
being used, the humidity setting should be adjusted manually when |
|
|
|
||
outdoor conditions change. |
|
Set |
|||
|
|
|
|
M24831 |
|
|
|
|
|
||
|
|
|
Red font is |
||
Outdoor Temp. |
Setting |
|
|||
|
blinking on |
||||
|
|
|
|||
-20°F (-29°C) |
15% |
|
screen. |
||
|
|
|
|
|
|
0°F (-18°C) |
25% |
|
|
|
|
|
|
|
|
|
|
20°F (-7°C) |
35% |
|
|
|
|
|
|
|
|
|
|
If both humidifier (hum) and dehumidifier (dehum) are installed:
Dehum setpoint can only be equal to or higher than Hum setpoint. If equal, equipment changeover will be at least 5% higher (dehum) or lower (hum).
If not equal, changeover occurs at setpoint plus 2% RH (control’s deadband).
69-2072—09 |
4 |

Changing humidifier settings
2.Press “More” to enter Window Frost Protection. Use the UP/DOWN arrows to set frost protection level.
LESS HUMIDITY |
|
|
|
MORE HUMIDITY |
|||||
LOOSE HOME/SINGLE-PANE WINDOWS |
|
TIGHT HOME/TRIPLE-PANE WINDOWS |
|||||||
1 |
2 |
3 |
4 |
5 |
6 |
7 |
8 |
9 |
|
|
|
|
|
|
|
|
|
|
|
|
|
|
|
|
|
|
|
M24830 |
|
On the first cold day after TrueIAQ® is installed, look for condensation on windows. If present, lower Frost Protection by one. Once set for your home, Frost Protection does not need to be changed again.
3.Press “More” again to enter operation style. Press the UP/DOWN arrows to set.
•“Auto” runs humidifier automatically according to settings.
•“Off” turns the humidifier off.
4.Press “Done” to save settings, or “More” to enter dehumidifier settings.
Window Frost
7
Humidify
M24832
Auto Off
Humidify
M24833
5 |
69-2072—09 |

Changing dehumidifier and ventilation settings
Note: These items will appear only if a dehumidifier is installed. If both a humidifier and dehumidifier are installed, these settings will appear after pushing “More” from the
humidifier operation style screen. |
60% |
|
1. |
Set dehumidifier by pressing the UP/DOWN arrows. RH% will change |
|
|
in increments of five. |
DeHumidify |
2. |
Press “More” to enter operation style. Press the UP/DOWN arrows to |
Set |
|
set. |
|
|
|
|
•“Auto” runs dehumidifier automatically according to your RH% settings.
• “Off” turns the dehumidifier off.
3.Press “Done” to save settings, or “More” to enter ventilation settings.
M24834
Auto Off
DeHumidify
M24835
Note: These items will appear only if a ventilator is installed.
1.Use the UP/DOWN arrows to run ventilation temporarily. Range is from 20 to 480 minutes, in 20-minute increments.
2.Press “More” again to enter operation style.
•“Auto” runs ventilation according to installer settings.
•“ON” runs ventilation continuously.
•“OFF” turns ventilation off. In this mode, ventilation will only run if turned on by a remote switch.
3.Press “Done” to save settings, or “More” to enter time settings.
Time On Ventilate
00 20
20
|
M24836 |
Auto |
On Off |
|
Ventilate |
|
M24837 |
69-2072—09 |
6 |
Changing time of day and service timers
12:00
Set
1.Press “More.” Adjust hour using the the UP/DOWN arrows.
2.Press “More.” Adjust minutes using the UP/DOWN arrows.
3.Press “Done” to save settings.
Service Timers
Service timers appear when the humidifier, dehumidifier, ventilator, air filter, and/or UV bulbs need service. Your HVAC technician will set these timers during installation.
M24934
12:00
Set
M24935
Resetting Service Timers
Press and hold the DOWN arrow for 5 seconds to reset your service timers.
M24933
7 |
69-2072—09 |
 Loading...