


 Loading...
Thor™ VX9
Vehicle-Mount Computer
Microsoft® Windows® EmbeddedStandardOperatingSystem
Microsoft® Windows® 7Professional OperatingSystem
Microsoft® Windows® XP® Professional OperatingSystem
User's Guide

Disclaimer
Honeywell International Inc. (“HII”)reserves theright tomakechanges inspecifications andotherinformationcontainedinthis document without priornotice, andthereadershouldinall cases consult HII todeterminewhetherany suchchanges have beenmade. Theinformationinthis publicationdoes not represent acommitment onthepart of HII.
HII shall not beliablefortechnical oreditorial errors oromissions containedherein; norforincidental orconsequential damages resultingfromthefurnishing, performance, oruseof this material.
This document contains proprietary informationthat is protectedby copyright. All rights arereserved. Nopart of this document may bephotocopied, reproduced, ortranslatedintoanotherlanguagewithout thepriorwrittenconsent of HII.
© 2009-2013Honeywell International Inc. All rights reserved.
WebAddress: www.honeywellaidc.com
RFTermis atrademark orregisteredtrademark of EMS Technologies, Inc. intheUnitedStates and/orothercountries.
Microsoft® Windows, ActiveSync®, MSN, Outlook®, Windows Mobile®, theWindows logo, andWindows Mediaare registeredtrademarks ortrademarks of Microsoft Corporation.
Intel®, Atom™, Core™, Celeron® andPentium® aretrademarks orregisteredtrademarks of Intel Corporationorits subsidiaries intheUnitedStates andothercountries.
Summit DataCommunications, theLairdTechnologies Logo, theSummit logo, and"Connected. NoMatterWhat" are trademarks of LairdTechnologies, Inc.
Atheros® andtheAtheros logoareregisteredtrademarks of Atheros Communications, Inc. Broadcom® andtheBroadcomlogoareregisteredtrademarks of BroadcomCorporation. TheBluetooth® wordmark andlogos areownedby theBluetoothSIG, Inc.
Symbol® is aregisteredtrademark of Symbol Technologies. MOTOROLA, MOTO, MOTOROLA SOLUTIONS andthe StylizedMLogoaretrademarks orregisteredtrademarks of MotorolaTrademark Holdings, LLC andareusedunderlicense.
RAM® andRAMMount™arebothtrademarks of National Products Inc., 1205S. OrrStreet, Seattle, WA 98108.
Freefloat, Freefloat WlinqandFreefloat Access*Onearetrademarks of Freefloat, Mölndalsvägen30B, SE-41263Gothenburg, Sweden.
Verizon® is aregisteredtrademark of VerizonTrademark Services LLC. T-MOBILE® is aregisteredtrademark of DeutscheTelekomAG. AT&T® is aregisteredtrademark of AT&TIntellectual Property. Option® andGlobeTrotter® areregisteredtrademarks of OptionNV.
Acrobat® Reader© 2013withexpress permissionfromAdobeSystems Incorporated.
Otherproduct names ormarks mentionedinthis document may betrademarks orregisteredtrademarks of othercompanies andaretheproperty of theirrespectiveowners.
Patents
Forpatent information, pleaserefertowww.honeywellaidc.com/patents.
Limited Warranty
Refertowww.honeywellaidc.com/warranty_informationforyourproduct’s warranty information.

Table of Contents
Chapter 1 - Introduction |
|
|
|
1-1 |
About this Guide |
1-1 |
|||
Microsoft Windows LicenseAgreement (First Boot) |
1-1 |
|||
Components |
1-2 |
|||
BottomView |
1-2 |
|||
LED Indicators |
1-3 |
|||
UnderServiceLid |
1-4 |
|||
PowerLED |
1-5 |
|||
UPS ModeLED |
1-5 |
|||
COMPort LEDs |
1-5 |
|||
60-Key Keyboard |
1-6 |
|||
Key Maps |
1-6 |
|||
NumLock |
1-6 |
|||
CapsLock |
1-6 |
|||
Secondary Keys |
1-6 |
|||
KeyboardBacklight |
1-6 |
|||
95-Key KeyboardwithPointingDevice |
1-7 |
|||
Key Maps |
1-7 |
|||
NumLock |
1-7 |
|||
CapsLock andScroll Lock |
1-7 |
|||
KeyboardBacklight |
1-8 |
|||
Chapter 2 - Set Up A New Thor VX9 |
|
|
2-1 |
|
HardwareSetup |
2-1 |
|||
SoftwareSetup |
2-1 |
|||
TappingtheTouchScreenwithaStylus |
2-2 |
|||
ThorVX9ConfigurationOptions |
2-3 |
|||
DateandTime |
2-3 |
|||
PowerManagement |
2-3 |
|||
SpeakerVolume |
2-3 |
|||
Connect BluetoothDevices |
2-3 |
|||
Restart/Shutdown |
2-4 |
|||
Soft Keyboard |
2-4 |
|||
CalibrateTouchScreen |
2-4 |
|||
SetupTerminal EmulationParameters |
2-5 |
|||
CleaningtheTouchScreen |
2-6 |
|||
Apply theTouchScreenProtectiveFilm |
2-6 |
|||
Chapter 3 - Connecting Cables to the Thor VX9 |
|
3-1 |
||
Connect Keyboard |
3-1 |
|||
i

95key RuggedKeyboard |
3-2 |
||
60key RuggedKeyboard |
3-3 |
||
Connect USB Devices |
3-4 |
||
Connect Ethernet Cable |
3-4 |
||
Connect Serial BarCodeScanner |
3-5 |
||
External AC PowerSupply, Optional |
3-6 |
||
Connect External Headset |
3-7 |
||
ConnectingVehiclePower |
3-8 |
||
Specifications forelectrical supply |
3-8 |
||
Connect VehicleElectrical Connection |
3-9 |
||
Connectionwithout ScreenBlanking |
3-11 |
||
ConnectionwithScreenBlankingBox |
3-12 |
||
ConnectionwithRelay/Mechanical SwitchforScreenBlanking |
3-13 |
||
Connect MultipurposeCable |
3-14 |
||
Chapter 4 - Product Agency Compliance - Thor VX9 |
|
4-1 |
|
LithiumBattery Safety Statement |
4-3 |
||
VehiclePowerSupply ConnectionSafety Statement |
4-5 |
||
Chapter 5 - Technical Assistance |
|
5-1 |
|
ii

Chapter 1 - Introduction
TheThorVX9is alsoknownas theFörj.
TheThorVX9VehicleMount Computer(VMT)is arugged, vehicle-mounted, PC (Personal Computer)equippedwitha Microsoft Windows® operatingsystem. TheThorVX9is capableof wireless datacommunications fromafork-lift truck orany properly configuredvehicle. Theunit uses aPCMCIA radio(spreadspectrum2.4GHz)forwireless datacommunications.
TheThorVX9is atablet-stylecomputerandfeatures acolordisplay. Thetouch-screendisplay supports graphic features and Microsoft Windows icons that theinstalledWindows operatingsystemsupports. Anilluminatedkeyboardis availableto facilitateuseindimly lit areas.
TheThorVX9provides thepowerandfunctionality of adesktopcomputerinavehiclemountedunit, withawiderangeof options.
TheThorVX9is availablewiththefollowingoperatingsystems:
Windows® 7Professional
Windows® EmbeddedStandard
Windows® XP Embedded/ Professional
TheThorVX9cansupport only oneoperatingsystemat atime. Informationinthis guideincludes instructionforall operating systems.
About this Guide
This ThorVX9User's Guideprovides instructionfortheend-userorsystemadministratortofollow whensettingupanew Thor VX9.
Microsoft Windows License Agreement (First Boot)
If yourThorVX9is shippedwithaMicrosoft Windows operatingsystempre-installed, it may benecessary tocompletetheWindows licensing/registrationscreens whenstartingtheThorVX9forthefirst time. Tocompletethis information, youmay needtheMicrosoft Windows software/product key that was includedwiththeThorVX9.
1-1

Components
Bottom View
Position Function
1 Connectionforexternal antenna
2 Powersupply
3 COM2(serial port 2)Yellow light indicates 12V out frompin9
4 COM1(serial port 1)Greenlight indicates 5V out frompin9
5 Keyboard/mouse
6 RJ-4510/100LAN
7 1х USB 2.0
8
MultipurposeConnection(provides USB, COM4withoptional +12V onpin9
orbothwithoptional cables) 9  AudioOut 3.5mm
10 Mic In3.5mm
1-2

LED Indicators
PowerButton
ScreenBrightness Controls
1.DecreaseScreen Brightness
2.IncreaseScreen Brightness
1.PowerLED
2.UPS ModeLED
3.COM1PowerLED
4.COM2PowerLED
1-3
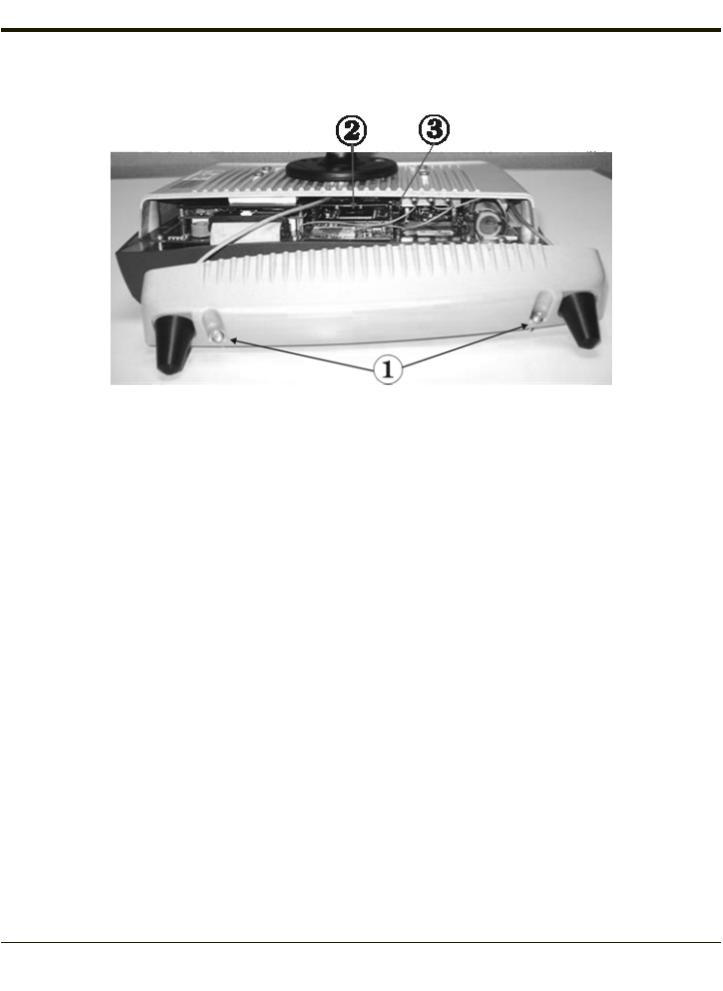
Under Service Lid
1.Torx 20Screws
2.PCMCIA CardSlots, optional
3.PCMCIA CardEjectionButtons
1-4

Power LED
ThePowerLED is locatedbesidethepowerbutton.
Power LED Behavior |
System State |
Off (nolight) |
Off andnot powered |
Greenflashvery slow |
Off but powered |
Greenon |
Operatingnormally |
Greenflashingslow |
Suspend |
Greenflashingfast |
Black-out Screen |
Redon |
Overvoltageshutdown |
Redflashing |
Overtemperature |
UPS Mode LED
TheUPS ModeLED is locatedbetweenthebrightness control buttons.
UPS LED Behavior |
UPS Battery State |
Greenflashingfast |
UPS battery powered |
Greenonorflashingslow |
UPS battery charging |
Off (nolight) |
UPS battery charged |
COM Port LEDs
Thereis anLED next toboththeCOM1andCOM2serial ports
COM Port LED behavior |
COM Port State |
Off (dark) |
NopowerappliedtoCOMport |
+5V poweris appliedtopin9of COM1 |
Green |
+12V poweris appliedtopin9of COM2 |
Amber |
1-5

60-Key Keyboard
The60-key QWERTY keyboardhas 101keyboardfunctions, includinganumeric keyboardpad.
The60key keyboardis alsoavailablewithoverlays designedfrousewithIBM3270andIBM5250terminal emulations.
Key Maps
The60-key keyboardsupports all 101keyboardfunctions. However, becausethekeyboardonly has 60keys, all functions are not visible(orprintedonthekeyboard).
PleaserefertotheKey Maps sectionof theThorVX9ReferenceGuide.
NumLock
The60-key keyboarddoes not haveaNumLock indicatororkey. NumLock canbetoggledOnorOff usingthe2nd SHIFT F10 keypress sequence. Changes madetotheNumLock status persist across aWindows restart.
CapsLock
TheCAPs LED indicates thestateof thekeyboardCapsLock mode. If CapsLock is enabledthis LED is illuminatedgreen. WhenCapsLock is off, theLED is dark.
Press 2nd thenF1totoggleCapsLock OnandOff.
Thedefault valueof CapsLock is “Off”.
Secondary Keys
TheVMTkeyboardis equippedwithseveral secondary keys. Thesekeys areidentifiedby thesuperscriptedtext foundonthe keyboardkeys. Thesecondary keys areaccessibleby usingtwo(2)keystrokes: the2ndkey followedby thesuperscripted key.
Oncethe2nd stateis enabled(by pressingthe2nd key)theSecondary ModeLED is illuminatedandthe2nd stateis enabled until anotherkey is pressed. The2nd key is toggledonwitha2nd keypress andthenimmediately off withanother2nd keypress.
Keyboard Backlight
Thekeyboardkeys arebacklit withLEDs. Thebacklight is manually controlledusingthe2nd + CTRL + F10 keypress sequence.
1-6
95-Key Keyboard with Pointing Device
Designedforeaseof usewithWindows operatingsystems, the95-key QWERTY keyboardwithpointingdeviceconnects via acabletothekeyboardport ontheThorVX9. Additional Windows keys (theWindows logokey andtheApplicationkey)andan integratedpointingdeviceareprovidedforeaseof usewithWindows operatingsystems.
Key Maps
The95-key keyboardsupports all 104keyboardfunctions (101keyboardstandardplus Windows keys)andincludes an integratedpointingdeviceandleft andright mousebuttons. However, becausethekeyboardonly has 95keys, all functions are not visible(orprintedonthekeyboard).
PleaserefertotheKey Maps sectionof theThorVX9ReferenceGuide.
NumLock
Forthe95-key keyboard, theNumLock key andthenumeric keys arebacklit greenwhenNumLock is off. WhenNumLock is on, thebacklight fortheNumLock key andthenumeric keys is amber.
CapsLock and Scroll Lock
Forthe95-key keyboard, theCapsLock key is backlit greenwhenCapsLock is off. WhenCapsLock is on, thebacklight forthe CapsLock key is amber.
TheScroll Lock key is backlit greenwhenScroll Lock is off. WhenScroll Lock is on, thebacklight fortheScroll Lock key is amber.
Thedefault values forCapsLock andScroll Lock areOff.
1-7

Keyboard Backlight
The95-key keyboardbacklights eachkey withanLED. Thekeyboardbacklight is manually controlledusingthe“backlight”key intheupperright handcornerof thekeyboard. Pressingthebacklight key cycles thekeyboardbacklight throughthelevels of backlight intensity:
•Off
•Maximumintensity
•Mediumintensity
•Low intensity.
1-8

Chapter 2 - Set Up A New Thor VX9
This pagelists aquick outlineof thesteps youmight takewhensettingupanew ThorVX9. Moreinstructionforeachstepis listedlaterinthis guide. PleaserefertotheThorVX9 ReferenceGuide foradditional informationandinstruction.
Contact Technical Assistanceif youneedadditional help.
Note: Installingorremovingaccessories shouldbeperformedonaclean, well-lit surface. Whennecessary, protect thework surface, theThorVX9, andcomponents from electrostatic discharge.
Hardware Setup
1.Connect accessories.
2.Connect powercable.
3.Secureall cables totheThorVX9withtheStrainRelief CableClamps.
4.Press thePowerkey.
Software Setup
Hardwaresetupshouldbecompletedbeforebeginningsoftwaresetup.
1.Adjust dateandtime
2.Setuppowermanagement
3.Adjust speakervolume
4.Connect Bluetoothdevices
5.Savesettings withRestart
6.EnabletheSoft Keyboard
2-1

Tapping the Touch Screen with a Stylus
Note: Always usethepoint of thestylus fortappingormakingstrokes onthetouchscreen.
Never use an actual pen, pencil, or sharp/abrasive object to write on the touch screen.
Holdthestylus as if it wereapenorpencil. Touchanelement onthescreenwiththetipof thestylus thenremovethestylus fromthescreen.
Firmly press thestylus intothestylus holderwhenthestylus is not inuse.
Usingastylus is similartomovingthemousepointerthenleft-clickingicons onadesktopcomputerscreen. Usingthestylus totapicons onthetouchscreenis thebasic actionthat can:
•Openapplications
•Choosemenucommands
•Select options indialogboxes ordrop-downboxes
•Dragthesliderinascroll bar
•Select text by draggingthestylus across thetext
•Placethecursorinatext box priortotypingindata
•Placethecursorinatext box priortoretrievingdatausingascanner/imageroraninput/output deviceconnectedtoa serial port.
A right click is generatedby tappingthemouseiconinthesystemtray. Aftertapping, themouseiconhighlights the right buttonof theiconinred. Thenext touchscreentapis treatedas aright click. Themouseiconreturns totheleft buttonhighlightedinredsosubsequent taps aretreatedas left clicks.
A stylus replacement kit is available.
2-2
Loading...