


 Loading...
Total Connect
User Guide
Stay connected to your home or business. Connect remotely from anywhere in the world.
K14741 12/08 Rev. B

TRADEMARKS
Honeywell is a registered trademark of Honeywell International Inc.
Windows and Windows Vista are trademarks, or registered trademarks of Microsoft Corporation in the United States and other countries.
Java is a trademark of Sun Microsystems, Inc.
QuickTime® is a registered trademark of Apple Inc., registered in the U.S. and other countries. All other trademarks are the properties of their respective owners.

Total Connect User Guide |
|
Contents |
|
Overview ....................................................................................................................................................... |
2 |
Obtaining a Total Connect account............................................................................................................... |
2 |
Setting up your PC for connecting to Total Connect..................................................................................... |
3 |
Additional Settings for use with Optiflex ................................................................................................... |
4 |
Accessing Total Connect .............................................................................................................................. |
4 |
Using Total Connect...................................................................................................................................... |
5 |
My Profile .................................................................................................................................................. |
6 |
Manage Users........................................................................................................................................... |
6 |
Deleting Users ...................................................................................................................................... |
7 |
Edit Device Names ................................................................................................................................... |
8 |
Remote Access......................................................................................................................................... |
9 |
System Status .................................................................................................................................... |
10 |
Zone Status ........................................................................................................................................ |
11 |
Device Control .................................................................................................................................... |
11 |
Event History ...................................................................................................................................... |
12 |
Users .................................................................................................................................................. |
13 |
Keypad ............................................................................................................................................... |
15 |
Setup .................................................................................................................................................. |
15 |
Video....................................................................................................................................................... |
17 |
Optiflex Viewing Window Functions ................................................................................................... |
17 |
Using the Email Archive feature ......................................................................................................... |
24 |
Configure Email ...................................................................................................................................... |
25 |
Configure SMS........................................................................................................................................ |
26 |
Event History........................................................................................................................................... |
27 |
Logout ..................................................................................................................................................... |
27 |
Controlling your system using Text Messages ........................................................................................... |
28 |
Contacting Technical Support..................................................................................................................... |
31 |
1

Total Connect User Guide
Overview
The Total Connect web site enables end users to remotely access their security system via an internet web browser, or wireless communications devices such as; cell phones, and PDAs (that support GSM/GPRS and SMS Text Messaging with short codes). Please check with your wireless carrier to be certain your device supports these protocols.
As a Total Connect user, you can manage and run your security system from almost anywhere in the world, check its status, and receive event notifications. You can also enable other people to receive event notifications.
Depending on the specific security system tasks to be accomplished, different communication methods are used.
|
End User Tasks |
|
|
Communication Method |
|
|
|
|
|
|
|||
|
Editing user profile |
|
• |
computer's web browser |
||
|
Viewing security system status |
|
• text message via a cell phone and PDA, or an emulated keypad |
|||
|
|
|
|
|
using a computer's web browser or PDA |
|
|
Controlling the security system |
|
• text message via a cell phone and PDA, or an emulated keypad |
|||
|
remotely |
|
|
using a computer's web browser or PDA |
||
|
Configuring Email and Text |
|
• |
computer's web browser |
||
|
message notifications |
|
|
|
|
|
|
Viewing the security system |
|
• |
computer's web browser |
||
|
event history |
|
|
|
|
|
|
Receiving System Event |
|
• |
|||
|
Notifications |
|
• text messages to a cell phone or PDA |
|||
|
|
|
|
|||
You can also enable additional cell phones or PDAs to be notified of system events by email or text messaging, and you can customize the names of events to be received.
Note: You will be able to access your security system via Honeywell’s Total Connect website, once the dealer has enabled you.
This guide provides a tour of the Total Connect web site, explaining each function, then focuses on how you can remotely control your security system using your PC, or by sending simple text message commands from your cell phone or PDA.
Obtaining a Total Connect account
The dealer/installer will set up your account and define the events you want to be notified of. These events match the output relay triggering events that were programmed in the control panel.
Note: The Dealer/Installer should refer to the "AlarmNet Direct User Guide" for information on configuring the hardware and creating a Total Connect web account for you.
Once the dealer assigns you a login name and password, you will receive a “Welcome” email message with your login name along with some helpful information. You will receive another email message with your password. You will then be able to receive notifications, and access your system via the Total Connect web site or using your cell phone/PDA that supports GSM/GPRS and Text Messaging (SMS).
2

Total Connect User Guide
Setting up your PC for connecting to Total Connect
It is recommended that you add the Total Connect web site to your browser's Trusted Sites list. This is especially important if you are also accessing Optiflex video.
1.Ensure you have Administrator privileges for the PC. From Internet Explorer navigate Tools > Internet Options. Then select the Security tab.
2.In the upper pane, select Trusted sites. To ensure the security level for this zone has the correct levels, click Default Level.
Note: Depending on what version of Windows you are using screen appearance will vary, and certain buttons may have different labels.
For example; Windows XP will often use the term OK on a button that saves the data and closes the active window, whereas Windows Vista will often use the term CLOSE as an equivalent.
Refer to the applicable guide for your operating system.
3. Click Sites.
4.In the Add this Web site to the zone field, enter https://services.alarmnet.com, then check the
Require server verification . . . box.
5.Click Add, then click OK. Click OK again to close out the window.
3
Total Connect User Guide
Additional Settings for use with Optiflex
Note: Total Connect Video operates with Optiflex Video Controller Hardware and ActiveX-based "Optiflex Connect" viewing software that is currently supported by Internet Explorer 6+ in the Windows Vista and Windows XP operating systems.
1.Log into Total Connect. (Refer to the next topic if necessary.)
2.At the left navigation bar, click Video. To connect, click the Optiflex Connect button. A separate window opens, then depending on your browser settings you may be prompted to "display nonsecure items?", please answer Yes to this prompt.
Note: The first time you access your video service, or any time that an update is needed you will be prompted to install the necessary software, or update.
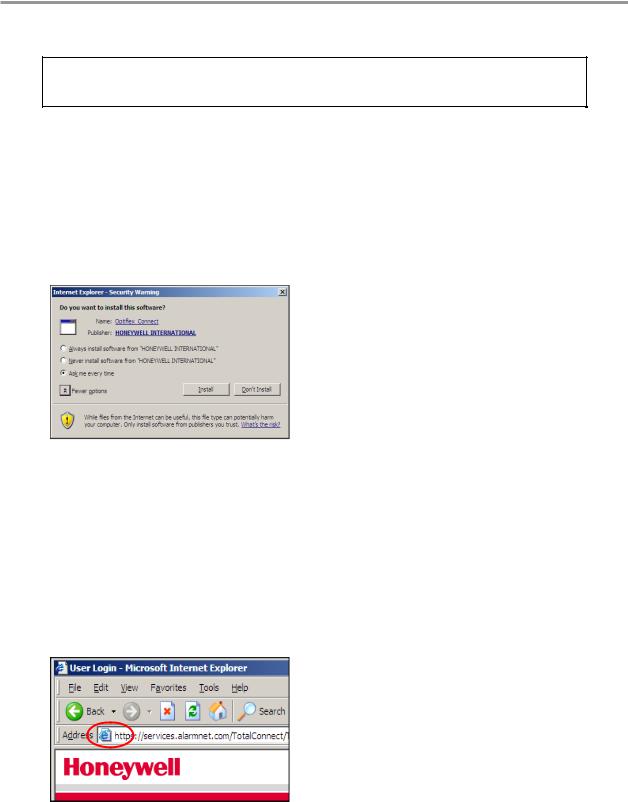
Next your network authorization will be checked, then if you need Java, ActiveX, or QuickTime player installed on your system (or an update to an existing version), a prompt will appear. Please install when prompted. For example, an ActiveX prompt is shown below.
3.Follow any of the prompts to complete the installation/upgrade of any Java, Active X, or QuickTime components.
Accessing Total Connect
To access Total Connect, visit the following link:
https://services.alarmnet.com/TotalConnect
After the page loads, create a desktop shortcut by positioning the cursor over the address icon, left click the mouse and drag it onto the desktop.
4

Total Connect User Guide
Using Total Connect
Navigate to the Total Connect home page using either the desktop shortcut (created in the last paragraph) or by typing the address into the browser's address field. The Total Connect Login page appears.
Enter your User Name and Password, then press Enter. The "Welcome" window appears.
Total Connect is easy to navigate. The layout consists of a navigation bar on the left, and an information window on the right.
By clicking on a category in the Navigation bar, the associated information window is displayed. (Note the selected category in the Navigation bar will be in RED.) From the information window you can view, edit, add, or delete information.
The following paragraphs will explore the various Total Connect categories.
5

Total Connect User Guide
My Profile
This category enables you to edit your profile. You can change your password, email address, phone number, and enter your mobile device phone numbers for use with SMS and mobile control.
Edit your profile and click Update Information, or click Exit to Main Menu page if no changes are made.
Manage Users
This category enables you to provide others access to your Total Connect account. This is very useful for adding company or family members that require access. Note, that you can edit an existing user by clicking their User Name and editing their profile. To add a new user, click Add New User.
A new user profile form appears. Enter the required information, then click Add User. Click OK to acknowledge the confirmation message and additional fields will appear on the form.
6

Total Connect User Guide
Note: In order to control the security system the user must have a system user code.
Check this box to deny access to Total Connect for this user.
If desired enter at least one phone number for remote access, then select the Authority Level and Features.
IMPORTANT: Please understand that if a Sub User is assigned the "Manage Users" feature, that Sub User can then assign features to other Sub Users.
Check the Authorize box to assign the security system to the sub user.
When you have completed the form, click Update Information. A confirmation message appears. Click OK, then click Exit to Manage Users page. You can add more users in the same manner.
Deleting Users
Users can only be deleted by the dealer. When a remote service account is deleted by the dealer, that account and all subordinate users are deleted. However, sub users may be denied remote services access by going to Manage Users, selecting the user and checking the Disable Login box. Then click the Update information button.
7

Total Connect User Guide
Edit Device Names
This category enables you to edit device alias and address information in the database.
Edit the desired information.
You can edit the information in this box.
If you have multiple locations, use the drop-down menu then for each location edit the device information for that site.
Click Update Information, then click OK to the first confirmation message. A device has been updated message appears, click OK, then click Exit to Main Menu page.
8
Total Connect User Guide
Remote Access
This category enables you to access and control your security system using an emulated keypad, or if the security system's control panel is programmed for an AUI (Advanced User Interface) remote keypad, you will have access to an enhanced keypad with tabs.
To access your security system, select the name of the system using the drop-down menu. Then click Launch Keypad. (If Java needs to be installed or updated on your PC, you will be prompted to install it. Just follow the on-screen prompts.)
If your remote access account has been configured by the dealer as a Keypad Only or Lynx Keypad, a keypad with NO tabs will appear. With any remote keypad, functions are performed in the same manner as on a local keypad, however you CANNOT initiate panics. (Refer to your control panel user guide for operating the system.)
Below are examples of these keypad types:
Enhanced Keypad with tabs |
Keypad with no tabs (LYNX keypad shown) |
Note: On the LYNX keypad, if a loss of AC power occurs at the security system the green Ready LED becomes yellow, and the red Armed LED becomes pink. Additionally, the AUX button does not function.
However, if your remote access account has been configured by the dealer as a Full Control keypad, you will access an enhanced interface with tabbed windows. When the Launch Keypad button is clicked, first an applet window appears. Then a security screen appears, after entering your Security System User Code, and clicking OK you will access an enhanced interface.
Note: If a "CONNECTION LOST" message appears, close the applet screen, and click Launch Keypad again.
This screen will appear whenever you attempt to access your security system (with a Full Control keypad type) remotely.
9
Loading...