


VisionPRO® Series with RedLINK™
User Guide
TM

Welcome
Congratulations on your purchase of a Honeywell touch screen programmable thermostat. When used with the optional RedLINK Internet Gateway, you can remotely monitor and control the heating and cooling system in your home or business—you
can stay connected to your comfort system wherever you go.
Honeywell’s Total Connect Comfort is the perfect solution if you travel frequently, own a vacation home, a business or manage an investment property or if you are simply looking for peace of mind.
Features of your VisionPRO thermostat
With your new thermostat, you can:
•Connect to the internet to monitor and control your heating/cooling system and receive alerts by email (requires optional RedLINK Internet Gateway)
•View outdoor temperature and humidity (requires optional Wireless Outdoor Sensor)
•Control humidification, dehumidifcation or ventilation (TH8321 model)
Your new thermostat also provides:
•Adaptive Intelligent Recovery—over time, the VisionPRO thermostat “learns” how long it takes your system to reach the temperature you want. It turns on the heating or cooling system earlier to make sure you’re comfortable at the time you expect.
•Dealer information on the screen—making it easy for you to contact your dealer for service.
•Vacation and holiday scheduling—allowing you to program a setback temperature to save energy while you are away.
•Keypad lockout to prevent unauthorized changes.
•Equipment status—provides on/off status of all equipment controlled by the thermostat.
•Preferences—allowing you to customize the thermostat to your desired settings.
1
Table of contents |
|
Programming and Operation |
|
Quick reference........................................... |
3 |
Setting the time/date.................................... |
5 |
Setting the fan............................................. |
6 |
Setting system mode................................... |
7 |
Preset energy-saving schedules................. |
8 |
Adjusting program schedules...................... |
9 |
Schedule overrides.................................... |
11 |
Menu Options |
|
Viewing equipment status.......................... |
13 |
Setting vacation, holiday, and events......... |
14 |
Setting holiday/event schedules: |
|
commercial use......................................... |
15 |
Setting humidification and |
|
dehumidification......................................... |
21 |
Setting ventilation...................................... |
24 |
Setting preferences.................................... |
26 |
Cleaning the thermostat screen................ |
27 |
Security settings........................................ |
28 |
Viewing dealer information........................ |
29 |
Advanced features..................................... |
30 |
Appendices |
|
Installer options......................................... |
31 |
Replacing batteries.................................... |
32 |
Temperature and humidity display............. |
35 |
Optional accessories................................. |
37 |
Troubleshooting......................................... |
39 |
Regulatory information.............................. |
41 |
2
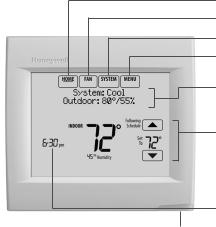
Quick reference: residential use
HOME. Touch to display Home screen. FAN. Select fan mode.
SYSTEM. Select system mode (Heat/Cool).
MENU. Touch to display options. Start here to set a program schedule.
Current status. Shows system mode (heat/ cool), outdoor temperature and humidity (with optional outdoor sensor).
Current schedule. Touch an arrow to change temperature setting and select a Temporary or
Permanent Hold.
 Indoor conditions. Shows indoor temperature and humidity.
The screen lights when you press any button. It stays lit for 7 seconds after you complete
changes. Depending on how your thermostat was installed, the screen light may always be on.
Current time. Touch to set the current time/date.

 Alert Light. On when alert message is active or system is set to EmHeat. Flashes for battery-only power; on continuous if system powered.
3

Quick reference: commercial use
The screen lights when you press any button. It stays lit for 7 seconds after you
complete changes. Depending on how your thermostat was installed, the screen light may always be on.
HOME. Touch to display Home screen. FAN. Select fan mode.
SYSTEM. Select system mode (Heat/Cool).
MENU. Touch to display options. Start here to set a program schedule.
Current status. Shows system mode (heat/cool), outdoor temperature and humidity (with optional outdoor sensor).
 Override. Touch to override program schedule.
Current schedule. Touch an arrow to change temperature setting and set a temporary hold.
Current program status.
Indoor conditions. Shows indoor temperature and humidity.
Current time. Touch to set the current time/date.

 Alert Light. On when alert message is active or system is set to EmHeat. Flashes for batteryonly power; on continuous if system powered.
Micro SD Card port. Use card to load holiday schedules and custom events.
4

Setting the time/date
1Touch the current time. The screen displays Select Option.
2Touch Time or Date, then touch Select.
3Touch σ or τ until the proper time/date is displayed.
4Touch Done to save or Cancel to ignore changes.
5Touch Home to redisplay the Home screen.
 NOTE: The date is not shown on the home screen; however, it should be set to allow the thermostat to adjust time automatically for daylight saving time and for other features such as vacation hold.
Select Option
Time Date
Please Set Time
6:30 PM
5

Setting the fan
1Touch FAN to display fan settings.
2Touch On, Auto, Circ, or Follow Schedule.
3Touch Done to save and exit.
On: Fan is always on.
Auto: Fan runs only when the heating or cooling system is on.
Circ: Fan runs randomly about 35% of the time (residential use only).
Follow Schedule: Fan controlled by program (see pages 8–12).
On Auto Circ
 NOTE: In commercial use, touch Auto or On to temporarily override the programmed fan schedule.
6

Setting system mode
1Touch SYSTEM to display system settings.
2Touch desired option:
Heat: Controls only the heating system.
Cool: Controls only the cooling system.
Off: Heating/cooling systems are off.
Auto: Selects heating or cooling depending on the indoor temperature.
Em Heat (heat pumps with aux. heat): Controls auxiliary/emergency heat. Compressor is locked out.
3 Touch Done to save and exit.
Heat Cool Auto
Off
 NOTE: The Auto and Em
  Heat system settings may not appear, depending on how your thermostat was installed.
7

Preset energy-saving schedules
This thermostat uses default Energy Saver settings that can reduce your heating/cooling expenses by as much as 33%. To customize settings, see next page.
Commercial Use Residential Use
|
|
Heat |
Cool |
Heat |
Cool |
Period |
Start time |
(Mon-Fri) |
(Mon-Fri) |
(Sat-Sun) |
(Sat-Sun) |
|
|
|
|
|
|
Wake |
6:00 am |
70° |
78° |
70° |
78° |
|
|
|
|
|
|
Leave |
8:00 am |
62° |
85° |
62° |
85° |
|
|
|
|
|
|
Return |
6:00 pm |
70° |
78° |
70° |
78° |
|
|
|
|
|
|
Sleep |
10:00 pm |
62° |
82° |
62° |
82° |
|
|
|
|
|
|
Period |
Start time |
Heat |
Cool |
Fan |
|
|
|
|
|
|
|
Occupied 1 |
|
8:00 am |
70° |
75° |
On |
|
|
|
|
|
|
Unoccupied 1 |
|
10:00 pm |
55° |
85° |
Auto |
|
|
|
|
|
|
Occupied 2* |
|
12:00 am |
70° |
75° |
On |
|
|
|
|
|
|
Unoccupied 2* |
|
12:00 am |
55° |
85° |
Auto |
|
|
|
|
|
|
*Period 2 is cancelled by default. If you activate it, the values shown above are default settings.
8
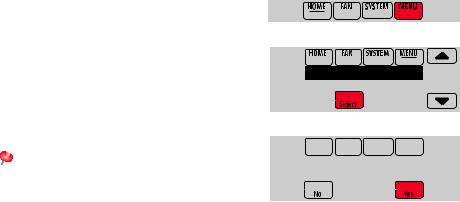
Adjusting program schedules
1Touch MENU.
2Select Edit Schedule to display Use
Scheduling Assistant?
•Touch Yes to create a schedule by answering simple questions.
•Touch No to manually create a program schedule. See page 10.
 NOTE: To reduce costs, use the preset Energy Saver settings described on page 8.
Edit Schedule
View Schedule
Use Scheduling
Assistant?
9

Adjusting program schedules (continued)
3Select the days to schedule, touch Next.
4Touch σ or τ to set your Wake time for selected day(s).
5Touch σ or τ to set Heat and Cool temperatures for the Wake period.
6Touch other time periods (Leave, Return, Sleep) to set time and temperatures for each.
7Touch Done to save and exit (Touch Cancel to exit without saving changes).
 NOTE: Touch Cancel Period to eliminate any unwanted time period.
 NOTE: Touch Fan Setting to customize fan settings for any time period.
Select the days to schedule
Set Wake 
 time & temperature

10

Overriding schedules: residential use
1Touch σ or τ to adjust the temperature (right side of screen) and the Hold Until time (left side). The schedule will resume when the Hold Until time expires.
2Select Permanent Hold to keep the same temperature until you change it or resume the program schedule.
Touch Cancel Hold at any time to resume the program schedule.
Temporary Hold
Permanent Hold
11

Overriding schedules: commercial use
Touch σ or τ to adjust the temperature. It will be maintained until the hold time you set.
• To change the hold time, touch the Hold Until arrow buttons. This time can be adjusted up to the maximum time set by the installer.
• Touch Override to use a pre-set occupied temperature if a person uses the room during an unoccupied period. The new temperature will be maintained for 1 hour and can be adjusted up to the maximum time set by the installer.
The programmed schedule will resume when the override timer expires. Touch Cancel Hold at any time to resume the program schedule.
12

Viewing equipment status
1Touch MENU.
2Select Equipment Status.
3Touch σ or τ to view the status of all the equipment your thermostat is controlling. Depending on how your thermostat was installed, the Equipment Status screen can report data about the following systems:
•Heating and cooling
•Fan
•Humidification
•Dehumidification
•Ventilation
•Maintenance reminders
•Thermostat information.
Equipment Status
Date/Time
Heat Stage 1: Off
Cool Stage 1: On
13

Setting vacation hold: residential use
This feature helps you save energy while you are away, and restores comfortable settings just before you return home.
1Touch MENU.
2Select Vacation Mode.
3Touch σ or τ to select the date you leave, then touch Next for further scheduling details, including times of
day, temperature settings, return date, and return settings.
4Review your selections on the last display, and touch Done to save your settings. Touch Cancel to ignore the changes.
Vacation Mode
Equipment Status
Date You Leave
Jul 17, 2012
Jul 25 - Jul 26
Heat: 72 Cool: 78
14

Setting holiday/event schedules: commercial use
This feature helps you conserve energy when the workplace is unoccupied for special events and holidays.
1Touch MENU.
2Select Holiday Schedule.
3Select the item you want to schedule and touch Next for further scheduling details.
•Custom Events lets you set up other days for special schedules.
•US and Canadian Holiday options let you select from a list of holidays commonly observed in each country.
4Make selections as prompted on each screen. For more information, see next two pages.
5Touch Done to save your settings.
Holiday Schedule
Holiday Mode
Custom Events
US Holidays
15

Setting custom events: commercial use
This feature lets you customize temperature settings to be maintained during a specific event. You can set up an event for a specific date or day in a month. The thermostat resumes normal scheduling after the event.
1Select Custom Events from the Holiday Schedule menu.
2Select Create New Event.
3Select Specific Date or Month/Weekday.
•For Specific Date, you are prompted to select the event’s start date, settings, end date, and frequency.
•For Month/Weekday, you are prompted to select the month, day of the week, week of the month, settings, length of event, and frequency for the event.
4Review the settings and touch Done to save them. Touch Cancel to ignore the changes.
Custom Events
US Holidays
Create New Event
Select Occurence
Specific Date
Schedule adjusted to 62 in heating
16

Setting holiday schedule: commercial use
This feature lets you customize temperature settings to be maintained on specified national holidays. The thermostat resumes normal scheduling between selected holidays.
1Select US Holidays or Canadian Holidays from the Holiday Schedule menu.
2Select Add/Edit Holidays. A list of national holidays is displayed.
3Touch the check box next to each holiday for which you want to maintain specific settings, (Touch σ or τ to scroll through the holiday list.) then touch Next.
Set the holiday schedule for Occupied or Unoccupied temperatures, depending whether the building will be in use.
4Touch σ or τ to select the Heat and Cool temperatures.
5Review the settings and touch Done to save them. Touch Cancel to ignore changes.
Add / Edit Holidays
Select US holidays  New Year’s Day
Temperature
During Holiday
17

Setting holiday override: commercial use
This feature lets you customize temperature settings to be maintained from now until
a specified date. The thermostat resumes normal scheduling on the date you select.
1Touch MENU.
2Select Holiday Mode to display Temperature While Away.
3Touch σ or τ to select the Heat and Cool temperatures, then touch Next to select return date.
4Review the settings and touch Done to save them. Touch Cancel to ignore the changes.
 NOTE: The cool temperature can only be set higher than the unoccupied program setting and the heat temperature can only be set lower than the unoccupied program setting.
Holiday Mode
Equipment Status
Temperature
While Away
18
Initiating occupancy mode: commercial use
This feature keeps temperature at an energysaving level until you touch Press HERE to
Start Occupancy. When you arrive, touch the message to maintain a comfortable temperature while the room is occupied.
Touch the σ or τ buttons to set the temperature or the Hold Until time. The temperature is maintained until the time you set. Temperature returns to an energy-saving level after the timer expires, or the “Occupied” period ends.
 NOTE: This feature is available only when programmed by the installer.
Press HERE to Start Occupancy
19
Remote setback (commercial use)
During Occupied program periods, an occupancy sensor directs the thermostat to go to REMOTE SETBACK settings when the room is empty. If someone is in the room, it uses the Occupied program period settings. The thermostat ignores the occupancy sensor during Unoccupied program periods.
If the thermostat is set up to be non-programmable, the sensor directs the thermostat to go to REMOTE SETBACK settings when the room is empty. If someone is in the room, then it follows the settings set by the user.
Depending on how your thermostat was installed, it may delay for up to 30 minutes before switching to REMOTE SETBACK settings. This delay allows the room to stay comfortable if the room is unoccupied for only a short time.
20
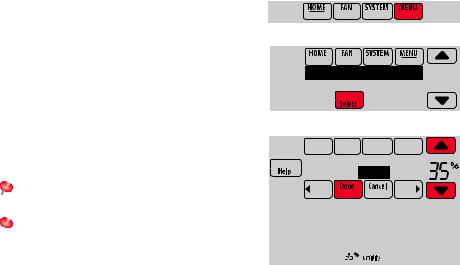
Adjusting humidification settings
1Touch MENU and select Humidification.
2Select Auto.
3Touch σ or τ to select humidity level.
4Touch Done to save your settings. Touch Cancel to ignore changes.
5If frost or condensation appears on the windows, touch MENU, then select Window Protection. (Use a lower number to prevent frost or condensation. Use a higher number if indoor air is too dry.)
 NOTE: Window Protection is available only
if an outdoor air sensor is installed.
 NOTE: The thermostat controls
  humidification and dehumidification as needed to maintain the desired humidity level. Depending on how your thermostat was installed, the thermostat may maintain a 15% separation between humidification and dehumidification settings.
Humidification
Window Protection
Humidification
Off Auto
21
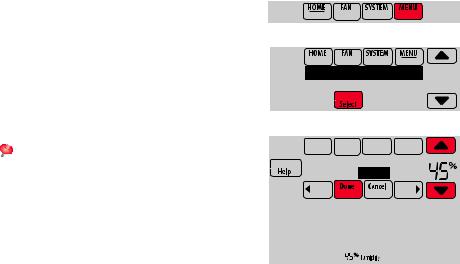
Adjusting dehumidification settings: residential use
This feature can control a dehumidifier or use your air conditioner to reduce humidity.
1Touch MENU and select Dehumidification.
2Select Auto.
3Touch σ or τ to select humidity level.
4Touch Done to save your settings. Touch Cancel to ignore changes.
 NOTE: If your air conditioner is used to control humidity, the temperature may drop up to 3° F below your temperature setting until humidity reaches the desired level.
Dehumidification
Equipment Status
Dehumidification
Off Auto
22

Adjusting dehumidification settings: commercial use
This feature can control a dehumidifier or use your air conditioner to reduce humidity.
1Touch MENU and select Dehumidification.
2Select Auto.
3Touch σ or τ to select humidity level.
4Touch Done to save your settings. Touch Cancel to ignore changes.
If your air conditioner is used to control humidity, the thermostat may use the following methods to maintain humidity:
•Cool from 1° to 5° F lower than your temperature setting.
•Run cooling for the minimum “on” time to reduce humidity.
•Run cooling and heating at the same time to reduce humidity without lowering the temperature.
Dehumidification
Equipment Status
Dehumidification
Off Auto
23
Adjusting ventilation settings
1Touch MENU, and select Ventilation.
2Select Mode, Temporary Boost, or
Lockout, then select appropriate options. (For options, see next page.)
3Touch Done to save your settings. Touch Cancel to ignore changes.
Ventilation
Equipment Status
Mode
Temporary Boost
24

Ventilation options
Mode:
Auto: Ventilation runs as programmed by the installer.
Off: Ventilation remains off unless turned on using the timer.
On: Ventilation is always on.
Temporary Boost: Touch σ or τ to select how long to run ventilation temporarily. To turn it off, set it to zero.
Lockout: Touch σ or τ to select Yes or No, then touch Next. Select Yes to prevent
ventilation from running during the Sleep or Unoccupied (commercial) program periods or when outdoor conditions exceed values set by the installer.
Ventilation Mode
Off Auto On
Run Ventilation For
60 minutes
Lockout in Sleep
Period: No
25

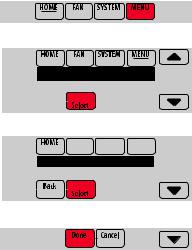
Setting preferences
Preference menu options let you select how the thermostat displays information or responds to certain situations.
1Touch MENU and select Preferences.
2Select an option and follow prompts:
•Reminders to change filters
•Fahrenheit/Celsius display
•12/24-hour clock display
•Screen backlighting
•Alert light options
•Scheduling options
•Adaptive recovery
•Default schedule
•Daylight saving time
3Touch Done to save your settings. Touch Cancel to ignore changes.
Preferences
Clean Screen
Reminders
Fahrenheit/Celsius
26
Cleaning the thermostat screen
When you select the Clean Screen option, the screen is locked so you don’t accidentally change settings while you clean.
1Touch MENU.
2Select Clean Screen. A prompt asks if you want to clean the screen for 30 seconds.
3Touch Yes. A countdown timer displays elapsed time until the screen is reactivated.
 NOTE: Do NOT spray any liquid directly on the thermostat. Spray liquids onto cloth, then use the damp cloth to clean the screen. Use water or household glass cleaner. Avoid abrasive cleansers.
Clean Screen
Security Settings
Clean screen for 30 seconds?
27

Adjusting security settings
You can adjust security options to prevent unauthorized changes to system settings.
1Touch MENU and select Security Settings.
2Select an option and follow prompts:
Unlocked: Full access allowed.
Partially locked: Only temperature can be changed.
Fully locked: No access allowed.
 NOTE: If you choose to use a password for additional security, write it here for reference:
Security Settings
Dealer Information
Change Lock Mode
Create Password
Lock Mode
Unlocked
28
 Loading...