


Excel 50
CONTROLLER
HONEYWELL EXCEL 5000 OPEN SYSTEM
USER GUIDE
® U.S. Registered Trademark |
EN2B-0137GE51 R0109 |
Copyright © 2009 Honeywell Inc. • All rights reserved |
|

EXCEL 50 USER GUIDE
Trademark Information Echelon, LON, LONMARK, LONWORKS, LonBuilder, NodeBuilder, LonManager, LonTalk, LonUsers, LonPoint, Neuron, 3120, 3150, the Echelon logo, the LONMARK logo, and the LonUsers logo are trademarks of Echelon Corporation registered in the United States and other countries. LonLink, LonResponse, LonSupport, and LonMaker are trademarks of Echelon Corporation.
EN2B-0137GE51 R0109 |
2 |

|
EXCEL 50 USER GUIDE |
|
CONTENTS |
Revision overview ........................................................................................................................................................................ |
5 |
About This User Guide................................................................................................................................................................. |
5 |
Operator's terminal ...................................................................................................................................................................... |
7 |
Password Procedure.................................................................................................................................................................... |
9 |
Modifying a Password............................................................................................. |
10 |
Plant Key ..................................................................................................................................................................................... |
11 |
TODAY Function..................................................................................................... |
12 |
Time Program Key...................................................................................................................................................................... |
14 |
System Time........................................................................................................... |
15 |
Setting Date and Time........................................................................................ |
15 |
Daylight Saving .................................................................................................. |
16 |
Daily Program ......................................................................................................... |
17 |
Modifying a Daily Time Program ........................................................................ |
18 |
Creating a New Daily Time Program .................................................................. |
19 |
Deleting a Daily Time Program........................................................................... |
20 |
Copying a Daily Time Program........................................................................... |
20 |
Weekly Program ..................................................................................................... |
20 |
Annual Program...................................................................................................... |
21 |
Data Points / Parameters Key.................................................................................................................................................... |
25 |
Data Points ............................................................................................................. |
28 |
Data Points Sequence........................................................................................ |
29 |
Hours Run .......................................................................................................... |
32 |
Manual Operation............................................................................................... |
33 |
Parameters ............................................................................................................. |
34 |
Points in Trend ................................................................................................... |
36 |
Parameter List.................................................................................................... |
36 |
System Information ............................................................................................ |
37 |
Hardware Interface Configuration....................................................................... |
39 |
DDC Program Cycle Times ................................................................................ |
42 |
Buswide Access ................................................................................................. |
42 |
Trend Buffer ....................................................................................................... |
43 |
Flash EPROM .................................................................................................... |
43 |
Alarms Key.................................................................................................................................................................................. |
45 |
Start-up sequence ...................................................................................................................................................................... |
48 |
Controller Setup...................................................................................................... |
50 |
Select Application ................................................................................................... |
52 |
Request Download.................................................................................................. |
54 |
Data Point Wiring Check......................................................................................... |
54 |
Adjustable Remote Trend Buffer (V2.03.x) ............................................................. |
56 |
Operator Access Levels............................................................................................................................................................. |
58 |
Time Program Description......................................................................................................................................................... |
58 |
Data Points / Parameters Description....................................................................................................................................... |
60 |
Data Point Attributes............................................................................................... |
61 |
Operating Mode ................................................................................................. |
62 |
Hours Run .......................................................................................................... |
62 |
Technical Address.............................................................................................. |
63 |
User Address ..................................................................................................... |
63 |
Suppress Alarm.................................................................................................. |
63 |
EN2B-0137GE51 R0109 |
3 |

EXCEL 50 USER GUIDE
Alarm Description ....................................................................................................................................................................... |
63 |
4 |
EN2B-0137GE51 R0109 |

EXCEL 50 USER GUIDE
REVISION OVERVIEW
The following pages have been changed from the previous issue of this document:
page |
change |
|
throughout |
All references to GSM modem have been modified to reflect |
|
obsolescence. |
||
|
ABOUT THIS USER GUIDE
This Excel 50 controller can be used in two different ways:
1.The Excel 50 controller can be used with embedded applications. Preconfigured applications stored in memory in the application module are selected by entering a specific code via its MMI or an external interface.
2.The Excel 50 controller can also be used with standard or custom applications created with the CARE software package and downloaded into the controller. Custom applications may have different screens and sequences than are shown in this document. The screens show here must be considered only as examples.
Differences between these two uses of the Excel 50 are noted where appropriate.
NOTE: The format of the date is determined by the Engineering Units:
—US - mm/dd/yyyy
—Europe - dd.mm.yyyy
The start-up sequence is an exception to this: The date in the start-up sequence must always be entered in the European format as shown above.
5 |
EN2B-0137GE51 R0109 |

EXCEL 50 USER GUIDE
6 |
EN2B-0137GE51 R0109 |
EXCEL 50 USER GUIDE
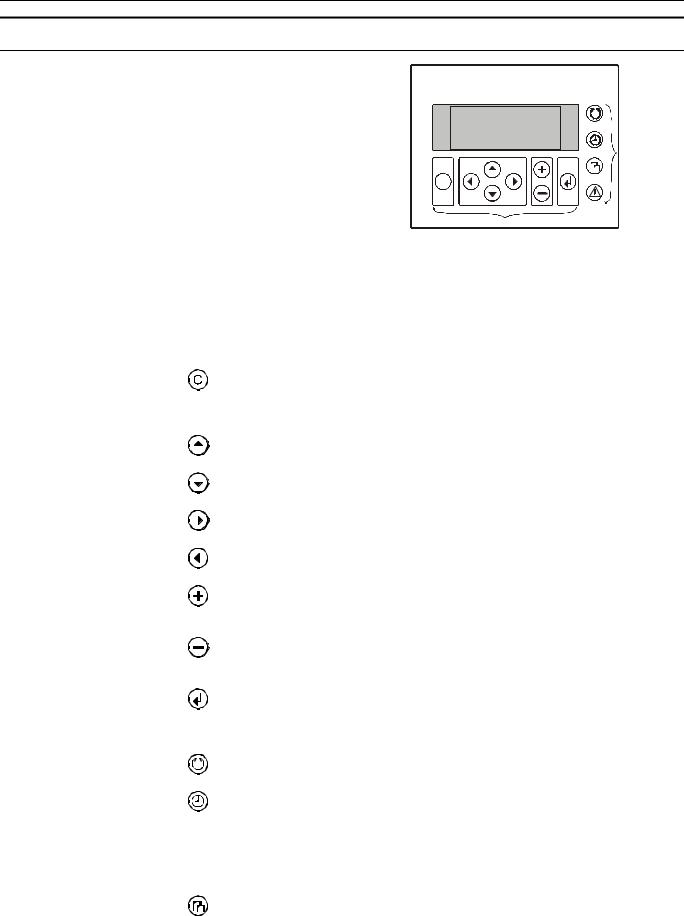
OPERATOR'S TERMINAL
0000040c
|
LCD DISPLAY |
|
FAST ACCESS |
|
KEYS |
|
C |
|
BASIC FUNCTION KEYS |
|
The Excel 50 controller incorporates an operator's terminal featuring a keyboard and |
|
a display. |
Keyboard |
The keyboard has eight basic function keys and four fast-access keys. These twelve |
|
keys perform the following functions: |
Basic function keys |
Function |
|
CANCEL – Escapes to the previous screen, cancels incorrect entries (unless you |
|
have already confirmed the entry using the ENTER key), or confirms alarm |
|
messages. |
|
UP ARROW– Moves the cursor to the previous line. |
|
DOWN ARROW– Moves the cursor to the next line. |
|
RIGHT ARROW– Moves the cursor to the next field of the current line. |
|
LEFT ARROW– Moves the cursor to the previous field of the current line. |
|
PLUS – Increases a numerical value by 1 each time the key is pressed or switches a |
|
digital status to the opposite status condition. |
|
MINUS – Decreases a numerical value by 1 each time the key is pressed or |
|
switches a digital status to the opposite status condition. |
|
ENTER – Confirms any changes made or moves to the next screen. |
Fast-access keys |
Function |
|
Plant – Displays data about the plant's current status. |
|
Time program – Initially displays the password entry screen to provide access to |
|
change time program settings: |
|
System clock (current date, time, daylight savings dates), |
|
Daily time programs, |
|
Weekly time programs, |
|
Annual time programs. |
|
Data points / parameters – Initially displays the password entry screen to provide |
|
access to information on: |
7 |
EN2B-0137GE51 R0109 |

OPERATOR’S TERMINAL |
EXCEL 50 USER GUIDE |
Physical, remote and pseudo user addresses, parameters, system data, DDC program cycle time, buswide access and Flash EPROM.
Alarms – Displays alarm information on:
Alarm history, points currently in an alarm condition, critical and non-critical alarms.
RESET A RESET can be achieved by pressing the following keys simultaneously:
IMPORTANT
After performing a RESET all data in the RAM and the configuration codes are lost.
+ |
DOWN ARROW and MINUS: Reboots the controller and starts the start-up |
|
sequence. |
A RESET can also be achieved by pressing the hardware RESET button at the rear of the controller housing under Terminal Block B.
Display The display shows four lines of alphanumeric text with 16 characters per line.
A typical screen contains fields, either a cursor or a blinking character, 'up' and 'down' arrows, and may look like the following example:
Field name. In this User Guide, it is shown in a different font and within arrow brackets.
Cursor. Can be moved with the arrow keys.
<field name> !NEW |
||
!06:00 |
AH1_occ ↑ |
|
!06:00 AH1_tsp |
1 |
|
!06:00 AH1_tsp |
↓ |
|
Arrows indicate a list which can be scrolled with the up and down arrow keys.
Specifies the number of pages the list will be scrolled when the right or left arrow key is pressed. Number can be changed with '+' and '–' keys.
Places where the cursor can be moved to. Gray arrows not visible on real display.
Selected character blinking in display. In this User Guide, it is shown underscored. Its value can be changed with the '+' and '–' keys.
NOTE: If the string "*****" should appear, this means that currently no value is available.
The field name is sometimes shown in this User Guide to make a screen easier to understand. Field names are not visible on the Excel 50 display.
NOTE: The screens shown in this User Guide are examples and may differ slightly from the screens visible on your Excel 50 controller.
8 |
EN2B-0137GE51 R0109 |

EXCEL 50 USER GUIDE
PASSWORD PROCEDURE
The following fast-access keys are not password-protected:
Plant
Alarms
A password is required before the following fast-access keys can be fully used:
Time programs
Data points / parameters
The password allows access to sensitive data screens.
NOTE: The password procedure will not be repeated in the following sections. Refer back to this page for guidance on the password procedure. For more information about the access levels, see section "Operator Access Levels".
NOTE: If no password or the level-2 password is entered, only those screens are displayed which the user may access at that operator access level. Entering the level-3 password enables you to access all data screens and to change all values.
IMPORTANT
If you have forgotten the password, please contact your local Honeywell branch.
Please Enter
Your Password
!****
!NEXT
Using the arrow keys, move the cursor to the password field. Confirm with ENTER.
Please Enter
Your Password
!3***
!NEXT
Enter the password by changing the number displayed using the '+' or '–' keys and by moving to the next digit using the right arrow key (the underscored character will be blinking in reality).
For operator access level 1, no password has to be entered.
Please Enter
Your Password
!***5
!NEXT
Confirm with ENTER.
9 |
EN2B-0137GE51 R0109 |

PASSWORD PROCEDURE |
EXCEL 50 USER GUIDE |
Please Enter
Your Password
!****
!NEXT
Using the arrow keys, move the cursor to 'NEXT'. Confirm with ENTER to proceed to the next screen.
Modifying a Password
If the level-3 password has been entered, the level-2 and level-3 passwords can be changed:
Please Enter
Your Password
!****
!CHANGE !NEXT
Using the arrow keys, move the cursor to the 'CHANGE' field. Confirm with ENTER.
The following screen appears.
Change Password
Level 2:!2222
Level 3:!3333
!BACK
Using the arrow keys, move the cursor to the password to be changed. Confirm with
ENTER.
Change the password using the '+' or '–' keys and by moving to the next digit using the right arrow key. Confirm with ENTER.
Change Password
Level 2:!1775
Level 3:!3333
!NEXT
After you have finished changing the passwords, use the arrow keys to move the cursor to 'BACK'. The previous screen will be displayed.
NOTE: The default level-2 password is '2222'.
The default level-3 password is '3333'.
10 |
EN2B-0137GE51 R0109 |
EXCEL 50 USER GUIDE
PLANT KEY
0000040c
LCD DISPLAY
FAST ACCESS
KEYS
 C
C
BASIC FUNCTION KEYS
The 'Plant' procedure is used to choose the time program where changes should be made to in the 'Time program' procedure and to make temporary changes to the daily time program. The first screen of the 'Plant' procedure is the start screen. It is the default screen and is always visible when no other screen has been selected. This start screen will also be displayed if no key has been pressed for a long time.
The screen displays the name of the first time program, the application status, the current day, the date, and the time. The next switching time of the first user address of the time program with its current value/status is displayed below. Each time program can be assigned to more than one user address. Each application can have up to 20 different time programs.
The application status is shown in the upper right corner of the display and will appear as one of the following:
Init |
Initializing—The application tasks are started, and data points and memory |
|
are being initialized. |
Run |
Running—All relevant application tasks are running. |
Shut |
Shutdown—All relevant application tasks are halted. The application stops |
|
step by step. |
Stop |
Stopped—Some or all relevant application tasks are stopped. The application |
|
does not run. |
Press the 'Plant' fast-access key to display the default screen.
<1. time program>Init MON 13.06. 10:27 to 20:30 20 °C !TODAY !NEXT
Using the arrow keys, move the cursor to
-'NEXT' to display the next time program.
-'TODAY' to make temporary changes to the current time program. Confirm with ENTER.
If 'NEXT' has been selected, the screen will now display the next time program with the switching point time of the first user address with its value/status and the current day, date and time.
<2. time program>Init MON 13.06. 10:27 to 12:00 ON !TODAY !NEXT
Using the arrow keys, move the cursor to 'NEXT'. Confirm with ENTER. The following screen appears.
11 |
EN2B-0137GE51 R0109 |

PLANT KEY |
EXCEL 50 USER GUIDE |
<3. time program>Init MON 13.06. 10:27 to 14:30 18 °C !TODAY !NEXT
Like the previous screen, this next screen displays the next time program with its switching point, value/status and current day, date, and time.
TODAY Function
The 'TODAY' function allows the user to make an immediate, temporary change to the switching time point or the value/status without affecting the original time program. When using the 'TODAY' function, the data point must have value/status and start and stop times assigned.
Important
The new start time will be within 24 hours of the current time. That means for example, that a start time of 10:00 a.m. entered at 10:27 a.m. will activate the temporary changes the next morning. The changed fields are valid for only 24 hours; they are automatically deleted after the stop time has been reached.
If 'TODAY' has been selected, the screen will now display the password entry screen.
Please Enter Your password !****
!NEXT
NOTE: Changing a switching time point requires a level-2 or level-3 password.
Enter the level-2 or level-3 password using the arrow keys and the '+' and '–' key. Confirm with ENTER. Using the arrow keys, move the cursor to 'NEXT' and confirm with ENTER. The following screen appears.
<time prg.> Today |
|
!<user address> |
↑ |
!<user address> |
1 |
!<user address> |
↓ |
Using the arrow keys, move the cursor to the user address to be changed temporarily. Confirm with ENTER. The following screen appears.
<user address>
!09:00 to!12:00 Value: !ON !SELECT !BACK
Change the time or value/status using the '+' or '–' keys as required and use the arrow keys to move from field to field. Confirm with ENTER.
<user address>
!10:00 to!13:00 Value: !ON !SELECT !BACK
Once you have finished changing the values, use the arrow keys to move the cursor to
-'SELECT' to return to the selection list screen.
EN2B-0137GE51 R0109
EXCEL 50 USER GUIDE |
PLANT KEY |
- 'BACK' to return to the default screen. Confirm with ENTER.
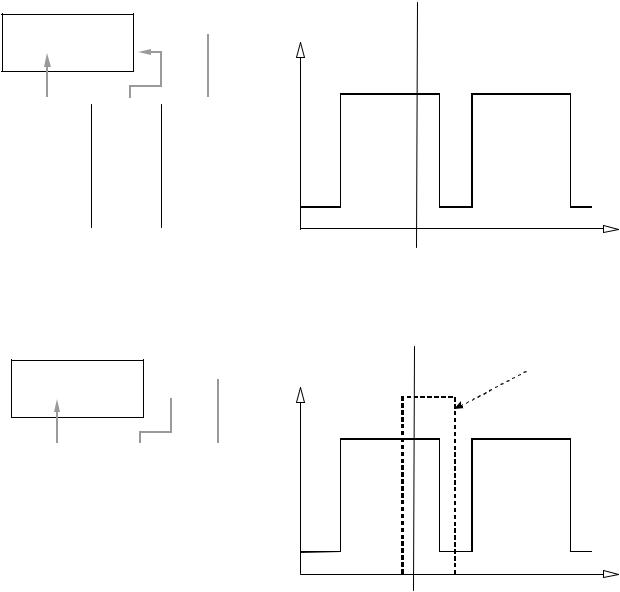
Example A normal day cycle is shown below.
Day cycle: |
06:00 ON |
|
12:00 OFF |
|
14:00 ON |
|
20:00 OFF |
Screen displays: |
Systime 10:27 |
0000095a
AH01
MON 13.06. 10:27 
TO: 12:00 ON
TODAY NEXT
6:00 |
12:00 |
14:00 |
20:00 |
Time of the next |
Status |
Current time |
change of state |
|
|
12:00 |
ON |
10:27...11:59 |
14:00 |
OFF |
12:00...13:59 |
20:00 |
ON |
14:00...19:59 |
6:00 |
OFF |
20:00... 5:59 |
t
For this day cycle, a 'TODAY' entry from 10:00 to 13:00 with the status ON has been made. The time of the next change has changed temporarily from 12:00 to 13:00. See the following figure.
Screen displays:
AH01
MON 13.06. 10:27  TO: 13:00 ON
TODAY NEXT
Time of the next |
Status |
Current time |
change of state |
|
|
13:00 |
ON |
10:27...12:59 |
14:00 |
OFF |
13:00...13:59 |
20:00 |
ON |
14:00...19:59 |
6:00 |
OFF |
20:00... 5:59 |
|
|
|
Systime 10:27 |
|
|
0000094a |
|
|
|
|
|
|
|
|
|
|
Active in |
|
10:00 |
13:00 |
the next day |
|
|
|
|||
6:00 |
12:00 |
14:00 |
20:00 |
|
t
EN2B-0137GE51 R0109 |
13 |

EXCEL 50 USER GUIDE
TIME PROGRAM KEY
Select the time program by pressing the 'Plant' fast-access key and changing the screens with 'NEXT' until the time program name to be changed appears in the first line of the screen.
Press the 'Time program' fast-access key to change time program settings. The password entry screen will be displayed.
Please Enter
Your Password
!****
!NEXT
Changing the system time requires a level-2 or level-3 password. Refer to the section 'Password Procedure' for help with password entry.
Enter the password. Confirm with ENTER.
Using the arrow keys, move the cursor to 'NEXT'. Confirm with ENTER.
14 |
EN2B-0137GE51 R0109 |
EXCEL 50 USER GUIDE |
TIME PROGRAM KEY |
System Time
The 'System Time' procedure is used to make changes to the time and the date which the Excel 50 controller uses for its control programs. Use the 'Daylight saving' function instead of the 'Date / Time' function to change the time in spring and autumn.
!System Time !Daily !Weekly !Annual
Using the arrow keys, move the cursor to the 'System Time' field. Confirm with
ENTER.
Setting Date and Time
System Time
!Date / Time
!Daylight Saving
Using the arrow keys, move the cursor to the 'Date / Time' field. Confirm with
ENTER. The following screen appears.
System Time
Date:!13.06.1997
Time:!10:28
!BACK
Using the arrow keys, move the cursor to the 'Date' or 'Time' field. Confirm with
ENTER.
System Time
Date:!23.06.1997
Time:!10:28
!BACK
If 'Date' is selected:
Set the date using the '+' or '–' keys. Use the arrow keys to move from field to field. Confirm with ENTER. Use the arrow keys to move the cursor to 'BACK'. Confirm with ENTER to return to the previous screen.
NOTE: The date must be entered in the format determined by the Engineering Units: for example, 23. July 1997 must be entered as 23.07.1997 for Europe and 07/23/1997 for the US. Press the CANCEL key to abort the operation or to cancel an incorrect entry before ENTER has been pressed. The value previously displayed will be restored.
EN2B-0137GE51 R0109 |
15 |

TIME PROGRAM KEY |
EXCEL 50 USER GUIDE |
System Time
Date:!23.06.1997
Time:!12:30
!BACK
If 'Time' is selected:
Set the time using the '+' or '–' keys. Use the arrow keys to move from field to field.
Confirm with ENTER. Use the CANCEL key to return to the previous screen.
NOTE: The time must be entered in the following format: HH:MM in 24-hour clock format; for example: 9:30 a.m. must be 09:30 and 9:30 p.m. must be 21:30. Press the CANCEL key to abort the operation or to cancel an incorrect entry before ENTER has been pressed. The value previously displayed will be restored.
Daylight Saving
The actual dates on which daylight savings time starts and ends in a given year must be changed every year.
System Time
!Date / Time
!Daylight Saving
Using the arrow keys, move the cursor to the 'Daylight Saving' field. Confirm with
ENTER. The following screen appears.
Daylight Saving
Start:!25.03
End :!26.09
!BACK
Enter the dates on which daylight savings time starts and ends for the current year using the '+' or '–' keys. Move from field to field using the arrow keys. Confirm with ENTER.
NOTE: Press the CANCEL key to abort the operation or to cancel an incorrect entry before ENTER has been pressed. The value previously displayed will be restored.
Daylight Saving
Start:!27.03
End :!26.09
!BACK
Using the arrow keys, move the cursor to 'BACK'. Confirm with ENTER to return to the start screen of the time program.
16 |
EN2B-0137GE51 R0109 |
EXCEL 50 USER GUIDE |
TIME PROGRAM KEY |
Daily Program
!System Time !Daily !Weekly !Annual
Using the arrow keys, move the cursor to the 'Daily' field in the main screen. Confirm with ENTER.
NOTE: The 'Daily' program contains daily time programs.
EN2B-0137GE51 R0109 |
17 |

TIME PROGRAM KEY |
EXCEL 50 USER GUIDE |
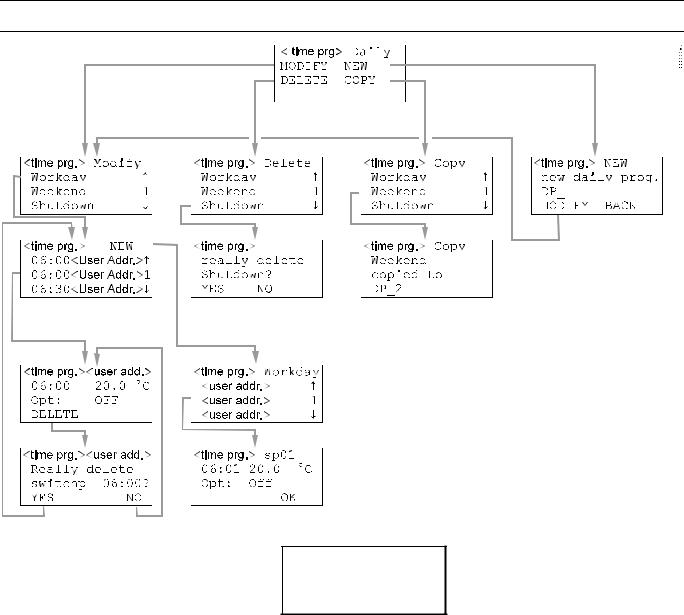
AHU1 Daily !MODIFY !NEW !DELETE !COPY
Using the arrow keys, move the cursor to
-'MODIFY' to modify the daily time programs.
-'NEW' to create a new daily time program.
-'DELETE' to delete a daily time program.
-'COPY' to copy a daily time program to another. Confirm with ENTER.
Modifying a Daily Time Program
AHU1 Modify |
|
!Workday |
↑ |
!Weekend |
1 |
!Shutdown |
↓ |
Using the arrow keys, move the cursor to the daily time program you wish to modify and confirm with ENTER.
Creating a New Switching Point
AHU1 !NEW
!06:00 <user addr.>↑ !06:00 <user addr.>1 !06:30 <user addr.>↓
Using the arrow keys, move the cursor to 'NEW'. Confirm with ENTER.
AHU1 |
Workday |
|
!<user addr.> |
↑ |
|
!<user addr.> |
1 |
|
!<user addr.> |
↓ |
|
Using the arrow keys, move the cursor to the user address to which the new switching point should belong.
AHU1 sp01 !06:01 !20.0 °C Opt: !OFF
!OK
Modify the time, the value or the optimize flag of the new switching point using the '+' or '–' keys (The optimize flag can be set to ON only if the user address is suitable for optimization).
Use the arrow keys to move from field to field. Confirm with ENTER.
Using the arrow keys, move the cursor to 'OK' and confirm with ENTER to add the new switching point to the current time program.
18 |
EN2B-0137GE51 R0109 |

EXCEL 50 USER GUIDE |
TIME PROGRAM KEY |
|
|
|
Modifying or Deleting a Switching Point |
AHU1 |
!NEW |
!06:00 <user addr.>↑ |
|
!06:00 <user addr.>1 |
|
!06:00 <user addr.>↓ |
|
Using the arrow keys, move the cursor to the switching point you wish to modify or delete. Confirm with ENTER.
AHU1 |
<user addr.> |
!06:00 !20.0°C |
|
Opt: |
!OFF |
!DELETE |
|
Modify the time, the value, or the optimize flag of the switching point. Using the arrow keys, move the cursor to the field you wish to change. Confirm with ENTER.
Use the '+' and '–' keys to change the field content. If you wish to delete the switching point, use the arrow keys to move the cursor to the 'DELETE' field and confirm with ENTER.
AHU1 |
<user addr.> |
Really delete |
|
switchp 06:00? |
|
!YES |
!NO |
If you are sure that you wish to delete the switching point, use the arrow keys to move the cursor to 'YES' and confirm with ENTER. If you do not wish to delete the switching point, use the arrow keys to move the cursor to 'NO' and confirm with ENTER. In the latter case, you will escape to the previous screen without deleting the switching point.
Creating a New Daily Time Program
Using the arrow keys, move the cursor to 'YES'. Confirm with ENTER.
AHU1
new daily prog. DP 1
!MODIFY !BACK
The newly created daily time program is issued the name DP and the lowest number which is not assigned to a daily time program.
Using the arrow keys, move the cursor to
-'MODIFY' to go to the 'Modify daily time program' sequence.
-'BACK' to return to the 'Time program' menu screen. Confirm with ENTER.
EN2B-0137GE51 R0109 |
19 |

TIME PROGRAM KEY |
|
EXCEL 50 USER GUIDE |
|
|
|
|
|
|
|
|
Deleting a Daily Time Program |
|
|
|
|
|
AHU1 |
Delete |
|
|
!Workday |
↑ |
|
|
!Weekend |
1 |
|
|
!Shutdown |
↓ |
|
Using the arrow keys, move the cursor to the daily time program to be deleted. |
|||
Confirm with ENTER. |
|
|
|
AHU1
Really delete Shutdown ? !YES !NO
Using the arrow keys, move the cursor to 'YES' to delete the daily time program or 'NO' to keep it. Confirm with ENTER.
Copying a Daily Time Program
A daily time program can be copied in order to create a new daily time program, which should be similar to an already existing daily time program.
AHU1 Copy !Workday ↑ !Weekend 1 !Shutdown ↓
Using the arrow keys, move the cursor to the daily time program to be copied.
Confirm with ENTER.
AHU1 Weekend copied to
DP_2 !BACK
The copy of the daily time program is issued the name DP and the lowest number which is not assigned to a daily time program.
Weekly Program
!System Time !Daily !Weekly !Annual
Using the arrow keys, move the cursor to the 'Weekly' field. Confirm with ENTER.
AHU1 Weekly
!MON Workday |
↑ |
|
!TUE |
Workday |
1 |
!WED |
Workday |
↓ |
20 |
EN2B-0137GE51 R0109 |
 Loading...