

Page 1
User Information Guide
EV1 Protective Hel mets for
Structural Fire Fighting
ONLY THE END USER SHALL REM OV E THIS INFORMATION PRIOR TO USING THE HELMET
DANGER
YOU MAY DIE OR SUSTAIN SERIOUS INJURY IF YOU DO NOT HAVE THE SPECIAL TRAINING AND
KNOWLEDGE TO CORRECTLY USE YOUR HELMET AND/OR HAVE NOT READ THIS USER GUIDE. IF
YOU WERE NOT GIVEN A COMPLETE GUIDE OR YOU LOSE YOUR USER GUIDE, ALERT YOUR
ORGANIZATION OR CONTACT HONEYWELL FOR A REPLACEMENT.
• DO NOT USE YOUR PROTECTIVE HELMET IF YOU HAVE NOT READ AND UNDERSTOOD THIS GUIDE AND THE
LABEL ON YOUR HELMET, AND HAVE NOT BEEN PROPERLY TRAINED AND SUPERVISED IN ITS USE.
• THIS HELMET AND ANY OTHER HELMET WILL NOT PROTECT YOU FROM ALL HAZARDS UNDE
AL
L CONDITIONS.
• THIS HELMET MUST BE WORN AS PART OF A COMPLETE PROTECTIVE ENSEMBLE; IT IS THE RESPONSIBILIT
O
F YOUR DEPARTMENT TO DETERMINE WHEN THIS HELMET MUST BE WORN TOGETHER WITH OTHE
SEMBLE ELEMENTS AND TO ENSURE THAT THE SELECTED ENSEMBLE ELEMENTS WORK TOGETHER TO
EN
PROVIDE THE INTENDED PROTECTION.
• YOU MUST CORRECTLY ADJUST YOUR HELMET SUCH THAT IT PROPERLY FITS ON YOUR HEAD AND ENSUR
HAT IT IS PROPERLY DONNED WITH ALL COMPONENTS IN PLACE AND FULLY DEPLOYED.
T
• YOU MUST PROPERLY INSPECT, CARE FOR, AND MAINTAIN THIS HELMET WITH THIS GUIDE IN ORDER FOR
THE HELMET TO PROVIDE EFFECTIVE PROTECTION.
R
Y
R
E
Introduction
This guide specifically addresses Honeywell EV1 protective helmets for structural firefighting (certified to NFPA 1971, Standard on
Protective Ensembles for
Pride Ben 2 and Lite Force models. It is important to check the label inside your helmet to ensure that you have the correct guide
for type of firefighting helmet you have been provided. There are some differences in the care and maintenance of the different
types of helmets provided by Honeywell.
Your protective helmet is intended to provide protection to your head and portions of your face and neck as part of a properly
selected and configured protective ensemble during structural firefighting and proximity fire fighting. While your protective helmet
is designed to provide protection against a number of fireground and/or other emergency operations hazards, your protective
helmet will not protect you against all exposures and under all conditions, even when worn properly.
This user information guide provides information and instructions related to the selection, use, care, and maintenance of your
protective helmet. However, this guide does not tell you when and under what circumstances you should wear your protective
helmet. Rather, this guide tells you how to wear your protective helmet and provides an understanding of the limitations of your
helmet in how it may or may not protect you. Determination of the suitability of your protective helmet for specific emergency
operations rests with your department or employer, who has the legal responsibility to conduct a hazard assessment and decide if
your protective helmet provides appropriate protection against identified hazards.
While this guide provides you basic
additional procedures – such as advanced inspection,
be performed only by trained and qualified personnel. Information and
provided on our website. Go to ww.HoneywellFirstResponder.
Structural Fire Fight Fighting and Proxim
information to adequately care for and maintain your protective helmet, there
ity Fire Fighting). An additional guide is provided for the Morning
advanced cleaning, decontamination,
instructions for these additional procedures are
com.
and retirement – that should
are certain
Page 2

User Information Guide – Protective Helmets for Structural Firefighting
Pre-use Information
General Construction and Features –
Your EV1 protective helmet has been
manufactured to comply with NFPA
1971, Standard on Protective Ensembles
Structural Fire Fighting and Proximity
for
Fire
Fighting. Honeywell offers two styles
of this helmet: a traditional style (HTTRA- EV1) and a modern style (HT-MODEV1). Each type of structural firefighting
protective helmet consists of a shell,
suspension system, retention system,
and ear covers and is provided with an
integrated eye protection component (EZ
Touch). These helmets also have highvisibility markings on the shell and
include several options for additional
eye/face protection devices (goggles or
faceshield) and visibility markings. Other
optional features include various types of
fronts. Specific information about
designs, materials, and features of these
helmet styles is provided on the
Honeywell website at
www.honeywellfirstresponder.com.
Safety Considerations and
Limitations of Use – It is critically
important that you do not use your EV1
protective helmet until you have read
and understood this entire guide and
the labels provided on the interior of
your protective helmet. In order to
reduce – but not eliminate – your risks,
do not wear this protective helmet
unless:
•
You Understand the La bels, this
Guide and Applicable Standards:
You have read, fully understand,
strictly adhere to the following: this
guide and all labels for this helmet;
NFPA 1971, Standard on Protective
Ensembles for Structural Fire Fighti
Proximity Fire Fighting; NFPA 1851,
and
Standard on Selection, Care,
M
aintenance of
for Structural Fire
Proximity Fire Fighting; and applicabl
nat
ional, state/provincial, and loca
r
egulations pertinent to emergency
operations in your area.
•
Your Use Is in Accordance with
Applicable Standards and Regulations: Your use of this protectiv
hel
met is consistent with NFPA1500,
Standard on Fire Department
Occupational Safety and Healt
rogram and with Title 29, Code of
P
Federal Regulations
1910.132 and General
Part
Requirements of Subpart I,
“Personal Protective Equipment.”
•
Need for Hazard/Risk
Protective Ensembles
Fighting and
and
ng
and
e
l
e
h
A
ssessment: Your department,
organization, or employer has
conducted a hazard/risk
assessment and determined that
this helmet provides an acceptable
level of protection for the particular
emergency operations consistent
with applicable federal,
state/provincial, and local
regulations.
•
Your Helmet Is Properly Adjusted:
Your helmet must fit or be adjusted
to the size of your head. It also
should be positioned to not interfere
w
ith your self-contained breathi
appar
atus (SCBA) facepiece.
•
All Components of Your Helmet
Are in Place and Properly Worn:
Your helmet must be complete and
you must wear your helmet properly.
This includes the full deployment of
your ear covers and the proper
attachment and adjustment of your
chinstrap for securing the helmet
our head.
y
•
Limitations of Protection: You
hav
e been trained and underst
hat not all helmets provide heat
t
and/or flame resistance or protecti
rom all hazards, and you have
f
t
rained and understand how t
s
elect and properly use t
opriate helmet to meet t
appr
pected exposure.
ex
•
Heat Stress: Wearing your
protective helmet together with other
ensemble elements may increas
y
our risk of heat stress, which ma
c
ause heart attack, stroke,
dehydration, or other health relat
onditions. At the first sign of heat
c
stress, immediately seek medical
help.
•
Burn Injury: Your protective helmet
will not protect you from all burns
and injuries. If your protective
helmet is exposed to radiant,
convective, or conductive heat, or
comes in contact with a hot
environment or hot object, you may
be burned underneath the protectiv
met with no warning and no si
hel
damage to the protective helmet.
of
•
Heat Sensation: Your protective
hel
met will lower your ability to feel
heat. Do not be misled by th
ence of heat or discomfort
abs
underneath your protectiv
•
helmet. Even though you do not feel
heat or discomfort, you can
bur
ned or injured suddenly a
ithout warning. If you feel heat or
w
and
o
he
he
e
e
be
nd
ng
on
been
e
y
ed
gn
on
some slight discomfort or unusual
sensation under your protective
helmet, you may already have
been burned or are about to be
burned. Be constantly alert to the
possibility of exposure to heat and
other hazards.
•
Barrier Protection: Your helmet’s
ear covers are NOT equipped wit
rier material. Consequently, your
bar
protective helmet will provide little t
no
integrity against liquids in your
head and face area. Your protectiv
met may not protect you from all
hel
chemical, radiological, or biological
hazards that can cause death,
injuries, diseases, and illnesses.
Furthermore, this helmet does not
offer any protection from hazardous
vapors or gases, liquefied gases, or
cryogenic liquids. Ensure that y
e a proper interface for your
hav
protective helmet with your
protective coat, protective hood,
SC
BA.
•
Other Hazards: Your protective
hel
met, wet or dry, may not offer
protection from electrical shock.
Your protective helmet will not
protect you from all physical
hazards. Heavy falling objects or
impact with hard surfaces involv
f
orces that can be fatal or severely
injure you. Do not use your
protective helmet if it is
contaminated, cut, punctured, worn,
cracked, abraded, or altered from its
original condition.
•
Need for Complete Ensemble:
This helmet is effective only when it
is properly worn; provides a proper
interface with your garment, hood,
and SCBA; and is part of
c
omplete ensemble. A complet
ens
emble includes appropriat
ements for your overall protecti
el
is consistent with your
and
organization/department’s hazard/
risk assessment.
•
Proper Care and Maintenance:
e
This helmet must be properly
inspected, maintained, and cared for
by your department, organization, or
employer consistent with thes
i
nstructions and applicable federal,
state/provincial, and local
regulations. It must be free of
soiling, contamination, damage,
any
alteration from its original
condition that would compromise its
protection. Damage
ontamination of this helmet may
c
a
and
h
o
e
ou
and
e
e
e
on
e
and
Page 3
User Information Guide – Protective Helmets for Structural Firefighting
warrant its disposal.
•
Replacement After Impact or High
:
Heat Exposure
t
o absorb the energy of a blow by
partial destruction or damage to t
hell and/or suspension system. Ev
s
hough such damage may not
t
r
eadily apparent, you should replac
y
our helmet if it is subjected to
evere impact or excessive heat.
s
•
Warranty: This helmet is NOT
warranted to be fit for a particular
purpose. Read carefully the “Warranty
Information” in this guide. If labels i
t
he helmet are missing or becom
unr
eadable, contact Honeywell for
replacement label information.
Marking Recommendations – Do not
attempt to alter or modify your helmet.
Do not paint or apply any materials to
the exterior of the helmet that have not
been approved by Honeywell. For
identification purposes, you may mark
your protective helmet on the interior
using an indelible marker, if permitted by
your department or organization. Do not
write over or obscure information on the
product label.
Testing and Assessment of
Performance – Your protective helmet
has been evaluated for a number of
performance properties that are based
on the respective standard(s) for its
certification. These properties include,
but are not limited to, impact resistance
and force acceleration, physical
penetration resistance, heat and thermal
shrinkage resistance, flame resistance,
electrical insulation, retention system
slippage, suspension system retention
(on the head), shell separation, label
durability and legibility, corrosion
resistance, and trim visibility. For an
understanding of the performance
requirements and test methods, review
the NFPA 1971 standard and the
Honeywell Reference Guide.
None of the NFPA 1971 performance
properties can be evaluated in the
field. If you have questions, check with
your department or organization, who
in turn can contact Honeywell.
Your helmet is made
he
en
be
e
a
n
e
Preparation for Use
Adjusting Proper Fit – The integrity, fit,
and proper assembly of the helmet, suspension, and chinstrap must be
checked before each use. Your safety
depends upon the proper fit of your
helmet and proper use of all features
and components. Typically, helmets are
adjusted so that the helmet is tilted
approximately 5 degrees above a level
horizontal plane to properly
accommodate your SCBA facepiece.
This adjustment is referred to as a
“helmet positioning index (HPI)” for
purposes of helmet testing and
certification.
All adjustments are independent of how
far your head goes into the helmet and
DO NOT affect the length of the
overhead suspension straps.
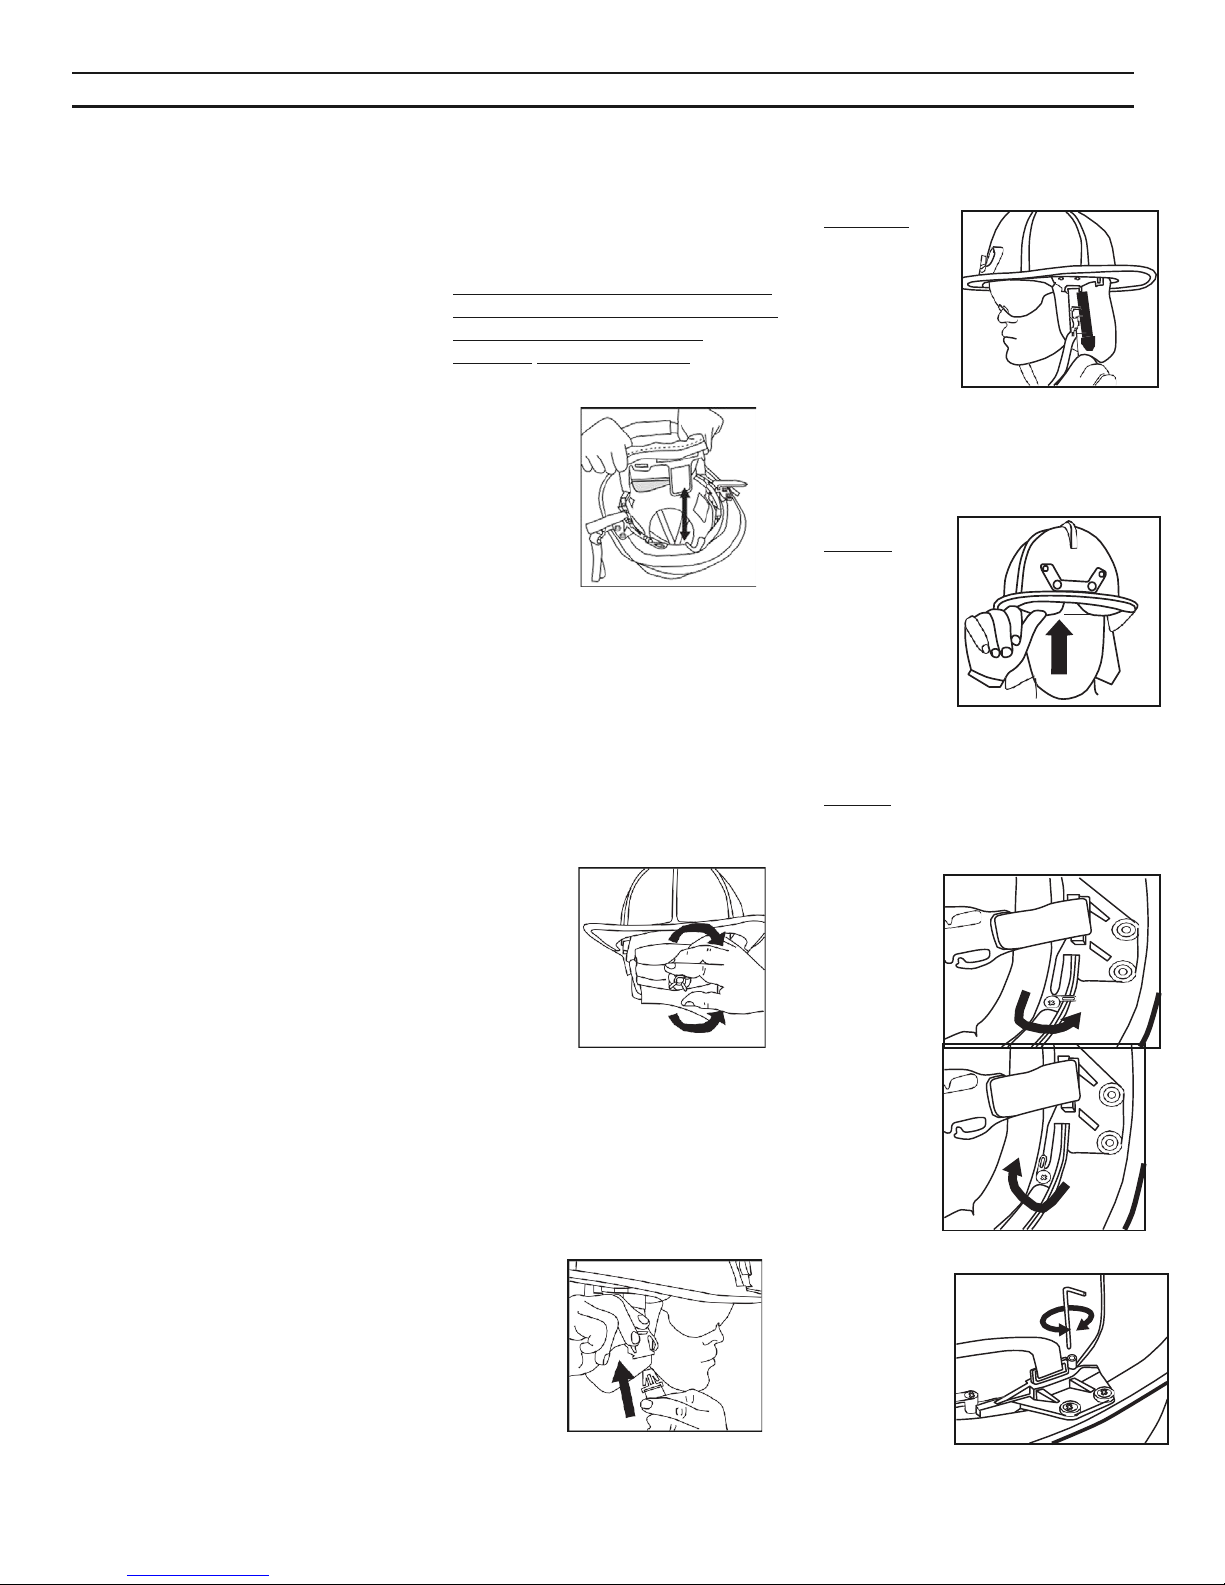
Adjusting the Headband
1.
Three large
w
hite hook
oop
and l
abs secur
t
headband
i
nto liner.
These tabs
are located
on the front and on both sides.
The hook parts of the hook and
loop are fixed into the helmet i
he same positions.
t
2.
Adjust the position of the tabs up
and
l
iner.
3.
The lower edge of the headband
should rest near the top of your
ears. This will ensure the best
lateral stability of the helmet.
Adjusting
Your Helmet
to Fit Your
Head
Rotate the
ratchet control
knob to
expand or
contract the
band to provide comfortable but firm fit.
Securing the Chinstrap
Check the operation of the chinstrap
buckle before putting the helmet on
your head. When the buckle is closed,
both push levers on the female side
(mating clip) must be depressed
before the male side (prong) will with
draw.
Step 1 –
Insert the
prong into
the mating
clip until it
snaps in with
a clicking
sound.
Step 2 – Pull the free end at the postman buckle to tighten the
the free end to the hook and loop to
stow it.
e
down vertically inside th
strap. Attach
n
e
Always keep your chinstrap securely
fastened during firefighting operations.
Operating the EZ Touch Eye Protector
Deploying
1.
Use your
thumb t
gent
t
edge
eye
pr
upward.
2.
A clicking sound will be heard and
the eye protector will automatically
descend gradually from the stowed
pos
Stowing
1.
Use your
thumb to
gent
the ey
protector
up.
2.
Stop pushing when you hear the
cli
now in t
Storage
When not in use, the EZ Touch eye
protector should be stored using the
safety latch.
Locked
position:
Safety latch
extended out
over the
of the
eye protector.
Unlocked
position: The
safety latch
rotates away
toward the
inside of the
helmet.
Adjustment of Eye Protector Height
To adjust the
eye protector
height for a
comfortable
fit, use the
hex key provided. Turn
the pictured
small hex screw (on the left underside
of the helmet brim) to adjust the
resting position of the eye protector on
the bridge of your nose.
o
h
ly pus
lower
he
of the
otector
ition.
ly push
e
back
cking sound. The eye protector
he stowed position.
edge
is
Page 4

User Information Guide – Protective Helmets for Structural Firefighting
Recommended Storage Practices –
rear hook on the back brim of the
The
helmet can be used to hang your helmet.
Store your helmet only when it is clean, dry,
and free of contamination. Storing wet
helmets, particularly when the
suspension and ear covers are wet, will
promote growth of mildew, fungus,
bacteria, or other harmful substances that
can lead to skin irritation, rashes, and
potential
conditions can also lead to deterioration of
helmet textile
away from potential contaminants such
as oils, greases, or other chemical
substances. Store your helmet in a clean,
ventilated area away from direct sunlight
and away from tools or other sharp
objects. Do not store your helmet with
your personal belongings or in a
personal living area. Do not store or
transport your helmet in the window
areas of apparatus and vehicles.
diseases or illnesses. Wet
components. Keep helmets
Inspection Details
Frequency
and
Routine Inspections – Ins pect your
protective helmet prior to its first use
and following every use. Prior to
using the helmet for the first time,
ensure that the helmet does not have
any construction flaws, is completely
and properly assembled, and was not
damaged when being put into
service. Following every use, inspect
your protective helmet for:
•
Soiling
•
Contamination
•
Shell: physical damage such as
cracks, dents, and abrasions
•
Shell: thermal damage such
as
bubbling, soft spots,
warping, and discoloration
•
Ear covers or headband covers:
physical damage such as rips,
tears, and cuts
•
Ear covers or headband covers:
thermal damage such as charring,
burn holes, and melting
•
Ear covers or headband covers: loss
of seam integrity and broken or
m
issing stitches
•
Suspension and retention
systems:
components
•
Faceshield/goggles system:
damaged
including discoloration or
scratches to the faceshield or
goggles or eye/face protectio
l
ens, limiting visibility
damaged or missing
or missing components,
n
•
Reflective trim or visibility
markings: damaged or
missing pieces
If these conditions exist, alert your
supervisor for your department or
organization to make a determination
on the continued serviceability of your
protective helmet.
Advanced Inspections
protective
to a more thorough inspection at
least every 12 months, after every
advanced cleaning, or whenever
there is a concern about its condition
for continued service. This
inspection must be carried out by
an individual within your
department or organization who
has been trained in advanced
inspections or by a qualified and
accepted independent service
provider.
helmet must be subjected
– Your
Wearing Instructions
Donning – The following applies
for properly donning your helmet:
•
Ensure the correct adjustment of your
helmet as described in the secti
above.
The adjustment of your helm et
should t
be wearing either a hood or an
S
•
Place your adjusted helmet on your
head and secure the chinstrap. Never
wear your helmet without securi
y
•
Adjust all helmet, hood, SCBA, and
coat components so that they provide a
pr
pr
position taken during use. You must
deploy your ear covers completely t
ens
protective
and SCBA facepiece. If provided and
when
faceshield or goggles are correctly
deployed.
Check to make sure that your helmet,
hood, and coat do not interfere with t
s
eal of the SCBA facepiece on your face.
Doffing – If your protective helmet is not
contaminated:
•
Remove the helmet in the reverse
order in which you put it on.
•
Inspect your helmet as indicated in
the instructions above.
If your protective helmet is damaged,
report this damage or other change in
its condition to your supervisor or
organization. Any damage or change
ake into account if you will
CBA facepiece or both.
our chinstrap.
oper interface, with no gaps i
otection occurring in any body
ure overlap between your
coat collar, protective hood,
needed, ensure that your
on
ng
n
o
he
in condition must be corrected before
reusing your helmet. If your helmet has
become contaminated with blood, body
fluids, chemicals, or other hazardous
substances, use protective gloves and
extreme caution in removing your
helmet, and do not contact the surface of
your helmet with your bare hands. Seek
assistance in removing your helmet and
other parts of your ensemble to minimize
your exposure to any contaminants.
Care and Maintenance
Instructions
Importance of Clean and Maintained
Helmets – It is important that you keep
your protective helmet clean, free of contamination, and properly maintained at
all times. Protective helmets that are
dirty or contaminated pose significant
hazards. The wearing of soiled or
contaminated clothing and equipment
can cause acute or long-term health
hazards. Many contaminants can be
absorbed by the skin, and some are
carcinogenic. In addition, many
contaminants are flammable. Do not
wear your protective helmet unless it is
properly cleaned and thoroughly dried.
Refer to NFPA 1851, Standard on
Selection, Care, and Maintenance of
Protective Ensembles for Structural Fire
Fighting and Proximity Fire Fighting, for
additional guidance. However, the
instructions provided by Honeywell First
Responder Products take precedence
over any requirements specified in
NFPA 1851.
Cleaning Precautions
your protective helmet:
•
Use only mild detergents with a pH
range of not less than 6.0 pH and not
greater than 10.5 pH as indicated
t
he product material safety data sheet
(MSDS) or original product container.
Do not use detergents or cleani
agent
s that are not approved b
Ho
neywell First Responder Products
G
o to www.HoneywellFirstResponder
.com for a list of recommende
leaning agents.
c
•
Never use solvents or chlorine bleach
cleaning agents that contain chlorine
bleach. These substances rapidly
break down some helmet materials.
•
Do not machine wash or dry whole
hel
mets. The ear covers and head-
band/ratchet covers may be machi
ashed and dried as instructed below.
w
•
Separately clean helmet ear covers.
•
Do not use wash water or drying
t
emperatures above 105°F (40°C).
– In cleaning
on
ng
y
.
d
or
ne
Page 5
•
Wear protective gloves and eye/face
splash protection when cleaning soiled
items.
•
Do not wash protective helmets or other
protective clothing alongside personal
items.
•
Do not dry clean your protective helmet
or helmet components.
Routine Cleaning – Clean your protective helmet after each use or whenever
your helmet has become soiled. You
may clean your helmet with or without
the ear covers, headband/ratchet
covers, and chinstrap. Use the following
procedures for routine cleaning by hand
of your protective helmet in a utility sink:
1.
Choose a utility sink that is specifically used for cleaning protective
gear; do not use a kitchen sink or
other sink that is employed for
personal products.
2.
Remove the ear covers and chinstraps and wash them separately
using the instructions provided below.
3.
Brush off any loose debris.
4.
Fill the utility sink with warm water
no hotter than 105°F (40°C).
5.
Use a mild detergent in an amount
according to the detergent supplier’s
instructions.
6.
Scrub the exterior of the helmet
gently using a soft-bristle brush.
7.
Use only a soft cloth or sponge to
clean the EZ-Touch eye protectors.
8.
Drain the sink and thoroughly rinse
the exterior of the helmet. Conduct a
second rinse if necessary.
9.
Inspect the helmet and, where
necessary, rewash any portions of the
protective helmet that do not appear
clean, or submit it for advanced
cleaning.
10.
Dry the helmet by air drying it in a
well ventilated area, but not in
direct sunlight. Do not force-dry
the helmet with a hair dryer, or
place it over a heating duct or
radiator. Forced drying may cause
damage to the helmet
suspension.
11.
Only when all components are dry,
reinstall the ear covers and headband/ratchet pads according to the
instructions provided below.
12.
Rinse the utility sink, following
routine cleaning procedures.
Optional Machine Cleaning of
Selected Components – Washing
machines and dryers may be used only
for the ear covers and chinstraps. If
User Information Guide – Protective Helmets for Structural Firefighting
washing with protective garments,
wash your ear covers and chin straps
only with the liners of your protective
garment. Do not wash these
components with garment outer
shells, as the hardware and hook and
loop closure tape will damage your
helmet components. Use the
following procedures if machine
washing and drying:
1.
Choose a washing machine that is
used for cleaning of protective
clothing. While top-loading
machines may be used, frontloading washers/extractors are
preferred as these machines are
less likely to physically damage
clothing and can be programmed
for specific water levels,
temperatures, and times.
2.
Brush off any loose debris.
3.
Pre-treat heavily soiled or
spotted areas.
4.
Unless otherwise instructed, load
machine to 80% of its rated
capacity. Overloading will result in
inefficient cleaning.
5.
Use mild wash settings, a mild
detergent, and warm water
temperatures.
6.
Following washing, remove helmet
ear covers and chin straps from
washing machine and air dry as
specified above, or put in a dryer on
a no-heat setting.
7.
Inspect the ear covers and
chinstraps. If necessary, rewash
these components or submit them
for advanced cleaning.
Advanced Cleaning – Your protective
helmet must be subjected to an advanced cleaning at least every 12 months
at the time of advanced inspection or
whenever soiling requires additional
cleaning. Advanced cleaning must be
performed by persons qualified by your
department or organization, or by an independent service provider (ISP) that
has been accepted by Honeywell.
Decontamination – Proper
decontamination of your protective
helmet will depend on the type and
extent of contamination. If your
protective helmet has become
contaminated with blood or body fluids,
immediately isolate the helmet and
inform your supervisor, department, or
organization. Before reuse of your
protective helmet, it must be subjected
to specialized cleaning procedures that
have been proven to remove
contaminated fluids.
If your protective helmet has become
contaminated with chemicals or other
hazardous substances, immediately
isolate your helmet and remove it from
service, taking care not to crosscontaminate other clothing items.
Immediately inform your supervisor,
department, or organization. Do not
wear a protective helmet that was
contaminated until verification has been
provided that your protective helmet is
free from contamination.
Removal and Installation of Components – In most cases, your protective
helmet will be provided fully assembled.
However, there are some cases where
you will need to install certain components, or you may need to replace some
components that have become damaged. You will also need to remove the
ear covers for complete cleaning of your
helmet. Use the following instructions for
these actions:
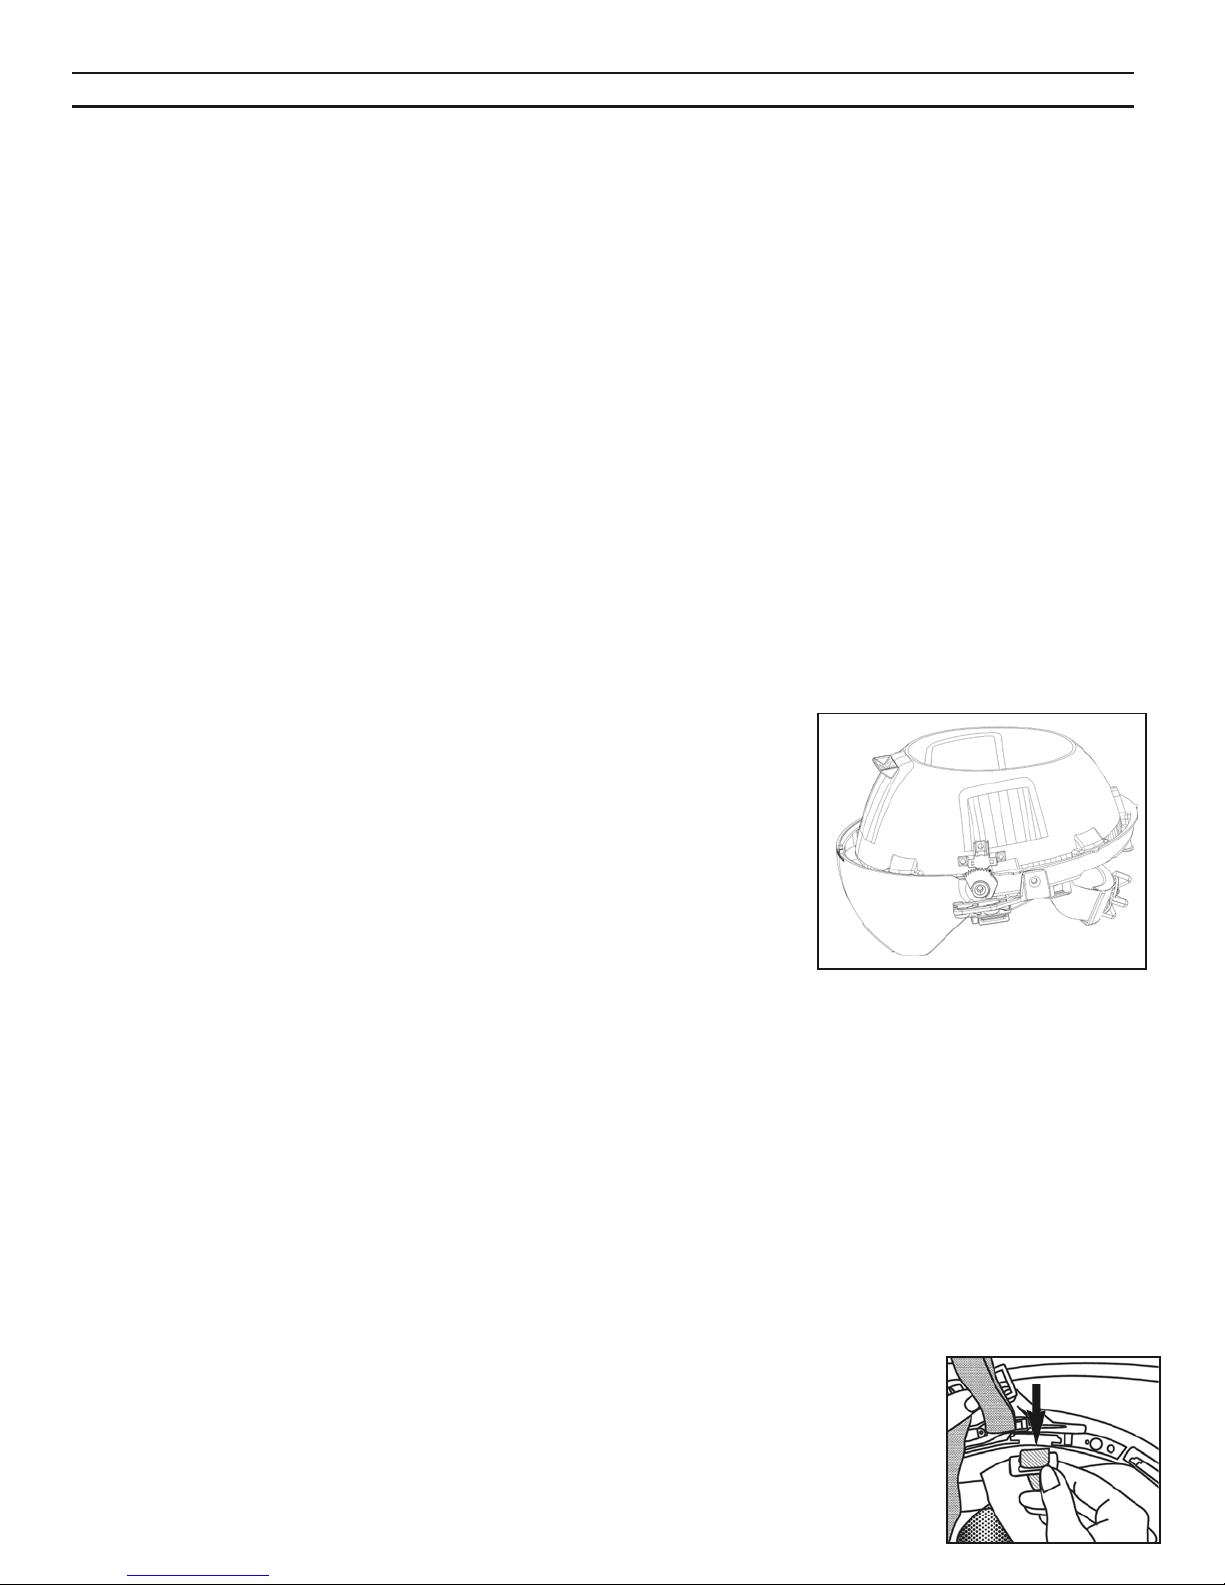
Removing Impact Liner and
Suspension
The one-piece impact liner and suspension is secured in the shell by four
screws (two on either side of the
helmet). Liners should not be removed
more often than is essential for special
repairs, such as replacing the EZ Touch
eye protector. When necessary, use a
Phillips screwdriv er to fully remove each
screw. If the screw turns without
loosening, then use an adjustable or
other type of wrench to hold the nut (top
of side brim) while turning the screw.
Ensure that the screws and nuts are
fully tightened before using your helmet.
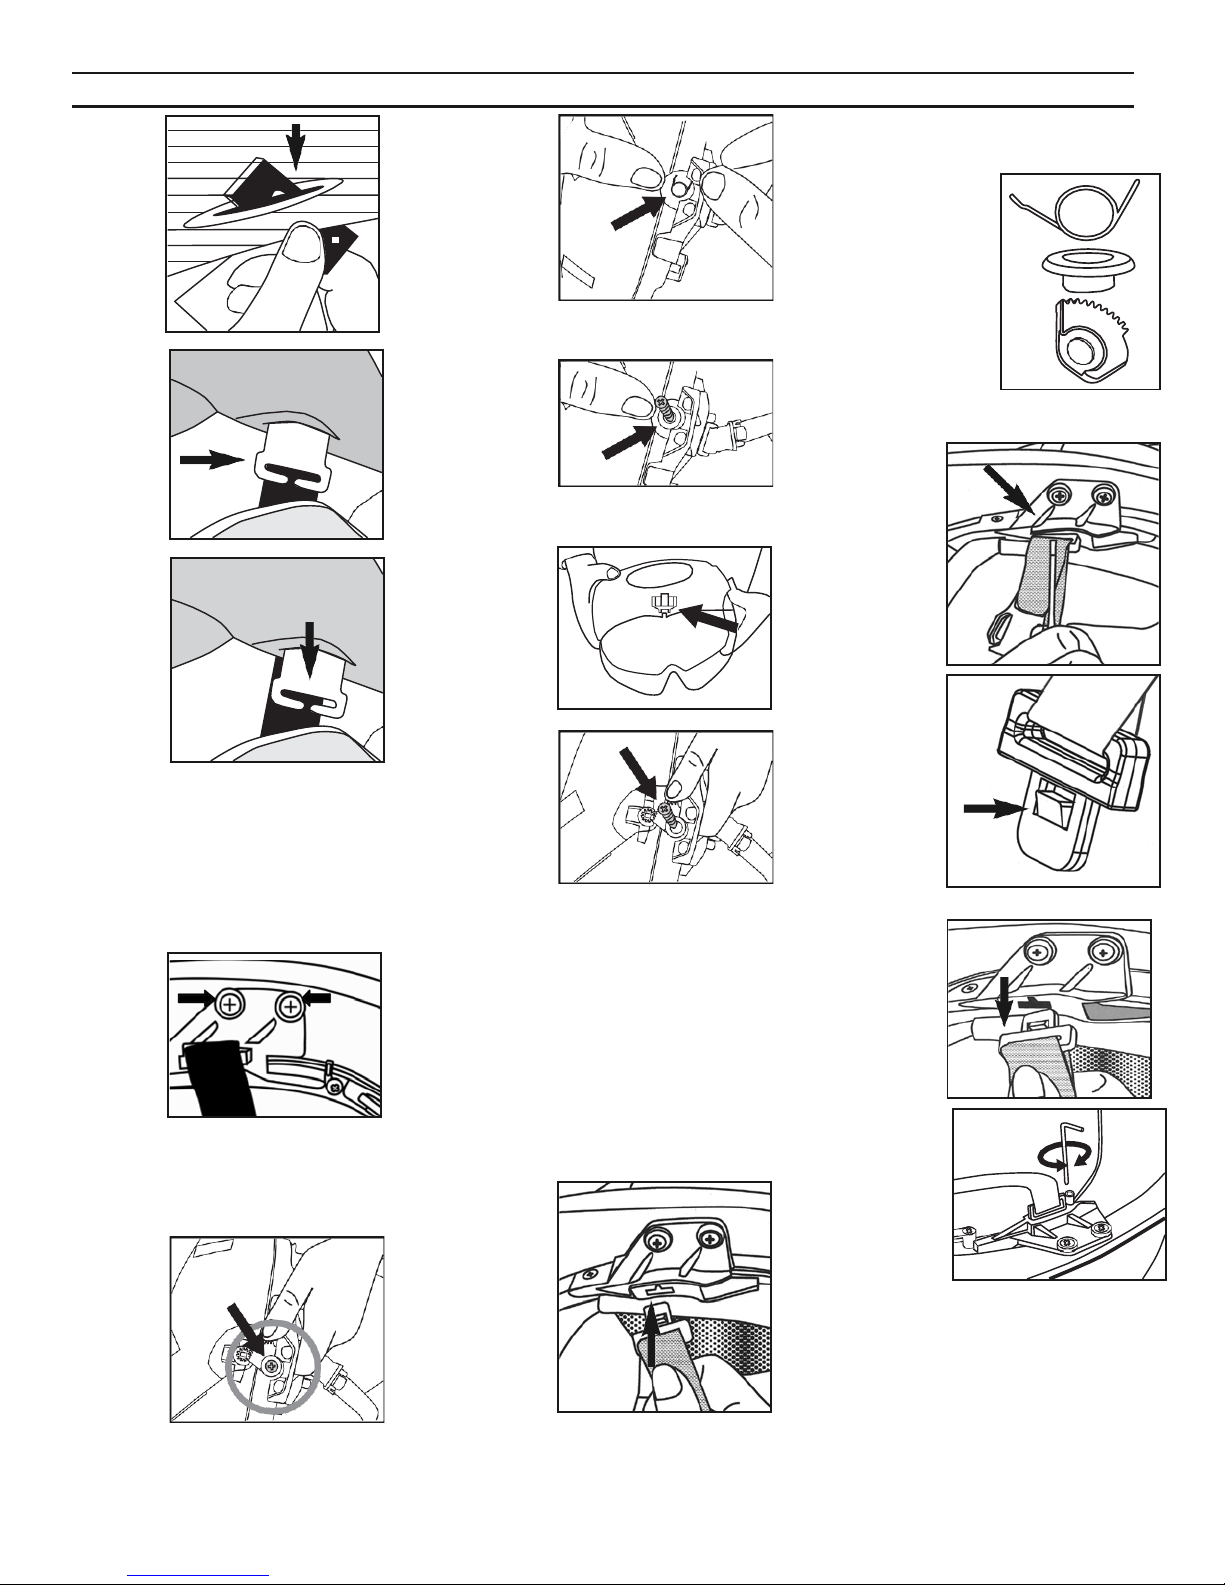
Removing Ear Covers
Step 1 –
Remove both
side ribbon
tabs from the
suspension
ring by pulling
them up
firmly.
Page 6
User Information Guide – Protective Helmets for Structural Firefighting
Step 2 –
Feed the
ribbon tab
through the
buttonhole
on the ear
cover.
tep 3 –
S
Unhook the
two rear
ribbons for
each of the
ribbon tag
legs.
S
tep 4 –
Slide off
ear
the
cover
from the
ribbon
tab legs.
Installing Ear Covers
To install a new ear cover, reverse the
action in each step above, steps 4
through 1.
Removing and Installing the EZ
Touch Eye Protector
Step 1 –
Remove
the onepiece
impact
liner and
suspension. It is
secured to the shell by four screws
(two on either side of the helmet). Keep
all screws and hardware.
Step 2 –
Unscrew
the
EZ
Touch at
each side
of the
suspension
ring and
remove the
bushings.
Step 3 – On the non- geared side of
the one-piece impact
suspension, insert the post of the
pre-loaded spring into the small hole
liner and
in the plastic
suspension
and align the
hole in the EZ
Touch with
screw hole.
Note: The preloaded spring is held in place by a wire
tie that will need to be removed later.
Step 4 –
Insert the
bushing and
screw through
the hole in the
EZ Touch and
screw them to the one-piece impact liner
and suspension.
Step 5 –
Click the EZ
Touch into
the stowed
(locked)
position.
S
tep 6 – On
the geared
wheel mechanism side of
the EZ Touch,
align the two
gears. Also
align the hole in the EZ Touch with the
hole in one-piece impact liner and suspension. Insert the bushing and screw,
then screw them to the one-piece impact
liner and suspension.
Step 7 – Remove the green wire tie
and the plastic film on the EZ Touch.
Step 8 – Reattach the one-piece
impact liner and suspension with the
new EZ Touch to the shell by
reversing Step 1.
Step 9 –
lace the
P
helmet on
your head
to
determine if
the EZ
Touch eye
protector
needs
adjusting
for a comfortable fit. To adjust, use
the hex key provided. Turn the
pictured small hex screw (on the left
underside of the helmet brim) to
ust the resting position of the eye
adj
protector on the bridge of your
Legend:
Tension Spring
Bushing
Geared Wheel
eplacing the Chinstrap
R
Step 1 – Insert a small
sharp object
(small screw
driver/ice
pick) into the
outer slot of
the chinstrap
retaining
base.
Step 2 –
Using the
inserted
object,
depress the
tongue on
the chinstrap
clip.
tep 3 – Pull
S
the chinstrap
clip up and
out. Repeat
for both
sides.
Step 4 – To
install the
new chinstrap, push
the clip into
the slot with
the clip
tongue
facing outwards.
FOR HOT FIRE TRAINING
Removing and Installing the
Aluminized Helmet Cover
The training aluminized helmet cover is
intended to fit over the helmet shell and
uses an elasticized edge to keep the
cover in place on top of the helmet
shell. To remove the cover, expand the
bottom opening of the cover that fits to
Page 7
the inside of the brim and slide it off
gently. Do not use excessive force to
remove the cover, as you may
damage or rip the material or damage
the reflective surface of this material.
To install, reverse the above
procedures.
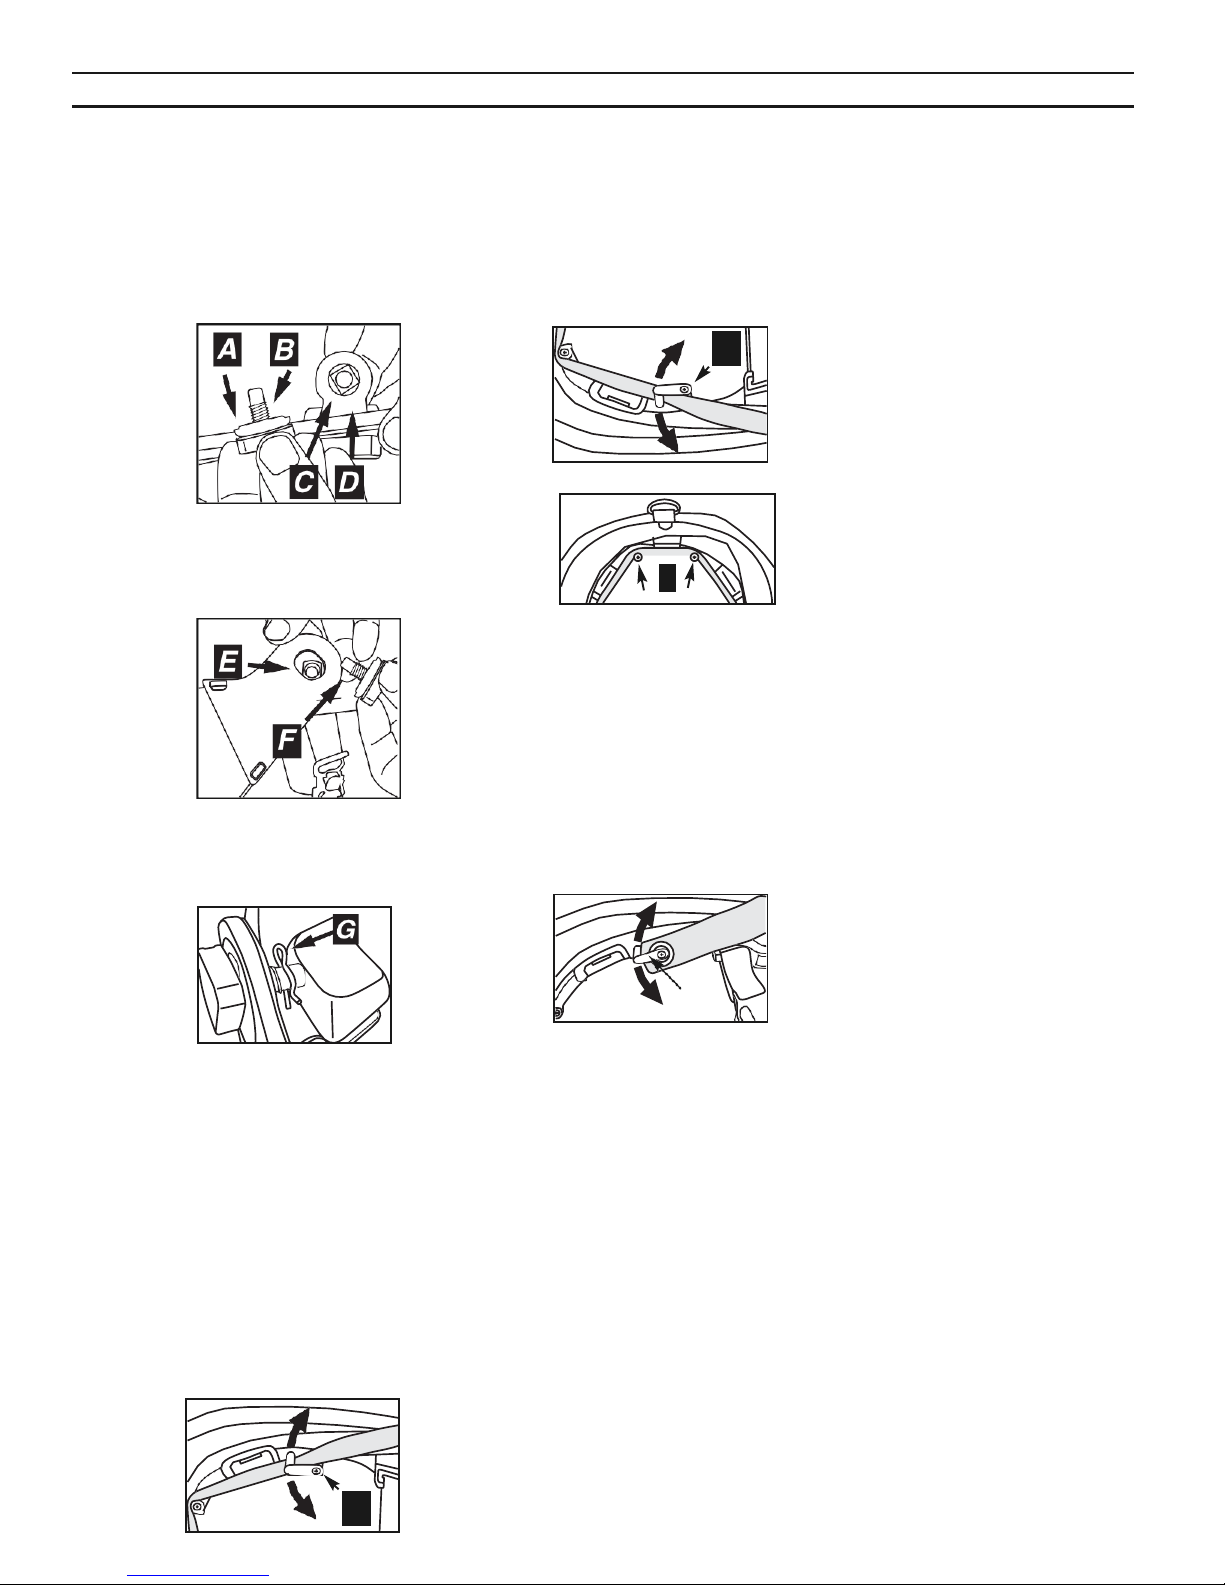
Installing Optional Faceshields
Step 1 –
Place the Oring washer A
onto the
threaded
screw knob B
with the
rubber
the O-ring facing toward the
faceshield. Insert the combination
swivel/washer nut C through the back
side of the faceshield bracket D.
Step 2 –
Seat the
faceshield’s
mounting
hole E over
the swivel/
washer nut.
Screw the
threaded
screw knob into the combination
swivel/washer nut F and tighten
snugly. Do not over tighten.
Step 3 –
Insert the
hitch pin G
into the
hole in the
threaded
screw knob.
Step 4 – Repeat above steps on
other side and adjust tension to your
preference.
Installing Optional Full-strap
Goggles
Step 1 – Orient the goggles on the
front of the helmet and above the
brim allowing the goggle strap to
dangle below the brim.
Step 2 – While holding the goggles in
place turn the helmet over to expose
the suspension ring.
Step 3 –
Locate
and rotate
post A
counter
clockwise and
part of
User Information Guide – Protective Helmets for Structural Firefighting
A
pull the goggle strap to the inside of
the post. Rotate the post clockwise
back to its original position forming a
tunnel for the goggle strap.
Step 4 – Locate post B on the opposite
side and rotate it counter clockwise.
Pull the goggle strap to the inside of
the post. Rotate the post clockwise
back to its
original
position
forming a
tunnel for
the goggle
strap.
Step 5 –
Finish by
feeding the
goggle
strap to the
outside of
the two posts on the
back C.
Installing 2-strap Goggles
Step 1 – Orient the goggles on the front
of the helmet and above the brim
allowing the 2 straps to dangle below
the brim.
Step 2 – While holding the goggles in
place turn the helmet over to expose
the suspension ring.
Step 3 –
Locate the
2 posts on
the
suspension
ring and
rotate each
counter- clockwise. Stretch both ends of
the goggle straps over the posts. Rotate
the posts clockwise back to their original
positions.
Repairs – The only repairs you are permitted to make on your protective
helmet are the removal and
replacement of the entire impact cap
and suspension, the removal and
installation of ear covers, the removal
and replacement of the EZ Touch eye
protector, the removal and replacement of the chin strap, the addition of
supplemental goggles or faceshields,
and changing the front leather shield of
the helmet. Detailed instructions for
these repairs are included in this guide
and on the Honeywell website. Do not
attempt to conduct any other types of
repairs of your helmet. Your protective
helmet must be repaired only by
Morning Pride or an organization that
B
C
Post
has been qualified by Honeywell First
Responder Products. If your helmet is
damaged, report the damage to your
supervisor, department, or organization
and obtain a new helmet to replace the
damaged helmet.
Retirement and Disposal
The decision for the continued service of
your protective helmet must be made by a
qualified individual within your department or organization. Typical reasons for
retiring a helmet include but are not limited
to the following:
• The shell shows signs of major
laminate failure/breakage. This will
take the form of either deep
indentations from falling objects or
major crushing. It may also be seen
as a whitening of the laminate in the
impact area when the inside of the
shell is inspected.
• The brim area has severe crack lines
or flexes abnormally.
•
The helmet has obviously suffered
excessive heat or burning. This
includes any charring of the paint or
helmet substrate. Charring is
described as an actual burnt area or
surface damage that cannot be
repaired by sanding or repainting.
•
There is visual sign of acid or
chemical residue, which may
damage the shell paint or substrate.
•
The shell shape is distorted. This can
be seen as sagging or drooping
when it is compared to a new helmet.
If you have any doubts about your
protective helmet and its condition, bring
this matter to the attention of your
supervisor, department, or organization
immediately. Protective helmets that are
no longer deemed serviceable for
reasons of damage, contamination, or
other unsafe condition must be disposed
of in a fashion whereby the helmet
cannot be reused. One example is
drilling holes in the shell, removing the
chinstrap and suspension, and
damaging the tabs for attaching the
headband. Contaminated helmets must
be disposed of by your department or
organization in accordance with federal,
state/provincial, or local regulations.
If your head, face, neck, or other parts
of your body are burned or injured
while you are wearing your protective
helmet, that helmet must be removed
from service and retained by your
department or organization for an
appropriate period as determined by
your department or organization.
Page 8
User Information Guide – Protective Helmets for Structural Firefighting
ranty
War
Honeywell warrants that all
Morning Pride by Honeywell First
Responder Products protective
helmets are free from defects in
material and workmanship for the
useful life of the product. The end
user is STRONGLY CAUTIONED
not to install any accessory
piercing the shell. This warranty
specifically excludes accidental
damage (e.g., exposure to acid,
being run over by apparatus),
intentional or unintentional
abuse, natural disasters, damage
caused by disregard of care
instructions, and normal wear.
Hot Fire Training Damage – This
helmet meets the NFPA 1971
standard for high convective and
radiant heat resistance. These
tests will damage the helmet. To
avoid similar damage in training
exercises (flashover and/or high
heat training), always use an
aluminized helmet cover. Any
heat damage to a helmet without
an aluminized cover during such
training voids all warranties,
express or implied.
THESE WARRANTIES ARE
EXCLUSIVE
OTHER
WHETHER WRITTEN, EXPRESS,
IMPLIED, STATUTORY, OR
OTHERWISE. A full warranty
statement can be found at:
www.HoneywellFirstResponder.com
AND IN LIEU OF ALL
WARRANTIES,
Contact Information
If you have questions or
require more information,
contact Honeywell First
Responder Products.
Honeywell First Responder Products
#1 Innovation Court
Dayton, OH 45414
Tel: 800-688-6148
ISO 9001:2015
www.HoneywellFirstResponder.com
99-BK-S07-EV1
Rev. March 2018
© 2018 Honeywell International Inc.
 Loading...