


user manual
Οδηγίες Χρήσης manual de instruções manual de instrucciones
Fridge-Freezer
Ψυγειοκαταψύκτης
Combinado Frigorífico-congelador
END42405X

2 electrolux
Electrolux. Thinking of you.
Share more of our thinking at www.electrolux.com
Contents
Safety information |
2 |
Control panel |
4 |
First use |
5 |
Daily use |
5 |
Helpful hints and tips |
6 |
How to use the water dispenser with BRITA
MAXTRA filter cartridge |
7 |
Care and cleaning |
13 |
What to do if… |
14 |
Technical data |
16 |
Installation |
16 |
Environmental concerns |
19 |
Subject to change without notice
Safety information
In the interest of your safety and to ensure the correct use, before installing and first using the appliance, read this user manual carefully, including its hints and warnings. To avoid unnecessary mistakes and accidents, it is important to ensure that all people using the appliance are thoroughly familiar with its operation and safety features. Save these instructions and make sure that they remain with the appliance if it is moved or sold, so that everyone using it through its life will be properly informed on appliance use and safety.
For the safety of life and property keep the precautions of these user's instructions as the manufacturer is not responsible for damages caused by omission.
Children and vulnerable people safety
•This appliance is not intended for use by persons (including children) with reduced physical, sensory or mental capabilities, or lack of experience and knowledge, unless they have been given supervision or instruction concerning use of the appliance by a person responsible for their safety. Children should be supervised to ensure that they do not play with the appliance.
•Keep all packaging well away from children. There is risk of suffocation.
•If you are discarding the appliance pull the plug out of the socket, cut the connection cable (as close to the appliance as you can) and remove the door to prevent playing children to suffer electric shock or to close themselves into it.
•If this appliance featuring magnetic door seals is to replace an older appliance having a spring lock (latch) on the door or lid, be sure to make that spring lock unusable before you discard the old appliance. This will prevent it from becoming a death trap for a child.
General safety
Caution! Keep ventilation openings clear of obstruction.
•The appliance is intended for keeping foodstuff and/or beverages in a normal household as explained in this instruction booklet.
•Do not use a mechanical device or any artificial means to speed up the thawing process.
•Do not use other electrical appliances (such as ice cream makers) inside of refrigerating appliances, unless they are approved for this purpose by the manufacturer.
•Do not damage the refrigerant circuit.
•The refrigerant isobutane (R600a) is contained within the refrigerant circuit of the appliance, a natural gas with a high level of environmental compatibility, which is nevertheless flammable.
During transportation and installation of the appliance, be certain that none of the components of the refrigerant circuit become damaged.
If the refrigerant circuit should become damaged:

–avoid open flames and sources of ignition
–thoroughly ventilate the room in which the appliance is situated
•It is dangerous to alter the specifications or modify this product in any way. Any damage to the cord may cause a short-circuit, fire and/or electric shock.
Warning! Any electrical component (power cord, plug, compressor) must be replaced by a certified service agent or qualified service personnel.
1.Power cord must not be lengthened.
2.Make sure that the power plug is not squashed or damaged by the back of the appliance. A squashed or damaged power plug may overheat and cause a fire.
3.Make sure that you can come to the mains plug of the appliance.
4.Do not pull the mains cable.
5.If the power plug socket is loose, do not insert the power plug. There is a risk of electric shock or fire.
6.You must not operate the appliance without the lamp cover1) of interior lighting.
•This appliance is heavy. Care should be taken when moving it.
•Do not remove nor touch items from the freezer compartment if your hands are damp/wet, as this could cause skin abrasions or frost/freezer burns.
•Avoid prolonged exposure of the appliance to direct sunlight.
Daily Use
•Do not put hot pot on the plastic parts in the appliance.
•Do not store flammable gas and liquid in the appliance, because they may explode.
•Do not place food products directly against the air outlet on the rear wall.2)
•Frozen food must not be re-frozen once it has been thawed out.
•Store pre-packed frozen food in accordance with the frozen food manufacturer's instructions.
electrolux 3
•Appliance's manufacturers storage recommendations should be strictly adhered to. Refer to relevant instructions.
•Do not place carbonated or fizzy drinks in the freezer compartment as it creates pressure on the container, which may cause it to explode, resulting in damage to the appliance.
•Ice lollies can cause frost burns if consumed straight from the appliance.
Care and cleaning
•Before maintenance, switch off the appliance and disconnect the mains plug from the mains socket.
•Do not clean the appliance with metal objects.
•Do not use sharp objects to remove frost from the appliance. Use a plastic scraper.
•Regularly examine the drain in the refrigerator for defrosted water. If necessary, clean the drain. If the drain is blocked, water will collect in the bottom of the appliance.
Installation
Important! For electrical connection carefully follow the instructions given in specific paragraphs.
•Unpack the appliance and check if there are damages on it. Do not connect the appliance if it is damaged. Report possible damages immediately to the place you bought it. In that case retain packing.
•It is advisable to wait at least four hours before connecting the appliance to allow the oil to flow back in the compressor.
•Adequate air circulation should be around the appliance, lacking this leads to overheating. To achieve sufficient ventilation follow the instructions relevant to installation.
•Wherever possible the back of the product should be against a wall to avoid touching or catching warm parts (compressor, condenser) to prevent possible burn.
•The appliance must not be located close to radiators or cookers.
•Make sure that the mains plug is accessible after the installation of the appliance.
1)If the lamp cover is foreseen
2)If the appliance is Frost Free
4 electrolux
• Connect to potable water supply only.3)
Service
•Any electrical work required to do the servicing of the appliance should be carried out by a qualified electrician or competent person.
•This product must be serviced by an authorized Service Centre, and only genuine spare parts must be used.
Environment Protection
This appliance does not contain gasses which could damage the ozone layer, in
either its refrigerant circuit or insulation materials. The appliance shall not be discarded together with the urban refuse and rubbish. The insulation foam contains flammable gases: the appliance shall be disposed according to the applicable regulations to obtain from your local authorities. Avoid damaging the cooling unit, especially at the rear near the heat exchanger. The materials used on this appliance marked by the symbol  are recyclable.
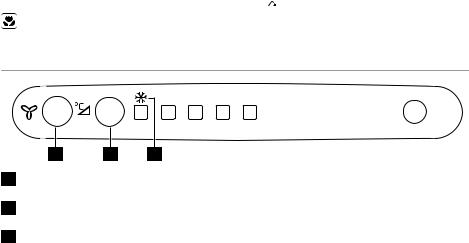
Control panel
+2 +4 +5 +6 +8
1 |
2 |
3 |
1Fan function switch Fan light
2Temperature regulator Action Freeze button
3Action Freeze indicator
Switching on
Remove, if present, the remove label stuck on the inside of the freezer compartment. Insert the plug into the wall socket.
Switching off
To switch off the appliance remove the mains plug.
Temperature regulation
The temperature is automatically regulated. To operate the appliance, proceed as follows:
•press the temperature regulator more times until the LED corresponding to the required temperature lights up. Selection is progressive, varying from +2°C to +8°C.
 A medium setting is generally the most suitable.
However, the exact setting should be chosen keeping in mind that the temperature inside the appliance depends on:
•room temperature
•how often the door is opened
•the quantity of food stored
•the location of the appliance.
Important! If the ambient temperature is lower than 16°C press the temperature regulator until the LED corresponding to the lowest temperature lights up.
Action Freeze function
You can activate the Action Freeze function by pressing the Action Freeze button more times until the LED corresponding to the symbol Action Freeze indicator lights up. You can deactivate the Action Freeze function by pressing the Action Freeze button more times until the required temperature is selected.
3) If a water connection is foreseen

electrolux 5
First use
Cleaning the interior
Before using the appliance for the first time, wash the interior and all internal accessories with lukewarm water and some neutral soap so as to remove the typical smell of a brandnew product, then dry thoroughly.
Important! Do not use detergents or abrasive powders, as these will damage the finish.
Daily use
Movable shelves
The walls of the refrigerator are equipped with a series of runners so that the shelves can be positioned as desired.
Bottle rack
Place the bottles (with the opening facing front) in the pre-positioned shelf.
Important! If the shelf is positioned horizontally, place only closed bottles.
This bottle holder shelf can be tilted in order to store previously opened bottles. To obtain
this result, pull the shelf up so it can rotate upwards and be placed on the next higher level.
Positioning the door shelves
To permit storage of food packages of various sizes, the door shelves can be placed at different heights.
To make these adjustments proceed as follows:
gradually pull the shelf in the direction of the arrows until it comes free, then reposition as required.
Air cooling
The Dynamic Air Cooling (DAC) fan let food cool quickly and a more uniform temperature in the compartment.
You can activate the fan by pressing the fan function switch (refer to "Control panel"). The fan light comes on.
Important! Switch on the fan when the ambient temperature exceeds 25°C.
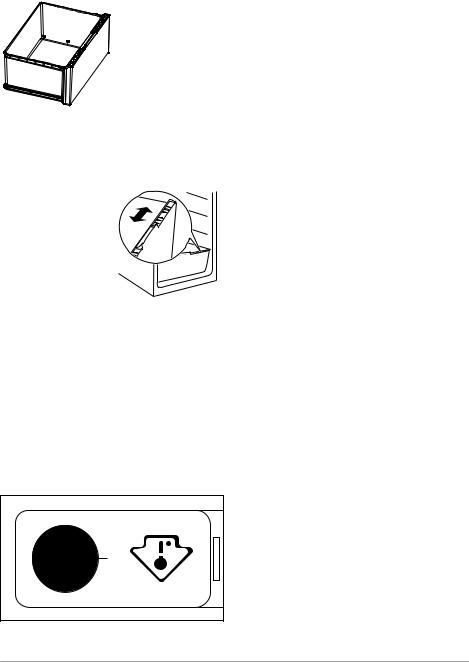
Vegetable drawer with humidity control
The drawer is suitable for storing fruit and vegetables.
6 electrolux
There is a grille (if foreseen) on the bottom of the drawer to separate the fruit and vegetables from any humidity that may form on the bottom surface.
All parts inside the drawer can be removed for cleaning purposes
To regulate the humidity in the vegetable drawer there is a device with slits (adjustable by means of a sliding lever).
When the ventilation slots are closed: the natural moisture
content of the food in
the fruit and vegetable compartments is preserved for longer.
When the ventilation slots are opened: more air circulation results in a lower air moisture content in the fruit and vegetable compartments.
Important! this appliance is sold in France. In accordance with regulations valid in this country it must be provided with a special device (see figure) placed in the lower compartment of the fridge to indicate the coldest zone of it.
Freezing fresh food
The freezer compartment is suitable for freezing fresh food and storing frozen and deep-frozen food for a long time.
To freeze fresh food activate the Action Freeze function at least 24 hours before placing the food to be frozen in the freezer compartment.
Move the shelf present in the freezer compartment to the middle seat, keeping it horizontal.
Place the fresh food to be frozen on that shelf.
The maximum amount of food that can be frozen in 24 hours is specified on the rating plate, a label located on the inside of the appliance.
The freezing process lasts 24 hours: during this period do not add other food to be frozen.
After 24 hours, when the freezing process is completed, return to the required temperature (refer to "Temperature regulation").
Storage of frozen food
When first starting-up or after a period out of use, before putting the products in the compartment let the appliance run at least 2 hours on the higher settings.
Important! In the event of accidental defrosting, for example due to a power failure, if the power has been off for longer than the value shown in the technical characteristics chart under "rising time", the defrosted food must be consumed quickly or cooked immediately and then re-frozen (after cooling).
Thawing
Deep-frozen or frozen food, prior to being used, can be thawed in the refrigerator compartment or at room temperature, depending on the time available for this operation. Small pieces may even be cooked still frozen, directly from the freezer: in this case, cooking will take longer.
Helpful hints and tips
Hints for energy saving
•Do not open the door frequently or leave it open longer than absolutely necessary.
•If the ambient temperature is high and the Temperature Regulator is set to low temperature and the appliance is fully loaded,

the compressor may run continuously, causing frost or ice on the evaporator. If this happens, set the Temperature Regulator toward warmer settings to allow automatic defrosting and so a saving in electricity consumption.
Hints for fresh food refrigeration
To obtain the best performance:
•do not store warm food or evaporating liquids in the refrigerator
•do cover or wrap the food, particularly if it has a strong flavour
•position food so that air can circulate freely around it
Hints for refrigeration
Useful hints:
Meat (all types) : wrap in polythene bags and place on the glass shelf above the vegetable drawer.
For safety, store in this way only one or two days at the most.
Cooked foods, cold dishes, etc..: these should be covered and may be placed on any shelf.
Fruit and vegetables: these should be thoroughly cleaned and placed in the special drawer(s) provided.
Butter and cheese: these should be placed in special airtight containers or wrapped in aluminium foil or polythene bags to exclude as much air as possible.
Milk bottles: these should have a cap and should be stored in the bottle rack on the door.
Bananas, potatoes, onions and garlic, if not packed, must not be kept in the refrigerator.
Hints for freezing
To help you make the most of the freezing process, here are some important hints:
•the maximum quantity of food which can be frozen in 24 hrs. is shown on the rating plate;
electrolux 7
•the freezing process takes 24 hours. No further food to be frozen should be added during this period;
•only freeze top quality, fresh and thoroughly cleaned, foodstuffs;
•prepare food in small portions to enable it to be rapidly and completely frozen and to make it possible subsequently to thaw only the quantity required;
•wrap up the food in aluminium foil or polythene and make sure that the packages are airtight;
•do not allow fresh, unfrozen food to touch food which is already frozen, thus avoiding a rise in temperature of the latter;
•lean foods store better and longer than fatty ones; salt reduces the storage life of food;
•water ices, if consumed immediately after removal from the freezer compartment, can possibly cause the skin to be freeze burnt;
•it is advisable to show the freezing in date on each individual pack to enable you to keep tab of the storage time.
Hints for storage of frozen food
To obtain the best performance from this appliance, you should:
•make sure that the commercially frozen foodstuffs were adequately stored by the retailer;
•be sure that frozen foodstuffs are transferred from the foodstore to the freezer in the shortest possible time;
•not open the door frequently or leave it open longer than absolutely necessary.
•Once defrosted, food deteriorates rapidly and cannot be refrozen.
•Do not exceed the storage period indicated by the food manufacturer.
How to use the water dispenser with BRITA MAXTRA filter cartridge
BRITA water filter unit
Internal components:

8 electrolux
6 |
3 |
5 |
2 |
1 |
4 |
1Water tank
2Funnel
3Tank lid
4Valve + gasket
5Including BRITA MAXTRA filter
6BRITA Memo - the electronic cartridge exchange indicator
External components:
2Water lever
3Water drop tray
Initial operations to use your water dispenser
1.Remove every tape and other protection system from the tank assembly
2.clean the components, as described into "Water dispenser cleaning procedure", in order to remove eventual residue.
Water dispenser cleaning procedure
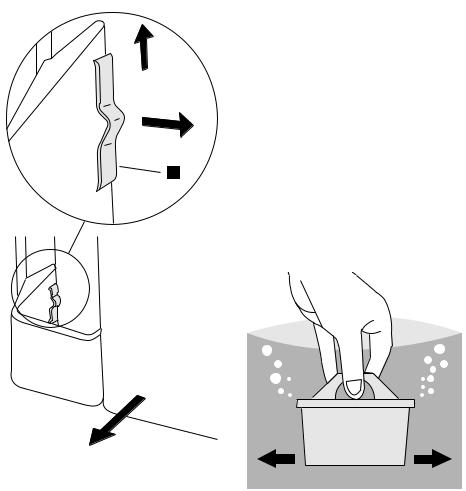
1.Unblock the two stopping elements on the sides of the tank as shown in the pictures:
–take out the BRITA MAXTRA cartridge from the water filter unit
–press the stopping elements in the middle and move it up
–move the stopper into direction of the central tank.
2.Push up the tank along the direction of the valve.
3.Remove the lid and the funnel.
1 Dispenser
A |
4.Unscrew the valve in counter clockwise (pay particular attention not to lose the Valve Gasket because is necessary to a correct functioning of the features ).
5.Clean the tank lid, the valve and the gasket with a solution of warm water and neutral soap. Rinse it and put it inside the door hole during the cleaning of the other components (in order to avoid cold air leakage from the fridge).
6.Clean the tank and the funnel into the dishwasher or with a solution of warm water and neutral soap and rinse them.
7.After the tank components cleaning take back the valve from the fridge door and assembly the tank in the inverse order (4;3;2;1) of disassembly (pay attention at the valve gasket positioning ).
electrolux 9
8.Put the assembled tank on the door along the valve direction.
9.Block the stopping elements in the inverse order of unblock.
10.Insert again the BRITA MAXTRA cartridge in the funnel .
How to use the BRITA MAXTRA filter cartridge
Step 1: Preparing the cartridge
To prepare your BRITA filter cartridge, please remove the protective wrapper (note: cartridge and inside wrapper may appear moist, this is simply condensation).
Immerse the cartridge in cold water and shake it gently to remove any air bubbles. The filter now is ready to use.
As required for some other water filter cartridges, there is no need to pre-soak the new Maxtra Cartridge.
Step 2: Insert in the water tank
Remove the tank lid. Before inserting the cartridge, remove the funnel and clean it thoroughly by rising it and wiping it dry.
Then, thoroughly clean the inside of the water tank with a dump cloth and wipe it dry as well.
Place the cartridge into the filter tank and push downwards until it 'clicks' firmly into place.
The cartridge should stay in place if the funnel is turned upside down.

10 electrolux
Step 3: Rinse the cartridge
2x 3x=ok
Take the funnel out of the BRITA water filter unit, fill it under the tap with cold tap water and allow it to filter through.
Discard the first two fillings into the sink. These first two fillings are used to flush the filter cartridge.
Then, place the funnel back into BRITA water filter unit.
Place the cover back onto the jug and press it carefully downwards to ensure it fits correctly into place.
Step 4: Refill the water tank
To fill the tank with cold water, simply open the flip top lid, take a jug of tap water and
pour it inside the tank through the cover as shown into the picture (use the lid every time that you want to fill your water).
Important! In order to avoid risk of spillage of water during closing and opening of the refrigerator door, we recommend to not fill completely the water tank but leave a head space of air (max. refilling limit till the frontal marks).
If you have not used all filtered water in the water tank within 1-2 days, please discard any water left inside the BRITA water filter unit before refilling it.
Allow the water to filter through and repeat "Step 4" as many times as you want until the BRITA water filter unit is filled up.
Remove cartridge with ring pull handle
To exchange the cartridge after four weeks, simply use the ring pull handle on the top of the cartridge to remove it from the funnel, and repeat steps 1 - 3 above.
The BRITA Memo
For maximum filter performance and optimum taste, it is important to change your BRITA cartridge regularly. BRITA recom-
mends that you replace the cartridge in the BRITA unit of your fridge every four weeks.
BRITA Memo automatically reminds you when to change the cartridge.
START
%
100
75
50
25
The unique BRITA Memo measures the recommended time of use of your cartridge. Memo is easy to use and automatically reminds your when to change your cartridge. The BRITA Memo is located on the lid of the water tank. Operation is really simple.
Start the Memo display
To start Memo please press and hold down the start button on the lid until all four bars appear in the display and flash twice. The Memo is now set.
electrolux 11
START
%
100
75
50
25
Functional control
The flashing dot in the bottom right corner of the Memo indicates that the Memo is working.

12 electrolux
START
%
100
75
50


 25
25
Change display
START
%
100
75
50
25
Every week one bar will disappear to show the remaining cartridge life. After four weeks all four bars will disappear. This, and a flashing arrow, indicate that the cartridge should now be changed.
Insert a new cartridge according to the instructions and reactivate the Memo as described above.
START
%
100
75
50
25
When only one bar is showing, you should just check whether you have a new BRITA MAXTRA filter cartridge to hand.
Important! The Memo is only designed to be used with BRITA filter cartridges.
BRITA Memo: the electronic cartridge exchange indicator has a life of approximately 5 years. At the end of the Memo's life, please remember that it is an electronic device and to dispose on the Memo according to all applicable provisions and regulations.
To remove the exhausted Memo place a screwdriver in the notch next to the Memo and push it out.
Please note that Memo should not be removed for any other reason than to dispose of it.

Important information
•The fridge door valve hole must be closed with the Water Valve during the regular functioning of the appliance.
•Use only drinking water. The use of any other drink type can leave residues, taste or odor in the reservoir and in the tap.
•It is possible to hear some noises caused by air entering when the water left the reservoir.
•In case the water does not flow well, press the driving lever once again. Keep the glass below the tap for some instants, in order to assure that all the water is collected by the glass.
•Do not use gasified drinks, such as soft drinks. The drink can leak due to the gas pressure.
•Remember that water is a foodstuff. Please consume filtered water within one to two days.
electrolux 13
•Should your BRITA water filter unit not be in use for a prolonged period (e.g. vacation), we recommend that you discard any water left inside the system and leave the cartridge inside the filter tank.
Before using the system again take out the cartridge and repeat steps 1 to 4 of "How to use the BRITA MAXTRA filter cartridge".
•The BRITA water filter unit is designed for use only with municipally treated tap water (note: this water is constantly controlled and according to legal regulations safe to drink) or with water from private supplies which has been tested safe to drink.
If an instruction is received from the authorities that mains water must be boiled, the BRITA filtered water has also to be boiled. When the instruction to boil water is no longer in force, the entire filter system
must be cleaned and a new cartridge inserted.
More information on the use of BRITA filter cartridges and the Memo can be found in the BRITA information guide.
 You can purchase new BRITA filter cartridges and Memo through consumer service network of Electrolux or BRITA.
Care and cleaning
 Caution! Unplug the appliance before carrying out any maintenance operation.
 This appliance contains hydrocarbons in its cooling unit; maintenance and recharging must therefore only be carried out by authorized technicians.
Periodic cleaning
polishes to clean the interior as this will damage the surface and leave a strong odour.
Clean the condenser (black grill) and the compressor at the back of the appliance with a brush or a vacuum cleaner. This operation will improve the performance of the appliance and save electricity consumption.
The equipment has to be cleaned regularly:
•clean the inside and accessories with lukewarm water and some neutral soap.
•regularly check the door seals and wipe clean to ensure they are clean and free from debris.
•rinse and dry thoroughly.
Important! Do not pull, move or damage any pipes and/or cables inside the cabinet. Never use detergents, abrasive powders, highly perfumed cleaning products or wax
Important! Take care of not to damage the cooling system.
Many proprietary kitchen surface cleaners contain chemicals that can attack/damage the plastics used in this appliance. For this reason it is recommended that the outer casing of this appliance is only cleaned with warm water with a little washing-up liquid added.
After cleaning, reconnect the equipment to the mains supply.

14 electrolux
Defrosting of the refrigerator
Frost is automatically eliminated from the evaporator of the refrigerator compartment every time the motor compressor stops, during normal use. The defrost water drains out through a trough into a special container at the back of the appliance, over the motor compressor, where it evaporates.
It is important to periodically clean the defrost water drain hole in the middle of the refrigerator compartment channel to prevent the water overflowing and dripping onto the food inside. Use the special cleaner provided, which you will find already inserted into the drain hole.
Defrosting of the freezer
The freezer compartment of this model, on the other hand, is a "no frost" type. This means that there is no buildup of frost when it is in operation, neither on the internal walls nor on the foods.
The absence of frost is due to the continuous circulation of cold air inside the compartment, driven by an automatically controlled fan.
Periods of non-operation
When the appliance is not in use for long periods, take the following precautions:
•disconnect the appliance from electricity supply
•remove all food
•defrost 4)and clean the appliance and all accessories
•leave the door/doors ajar to prevent unpleasant smells.
If the cabinet will be kept on, ask somebody to check it once in a while to prevent the food inside from spoiling in case of a power failure.
What to do if…
Warning! Before troubleshooting, disconnect the mains plug from the mains socket.
Only a qualified electrician or competent person must do the troubleshooting that is not in this manual.
Important! There are some sounds during normal use (compressor, refrigerant circulation).
Problem
The appliance does not operate. The lamp does not operate.
Possible cause
The appliance is switched off.
The mains plug is not connected to the mains socket correctly.
The appliance has no power. There is no voltage in the mains socket.
Solution
Switch on the appliance.
Connect the mains plug to the mains socket correctly.
Connect a different electrical appliance to the mains socket. Contact a qualified electrician.
4) If foreseen.

Problem |
Possible cause |
The lamp does not work. |
The lamp is in stand-by. |
|
The lamp is defective. |
The compressor operates |
The temperature is not set cor- |
continually. |
rectly. |
|
The door is not closed correctly. |
|
The door has been opened too |
|
frequently. |
|
The product temperature is too |
|
high. |
|
|
|
The room temperature is too |
|
high. |
Water flows on the rear |
During the automatic defrosting |
plate of the refrigerator. |
process, frost defrosts on the rear |
|
plate. |
Water flows into the re- |
The water outlet is clogged. |
frigerator. |
|
|
Products prevent that water flows |
|
into the water collector. |
Water flows on the |
The melting water outlet does not |
ground. |
flow in the evaporative tray above |
|
the compressor. |
The temperature in the |
The temperature regulator is not |
appliance is too low. |
set correctly. |
The temperature in the |
The temperature regulator is not |
appliance is too high. |
set correctly. |
|
The door is not closed correctly. |
|
The product temperature is too |
|
high. |
|
|
|
Many products are stored at the |
|
same time. |
The temperature in the re- |
There is no cold air circulation in |
frigerator is too high. |
the appliance. |
The temperature in the |
Products are too near to each |
freezer is too high. |
other. |
There is too much frost. |
Food is not wrapped correctly. |
|
The door is not closed correctly. |
|
The temperature regulator is not |
|
set correctly. |
electrolux 15
Solution
Close and open the door.
Refer to "Replacing the lamp".
Set a higher temperature.
Refer to "Closing the door".
Do not keep the door open longer than necessary.
Let the product temperature decrease to room temperature before storage.
Decrease the room temperature.
This is correct.
Clean the water outlet.
Make sure that products do not touch the rear plate.
Attach the melting water outlet to the evaporative tray.
Set a higher temperature.
Set a lower temperature.
Refer to "Closing the door".
Let the product temperature decrease to room temperature before storage.
Store less products at the same time.
Make sure that there is cold air circulation in the appliance.
Store products so that there is cold air circulation.
Wrap the food correctly.
Refer to "Closing the door".
Set a higher temperature.
Replacing the lamp
Caution! Disconnect the plug from the mains socket.
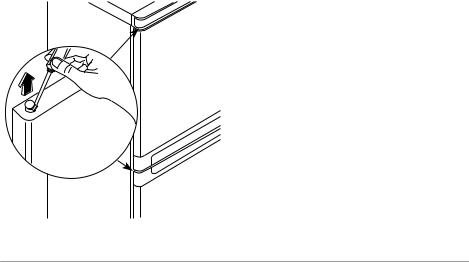
1. Remove the screw from the lamp cover.
2.Pull outwards the rear hook of the lamp cover by using a screwdriver and remove the lamp cover pulling downwards.
3.Replace the lamp with one of the same power (the maximum power is shown on the lamp cover).
4.Install the lamp cover.

16 electrolux
5.Tighten the screw to the lamp cover.
6.Connect the plug to the mains socket.
7.Open the door. Make sure that the light comes on.
Closing the door
1.Clean the door gaskets.
2.If necessary, adjust the door. Refer to "Installation".
3.If necessary, replace the defective door gaskets. Contact the Service Center.
Technical data
|
|
|
|
|
Dimension of the recess |
|
|
|
|
|
|
Height |
|
1800 mm |
|
|
Width |
|
695 mm |
|
|
Depth |
|
669 mm |
Rising Time |
|
|
|
20 h |
|
|
|
|
|
The technical information are situated in the rating plate on the internal left side of the appliance and in the energy label.
Installation
Read the "Safety Information" carefully for your safety and correct operation of the appliance before installing the appliance.
Positioning
Install this appliance at a location where the ambient temperature corresponds to the climate class indicated on the rating plate of the appliance:
Climate |
|
Ambient temperature |
class |
|
|
SN |
|
+10°C to + 32°C |
N |
|
+16°C to + 32°C |
ST |
|
+16°C to + 38°C |
T |
|
+16°C to + 43°C |
|
|
|
Location
The appliance should be installed well away from sources of heat such as radiators, boilers, direct sunlight etc. Ensure that air can circulate freely around the back of the cabinet. To ensure best performance, if the appliance is positioned below an overhanging wall unit, the minimum distance between the top of the cabinet and the wall unit must be at least 100 mm . Ideally, however, the appliance should not be positioned below overhanging wall units. Accurate levelling is ensured by one or more adjustable feet at the base of the cabinet.
Warning! It must be possible to disconnect the appliance from the mains power supply; the plug must therefore be easily accessible after installation.

electrolux 17
mm100
A mm10 


B |
10 mm |
Electrical connection
Before plugging in, ensure that the voltage and frequency shown on the rating plate correspond to your domestic power supply. The appliance must be earthed. The power supply cable plug is provided with a contact for this purpose. If the domestic power supply socket is not earthed, connect the appliance to a separate earth in compliance with current regulations, consulting a qualified electrician.
The manufacturer declines all responsibility if the above safety precautions are not observed.
This appliance complies with the E.E.C. Directives.
Rear spacers
Inside the appliance you find two spacers which must be fitted as shown in the figure.
Slacken the screws and insert the spacer under the screw head, then retighten the screws.
Door reversibility
Warning! Before carrying out any operations, remove the plug from the power socket.
Important! To carry out the following operations, we suggest that this be made with another person that will keep a firm hold on the doors of the appliance during the operations.
To change the opening direction of the door, do these steps:
1.Remove the upper hinge taking care for the upper door not to fall off and keep it for future actions.

18 electrolux
2.Remove the upper door.
3.Remove the upper support and mount it in the opposite side.
4.Unscrew the middle hinge (H). Unscrew the plastic plugs located on the opposite side of the central hinge and introduce them in the holes occupied before by the hinge.
H
5.Remove the lower door.
6.Pull off the ventilation grille which is fixed by two screws.
7.Carefully place the appliance on its back, totally unscrew the adjustable foot and screw it in the opposite side.
8.Remove the bottom hinge by unscrewing its fixing screws.
9.Using a 12 mm spanner, unscrew the hinge pin and reassemble it on the opposite side of the hinge.
10.Reassemble the lower hinge in the opposite side, using the screws previously removed.
11.Carefully replace the appliance in its working position and adjust the level of the appliance by screwing / unscrewing the adjustable feet at the bottom of the cabinet using your fingers or a tool.
12.Slide the hole cover out of the ventilation grille by pushing it in the direction of the arrow and reassemble it on the opposite side.
13.Refit the ventilation grille, fixing the screws.
14.Reassemble the lower door.
15.Reassemble the middle hinge (H) in the opposite side.
16.Reassemble the upper door.
17.In your documentation bag you will find the upper hinge necessary to make the reversibility. Please screw it in place.
electrolux 19
Do a final check to make sure that:
•All screws are tightened.
•The magnetic seal adheres to the cabinet.
•The door opens and closes correctly.
If the ambient temperature is cold (i.e. in Winter), the gasket may not fit perfectly to the cabinet. In that case, wait for the natural fitting of the gasket.
In case you do not want to carry out the above mentioned operations, contact the nearest After Sales Service Force. The After Sales Service specialist will carry out the reversibility of the doors at your cost.
Environmental concerns
The symbol  on the product or on its packaging indicates that this product may not be treated as household waste. Instead it should be taken to the appropriate collection point for the recycling of electrical and electronic equipment. By ensuring this product is disposed of correctly, you will help prevent potential negative consequences for
the environment and human health, which could otherwise be caused by inappropriate waste handling of this product. For more detailed information about recycling of this product, please contact your local council, your household waste disposal service or the shop where you purchased the product.
20 electrolux
Electrolux. Thinking of you.
Μοιραστείτε τη φιλοσοφία μας στο www.electrolux.com
Περιεχόμενα
Πληροφορίες ασφαλείας |
20 |
Φροντίδα και καθάρισμα |
33 |
Πίνακας χειριστηρίων |
22 |
Τι να κάνετε αν... |
34 |
Πρώτη χρήση |
23 |
Τεχνικά χαρακτηριστικά |
36 |
Καθημερινή χρήση |
23 |
Εγκατάσταση |
36 |
Χρήσιμες συμβουλές |
25 |
Περιβαλλοντικά θέματα |
39 |
Τρόπος χρήσης του διανομέα νερού με |
26 |
|
|
φύσιγγα φίλτρου BRITA MAXTRA |
|
|
|
|
|
Υπόκειται αε αλλαγές χωρίς προειδποίηση |
|
 Πληροφορίες ασφαλείας
Χάρητης ασφάλειάς σας καιγιαναεξασφα |
• Κρατήστε όλα τα υλικά της συσκευασίας |
|
λιστεί η σωστή χρήση, πριν την εγκατάστα |
μακριά από τα παιδιά. Υπάρχει κίνδυνος |
|
σηκαιτην πρώτηχρήσητηςσυσκευής,δια |
ασφυξίας. |
|
βάστε προσεκτικά αυτό το εγχειρίδιο χρή |
• Εάν απορρίψετε τη συσκευή, βγάλτε το |
|
στη, συμπεριλαμβανομένων των συμβου |
φις του ηλεκτρικού καλωδίου από την |
|
λών και των προειδοποιήσεών του. Για την |
πρίζα, κόψτε το καλώδιο σύνδεσης (όσο |
|
αποφυγή περιττών λαθών και ατυχημάτων, |
μπορείτε πιο κοντά στη συσκευή) και |
|
είναι σημαντικό να εξασφαλίσετε ότι όλα τα |
αφαιρέστε την πόρτα για να την αποφυγή |
|
άτομαπουχρησιμοποιούντησυσκευήγνω |
ηλεκτροπληξίας ή παγίδευσης μέσα στη |
|
ρίζουν καλά τη λειτουργία της και τα χαρα |
συσκευή παιδιών που παίζουν. |
|
κτηριστικά ασφαλείας της. Φυλάξτε τις οδη |
• Εάν η συσκευή, η οποία διαθέτει μαγνη |
|
γίες αυτές και βεβαιωθείτε ότι παραμένουν |
τικά λάστιχα πόρτας, θα αντικαταστήσει |
|
με τη συσκευή εάν μετακινηθεί ή πωληθεί, |
μια παλαιότερη συσκευή με μάνδαλο |
|
έτσιώστεοποιοσδήποτετηχρησιμοποιήσει |
στηνπόρταήτοκαπάκι,μηνπαραλείψετε |
|
κατά τη διάρκεια της ζωής της να είναι σω |
να καταστρέψετε το μάνδαλο προτού |
|
στά ενημερωμένος για τη συσκευή και την |
απορρίψετε την παλαιά συσκευή. Με αυ |
|
ασφάλεια. |
τό τον τρόπο θα αποτρέψετε τη μετατρο |
|
Για την ασφάλεια της ζωής και της περιου |
πή του ψυγείου σε θανάσιμη παγίδα για |
|
σίας, φυλάξτε τις προφυλάξεις αυτών των |
παιδιά. |
|
οδηγιών χρήσης επειδή ο κατασκευαστής |
Γενική ασφάλεια |
|
δεν φέρει ευθύνη για ζημιές που θα προ |
|
|
κληθούν από παραλείψεις. |
ΠΡΟΣΟΧΗ Μη φράζετε τα ανοίγματα |
|
Ασφάλεια παιδιών και ευπαθών ατόμων |
εξαερισμού. |
|
• Η συσκευή προορίζεται για τη φύλαξη |
||
• Ησυσκευήαυτήδενπροορίζεταιγιαχρή |
||
ση από άτομα (συμπεριλαμβανομένων |
τροφίμων ή/και αναψυκτικών σε ένα συν |
|
των παιδιών) με μειωμένη σωματική ή |
ηθισμένο νοικοκυριό όπως εξηγείται σε |
|
πνευματική ικανότητα ή έλλειψη εμπει |
αυτό το εγχειρίδιο οδηγιών. |
|
ρίας και γνώσης, εκτός και εάν επιβλέπο |
• Μη χρησιμοποιείτε μηχανικές συσκευές ή |
|
νται ή έχουν λάβει οδηγίες σχετικά με τη |
άλλα τεχνητά μέσα για την επιτάχυνση |
|
χρήση της συσκευής από άτομο υπεύθυ |
της διαδικασίας ξεπαγώματος. |
|
νο για την ασφάλειά τους. |
• Μη χρησιμοποιείτε άλλες ηλεκτρικές συ |
|
Τα παιδιά πρέπει να εποπτεύονται ώστε |
σκευές (όπως παγωτομηχανές) στο εσω |
|
να εξασφαλίζεται ότι δεν παίζουν με τη |
τερικόψυκτικώνσυσκευών,εκτόςανείναι |
|
συσκευή. |
εγκεκριμένες για το σκοπό αυτό από τον |
|
|
κατασκευαστή. |
•Μην προκαλείτε ζημιά στο ψυκτικό υγρό.
•Το ψυκτικό ισοβουτάνιο (R600a) που πε ριέχεται στο κύκλωμα του ψυκτικού υγρούτηςσυσκευής,είναιέναφυσικόαέ ριο με υψηλό επίπεδο περιβαλλοντικής συμβατότητας, το οποίο ωστόσο είναι εύ φλεκτο.
Κατά τη μεταφορά και εγκατάσταση της συσκευής, βεβαιωθείτε ότι δεν προκαλεί ται ζημιά σε κανένα εξάρτημα του κυκλώ ματος του ψυκτικού υγρού.
Εάν προκληθεί ζημιά στο κύκλωμα του ψυκτικού υγρού:
–αποφύγετε τις γυμνές φλόγες και τις πηγές ανάφλεξης
–εξαερίστε καλά το χώρο στον οποίο βρίσκεται η συσκευή
•Η οποιαδήποτε αλλαγή των τεχνικών χα ρακτηριστικών ή τροποποίηση αυτού του προϊόντος είναιεπικίνδυνη.Εάντοκαλώ διο υποστεί οποιαδήποτε ζημιά, μπορεί να προκληθεί βραχυκύκλωμα, πυρκαγιά ή/και ηλεκτροπληξία.
ΠΡΟΕΙΔΟΠΟΙΗΣΗ Η αντικατάσταση των ηλεκτρικών εξαρτημάτων (καλώδιο τροφοδοσίας, φις, συμπιεστής) πρέπει να γίνεται από πιστοποιημένο αντιπρό σωπο ή από καταρτισμένο προσωπικό σέρβις.
1.Το καλώδιο τροφοδοσίας δεν πρέπει να επιμηκύνεται.
2.Προσέξτε να μη συνθλιβεί ή να μην υποστείζημιάτοφιςτροφοδοσίαςστο πίσω μέρος της συσκευής. Εάν το φις του καλωδίου τροφοδοσίας συνθλιβεί ή υποστεί ζημιά ενδέχεται να υπερ θερμανθεί και να προκαλέσει πυρκα γιά.
3.Βεβαιωθείτε ότι έχετε πρόσβαση στο φις τροφοδοσίας της συσκευής.
4.Μην τραβάτε το καλώδιο τροφοδο σίας.
5.Εάν η ηλεκτρική πρίζα είναι χαλαρή, μην εισάγετε τοφις.Υπάρχεικίνδυνος ηλεκτροπληξίας ή πρόκλησης πυρκα γιάς.
6.Η συσκευή δεν πρέπει να χρησιμο ποιείται χωρίς το κάλυμμα του λαμ πτήρα 5) εσωτερικού φωτισμού.
electrolux 21
•Η συσκευή είναι βαριά. Πρέπει να προ σέχετε κατά τη μεταφορά της.
•Μην αφαιρείτε και μην αγγίζετε αντικείμε να από την κατάψυξη αν τα χέρια σας εί ναι νωπά/βρεγμένα, καθώς μπορεί να προκληθούν εκδορές στο δέρμα ή κρυο παγήματα.
•Αποφεύγετε την παρατεταμένη έκθεση της συσκευής σε άμεσο ηλιακό φως.
Καθημερινή χρήση
•Μην τοποθετείτε ζεστές κατσαρόλες στα πλαστικά μέρη της συσκευής.
•Μην φυλάσσετε εύφλεκτα αέρια και υγρά στησυσκευήεπειδήμπορείναεκραγούν.
•Μην τοποθετείτε τρόφιμα απευθείας πά
νω στην έξοδο αέρα στο πίσω τοίχωμα.
6)
•Τα κατεψυγμένα τρόφιμα δεν πρέπει να καταψύχονται και πάλι αφού αποψυ χθούν.
•Αποθηκεύετεταπροσυσκευασμένακατε ψυγμένατρόφιμασύμφωναμετιςοδηγίες του κατασκευαστή για κατεψυγμένα τρό φιμα.
•Θα πρέπει να τηρούνται αυστηρά οι συ στάσεις αποθήκευσης των παρασκευα στών της συσκευής. Ανατρέξτε στις σχε τικές οδηγίες.
•Μην τοποθετείτε ανθρακούχα ποτά στον καταψύκτη εφόσον δημιουργείται πίεση στο δοχείο, το οποίο μπορεί να εκραγεί, προκαλώντας ζημιές στη συσκευή.
•Τα παγωτά τύπου ξυλάκι γρανίτα μπορεί να προκαλέσουν εγκαύματα από πάγο εάν καταναλωθούναπευθείας απότησυ σκευή.
Φροντίδα και καθαρισμός
•Πριν από τη συντήρηση, απενεργοποιή στε τη συσκευή και αποσυνδέστε το φις τροφοδοσίας από την πρίζα. Εάν δεν μπορείτε να πλησιάσετε την πρίζα, δια κόψτε την παροχή ρεύματος.
•Μην καθαρίζετε τη συσκευή με μεταλλικά αντικείμενα.
•Μη χρησιμοποιείτε αιχμηρά αντικείμενα για να αφαιρείτε τον πάγο από τη συ σκευή. Χρησιμοποιείτε πλαστική ξύστρα.
•Ελέγχετε τακτικά την αποστράγγιση του ψυγείου για νερό απόψυξης. Εάν χρεια στεί, καθαρίστε την αποστράγγιση. Εάν η
5)Εάν προβλέπεται κάλυμμα λαμπτήρα
6)Αν η συσκευή δεν συγκεντρώνει πάγο

22 electrolux
αποστράγγιση είναι φραγμένη, θα συσ σωρεύεται νερό στο κάτω μέρος της συ σκευής.
Εγκατάσταση
ΣΗΜΑΝΤΙΚΟ Για τη σύνδεση του ηλεκτρικού ακολουθήστε προσεκτικά τις οδηγίες που δίνονται στις αντίστοιχες παραγράφους.
•Αποσυσκευάστε τη συσκευή και ελέγξτε αν έχει υποστεί ζημιές. Μη συνδέετε τη συσκευή εάν έχει υποστεί ζημιά. Αναφέ ρετε αμέσως ενδεχόμενες ζημιές στο μέ ρος όπου αγοράσατε τη συσκευή. Σε αυ τή την περίπτωση, φυλάξτε τη συσκευα σία.
•Είναι σκόπιμο να περιμένετε τουλάχιστον δύο ώρες προτούσυνδέσετε τη συσκευή, ώστε το έλαιο να επιστρέψει και πάλι στο συμπιεστή.
•Θα πρέπει να υπάρχει επαρκή κυκλοφο ρία του αέρα γύρω από τη συσκευή. Δια φορετικά θα προκληθεί υπερθέρμανση. Για την επίτευξη επαρκούς κυκλοφορίας αέρα ακολουθήστε τις σχετικές οδηγίες της εγκατάστασης.
•Όποτε είναι δυνατό, η πλάτη της συ σκευής πρέπει να βρίσκεται κοντά σε τοί χογιατηναποφυγήεπαφήςήπιασίματος με ζεστά μέρη (συμπιεστής, συμπυκνω τής) και της πιθανότητας εγκαύματος.
•Η συσκευή δεν πρέπει να τοποθετείται κοντάσεσώματακαλοριφέρήφούρνους.
•Βεβαιωθείτε ότι υπάρχει εύκολη πρόσβα ση στο φις τροφοδοσίας μετά την εγκατά σταση της συσκευής.
•Συνδέετετησυσκευήμόνομετηνπαροχή πόσιμου νερού. 7)
Σέρβις
•Οιηλεκτρολογικέςεργασίεςπουαπαιτού νται για το σέρβις της συσκευής θα πρέ πει να εκτελούνται από επαγγελματία ηλεκτρολόγο ή άλλο ειδικό.
•Το προϊόν αυτό θα πρέπει να επισκευά ζεται από εξουσιοδοτημένα Κέντρα Σέρ βις, ενώ θα πρέπει να χρησιμοποιούνται μόνο γνήσια ανταλλακτικά.
Προστασία του περιβάλλοντος
Η συσκευή αυτή δεν περιέχει αέρια τα οποία μπορούν να προκαλέσουν ζημιά στο στρώμα του όζοντος, είτε στο κύ κλωμα ψυκτικού υγρού ή στα μονωτικά υλικά της. Η συσκευή δε θα πρέπει να απορρίπτεται μαζί με τα οικιακά απορ ρίμματα. Ο αφρός μόνωσης περιέχει εύφλεκτα αέρια: Η συσκευή θα πρέπει να απορρίπτεται σύμφωνα με τους ισχύοντες κανονισμούς που θα λάβετε από τις τοπικές αρχές. Αποφύγετε να προκαλέσετε ζημιά στην ψυκτική μονά δα, ειδικά στο πίσω μέρος κοντά στον εναλλάκτη θερμότητας. Τα υλικά που χρησιμοποιούνται σε αυτή τη συσκευή
και σημειώνονται με το σύμβολο  εί ναι ανακυκλώσιμα.
Πίνακας χειριστηρίων
+2 |
+4 |
+5 |
+6 |
+8 |
1 |
2 |
3 |
1Διακόπτης λειτουργίας ανεμιστήρα Λυχνία ανεμιστήρα
2Ρυθμιστής θερμοκρασίας Κουμπί Action Freeze
3 Ένδειξη Action Freeze
Ενεργοποίηση
Αφαιρέστε, εφόσον υπάρχει, την ετικέτα αφαίρεσης, που είναι κολλημένη στο εσω τερικό του θαλάμου κατάψυξης. Συνδέστε το φις στην πρίζα τοίχου.
7) Εάν προβλέπεται σύνδεση νερού

Απενεργοποίηση
Για να απενεργοποιήσετε τη συσκευή, απο συνδέστε το φις από την πρίζα.
Ρύθμιση θερμοκρασίας
Η θερμοκρασία ρυθμίζεται αυτόματα. Για να χρησιμοποιήσετε τη συσκευή, ακο λουθήστε την παρακάτω διαδικασία:
•Κρατήστε πιεσμένο το ρυθμιστή θερμο κρασίας ώσπου να ανάψει η λυχνία LED πουαντιστοιχείστηναπαιτούμενηθερμο κρασία. Η επιλογή είναι προοδευτική και κυμαίνεται από +2°C έως +8°C. Η θερμο κρασία που υποδεικνύεται από τη λυ χνία LED επιλέγεται κάθε φορά που πιέ ζεται το πλήκτρο.
Πιο κατάλληλη είναι συνήθως μια με σαία ρύθμιση.
Ωστόσο, η ακριβής ρύθμιση πρέπει να επι λεγεί λαμβάνοντας υπόψη ότι η θερμοκρα σία στο εσωτερικό της συσκευής εξαρτάται από:
electrolux 23
•τη θερμοκρασία δωματίου,
•πόσο συχνά ανοίγει η πόρτα,
•την ποσότητα των τροφίμων που αποθη κεύονται,
•τη θέση της συσκευής.
ΣΗΜΑΝΤΙΚΟ Αν η θερμοκρασία περιβάλλοντος είναι χαμηλότερη από 16°C, πιέστε το ρυθμιστή θερμοκρασίας ώσπου ναανάψειηλυχνίαLEDπουαντιστοιχείστη χαμηλότερη θερμοκρασία.
Action Freeze Λειτουργία
Μπορείτε να ενεργοποιήσετε τη λειτουργία Action Freeze, πατώντας το κουμπί Action Freeze επαναλαμβανόμενα, μέχρι να ανά ψει η λυχνία που αντιστοιχεί στο σύμβολο ένδειξης Action Freeze .
Μπορείτε να απενεργοποιήσετε τη λειτουρ γία Action Freeze, πατώντας το κουμπί Action Freeze επαναλαμβανόμενα, μέχρι να επιλεγεί η απαιτούμενη θερμοκρασία.
Πρώτη χρήση
Καθάρισμα του εσωτερικού
Προτού χρησιμοποιήσετε τη συσκευή για πρώτη φορά, πλύντε το εσωτερικό και όλα ταεσωτερικάεξαρτήματαμεχλιαρόνερόκαι λίγο ουδέτερο σαπούνι για να αφαιρέσετε την τυπική μυρωδιά των καινούριων προϊό ντων και στη συνέχεια στεγνώστε καλά.
ΣΗΜΑΝΤΙΚΟ Μη χρησιμοποιείτε απορρυ παντικά ή σκόνεςπουχαράσσουν, διότικα ταστρέφουν το φινίρισμα.
Καθημερινή χρήση
Μετακινούμενα ράφια
Τα τοιχώματα του ψυγείου είναι εφοδιασμέ να με μια σειρά αυλακώσεων ώστε να είναι δυνατή η κατ' επιλογή τοποθέτηση των ρα φιών.

24 electrolux
Σχάρα μπουκαλιών
Τοποθετήστε τα μπουκάλια (με το άνοιγμα προςταεμπρός)στοήδητοποθετημένορά φι.
ΣΗΜΑΝΤΙΚΟ Αν το ράφι είναι τοποθετημένο οριζόντια, τοποθετήστε μόνο κλειστά μπουκάλια.
Τοράφιμετησχάραμπουκαλιώνμπορείνα πάρει κλίση για την αποθήκευση ανοιγμέ νων μπουκαλιών. Για να κάνετε κάτι τέτοιο τραβήξτε τη σχάρα μπουκαλιών προς τα εμπρός μέχρι να μπορεί να περιστραφεί και νατοποθετηθείστοαμέσωςυψηλότεροεπί πεδο.
Τοποθέτηση των ραφιών της πόρτας
Γιαναείναιδυνατήηαποθήκευσησυσκευα σιών τροφίμων διαφόρων μεγεθών, τα ρά φια της πόρτας μπορούν να τοποθετούνται σε διαφορετικό ύψος.
Για να πραγματοποιήσετε αυτές τις προ σαρμογές, κάντε τα εξής:
Τραβήξτε σταδιακάτοράφιπροςτηνκατεύ θυνση των βελών μέχρι να απελευθερωθεί καιστησυνέχειατοποθετήστετοξανάόπως θέλετε.
Ψύξη αέρα
Ο ανεμιστήρας της δυναμικής ψύξης αέρα (DAC)επιτυγχάνειτηνταχείαψύξητωντρο φίμωνκαιμιαπιοομοιόμορφηθερμοκρασία μέσα στο θάλαμο.
Μπορείτε να ενεργοποιήσετε τον ανεμιστή ρα, πατώντας το διακόπτη λειτουργίας ανε μιστήρα (ανατρέξτε στην ενότητα «Πίνακας ελέγχου»). Ανάβει η λυχνία ανεμιστήρα.
ΣΗΜΑΝΤΙΚΟ Ενεργοποιήστε τον ανεμιστήρα, όταν η θερμοκρασία περιβάλλοντος υπερβαίνει τους 25°C.
Συρτάρι λαχανικών με έλεγχο υγρασίας
Το συρτάρι είναι κατάλληλο για την αποθή κευση φρούτων και λαχανικών.
Στο κάτω μέρος του συρταριού υπάρχει μια γρίλια(ανπροβλέπεται),ηοποίαδιαχωρίζει τα φρούτα και τα λαχανικά απότην υγρασία που ενδέχεται να σχηματιστεί στην κάτω επιφάνεια.
Όλα τα εξαρτήματα στο εσωτερικό του συρ ταριού μπορούν να αφαιρεθούν για καθάρι σμα Για να ρυθμίσετε την
υγρασία στο συρτάρι λαχανικών, υπάρχει μια διάταξη με σχι σμές (ρυθμιζόμενες μέσω ενός συρόμε νου μοχλού).
Όταν οι σχισμές αε ρισμού είναι κλει στές:
διατηρείται περισσότερο η φυσική υγρασία των τροφίμων στους θαλάμους φρούτων και λαχανικών.
Όταν οι σχισμές αερισμού είναι ανοικτές: υπάρχειμεγαλύτερηκυκλοφορίααέρα,έχο ντας ως αποτέλεσμα τη χαμηλότερη συ γκέντρωση υγρασίας στον αέρα του θαλά μου των φρούτων και των λαχανικών.
 Loading...