


DWR-932
Table of contents
 Loading...
Version 1.20 | 11/02/2016
User Manual
4G/LTE Mobile Router
DWR-932C
Preface
D-Link reserves the right to revise this publication and to make changes in the content hereof without obligation to notify
any person or organization of such revisions or changes.
Manual Revisions
Revision Date Description
1.0 November 02, 2016 • Initial release
Trademarks
D-Link and the D-Link logo are trademarks or registered trademarks of D-Link Corporation or its subsidiaries in the United
States or other countries. All other company or product names mentioned herein are trademarks or registered trademarks
of their respective companies.
Copyright © 2016 by D-Link Corporation, Inc.
All rights reserved. This publication may not be reproduced, in whole or in part, without prior expressed written permission
from D-Link Corporation, Inc.
iD-Link DWR-932C User Manual

Table of Contents
Table of Contents
Product Overview ..............................................................1
Package Contents .........................................................................1
System Requirements ................................................................. 2
Introduction ................................................................................... 3
Hardware Overview ..................................................................... 4
Overview .................................................................................. 4
Battery Cover Removed ......................................................5
LED Indicators ........................................................................ 6
Installation ......................................................................... 7
Initial Setup ..................................................................................... 7
Insert a microSD Card ................................................................. 8
Wireless Installation Considerations ......................................9
Conguration ................................................................... 10
Initial Connection to the Router ...........................................10
Connect via USB ..................................................................10
USB Tethering Driver Installation ..................................10
Connect via Wi-Fi ................................................................11
Web-based Conguration .......................................................13
Conguration Utility ..........................................................13
Navigation .....................................................................................14
Quick Access .................................................................................15
Network Setup .............................................................................16
Setup Wizard ........................................................................16
APN For LTE/3G ...............................................................17
If you selected Basic Protection: ...............................17
Connection Settings ..........................................................17
Wi-Fi 2.4 GHz Access Name ........................................18
Wi-Fi Status ...........................................................................18
If you selected Basic Protection: ...............................19
Admin Settings ...............................................................20
Date & Time ......................................................................20
Admin Settings ....................................................................20
Apply Settings ......................................................................22
Internet Settings .........................................................................23
Network Status ....................................................................23
Cellular Information ......................................................23
Network Status ...............................................................23
APN Settings .........................................................................24
Access Point Name (APN) Settings ..........................24
APN Mode .........................................................................25
Connect Mode Settings ....................................................26
Cellular Settings .............................................................26
SIM Card PIN Lock Settings .............................................27
SIM .......................................................................................27
My Operator (PLMN) ..........................................................28
Operator Mode (PLMN) ...............................................28
Available Operators ......................................................29
Router LAN Settings ..........................................................30
LAN Setting ......................................................................30
To DHCP Service Setting .............................................30
DHCP Service ................................................................... 31
iiD-Link DWR-932C User Manual

Table of Contents
Wi-Fi Settings ...............................................................................32
Wi-Fi Status ...........................................................................32
General Information .....................................................32
Wi-Fi Status .......................................................................32
Wi-Fi Control .........................................................................33
Wi-Fi 2.4 GHz ....................................................................33
Wi-Fi WPS ..........................................................................34
Wi-Fi Clients ..........................................................................35
Wi-Fi 2.4 GHz Clients List .............................................35
Wi-Fi Security Settings ......................................................36
Wi-Fi 2.4 GHz SSID .........................................................36
If you selected Advanced Protection: .....................36
If you selected Basic Protection: ...............................37
MAC Filter ..............................................................................38
MAC Filter Settings ........................................................38
Application Settings ..................................................................39
Short Messages ...................................................................39
Account .............................................................................51
Language ..........................................................................52
Date & Time ......................................................................53
Settings Prole .....................................................................55
Import ................................................................................55
Export Proles .................................................................56
Export ................................................................................. 56
Reset and Reboot ...........................................................57
Reset and Reboot ...........................................................57
Firmware Upgrade ..............................................................58
Upgrade My router ........................................................58
Network Statistics ...............................................................59
Statistics ............................................................................59
Advanced Options ..............................................................60
Power Saving ...................................................................61
Help .................................................................................................62
General Mobile Router FAQs ...................................... 62
DHCP Settings ......................................................................42
USSD ........................................................................................43
Firewall Settings ..................................................................44
Firewall Settings .............................................................44
IP Filter ...............................................................................46
Add IP Filter ......................................................................47
Port Forwarding .............................................................48
Add Port Forwarding ....................................................49
System ............................................................................................50
System Information ...........................................................50
About DWR-932C ...........................................................50
Admin Settings ....................................................................51
Connecting to a Wireless Network .................................63
Using Windows 10 ..................................................................... 63
932C ....................................................................................63
932C ....................................................................................64
932C ....................................................................................64
Using Windows 8 .......................................................................65
Using Windows 7 .......................................................................67
Conguring Wireless Security ........................................69
Using Windows Vista™ ..............................................................72
Conguring Wireless Security ........................................73
®
Using Windows
XP ....................................................................75
iiiD-Link DWR-932C User Manual

Table of Contents
Troubleshooting .............................................................. 76
Networking Basics ........................................................... 78
Check your IP address ...............................................................78
Statically Assign an IP address ...............................................79
Technical Specications .................................................. 80
Regulatory Information ..................................................81
ivD-Link DWR-932C User Manual

Section 1 - Product Overview
D-Link DWR-932C 4G/LTE Mobile Router
USB Cable
Power Adapter
Product Overview
Package Contents
If any of the above items are missing from your package, please contact your reseller.
1D-Link DWR-932C User Manual

Section 1 - Product Overview
System Requirements
Network Requirements
Web-based Conguration
Utility Requirements
1
Subject to services and service terms available from your carrier.
• A compatible (U)SIM card with mobile data service
Computer with the following:
• Windows®, Macintosh, or Linux-based operating system
• An installed Ethernet adapter
Browser Requirements:
• Internet Explorer 9 or higher
• Firefox 12 or higher
• Safari 4 or higher
• Chrome 20 or higher
Windows® Users: Make sure you have the latest version of Java installed.
Visit www.java.com to download the latest version.
1
2D-Link DWR-932C User Manual

Section 1 - Product Overview
Introduction
The D-Link DWR-932C 4G/LTE Mobile Router lets you share a fast mobile Internet connection with multiple PCs and mobile devices letting you and
your friends enjoy the advantages of a wireless network anywhere, anytime. It oers 4G LTE and 3G HSPA+ compatibility for fast downlink and uplink
data rates, so you get fast upload and download speeds in areas without wired Internet.
High-Speed Mobile Internet with LTE Connectivity
The DWR-932C 4G/LTE Mobile Router gives you high-speed Internet wherever you are and lets you share it on the go. Using LTE technology, you
1
can achieve download speeds of up to 150 Mbps and upload speeds of up to 50 Mbps
your mobile service provider, and a separate internal Wi-Fi antenna gives extended coverage to the computers and mobile devices connected to the
DWR-932C.
Mobile Internet for All of Your Devices
With the DWR-932C, you can get online with your notebook, smartphone, tablet, or any other wireless device using a single mobile connection. The
DWR-932C provides high-speed Wireless N coverage, giving high-speed wireless access to everybody – whether you are with colleagues on a business
trip, or travelling with friends and family.
. The built-in LTE antenna provides a reliable connection to
Built-in Software for Instant Access Anywhere
The DWR-932C is truly plug-and-play, with drivers already on the router, you can connect without needing to install anything. Open a browser, connect
the router, and you can set up your network right from the web interface. Once the device is set up, you can simply power it on to start up your portable
mobile network, meaning that you can share your mobile Internet connection without even needing a computer.
Designed for True Portability
The DWR-932C 4G/LTE Mobile Router is small and slim enough to carry around in your purse, bag, or pocket. The built-in 2000 mAh rechargeable LiIon battery can provide hours of mobile usage, so you can work online longer and it also can act as a power bank - capable of charging your devices
when their battery is low.
1
All references to speed are for comparison purposes only. Actual speeds will vary depending on a range of factors including mobile network coverage, signal strength, network activity, and environmental conditions.
3D-Link DWR-932C User Manual

Section 1 - Product Overview
1
2
Hardware Overview
Overview
3
4
1 Power Button
2 WPS Button
3 Status LEDs
4 Micro-USB Connector
Press and hold this button for 6 seconds to power on/o the device.
Press this button to add new wireless devices quickly and easily using Wi-Fi Protected Setup (WPS).
Please refer to LED Indicators on page 6.
Use the included cable to connect to a powered USB port to charge the device, or connect to a
computer to access the conguration utility.
4D-Link DWR-932C User Manual
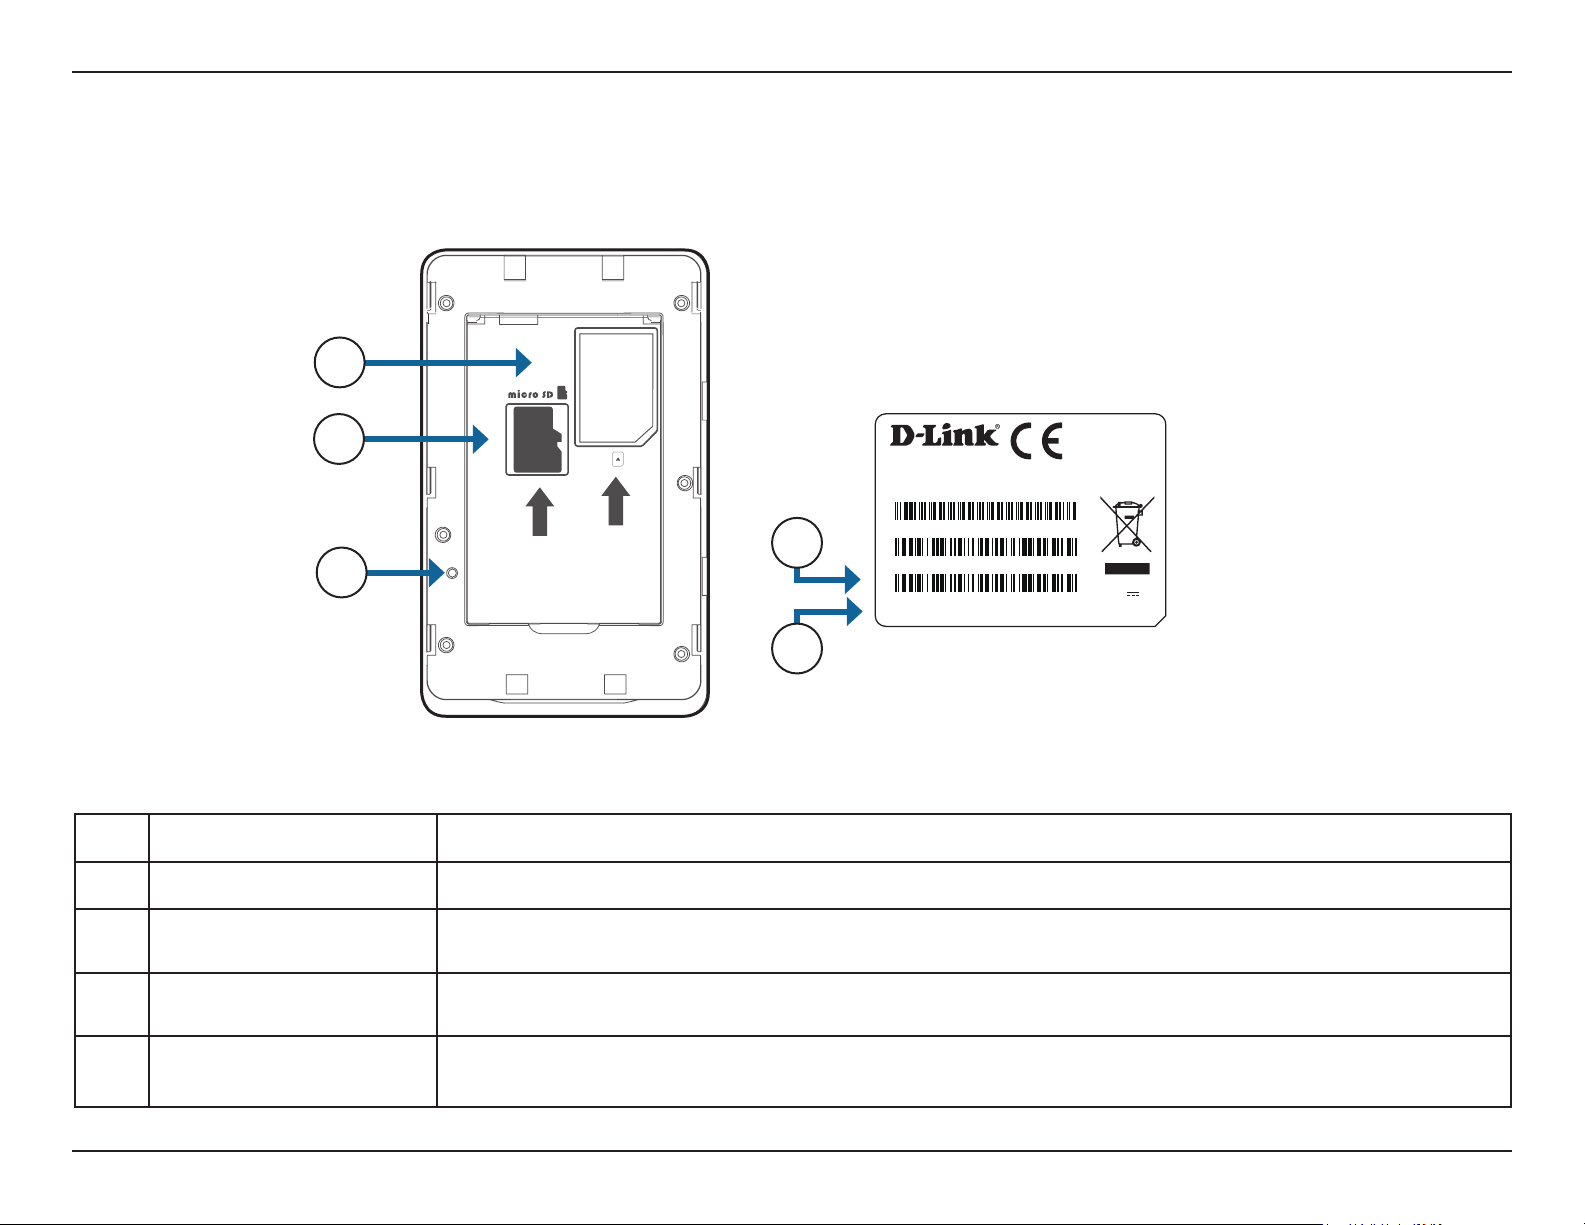
Section 1 - Product Overview
1
Hardware Overview
Battery Cover Removed
2
3
1 SIM Card Slot
2 microSD Card Slot
3 Reset Button
4 Wi-Fi Network (SSID)
SIM
Model No.: DWR-932C
H/W Ver.: XX F/W Ver.: 1.00
P/N: EWR932.......C1E
IMEI: XXXXXXXXXXXXXXX
MAC: XXXXXXXXXXXX
4
S/N: RD2W1ymXXXXXX
SSID: dlink_DWR-932
Password:XXXX
Input: 5V 1A
Made in China
5
Insert a SIM card to access the Internet and your SIM card contacts list.
Insert a microSD card for data storage.
Using a paper clip, press and hold this button for 6 seconds to reboot the unit.
Note: Ensure that the battery is inserted and the unit is powered on when pressing the reset button.
The network name (SSID) of the DWR-932C will be displayed here.
5
Network (SSID)
The network (SSID) security key of the DWR-932C will be displayed here.
Password
5D-Link DWR-932C User Manual

Section 1 - Product Overview
Number Name Color Explanation
Hardware Overview
LED Indicators
1 12 3
Blue Solid: Registering with 4G network
Blinking: Connected to 4G network
Green Solid: Registering with 3G network
1
2
3
Signal LED
Wi-Fi LED
Battery LED
Blinking: Connected to 3G network
Purple Solid: Registering with 2G network
Blinking: Connected to 2G network
Red No signal or SIM error
Blue Solid: Wi-Fi Active
Blinking: Transmitting data / WPS active
Blue Battery level greater than 50%
Amber Charging
Green Battery level 10% - 50%
Red Battery Low
Purple SMS message received
6D-Link DWR-932C User Manual

Section 2 - Installation
Installation
This section will guide you through the installation process.
Initial Setup
1. Ensure that your DWR-932C 4G/LTE Mobile Router is powered o.
2. Remove the cover on the underside of the router. Slide your SIM card into the cage provided,
ensuring that the alignment is the same as indicated by the logo next to the carriage. The
gold contacts on the card should be facing downwards.
Note: Always unplug and turn o the router before installing or removing the SIM card. Never
insert or remove the SIM card while the router is in use.
SIM
3. Press and hold the power button on the side of the router.
a. The Battery LED will light up green as the router performs its initialization processes.
b. After a few moments, the LED indicators will show the current status of the router’s
various functions. For more information please refer to LED Indicators on page 6.
7D-Link DWR-932C User Manual

Section 2 - Installation
Insert a microSD Card
1. Ensure that your DWR-932C 4G/LTE Mobile Router is powered o.
2. Remove the cover on the underside of the router.
3. Slide your microSD card into the cage provided, ensuring that the alignment is the same
as indicated by the logo next to the carriage. The gold contacts on the card should be
facing downwards.
4. Close the cover.
SIM
8D-Link DWR-932C User Manual

Section 2 - Installation
Wireless Installation Considerations
The DWR-932C can be accessed using a wireless connection from anywhere within the operating range of its wireless network. Keep in mind that
the quantity, thickness, and location of walls, ceilings, or other objects that the wireless signals must pass through may adversely aect wireless
signals. Ranges vary depending on the types of materials and background RF (radio frequency) noise in your home or oce. The key to maximizing
the wireless range is to follow these basic guidelines:
1. Minimize the number of walls and ceilings between the router and other network devices. Each wall or ceiling can reduce your adapter’s range
from 3 to 90 feet (1 to 30 meters).
2. Be aware of the direct line between network devices. A wall that is 1.5 feet thick (0.5 meters) appears to be almost 3 feet (1 meter) thick at a
45-degree angle. At a 2-degree angle it appears over 42 feet (14 meters) thick. Position devices so that the signal will travel straight through a
wall or ceiling (instead of at an angle) for better reception.
3. Try to position access points, wireless routers, and computers so that the signal passes through open doorways. Materials such as glass, metal,
brick, insulation, concrete, and water can aect wireless performance. Large objects such as sh tanks, mirrors, le cabinets, metal doors, and
aluminum studs may also have a negative eect on range.
4. If you are using a 2.4 GHz cordless phone, make sure that the 2.4 GHz phone base is as far away from your wireless device as possible. The base
transmits a signal even when the phone is not in use. In some cases, cordless phones, X-10 wireless devices, and electronic equipment such as
ceiling fans, uorescent lights, and home security systems may dramatically degrade wireless connectivity.
9D-Link DWR-932C User Manual
Section 3 - Conguration
Conguration
This section will show you how to congure your new D-Link mobile router using the conguration utility that can be accessed
via your web-browser.
Initial Connection to the Router
By default, the DWR-932C comes congured to work with most 4G SIM cards. Simply connect to it via Wi-Fi or use the included USB to access the
SIM’s Internet connection. If you wish to congure the router, you will need to establish a direct connection with the router in order to access the
web-based conguration utility. For information about how to Connect via Wi-Fi on page 11. Once you have congured your router, you will
be able to connect using the Wi-Fi settings that you specied in the conguration process. Please ensure that the router is powered on and has
sucient battery power before commencing the setup process.
Connect via USB
To connect to the router via USB, plug the provided Micro-USB cable into the Micro-USB port on the side of the router, and plug the other end into
an available USB port on your computer.
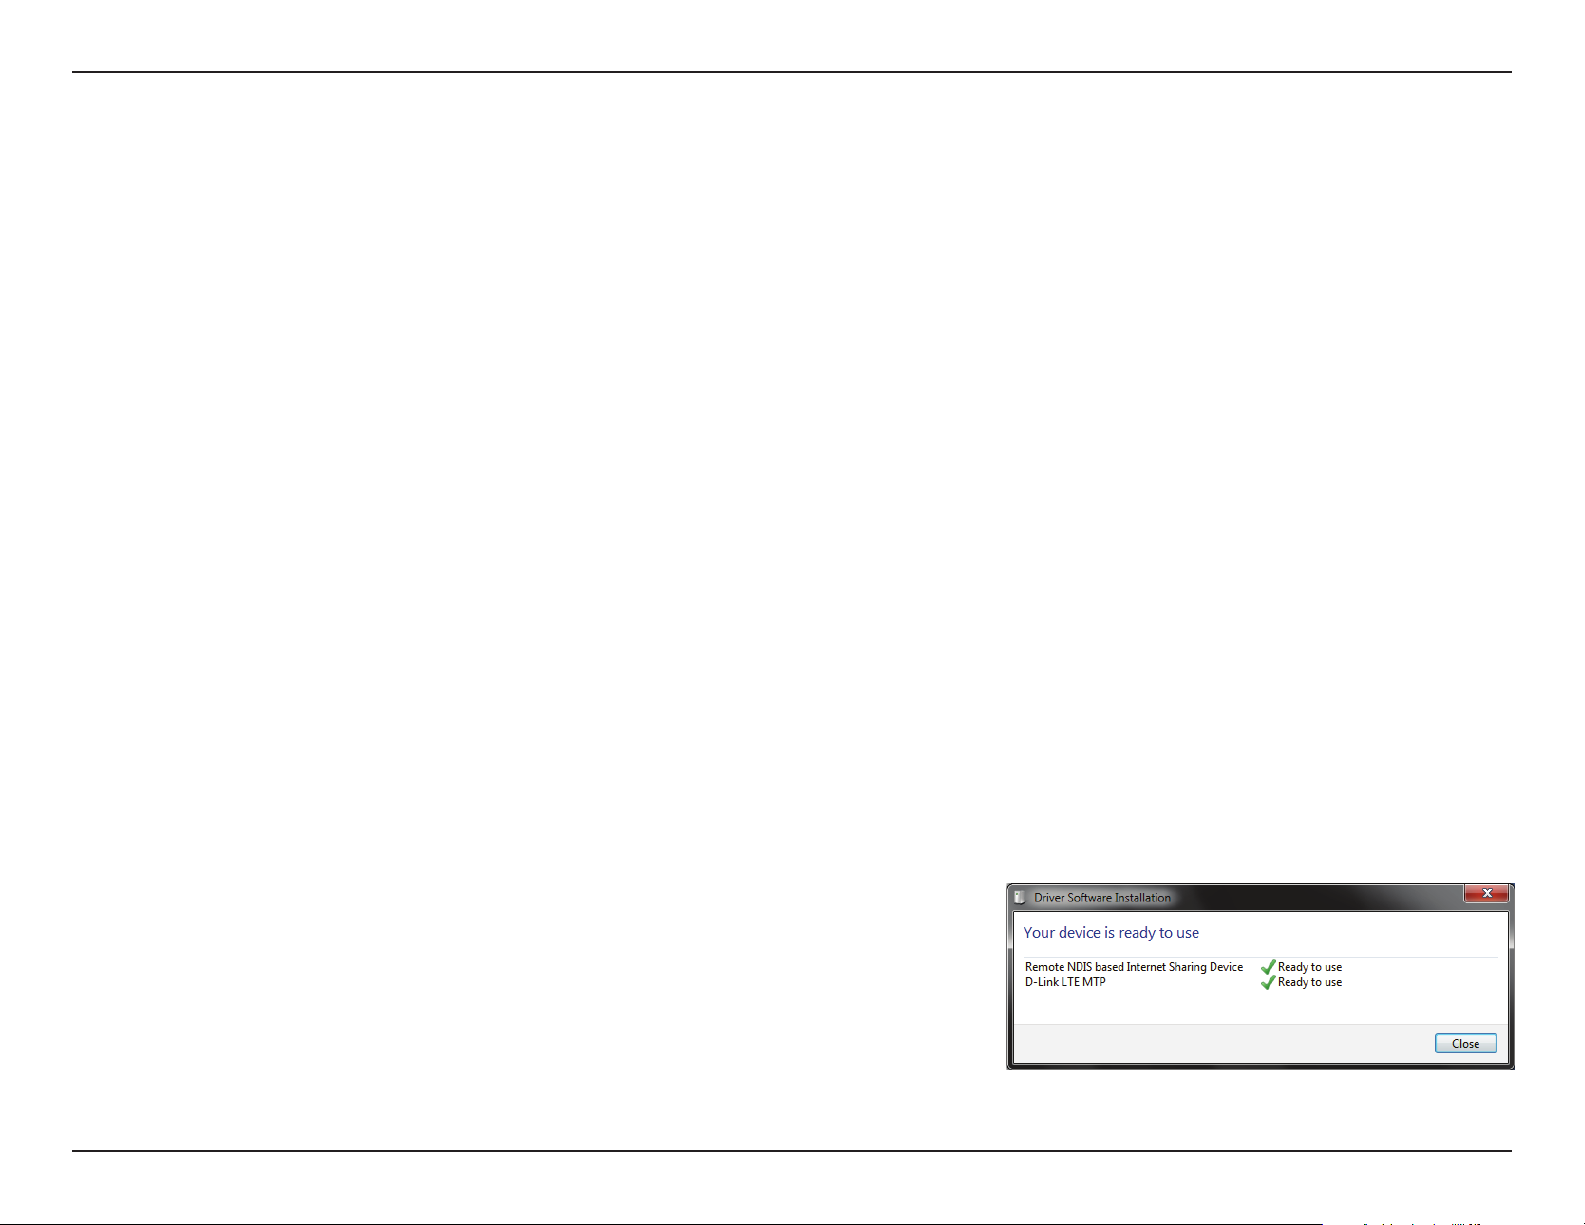
USB Tethering Driver Installation
When you plug the DWR-932C into your computer, any necessary drivers will immediately
install. Your version of Windows may prompt you to conrm the driver installation.
10D-Link DWR-932C User Manual

Section 3 - Conguration
Connect via Wi-Fi
Note: The following example uses Windows 7’s built-in wireless connection utility. If you are using a dierent operating system, or a third party connection
utility, the process may be dierent. Please refer to the documentation that came with your operating system or wireless client for further information on
how to connect to a wireless network.
To connect to the router using Wi-Fi, open your operating system’s wireless networking utility
and scan for available networks to connect to. By default, the network name (SSID) of the
DWR-932C will be in the format dlink_DWR-932C_xxxx, where “xxxx” represents the last
four character’s of the DWR-932C’s MAC address. The default SSID and password can also be
found on the product label situated under the battery. For more information on where to nd
this label refer to Hardware Overview on page 4.
dlink_DWR-932C_0816
Once you have located your DWR-932C’s wireless network, connect to it.
dlink_DWR-932C_0816
11D-Link DWR-932C User Manual
Section 3 - Conguration
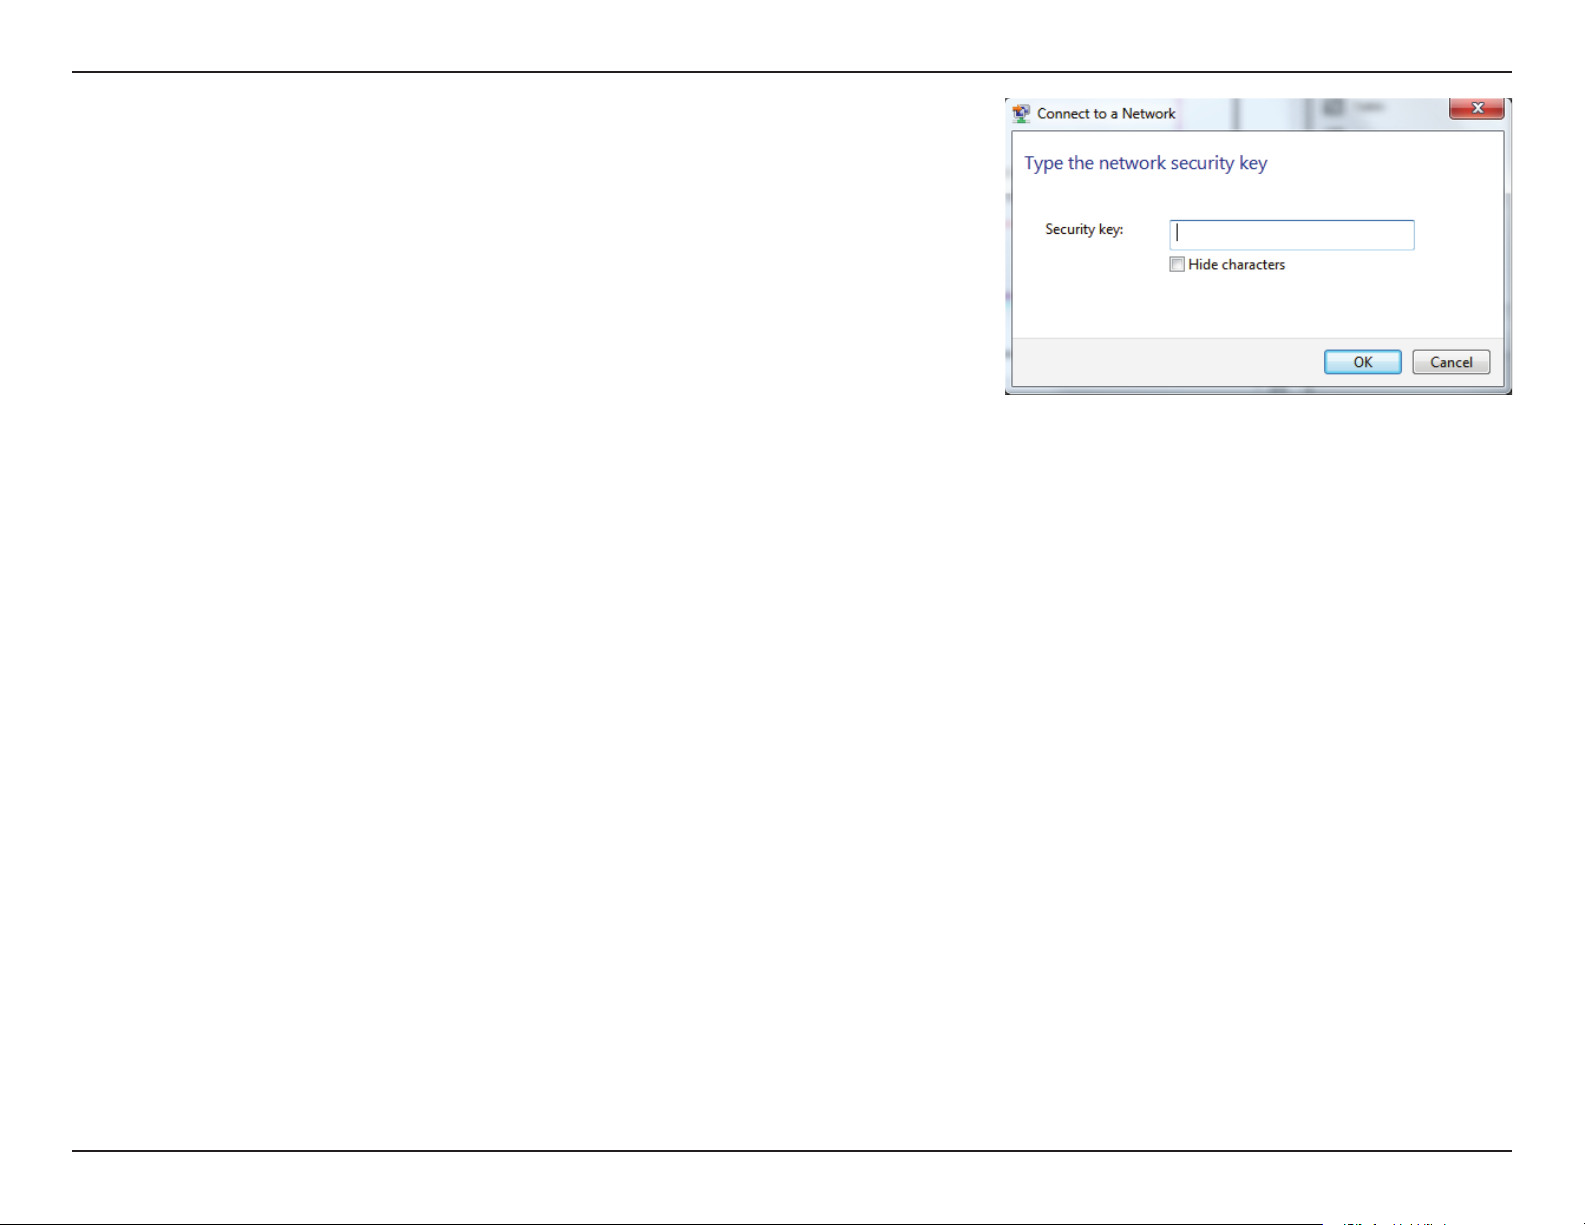
You will then be prompted to enter the network security key for your router. Enter the security
key in the box provided and click OK. Your wireless connection utility will conrm that the
connection is successful, and you can move to the next step to continue to the conguration
process.
You can also set up a connection using the Windows built-in WPS feature. Please see
Connecting to a Wireless Network on page 63.
12D-Link DWR-932C User Manual
Section 3 - Conguration
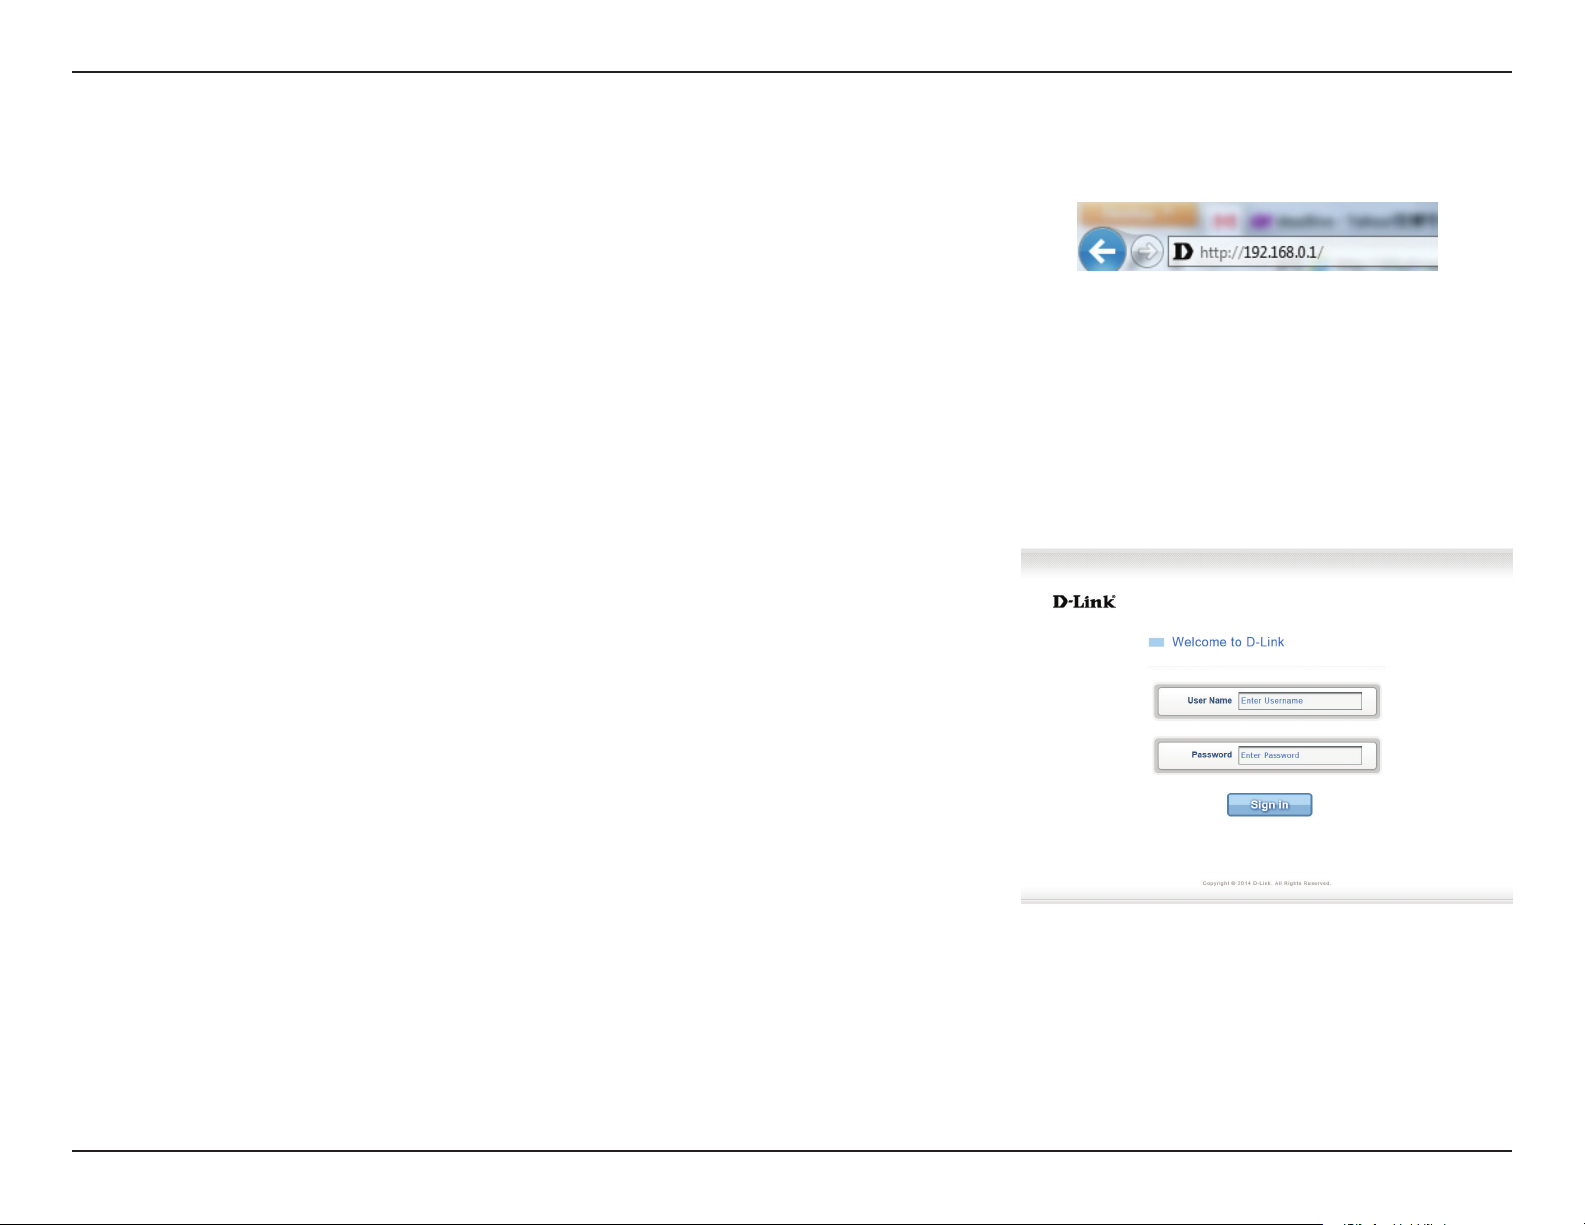
Web-based Conguration
To access the conguration utility, open a web browser (such as Internet Explorer) and enter
the IP address of the router, which is 192.168.0.1 by default in the address bar.
Conguration Utility
Once you have reached the conguration utility through your web browser, you will need
to log in. Enter admin as the username, and then enter the password. By default, the
password is blank.
Click Sign in to continue.
13D-Link DWR-932C User Manual
Section 3 - Conguration
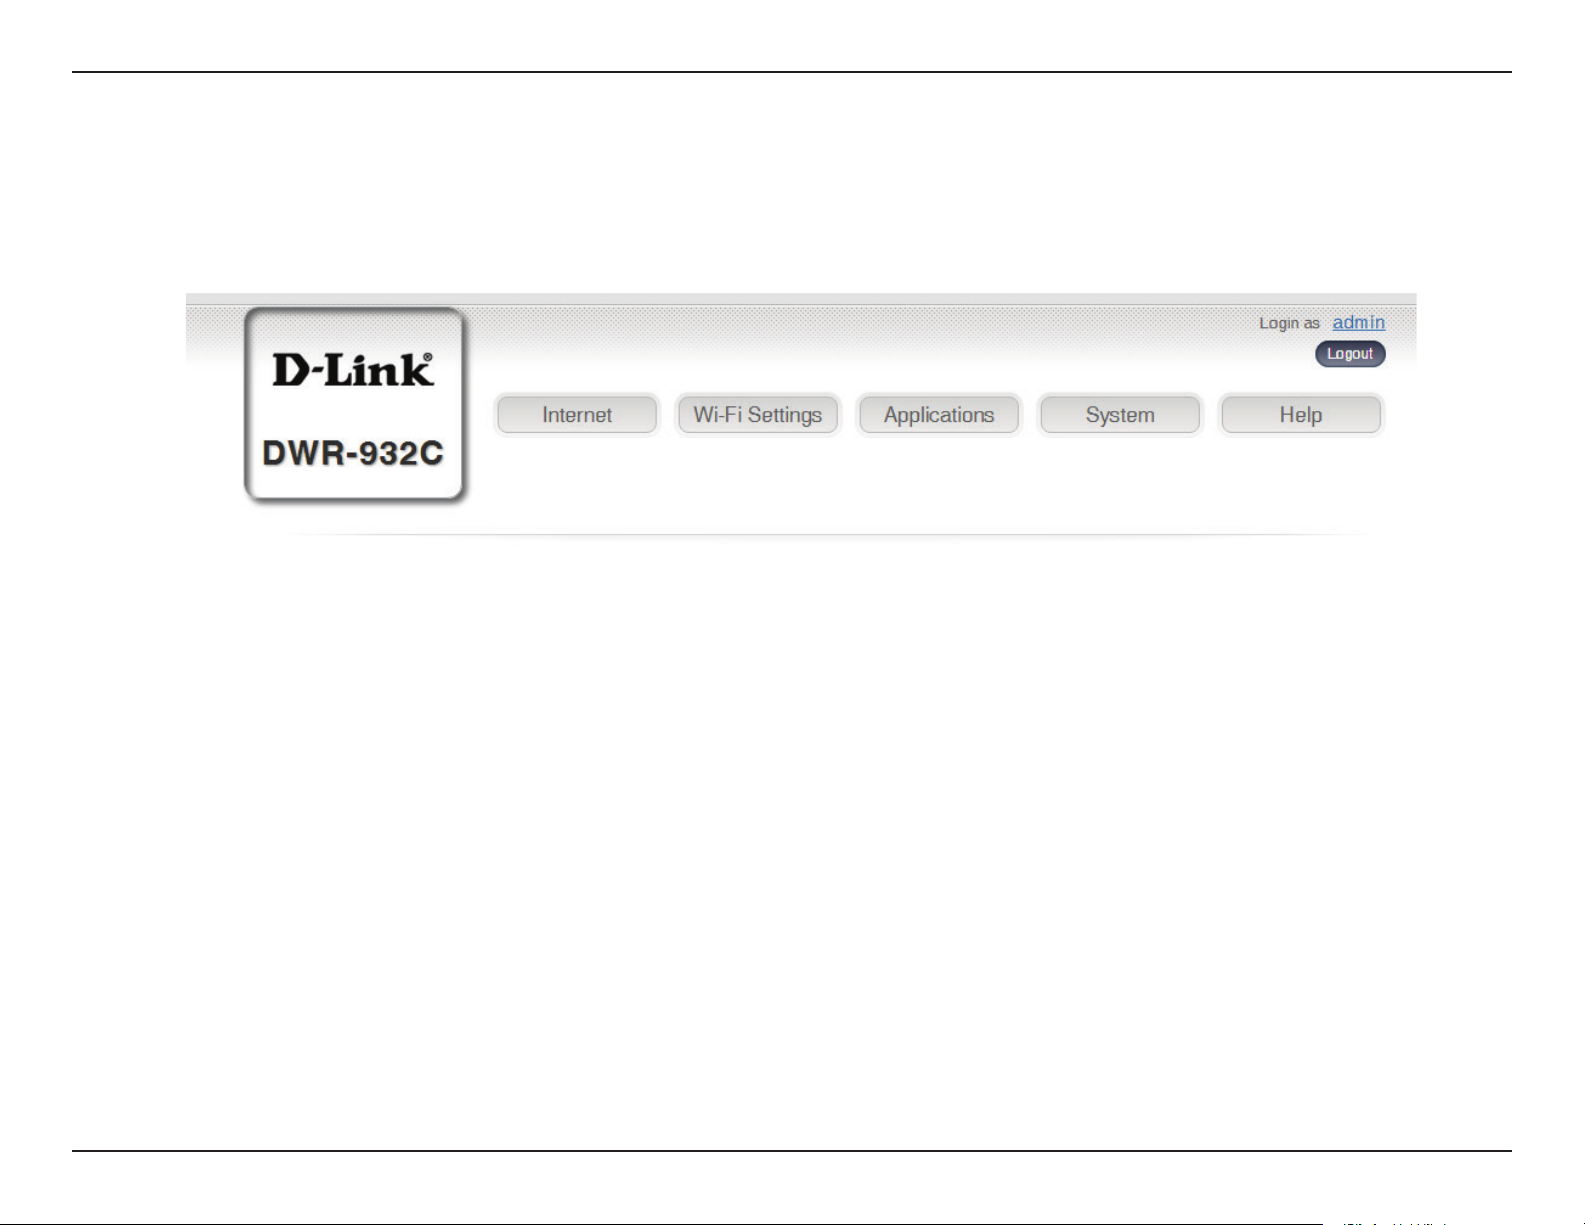
Navigation
On the homepage of the interface, you will nd a menu bar at the top of the page which includes tabs for easy navigation,
and a summary bar in the upper right corner with a quick view of essential information.
Internet
Wi-Fi Setting
Applications
System
Help
The Internet tab allows you to congure your Internet settings.
The Wi-Fi Setting allows you to congure your Wi-Fi network, as well as add new devices using WPS.
The Applications tab allows you to congure rewall and security settings to protect your network from WAN-side
intrusions.
The System tab allows you to view system information and alter your login password.
From the Help tab, you can access a general mobile router FAQ.
14D-Link DWR-932C User Manual
Section 3 - Conguration
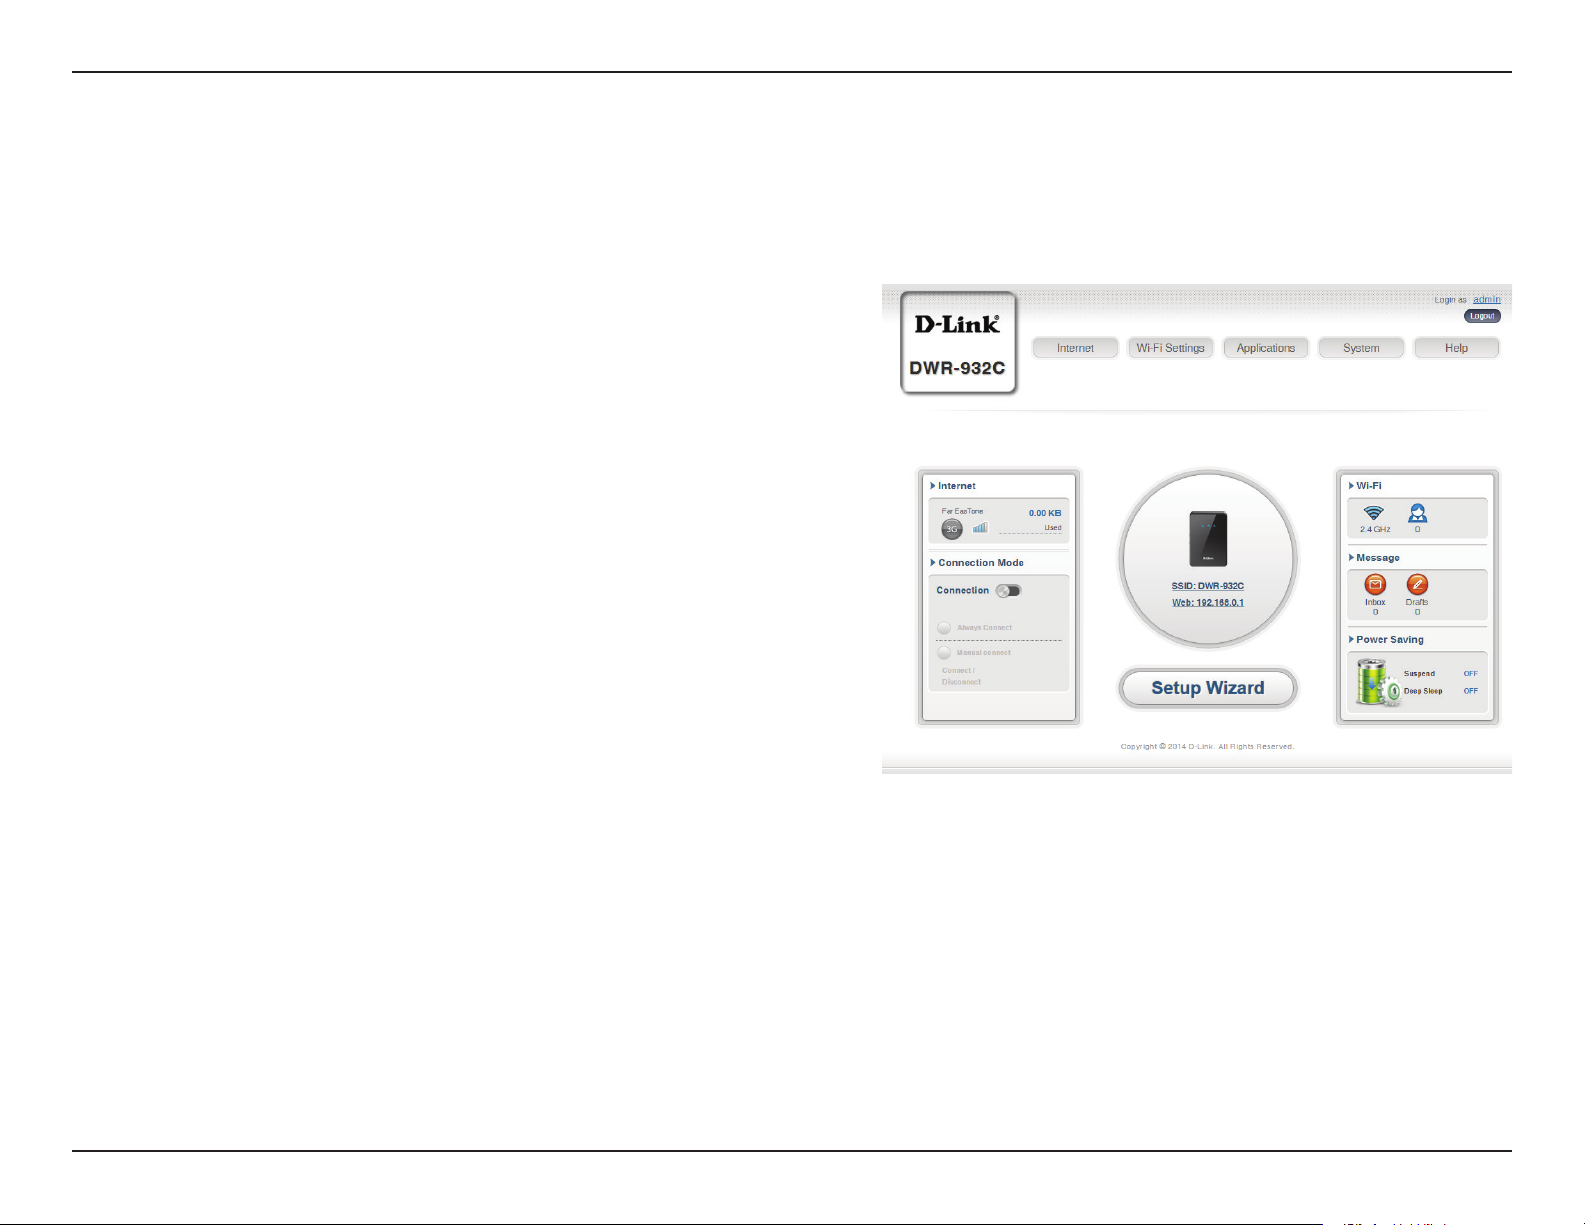
Quick Access
A quick access page will be displayed on the initial homepage for the DWR-932C. The headings below link through to windows
where you can alter settings in more detail.
Internet
Connection Mode
Wi-Fi
Messaging
Power Saving
This area displays your Internet provider, the type of
Internet service you are using, the signal strength
and your current data usage.
This area displays the length of connection time and
allows you to change between Always Connect and
Manual Connect.
The Wi-Fi section displays the number of devices
currently connected to the router.
This area displays the number of SMS messages in
your inbox and your draft massages.
This area displays whether power saving features
have been selected, such as sleep mode.
15D-Link DWR-932C User Manual

Section 3 - Conguration
Network Setup
Setup Wizard
The Wizard page will guide you through the steps required to congure the basic settings of your router such as the IP address,
network name (SSID), and password. Click on the Setup Wizard button to begin the quick setup wizard.
16D-Link DWR-932C User Manual
Section 3 - Conguration
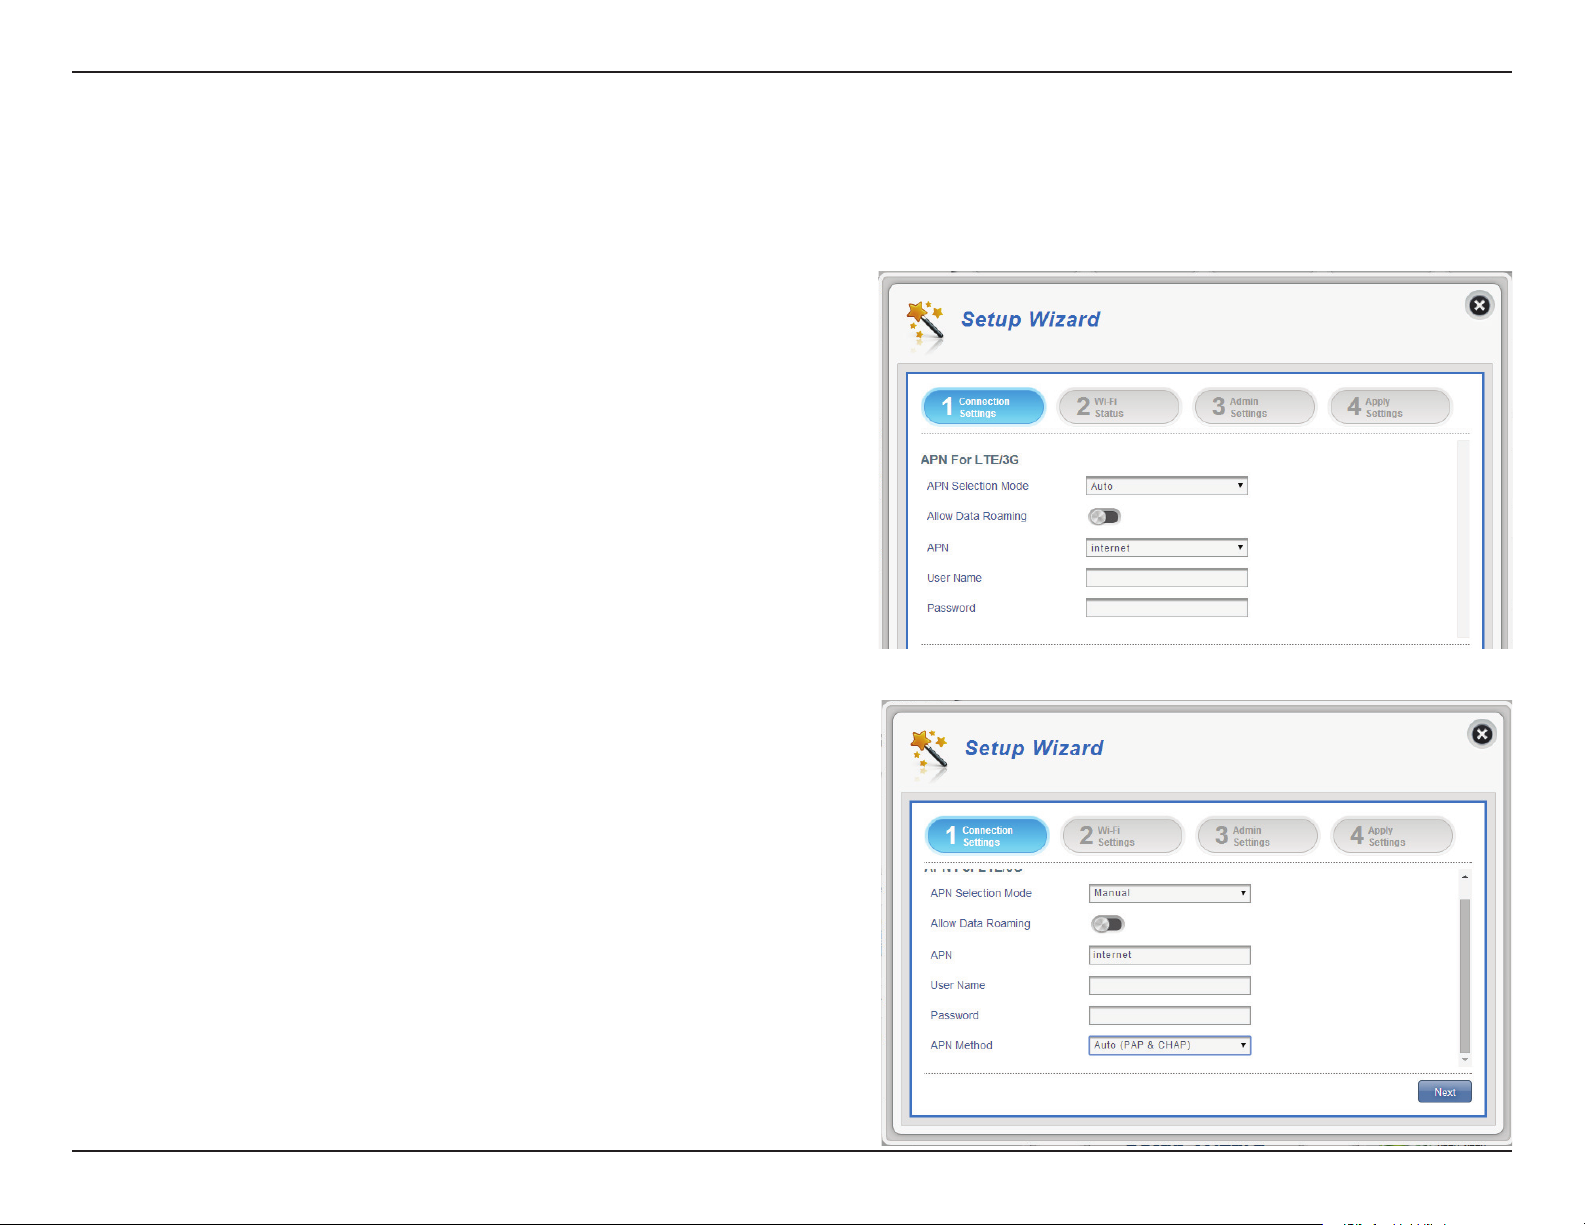
Connection Settings
In this section you can congure your connection settings. Depending on your mobile service provider, you may have to input
additional settings before use. If so, please contact your service provider for this information.
APN For LTE/3G
APN Selection Mode
Allow Data Roaming
User Name and
Password (optional)
If you choose to manually select your APN.
Auto (PAP & CHAP)
If you selected Basic Protection:
Choose to either automatically or manually select
an APN.
Select this if you want to allow data roaming.
APN
PAP
Enter your service provider’s APN.
Enter the username and password provided by your
service provider.
Both PAP and CHAP combined.
Select this if your service provider uses this protocol.
Password Authentication Protocol. Select this if your
service provider uses this protocol.
CHAP
Challenge Handshake Authentication Protocol.
Select this if your service provider uses this protocol.
Click Next to move to the next section.
17D-Link DWR-932C User Manual
Section 3 - Conguration
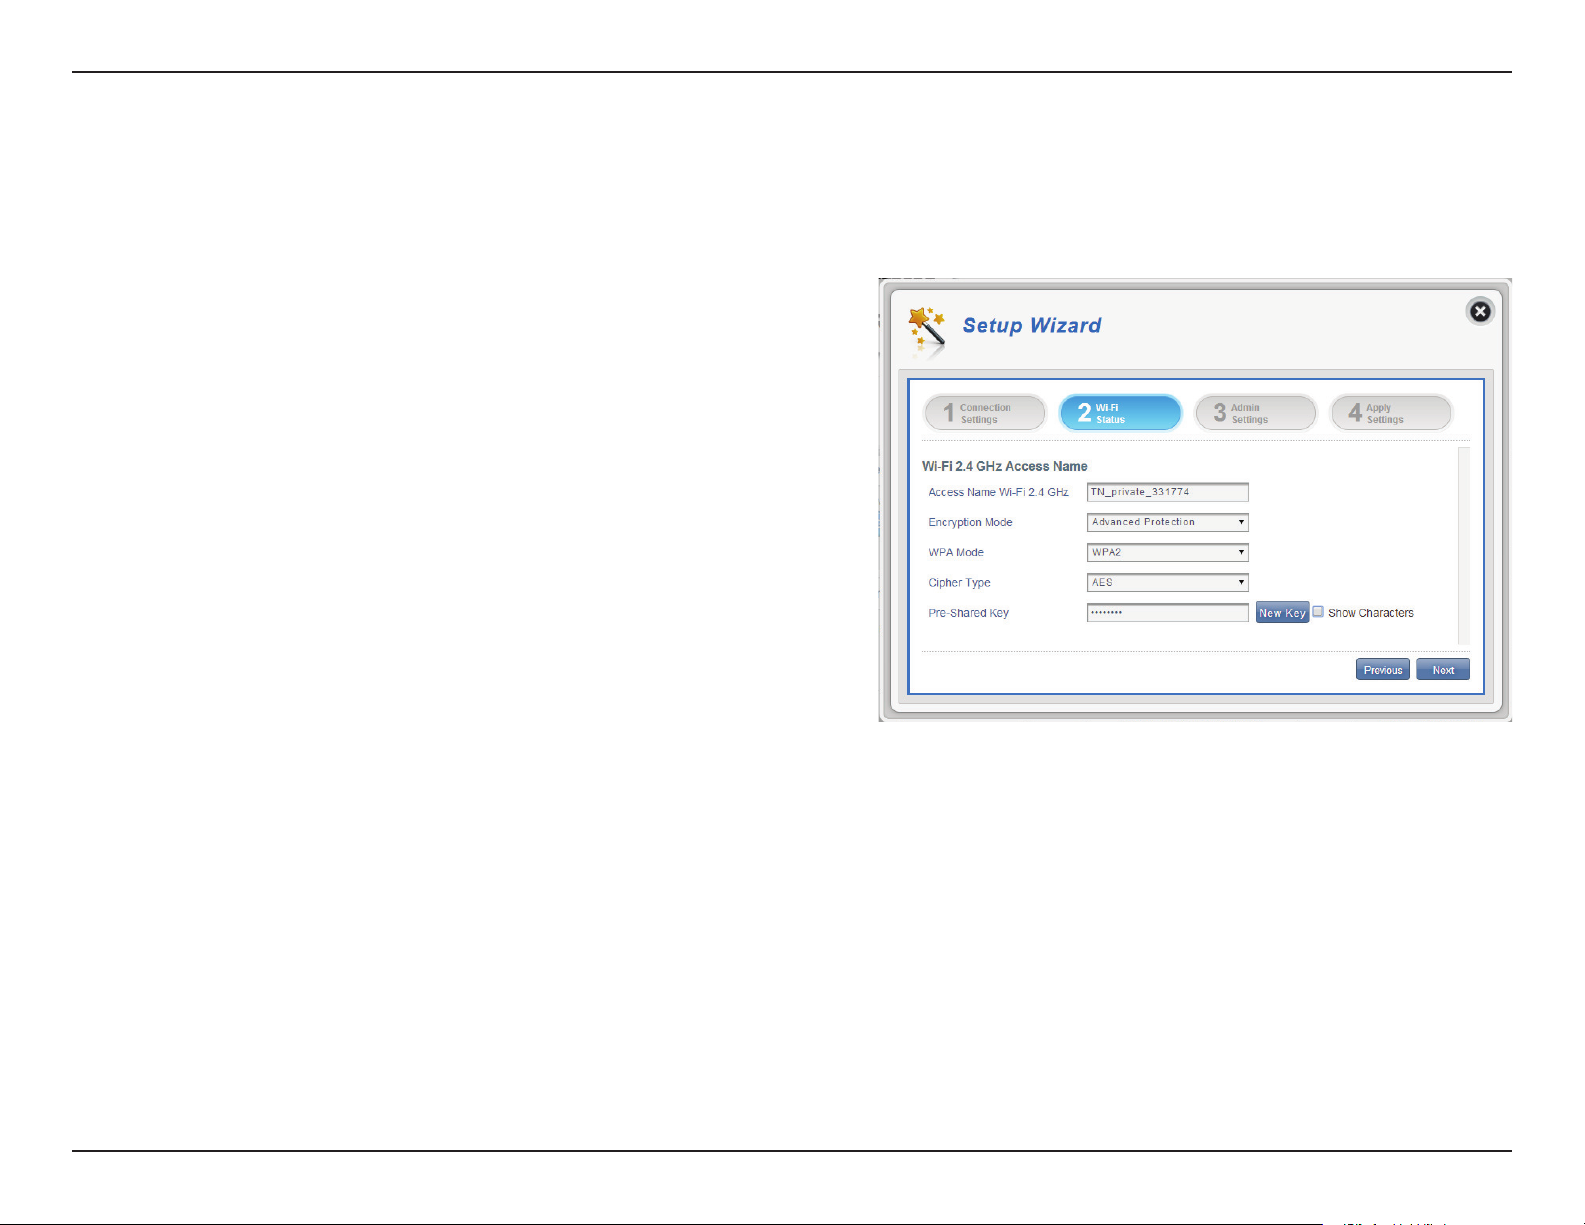
Wi-Fi Status
In this section you have the option of changing your Wi-Fi access name and password as well as security features, keeping your
network safe from unwanted intruders.
Wi-Fi 2.4 GHz Access Name
Access Name Wi-Fi 2.4
GHz
Encryption Mode
WPA Mode
Cipher Mode
The name of your wireless access point.
By default encryption mode is set to Advanced
Protection. You may change this to Basic Protection
or No Protection but it is not recommended.
Auto (WPA or WPA2) - The router will automatically
determine the version of WPA to be used based on
the client that is connecting to it.
WPA2 - Clients will only be able to associate with the
router using the WPA2 standard. Clients which do not
support WPA2 will not be able to associate with the
router.
AES - A newer cipher used by the WPA2 standard.
Use of this cipher type is required in order to achieve
802.11 speeds.
AES/TKIP - TKIP is an encryption method commonly
used by older devices. Select this option for greater
compatibility with old and new devices.
Pre -Shared Key
The pre-shared key is the password which clients will
require in order to connect to your network. Enter a
password of between 8 and 63 characters in length.
Click Next to move to the next section.
18D-Link DWR-932C User Manual
Section 3 - Conguration
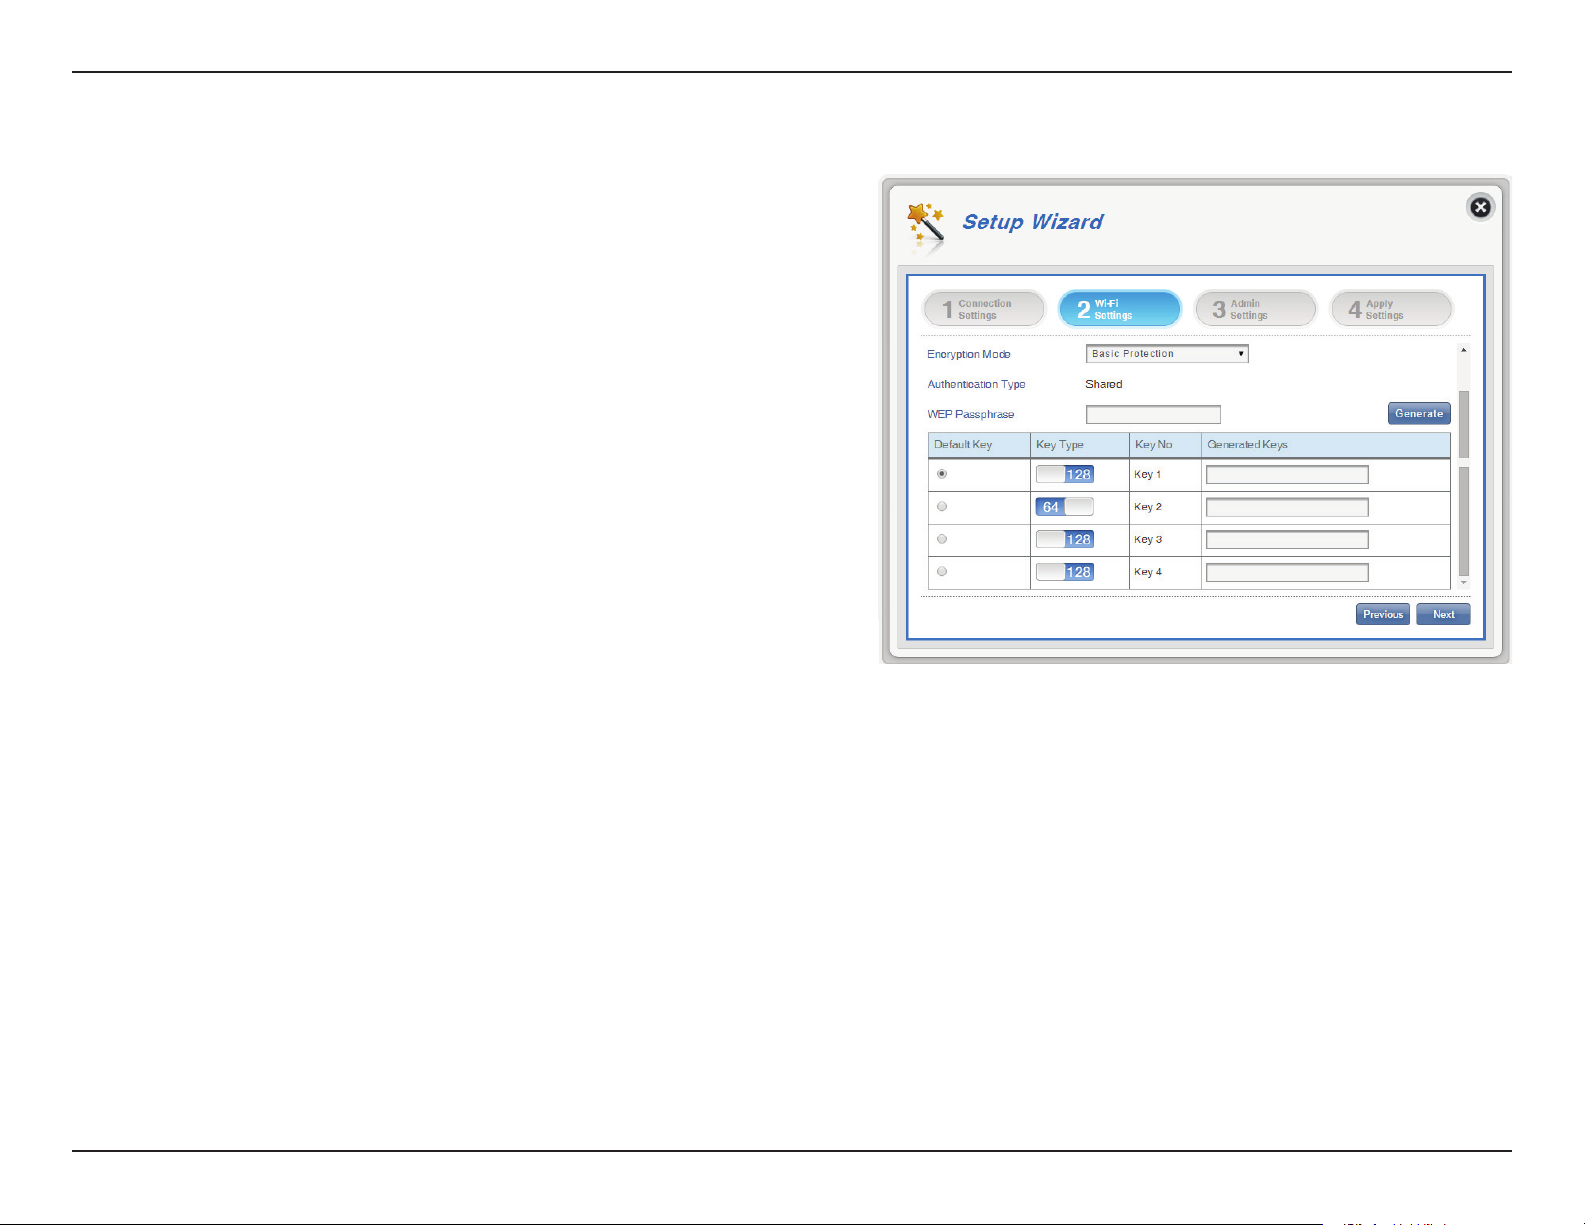
If you selected Basic Protection:
Authentication Type:
WEP Passphrase:
Key 1-4:
Shared - The encryption key is used for
authentication as well as to encrypt data packets.
Enter your passphrase to be used when connecting
to the router.
You can predetermine up to 4 WEP keys. Select the
WEP key you wish to use by clicking on the radio
buttons next to the keys. Select whether you wish
to use HEX or ASCII characters in your key using the
drop-down menu. Enter the desired key in the eld
provided.
Click Next to move to the next section.
19D-Link DWR-932C User Manual
Section 3 - Conguration
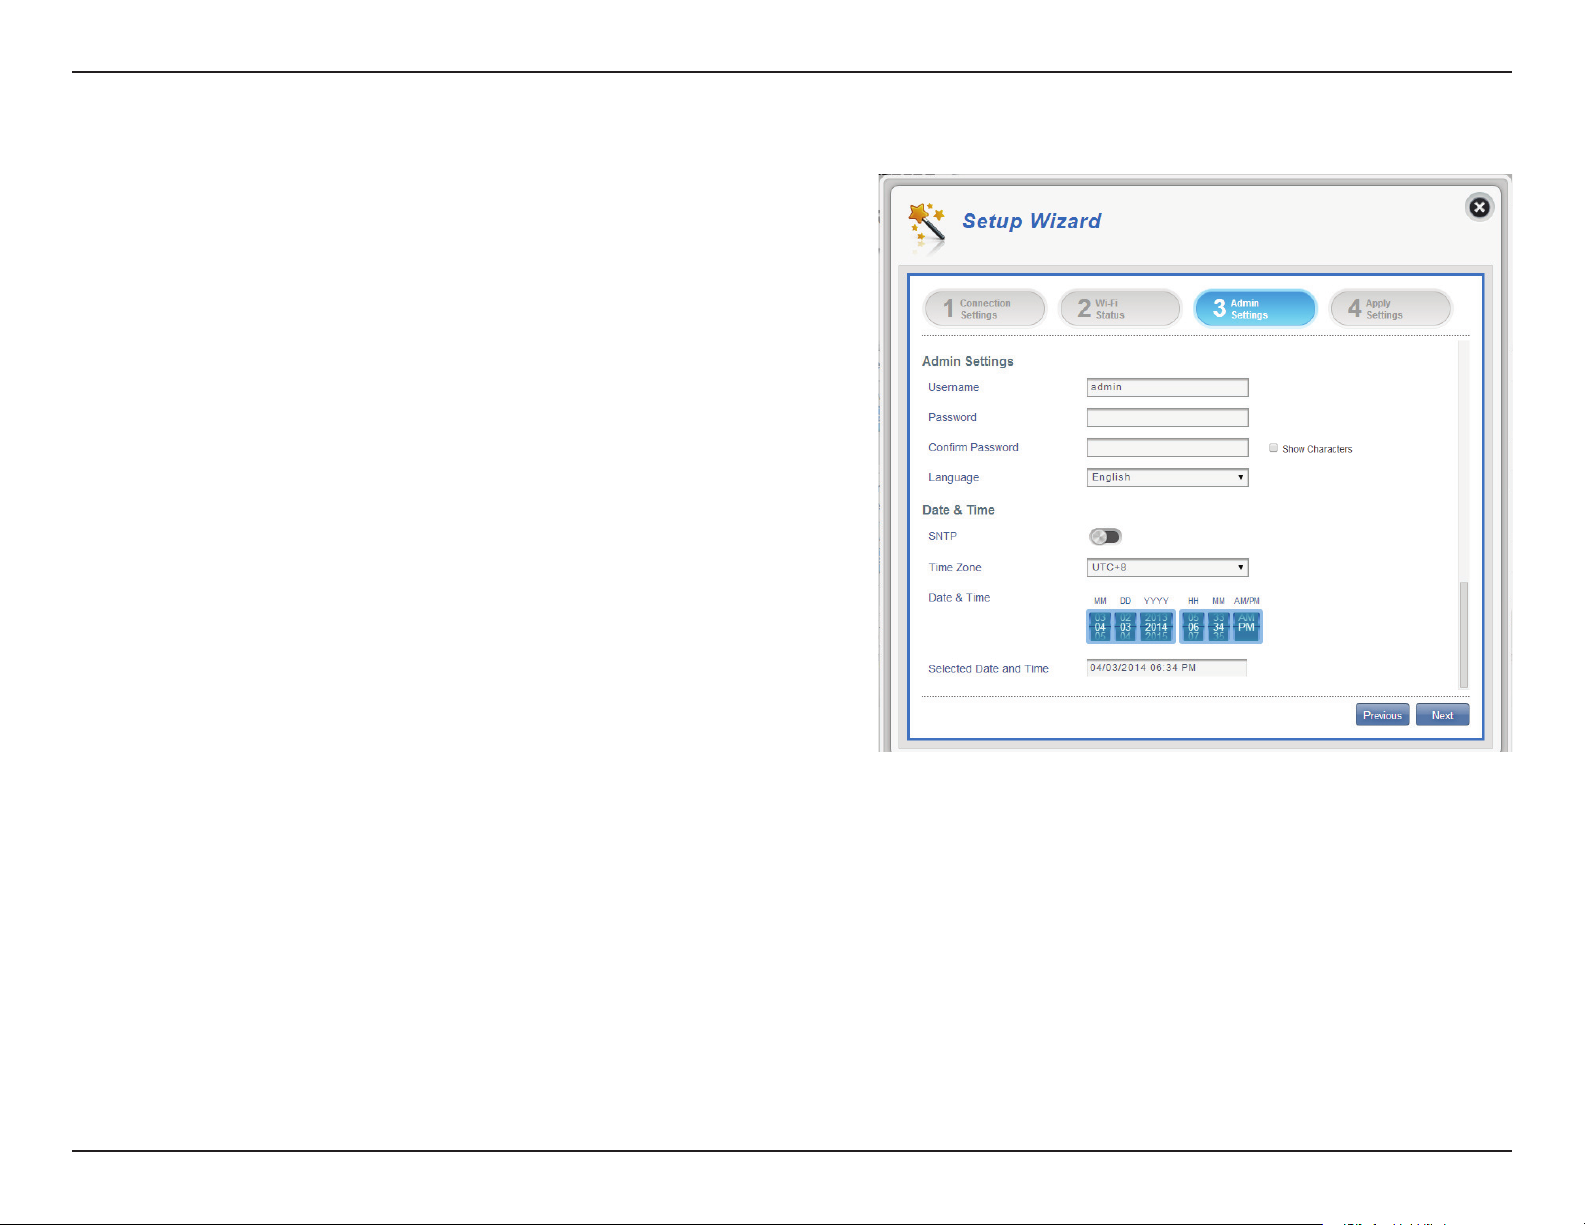
Admin Settings
In this section, you can adjust your admin username and password for logging in
via your web browser to access the router settings, as well as the time and date.
Admin Settings
Username
Password
Language
Date & Time
SNTP
Time Zone
Date & Time
Selected Date and Time
Enter your desired username here.
Enter your desired password here.
Select your desired language here.
Toggle the switch to Enable or Disable to
automatically synchronize the time with a Simple
Network Time Protocol (SNTP) server.
Select your current Coordinated Universal Time
zone (UTC).
Adjust the dials on the screen with your mouse
curser or pointer to set the time and date.
Displays your new, dial adjusted time.
Click Next to move to the next section.
20D-Link DWR-932C User Manual
Section 3 - Conguration
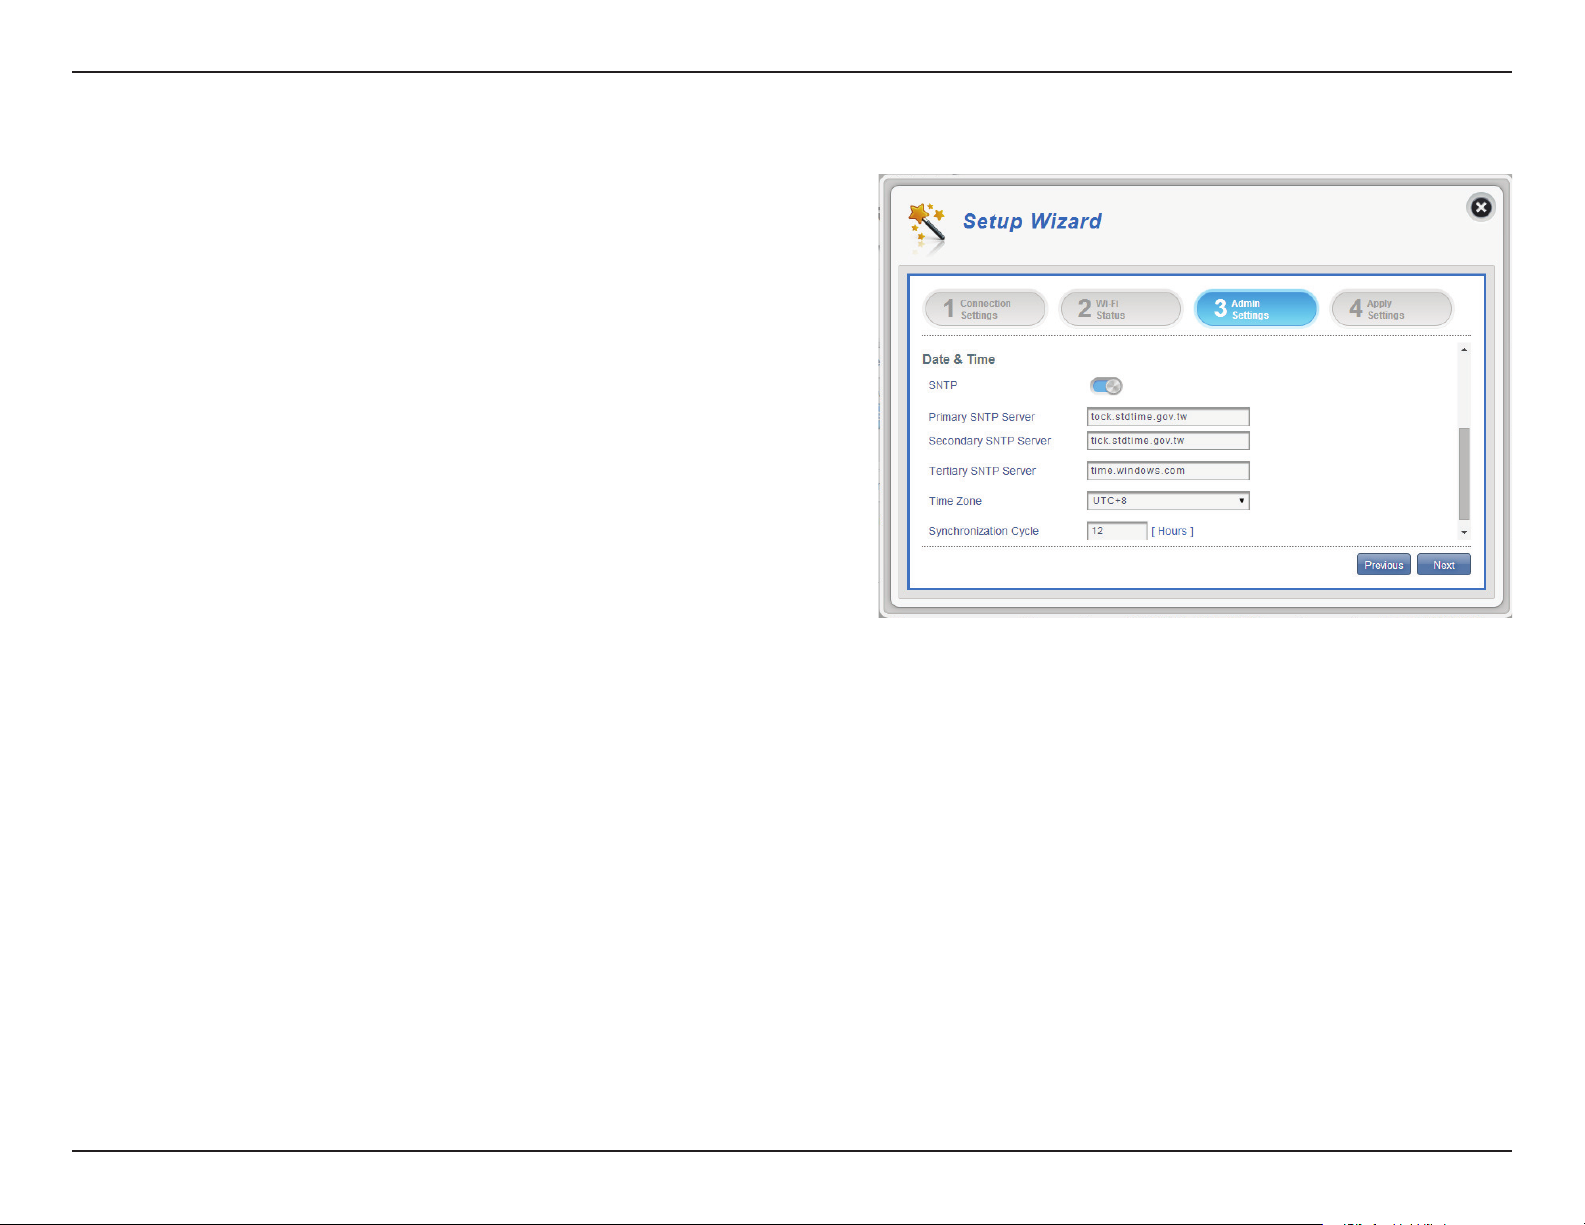
If you enabled automatically synchronize the time with an SNTP server:
Primary,
Secondary, and
Tertiary SNTP
Server
Time Zone
Synchronization
Cycle
Enter an SNTP server address which will be used to
synchronize the router’s system time and date.
Enter the time zone where you are currently using
the DWR-932C to accurately set the time.
You can specify in hours how frequently the
DWR-932C will update the time from an SNTP
server.
Click Next to move to the next section.
21D-Link DWR-932C User Manual
Section 3 - Conguration
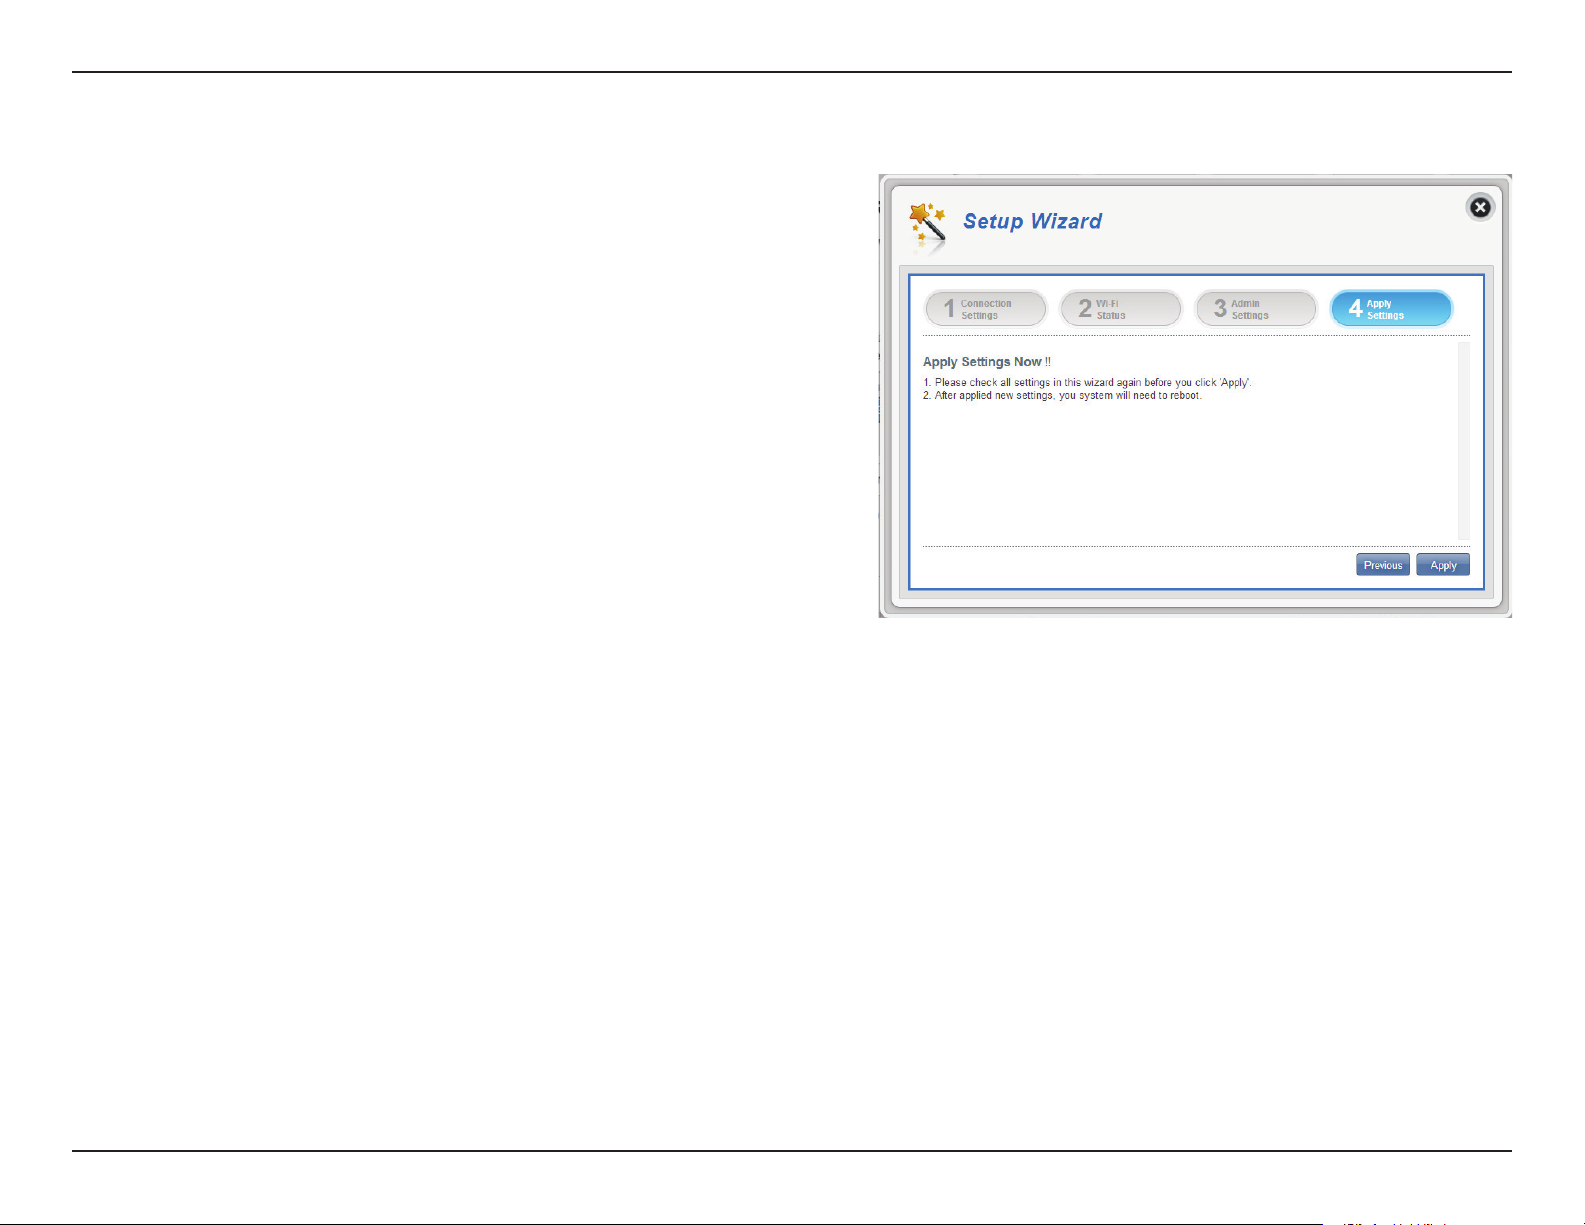
Apply Settings
Check all settings in the wizard and click Apply. After applying the new settings
you will need to reboot your system.
Click Apply to save changes.
22D-Link DWR-932C User Manual
Section 3 - Conguration
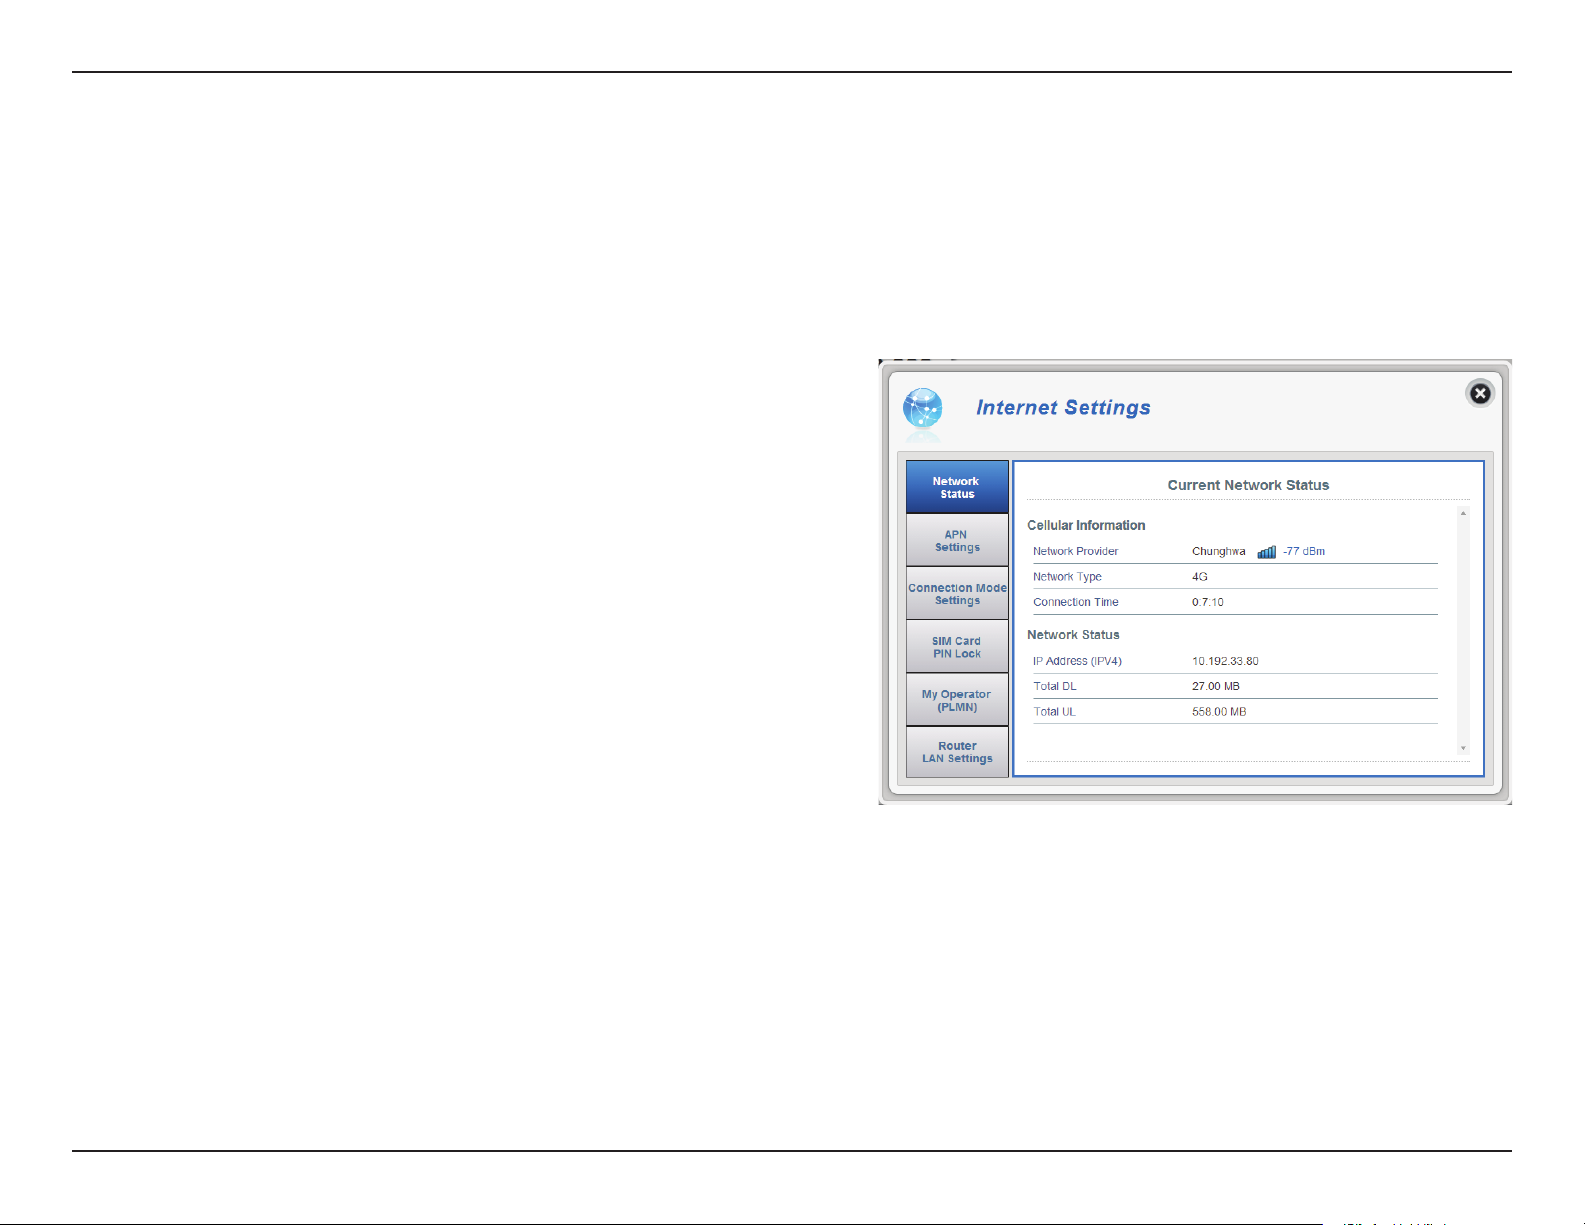
Internet Settings
Network Status
In this section you can check your current network status as well as your service provider and data usage.
Cellular Information
Network Provider
Network Type
Connection Time
Network Status
IP Address (IPV4)
Total DL
Total UL
Displays your current network provider and signal
strength.
Displays the type of network you are connected to,
such as 2G, 3G or 4G.
The length of time you have been connected to the
network.
Displays your current IP address.
Displays your average download speed.
Displays your average upload speed.
23D-Link DWR-932C User Manual

Section 3 - Conguration
APN Settings
In this section you can congure your APN settings. Depending on your mobile service provider, you may have to input optional
settings before use, if so, you may need to contact your service provider regarding these details.
Access Point Name (APN) Settings
APN Selection Mode
Auto Connect
Check this option if you want the DWR-932C to
automatically connect to a mobile network after it
has been powered on, or has been disconnected
from its current mobile network.
Manual
Enter the Access Point Name (APN) for the
connection. If you do not know this information,
please contact your service provider.
Click Apply to save changes.
24D-Link DWR-932C User Manual
Loading...