


D-Link AirPlus DI-614+
Enhanced 2.4GHz Wireless Broadband Router
Manual
Building Networks for People
Contents
Package Contents ................................................................................ |
3 |
Introduction........................................................................................... |
4 |
Wireless Basics.................................................................................... |
6 |
Getting Started ..................................................................................... |
9 |
Using the Configuration Menu............................................................ |
10 |
Troubleshooting .................................................................................. |
50 |
Networking Basics.............................................................................. |
55 |
Technical Specifications ..................................................................... |
68 |
Contacting Technical Support............................................................. |
70 |
Warranty............................................................................................. |
71 |
Registration ........................................................................................ |
74 |
2
Package Contents
Contents of Package:
D-Link AirPlus DI-614+ Enhanced 2.4GHz Wireless Broadband Router
Power Adapter – 5V DC, 2.5A
Manual on CD
Quick Installation Guide
Note: Using a power supply with a different voltage rating than the one included with the DI-614+ will cause damage and void the warranty for this product.
If any of the above items are missing, please contact your reseller.
System Requirements For Configuration:
Computer with a Windows, Macintosh, or Linux based operating system with an installed Ethernet adapter
Internet Explorer or Netscape Navigator, version 6.0 or above, with JavaScript enabled
3
Introduction
The D-Link AirPlus DI-614+ Wireless Broadband Router is an enhanced 802.11b high-performance, wireless router. It is an ideal way to extend the reach and number of computers connected to your wireless network.
Unlike most 802.11b routers, the DI-614+ is capable of data transfer speeds up to 22 Mbps* (compared to the standard 11 Mbps) when used with other D-Link AirPlus products such as the DWL-520+ Wireless PCI Adapter.
After completing the steps outlined in the Quick Installation Guide (included in your package) you will have the ability to share information and resources, such as files and printers, and enjoy the freedom that wireless networking delivers.
The DI-614+ is compatible with most popular operating systems, including Macintosh, Linux and Windows, and can be integrated into a large network. This Manual is designed to help you connect the Router and the D-Link AirPlus 2.4GHz Wireless Adapters into a network in Infrastructure mode. Please take a look at the
Getting Started section in this manual to see an example of an Infrastructure network using the DI-614+.
This manual provides a quick introduction to wireless technology and its application as it relates to networking. Please take a moment to read through this manual and get acquainted with wireless technology.
*Maximum wireless signal rate derived from IEEE Standard 802.11b specifications. Actual data throughput wil vay. Network conditions and environmental factors, including volume of network traffic, building materials and construction, and network overhead lower actual data throughput rate.
4

Connections
Auto-Sensing Ports:All ports (both LAN and WAN) auto-sense cable types to accomodate stright-through or cross-over cable.
LAN ports provide connections to Ethernetenabled devices.
WAN port is the |
|
|
|
|
|
|
|
|
|
||
|
|
|
|
||
Pressing the Reset |
Receptor |
||||
connection for the |
Button restores the |
||||
for the |
|||||
Ethernet cable to the |
router to its original |
||||
Power |
|||||
Cable or DSL modem |
factory default |
||||
Adapter |
|||||
|
settings. |
||||
|
|
||||
LEDs
WAN LED: A solid light indicates connection on the WAN port.This
LED blinks during transmission.
WLAN LED: A solid light indicates that the wireless segment is ready.This
LED blinks during wireless transmission.
Power LED: A solid light indicates a proper connection to the power supply.
M1 LED: A solid light indicates that the DI-614+ is ready.
M2 LED: A solid light indicates that the unit is defective.
Local Networ LED: A solid light indicates a connection to an Ethernet-enabled computer on ports 1-4.This LED blinks during data transmission.
5
Wireless Basics
D-Link AirPlus wireless products are based on industry standards to provide easy-to-use and compatible high-speed wireless connectivity within your home, business or public access wireless networks. Strictly adhering to the IEEE standard, the D-Link AirPlus wireless family of products will allow you to access the data you want, when and where you want it.You will be able to enjoy the freedom that wireless networking delivers.
A wireless local area network (WLAN) is a cellular computer network that transmits and receives data with radio signals instead of wires.Wireless LANs are used increasingly in both home and office environments, and public areas such as airports, coffee shops and universities.Innovative ways to utilizeWLAN technology are helping people to work and communicate more efficiently. Increased mobility and the absence of cabling and other fixed infrastructure have proven to be beneficial for many users.
Wireless users can use the same applications they use on a wired network. Wireless adapter cards used on laptop and desktop systems, support the same protocols as Ethernet adapter cards.
Under many circumstances, it may be desirable for mobile network devices to link to a conventional Ethernet LAN in order to use servers, printers or an Internet connection supplied through the wired LAN. A Wireless Access Point (AP) is a device used to provide this link.
People use wireless LAN technology for many different purposes:
Mobility - Productivity increases when people have access to data in any location within the operating range of theWLAN.Management decisions based on real-time information can significantly improve worker efficiency.
Low Implementation Costs – WLANs (Wireless Local Area Networks) are easy to set up, manage, change and relocate. Networks that frequently change, both physically and logically, can benefit from WLANs ease of implementation. WLANs can operate in locations where installation of wiring may be impractical.
Installation Speed and Simplicity - Installing a wireless LAN system can be fast and easy and can eliminate the need to pull cable through walls and ceilings.
Network Expansion - Wireless technology allows the network to go where wires cannot go.
Reduced Cost-of-Ownership - While the initial investment required for wireless LAN hardware might be higher than the cost of wired LAN hardware, overall installation expenses and life-cycle costs will be significantly lower. Long-term cost benefits are greatest in dynamic environments requiring frequent moves, adds, and changes.
Scalability – Wireless Local Area Networks (WLANs) can be configured in a variety of topologies to meet the needs of specific applications and installations. Configurations
are easily changed and range from peer-to-peer networks suitable for a |
6 |
Wireless Basics
small number of users to full infrastructure networks of thousands of users that allow roaming over a broad area.
D-Link AirPlus Wireless Family of LAN products include:
Enhanced 2.4GHz Wireless Cardbus Adapters used with laptop computers (DWL-650+)
Enhanced 2.4GHz Wireless PCI cards used with desktop computers (DWL-520+)
Enhanced 2.4GHz Wireless Router and Access Point (DI-614+, DWL900AP+)
The DI-614+ is also compatible with the D-Link Air 802.11b family of products, which include:
2.4GHz Wireless Cardbus Adapters used with laptop computers (DWL-650)
2.4GHz Wireless PCI cards used with desktop computers (DWL-520)
Wireless Router/Access Point/Print Servers (DI-713P)
Wireless Access Points (DWL-1000AP, DWL-900AP)
Standards - Based Technology
The IEEE standard-based technology assures that the D-Link AirPlus Products are interoperable with existing compatible 2.4GHz wireless technology.This means you will be able to transfer large files quickly or even watch a movie in MPEG format over your network without noticeable delays.The technology works by using multiple frequencies in the 2.4GHz range at speeds up to 22 Mbps. D-Link AirPlus products will automatically sense the best possible connection speed to ensure the greatest speed and range possible with the technology.
Installation Considerations
Designed to go up to 1,312 feet (400 meters) outdoors and up to 328 feet (100 meters) indoors, the D-Link AirPlus DI-614+ lets you access your network with your laptop computer from virtually anywhere. Keep in mind, however, that the number, thickness and location of walls, ceilings or other objects that the wireless signals must pass thru may limit range.Typical ranges vary depending on the types of materials and background RF (radio frequency) noise in your home or business.The key to maximizing range is to follow these basic guidelines:
7
Wireless Basics
1.Keep the number of walls and ceilings between the wireless Access Point and your receiving device (e.g., the DWL-650+) to a minimum - Each wall or ceiling can reduce your D-Link AirPlus Wireless product’s range from 3-90 feet (1-30 meters.) Position your Access Points, Residential Gateways, and computers so that the number of walls or ceilings is minimized.
2.Be aware of the direct line between Access Points, Residential Gateways (routers) and computers.A wall that is 1.5 feet thick (.5 meters), at a 45-degree angle appears to be almost 3 feet (1 meter) thick. At a 2-degree angle it looks
over 42 feet (14 meters) thick! Try to make sure that the Access Points and adapters are positioned so that the signal will travel straight through a wall or ceiling for better reception.
3.Building Materials make a difference - A solid metal door or aluminum studs may have anegativeeffect onrange.Trytoposition Access Points,andcomputerswith wireless adapters so that the signal passes through drywall or open doorways and not other materials.
4.Make sure that the device’s antenna is positioned for best reception by using the software signal strength tools included with your product.
5.Keep your product away (at least 3-6 feet or 1-2 meters) from electrical devices or appliances that may generate extreme RF noise.
For the average home, signal range should not be an issue. If you experience low or no signal strength in areas of your home that you wish to access, consider positioning the Access Point in a location directly between the computers with wireless adapters. Additional Access Points can be connected to provide better coverage in rooms where the signal does not appear as strong as desired.
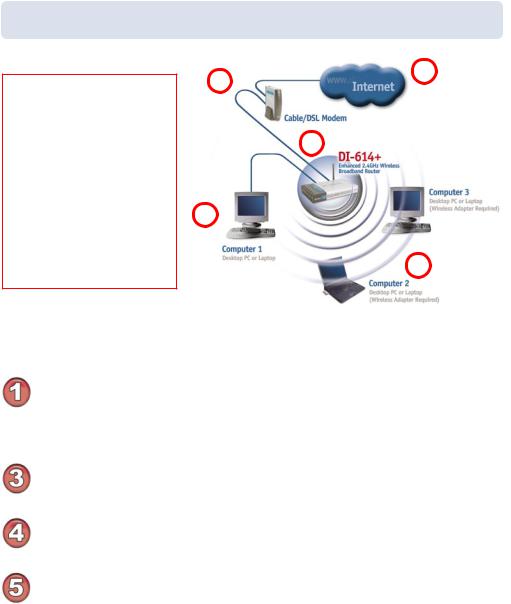
The Infrastructure Network example shown on the following page contains the following D-Link network devices:
A wireless Broadband Router - D-Link AirPlus DI-614+
A laptop computer with a Wireless Adapter - D-Link AirPlus DWL-650+ A desktop computer with a Wireless Adapter - D-Link AirPlus DWL-520+
A Cable Modem - D-Link DCM-201
8
Getting Started
With its default settings, the DI-614+, when activated, will connect with other D- Link Air or AirPlus products, right out of the box.
Please refer to the following sections of this manual for additional information about setting up a network:
Networking Basics - learn how to check and assign your IP Address; share printers and files.
Using the Configuration Menu
- learn the settings for the DI-614+,usingtheweb-based interface.
2 |
1 |
|
|
|
3 |
4
5
For a typical network setup at home (as shown above), please do the following:
You will need broadband Internet access (a Cable or DSL subscription line into your home or office).
 Consult with your Cable or DSL provider for proper installation of the modem.
Connect the Cable or DSL modem to the DI-614+ wireless broadband router (see the Quick Installation Guide included with the DI-614+).
If you are connecting a desktop computer to your network, you can install the D-Link DFE-530TX+ ethernet adapter into an available PCI slot. (See the Quick Installation Guide included with the DWL-530TX+.)
If you are connecting a laptop computer to your network, install the drivers for the Ethernet Cardbus adapter (e.g., D-Link DWL-650+) into a laptop computer.(See the Quick Installation Guide included with the DWL-650+.)
9

Using the Configuration Menu
Whenever you want to configure your network or the DI-614+, you can access the Configuration Menu by opening the web-browser and typing in the IP Address of the
DI-614+.The DI-614+ default IP Address is shown below:
Open the web browser
Type in the IP Address of the DI-614+
http://192.168.0.1
Note: if you have changed the default IP Address assigned to the DI-614+, make sure to enter the correct IP Address.
The factory default User name is admin and the default Password is blank (empty). It is recommended that you change the admin password for security purposes. Please refer to Tools>Admin to change the admin password.
Home > Wizard
The Home>Wizard screen will appear. Please refer to the
Quick Installation Guide for more information regarding the Setup Wizard.
Apply |
Clicking Apply will save changes made to the page. |
Cancel |
Clicking Cancel will clear changes made to the page. |
Help |
Clicking Help will bring up helpful information regarding the page. |
|
|
|
Clicking Restart will restart the router. (Necessary for some changes.) |
10
Using the Configuration Menu
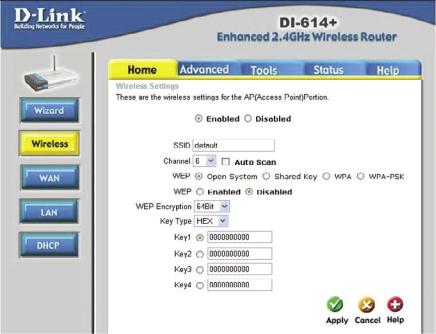
Home > Wireless
Wireless Settings are settings for the (Access Point) Portion of the Wireless Router. It allows you to change the wireless settings to fit an existing wireless network or to
customize your wireless network.
Enabled or Disabled By default, Wireless is Enabled. If you do not want to use the Wireless feature on the DI-614+, you can disable it by selecting
|
Disabled. |
SSID |
Service Set Identifier (SSID) is the name designated for a specific |
|
wireless local area network (WLAN).The SSID’s factory default |
|
setting is “default”. The SSID can be easily changed to connect |
|
to an existing wireless network or to establish a new wireless |
|
network. |
Channel
Auto Scan
Indicates the channel setting for the DI-614+. By default the channel is set to 6. The Channel can be changed to fit the channel setting for an existing wireless network or to customize the wireless network.
Click the check box to enable Auto Scan. Enabling this will allow the device to detect the best wireless channel to use.
11
Using the Configuration Menu
Home > Wireless (Continued)
WEP
Shared Key
Open System
Key Type
KEYS
Wired Equivalent Protocol (WEP) is a wireless security protocol forWireless Local Area Networks (WLAN).WEP provides security by encrypting the data that is sent over the WLAN.The DI-614+ supports 3 levels of WEP Encryption: 64Bit encryption, 128Bit encryption, and 256Bit encryption.WEP is disabled by default.The WEP setting can be changed to fit an existing wireless network or to customize your wireless network.
In this mode, in order to access the DI-614+ on the network, the device must be listed in the MAC Address Control List.
The DI-614+ will be visible to all devices on the network.This is the default setting.
The Key Types that are supported by the DI-614+ are HEX (Hexadecimal) and ASCII (American Standard Code for Information Interchange.) The Key Type can be changed to fit an existing wireless network or to customize your wireless network.
Keys 1-4 allow you to easily change wireless encryption settings to maintain a secure network.Simply select the specific key to be
used for encrypting wireless data on the network. |
12 |
|
Using the Configuration Menu
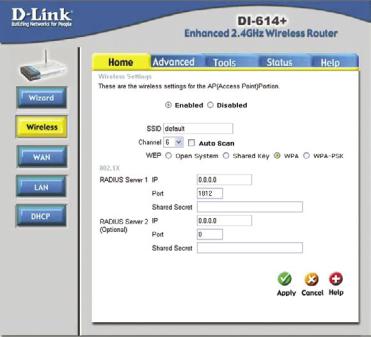
Home > Wireless > WPA
Wi-Fi Protected Access authorizes and authenticates users onto the wireless network. WPA uses stronger security thanWEP and is based on a key that changes automatically at a regular interval.This mode requires a RADIUS server in the network.
Radius Server 1
Radius Server 2
IP - Enter the IP Address of the RADIUS server.
Port - Enter the port number that your RADIUS server uses for Authentication. The default setting of 1812 is the port setting for many RADIUS servers.
Shared Secret - Enter the Shared Secret.The Shared Secret must be the same as the Shared Secret on your RADIUS server.
Optional. If you have a second RADIUS server, you will input the same information as shown above.
13

Using the Configuration Menu
Home > Wireless > WPA-PSK
Wi-Fi Protected Access - Pre-Shared Key mode means that the wireless client and the router must have the same passphrase in order to establish the wireless connection. A RADIUS server is not required with PSK.
Passphrase |
Enter a passphrase for the router.The RADIUS server should |
|
use the same passphrase (secret key) as the router. |
Confirmed PassphraseEnter the Passphrase again to confirm.
14
Using the Configuration Menu
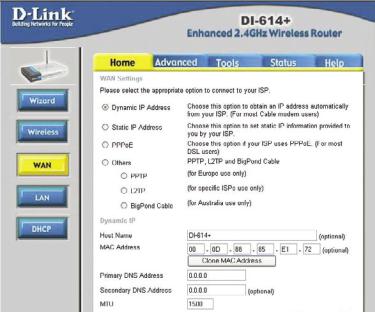
Home > WAN
Choose WAN Type
WAN stands for Wide Area Network. In this case WAN represents the mode in which you connect to the Internet.If you are uncertain, please ask your ISP which of the following
represents your connection mode to the Internet:
Dynamic
IP Address
Static IP
Address
PPP over Eth-
ernet
Others
Obtain an IP address from your ISP automatically (mainly for Cable users).
Your ISP assigns you a Static IP Address.
Some ISPs require the use of PPPoE to connect to their services (mainly for DSL users).
PPTP |
For use in Europe only. |
L2TP |
For specific ISP’s use only. |
Big Pond |
For use in Australia only. |
Cable |
|
15
Using the Configuration Menu
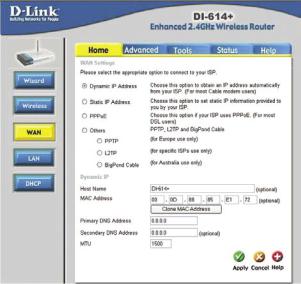
Home > WAN > Dynamic IP Address
Most Cable modem users will select this option to obtain an IP Address automatically from their ISP (Internet Service Provider).
Host Name
MAC Address
Clone
MAC Address
Primary DNS
Address
Secondary DNS
Address
MTU
This is optional, but may be required by some ISPs. The host name is the device name of the Router.
The default MAC Address is set to the WAN’s physical interface MAC address on the Router.
This feature will copy the MAC address of the Ethernet card, and replace the WAN MAC address of the Router with this Ethernet card MAC address. It is not recommended that you change the default MAC address unless required by your ISP.
Input the primary DNS address provided by your ISP
(Optional) Input the Secondary DNS address provided by your ISP.
Maximum Transmission Unit; default is 1500; you may need to change the MTU to conform to your ISP.
16
Using the Configuration Menu
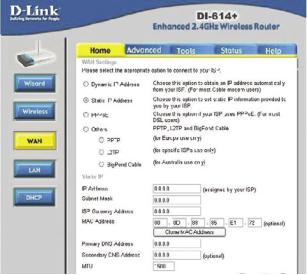
Home > WAN > Static IP Address
Choose Static IP Address if allWAN IP information is provided to you by your ISP.You will need to enter in the IP address, subnet mask, gateway address, and DNS address(es) provided to you by your ISP. Each IP address entered in the fields must be in the appropriate IP form, which are four IP octets separated by a dot (x.x.x.x).The Router will not accept the IP address if it is not in this format.
IP Address
Subnet Mask
ISP Gateway
MAC Address
Clone
MAC Address
Primary DNS
Address
Input the IP Address provided by your ISP.
Input the Subnet Mask provided by your ISP. Input the Gateway address provided by your ISP.
The default MAC Address is set to theWAN’s physical interface MAC address on the Router.
This feature will copy the MAC address of the Ethernet card, and replace theWAN MAC address of the Router with this Ethernet card MAC address.It is not recommended that you change the default MAC address unless required by your ISP.
Input the primary DNS address provided by your ISP.
Secondary DNS
Address
MTU
(Optional) Input the Secondary DNS address provided by your ISP.
Maximum Transmission Unit; default is 1500; you may need to
change the MTU to conform to your ISP.
17
Using the Configuration Menu
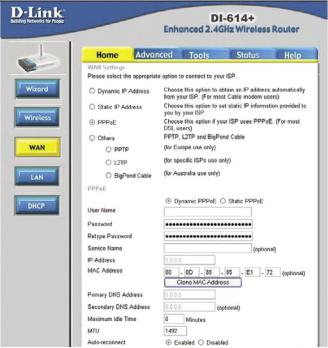
Home > WAN > PPPoE
Most DSL users will select this option to obtain an IP address automatically from their ISP through the use of PPPoE.
User Name
Password
Service Name
IP Address
MAC Address
Clone
MAC Address
Your PPPoE username provided by your ISP.
Your PPPoE password is provided by your ISP.
(Optional) Check with your ISP for more information if they require the use of service name.
(Optional) Enter in the IP Address if you are assigned a static PPPoE address.
The default MAC Address is set to the WAN’s physical interface MAC address on the Router.
This feature will copy the MAC address of the Ethernet card, and replace the WAN MAC address of the Router with this Ethernet card MAC address. It is not recommended that you change the default MAC address unless required by your ISP.
18

Using the Configuration Menu
Home > WAN > PPPoE (Continued)
Primary DNS
Address
Secondary DNS
Address
Maximum
Idle Time
MTU
Auto-reconnect
You will get the DNS IP automatically from your ISP but you may enter a specific DNS address that you want to use instead.
(Optional) Input the secondary DNS address.
Enter a maximum idle time during which Internet connection is maintained during inactivity. To disable this feature, enable
Auto-reconnect.
Maximum Transmission Unit; default is 1492; you may need to change the MTU to conform to your ISP.
If enabled, the Broadband Router will automatically connect to your ISP after your system is restarted or if the connection is dropped.
19
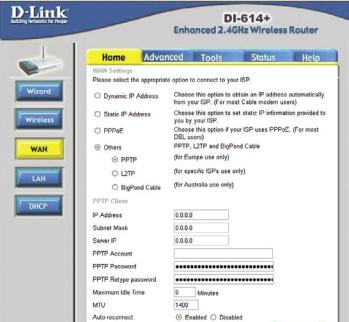
Using the Configuration Menu
Home > WAN > PPTP
Point-to-Point Tunneling Protocol (PPTP) is a WAN connection used in Europe.
IP Address
Subnet Mask
Server IP
PPTP Account
PPTP Password
Maximum
Idle Time
MTU
Auto-reconnect
Enter the IP Address.
Enter the Subnet Mask.
Enter the Server IP Address.
Enter the PPTP account name.
Enter the PPTP password.
Enter a maximum idle time during which Internet connection is maintained during inactivity. To disable this feature, enable
Auto-reconnect.
Maximum Transmission Unit; default is 1400; you may need to change the MTU to conform to your ISP.
If enabled, the Broadband Router will automatically connect to your ISP after your system is restarted or if the connection is dropped.
20
Using the Configuration Menu
Home > WAN > L2TP
Layer 2 Tunneling Protocol (L2TP) is a WAN connection.
IP Address
Subnet Mask
Server IP
L2TP Account
L2TP Password
Maximum
Idle Time
MTU
Auto-reconnect
Enter the IP Address.
Enter the Subnet Mask.
Enter the Server IP Address.
Enter the PPTP account name.
Enter the PPTP password.
Enter a maximum idle time during which Internet connection is maintained during inactivity. To disable this feature, enable
Auto-reconnect.
Maximum Transmission Unit; default is 1400; you may need to change the MTU to conform to your ISP.
If enabled, the Broadband Router will automatically connect to your ISP after your system is restarted or if the connection is dropped.
21
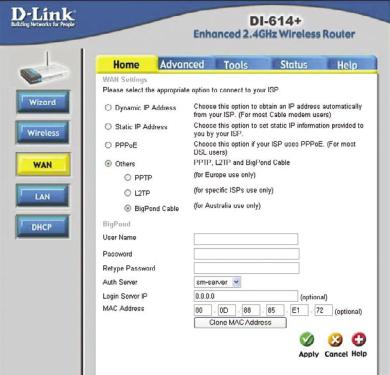
Using the Configuration Menu
Home > WAN > BigPond Cable
Dynamic IP Address for BigPond is a WAN connection used in Australia.
User Name
Password
Auth Server
Login Server IP
MAC Address
Clone
MAC Address
Enter in the username for the BigPond account.
Enter the password for the BigPond account.
Select the auth server for the BigPond account.
(Optional) Enter the Login Server name if required.
The default MAC Address is set to theWAN’s physical interface MAC address on the Router.
This feature will copy the MAC address of the Ethernet card, and replace theWAN MAC address of the Router with this Ethernet card MAC address.It is not recommended that you change the default MAC address unless required by your ISP.
22
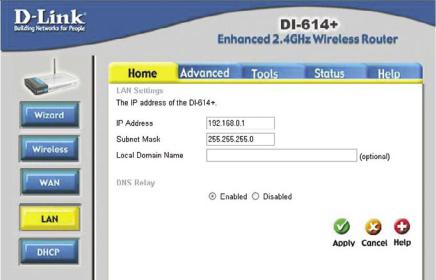
Using the Configuration Menu
Home > LAN
LAN is short for Local Area Network.This is considered your internal network.These are the IP settings of the LAN interface for the DI-614+. These settings may be referred to as Private settings.You may change the LAN IP address if needed.The LAN IP address is private to your internal network and cannot be seen on the Internet.
IP Address
Subnet Mask
Local Domain Name
DNS Relay
The IP address of the LAN interface.
The default IP address is: 192.168.0.1.
The subnet mask of the LAN interface.
The default subnet mask is 255.255.255.0.
(Optional) The name of your local domain.
You may choose to enable or disable DNS Relay. If disabled, the DNS address received on the WAN port will pass through to the LAN clients.
23
 Loading...