


 Loading...
Version 1.10 | 06/24/2013
User Manual
Broadband Cloud VPN Router
DIR-140L

Preface
D-Link reserves the right to revise this publication and to make changes in the content hereof without obligation to notify any person or organization of such revisions or changes.
Manual Revisions
Revision |
Date |
Description |
1.0 |
October 09, 2012 |
• Initial release |
|
|
|
1.10 |
June 24, 2013 |
• First revision |
|
|
|
Trademarks
D-Link and the D-Link logo are trademarks or registered trademarks of D-Link Corporation or its subsidiaries in the United States or other countries. All other company or product names mentioned herein are trademarks or registered trademarks of their respective companies.
Copyright © 2013 by D-Link Corporation.
All rights reserved. This publication may not be reproduced, in whole or in part, without prior expressed written permission from D-Link Corporation.
D-Link DIR-140L User Manual |
i |

Table of Contents
Table of Contents
Preface.................................................................................. |
i |
Manual Revisions........................................................................... |
i |
Trademarks....................................................................................... |
i |
Product Overview............................................................... |
1 |
Package Contents......................................................................... |
1 |
System Requirements.................................................................. |
2 |
Introduction.................................................................................... |
3 |
Features............................................................................................ |
4 |
Hardware Overview...................................................................... |
5 |
Back............................................................................................ |
5 |
Front........................................................................................... |
6 |
Installation.......................................................................... |
7 |
Before you Begin........................................................................... |
7 |
Wall-Mount Kit Installation........................................................ |
8 |
Hardware Setup............................................................................. |
9 |
Configuration.................................................................... |
11 |
Web Setup Wizard....................................................................... |
11 |
Web-based Configuration Utility........................................... |
16 |
Internet Connection Setup...................................................... |
17 |
Internet Connection Wizard............................................ |
17 |
Manual Internet Connection........................................... |
19 |
Static (assigned by ISP)................................................. |
20 |
Dynamic IP (DHCP)........................................................ |
21 |
PPPoE (DSL)...................................................................... |
22 |
PPTP.................................................................................... |
23 |
L2TP..................................................................................... |
24 |
3G......................................................................................... |
25 |
Dial-Up............................................................................... |
26 |
Russian PPPoE.................................................................. |
27 |
Russian PPTP.................................................................... |
28 |
Russian L2TP..................................................................... |
29 |
Network Settings......................................................................... |
30 |
VPN Settings................................................................................. |
32 |
VPN Setup Wizard................................................................ |
32 |
Dynamic IPSec VPN........................................................ |
33 |
IPSec VPN........................................................................... |
34 |
PPTP VPN........................................................................... |
35 |
L2TP VPN............................................................................ |
37 |
VPN Manual Settings......................................................... |
39 |
IPSec Settings.................................................................. |
40 |
PPTP/L2TP Settings........................................................ |
42 |
GRE Settings..................................................................... |
43 |
IPv6................................................................................................... |
44 |
Static IPv6............................................................................... |
45 |
DHCPv6................................................................................... |
46 |
PPPoE....................................................................................... |
47 |
IPv6 over IPv4 Tunneling.................................................. |
48 |
6 to 4 Tunneling................................................................... |
49 |
6rd............................................................................................. |
50 |
Link-Local Connectivity..................................................... |
51 |
Mydlink Settings.......................................................................... |
52 |
D-Link DIR-140L User Manual |
ii |

Table of Contents
Advanced.......................................................................... |
53 |
Virtual Server................................................................................ |
53 |
Application Rules........................................................................ |
54 |
QoS Engine.................................................................................... |
55 |
Network Filter............................................................................... |
57 |
Web Filter....................................................................................... |
58 |
Firewall Settings.......................................................................... |
59 |
Routing........................................................................................... |
61 |
Advanced Network..................................................................... |
62 |
IPv6 Firewall.................................................................................. |
63 |
User Group..................................................................................... |
64 |
Maintenance..................................................................... |
65 |
Admin.............................................................................................. |
65 |
SNMP............................................................................................... |
66 |
Time................................................................................................. |
67 |
SysLog............................................................................................. |
68 |
Email Settings............................................................................... |
69 |
System............................................................................................. |
70 |
Firmware......................................................................................... |
71 |
Dynamic DNS................................................................................ |
72 |
System Check............................................................................... |
73 |
Schedules....................................................................................... |
74 |
Status................................................................................. |
75 |
Device Info..................................................................................... |
75 |
Log.................................................................................................... |
76 |
Statistics.......................................................................................... |
77 |
Active Session............................................................................... |
78 |
LAN Clients.................................................................................... |
79 |
Routing........................................................................................... |
80 |
VPN................................................................................................... |
81 |
IPv6................................................................................................... |
82 |
Support............................................................................. |
83 |
Troubleshooting............................................................... |
84 |
Networking Basics............................................................ |
88 |
Check your IP address................................................................ |
88 |
Statically Assign an IP address................................................ |
89 |
Technical Specifications................................................... |
90 |
D-Link DIR-140L User Manual |
iii |

Section 1 - Product Overview
ProductPackageOverviewContents
DIR-140L Broadband Cloud VPN Router
Ethernet Cable
Power Adapter
Optional Wall-Mount Kit
If any of the above items are missing, please contact your reseller.
Note: Using a power supply with a different voltage rating than the one included with the DIR-140L will cause damage and void the warranty for this product.
D-Link DIR-140L User Manual |
1 |

Section 1 - Product Overview
System Requirements
Network Requirements |
• An Ethernet-based Cable or DSL modem |
|
• 10/100 Ethernet |
||
|
||
|
|
|
|
Computer with the following: |
|
|
• Windows®, Macintosh, or Linux-based operating system |
|
|
• An installed Ethernet adapter |
|
Web-based Configuration |
Browser Requirements: |
|
• Internet Explorer 8 or later |
||
Utility Requirements |
• Firefox 12.0 or later |
|
|
• Safari 4 or later |
|
|
• Google Chrome 20.0 or later |
|
|
Windows® Users: Make sure you have the latest version of Java |
|
|
installed. Visit www.java.com to download the latest version. |
|
|
|
D-Link DIR-140L User Manual |
2 |

Section 1 - Product Overview
Introduction
TERRIFIC VPN PERFORMANCE
For optimal VPN configuration, the DIR-140L has an integrated VPN client and server to support almost any required VPN policy. This device has a hardware VPN engine to support and manage up to 25 VPN configurations. The DIR-140L can support IPSec, PPTP, L2TP, and GRE protocols in server mode and can handle pass-through traffic as well. Advanced VPN configuration options include: DES, 3DES, and AES encryption, IKE/ISAKMP key management, Main/Aggressive Negotiation modes, and VPN authentication support using the internal 10-user database.
User Configurable Interface
The DIR-140L features an intuitive user interface that can easily be configured and monitored via D-Link’s web-based management interface.These configuration options can be managed through Admin or Read/Write administrator rights.With these access management levels, any authorized user can easily configure or access the management interface of the DIR-140L.
Use mydlink to Monitor Your Network
The Broadband Cloud VPN Router is mydlink-enabled, so you can effortlessly access and view your network no matter where you are. See who is connected to your router, change settings, or block someone from using your network connection, all from any Internet connected PC, or an iOS or Android mobile device. Home users can check on their children’s web browsing habits, and business users can manage employee Internet activity, all while staying informed and in control on the go.
Advanced Hardware Features
The DIR-140L can be connected to a cable or DSL line to share high-speed Internet access. It also doubles as a 4-port full-duplex 10/100 switch to connect up to four Ethernet-enabled devices, and you can simply add more switches to expand your wired network. In addition, you can create a Virtual Private Network (VPN) with the DIR-140L and allow up to 25 off-site or traveling users to securely access your central network through the Internet simultaneously.
TOTAL NETWORK SECURITY
The DIR-140L has a host of security features to prevent unauthorized access and utilizes dual active firewalls (SPI and NAT) to prevent potential attacks from across the Internet.
D-Link DIR-140L User Manual |
3 |

Section 1 - Product Overview
Features
•Versatile VPN Connectivity - The DIR-140L can create secure connections easily with support for up to 25 VPN tunnels and standards including IPSec, PPTP, L2TP, and GRE tunneling
•Built-In Security - The DIR-140L features a dual-active firewall that works to protect against network attacks and keep your network safe from outside threats
•Cloud Management - The DIR-140L is mydlink-enabled, which helps you manage your router from anywhere.1
•Advanced Firewall Features - The web-based user interface displays a number of advanced network management features including:
•Secure Multiple/Concurrent Sessions - The DIR-140L can pass through VPN sessions. It supports multiple and concurrent IPSec and PPTP sessions, so users behind the DIR-140L can securely access corporate networks.
•User-friendly Setup Wizard - Through its easy-to-use web-based user interface, the DIR-140L lets you control what information is accessible to those on the network, whether from the Internet or from your company’s server. Configure your router to your specific settings within minutes.
1 mydlink support available soon through a future firmware update.
D-Link DIR-140L User Manual |
4 |
Section 1 - Product Overview
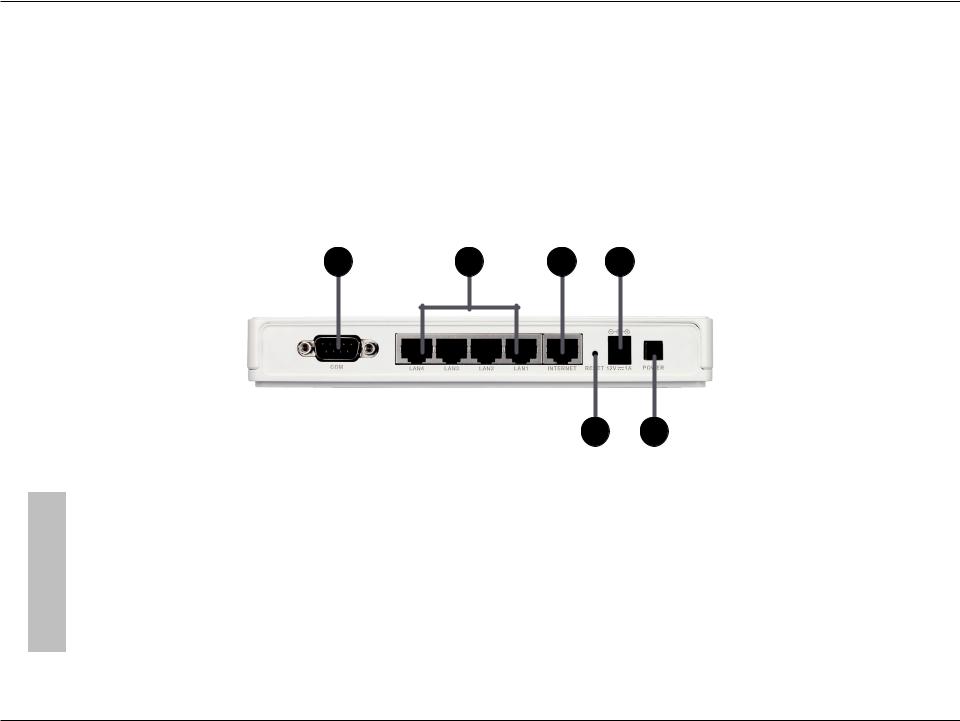
Hardware Overview
Back
1 |
2 |
3 |
5 |
4 6
1 |
COM Port |
RS-232 COM port for serial port communication and legacy device connectivity. |
|
|
|
2 |
LAN Ports (1-4) |
Connect 10/100 Ethernet devices such as computers, switches, and NAS. |
|
|
|
3 |
Internet Port |
The auto MDI/MDIX Internet port is the connection for the Ethernet cable to the cable or DSL modem. |
|
|
|
4 |
Reset Button |
Pressing the Reset button restores the router to its original factory default settings. |
|
|
|
5 |
Power Connector |
Receptor for the supplied power adapter. |
|
|
|
6 |
Power Switch |
Turns the device on/off. |
|
|
|
D-Link DIR-140L User Manual |
5 |
Section 1 - Product Overview
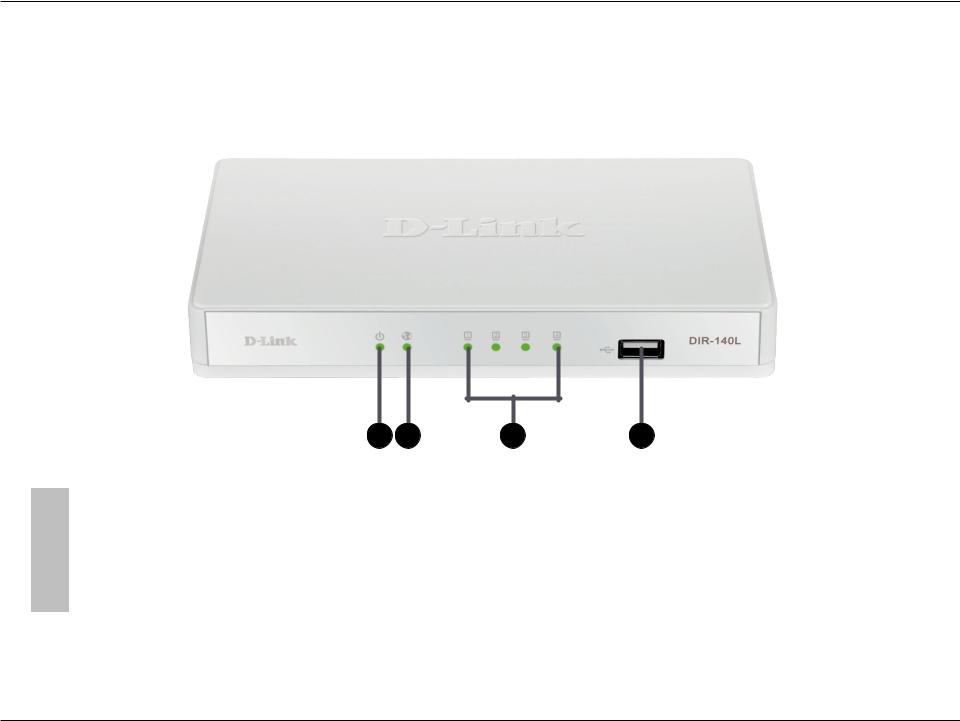
Hardware Overview
Front
1 |
2 |
3 |
4 |
1 |
Power LED |
A solid light indicates a proper connection to the power supply. |
|
|
|
|
|
2 |
Internet LED |
A solid light indicates connection on the Internet port. This LED blinks during data transmission. |
|
|
|
|
|
3 |
LAN LEDs (1-4) |
A solid light indicates a connection to an Ethernet-enabled computer on ports 1-4. This LED blinks during |
|
data transmission. |
|||
|
|
||
|
|
|
|
4 |
USB 2.0 port |
Allows you to connect 3G modems. |
|
|
|
|
D-Link DIR-140L User Manual |
6 |
Section 2 - Installation
Installation
This section will walk you through the installation process. Placement of the router is very important. Do not place the router in an enclosed area such as a closet, cabinet, or in an attic or garage.
Before you Begin
•Please configure the router with the computer that was last connected directly to your modem.
•You can only use the Ethernet port on your modem. If you were using a USB connection before using the router, then you must turn off your modem, disconnect the USB cable and connect an Ethernet cable to the Internet port on the router, and then turn the modem back on. In some cases, you may need to call your ISP to change connection types (USB to Ethernet).
•If you have DSL and are connecting via PPPoE, make sure you disable or uninstall any PPPoE software such asWinPoet, Broadjump, or Enternet 300 from your computer or you will not be able to connect to the Internet.
D-Link DIR-140L User Manual |
7 |

Section 2 - Installation
Wall-Mount Kit Installation
The wall-mount kit includes the following items:
-Two 2 cm screws
-Two screw anchors
-One attachment plate
Step 1. Align the attachment plate to your preferred position, and mark the hole positions on the wall, preferably after you locate one of the studs in the wall.
Step 2. Drill holes into the wall and insert the screw anchors where there is no stud. Check that the screw anchors are securely in place.
Step 3. Securely screw down the attachment plate on the wall.
Wall mount hole |
Wall mount hole |
|
DIR-140L |
Step 4. Hang the router on the wall by sliding the tops of the screws through the holes on the bottom of the router and then slide to lock into position. Confirm that the router is firmly in place.
D-Link DIR-140L User Manual |
8 |
Section 2 - Installation
Hardware Setup
1. Turn off and unplug your cable or DSL broadband modem. This is required.
Modem
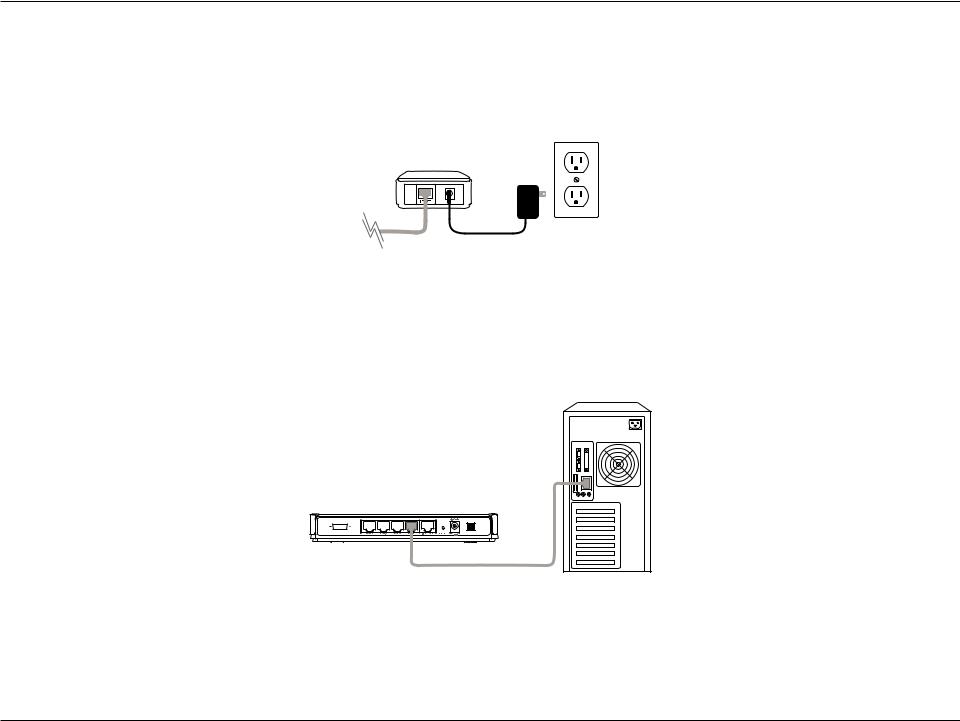
2.Unplug the Ethernet cable from your modem (or existing router if upgrading) that is connected to your computer. Plug it into the blue port labeled 1 on the back of your router. The router is now connected to your computer.
DIR-140L
COM |
POWER |
Computer |
D-Link DIR-140L User Manual |
9 |

Section 2 - Installation
4.Plug one end of the included blue Ethernet cable that came with your router into the yellow port labeled INTERNET on the back of the router. Plug the other end of this cable into the Ethernet port on your modem.
COMM |
POWER |
DIR-140L |
Modem |
5.Reconnect the power adapter to your cable or DSL broadband modem and wait for two minutes.
6.Connect the supplied power adapter into the power port on the back of the router and then plug it into a power outlet or surge protector. Press the power button and verify that the power LED is lit. Allow 1 minute for the router to boot up.
COMM |
POWER |
DIR-140L
7.If you are connecting to a Broadband service that uses a dynamic connection (not PPPoE), you may be online already. Try opening a web browser and enter a web site. If you connect, you are finished with your Internet setup. Please skip to page 13 to configure your router and use the manual setup procedure to configure your network. If you are unable to connect to the Internet, use the D-Link Setup Wizard (refer to page 15).
D-Link DIR-140L User Manual |
10 |
Section 3 - Configuration
Configuration
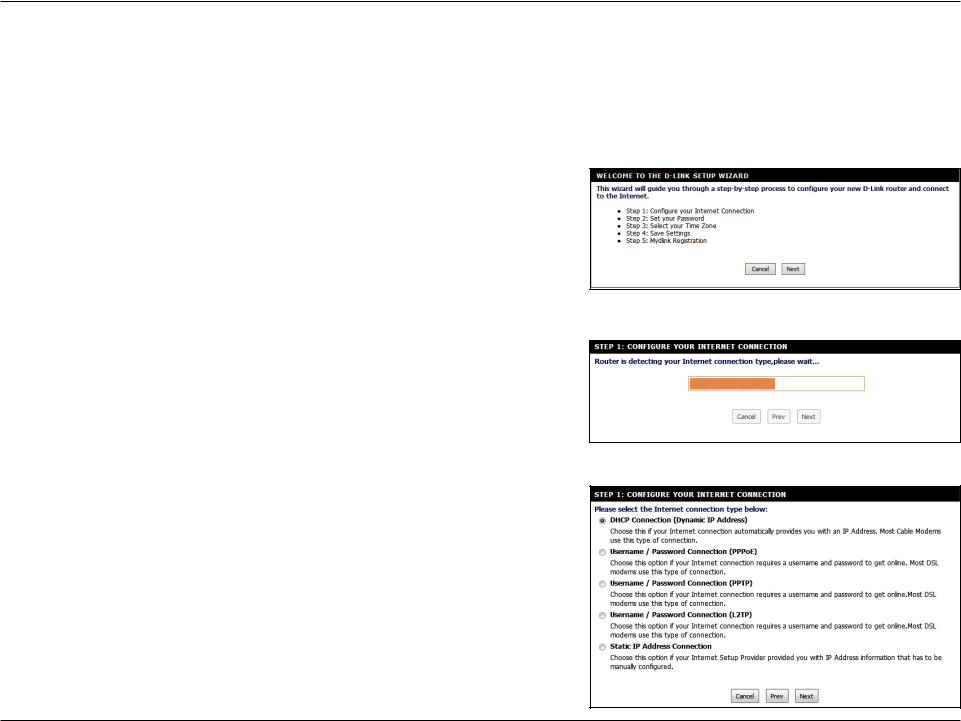
Web Setup Wizard
Open your web browser and the setup wizard will automatically launch.
Step 1: The Welcome screen will appear. Click Next to continue.
Note: Make sure to remove any PPPoE software from your computer. The software is no longer needed and will not work through a router.
Step 2: The router will automatically detect your Internet connection type.
Step 3: If the router could not automatically detect your connection type, select your connection type and click Next to continue.
D-Link DIR-140L User Manual |
11 |

Section 3 - Configuration
If you selected PPPoE, enter your PPPoE username and password. Click Next to continue.
Note: Make sure to remove your PPPoE software from your computer. The software is no longer needed and will not work through a router.
If you selected PPTP, enter your PPTP settings supplied by your ISP and your PPTP username and password. Click Next to continue.
If you selected L2TP, enter your L2TP settings supplied by your ISP and your L2TP username and password. Click Next to continue.
D-Link DIR-140L User Manual |
12 |

Section 3 - Configuration
If you selected Static, enter your network settings supplied by your Internet provider. Click Next to continue.
Step 4: Create a new password and then click Next to continue.
Step 5: Select your time zone from the drop-down menu and then click Next to continue.
D-Link DIR-140L User Manual |
13 |
Section 3 - Configuration
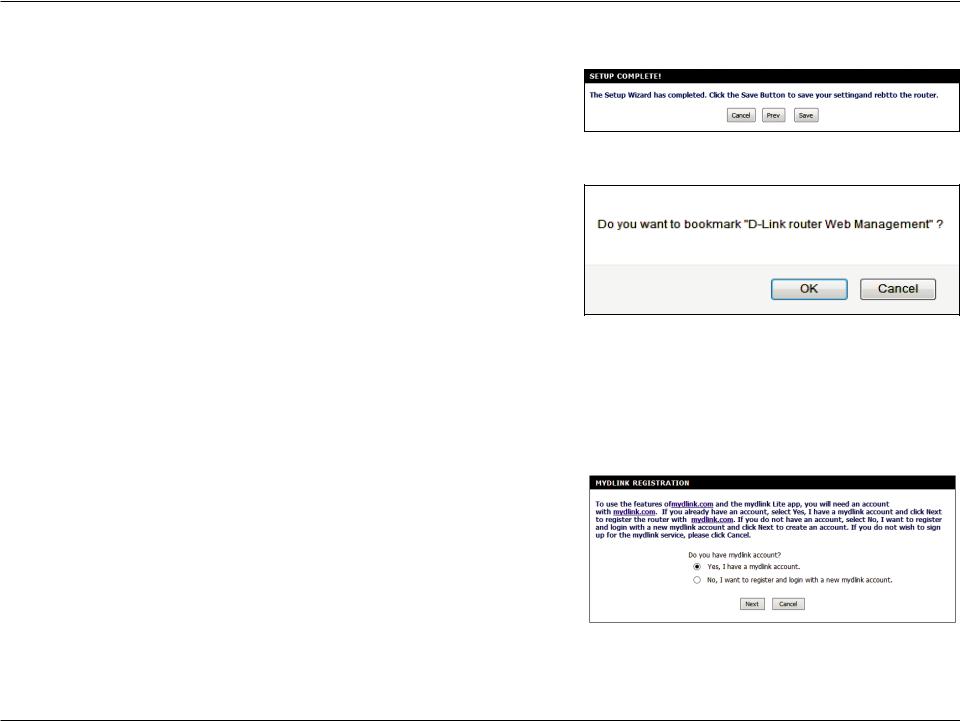
Step 6: Setup is complete. Click Save to continue.
Step 7: You may bookmark the router’s web UI by clicking OK. If you do not want to bookmark the link, click Cancel.
The router will reboot. Please allow 1-2 minutes.
Close your browser window and reopen it to test your Internet connection. It may take a few tries to initially connect to the Internet.
Step 8: Select Yes to register your router with your existing mydlink account or select No to create a new mydlink account. Click Next.
D-Link DIR-140L User Manual |
14 |

Section 3 - Configuration
Step 9: If you have an existing mydlink account, enter the required information and click Login.
If you don’t have a mydlink account, enter the required registration information and click Sign Up.
Step 10: A pop-up will appear, click OK.
D-Link DIR-140L User Manual |
15 |
Section 3 - Configuration
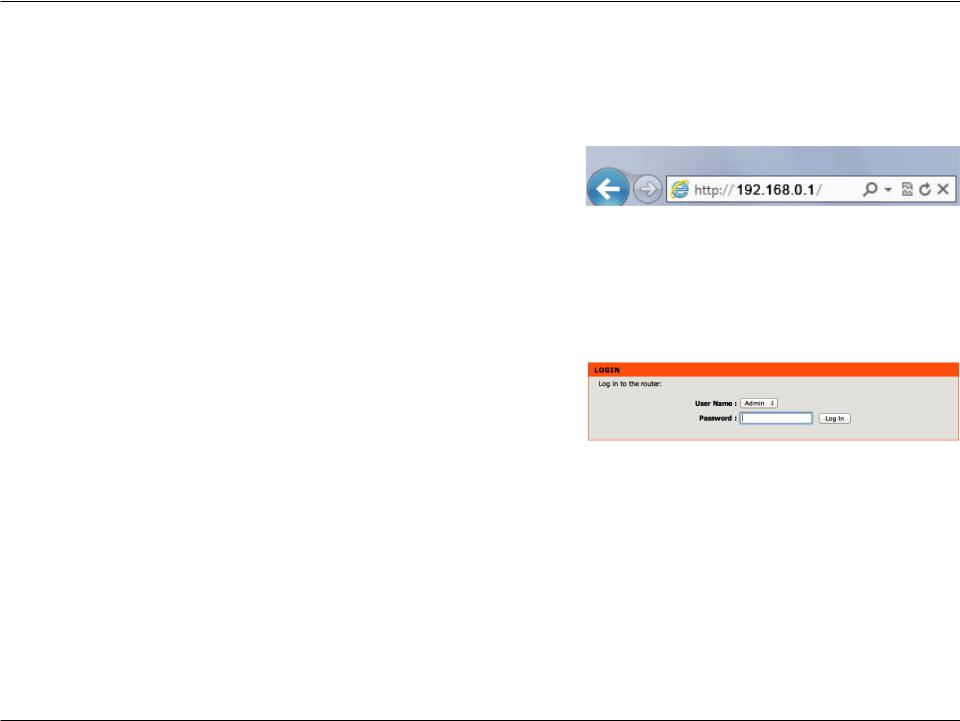
Web-based Configuration Utility
To access the configuration utility, open a web-browser such as Internet Explorer and enter the IP address of the router (http://192.168.0.1 or you can use http://dlinkrouter.local.).
Select Admin from the drop-down menu and the password should be left empty.
D-Link DIR-140L User Manual |
16 |
Section 3 - Configuration
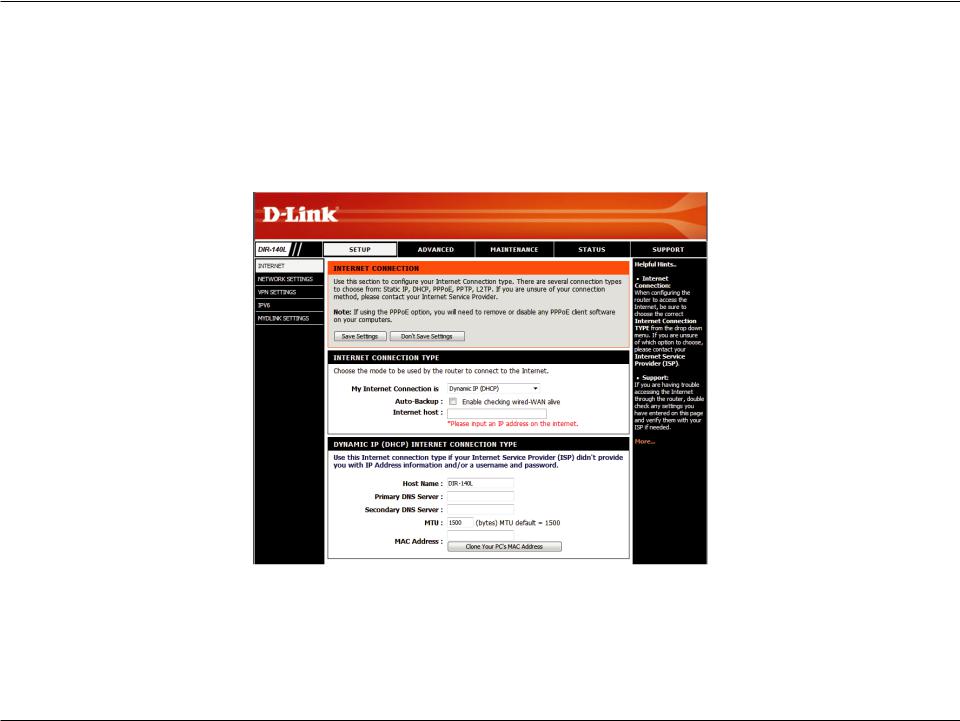
Internet Connection Setup
Use this tab to choose if you want to follow the simple steps of the Connection Setup Wizard, or if you want to set up your Internet connection manually.
Internet Connection Wizard
Click Next to begin the Setup Wizard.
D-Link DIR-140L User Manual |
17 |

Section 3 - Configuration
STEP 1: Choose a password for your device.
STEP 2: Choose the method you use to connect to the Internet, and follow the step-by-step instructions.
D-Link DIR-140L User Manual |
18 |
Section 3 - Configuration
Manual Internet Connection
Use this tab to choose either Static IP, DHCP, PPPoE, PPTP, Dial-Up, or L2TP to configure your Internet connection. You may need to get this information from your Internet Service Provider (ISP).
D-Link DIR-140L User Manual |
19 |

Section 3 - Configuration
Static (assigned by ISP)
Select Static IP address if all the Internet port’s IP information is provided to you by your ISP. You will need to enter in the IP address, subnet mask, gateway address, and DNS address(es) provided to you by your ISP. Each IP address entered in the fields must be in the appropriate IP form, which are four octets separated by a dot (x.x.x.x). The router will not accept the IP address if it is not in this format.
My Internet Select Static IP to manually enter the IP settings supplied by your ISP.
Connection Is:
Auto-Backup: Check this box to enable wired-WAN alive if you have 3G failover.
Internet host: Enter the IP address for the auto-backup host.
IP Address: Enter the IP address assigned by your ISP.
Subnet Mask: Enter the subnet mask assigned by your ISP.
Default Gateway: Enter the gateway assigned by your ISP.
DNS Servers: The DNS server information will be supplied by your ISP.
MTU: Maximum Transmission Unit - you may need to change the MTU for optimal performance with your specific ISP. 1500 is the default MTU.
MAC Address: The default MAC address is set to the Internet port’s physical interface MAC address on the broadband router. It is not recommended that you change the default MAC address unless required by your ISP. You can use the Clone Your PC’s MAC Address button to replace the Internet port’s MAC address with the MAC address of your Ethernet card.
D-Link DIR-140L User Manual |
20 |
Section 3 - Configuration
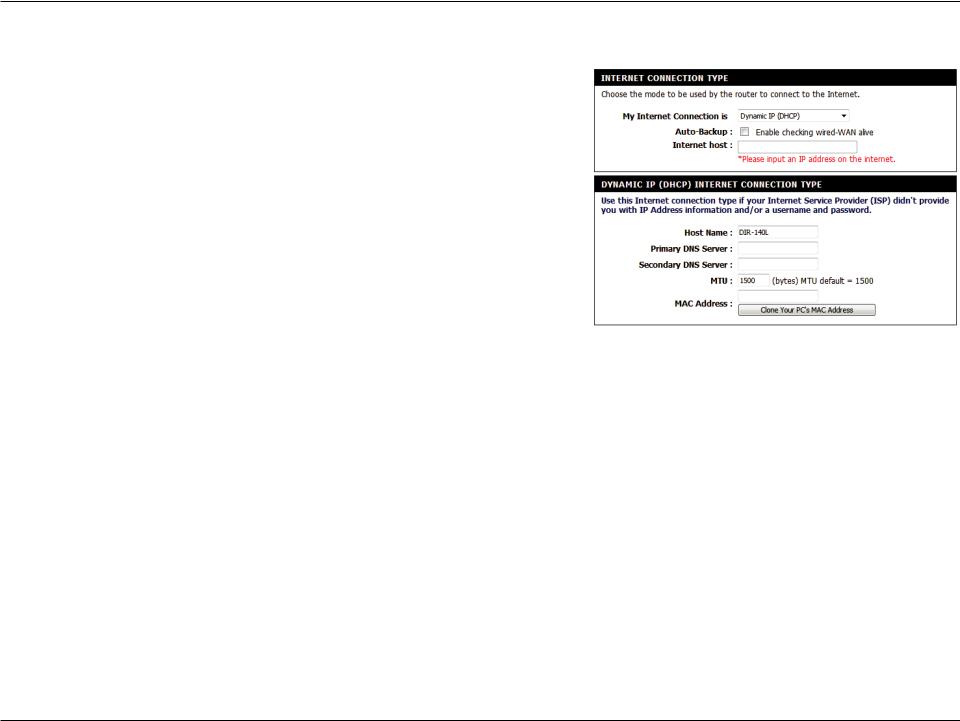
Dynamic IP (DHCP)
My Internet Select Dynamic IP (DHCP) to obtain IP address information Connection Is: automatically from your ISP. Select this option if your ISP does not give you any IP numbers to use. This option is commonly used for cable
modem services.
Auto-Backup: Check this box to enable wired-WAN alive if you have 3G failover.
Internet host: Enter the IP address for the auto-backup host.
Host Name: The host name is optional but may be required by some ISPs. Leave blank if you are not sure.
Primary/Secondary Enter the primary and secondary DNS server IP addresses assigned DNS Server: by your ISP. These addresses are usually obtained automatically from
your ISP. Leave at 0.0.0.0 if you did not specifically receive these from your ISP.
MTU: Maximum Transmission Unit - you may need to change the MTU for optimal performance with your specific ISP. 1500 is the default MTU.
MAC Address: The default MAC address is set to the Internet port’s physical interface MAC address on the broadband router. It is not recommended that you change the default MAC address unless required by your ISP. You can use the Clone Your PC’s MAC Address button to replace the Internet port’s MAC address with the MAC address of your Ethernet card.
D-Link DIR-140L User Manual |
21 |
Section 3 - Configuration
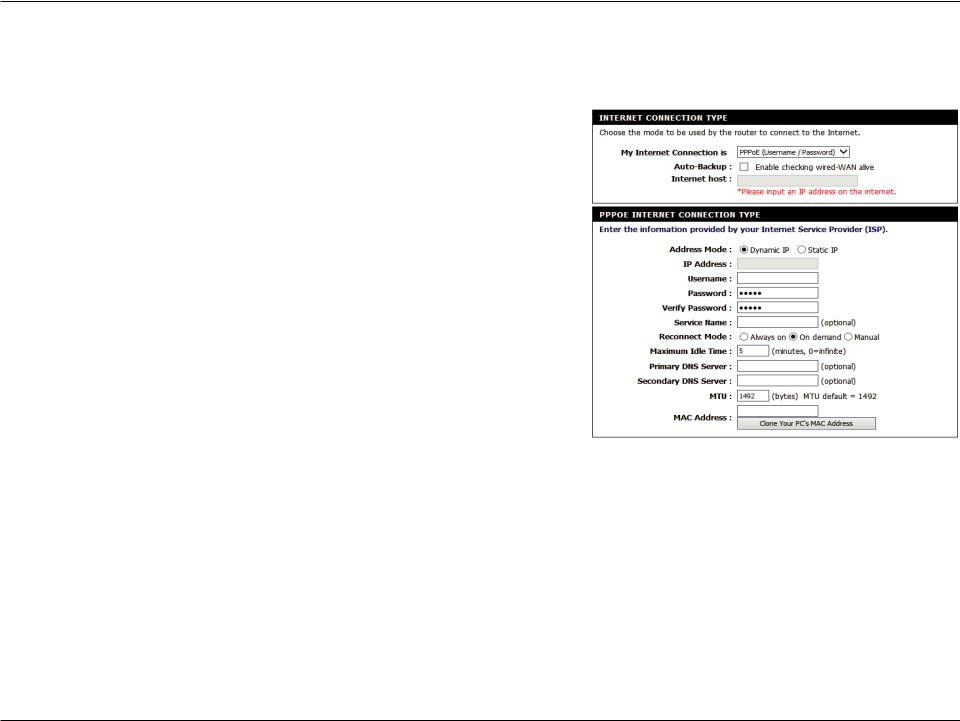
PPPoE (DSL)
Choose PPPoE (Point to Point Protocol over Ethernet) if your ISP uses a PPPoE connection. Your ISP will provide you with a username and password. This option is typically used for DSL services. Please be sure to remove any PPPoE software from your computer.
My Internet Select PPPoE (Username/Password) from the drop-down menu.
Connection Is:
Auto-Backup: Check this box to enable wired-WAN alive if you have 3G failover.
Internet host: Enter the IP address for the auto-backup host.
Address Mode: Select Static IP if your ISP assigned you the IP address, subnet mask, gateway, and DNS server addresses. In most cases, select Dynamic.
IP Address: Enter the IP address (Static PPPoE only).
User Name: Enter your PPPoE user name.
Password: Enter your PPPoE password and then retype the password in the next box.
Service Name: Enter the ISP service name (optional).
Reconnect Select either Always-on, On-Demand, or Manual.
Mode:
Maximum Idle Enter a maximum idle time during which the Internet connection is maintained during inactivity. To disable this feature, enable Time: auto-reconnect.
DNS Addresses: Enter the primary and secondary DNS server addresses (Static PPPoE only).
MTU: Maximum Transmission Unit - you may need to change the MTU for optimal performance with your specific ISP. 1492 is the default MTU.
MAC Address: The default MAC address is set to the Internet port’s physical interface MAC address on the broadband router. It is not recommended that you change the default MAC address unless required by your ISP. You can use the Clone Your PC’s MAC Address button to replace the Internet port’s MAC address with the MAC address of your Ethernet card.
D-Link DIR-140L User Manual |
22 |
Section 3 - Configuration
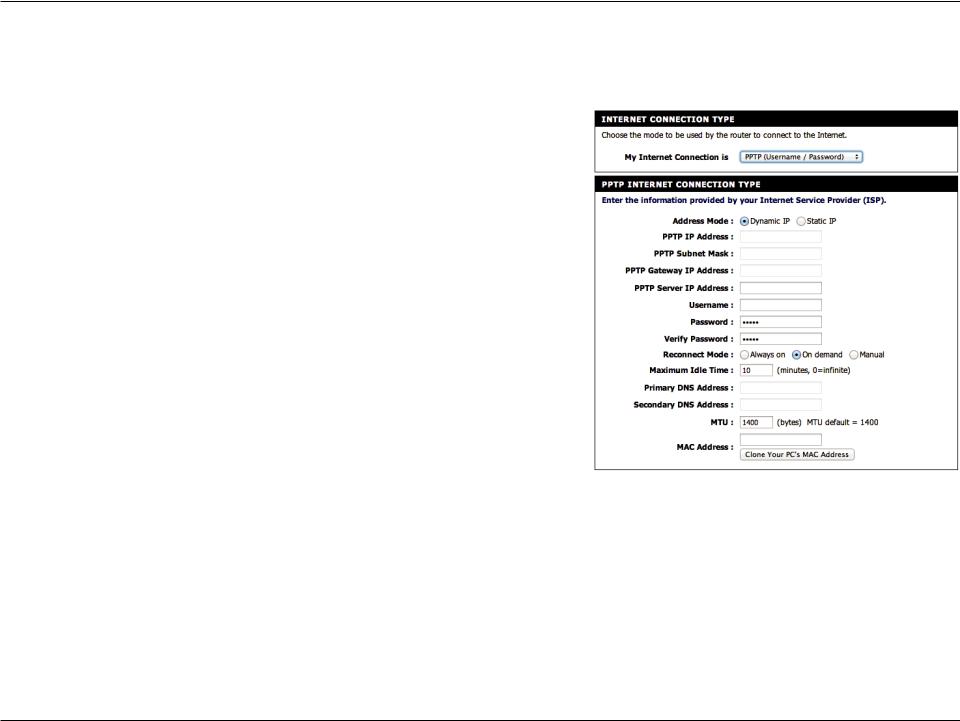
PPTP
Choose PPTP if your ISP uses a PPTP connection. Your ISP will provide you with a username and password.
My Internet Select PPTP from the drop-down menu.
Connection Is:
Address Mode: Select Static IP if your ISP assigned you the IP address, subnet mask, gateway, and DNS server addresses. In most cases, select Dynamic.
PPTP IP Address: Enter the IP address for your PPTP connection.
PPTP Subnet Mask: Enter your PPTP subnet mask.
PPTP Gateway IP Enter the gateway IP address for your PPTP connection.
Address:
PPTP Server IP Enter the server IP address for your PPTP connection.
Address:
User Name: Enter your PPTP user name.
Password: Enter your PPTP password and then retype the password in the next box.
Reconnect Mode: Select either Always-on, On-Demand, or Manual.
Maximum Idle Enter a maximum idle time during which the Internet connection is maintained during inactivity. To disable this feature, enable Time: auto-reconnect.
DNS Addresses: Enter the primary and secondary DNS server addresses (Static PPTP only).
MTU: Maximum Transmission Unit - you may need to change the MTU for optimal performance with your specific ISP. 1492 is the default MTU.
MAC Address: The default MAC address is set to the Internet port’s physical interface MAC address on the broadband router. You can use the Clone Your PC’s MAC Address button to replace the Internet port’s MAC address with the MAC address of your Ethernet card.
D-Link DIR-140L User Manual |
23 |
Section 3 - Configuration
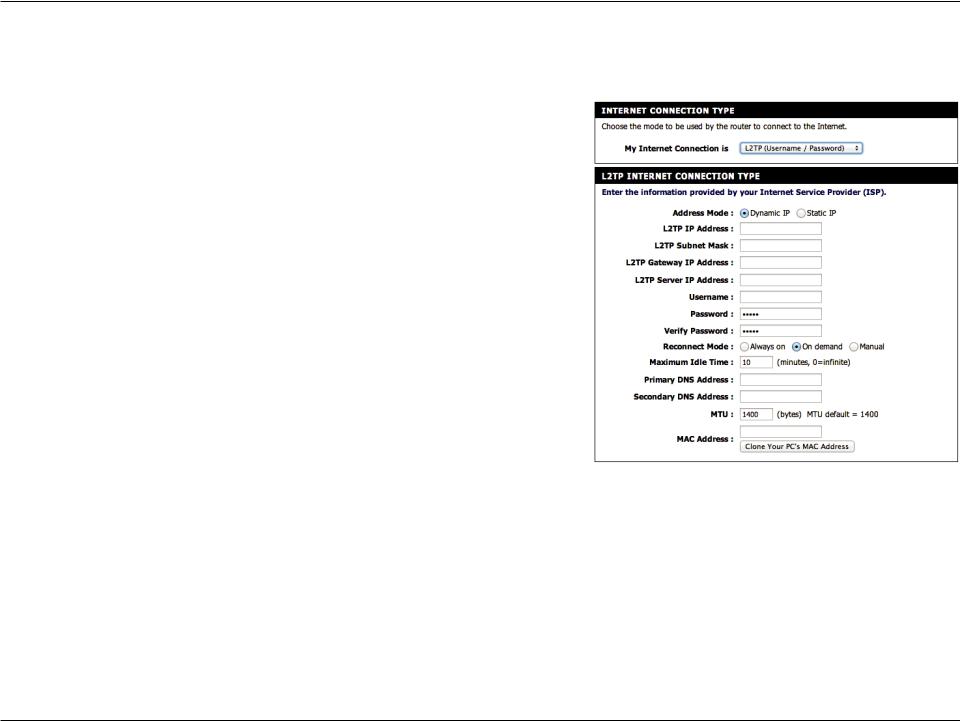
L2TP
Choose L2TP if your ISP uses a L2TP connection. Your ISP will provide you with a username and password.
My Internet Select L2TP from the drop-down menu.
Connection Is:
Address Mode: Select Static IP if your ISP assigned you the IP address, subnet mask, gateway, and DNS server addresses. In most cases, select Dynamic.
PPTP IP Address: Enter the IP address for your L2TP connection.
PPTP Subnet Mask: Enter your L2TP subnet mask.
PPTP Gateway IP Enter the gateway IP address for your L2TP connection.
Address:
PPTP Server IP Enter the server IP address for your L2TP connection.
Address:
User Name: Enter your L2TP user name.
Password: Enter your L2TP password and then retype the password in the next box.
Reconnect Mode: Select either Always-on, On-Demand, or Manual.
Maximum Idle Enter a maximum idle time during which the Internet connection is maintained during inactivity. To disable this feature, enable Time: auto-reconnect.
DNS Addresses: Enter the primary and secondary DNS server addresses (Static L2TP only).
MTU: Maximum Transmission Unit - you may need to change the MTU for optimal performance with your specific ISP. 1492 is the default MTU.
MAC Address: The default MAC address is set to the Internet port’s physical interface MAC address on the broadband router. You can use the Clone Your PC’s MAC Address button to replace the Internet port’s MAC address with the MAC address of your Ethernet card.
D-Link DIR-140L User Manual |
24 |
Section 3 - Configuration
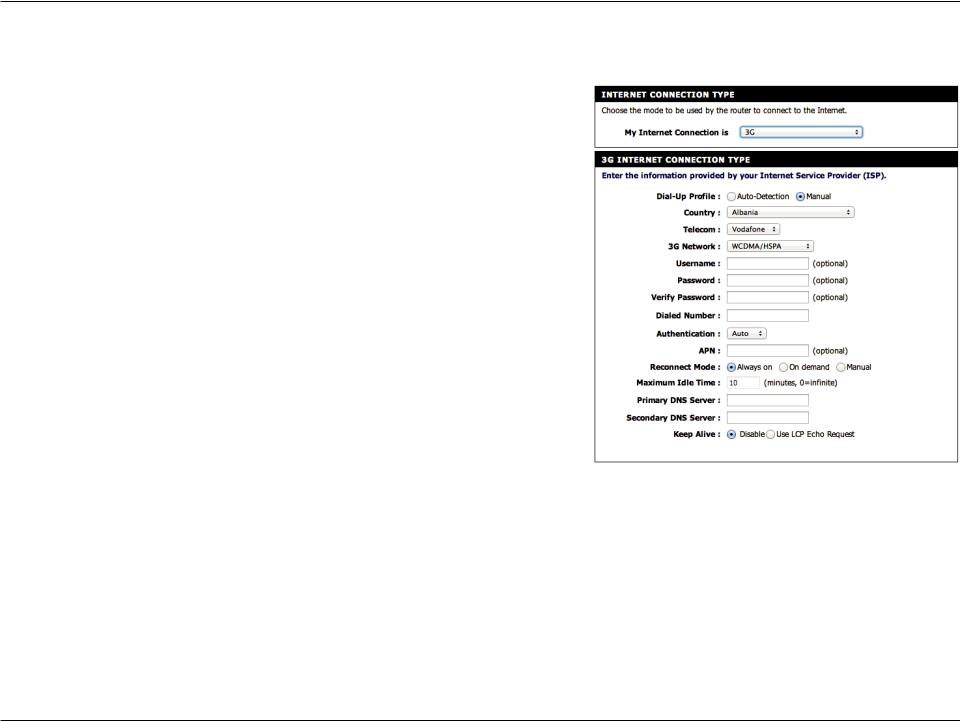
3G
Choose 3G if you are connection from a mobile wireless network with an ISP that uses a 3G connection.
My Internet Select 3G from the drop-down menu.
Connection Is:
Dial-Up Profile: In most cases you can choose Auto-Detection to get a connection.
Otherwise choose Manual and personalize the settings below.
Country: Choose the country where you get 3G service from the drop-down menu.
Telecom Choose your mobile service provider from the drop-down menu.
3G Network: Choose the type of 3G network you have from the drop-down menu.
User Name: Enter your 3G network user name, this is not always required by your ISP.
Password: Enter your 3G network password and then retype the password in the next box. This is also not always required by your ISP.
Dialed Number: Enter the number your ISP gave you to dial for a connection.
Authentication: Choose the type of authentication need to connect or use auto detection.
APN: If your ISP has given you an Access Point Name to use for your connectivity, you may enter it here.
Reconnect Mode: Select either Always-on, On-Demand, or Manual.
Maximum Idle Enter a maximum idle time during which the Internet connection is maintained during inactivity. To disable this feature, enable Time: auto-reconnect.
DNS Addresses: Enter the primary and secondary DNS server addresses.
Keep Alive: To prevent inactivity from assuming a dropped connection you can select LCP Echo Request to request frequent pings to maintain communication. This is disabled by default.
D-Link DIR-140L User Manual |
25 |
Loading...