


5751009900 17-04-2003 15:07 Pagina 1
PAC 10
Use and maintenance manual . . . . . . . . . .page 4
Mode d’emploi et d’entretien . . . . . . . . . .page 16
Instrucciones de uso . . . . . . . . . . . . . . .página 28
Istruzioni per l’uso . . . . . . . . . . . . . . . . .pagina 40
5751009900 17-04-2003 15:07 Pagina 2
Dear Customer,
Thank you for purchasing an appliance made by De’ Longhi, the international leader in portable air conditioning units. Thanks to our years of experience all around the world we are constantly improving the quality and performance of Pinguino.
We are confident that you will be satisfied with your purchase and enjoy cool comfort created by the Pinguino for many years to come.
You should spend some time reading this instruction manual and keep it handy to refer to in order to use your Pinguino of maximum efficiency and peace of mind.
Chère Cliente, Cher Client,
Nous vous remercions d’avoir choisi un produit De’Longhi, le plus important fabricant mondial de climatiseurs portables. Des années d’expérience dans le monde entier nous permettent d’améliorer constamment la qualité et les performances de Pinguino.
Nous sommes certains que vous serez immédiatement satisfait de votre achat et que vous profiterez pendant longtemps de la fraîcheur et du bien-être que Pinguino cré.
Nous vous prions de bien vouloir consacrer un peu de temps à la lecture de ce mode d’emploi et de le conserver soigneusement. Ses conseils vous permettront d’obtenir les meilleurs résultats de votre Pinguino en toute sécurité.
Estimado Cliente
Le agradecemos por haber elegido un producto De’ Longhi, líder mundial en la fabricación de los acondicionadores portátiles. Años de experiencia en todo el mundo nos permiten mejorar constantemente la calidad y las prestaciones de Pingüino.
Estamos seguros que quedará inmediatamente satisfecho de su compra y que gozará por largo tiempo el fresco bienestar que da Pingüino.
Le pedimos que dedique un poco de su tiempo a la lectura de este manual de instrucciones y de guardarlo con cuidado. De este modo, podrá usar Pingüino en condiciones de máxima eficacia y serenidad.
Gentile Cliente
la ringraziamo per aver scelto un prodotto De’ Longhi, il più importante produttore mondiale di condizionatori portatili. L’esperienza di anni di lavoro in tutto il mondo ci ha permesso di migliorare la qualità e le performaces del nostro Pinguino. Siamo certi che sarete soddisfatti del Vostro acquisto e potrete beneficiare per molti anni del comfort creato dal Pinguino. Vi consigliamo di leggere questo libretto e di tenerlo a portata di mano in modo da ottenere i migliori risultati dal Vostro Pinguino.
ENGLISH

5751009900 17-04-2003 15:07 Pagina 3
De s c r i p t i o n • De s c r i p t i o n • De s c r i p t c i ó n • De s c r i z i o n e
1
|
4 |
|
2 |
|
|
|
5 |
|
|
6 |
|
|
7 |
|
|
* |
|
3 |
10 |
|
8 |
||
|
||
|
9 |
* serial plate * plaquette des données * etiqueta de calsificación * targa caratteristiche
CONTROL PANEL • PANNEAU DE COMMANDE • TABLERO DE MANDOS • PANNELLO COMANDI
11 |
12 |
13 |
15 |
|
|||
|
|
||
|
|
14 |
|
ACCESSORY-SET • ACCESSOIRES • ACCESORIOS • ACCESSORI
16 |
18 |
19 |
17 |
|
|
20 |
21 |
22 |
5751009900 17-04-2003 15:07 Pagina 4
Important Safeguards
When using electrical appliances, basic safety precautions should always be taken, with particular reference to the following:
-Read all instructions.
-To protect against fire, electric shock and personal injury, do not immerse cable, plug or appliance in water or other liquid.
-Close supervision is necessary when any appliance is used by or near children.
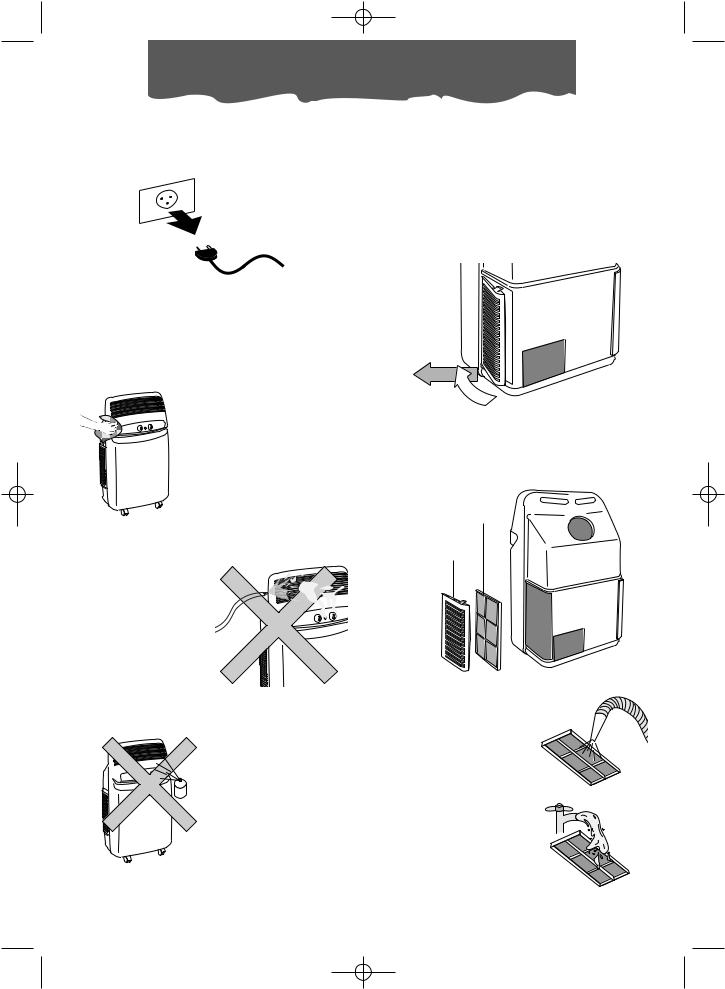
-Unplug from socket when not in use and before cleaning.
-Do not operate if the cord, plug or unit itself is damaged or faulty. Return the appliance to the nearest authorized De’Longhi service center for examination, repair or adjustment.
-The use of accessories or spare parts other than those recommended by the manufacturer may result in fire, electric shock or personal injury.
-Do not use outdoors.
-Do not use the appliance in ways other than that for which it was intended.
-Do not place the power cord under strain. Avoid twisting and/or tangling.
-Ensure that the outlet of the discharge hose is kept free from debris and blockages.
-Do not obstruct the ventilation holes at the rear of the unit or the front grilles.
-The Pinguino should not be installed where there may be combustible gases in the atmosphere.
-Avoid using Pinguino in oily or sulphurous atmospheres or near sources of heat.
-Before moving the air conditioner, empty water from condensation tray.
-Do not place hot or heavy objects on the unit.
-Clean air filter every week.
-To disconnect, turn control to “OFF”, then unplug from wall socket.
-Important: if an extension is required, use heavy duty cable only (minimum 14 gauge).
SAVE THESE INSTRUCTIONS
DESCRIPTION |
14 full tank light |
|
1 |
air outlet |
15 termostat control knob |
2 |
control panel |
16 door bracket |
3 |
wheels |
17 window bracket |
4 |
coupling |
18 stopper |
5 |
timer |
19 exhaust hose |
6 |
cord wrap |
20 window nozzle |
7 |
air intake |
21 suction cups |
8 |
condensation collection tank |
22 blocking devices |
9drainage hose
10power cord
11function control knob
12power light
13cool/dehumidify light
4
5751009900 17-04-2003 15:07 Pagina 5
W h at i s P i n g u i n o
During the summer, optimum comfort is achieved with a temperature of between 75 and 80˚F and about 50% relative humidity.
An air conditioner removes moisture and heat from the room where it is located. One advantage of portable air conditioning units over fitted models is that they can be moved from one room to another in the home or even transferred between different buildings.
The hot air in your room is passed through a coil cooled by refrigerant gas, losing excess heat and moisture before being discharged again into the
room.
In Pinguino, a small part of this air is used to cool the refrigerant gas before, hot and moist, being discharged outside.
Each Pinguino can also be used as a fan only.
For more details, contact:
DE’LONGHI AMERICA INC.
Tel: 1-800-322-3848
DE’LONGHI CANADA tel. (888) 335-6644
or visit our Internet site www.delonghiusa.com
for general overlook of DE’LONGHI group visit: www.delonghi.com
ENGLISH
5
5751009900 17-04-2003 15:07 Pagina 6
S e t t i n g u p
The following instructions will help you set up your air conditioning unit as efficiently as possible.
AIR CONDITIONING WITHOUT INSTALLATION
With just a few simple operations, Pinguino will restore comfortable conditions in your room:
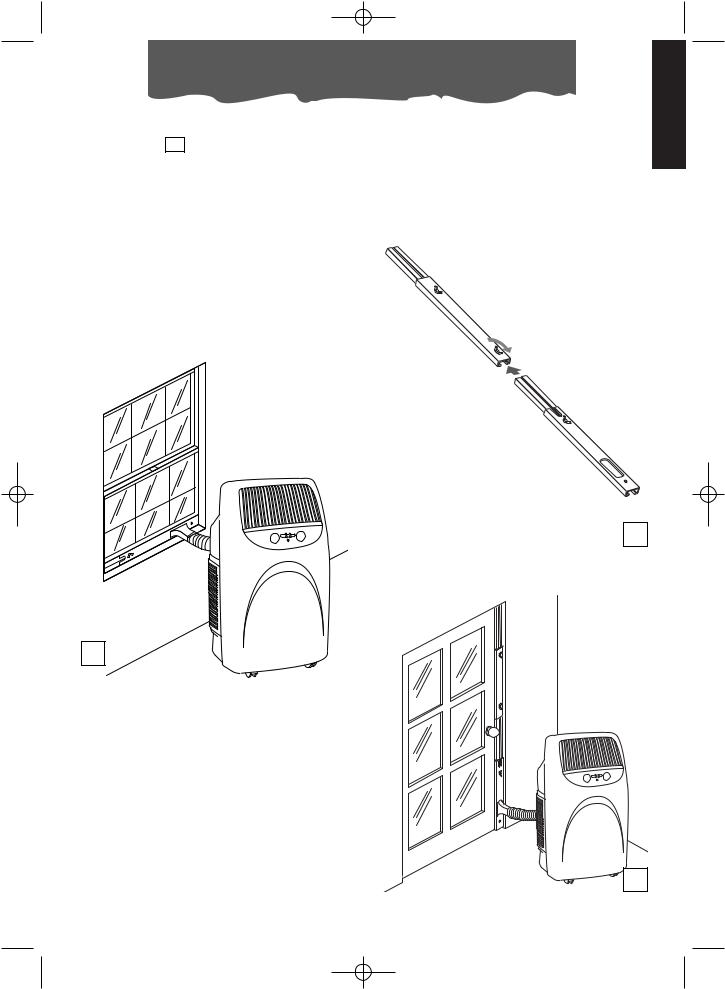
• Fit the air outlet tube 19 to the coupling
4 on the back of the unit as shown in fig-
ure A.
•With a double casement window, use the suction cups 21 provided to hold the two halves of the window together (fig. C).
C
A
•Fit the window attachment 20 to the end of the tube 19 .
•Place the unit near a window or a French window.
•Open the window or French window slightly and place the window attachment 20 as shown in figure B.
B
6
5751009900 17-04-2003 15:07 Pagina 7
S e t t i n g u p
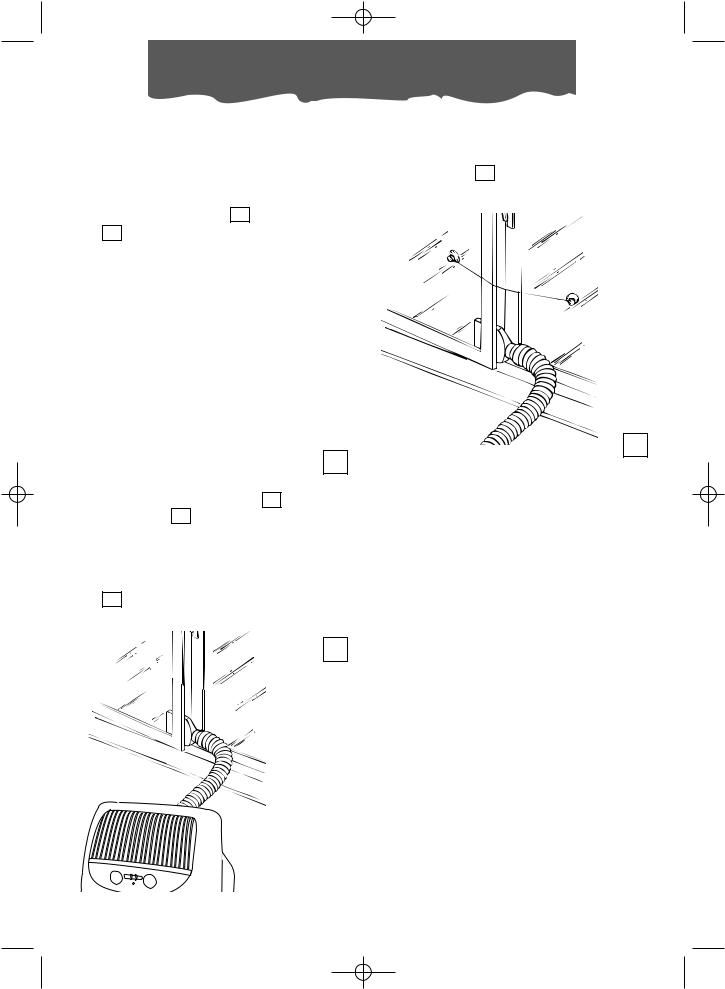
Pinguino is equipped with an adjustable window bracket 17 . If you have a sliding window, place the bracket on the window sill, extend the bracket fully within the window frame and lower the window onto the bracket. Insert the nozzle of the exhaust hose into the slot, then connect the hose to the air conditioner (Fig. D).
Thanks to the wing nut, it’s possible to use the window bracket also for sliding windows. Position the hole of the bracket to allow a correct installation of the exhaust hose (see the following instructions).
If you have a sliding door, use the additional set provided in order to extend the accessory to the desired length; joining the two parts (fig. E), adjust the total length according to your needs then, fit the bracket with the relevant nuts, close the door and connect the hose (fig. F).
E
D
F
ENGLISH
7
5751009900 17-04-2003 15:07 Pagina 8
S e t t i n g u p
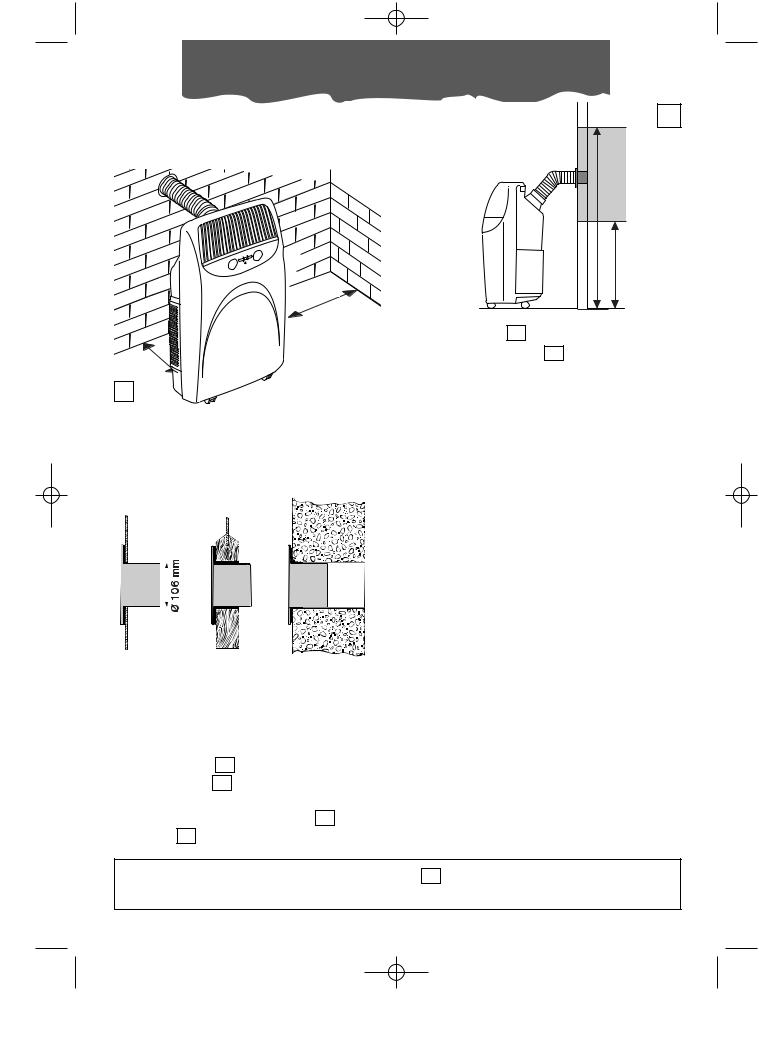
AIR CONDITIONING WITH INSTALLATION
Pinguino can also be semi-permanently installed (fig. G).
1230inchm.
12 inch.
30 cm
G
To install, proceed as follows:
•Make a hole in a wall that goes through to the outside or through the pane of a window. Respect the height and dimensions given in figures H and I.
I
MAX11546 inchcm .
MIN 5020 cminch.
When the tube 19 is not attached, close the
hole with the stopper 18 .
NOTE:
When the unit is installed semi-permanently, we recommend leaving a door slightly open (0.5 in. ‘1 cm’ is enough) to ensure an adequate exchange of air.
|
|
|
|
ø 4,18 inches |
|
|
|
|
|
|
|
|
|
||
|
|
|
|
|
|
||
|
|
|
|
|
|||
in a window |
in the |
in the |
wall: for |
||||
pane |
wood sill |
optimum results, |
|||||
|
|
|
|
|
of a win- |
insulate the sec- |
|
|
|
|
|
|
dow |
tion of the wall |
|
|
|
|
|
|
|
with |
suitable |
H |
|
|
|
insulating mater- |
|||
|
|
|
|
|
|
ial. |
|
|
|
|
|
|
|
|
|
• Fit the flange 18 supplied to the hole.
•Fit the tube 19 to the coupling on the back of the unit (figure A, page 6).
•Attach the end of the tube 19 to the flange 18 as shown in the figure I.
The unit must only be used with the air outlet tube 19 provided. Failure to observe the set up
and use procedures specified in this manual absolves the manufacturer from all liability.
8
5751009900 17-04-2003 15:07 Pagina 9
Turning on and programming the unit
CONNECTING TO THE MAIN ELECTRIC SUPPLY AND TURNING THE UNIT ON
1. Before plugging the unit into the socket, check that:
•the main electric voltage corresponds to the value indicated on the rating plate on the back of the unit;
• the socket and power cord 10 are adequate for the voltage required;
•the socket is the right type for the plug, otherwise have the socket replaced;
•the socket is effectively grounded. Failure to observe this safety regulation absolves the manufacturer from all liability.
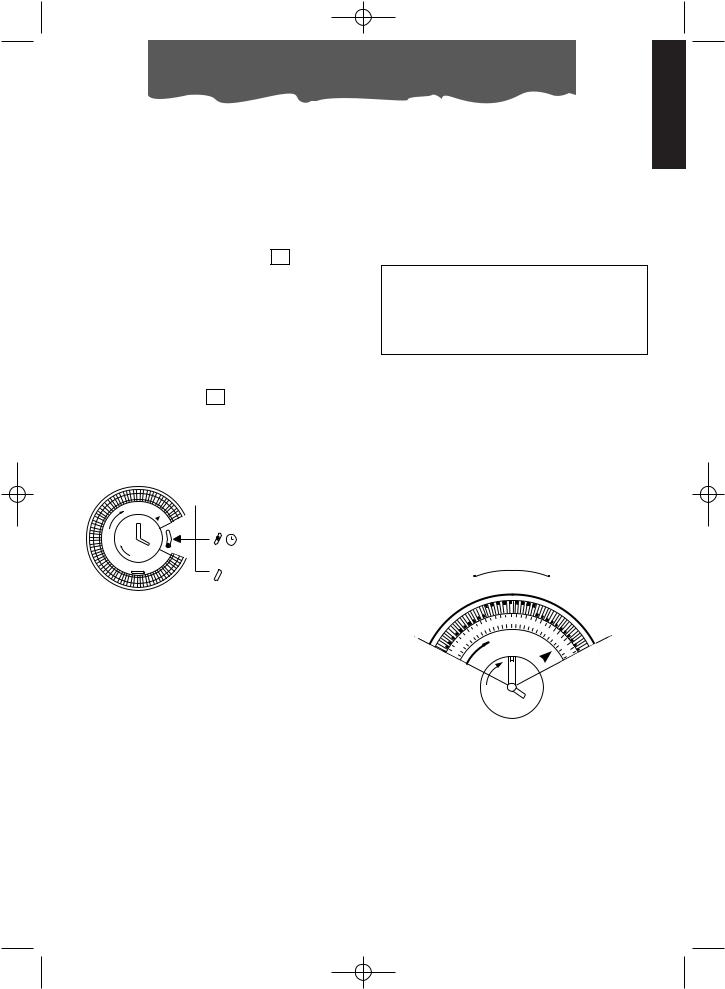
2. Before setting the required function, check that the timer switch 5 is on “ I “ (manual).
If you want to use the timer, turn the switch to the intermediate position  .(timer on).

 MANUALEI
12
1
9
0
6
 STOPSTOP
TIMER: SETTING THE TIME
As with all clocks, the programmer/timer must be set to the right time. If it is 4:00 p.m., rotate the pointers clockwise (follow the direction of the arrow) until you reach 4:00 p.m.
Note: never rotate the timer dial in a counterclockwise direction.
The timer is an electric clock and only works while the unit is connected to the outlet. When it is unplugged or there is no electricity, the timer stops (the clock is “slow”) and must be re-set.
TIMER: PROGRAMMING
1)Set the times when the unit will function by pushing the notches in the required interval towards the outside (each notch represents 15 minutes).
2)Check that the timer indicates the exact time (see setting the time).
3)Choose the required function according to the instructions on the following page.
Period of operation
ENGLISH
When the timer’s on the “0” (POWER OFF) position, the appliance doesn’t work.
9
8
12
7
4
Example: from 7:00 p.m. to 9:00 p.m.
In this mode, the unit will repeat the set program every day.
Note: It is not necessary to modify the program to exclude “timer” operation. Just turn the switch to “ I “ (manual).
9
5751009900 17-04-2003 15:07 Pagina 10
S e l e c t i n g f u n c t i o n s
AIR CONDITIONER
With the unit turned off, the function selector
11 is in the “O” position. To turn the unit on in air conditioning mode, proceed as follows:
1.Rotate the function selector knob clockwise:
• Place the large crystal symbol in line with the reference mark to operate the unit in air conditioning mode at maximum fan speed.
•Place the small crystal symbol  in line with the reference mark to operate the
unit in air conditioning mode at minimum fan speed.
2.Now set the required temperature by rotating the room thermostat knob.
Note
The temperature is not expressed in degrees. We therefore recommend rotating the room
thermostat knob 15 to the maximum cool position. When room temperature has reached the required level, rotate the thermostat knob slowly clockwise until the thermostat is activated, turning the unit off. This programs the unit to the precise level of comfort required which will then be automatically maintained by the thermostat with considerable energy savings. When regulating the thermostat, the air conditioning function is temporarily interrupted and the unit continues to operate in fan only mode.
HOW TO DEHUMIDIFY
When the appliance is working as an air conditioner, it automatically reduces the excess humidity in the air present in the room. This is
eliminated through the exhaust tube 19 .
If only the elimination of the excess humidity in the room is desired without lowering the temperature, simply turn the function selector knob in a clockwise direction until the
 symbol is reached. The excess condensed humidity automatically gathers in the tank
8 . It is also possible to carry out continuous drainage of the condensed humidity, following the instructions aside.
DEHUMIDIFICATION ONLY
Position the appliance in the room without inserting the tube; in this way the dehumidified air will exhaust directly into the room.
Note
In the dehumidifying mode, air colder than the room temperature will exhaust from the air exhaust grill. Conversely, air warmer than room temperature will be exhausted from the coupling 4 on the back side of the appliance.
TO TURN THE UNIT OFF COMPLETELY, SET THE FUNCTION SELECTOR 11 TO THE “O” POSITION AND UNPLUG FROM THE SOCKET.
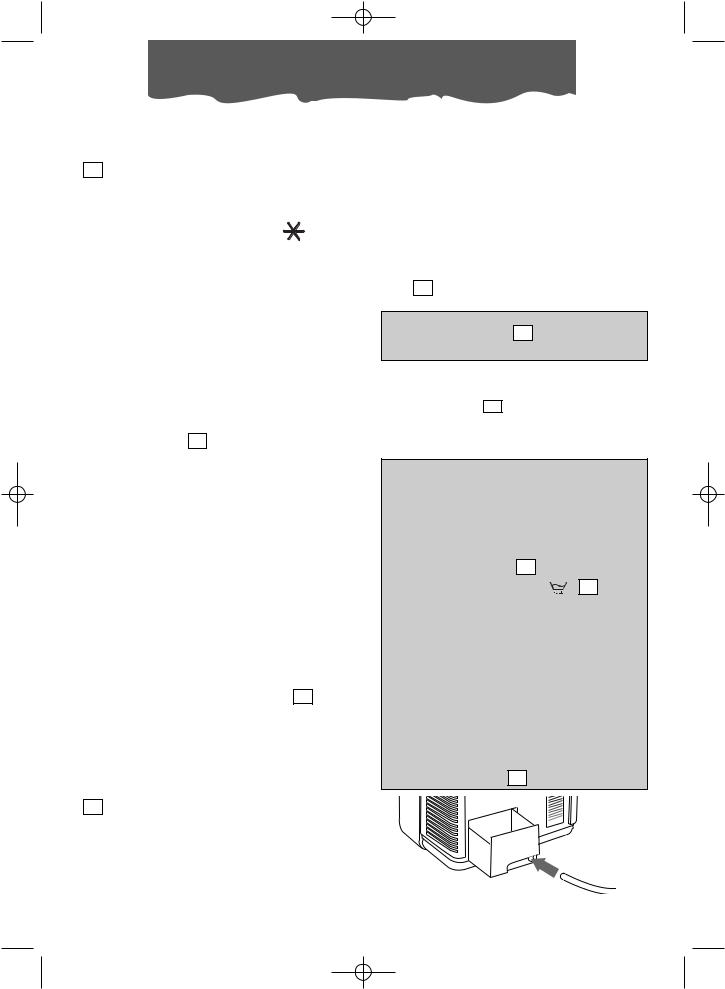
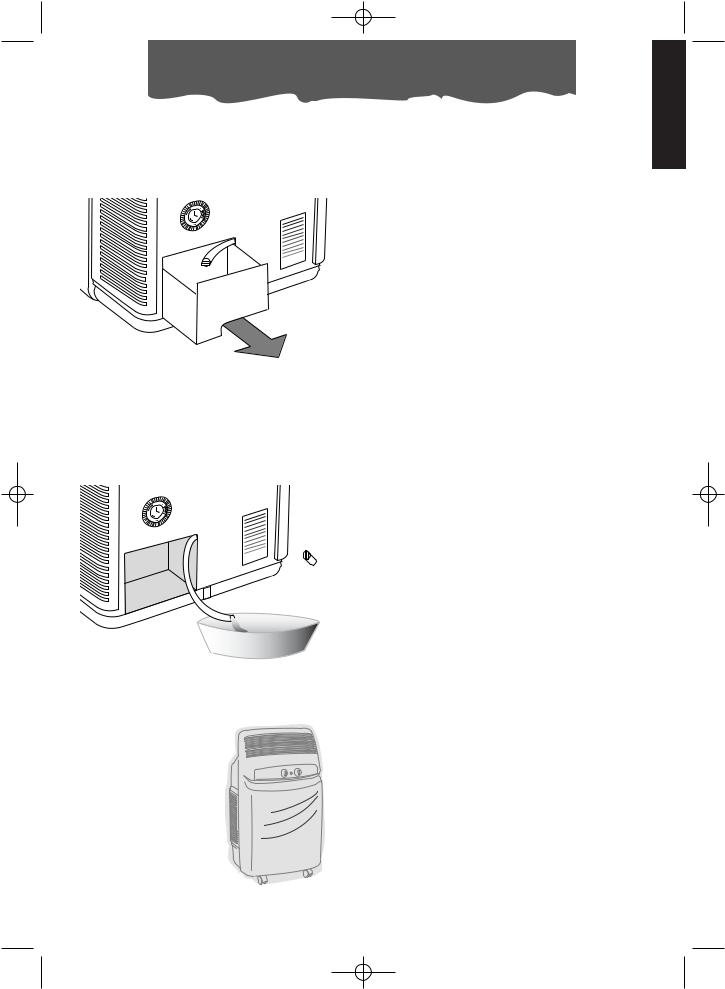
REMOVING COLLECTED WATER
Condensation will be collected in the removable tank 8 .
It’s also possibe to drain it continuosly.
CONTINUOUS EXTERNAL DRAINING
THIS UNIT EMPLOYS AN EXCLUSIVE CONDENSATION RECYCLING SYSTEM TO DISPOSE OF EXCESS MOISTURE. IN NORMAL CONDITIONS, CONDENSATION IS DISPOSED OF AUTOMATICALLY. WHEN THE HUMIDITY IS PARTICULARLY HIGH, AN EXCESS OF CONDENSATION MAY
BUILT UP IN THE TANK 8 . WHEN THIS HAP-
PENS, THE INDICATOR LIGHT |
14 COMES |
ON INDICATING THAT THE TANK |
SHOULD BE |
EMPTIED. WHENEVER CONDITIONS OF HIGH HUMIDITY MAKE THE PROBLEM RECURRENT, YOU MAY DISCHARGE THE EXCESS WATER DIRECTLY INTO A DRAIN, USING THE RUBBER TUBE SUPPLIED. THE TUBE SHOULD BE INSERTED INTO THE HOLE PROVIDED, AFTER HAVING REMOVED THE RUBBER STOPPER. (see figure below).
MAKE SURE THE TANK IS PUT BACK CORRECTLY OTHERWISE THE LIGHT 14 WILL REMAIN ON.
10
5751009900 17-04-2003 15:07 Pagina 11
R e c o m m e n d a t i o n s
Follow these recommendations to achieve maximum efficiency from your air conditioning unit:
•Close the doors and windows in the room where the unit is functioning. The only exception is in the case of installation through a hole in the wall. In this case, you are recommended to allow a small amount of air to enter through a door or window to guarantee an adequate exchange of air.
close doors and windows
•Protect the room from direct exposure to the sun’s rays by drawing the curtains and/or partially lowering the blinds so as to maximize energy savings.
•Do not rest objects on the air conditioning unit.
• Do not obstruct the air intake 7 or outlet
1.
•Make sure there are no heat sources in the room.
•
do not cover
lower the blinds or draw the curtains
Make sure the unit is located on a level floor. If necessary, place the two blocking devices 22 under the front wheels 3 .
ENGLISH
11
5751009900 17-04-2003 15:07 Pagina 12
C l e a n i n g
Before cleaning or maintenance, always turn the unit off by placing the selector in the “O” position and unplug from the socket .
CLEANING THE AIR FILTERS.
To maintain the air conditioning unit at peak efficiency, you are recommended to clean the anti-bacteria filter weekly.
To clean the filters:
1.Remove the intake grilles by rotating them outwards.
For safety reasons, do not wash the air conditioner with water.
CLEANING THE EXTERNAL UNIT
We recommend cleaning the unit with a slightly damp cloth then drying with a dry cloth.
Precautions
Never clean with benzene, alcohol or solvents. Never spray liquid insecticide or similar.
2
1
2.Remove the dust filter by unhooking it from the external grille.
anti-dustfilter
intake grille
To remove dust deposited on the dust filter, use a vacuum cleaner. If it is very dirty, rinse repeatedly in warm water at a temperature of not more than 104°F.
After washing, dry the filter. To replace, put the filters back into the external grill, then hook the latter to the unit.
12
5751009900 17-04-2003 15:07 Pagina 13
C l e a n i n g
END OF SEASON OPERATIONS |
BEGINNING OF SEASON CHECKS |
|
Take out the condensation tank located in |
Check that the power cord and outlet are |
|
undamaged and that the installation is effi- |
||
the rear of the unit and empty it. |
||
cient. |
||
|
Empty the residual water by removing the stopper in the drainage tube.
After replacing the bung, put the condensation tank back.
Clean the anti-bac- teria filters and dry well before replacing.
Protect the unit from dust by covering with a plastic bag.
ENGLISH
13
5751009900 17-04-2003 15:07 Pagina 14
Troubleshooting
If the unit is not working properly, this may be due to small problems that you can easily resolve yourself. Follow these instructions carefully before contacting your local De’Longhi Authorized Technical Service Center.
PROBLEM |
CAUSE |
|
SOLUTION |
The unit does not |
• there is no electricity |
• |
wait |
work |
• it is not plugged in |
• |
plug in |
|
• the function selector is in the “O” position |
• move the selector to the desired |
|
|
• the timer pin is in the “0” position or it is not |
|
position |
|
programmed to operate at that moment |
• |
set the timer to the required |
|
|
|
mode (see turning on the unit and |
|
|
|
programming the timer) |
|
|
|
|
The unit works for |
• there is a kink in the outlet tube |
• position the outlet tube correctly |
|
only a short time |
• the outlet tube is blocked |
• check there are no blockages |
|
|
|
|
preventing the discharge of air |
|
|
|
to the outside |
|
• there are too many twists in the outlet tube |
• |
rearrange the tube correctly |
|
|
|
(see set up instructions) |
|
• the fan is blocked |
• contact the Service Center |
|
|
|
|
|
The tank full light is |
• the tank is full activating the safety float |
• |
empty the tank |
on |
• the tank is incorrectly positioned |
• reposition the tank correctly |
|
The unit works but does not cool the room
• three minutes have not passed since it was |
• wait three minutes (safety |
||
|
turned on |
|
device) |
• |
windows open |
• |
close the windows |
• a heat source is operating in the room |
• |
eliminate heat sources |
|
|
(burner, light, etc.) or there are a lot of peo- |
|
|
|
ple |
|
|
• the air outlet tube has detached from the |
• fit the tube in the coupling |
||
|
coupling |
|
|
• thermostat adjusted too high |
• |
lower the thermostat |
|
• |
air filters clogged |
• |
clean/replace filters |
•the cooling capacity of the unit is insufficient for the conditions or size of the room
TECHNICAL ASSISTANCE
Keep the list of Technical Service Centers and
identify the one nearest to you.
RECOMMENDED OPERATING CONDITIONS
Room temperature: |
69-90°F |
|
(21-32 °C) |
|
|
Outside temperature: |
69-109°F |
|
(21-43 °C) |
TECHNICAL SPECIFICATION
Power supply |
see rating plate |
|
Max. absorbed power |
|
|
in air conditioning |
“ |
|
Refrigerating capacity |
see rating plate |
|
Number of fan speeds |
2 |
|
Dimensions of internal unit: |
||
• |
width |
18” |
• |
height |
31,50” |
• |
depth |
16” |
• |
weight |
72,8 lbs. |
14
5751009900 17-04-2003 15:07 Pagina 15
ENGLISH
LIMITED WARRANTY
We warrant each DE’LONGHI AIR-CONDITIONER to be free from defects in material and workmanship. Our obligation under this warranty is to provide one year parts and labor free from purchase date, with an additional four (4) years on any part of the sealed system consisting of the compressor, evaporator, condenser and factory connected refrigerant tubing. This warranty shall apply only if the AIR-CONDITIONER is used in accordance with the factory directions which accompany it, and on Alternatign Current (AC) circuit. This warranty is in lieu of all other warranties and representations, expressed or implied, and all other obligations or liabilities on our part. We do not authorize any other person or company to assume for us any liability in connection with the sale or use of our AIR-CONDITIONER. This warranty shall not apply to assume for us any liability in connection with the sale or use of our AIR-CONDITIONER. This warranty shall not apply to any AIR-CONDITIONER which shall have been repaired or altered outside our factory nor shall it apply to any AIR-CONDITIONER which has been subjected to misuse, negligence or accidents.
If repairs become necessary or spare parts are needed, please write to:
De’Longhi America Inc. |
De’ Longhi CANADA |
Park 80 West Plaza One 4th floor |
1040 Ronsa Court |
Saddle Brook, NJ 07663 |
MISSISSAUGA, ONTARIO |
or call Service Tel. No. 1-800-322-3848 |
L4W 3Y4 CANADA |
15
5751009900 17-04-2003 15:07 Pagina 16
Mesures de securité importantes
Lors de l’utilisation d’un appareil électroménager, il faut toujours prendre certaines précautions de base:
-Lire toutes les instructions.
-Afin d’éviter les incendies, les chocs électriques et les blessures aux personnes, ne pas immerger le cordon, la fiche ou l’appareil dans l’eau ou tout autre liquide.
-Faites très attention lorsqu’un appareil est utilisé par un enfant ou se trouve à sa portée.
-Il est déconseillé d’utiliser l’appareil si le cordon ou la fiche sont endommagés, défectueux ou s’ils ont subi des dommages. Il est en effet préférable de renvoyer l’appareil à un centre de service après-vente autorisé.
-L’utilisation d’accessoires non recommandés par le fabricant peut causer des incendies, des chocs électriques et des blessures.
-Ne pas utiliser l’appareil à l’extérieur.
-Il ne faut utiliser l’appareil que pour les fonctions qui lui sont attribuées.
-Ne pas exercer des tractions sur le câble électrique. Eviter que le câble soit tordu et/ou entortillé.
-S’assurer qu’aucun obstacle ne se trouve sur l’extrémité extérieure du tuyau d’échappement flexible.
-S’assurer que les orifices de l’admission à l’arrière de l’appareil ou les grilles antérieures ne soient pas obstrués.
-Le Pinguino ne doit pas être installé où l’atmosphère peut contenir des gaz combustibles.
-Eviter de faire fonctionner le Pinguino en atmosphère huileuse ou sulfureuse ou près de sources de chaleur.
-Avant de déplacer le climatiseur, extraire le bidon et vidanger l’eau du bac collecteur.
-Ne pas poser d’objets chauds ou lourds sur l’appareil.
-Nettoyer le filtre de l’air toutes les semaines.
-Important: si vous avez besoin d’utiliser une rallonge électrique, nous vous prions d’avoir soin d’utiliser une rallonge électrique à fort diamètre (minimum 14).
CONSERVEZ CES INSTRUCTIONS
DESCRIPTION |
14 |
Voyant cuvette pleine |
|
1 |
Grille de sortie d’air |
15 Bouton du thermostat |
|
2 |
Panneau de commande |
16 |
Traverse pour porte |
3 |
Roulettes |
17 |
Traverse pour fenêtre |
4 |
Logement du tuyau |
18 |
Bouchon bride |
5 |
Programmeur/ Timer |
19 |
Tuyau sortie d’air |
6 |
Crochet pour câble |
20 |
Embout |
7 |
Grille aspiration air |
21 |
Ventouses |
8 |
Rèservoir |
22 |
Cale-roulettes |
9Tuyau évacuation eau
10Fiche
11Sélecteur de fonctions
12Voyant alimentation
13Voyant climatisation/déshumidification
16
5751009900 17-04-2003 15:07 Pagina 17
Le climatiseur portable Pinguino
Pendant les mois d’été, les conditions de bien-être sont atteintes avec une température comprise entre 24°C et 27°C et avec une humidité relative d’environ 50%.
Le climatiseur est un appareil qui enlève l’humidité et la chaleur de la pièce dans laquelle il est placé. Par rapport aux modèles à installation fixe, les climatiseurs portables présentent l’avantage de pouvoir être non seulement déplacés d’une
pièce à l’autre d’une maison mais aussi transportés d’un édifice à un autre.
L’air chaud de votre pièce passe, sous l’effet du gaz réfrigérant, à travers une batterie de refroidissement où il cède la chaleur et l’humidité en excès avant d’être réintroduit dans la pièce.
Dans Pinguino, une petite partie de cet air est utilisée pour refroidir le gaz réfrigérant; ensuite, devenue chaude et humide, elle est évacuée vers l’extérieur.
Tous les Pinguino peuvent être également utilisés en mode seulement ventilation.
Pour tous renseignements complémentaires, vous pouvez vous adresser à:
DE’LONGHI CANADA:
Tel: 1-888-335 66 44
ou bien contacter notre site Internet: www.delonghi.it
FRANÇAIS
17
 Loading...