


IMPORTANT SAFEGUARDS
•Use this local air conditioner only as described in this instruction manual.
As with all electrical equipment, whilst the instructions aim to cover as many eventualities as possible, caution and common sense should be applied when operating and installing this appliance.
•This appliance is designed for home air conditioning and must not be used for other purposes.
•It is dangerous to modify or alter the characteristics of the appliance in any way.
•The appliance must be installed in conformity with national legislation regulating electrical equipment and installations.
•If the appliance requires repair, contact a Service Centre authorised by the manufacturer only. Repairs carried out by unauthorised personnel may be dangerous.
•This appliance must be used exclusively by adults.
•This appliance can be used by
children aged 8 upwards and by persons with reduced physical, sensory or mental capabilities or who lack of experience and knowledge if they are supervised or have been given instructions concerning use of the appliance in a safe way and understand the hazards involved. Children must not play with the appliance. Cleaning and user maintenance must not be carried out by children unless they are older than 8 and supervised. Keep the appliance and its cord out of the reach of children under 8 years of age.
•The appliance must be connected to an efficient earth system. Have your electrical circuit checked by a qualified electrician.
•Do not use extension cables.
•Before cleaning or maintenance, always unplug the appliance from the mains socket.
•Never unplug the appliance by pulling on
DESCRIPTION
1air outlet grille
2control panel
3handles
4castors
5filter
6evaporator air intake grille
7air exhaust hose housing
8condenser air intake grille
the power cable.
•Do not install the appliance in rooms containing gas, oil or sulphur. Do not install near sources of heat.
•Keep the appliance at least 50 cm away from flammable substances (alcohol etc) or pressurised containers (eg aerosol cans).
•Do not rest heavy or hot objects on top of the appliance.
•Clean the air filter at least once a week.
•Avoid using heating appliances near the air conditioner.
•Always transport the appliance upright or resting on one side.
Before moving the appliance, empty the internal circuit completely of water.
After moving the appliance, wait at least 1 hour before starting it
•When putting the appliance away, do not cover with plastic bags.
•The materials used for packaging can be recycled.
You are therefore recommended to dispose of them in special differentiated waste collection containers.
•At the end of its working life, consign the appliance to a specialist collection centre.
•If the power cable is dama-
ged, it must be replaced by the manufacturer or an authorised technical service centre in order to avoid all risk.
SPECIFIC WARNINGS FOR APPLIANCES WITH R410A* REFRIGERANT GAS
R410A refrigerant gas conforms to EC regulations on the environment. Avoid perforating the refrigerant circuit of the appliance.
ENVIRONMENTAL INFORMATION: This unit contains fluorinated greenhouse gases covered by the Kyoto Protocol. Maintenance and disposal must be carried out by qualified personnel only (R410A, GWP=1975).
* Verify the type of refrigerant gas used in your appliance on the rating plate.
9power cable
10drain hose with 2 caps
11flange with cap
12air exhaust hose
13hose adapter (2 pieces)
14wall mounting accessory
15window outlet
16remote control unit (some models only)
15
PREPARING FOR USE
ELECTRICAL CONNECTIONS
Before plugging the appliance into the mains socket, check that:
•The mains power supply corresponds to the value indicated on the rating plate on the back of the appliance;
•The mains socket and electrical circuit are adequate for the appliance;
•The mains socket matches the plug. If this is not the case, have the plug replaced;
•The mains socket is adequately earthed. Failure to follow these important safety instructions absolves the manufacturer of all liability.
The power cable must be replaced by a qualified professional only.
The instructions below will enable you to prepare your air conditioner for operation as efficiently as possible.
Before use, make sure the air intake and outlet grilles are unobstructed.
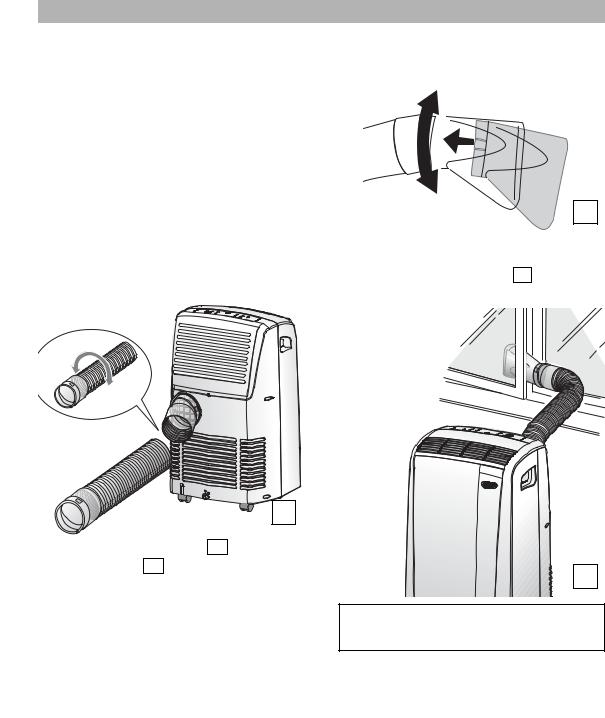
AIR-CONDITIONING WITHOUT INSTALLATION
Just a few simple steps and your comfort is ensured with your air conditioner:
• |
Screw one of the hose adapters |
13 |
to one |
||||
|
end of the air exhaust hose 12. |
||||||
• |
Fit the other adapter |
|
13 |
to the air exhau- |
|||
|
st hose housing |
|
|
at the back of the |
|||
|
7 |
|
|||||
appliance (see fig. A).
•Screw the end of the hose without adapter to the adapter previously mounted on the appliance (see fig. A).
A
• Fit the window outlet 15 to the air exhaust hose 12 as shown in fig. B.
•Place the air conditioner near a window or French window.
•Make sure the air exhaust hose is unobstructed.
2 1
1
B
•Open the window or French window slightly and position the outlet 15 as
figure C.
C
Keep the air hoses as short and free of curves as possible to avoid constrictions.
16

AIR-CONDITIONING WITH INSTALLATION
If required, your appliance can also be installed semi-permanently (Fig. D).
30 cm
30 cm
D
Proceed as follows:
•Drill a hole (ø134mm) in an outside wall or through a window pane.
Respect the height and dimensions of the hole given in figure E.
• |
Fit the wall flange accessory |
|
11 |
provi- |
||||||||||||
|
ded in the hole. |
|
|
|
|
|
|
|||||||||
• |
Fit the air exhaust hose |
|
13 |
in the rele- |
||||||||||||
|
vant hose |
|
located on the rear side of |
|||||||||||||
|
7 |
|||||||||||||||
|
the appliance (see fig. A). |
|
|
|
|
|||||||||||
• |
Screw the wall mounting accessory |
14 |
||||||||||||||
|
|
|
|
|
|
|
|
|
|
|
|
|
|
|
|
|
|
al tubo uscita aria |
12 |
to the air exhaust |
|||||||||||||
|
|
|
|
|
|
|
|
|
|
|
|
|
|
|
|
|
|
hose |
|
13 |
|
|
or, if necessary, |
unscrew |
the |
||||||||
|
|
|
|
|
|
|
||||||||||
|
adapter |
|
12 |
from the air exhaust hose and |
||||||||||||
|
|
|
||||||||||||||
|
replace it with the wall installation terminal |
|||||||||||||||
|
|
|
|
|
|
|
|
|
|
|
|
|
|
|||
|
|
14 |
|
(fig. F). |
|
|
|
|
|
|
|
|
|
|||
1
2
F
• Insert the other end of the hose 12 on the flange 11 as shown in fig. G.
134 |
in the window |
in the wooden |
in the wall: you are |
|
pane |
kickboard of a |
recommended to |
|
|
|
French window |
insulate the section |
|
|
|
of wall using suita- |
|
|
|
ble insulation. |
E |
|
|
|
|
|
|
|
|
|
|
|
Keep the air hoses as short and free of curves as possible to avoid constrictions.
MAX100 cm
MIN 35 cm
G
When the hose 12 is not fitted, the hole can
be closed with the flange cap 11 .
NOTE.
When installing the air conditioner semi-per- manently, you should leave a door slightly open (as little as 1 cm) to guarantee correct ventilation.
17

THE CONTROL PANEL
S H
G
Q O P I L T
NM
|
|
|
|
|
|
|
|
|
|
|
|
|
|
|
|
|
|
|
|
|
|
|
|
|
|
|
|
|
|
|
|
|
|
|
|
|
|
|
|
|
|
|
|
|
|
|
|
|
|
|
|
|
|
|
|
|
|
|
|
|
|
|
|
|
|
|
|
|
|
|
|
|
|
|
|
|
|
|
|
|
|
|
|
|
|
|
|
|
|
|
|
|
|
|
|
|
|
|
|
|
|
|
|
|
|
|
|
|
|
|
|
|
|
|
|
|
|
|
|
|
|
|
|
|
|
|
|
|
|
|
|
|
|
|
|
|
|
|
|
|
|
|
|
|
|
|
|
|
|
|
|
|
|
|
|
|
|
|
|
|
|
|
|
|
|
|
|
|
|
|
|
|
|
|
|
|
|
|
|
|
|
|
|
|
|
|
|
|
|
|
|
|
|
|
|
|
D |
|
|
|
|
|
|
|
|
|
|
|
|
|
|||||||||
|
|
|
|
|
|
|
|
|
|
|
|
|
|
|
|
|
|
|
|
|
|
|
|
|
|
R |
|
|
|
|
|
|
|
|
|
|
|
|
|
|||||||||||||||
|
|
|
|
|
|
|
|
|
|
|
|
|
|
|
|
|
|
|
C |
|
|
|
|
|||||||||||||||||||||||||||||||
|
|
|
|
|
|
|
|
|
|
|
|
|
|
|
|
|
|
|
|
|
|
|
|
|||||||||||||||||||||||||||||||
|
|
|
|
|
|
|
|
|
|
|
|
|
|
|
|
|
|
|
|
|
|
|
|
|
|
|
|
|
|
|
|
|||||||||||||||||||||||
A |
|
|
|
|
|
|
B |
|
|
|
|
|
|
|
|
|
|
|
|
|
|
|
|
|
|
|
|
|
|
|
|
|
|
|
|
E |
F |
|
||||||||||||||||
|
|
|
|
|
|
|
|
|
||||||||||||||||||||||||||||||||||||||||||||||
|
|
|
|
|
|
|
|
|
|
|
|
|
|
|
|
|
|
|
||||||||||||||||||||||||||||||||||||
|
|
|
|
|
|
|
|
|
|
|
|
|
|
|
|
|
|
|
|
|
|
|
|
|
|
|
|
|
|
|
|
|
|
|
|
|
|
|
|
|
|
|
|
|
|
|
|
|
|
|
|
|||
|
|
|
|
|
|
|
|
|
|
|
|
|
|
|
|
|
|
|
|
|
|
|
|
|
|
|
|
|
|
|
|
|
|
|
|
|
|
|
|
|
|
|
|
|
|
|
|
|
|
|
|
|
|
|
DESCRIPTION OF THE CONTROL PANEL
AON/OFF button
BMODE selection button
Air conditioning, dehumidifying, fan.
CFan speed selection button (MAX/MED/MIN)
DTimer button
EProgrammed operation increase temperature/time button
FProgrammed operation decrease temperature/time button
GDisplay (Displays the temperature values set, room temperature and the programmed operating time)
HTimer in operation indicator light
I/L/M Fan speed lights
NFan mode light
OAir-conditioning mode light
PDehumidifying mode light
QAlarm light
RRemote control signal receiver
SLight: displays room temperature
TLight: displays set temperature
|
Never turn the air conditioner off by unplugging from the mains. Always press the |
|
button, then wait for a few minutes before unplugging. This allows the appliance to |
|
perform a cycle of checks to verify operation. . |
|
|
18
 Loading...