


PACA110-A120E
PORTABLE AIR-CONDITIONER
CLIMATISEUR
CLIMATIZADOR
CONDIZIONATORE
Register this product on-line and receive a free trial issue of Cook's Illustrated. Visit www.delonghiregistration.com. Visit www.delonghi.com for a list of service centers near you. (U.S. Only)
Enregistrez ce produit en ligne et recevez un numéro gratuit de Cook's Illustrated. Visitez www.delonghiregistration.com.
Visitez www.delonghi.com pour y voir une liste des centres de réparation proches de chez vous. (É.-U. uniquement)
Registre este producto en línea y reciba un ejemplar gratis de Cook's Illustrated. Visite www.delonghiregistration.com.
Visite www.delonghi.com para ver la lista de centros de servicios cercanos a usted. (Solamente en los Estados Unidos)
Registra questo prodotto "on-line" per ricevere una copia omaggio della rivista Cook's Illustrated. Visita www.delonghiregistration.com.
Visita www.delonghi.com per una lista dei centri di servizio a te più vicini. (Solo negli Stati Uniti)
Instructions for use
Keep these instructions
Mode d'emploi
Conservez cette notice
Instrucciones para el uso
Repase y guarde estas instrucciones
Lea cuidadosamente este instructivo antes de usar su aparato
Istruzioni per l’uso
Leggere e conservare queste istruzioni
ELECTRICAL SPECIFICATIONS 115V ~ 60Hz
DONNEES ELECTRIQUES 115V~60Hz
CARACTERISTICAS ELECTRICAS 115V ~ 60Hz
CARATTERISTICHE ELETTRICHE 115V~60Hz
DESCRIPTION - DESCRIPCIÓN - DESCRIZIONE
2
1
6
3

 7 5
7 5
8
9
10
4
ACCESSORIES • ACCESORIOS • ACCESSOIRES • ACCESSORI
11 |
12 |
13 |
14 |
17
15 |
16 |
|

IMPORTANT SAFEGUARDS
•Use this appliance only as described in this instruction manual.
As with any electrical appliance, the instructions aim to cover as many eventualities as possible. Caution and common sense should be used when operating and installing this air conditioner.
•This appliance has been manufactured to cool and dehumidify domestic environments and should not be used for other purposes.
•It is dangerous to alter or modify the unit's characteristics in any way.
•The appliance must be installed in line with the relevant national legislation.
•Should repairs be necessary, contact the nearest authorized Repair Service Center. Unauthorized servicing can be dangerous.
•The appliance is not intended for use by persons (including children) with reduced physical, sensory or mental capabilities, or lack of experience and knowledge, unless they have been given supervision or instruction concerning use of the appliance by a person responsible for their safety. Children should be supervised to ensure that they do not play with the appliance.
•In the case that the power cord becomes damaged, this must be substituted only by specialized personnel authorized by the manufacturer, to protect against fire.
•Always ensure the appliance is grounded. If you have any doubts check with a qualified electrician.
•We strongly discourage the use of an extension cord due to potential safety hazards for temporary situations, use only CSA certified and UL listed 3-wire grounded extension cord, attachment plug and connector, rated 15A, 125V
•Before cleaning or maintenance operations, always unplug the unit from the outlet.
•Do not pull on or place strain on the power cord when moving the appliance.
•The appliance should not be installed where the atmosphere may contain combustible gases, oil or sulphur, or near heat sources.
•Do not rest hot or heavy objects on the appliance.
•Clean the filters at least once a week.
•Avoid using heaters near the unit.
•The unit should be transported in a vertical position. If this is not possible secure the unit at an angle, do not lie it horizontally.
•Before transporting the unit, drain the unit. After transportation, wait at least 4 hour before switching the unit on.
•The packaging materials can be recycled. You are therefore recommended to place them in the special containers for differentiated waste collection.
•This appliance is fitted with a special safety device. When the compressor switches off, this device prevents it from switching on again for at least 3 minutes.
SAVE THESE INSTRUCTIONS
THIS PRODUCT IS FOR HOUSEHOLD ONLY
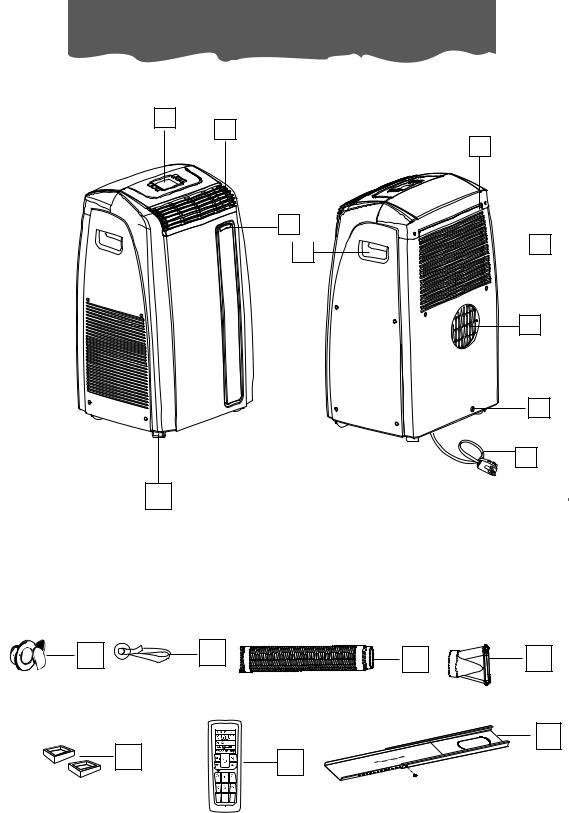
DESCRIPTION
1 |
air outlet grille |
10 |
power cable |
2 |
control panel |
11 wall flange |
|
3 |
remote control receiver |
12 |
sucker |
4 |
castors |
13 |
air exhaust hose |
5 |
handles |
14 |
window outlet |
6 |
filter |
15 |
castor locks |
7 |
evaporator air intake grille |
16 |
remote control unit |
8 |
air exhaust hose housing |
17 |
window bracket with locking pins |
9 |
drainage hose |
|
|
4

I NSTALLING YOUR PORTABLE
AIR-CONDITIONER
ELECTRICAL CONNECTIONS
Before plugging the appliance into the mains socket, check that:
•The mains power supply corresponds to the value indicated on the rating plate on the back of the appliance;
•The mains socket and electrical circuit are adequate for the appliance;
•The mains socket matches the plug. If this is not the case, have the plug replaced;
•The mains socket is adequately earthed.
Failure to follow these important safety instructions absolves the manufacturer of all liability.
The power cable must be replaced by a qualified professional only.
The instructions below will enable you to prepare your air conditioner for operation as efficiently as possible.
Before use, make sure the air intake and outlet grilles are unobstructed.
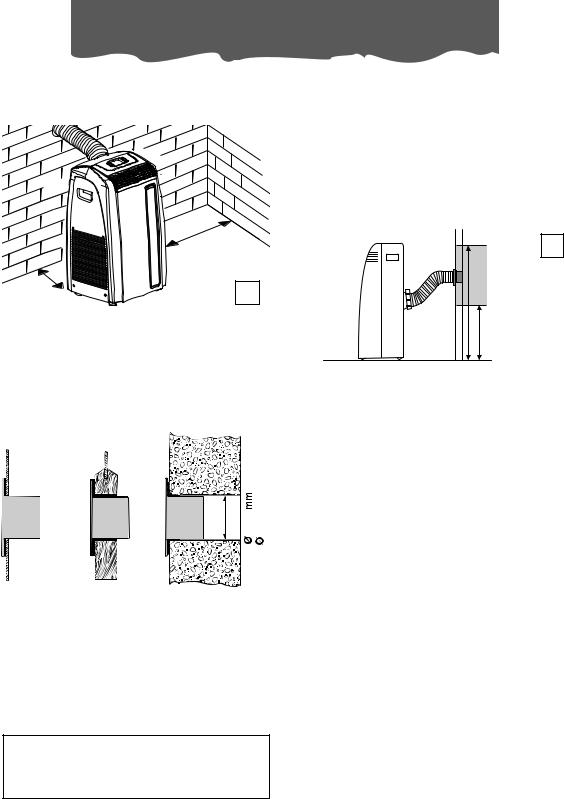
AIR-CONDITIONING WITHOUT INSTALLATION
Just a few simple steps and your comfort is ensured with your air conditioner:
• Fit the air exhaust hose 13 in the housing
8 at the back of the appliance. Insert it as shown in figure A.
Thanks to the locking pins, it’s possible to use the window bracket also for sliding windows. Position the hole of the bracket so to allow a correct installation of the exhaust hose (see figure C).
A
For optimum results:
• If you have a sash window, place the bracket 17 on the window sill, extend the bracket fully within the window frame, fix the bracket by using the pin then lower the window onto the bracket. Insert the window
outlet 14 of the exhaust hose 13 into the slot, then connect the hose to the air condi-
B
C
•If you have a double window, use the sucker provided to hold the two parts of the window together (fig. D).
2
1
D
Keep the air hoses as short and free of curves as possible to avoid constrictions
5
Pre p a r i n g fo r u s e
SEMI-PERMANENT INSTALLATION
If required, your appliance can also be installed semi-permanently (Fig. E).
11,8 in
30 cm
11,8 in |
E |
|
30 cm |
||
|
Proceed as follows:
•Drill a hole ø 5,25 inches (ø 134 mm) in an outside wall or through a window pane. Respect the dimensions and height of the hole given in figure F and G.
134 5,25 in. |
in the window |
in the wood- |
in the wall: it is rec- |
|||
ommended |
that |
||||
pane |
en kickboard |
||||
you insulate a sec- |
|||||
|
|
of a French |
|||
|
|
tion of the |
wall |
||
F |
|
window |
|||
|
using suitable insu- |
||||
|
|
||||
|
|
|
lation. |
|
|
|
|
|
|
||
• |
Fit the wall flange |
11 |
|
into the hole. |
||||||
|
|
|
|
|
|
|
|
|
|
|
• |
Fit the air exhaust hose |
|
13 |
in the relevant |
||||||
|
hose located on the rear side of the appli- |
|||||||||
|
ance (fig. A page 5). |
|
|
|
|
|
||||
|
Fit the end of the hose |
|
|
to the wall |
||||||
• |
13 |
|||||||||
|
|
|
|
|
|
|
|
|
|
|
|
flange |
11 |
as shown in fig. G. |
|||||||
G
MAX 39 in
MAX100 cm
MIN 14 in
MIN 35 cm
When the hose (9) is not fitted, the drilled hole can be closed with the flange cap (11).
NOTE: When installing the air conditioner semi-permanently, you should leave a door slightly open as little as 1/2 “ (1 cm) to guarantee correct ventilation.
Keep the air hoses as short and free of curves as possible to avoid constrictions.
As special tools are required for installation, we suggest you let install the appliance by specialized personnel.
6
 Loading...