


PORTABLE AIR CONDITIONER
INSTRUCTION FOR USE
SAVE THESE INSTRUCTIONS
EQUIPO PORTÁTIL DE AIRE ACONDICIONADO
INSTRUCCIONES DE USO
CONSERVE ESTAS INSTRUCCIONES
LEA CUIDADOSAMENTE ESTE INSTRUCTIVO ANTES DE USAR SU APARATO
PAC CN120E
Visit www.delonghi.com for a list of service centers near you Visite www.delonghi.com para ver la lista de centros de servicios cercanos a usted
ELECTRICAL SPECIFICATIONS
ESPECIFICACIONES ELECTRICAS
115 V 60 Hz

2

Description - Descripción 
1 |
2 |
5 |
6

 3
3 

7 8
9 

4
10
Accessories - Accesorios 
11 |
|
12 |
13 |
14 |
|
15 |
16 |
17 |
18 |
|
|
3

Important safeguards en
•Use this appliance only as described in this instruction manual.
As with any electrical appliance, the instructions aim to cover as many situations as possible. Caution and common sense should be used when operating and installing this air conditioner.
•This appliance has been manufactured to cool and dehumidify domestic environments and mustnotbeusedforotherpurposes.
•It is dangerous to alter or modify the unit’s characteristicsinanyway.
•The appliance must be installed in accordance withtherelevantnationallegislation.
•Shouldrepairsbenecessary,contactthenearest authorized Repair Service Center. Unauthorized servicingcanbedangerous.
•The appliance is not intended for use by persons (including children) with reduced physical, sensory or mental capabilities, or lack of experience and knowledge, unless they have been given supervision or instruction concerning use of the appliance by a person responsiblefortheirsafety.
Children should be supervised to ensure that theydonotplaywiththeappliance.
•In the case that the power cord becomes damaged, this must be repaired only by specialized personnel authorized by the manufacturerinorder toprotectagainstfire.
•Always ensure the appliance is plugged into a grounded 3-prong outlet. If you have any doubtscheckwithaqualifiedelectrician.
•We strongly discourage the use of an extension corddueto potentialsafetyhazards.
•Before cleaning or maintenance operations, alwaysunplugtheunitfromtheoutlet.
•Donotpullonorplacestrainonthepowercord whenmovingtheappliance.
•Theapplianceshouldnotbeinstalledwherethe atmospheremaycontaincombustiblegases,oil orsulphur,ornearheatsources.
•Do not rest hot or heavy objects on the appliance.
•Cleanthefiltersatleastonceaweek.
•Avoidusingheatersneartheunit.
•The unit should be transported in a vertical position.Ifthisisnotpossiblesecuretheunitat anangle,donotlieithorizontally.
•Before transporting the unit, drain the unit. After transportation, wait at least 6 hours beforeswitchingtheuniton.
•The packaging materials can be recycled. You are therefore recommended to place them in the special containers for differentiated waste collection.
•This appliance is fitted with a special safety device.When the compressor switches off, this device prevents it from switching on again for at least 3 minutes.
•WARNING: Changes or modifications not expresslyapprovedbythepartyresponsiblefor compliance could void the user’s authority to operatetheequipment.
Specific warnings for appliances with R410A refrigerant gas
R410A is a refrigerant that complies with European ecological standards; nevertheless, it is recommended not to pierce the cooling circuit of themachine.Attheendofitsusefullife,deliverthe appliance to a special waste collection centre for disposal.
Thishermeticallysealedsystemcontainsfluorinated greenhousegases.
ENVIRONMENTAL INFORMATION:
This unit contains fluorinated greenhouse gases coveredbytheKyotoProtocol.
Maintenance and disposal must be carried out by qualifiedpersonnelonly(R410A,GWP=2088).
Savetheseinstructions
Thisproductisforhousehold only
4
DESCRIPTION
1Airoutletgrille
2Control panel
3Handles
4Castors
5Filter
6Evaporatorairintakegrille
7Airexhausthosehousing
8Condenserairintakegrille
9Powercable
10Drainagehosewith2caps
11Wallflangewithcap
12Airexhausthose
13Hose adaptor
14Accessoryforwallmounting
15Windowbracket
16Additionalwindowbracket
17Windowoutlet
18Remote control
ELECTRICAL CONNECTIONS
Before plugging the appliance into the mains socket, check that:
•The outlet’s power supply corresponds to the value indicatedontheratinglabelonthebackoftheappliance;
•The outlet and electrical circuit are adequate for the appliance;
•Theoutletisa3-holegroundedoutlet  .Ifthisisnot thecase,youmustchooseanotheroutlet.
Failure to follow these important safety instructions absolves the manufacturer of all liability.
The power cable must be replaced by a qualified professional only.
The instructions below will enable you to prepare your air conditioner for operation as efficiently as possible. Before use, make sure the air intake and outlet grilles are unobstructed.
NOTE: Thisappliance isprovidedwithandauto-evaporation feature for condensate removal during cooling and dehumidifingmodes.
AIR-CONDITIONING WITH INSTALLATION
Just a few simple steps and your comfort is ensured with your air conditioner.
For optimal results set-up your appliance as follows:
•Screwthehoseadaptor13 tothehose’send 12.
•Fit the air exhaust hose in the housing at the back of the
Preparing for use en
appliance. InsertitasshowninfigureA.
A
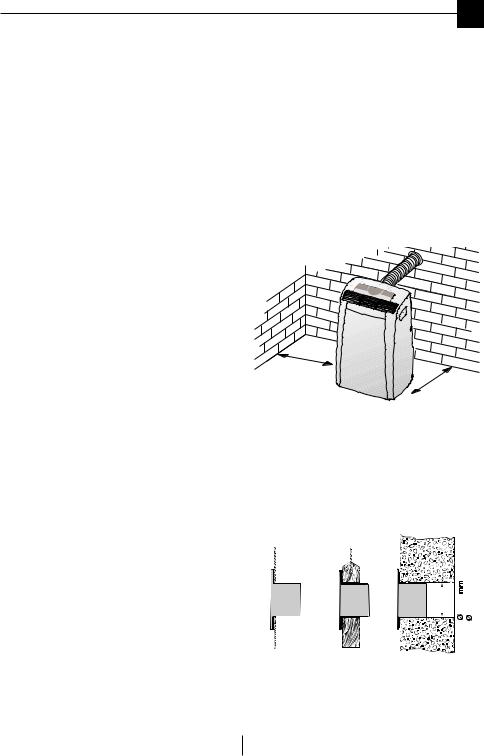
•Install the appliance respecting the distances given in fig.
B.
B
30 cm
12 inches
30 cm
12 inches
Proceedasfollows:
•Drill a hole (ø134mm / 5,27 in.) in an outside wall or throughawindowpane.
Respect the height and dimensions of the hole given in figuresB and C.
NOTE: As special tools are required for installation, we suggest youhavetheapplianceinstalledbyspecializedpersonnel.
C
|
|
134 5,25 in. |
|
|
|
|
|
|
inthewindowpane inthewooden |
inthewall:youare |
|
kickboardofa |
recommended to |
|
Frenchwindow |
insulatethesection |
|
|
ofwallusingsuitable |
|
|
insulation. |
|
5
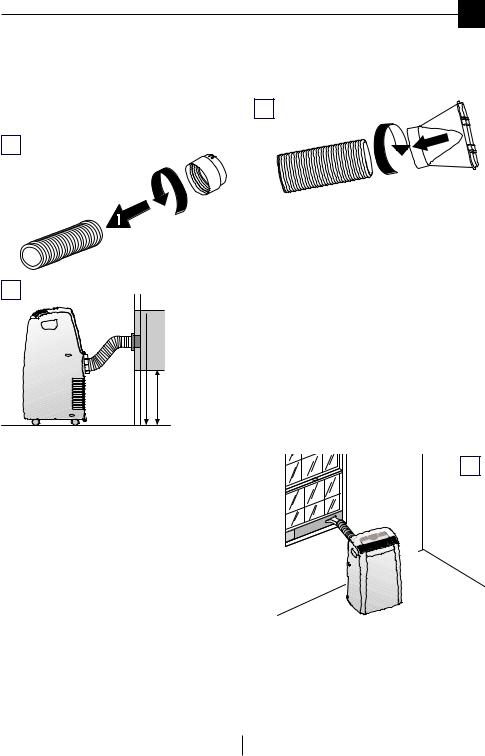
•Fitthewallflange 11 intothehole.
• Screwthehoseadaptor 13 tothehose’send 12.
•Fit the air exhaust hose in the housing at the back of the applianceasshowninfigureA.
•Screw thewallmountingaccessory 14 intothehose12. (fig.D)andfititintothe wallflange 11 asshowninfig.E.
D
2
Preparing for use en
•Screw the window outlet 17 to the other end of the exhausthose.(seefig.F).
F
 1 2
1 2
E
 MAX100 cm
MAX 39 inches
MIN 35 cm
MIN 14 inches
Whenthehose 12 isnotfitted,theholecanbeclosedwiththe flangecap11 .
NOTE: When air conditioning with installation, you should leaveadoorslightlyopen(aslittleas1cm)toguaranteecorrect ventilation.
KEEP THE AIR HOSES AS SHORT AND FREE OF CURVES AS POSSIBLE TO AVOID CONSTRICTIONS.
AIR-CONDITIONING WITHOUT INSTALLATION
Just a few simple steps and your comfort is ensured with your airconditioner:
•Screwthehoseadaptor13 tothehose’send 12.
•Fit the air exhaust hose in the housing at the back of the appliance. InsertitasshowninfigureA.
Sash window
•Openthewindow.
•Placethewindowbracket15 inthewindow,extendingit tofitthewidthofthewindow(fig.G).
•Place the air conditioner near the window. Insert the assembledexhausthose12 intothewindowbrackethole
15.
•Makesuretheairexhausthoseisunobstructed.
•If you have a very large window, in order to cover your
window aperture, use the additional window bracket without holes extending it to the desired dimension, then fix the bracket by using the locking pin provided. When extracting the window bracket and joining the two piecespayattentionyoudonotcoverthe hole.
G
Other set-up methods:
•Thanks to the locking pin, it’s possible to use the window bracket also for sliding windows. Position the hole of the bracket so to allow a correct installation of the exhaust hose(seefigureH).
6
Keep the air hoses as short and free of curves as possible to avoid constrictions.
H
CONTROL PANEL
Control panel en
Sash window
•After having screwed the window outlet 17 into the air exhaust hose 12 , open the French window slightly and positionthewindowoutlet 17 asshowninfigure I.
I
R Q |
C |
I |
F S |
G |
T E |
P O |
B |
H A |
|
|
L |
M |
|
|
N |
|
|
|
|
|
|
|
DESCRIPTION OF THE CONTROL PANEL |
D |
|||
|
|
|||
A |
ON/OFF button |
H |
Timer in operation indicator light |
|
B |
MODE selection button |
I/L/M Fan speed lights |
|
|
|
Airconditioning,dehumidifying,fan. |
N |
Fan mode light |
|
C |
Fan speed selection button (MAX/MED/MIN) |
O |
Air-conditioning mode light |
|
D |
Timer button |
P |
Dehumidifying mode light |
|
E |
Programmed operation increase temperature/time |
Q |
Alarm light |
|
|
button |
R |
Remote control receiver |
|
F |
Programmed operation decrease temperature/time |
S |
Light: the inner temperature is shown on the |
|
|
button |
|
display |
|
G |
Display Displaysthetemperaturevaluessetandthe |
T |
Light: set temperature is shown on the display |
|
|
programmedoperatingtime |
|
|
|
NOTE: Neverturntheairconditioneroffbyunpluggingfromtheoutlet.Alwayspressthe |
button,thenwaitforafewminutes |
|||
beforeunplugging. Thisallowstheappliancetoperformacycleofcheckstoverifyoperation. |
|
|||
7
 Loading...