


Important safeguards
•Use this appliance only as described in this instruction manual.
As with any electrical appliance, the instructions aim to cover as many situations as possible. Caution and common sense should be used when operating and installing this air conditioner.
•This appliance has been manufactured to cool and dehumidify domestic environments and must not be used for other purposes.
•It is dangerous to alter or modify the unit's characteristics in any way.
•The appliance must be installed in accordance with the relevant national legislation.
•Should repairs be necessary, contact the nearest authorized Repair Service Center. Unauthorized servicing can be dangerous.
•The appliance is not intended for use by persons (including children) with reduced physical, sensory or mental capabilities, or lack of experience and knowledge, unless they have been given supervision or instruction concerning use of the appliance by a person responsible for their safety.
Children should be supervised to ensure that they do not play with the appliance.
•In the case that the power cord becomes damaged, this must be repaired only by specialized personnel authorized by the manufacturer in order to protect against fire.
•Always ensure the appliance is plugged into a grounded 3-prong outlet. If you have any doubts check with a qualified electrician.
•We strongly discourage the use of an extension cord due to potential safety hazards. For temporary situations, use only CSA certified and UL listed 3-prong grounded extension cord, attachment plug and connector, rated 15A, 125V
•Before cleaning or maintenance operations, always unplug the unit from the outlet.
•Do not pull on or place strain on the power cord when moving the appliance.
•The appliance should not be installed where the atmosphere may contain combustible gases, oil or sulphur, or near heat sources.
•Do not rest hot or heavy objects on the appliance.
•Clean the filters at least once a week.
•Avoid using heaters near the unit.
•The unit should be transported in a vertical position. If this is not possible secure the unit at an angle, do not lie it horizontally.
•Before transporting the unit, drain the unit. After transportation, wait at least 6 hours before switching the unit on.
•The packaging materials can be recycled. You are therefore recommended to place them in the special containers for differentiated waste collection.
•This appliance is fitted with a special safety device. When the compressor switches off, this device prevents it from switching on again for at least 3 minutes.
•WARNING: Changes or modifications not expressly approved by the party responsible for compliance could void the user's authority to operate the equipment.
ENVIRONMENTAL INFORMATION: This unit contains fluorinated greenhouse gases covered by the Kyoto Protocol. Avoid perforating the refrigerant circuit of the appliance.
Maintenance and disposal must be carried out by qualified personnel only (R410A, GWP=1975).
.SAVE THESE INSTRUCTIONS
THIS PRODUCT IS FOR HOUSEHOLD ONLY
4

Description
DESCRIPTION |
10 |
Power cable |
GB |
||
1 |
Air outlet grille |
||||
11 |
Wall flange |
|
|||
2 |
Control panel |
|
|||
12 |
Air exhaust hose |
|
|||
3 |
Remote control receiver |
|
|||
13 |
Window outlet |
|
|||
4 |
Castor wheels |
|
|||
14 |
Castor locks |
|
|||
5 |
Handles |
|
|||
15 |
Remote control |
|
|||
6 |
Filter |
|
|||
16 |
Window bracket with locking pins |
|
|||
7 |
Air intake grille |
|
|||
17 |
End of season dust cover |
|
|||
8 |
Air exhaust hose housing |
|
|||
18 |
End of season accessories bag |
|
|||
9 |
Drainage hose + black cap |
|
|||
19 |
Extra locking pins for window bracket |
|
|||
|
|
|
|||
TO AVOID DAMAGE TO THE UNIT:
NEVER TRANSPORT OR TURN THE APPLIANCE UPSIDE DOWN OR ON ITS SIDE. IF THIS OCCURS, WAIT 6 HOURS BEFORE TURNING THE APPLIANCE ON, 24 HOURS IS RECOMMENDED.
(After the unit has been on its side, oil needs to return to the compressor to ensure proper function. Without allowing the unit this time (6-24 hours) The unit may function for only a short time, and then the compressor will break down from lack of oil).
ELECTRICAL CONNECTIONS
Before plugging the appliance into the outlet, check that:
•The outlet’s power supply corresponds to the value indicated on the rating label on the back of the appliance;
•The outlet and electrical circuit are adequate for the appliance;
•The outlet is a 3-hole grounded outlet. If this is not the case, you must choose another outlet.
Failure to follow these important safety instructions absolves the manufacturer of all liability.
If it becomes necessary, the power cable must be replaced by a qualified professional only.
The instructions below will enable you to prepare your air conditioner for operation as efficiently as possible.
Before use, make sure the air intake and outlet grilles are unobstructed.
5

Setting up your portable air conditioner
AIR CONDITIONING WITHOUT INSTALLATION
NOTE: Keep the air hoses as short and free of curves as possible to avoid constrictions.
FOR OPTIMAL RESULTS SET-UP IN A DOUBLE-HUNG WINDOW:
1)Place the bracket in the window sill, extend the bracket fully within the window frame, fix the bracket by using the pin then lower the window onto the bracket. (Should the window bracket be too large for the window. The plastic can be cut with a saw by a qualified professional.)
2)Fit the air exhaust hose in the housing at the back of the appliance. Insert it as shown in figure A.
3)Connect the window outlet 13 to the other end of the exhaust hose.
A
4)Insert the window outlet end of the exhaust hose into the slot of the window bracket (fig. B).
B
Other set-up methods:
•Thanks to the locking pins, it’s possible to use the window bracket also for sliding windows. Position the hole of the bracket so to allow a correct installation of the exhaust hose (see figure C)
C
•If you have a casement window (figure D) follow steps 2 & 3 and place the
window outlet 13 outside the window to exhaust the hot air.
D
For help with installation, operation, and for all accessories and spare/replacement parts, please contact our toll free customer service call center at:
1-800-322-3848 [US only]
1-888-335-6644 [Canada only] 01-800-711-8805 (Mexico only] or log onto our website at www.delonghi.com
6
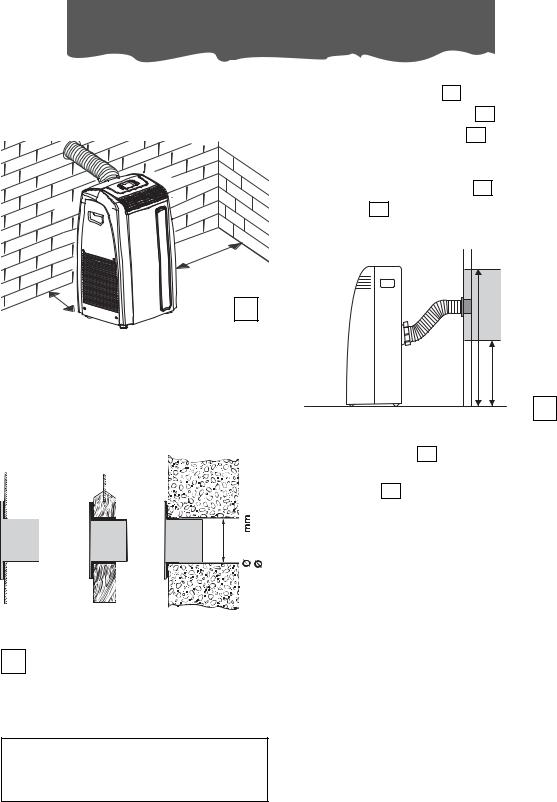
Semi-permanent installation
SEMI-PERMANENT INSTALLATION
If required, your appliance can also be installed semi-permanently (Fig. E).
12 inches
30 cm
12 inches |
E |
30 cm |
|
Proceed as follows:
•Drill a hole ø 5,25 inches (ø 134 mm) in an outside wall or through a window pane.
Respect the dimensions and height of the hole given in figure F and G.
134 |
5,25 inches |
in the win- |
in |
the |
dow pane |
w o o d e n |
|
Fkickboard of a French window
in the wall: it is recommended that you insulate a section of the wall using suitable insulation.
“As special tools are required for installation, we suggest you have the appliance installed by specialized personnel.”
• |
Fit the wall flange 11 into the hole. |
GB |
|||
• |
Fit the air exhaust hose |
12 |
into the air |
||
|
|||||
|
exhaust hose housing |
8 |
located on |
|
|
|
|
||||
|
the rear side of the appliance (fig. A |
||||
|
page 6). |
|
|
|
|
• |
Fit the end of the hose |
12 |
to the wall |
||
|
flange 11 as shown in fig. G. |
||||
MAX100 cm
MAX 39 inches
MIN 35 cm
MIN 14 inches
G
When the hose 12 is not connected, the drilled hole can be closed with the
flange cap 11 .
NOTE: When installing the air conditioner semi-permanently, you should leave a door slightly open as little as 1/2 “ (1 cm) to guarantee correct ventilation and room pressure.
Keep the exhaust hose as short and free of curves as possible to avoid constrictions.
7
Control panel
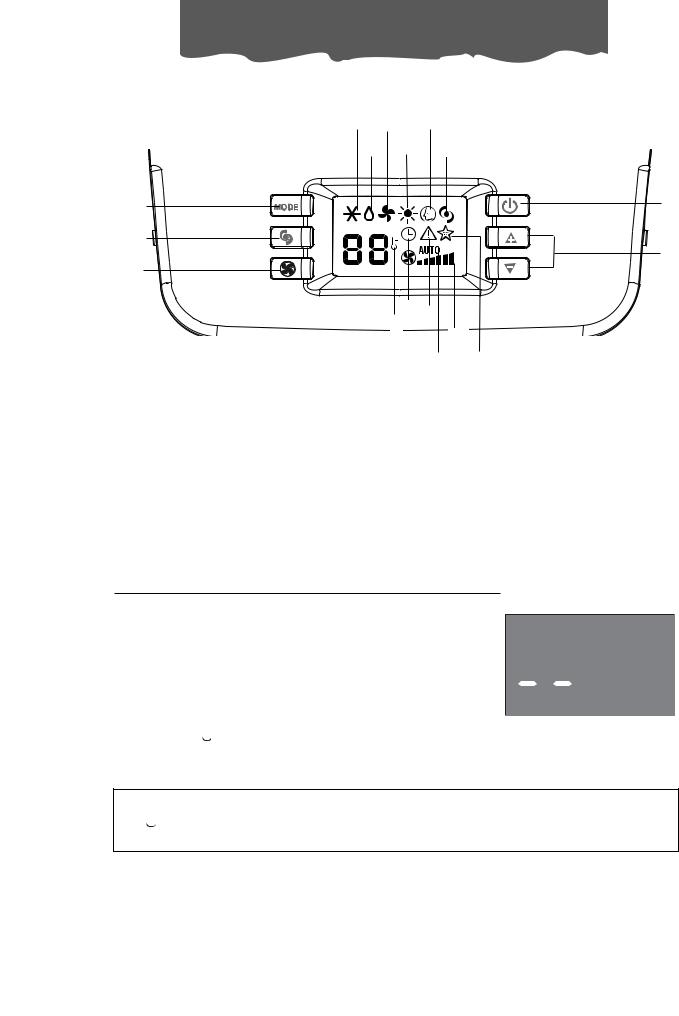
THE CONTROL PANEL
1 3 5
2 4 6
13
14
15
8 |
9 |
|
7 |
||
11 |
||
|
|
|
|
10 |
12 |
DESCRIPTION OF THE CONTROL PANEL |
|
|
|
|
1 |
Air conditioning symbol |
10 |
AUTOFAN indicator |
|
2 |
Dehumidifying symbol |
11 |
Fan speed indicator |
|
3 |
Fan symbol |
12 |
SLEEP symbol |
|
4 |
Heating symbol |
13 |
MODE button (selects the modes) |
|
5 |
SMART symbol |
14 |
BOOST button |
|
6 |
BOOST symbol |
15 |
FAN button |
|
7 |
Temperature indicator |
16 |
ON/Standby button |
|
8 |
Timer symbol |
17 |
Increase (+) and decrease (-) |
|
9 |
Alert symbol |
|
temperature button |
|
16
17
OPERATING FROM THE CONTROL PANEL
The control panel enables you to manage all the main functions of the appliance, but some features are present only on the remote control.
TURNING THE APPLIANCE ON
• Plug into an outlet and check the black cap
is fully inserted. Two lines appear on the display indicating that the appliance is in standby mode.
•Press the 

 (16) button until the appliance comes on. The last function active when it was turned off will appear.
Never turn the air conditioner off by unplugging from the outlet. Always press the


 button, then wait for a few minutes before unplugging. This allows the appliance to perform a cycle of checks to verify operation.
8
Operation
|
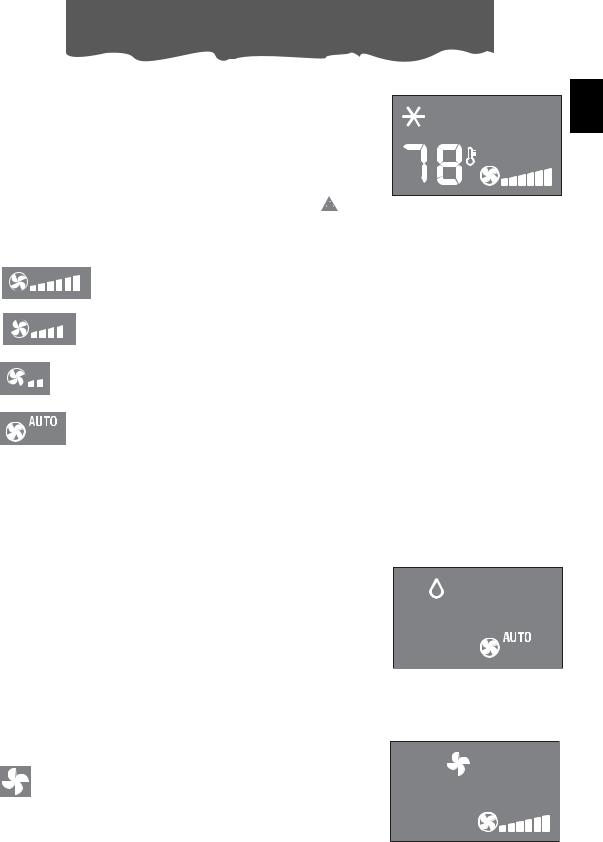
AIR CONDITIONING MODE |
GB |
|
|
Ideal for hot muggy weather when you need to cool and dehumidify the room.
To set this mode:
• Press the MODE button a number of times until the airconditioning symbol appears.
•Select the target temperature by pressing the  or
or button until the desired temperature is reached.
•Select the desired fan speed by pressing the FAN button. Four speeds are available:
Maximum speed: to achieve the target
temperature as rapidly as possible
Medium speed: reduces noise levels while maintaining a comfortable temperature
Low speed: for silent operation and maxium energy efficiency
AUTO: the appliance automatically selects the most suitable fan speed in relation to the
temperature set on the digital display.
The most suitable temperature for the room during the summer varies from 75°F to 81°F (24 to 27°C). You are recommended, however, not to set a temperature much below the outdoor temperature.
 DEHUMIDIFYING MODE
Ideal to reduce room humidity (spring and autumn, damp rooms, rainy periods, etc).
In dehumidifying mode, the appliance MUST be set-up in the same way as for air conditioning, with the air exhaust hose attached to enable the moisture to be discharged outside.
To set this mode:
• Press the MODE button a number of times until the dehumidifying symbol appears.
In this mode, fan speed is selected automatically by the appliance and cannot be set manually.
FAN MODE
When using the appliance in this mode, the air hose does not need to be attached.
To set this mode:
9
 Loading...