


Identifying the Location of Paper Jams
The paper jams may occur at any of the locations shown below:
CAUTION: To avoid permanent damage to your printer, do not attempt to clear paper jams using any tools or instruments.
1 |
2 |
1 |
Scanner Unit |
|
|
2 |
DADF Cover |
|
|
3 |
Levers |
|
|
4 |
Fusing Unit |
|
|
5 |
Rear Cover |
|
|
6 |
Front Cover |
|
|
7 |
Multipurpose Feeder (MPF) |
Dell™ B2375dfw / B2375dnf Mono MFP
Quick Reference Guide
About Your Printer
1 |
2 |
3 |
4 |
|
|
|
|
|
|
|
|
|
|
|
|
|
|
|
|
|
|
|
|
|
|
|
|
|
|
|
|
|
|
|
|
|
|
|
|
|
|
|
|
|
|
|
|
|
|
|
|
|
|
|
|
|
|
|
|
|
|
|
|
|
|
|
|
|
|
|
|
|
|
|
|
|
|
|
|
|
|
|
|
|
|
|
|
|
|
|
|
|
|
|
|
|
|
|
|
|
|
|
|
|
|
|
|
|
|
|
|
|
|
|
|
|
|
|
|
|
|
|
|
|
|
|
|
|
|
|
|
|
|
|
|
|
|
|
|
|
|
|
|
|
|
|
|
|
|
|
|
|
|
|
|
|
|
|
|
|
|
|
|
|
|
|
|
|
|
|
|
|
|
|
|
|
|
|
|
|
|
|
|
|
|
|
|
|
|
|
|
|
|
|
|
|
|
|
|
|
|
|
|
|
|
|
|
|
|
|
|
|
|
|
|
|
|
|
|
|
|
|
|
|
|
|
|
|
|
|
|
|
|
|
|
|
|
|
|
|
|
|
|
|
|
|
|
|
|
|
|
|
|
|
|
|
|
|
|
|
|
|
|
|
|
|
|
|
|
|
|
|
|
|
|
|
|
|
|
|
|
|
|
|
|
|
|
|
|
|
|
|
|
|
|
|
|
|
|
|
|
|
|
|
7 |
|
|
|
|
|
|
|
|
|
|
|
|
|
|
6 |
|
|
|
|
|
|
|
|
5 |
4 |
|
3 |
|||||||||||||||
Printing the Printer Setting
14 |
13 |
12 |
11 |
10 |
9 |
8 |
7 |
6 |
1 |
Operator Panel |
2 |
Duplex Automatic Document Feeder (DADF) |
|
|
|
|
3 |
Document Width Guide |
4 |
Document Input Tray |
|
|
|
|
5 |
Document Output Tray |
6 |
Document Glass |
|
|
|
|
7 |
Control Board Cover |
8 |
USB Memory Port |
|
|
|
|
9 |
Output Tray |
10 |
Front Cover |
|
|
|
|
11 |
Tray 1 |
12 |
Multipurpose Feeder (MPF) |
|
|
|
|
13 |
Paper Output Extension |
14 |
Toner Cartridge |
|
|
|
|
1 Press My Settings → Machine Setup → Reports → Printer Settings from the home screen.
2Press Start ( ) on screen.
3The Printer Settings page prints out.
Locating the Service Tag
Cleaning the Printer |
Replacing Toners |
|
|
Vertical blanks in prints |
To replace toners |
|
|
See "Cleaning Your Printer" in the User's Guide |
See "Maintenence" in the User's Guide |
|
|
|
Setting Up Wireless Connection |
|
|
|
(Dell™ B2375dfw Mono MFP only) |
|
|
|
To set up wireless connection |
|
Service Tag |
|
See "Networking" in the User's Guide |
|
XXXXXXX |
|
|
|
000 000 000 00 |
|
|
Service Tag XXXXXXX |
Express Service Code |
|
www.dell.com/support |
October 2013 |
1 |
HMCWMA00 |
JC68-03031A00 |
Operator Panel Button Functions
1 |
2 |
3 |
4 |
|
|
|
5 |
6 |
||||||
|
|
|
|
|
|
|
|
|
|
|
|
|
|
|
|
|
|
|
|
|
|
|
|
|
|
|
|
|
|
|
|
|
|
|
|
|
|
|
|
|
|
|
|
|
|
|
|
|
|
|
|
|
|
|
|
|
|
|
|
|
|
|
|
|
|
|
|
|
|
|
|
|
|
|
|
|
|
|
|
|
|
|
|
|
|
|
|
|
|
11 |
10 |
9 |
8 |
7 |
1 |
Home |
|
Go to home screen. |
|||
|
|
|
|
|
|
|
2 |
Log In/Out |
|
You can log in or log out. |
|||
|
|
|
|
|
|
|
3 |
Status LED |
|
Status LED indicates the status of your machine. |
|||
|
|
|
|
|
|
|
4 |
Redial/Pause |
|
Redials the recently sent fax number or received caller ID in ready mode, |
|||
|
|
|
|
|
|
or inserts a pause(-) into a fax number in edit mode. |
|
|
|
|
|
|
|
5 |
Copy |
|
Start copy job using copy default setting regardless of which screen |
|||
|
|
|
|
|
|
the user is in if it is selected. |
|
|
|
|
|
|
|
6 |
Power Saver |
|
You can enter or exit Power Save mode. |
|||
|
|
|
|
|
|
|
7 |
Speed Dial1 |
|
Fax image to destination from stored speed dial1. |
|||
|
|
|
|
|
|
|
8 |
Speed Dial2 |
|
Fax image to destination from stored speed dial2. |
|||
|
|
|
|
|
|
|
9 |
Wi-Fi/WPS |
|
Configures the wireless network connection easily without a computer. |
|||
|
|
(Dell B2375dfw Mono MFP only) |
|
|||
|
|
|
|
|
|
|
10 |
Job Status |
|
Job status shows the jobs currently running and in queue. |
|||
|
|
|
|
|
|
|
11 |
Info |
|
Gives detailed information about product feature guide machine’s info. |
|||
|
|
|
|
|
|
reports, troubleshooting guide, and quick reference guide. |
|
|
|
|
|
||
Understanding the Status LED |
||||||
|
|
|
|
|
|
|
|
LED |
|
Status |
|
Description |
|
|
|
|
|
|
|
|
|
Status |
|
O |
|
• The machine is o -line. |
|
|
|
|
|
|
|
• The machine is in power save mode. When data is received, |
|
|
|
|
|
|
or any button is pressed, it switches to on-line automatically. |
|
|
|
|
|
|
|
|
|
|
Green |
|
Blinking |
The machine is warming up or ready to receive the data. |
|
|
|
|
|
|
|
|
|
|
|
|
On |
The machine is on-line and can be used. |
|
|
|
|
|
|
|
|
|
|
Orange |
|
Blinking |
• A minor error has occurred and the machine is waiting for the error to be |
|
|
|
|
|
|
cleared. Check the display message. When the problem is cleared, the |
|
|
|
|
|
|
machine resumes operation. |
|
|
|
|
|
|
• The toner cartridge is low. Order a new toner cartridge. |
|
|
|
|
|
|
You can temporarily improve print quality by redistribution. |
|
|
|
|
|
|
• The toner cartridge is totally empty. Remove the old toner cartridge and |
|
|
|
|
|
|
install a new one. |
|
|
|
|
|
|
• A paper jam has occurred. |
|
|
|
|
|
|
• There is no paper in the tray. Load paper in the tray. |
|
|
|
|
|
|
• The machine has stopped due to a major error. Check the display message. |
|
|
|
|
|
|
|
|
Wireless |
Blue |
|
Blinking |
• The machine is connecting to a wireless network. |
|
|
|
|
|
|
|
|
|
|
|
|
|
On |
• The machine is connected to a wireless network. |
|
|
|
|
|
|
|
|
|
|
|
|
O |
• The machine is disconnected from a wireless network. |
|
|
|
|
|
|
|
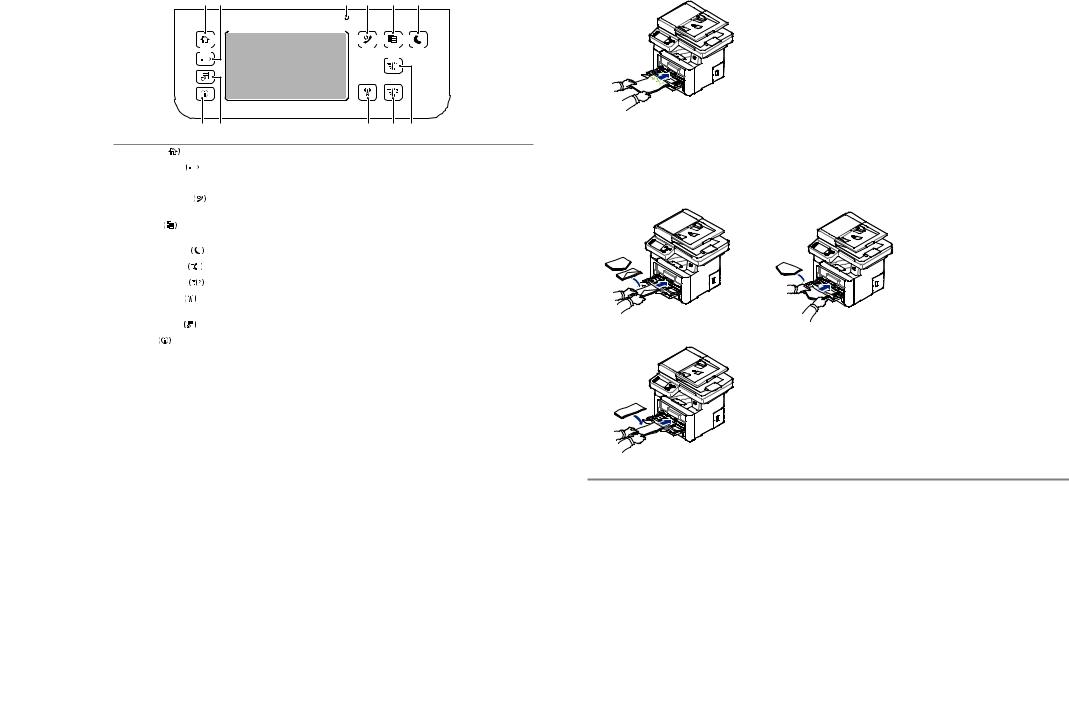
Loading Letterhead
Load the letterhead in the printer with the print-side facing up. Ensure that the title on the letterhead enters the printer first.
Loading Envelopes
Load envelopes in the printer as shown below:
When Loading Envelope #10, DL, or Monarch
To prevent DL and Monarch from getting wrinkled, they are recommended to be loaded with the print-side facing up, flap opened, and facing you.
When Loading C5
Finding Information |
Troubleshooting |
For additional information about printer |
Clearing jams |
components, clearing paper jams, and replacing |
See "Clearing Jams" in the User's Guide |
consumables, see the User's Guide available on |
|
the Drivers and Documentation CD. |
Print quality and other printing problems |
|
See "Solving Problems" in the User's Guide |
|
Common error messages |
|
See "Clearing LCD Error Messages" |
|
in the User's Guide |
|
|
2 |
3 |
 Loading...