


 Loading...
Dell™ Axim™ X5
User’s Guide
Model HC01U
w w w . d e l l . c o m | s u p p o r t . d e l l . c o m

Notes, Notices, and Cautions
NOTE: A NOTE indicates important information that helps you make better use of your computer.
NOTICE: A NOTICE indicates either potential damage to hardware or loss of data and tells you how to avoid the problem.
 CAUTION: A CAUTION indicates a potential for property damage, personal injury, or death.
Abbreviations and Acronyms
For a complete list of abbreviations and acronyms, see "Glossary" on page 163.
____________________
Information in this document is subject to change without notice. © 2003 Dell Computer Corporation. All rights reserved.
Reproduction in any manner whatsoever without the written permission of Dell Computer Corporation is strictly forbidden.
Trademarks used in this text: Dell, the DELL logo, Axim, and DellNet are trademarks of Dell Computer Corporation; Intel is a registered trademark and XScale and StrataFlash are trademarks of Intel Corporation; Microsoft, Windows, and ActiveSync are registered trademarks of Microsoft Corporation; EMC is a trademark of EMC Corporation; Bluetooth is a trademark owned by Bluetooth SIG, Inc. and is used by Dell Computer Corporation under license.
Other trademarks and trade names may be used in this document to refer to either the entities claiming the marks and names or their products. Dell Computer Corporation disclaims any proprietary interest in trademarks and trade names other than its own.
Model HC01U
May 2003 |
P/N K1971 |
Rev. A00 |

Contents
Finding Information . . . . . . . . . . . . . . . . 9
1 About Your Device
Front, Side, and Back Views . . . . . . . . . . . |
12 |
Front and Side Views . . . . . . . . . . . . . |
12 |
Back View . . . . . . . . . . . . . . . . . . |
14 |
Using the Batteries . . . . . . . . . . . . . . . . |
15 |
Installing and Removing the Main |
|
Battery . . . . . . . . . . . . . . . . . . . . |
16 |
Installing and Removing the Backup |
|
Battery . . . . . . . . . . . . . . . . . . . . |
17 |
Charging the Main Battery . . . . . . . . . . |
18 |
Connecting to a Computer . . . . . . . . . . . . |
19 |
Using the Cradle . . . . . . . . . . . . . . . |
19 |
Using the Sync Cable . . . . . . . . . . . . . |
22 |
Using Cards . . . . . . . . . . . . . . . . . . . . |
23 |
CompactFlash Cards . . . . . . . . . . . . . |
23 |
Secure Digital Memory Cards . . . . . . . . . |
24 |
Performing a Reset . . . . . . . . . . . . . . . . |
24 |
Soft Reset . . . . . . . . . . . . . . . . . . . |
24 |
Hard Reset . . . . . . . . . . . . . . . . . . |
25 |
Contents 3

2 Using Microsoft® Pocket PC
Device Buttons and the Stylus . . . . . . . . . . |
28 |
Today Screen . . . . . . . . . . . . . . . . . . . |
28 |
Status Icons . . . . . . . . . . . . . . . . . . . . |
30 |
Programs . . . . . . . . . . . . . . . . . . . . . |
31 |
Program Buttons . . . . . . . . . . . . . . . . |
31 |
Switcher Bar . . . . . . . . . . . . . . . . . . |
32 |
Navigation Bar and Command Bar . . . . . . . . |
33 |
Pop-Up Menus . . . . . . . . . . . . . . . . . . . |
35 |
Finding and Organizing Information . . . . . . . |
36 |
Backing Up Data . . . . . . . . . . . . . . . . . . |
37 |
3 Entering Information
Entering Text Using the Input Panel . . . . . . . |
40 |
Typing With the Soft Keyboard . . . . . . . . . |
42 |
Letter Recognizer . . . . . . . . . . . . . . . |
42 |
Block Recognizer . . . . . . . . . . . . . . . |
43 |
Transcriber . . . . . . . . . . . . . . . . . . |
43 |
Editing Typed Text . . . . . . . . . . . . . . . |
44 |
Writing on the Screen . . . . . . . . . . . . . . . |
44 |
Editing Written Text . . . . . . . . . . . . . . |
45 |
Drawing on the Screen . . . . . . . . . . . . . . |
48 |
Creating a Drawing . . . . . . . . . . . . . . |
48 |
Editing a Drawing . . . . . . . . . . . . . . . |
49 |
4 Contents

|
Recording a Message . . . . . . . . . . . . . . . |
50 |
|
Using My Text . . . . . . . . . . . . . . . . . . . |
51 |
4 |
Adjusting Settings |
|
|
Personal Tab . . . . . . . . . . . . . . . . . . . |
54 |
|
System Tab . . . . . . . . . . . . . . . . . . . . |
54 |
|
Connections Tab . . . . . . . . . . . . . . . . . |
55 |
5 Using Microsoft® ActiveSync® |
|
|
|
About ActiveSync . . . . . . . . . . . . . . . . . |
58 |
|
Installing and Using ActiveSync . . . . . . . . . |
59 |
6 |
Scheduling and Communicating |
|
|
About Microsoft® Pocket Outlook . . . . . . . . |
62 |
|
Calendar . . . . . . . . . . . . . . . . . . . . . |
62 |
|
Using the Summary Screen . . . . . . . . . . |
64 |
|
Creating Meeting Requests . . . . . . . . . . |
64 |
|
Contacts . . . . . . . . . . . . . . . . . . . . . |
65 |
|
Finding a Contact . . . . . . . . . . . . . . . |
66 |
|
Using the Summary Screen . . . . . . . . . . |
67 |
|
Tasks . . . . . . . . . . . . . . . . . . . . . . . |
67 |
|
Notes . . . . . . . . . . . . . . . . . . . . . . . |
68 |
Contents 5

Inbox . . . . . . . . . . . . . . . . . . . . . . . . |
70 |
Synchronizing E-Mail Messages . . . . . . . . |
70 |
Connecting Directly to an E-Mail Server . . . . |
71 |
Using the Message List . . . . . . . . . . . . |
71 |
Composing Messages . . . . . . . . . . . . . . |
73 |
Managing E-Mail Messages and Folders . . . . |
75 |
Notifications . . . . . . . . . . . . . . . . . . . . |
76 |
7 Adding and Removing Programs
Adding Programs Using Microsoft®
ActiveSync® . . . . . . . . . . . . . . . . . . . . |
78 |
Downloading Programs From the Internet . . . . |
79 |
Adding a Program to the Start Menu . . . . . . . |
80 |
Using File Explorer on the Device . . . . . . . |
80 |
Using ActiveSync on the Computer . . . . . . . |
80 |
Removing Programs . . . . . . . . . . . . . . . . |
81 |
8 Using Companion Programs
Microsoft Pocket Word . . . . . . . . . . . . . . |
84 |
Pocket Excel . . . . . . . . . . . . . . . . . . . . |
86 |
Tips for Working in Pocket Excel . . . . . . . |
88 |
MSN Messenger . . . . . . . . . . . . . . . . . . |
89 |
Setting Up . . . . . . . . . . . . . . . . . . . |
89 |
Working With Contacts . . . . . . . . . . . . |
90 |
Chatting With Contacts . . . . . . . . . . . . |
90 |
6 Contents

Windows® Media Player for Pocket PC . . . . . |
91 |
Microsoft Reader . . . . . . . . . . . . . . . . . |
91 |
Using the Library . . . . . . . . . . . . . . . |
92 |
Reading a Book . . . . . . . . . . . . . . . . |
92 |
Using Reader Features . . . . . . . . . . . . |
93 |
Removing a Book . . . . . . . . . . . . . . . |
95 |
9Using Microsoft® Pocket Internet Explorer
Mobile Favorites . . . . . . . . . . . . . . . . . |
98 |
Conserving Memory . . . . . . . . . . . . . . |
99 |
Mobile Favorites Folder . . . . . . . . . . . . |
100 |
Favorite Links . . . . . . . . . . . . . . . . . |
100 |
Using AvantGo Channels . . . . . . . . . . . . . |
100 |
Browsing Mobile Favorites and the Web . . . . . |
101 |
10 Getting Connected
Using Infrared . . . . . . . . . . . . . . . . . . |
106 |
Creating a Modem Connection . . . . . . . . . . |
107 |
Creating an Ethernet Connection . . . . . . . . |
108 |
Creating a VPN Connection . . . . . . . . . . . |
109 |
Ending a Connection . . . . . . . . . . . . . . . |
110 |
Connecting Directly to an E-Mail Server . . . . . |
111 |
Getting Help on Connecting . . . . . . . . . . . |
111 |
Contents 7

11 Appendix
Specifications . . . . . . . . . . . . . . . . . . |
114 |
Regulatory Notices . . . . . . . . . . . . . . . |
117 |
FCC Notices (U.S. Only) . . . . . . . . . . . |
119 |
IC Notice (Canada Only) . . . . . . . . . . . |
121 |
CE Notice (European Union) . . . . . . . . . |
122 |
CE Mark Notice . . . . . . . . . . . . . . . |
122 |
EN 55022 Compliance |
|
(Czech Republic Only) . . . . . . . . . . . . |
124 |
MIC Notice (Republic of Korea Only) . . . . . |
124 |
NOM Information (Mexico Only) . . . . . . . |
127 |
Contacting Dell . . . . . . . . . . . . . . . . . |
128 |
Limited Warranties and Return Policy . . . . . |
149 |
Limited Warranty for Dell-Branded |
|
Hardware Products (U.S. Only) . . . . . . . |
149 |
"Total Satisfaction" Return Policy |
|
(U.S. Only) . . . . . . . . . . . . . . . . . . |
153 |
Limited Warranty Terms for Dell-Branded |
|
Hardware Products (Canada Only) . . . . . . |
154 |
"Total Satisfaction" Return Policy |
|
(Canada Only) . . . . . . . . . . . . . . . . |
158 |
Dell Software and Peripherals |
|
(Canada Only) . . . . . . . . . . . . . . . . |
159 |
1-Year End-User Manufacturer Guarantee |
|
(Latin America and the Caribbean Only) . . . |
160 |
Glossary . . . . . . . . . . . . . . . . . . . . . |
163 |
Index . . . . . . . . . . . . . . . . . . . . . . . . . |
165 |
8 Contents
Finding Information
What Are You Looking For? |
Find It Here: |
|
|
How to set up my device and |
Getting Started placemat and the |
information on the connectors and |
Dell™ User’s Guide |
buttons on my device |
|
Information on using my device. |
Dell User’s Guide and Pocket PC Help. |
|
To view Help, tap the Start button and |
|
tap Help. |
Additional programs that can be |
Dell Companion CD |
installed on my device |
|
Information on using programs on my device
Connecting to and synchronizing with a computer
Pocket PC Help and, if available, tap Help within a specific program
Dell User’s Guide and Microsoft® ActiveSync® Help on your computer. To view Help, click Help and click
Microsoft ActiveSync Help.
Last-minute updates and detailed |
The readme files, located in the |
technical information |
ActiveSync folder on the computer and |
|
on the Dell Companion CD. |
Up-to-date information on your Pocket |
www.microsoft.com/mobile/pocketpc |
PC |
|
My service tag |
Label located in the main battery slot |
|
(remove the main battery) |
|
|
m o c . l l e d . t r o p p u s | m o c . l l e d .w w w
Finding Information |
|
9 |
|

w w w. d e l l . c o m | s u p p o r t . d e l l . c o m
Information Finding 10
1
S E C T I O N 1
About Your Device
Front, Side, and Back Views
Using the Batteries
Connecting to a Computer
Using Cards
Performing a Reset

w w w. d e l l . c o m | s u p p o r t . d e l l . c o m
Front, Side, and Back Views
 CAUTION: Before performing any of the procedures in this section, read and follow the safety instruction in the System Information Guide.
Front and Side Views
infrared sensor (top) |
microphone |
stylus |
Secure |
|
(extended) |
Digital |
|
power button |
card slot |
|
|
|
|
|
scroll |
|
|
dial |
|
touch screen |
record |
|
|
|
|
|
button |
|
|
reset |
|
|
button |
|
Home button |
|
|
|
|
|
Inbox button |
|
|
speaker |
Calendar button |
|
navigator button |
Contacts button |
|
|
I NF R A R E D S E N S O R — The infrared sensor lets you transfer files from your device to another infrared-compatible device without using cable connections.
MI C R O PH O NE — Allows you to record audio.
STY LU S — Use the stylus to write or draw on the screen. To remove the stylus, pull it straight up and out of the holder. To avoid losing the stylus, store the stylus in the holder when you are not using it. Ensure that the stylus is oriented correctly when you replace it in the slot.
P O W E R B UT TO N — Press the power button to turn the device on or off. Press and hold the power button to dim the display. Repeat to light the display.
12 About Your Device
•When the device is connected to external power and the main battery is fully charged, the power button light is solid green.
•When the main battery charge is low, the power button light flashes amber.
•When the main battery is charging, the power button light is solid amber.
•When the device relays a notification, the power button light flashes green.
T O U C H S CR E E N — Use the touch screen and the stylus to enter information into your device. See "Entering Information" on page 39.
HO M E B UT T ON — Press this button to launch Home or to turn on the device.
IN B OX BU T T O N — Press this button to launch your Inbox or to turn on the device.
S P E A KE R — Tap the speaker icon to adjust the volume.
NA V I GA T O R BU T T O N — Press the right, left, top, or bottom of the navigator button to move the cursor on the screen.
CO NT A C T S BU T T O N — Press this button to launch Contacts or to turn on the device.
CAL E ND A R B U T T O N — Press this button to launch Calendar or to turn on the device.
R E S E T B U T T O N — See "Performing a Reset" on page 24 for information on using the reset button.
R E CO R D BU T T O N — See "Recording a Message" on page 50 for information on using the record button.
S C R O LL D I AL
•Press the scroll dial to perform actions similar to pressing <Enter> on a keyboard.
•Rotate the scroll dial up or down to perform actions similar to using the upand down-arrow keys on a keyboard.
For information on the functionality of the scroll dial within programs, see Pocket PC Help on your device.
SE C U RE DIG I T A L CA R D S L O T — See "Secure Digital Memory Cards" on page 24 for information on using Secure Digital memory cards.
m o c . l l e d . t r o p p u s | m o c . l l e d .w w w
About Your Device |
|
13 |
|
w w w. d e l l . c o m | s u p p o r t . d e l l . c o m
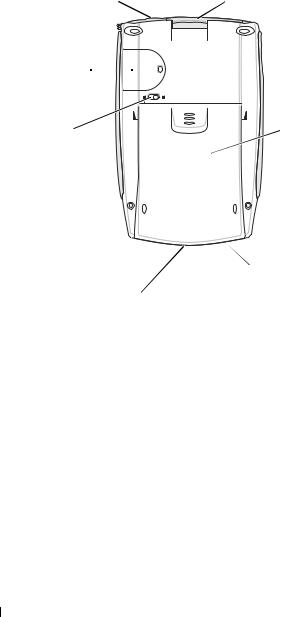
Back View
headphone connector (top) |
CompactFlash card slot |
stylus (secured) 
backup battery cover 
main battery lock |
main battery |
cradle/sync cable |
AC adapter |
connector |
|
connector (bottom) |
(bottom) |
CO MP A C T FLAS H C A R D S LO T — See "CompactFlash Cards" on page 23 for information on using CompactFlash cards.
MA I N B A T T E R Y — See "Using the Batteries" on page 15 for information on the main battery.
AC A D A P T ER C O NN EC T O R — Connect the AC adapter.
C R AD L E/SY NC C AB L E C O NN E CT O R — Connect a cradle or sync cable. See "Connecting to a Computer" on page 19.
MA I N B A T T E R Y L O CK — Use this switch to release and remove the main battery. See "Installing and Removing the Main Battery" on page 16.
B A CK UP B A T T E R Y C O V E R — Secures the backup battery. See "Installing and Removing the Backup Battery" on page 17.
HE A D P HO N E C O N NE C T O R — Attach headphones.
14 About Your Device

Using the Batteries
Your device uses two batteries:
•rechargeable main battery
•lithium coin-cell backup battery
NOTICE: Do not use your device until you have charged the main battery for at least 4 hours.
Before you use your device for the first time, you must install both batteries and completely charge the main battery. Once the main battery is charged, use the power properties to monitor the battery charge. See Pocket PC Help on the device for more information.
NOTICE: After you install the batteries for the first time, do not remove the main battery and the backup battery from the device at the same time. Doing so results in the loss of all data stored in SDRAM.
NOTICE: If you need to replace both batteries at the same time, ensure that you replace the main battery first.
m o c . l l e d . t r o p p u s | m o c . l l e d .w w w
About Your Device |
|
15 |
|
w w w. d e l l . c o m | s u p p o r t . d e l l . c o m
Installing and Removing the Main Battery
To install the main battery:
1Ensure that the device is turned off.
2Ensure that the main battery is oriented correctly and slide the battery into the slot until you feel a click.
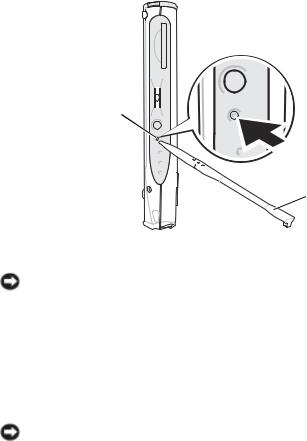
To remove the main battery:
1Insert the tip of the stylus into the main battery lock.
2Slide and hold the lock in the unlock position.
3Slide the battery out of the slot.
 battery slot
main battery lock
 stylus
main battery
NOTE: Your service tag is located underneath the main battery. You need your service tag if you access Dell Support at support.dell.com or if you call Dell for customer service or technical support.
16 About Your Device
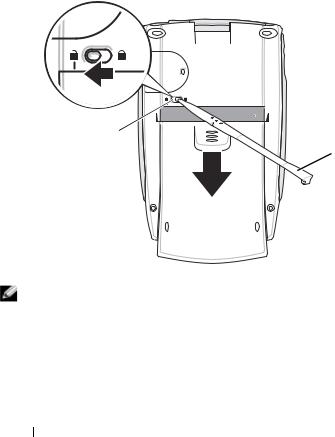
Installing and Removing the Backup Battery
NOTICE: Do not remove the backup battery unless the AC adapter is connected or the main battery is installed. Otherwise, you might lose data.
To install the backup battery:
1Ensure that the device is turned off.
2Insert the stylus into the backup battery release and slide the release to the left to remove the cover.
backup battery release
backup battery cover
stylus
3Wipe off the backup battery with a dry cloth.
4Insert the backup battery with the positive side (+) facing up.
5Slide the cover on and ensure that it is flush with the back of the device.
m o c . l l e d . t r o p p u s | m o c . l l e d .w w w
About Your Device |
|
17 |
|

w w w. d e l l . c o m | s u p p o r t . d e l l . c o m
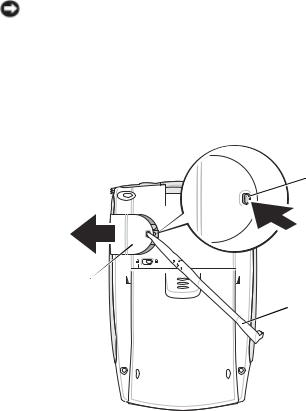
To remove the backup battery:
1Insert the tip of the stylus into the backup battery release.
2Slide the release to the left and remove the cover.
3With your finger tip, gently press the right side of the battery to tilt up the left side of the battery.
backup battery
4 Remove the battery.
Charging the Main Battery
Use one of the following options to charge the main battery:
•Connect the AC adapter directly to the device and to an electrical outlet.
•Connect the AC adapter to the cradle, and insert the device into the cradle. See "Using the Cradle" on page 19 for more information.
18 About Your Device

Connecting to a Computer
You either connect your device to a computer using a cradle or directly to a computer using a sync cable. Connect your device to a computer to:
•Add programs to your device. See "Adding Programs Using Microsoft® ActiveSync®" on page 78 for more information.
•Synchronize data on your device with data on your computer.
For information on synchronizing your data, see the following resources:
•"Using Microsoft® ActiveSync®" on page 57
•ActiveSync Help on your computer
•ActiveSync Help on your device
Using the Cradle
NOTE: Depending on the configuration of your device, the cradle is optional.
You can use the cradle to:
•Synchronize the data on your device with the data on your computer.
•Power the device with AC power to conserve battery power.
•Charge the main battery. See "Using the Batteries" on page 15 for more information.
•Charge a spare battery.
Before connecting your device to a computer for the first time, ensure that you install ActiveSync on the computer from the Dell™ Companion CD.
m o c . l l e d . t r o p p u s | m o c . l l e d .w w w
About Your Device |
|
19 |
|
w w w. d e l l . c o m | s u p p o r t . d e l l . c o m
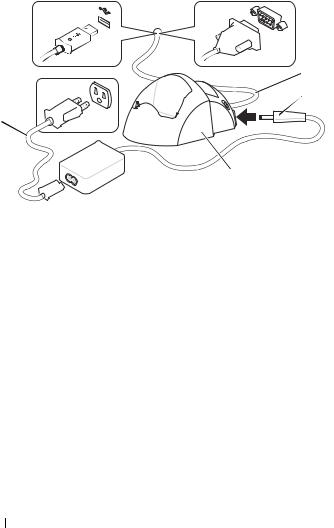
To connect your device to the cradle:
1Place the cradle on a flat, level surface near your computer.
2Depending on the type of cradle that you have, connect the cradle cable to either the USB or serial connector on your computer.
USB connector |
serial connector |
on the computer |
on the computer |
 cradle cable
AC adapter
power
cord 
 cradle
20 About Your Device
3 Connect the AC adapter to the cradle and to an electrical outlet.
 spare battery
 charger front of cradle

 stylus holder
 spare battery status light
4Align the connector on the bottom of the device with the connector on the cradle, and, keeping the front of the device flush with the front of the cradle, lower the device onto the cradle.
When the device is docked in the cradle, the DELL™ logo on the cradle lights up and the connection status icon appears on the command bar (see page 29).
The spare battery status light on the cradle operates as follows:
•Green — The spare battery is fully charged.
•Amber — The spare battery is charging.
NOTE: The power button on the device indicates the charge status of the main battery. See the description of the device status lights on page 13 for more information.
m o c . l l e d . t r o p p u s | m o c . l l e d .w w w
About Your Device |
|
21 |
|

w w w. d e l l . c o m | s u p p o r t . d e l l . c o m
To remove the device from the cradle, pull the device straight up and out of the cradle.
Using the Sync Cable
Use the sync cable to connect your device directly to the computer without using the cradle.
NOTE: Depending on the configuration of your device, the sync cable is optional.
To connect the sync cable:
1Depending on the type of sync cable that you have, connect one end of the cable to either the USB connector or the serial connector on your computer.
2Connect the other end of the cable to your device.
USB connector |
serial connector |
on the computer |
on the computer |
power cord 
|
|
device |
AC adapter |
sync cable |
connector |
|
|
22 About Your Device

Using Cards
CompactFlash Cards
Your device supports CompactFlash Type I and Type II cards. Some common types of cards include:
•Modem — Connect a telephone line for modem data communications.
•Wireless communication — Perform data communications without the use of cable connections. You can use cards, such as Bluetooth™ and 802.11b wireless LAN.
•Storage — Save data or install programs on a storage card.
When you do not have a CompactFlash card installed, insert the plastic blank to protect the CompactFlash card slot.
To install a CompactFlash card:
1 If a blank is installed, remove it.
blank

 CompactFlash
card slot
m o c . l l e d . t r o p p u s | m o c . l l e d .w w w
2Ensure that the CompactFlash card is oriented correctly, and slide the card into the slot.
NOTICE: Do not force the card. If you feel resistance, remove the card, check the orientation, and reinsert it.
See the documentation that came with the card for information on using the card.
About Your Device |
|
23 |
|

w w w. d e l l . c o m | s u p p o r t . d e l l . c o m
Secure Digital Memory Cards
Use Secure Digital memory cards to save or back up data. To install a Secure Digital memory card:
blank 
1If a card is already installed, press in the card to release it, and then remove it.
2Ensure that the card is oriented correctly, and slide it into the slot until you feel a click.
NOTICE: Do not force the card. If you feel resistance, remove the card, check the orientation, and reinsert it.
See the documentation that came with the card for information on using the card.
Performing a Reset
Soft Reset
When you perform a soft reset, the device deletes any data that has not been saved but saves any data that has been stored in memory. Try performing a soft reset if the device does not respond when you tap the display or press a button.
To perform a soft reset, use the stylus to press the reset button.
24 About Your Device
reset button 
 stylus
m o c . l l e d . t r o p p u s | m o c . l l e d .w w w
Hard Reset
NOTICE: When you perform a hard reset, you lose all the data stored on your device.
Perform a hard reset if:
•You want to delete all the data stored on your device.
•You forget your password and need to clear it.
•Your device is experiencing severe operational problems and you have already attempted a soft reset.
NOTICE: It is strongly recommended that you back up your data before you perform a hard reset. See ActiveSync Help on your computer for more information.
To perform a hard reset:
1Press and hold the power button.
2With the stylus, hold the reset button for about 2 seconds.
3Follow the instructions on the screen.
About Your Device |
|
25 |
|

w w w. d e l l . c o m | s u p p o r t . d e l l . c o m
Device Your About 26

2
S E C T I O N 2
Using Microsoft ®
Pocket PC
Device Buttons and the Stylus
Today Screen
Status Icons
Programs
Navigation Bar and Command Bar
Pop-Up Menus
Finding and Organizing Information
Backing Up Data

w w w. d e l l . c o m | s u p p o r t . d e l l . c o m
Device Buttons and the Stylus
Your device has hardware buttons that control actions and scroll functions, and a stylus for selecting items and entering information.
On the device, the stylus replaces the mouse:
•Tap — Touch the screen once with the stylus to open items and select options.
•Drag — Hold the stylus and drag across the screen to select text and images. Drag in a list to select multiple items.
•Tap and hold — Tap and hold the stylus on an item to see a list of actions available for that item. On the pop-up menu that appears, tap the action you want to perform.
See "Entering Information" on page 39 for more information.
Today Screen
When you turn on your device for the first time each day (or after 4 hours of inactivity), the Today screen appears. You can also view the Today screen by tapping the Start button and then tapping Today. The Today screen displays the date and information about the device owner, today’s calendar, and important tasks. To customize the Today screen:
1Tap the Start button and tap Settings.
2Tap the Personal tab and tap Today.
Use the Appearance tab to change the background that displays on the Today screen.
Use the Items tab to change the items that appear on the Today screen.
28 Using Microsof t® Pocket PC
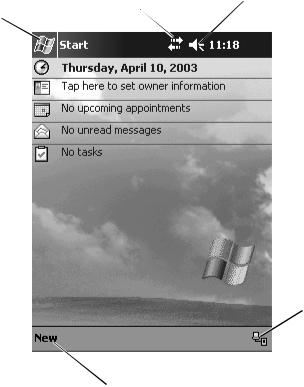
Start |
connection |
volume control icon |
|
configuration icon |
|||
button |
|
||
|
|
 connection status icon
 New items menu
m o c . l l e d . t r o p p u s | m o c . l l e d .w w w
Using Microsof t® Pocket PC |
|
29 |
|

w w w. d e l l . c o m | s u p p o r t . d e l l . c o m
Status Icons
NOTE: If there is not enough room to display all notification icons, the notification icon, , displays. Tap the notification icon to view all notifications.
Icon Description
Turns sound on and off.
Backup battery is low.
Main battery is charging.
Main battery is low.
Main battery is very low.
Main battery is full.
Connection is active. Tap the icon to configure connections.
Connection is not detected.
Wireless network is detected.
Synchronization is beginning or ending.
30 Using Microsof t® Pocket PC
Loading...