


 Loading...
Alienware Area-51m R2
Setup and Specifications
Regulatory Model: P38E
Regulatory Type: P38E002
June 2020
Rev. A01

Notes, cautions, and warnings

 NOTE: A NOTE indicates important information that helps you make better use of your product.
 CAUTION: A CAUTION indicates either potential damage to hardware or loss of data and tells you how to avoid the problem.
 WARNING: A WARNING indicates a potential for property damage, personal injury, or death.
© 2020 Dell Inc. or its subsidiaries. All rights reserved. Dell, EMC, and other trademarks are trademarks of Dell Inc. or its subsidiaries. Other trademarks may be trademarks of their respective owners.
Contents
1 Set up your Alienware Area-51m R2.................................................................................................... |
4 |
Alienware Graphics Amplifier.............................................................................................................................................. |
4 |
2 Views of Alienware Area-51m R2........................................................................................................ |
5 |
Front...................................................................................................................................................................................... |
5 |
Right...................................................................................................................................................................................... |
5 |
Left........................................................................................................................................................................................ |
5 |
Base....................................................................................................................................................................................... |
6 |
Display................................................................................................................................................................................... |
7 |
Back....................................................................................................................................................................................... |
7 |
Bottom................................................................................................................................................................................... |
8 |
3 Specifications of Alienware Area-51m R2........................................................................................... |
9 |
Dimensions and weight........................................................................................................................................................ |
9 |
Processor............................................................................................................................................................................... |
9 |
Chipset.................................................................................................................................................................................. |
9 |
Operating system................................................................................................................................................................ |
10 |
Memory............................................................................................................................................................................... |
10 |
External ports...................................................................................................................................................................... |
10 |
Internal slots......................................................................................................................................................................... |
11 |
Ethernet............................................................................................................................................................................... |
11 |
Wireless module.................................................................................................................................................................. |
11 |
Audio................................................................................................................................................................................... |
12 |
Storage................................................................................................................................................................................ |
12 |
Media-card reader.............................................................................................................................................................. |
13 |
Keyboard............................................................................................................................................................................. |
13 |
Camera................................................................................................................................................................................ |
14 |
Touchpad............................................................................................................................................................................. |
14 |
Power adapter..................................................................................................................................................................... |
14 |
Battery................................................................................................................................................................................. |
15 |
Display................................................................................................................................................................................. |
16 |
GPU—Integrated............................................................................................................................................................... |
16 |
GPU — Discrete.................................................................................................................................................................. |
17 |
Operating and storage environment.................................................................................................................................. |
17 |
4 Keyboard shortcuts.............................................................................................................................. |
18 |
5 Alienware Command Center.............................................................................................................. |
20 |
6 Getting help and contacting Alienware.............................................................................................. |
21 |
3

Set up your Alienware Area-51m R2

 NOTE: The images in this document may differ from your computer depending on the configuration you ordered.
Connect one or both power adapters that are supplied with your computer, then press the power button.
 NOTE: Your computer ships with two power adapters, and it operates normally with one power adapter connected. For maximum gaming performance, it is recommended to connect two adapters. Only use adapters supplied with your device, or Dell-approved adapters to power your device.
Alienware Graphics Amplifier
Alienware Graphics Amplifier enables you to connect an external graphics card to your computer.
When using the Virtual Reality (VR) headset, connect the HDMI cable to the graphics card installed on your Alienware Graphics Amplifier. The USB cables from the VR headset can be connected either to your computer or your Alienware Graphics Amplifier.
NOTE: The USB dongle is not required, if you are connecting the USB 3.2 Gen 1 cables on your VR headset to the USB 3.2 Gen 1 Type-A port on your Alienware Graphics Amplifier.
For more information about Alienware Graphics Amplifier, see Alienware Graphics Amplifier User’s Guide at www.dell.com/support.
4

Views of Alienware Area-51m R2
Front
1.Left speaker
Provides audio output.
2.Right speaker
Provides audio output.
Right
1.SD-card slot
Reads from and writes to the SD card. The computer supports the following card types:
•Secure Digital (SD)
•Secure Digital High Capacity (SDHC)
•Secure Digital Extended Capacity (SDXC)
2.USB 3.2 Gen 1 ports (2)
Connect peripherals such as external storage devices and printers. Provides data transfer speeds up to 5 Gbps.
Left
1.Security-cable slot (wedge-shaped)
Connect a security cable to prevent unauthorized movement of your computer.
2.Thunderbolt 3 (USB Type-C) port
Supports USB 3.2 Gen 2, DisplayPort 1.2, Thunderbolt 3 and also enables you to connect to an external display using a display adapter.
Provides data transfer rates up to 10 Gbps for USB 3.2 Gen 2 and up to 40 Gbps for Thunderbolt 3.

 NOTE: A USB Type-C to DisplayPort adapter (sold separately) is required to connect a DisplayPort device.
5
3.USB 3.2 Gen 1 port with PowerShare
Connect peripherals such as external storage devices and printers.
Provides data transfer speeds up to 5 Gbps. PowerShare enables you to charge your USB devices even when your computer is turned off.
 NOTE: If the charge on your computer’s battery is less than 10 percent, you must connect the power adapter to charge your computer, and USB devices connected to the PowerShare port.
 NOTE: If a USB device is connected to the PowerShare port before the computer is turned off or in hibernate state, you must disconnect and connect it again to enable charging.
 NOTE: Certain USB devices may not charge when the computer is turned off or in sleep state. In such cases, turn on the computer to charge the device.
4.Microphone/headphone port (configurable)
Connect an external microphone for sound input or headphones for sound output.
5.Headset port
Connect headphones or a headset (headphone and microphone combo).
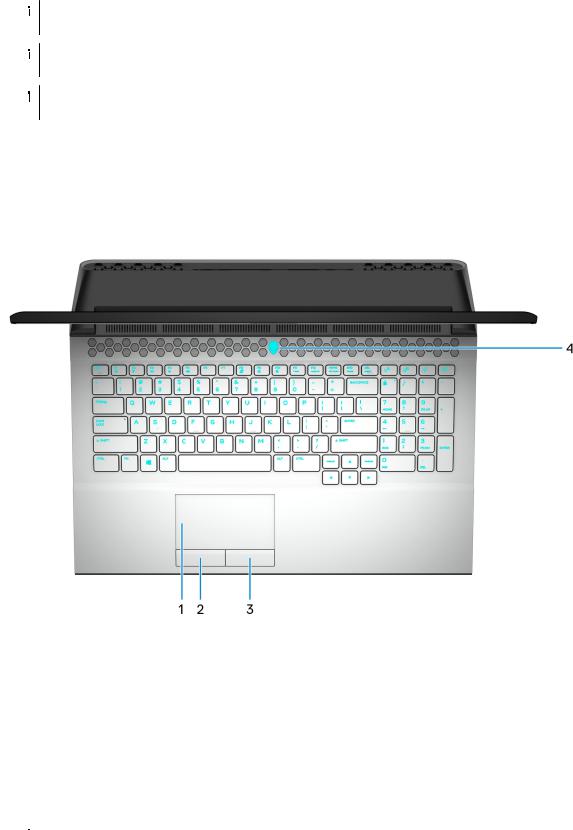
Base
1.Touchpad
Move your finger on the touchpad to move the mouse pointer. Tap to left-click and two finger tap to right-click.
2.Left-click area
Press to left-click.
3.Right-click area
Press to right-click.
4.Power button (Alienhead)
Press to turn on the computer if it is turned off, in sleep state, or in hibernate state. Press to put the computer in sleep state if it is turned on.
Press and hold for 4 seconds to force shut-down the computer.

 NOTE: You can customize the power-button behavior in Power Options.
6
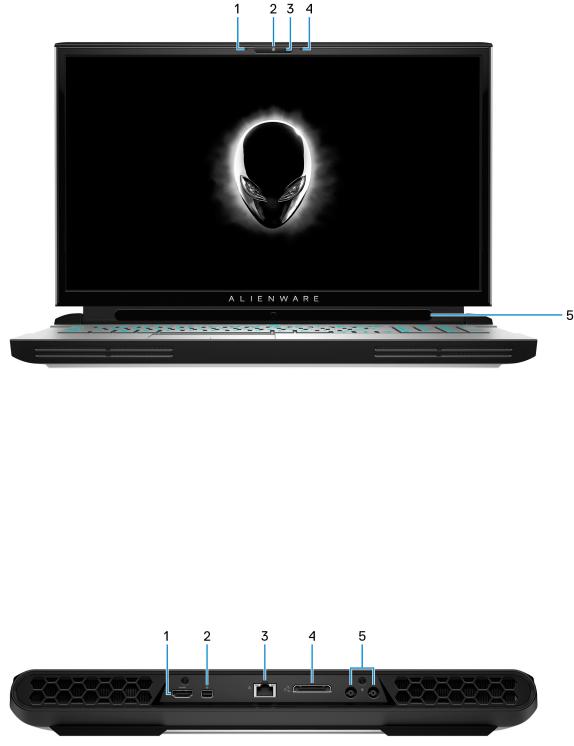
Display
1.Left microphone
Provides digital sound input for audio recording and voice calls.
2.Camera
Enables you to video chat, capture photos, and record videos.
3.Camera-status light
Turns on when the camera is in use.
4.Right microphone
Provides digital sound input for audio recording and voice calls.
5.Tobii Eye Tracker
Application that enables you to interact with your computer using your eyes.
Back
1.HDMI port
Connect to a TV or another HDMI-in enabled device. Provides video and audio output.
2.Mini DisplayPort
Connect to a TV or another DisplayPort-in enabled device. Provides video and audio output.
3.Network port
Connect an Ethernet (RJ45) cable from a router or a broadband modem for network or Internet access.
4.External graphics port
7
Loading...