


Moodpic 1 63,2 x 50,25mm CMYK & GREY
Register your new Bosch now: www.bosch-home.com/welcome
Moodpic 2 98,6 x 46,7mm CMYK & GREY
MUM 59...GB
en Instruction manual ms Arahan pengendalian ar مادختسلاا تاداشرإ
zf zh

en |
English |
3 |
|
|
|
ms |
Bahasa Melayu |
16 |
|
|
|
ar |
ةيبرعلا |
46 |
|
|
|
zf |
|
47 |
|
|
|
zh |
|
58 |
|
|
|

Congratulations on the purchase of your new Bosch appliance.
In doing so, you have opted for a modern, high-quality domestic appliance.
You can find further information about our products on our web page.
For your safety |
en |
Contents
For your safety 3 Safety systems 5 Overview 6 Operation 7 Bowl and tools 7 Cleaning and servicing 11 Storage 11 Troubleshooting 11 Application examples 12 Disposal 13 Guarantee 13 Optional accessories 14
For your safety
Before use, read these instructions carefully in order to become familiar with important safety and operating instructions for this appliance.
If the instructions for correct use of the appliance are not observed, the manufacturer’s liability for any resulting damage will be excluded. This appliance is designed for processing normal household quantities in the home or similar quantities in non-industrial applications. Nonindustrial applications include e.g. use in employee kitchens in shops, offices, agricultural and other commercial businesses, as well as use by guests in boarding houses, small hotels and similar dwellings. Use the appliance for processing normal quantities of food for domestic use. Do not exceed permitted maximum quantities (see “Application examples”).
This appliance is suitable for mixing, kneading and beating food. It must not be used for processing other objects or substances. Other applications are possible if the accessories approved by the manufacturer are used.
Use the appliance with original accessories only. When using the accessories, follow the enclosed operating instructions. Please keep the operating instructions in a safe place. If passing on the appliance to a third party, always include the operating instructions.
General safety instructions
AAElectric shock risk
The appliance must not be used by children. The appliance and its power cord must be kept away from children.
Appliances can be used by persons with reduced physical, sensory or mental capabilities or lack of experience and knowledge if they have been given supervision or instruction concerning use of the appliance
3
en For your safety
in a safe way and if they understand the hazards involved. Children shall not play with the appliance. Do not leave the running appliance unattended.
Connect and operate the appliance only in accordance with the specifications on the rating plate. Only use indoors. Do not use the appliance if the power cord and / or appliance are damaged.
Before replacing accessories or additional parts, which move during operation, switch off the appliance and disconnect from the power supply.Always disconnect the appliance from the supply if it is left unattended and before assembling, disassembling or cleaning. Do not place the power cord over sharp edges or hot surfaces.
To prevent injury, a damaged power cord must be replaced by the manufacturer or his customer service or a similarly qualified person. Only our customer service may repair the appliance.
Safety instructions for this appliance
AARisk of injury
AAElectric shock risk
Do not insert mains plug until all preparations for working with the appliance are complete. Never immerse the base unit in liquid or hold under running water. Do not use a steam cleaner. Do not adjust the swivel arm while the appliance is switched on. Wait until the drive has come to a standstill. Do not change tool / accessory until the drive is at a standstill – when the appliance is switched off, the drive continues running briefly. Use only the rotary switch to switch the appliance on or off. When the appliance is not in use, pull out the mains plug. Before eliminating a fault, pull out the mains plug.
AARisk of injury from the rotating tools!
Keep hands clear of rotating parts. While the appliance is operating, never place fingers in the mixing bowl. Attach the cover (12) before operating the appliance! Do not change tools until the drive has come to a standstill – when the appliance is switched off, the drive continues running briefly and stops in the tool change position. Do not move the swivel arm until the tool has come to a standstill. For reasons of safety the appliance cannot be operated unless unused drives are covered with drive guards (5, 8). Before attaching / removing the continuous-feed shredder, wait until the drive has come to a standstill and pull out the mains plug. Do not reach into the feed tube.
AARisk of injury from sharp blades!
Do not grip the sharp blades or edges of the cutting discs. Take hold of cutting discs by the edge only. Do not touch blender blades with bare hands.
4

Safety systems |
en |
AARisk of injury from sharp blades / rotating drive!
Never place fingers in the attached blender! Do not remove / attach the blender until the drive is at a standstill! Operate the assembled blender only and with the lid attached.
AARisk of scalding!
If processing hot liquids, steam escapes through the funnel in the lid. Add a max. 0,5 litres of hot or frothing liquid.
AAImportant!
Use the appliance with original accessories only. When using the accessories, follow the enclosed operating instructions. Use only one tool or accessory at any one time.
AAExplanation of the symbols on the appliance or accessory
 Follow the instructions in the operating instructions.
  Caution! Rotating blades.
Caution! Rotating tools.
Do not place fingers in the feed tube
Safety systems
Start lock-out
See “Operating positions” table.
The appliance can be switched on in position 1 and 3 only:
■■when the bowl (11) has been inserted and turned until it locks into place and
■■the blender drive cover has been attached (8).
Overload protection
If the motor switches itself off while the appliance is being used, the overload protection feature has been activated.Apossible cause may be that too much food was processed at one time.
If a safety system is activated, see “Troubleshooting”.
Restart lock-out
If the power is interrupted, the appliance remains switched on but the motor does not start running again when the power is restored. To switch the appliance on again, turn the rotary switch to 0/off, then switch on.
5

en Overview
The operating instructions describe several models, see also overview of models (Fig. M). The appliance requires no maintenance.
Overview
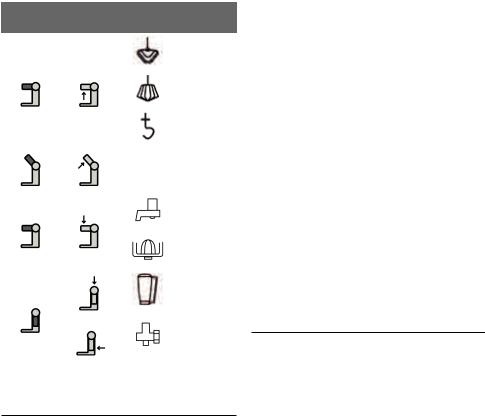
Please fold out the illustrated pages. Fig.A
Base unit
1Release button
2Swivel arm
“EasyArmlift” function to support the upward movement of the arm (see “Work positions”).
3Rotary switch
When the appliance has been switched off (position 0/off), the appliance runs automatically to the optimum position for changing the tools.
0/off = Stop
M = Instantaneous switching at maximum speed, hold switch for required blending duration.
Settings 1-7, Operating speed: 1 = low speed – slow,
7 = high speed – fast.
4Operating indicator
Is lit while the appliance is operating (rotary switch on M or 1-7). Flashes if the appliance has been operated incorrectly, the electronic fuse has tripped or the appliance is defective – see section “Troubleshooting”.
5Drive cover
To remove the drive cover, press on the rear area and remove cover.
6Drive for
–continuous-feed shredder and
–citrus press (optional accessory*). When not in use, attach the drive cover.
7Drive for tools
(stirrer, whisk, kneading hook) and mincer (optional accessory*)
8Blender drive cover
9Drive for blender
(optional accessory*)
When not in use, attach the blender drive cover.
10Automatic cord winder
Bowl with accessories
11Stainless steel stirring bowl
12Lid
Tools
13Professional flexi stirring whisk
14Professional beating whisk
15Kneading hook with dough deflector
16Accessories bag
For storage of the tools and cutting discs.
Continuous-feed shredder
17Pusher
18Cover with filling shaft
19Cutting discs
a)Professional Supercut reversible disc – coarse / fine
b)Reversible shredding disc – coarse / fine
c)Grating disc – medium-fine
d)Grating disc – coarse*
e)Asian vegetable disc*
20Disc holder
21Housing with outlet opening
Blender*
22Blender jug
23Lid
24Funnel
*If an accessory is not included in the product package, it can be purchased via the trade or customer service.
Operating positions
Figure B:
Attention:
Before operating the appliance, attach the tool / accessory to the correct drive and in the correct position and place in the operating position according to this table. The swivel arm must be engaged in every operating position.
Note:
The swivel arm features an “EasyArmlift” function which supports the upwards movement of the swivel arm.
6
Selecting the operating position:
■■Press the Release button and move the swivel arm. Support movement with your hand.
■■Move the swivel arm until it engages in the required position.
Position |
Drive |
Tool / |
Operating |
|
|
Accessory |
speed |
|
|
|
1-5 |
|
|
|
|
|
|
|
1-7 |
1 |
7 |
|
|
|
|
|
1-3 |
|
|
|
|
|
|
* |
– |
2 |
7 |
|
|
|
|
|
3-7 |
|
|
|
|
3 |
6 |
|
3-5 |
|
|
||
|
|
|
|
|
|
|
5-7 |
|
9 |
|
|
4 |
|
|
5-7 |
|
|
|
|
|
7 |
|
|
*Insert / remove whisk, stirrer or kneading hook.Add large quantities of ingredients
Operation
WWRisk of injury!
Do not insert mains plug until all preparations for working with the appliance are complete.
WWAttention!
Do not operate the appliance without an accessory / tool in the operating position. Do not operate the appliance empty. Do not expose appliance or accessories to heat sources. Parts are not microwave-safe.
Operation en
■■Before operating the appliance and accessories for the first time, clean thoroughly; see “Cleaning and servicing”.
Important information
These operating instructions contain a sticker with reference values for the operating speed of the appliance when using the tools or accessories. We recommend attaching this sticker to the appliance
(Fig. C).
Preparation
■■Place the base unit on a smooth, clean surface.
■■Pull out the cord in one go to the required length (max. 100 cm) and slowly release; the cord is locked (Fig. D).
■■Reducing the cord length:
Pull gently on the cord and allow it to roll up to the required length. Then gently
pull the cord again and slowly release; the cable is locked.
Warning!
Do not twist the cord when inserting it. If the appliance features an automatic cord winder, do not insert the cord manually. If the cord jams, pull out the cord all the way and then allow it to wind up.
■■ Insert the mains plug.
Bowl and tools
WWRisk of injury from rotating tools
While the appliance is operating, never place fingers in the mixing bowl.Attach the cover (12) before operating the appliance! Do not change tools until the drive has come to a standstill – when the appliance is switched off, the drive continues running briefly and stops in the tool change position. Do not move the swivel arm until the tool has come to a standstill. For reasons of safety the appliance may only be operated when unused drives have been covered with drive guards (5, 8).
Attention!
Use bowl with this appliance only.
7

en Bowl and tools
Professional flexi stirring whisk (13) for stirring dough, e.g. cake mixture
Professional beating whisk (14) for whisking egg whites, cream and light dough, e.g. sponge mixture
Kneading hook (15)
for kneading heavy dough and mixingin ingredients that ought not be cut (e.g. raisins and chocolate chips)
Important information concerning the use of the whisk
Figure E:
The whisk should almost touch the bottom of the bowl to ensure that the ingredients are optimally mixed. If not, adjust the height of the whisk as follows:
■■Remove mains plug.
■■Press the Release button and move the swivel arm to position 2.
■■Insert the whisk into the drive until the whisk locks into position.
■■Hold whisk in place and loosen nut clockwise using open-ended wrench (size 8).
■■Set the whisk to the optimum height by rotating the whisk:
–Turn clockwise: Raise
–Turn anti-clockwise: Lower
■■Press the Release button and move the swivel arm to position 1.
■■Check the height of the whisk and, if required, correct.
■■When the height has been set correctly, press Release button and move the swivel arm to position 2.
■■Hold whisk in place and tighten nut anticlockwise using open-ended wrench (size 8).
Working with the bowl and the tools
Figure F:
■■Press the Release button and move the swivel arm to position 2.
■■Insert the bowl:
–Tilt the bowl forwards and then set it down.
–Turn anti-clockwise until it locks into place.
■■Depending on the processing task, insert the stirrer, whisk or kneading hook until it locks into position.
Note:
If using the kneading hook, rotate the dough deflector until the kneading hook can lock into position (Fig. E-4b).
■■Put the ingredients to be processed into the bowl.
■■Press the Release button and move the swivel arm to position 1.
■■Attach the cover.
■■Set the rotary switch to the desired setting.
Our recommendation:
–Professional flexi stirring whisk:
First mix at setting 1-2, then setting 3-5 as required
–Professional beating whisk: setting 7, mix in at setting 1
–Kneading hook:
first stir in at setting 1, knead at setting 3
Adding more ingredients
■■Switch off the appliance with the rotary switch.
■■Add more ingredients through the feed
tube in the cover.
or
■■Remove lid.
■■Press the Release button and move the swivel arm to position 2.
■■Add ingredients.
8

After using the appliance
■■Switch off the appliance with the rotary switch.
■■Remove mains plug.
■■Remove lid.
■■Press the Release button and move the swivel arm to position 2.
■■Take the tool out of the drive.
■■Remove the bowl.
■■Clean all parts, see “Cleaning and servicing”.
Continuous-feed shredder
WWRisk of injury
Do not grip the sharp blades or edges of the cutting discs. Take hold of cutting discs by the edge only. Before attaching / removing the continuous-feed shredder, wait until the drive has come to a standstill and pull out the mains plug. Do not reach into the feed tube.
Warning!
The continuous-feed shredder must be completely assembled before use. Never assemble the continuous-feed shredder on the base unit. Operate the continuous-feed shredder in the indicated operating position only.
Predetermined breaking point Figure G:
The built-in predetermined breaking point protects the drive of the appliance. If an overload occurs, the drive shaft of the contin- uous-feed shredder breaks. However, the drive shaft can easily be replaced.
Anew disc holder with drive shaft is available from customer service.
Professional Supercut
reversible disc – coarse / fine
for slicing fruit and vegetables. Process at setting 5.
Designation on the reversible slicing disc: “Grob” for the coarse cutting side “Fein” for the fine cutting side
Bowl and tools |
en |
Warning!
The reversible slicing disc is not suitable for slicing hard cheese, bread, rolls or chocolate. Slice boiled, waxy potatoes only when they are cold.
Reversible shredding disc – coarse / fine
for shredding vegetables, fruit and cheese, except for hard cheese (e.g. Parmesan). Process at setting 3 or 4.
Designation on the reversible shredding disc: “2” for the coarse shredding side
“4” for the fine shredding side
Warning!
The reversible shredding disc is not suitable for shredding nuts. Shred soft cheese with the coarse side only at setting 7.
Grating disc – medium-fine
for grating raw potatoes, hard cheese
(e.g. Parmesan), cooled chocolate and nuts. Process at setting 7.
Warning!
The grating disc is not suitable for grating soft cheese and cheese slices.
Grating disc – coarse
for grating raw potatoes, e.g. for potato pancakes or dumplings. Process at setting 7.
Asian vegetable disc
Slices fruit and vegetables into fine strips forAsian vegetable dishes. Process at setting 5.
Working with the continuous-feed shredder
Figure H:
■■Press the Release button and move the swivel arm to position 2.
■■Insert the bowl:
–Tilt the bowl forwards and then set it down.
–Turn anti-clockwise until it locks into place.
9
en Bowl and tools
■■Press the Release button and move the swivel arm to position 3.
■■Remove drive cover from the drive of the continuous-feed shredder (Fig. H-5a).
■■Hold disc holder at the lower end, ensuring that the two tips are face up.
■■Carefully place the required slicing or shredding disc onto the tips of the disc holder (Fig. H-6a). In the case of reversible discs, ensure that the required side is face up.
■■Grip disc holder at the upper end and insert into the housing (Fig. H-6b).
■■Attach the cover (note mark) and turn all the way in a clockwise direction.
■■Place continuous-feed shredder on the drive and rotate all the way in a clockwise direction, as illustrated in Fig. H-8.
■■Turn rotary switch to recommended setting.
■■Put food to be processed in the feed tube and push down with the pusher.
WWWarning!
Prevent the cut ingredients from building up in the outlet opening.
Tip: To ensure even cutting results, process thin ingredients in bunches.
Note: If the food to be processed sticks in the continuous-feed shredder, switch food processor off, pull out mains plug, wait until the drive comes to a standstill, remove cover from the continuous-feed shredder and empty feed tube.
After using the appliance
■■Switch off the appliance with the rotary switch.
■■Rotate the continuous-feed shredder in an anti-clockwise direction and remove.
■■Rotate the lid in an anti-clockwise direction and remove.
■■Remove disc holder with disc. To do this, press finger from below against the drive shaft (Fig. J).
■■Clean parts.
Blender
WWRisk of injury from sharp blades / rotating drive!
Never place fingers in the attached blender! Do not remove / attach the blender until the drive is at a standstill! Operate the assembled blender only and with the lid attached.
WWRisk of scalding!
If processing hot liquids, steam escapes through the funnel in the lid.Add a max. 0.5 litres of hot or frothing liquid.
Warning!
Blender may be damaged. Do not process deep-frozen ingredients (except ice cubes). Do not operate blender when empty.
Working with the blender
Figure K:
■■Press the release button and move the swivel arm to position 4.
■■Remove the blender drive cover.
■■Attach blender jug (mark on the handle on mark on the base unit) and turn all the way in an anti-clockwise direction.
■■Add ingredients.
Maximum capacity – liquid = 1.25 litres; maximum capacity frothing or hot liquids max. 0.5 litres; optimal processing capacity – solids = 50-100 g;
■■Attach the cover and turn anti-clockwise all the way into the blender handle. The cover must be locked in position.
■■Set the rotary switch to the desired setting.
Adding more ingredients
Figure K-8:
■■Switch off the appliance with the rotary switch.
■■Remove the lid and add ingredients.
or
■■remove the funnel and gradually add solid ingredients through the refill opening.
or
■■ pour liquid ingredients through the funnel.
10
After using the appliance
■■Switch off the appliance with the rotary switch.
■■Rotate the blender in a clockwise direction and remove.
Tip: It is recommended to clean the blender immediately after use.
Cleaning and servicing
Attention!
Do not use abrasive cleaning agents. Surfaces may be damaged.
Cleaning the base unit
WWRisk of electric shock!
Never immerse the base unit in water or place under running water. Do not use a steam cleaner.
■■Remove mains plug.
■■Wipe the base unit and drive cover with a damp cloth. If required, use a little detergent.
■■Then dry the base unit.
Cleaning the bowl and tools
The bowl and tools are dishwasher-proof. Do not wedge plastic parts in the dishwasher, as they could be permanently deformed during the washing process!
Cleaning the continuous-feed shredder
All parts of the continuous-feed shredder are dishwasher-proof.
Tip: To remove the red film after processing e.g. carrots, pour a little cooking oil on a cloth and rub the film off the continuous-feed shredder (not the cutting discs). Then rinse the continuous-feed shredder.
Cleaning the blender
WWRisk of injury from sharp blades!
Do not touch blender blades with bare hands.
The blender jug, lid and funnel are dishwasher-proof.
Cleaning and servicing |
en |
Tip: After processing liquids, it is often sufficient to clean the blender without removing it from the appliance. Pour a little water and washing-up liquid into the attached blender. Switch on the blender for several seconds (setting M). Pour out the water and rinse out the blender with clear water.
Important information
If required, clean accessories bag. Follow care instructions in the bag.
Storage
WWRisk of injury!
When the appliance is not in use, pull out the mains plug.
Figure L:
■■Store tools and cutting discs in the accessories bag.
■■Keep accessories bag in the bowl.
Troubleshooting
WWRisk of injury!
Before eliminating a fault, pull out the mains plug.
Note:
The Operating indicator flashes if the appliance has been operated incorrectly or the electronic fuse has tripped or the appliance is defective.
The swivel arm must be engaged in every operating position.
Initially try to eliminate the problem which has occurred with the help of the following information.
Troubleshooting
Appliance does not start.
Remedial action
■■Check the power supply.
■■Check the mains plug.
■■Check swivel arm. Correct position? Engaged?
■■Screw on blender or bowl as far as possible.
■■Attach the blender cover and screw on as far as possible.
11

en Application examples
■■Attach drive cover to unused drives.
■■The safety lock is active. Switch appliance to 0/off and then back to the required setting.
Troubleshooting
Appliance switches off during use. The overload protection feature has been activated. Too much food was processed at one time.
Remedial action
■■Switch off the appliance.
■■Reduce processing quantity. Do not exceed permitted maximum quantities (see “Application examples”).
Troubleshooting
While the drive was running, the release button was inadvertently pressed. The swivel arm moves up. The drive switches off, but does not stop in the tool change position.
Remedial action
■■Set the rotary switch to 0/off.
■■Move swivel arm to position 1.
■■Switch on appliance (setting 1).
■■Switch off appliance again.
Tool stops in tool change position.
Troubleshooting
Blender does not start working or stops during use, the drive is “humming”. Blade is blocked.
Remedial action
■■Switch off the appliance and pull out the mains plug.
■■Detach the blender and remove the obstruction.
■■Re-attach the blender.
■■Switch on the appliance.
Important information
If the fault cannot be eliminated, please contact customer service.
Application examples
Whipped cream
100 g-600 g
■■Whip cream with the whisk for 1½
to 4 minutes at setting 7 – depending on the quantity and properties of the cream.
Egg white
1 to 8 egg whites
■■Beat egg white with the whisk for 4 to 6 minutes at setting 7.
Sponge mixture
Basic recipe
2 eggs
2-3 tbs. hot water
100 g sugar
1 packet of vanilla sugar
70 g flour
70 g cornflour
Baking powder if required
■■Beat the ingredients (except flour and cornflour) with the whisk for approx. 4-6 minutes at setting 7 until frothy.
■■Rotate switch to setting 1 and spoon in the sifted flour and cornflour within
approx. ½ to 1 minute.
Maximum quantity: 2 x basic recipe
Cake mixture
Basic recipe
3-4 eggs
200-250 g sugar
1 pinch of salt
1 packet of vanilla sugar or peel from ½ lemon
200-250 g butter or margarine (room temperature)
500 g flour
1 packet of baking powder
125 ml milk
■■Mix all ingredients with the stirrer for approx. ½ minute at setting 1, then for
approx. 3-4 minutes at setting 5.
Maximum quantity: 2 x basic recipe
Short pastry
Basic recipe
125 g butter (room temperature)
100-125 g sugar
1egg
1pinch of salt
Alittle lemon peel or vanilla sugar 250 g flour
Baking powder if required
12

■■Mix all ingredients with the stirrer for approx. ½ minute at setting 1, then for approx. 2-3 minutes at setting 3.
From 500 g flour:
■■ Knead the ingredients with the kneading hook for approx. ½ minute at setting 1, then for approx. 3-4 minutes at setting 3.
Maximum quantity: 2 x basic recipe
Yeast dough
Basic recipe
500 g flour
1 egg
80 g fat (room temperature)
80 g sugar
200-250 ml lukewarm milk
25 g fresh yeast
or 1 packet of dried yeast Peel of ½ lemon
1 pinch of salt
■■Mix all ingredients with the kneading hook for approx. ½ minute at setting 1, then for approx. 3-6 minutes at setting 3.
Maximum quantity: 2 x basic recipe
Pasta dough
Basic recipe
300 g flour
3 eggs
1-2 tbs. (10-20 g) cold water as required
■■Process all ingredients for approx. 3-5 minutes at setting 3 until a dough forms.
Maximum quantity: 1.5 x basic recipe
Bread dough
Basic recipe
1000 g flour
3 packets of dry yeast
2 tsp. salt
660 ml warm water
Mix all ingredients with the kneading hook for approx. ½ minute at setting 1, then for approx. 4-5 minutes at setting 3.
Disposal en
Mayonnaise
2eggs
2tsp. mustard ¼ l oil
2tbs. lemon juice or vinegar 1 pinch of salt
1 pinch of sugar
Ingredients must be at the same temperature.
■■Process the ingredients (except the oil) in the blender for several seconds at setting 3 or 4.
■■Switch the blender to setting 7 and slowly pour the oil through the funnel and mix until the mayonnaise emulsifies.
Eat the mayonnaise immediately, do not store.
Disposal
Dispose of packaging in an environ-
J mentally appliance is labelled in accordance -friendly manner. This with European Directive 2012/19/EU concerning used electrical and electronic appliances (waste electrical and electronic equipment – WEEE). The guideline determines the framework for the return and recycling of used appliances as applicable throughout the EU. Please ask your specialist retailer about current disposal facilities.
Guarantee
The guarantee conditions for this appliance
are as defi ned by our representative in the
country in which it is sold. Details regarding
these conditions can be obtained from
the dealer from whom the appliance was
purchased. The bill of sale or receipt must
be produced when making any claim under
the terms of this guarantee.
Changes reserved.
13
en Optional accessories
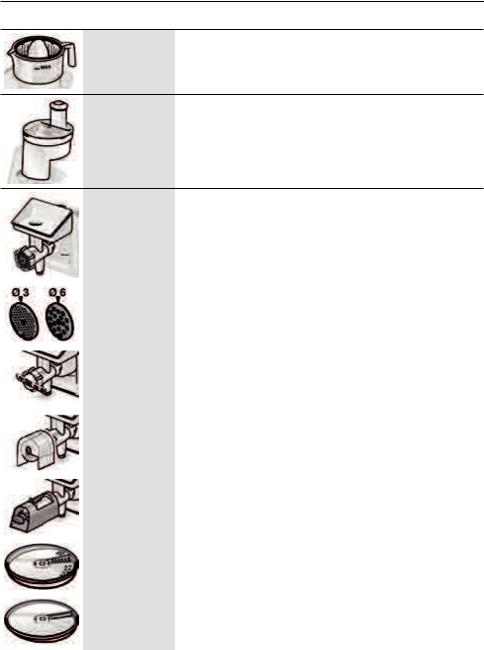
Optional accessories
MUZ5ZP1 For squeezing oranges, lemons and grapefruits.
Citrus press
MUZ5CC1 For cutting fruit and vegetables into equally sized cubes Dicer
MUZ5FW1 For cutting fresh meat for steak tartare or meat loaf.
Mincer
MUZ45LS1 |
For the mincer MUZ5FW1. |
Perforated disc |
Fine disc for pasties and spreads, coarse disc for |
set fine (3 mm), |
sausages and bacon. |
coarse (6 mm) |
|
MUZ45SV1 |
For the mincer MUZ5FW1. |
Viennese whirl |
With metal template for 4 different pastry moulds. |
attachment |
|
|
|
MUZ45RV1 |
For the mincer MUZ5FW1. |
Grater |
For grating nuts, almonds, chocolate and dried bread |
attachment |
rolls. |
|
|
MUZ45FV1 |
For the mincer MUZ5FW1. |
Juicer |
For pressing soft fruit, except raspberries, tomatoes and |
attachment |
rose hips, to a pulp.At the same time e.g. currants are |
|
automatically stemmed and pitted. |
MUZ45PS1 |
For the continuous-feed shredder MUZ5DS1. |
Chipper disc |
For slicing raw potatoes for chips. |
|
|
MUZ45AG1 |
For the continuous-feed shredder MUZ5DS1. |
Asian vege- |
Slices fruit and vegetables into fine strips forAsian |
table disc |
vegetable dishes. |
|
|
14
|
Optional accessories |
en |
|
|
|
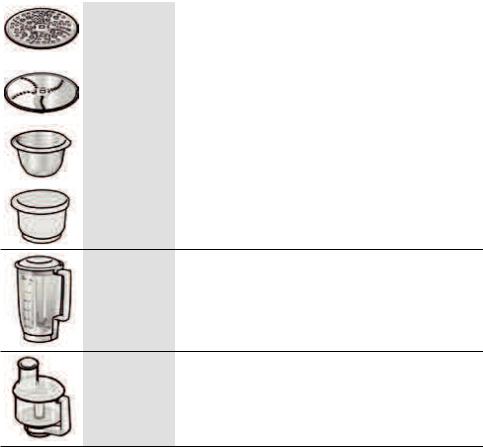
MUZ45RS1 |
For the continuous-feed shredder MUZ5DS1. |
|
Grating disc |
For grating raw potatoes, e.g. for potato pancakes or |
|
coarse |
dumplings. |
|
|
|
|
MUZ45KP1 |
For the continuous-feed shredder MUZ5DS1. |
|
Potato fritter |
For grating raw potatoes for rostis and potato fritters, for |
|
disc |
cutting fruit and vegetables into thick slices. |
|
|
|
|
MUZ5ER2 |
Up to 750 g of flour plus ingredients can be processed in |
|
Stainless steel |
the bowl. |
|
stirring bowl |
|
|
|
|
|
MUZ5KR1 |
Up to 750 g of flour plus ingredients can be processed in |
|
Plastic mixing |
the bowl. |
|
bowl |
|
|
MUZ5MX1
Plastic blender attachment
For blending drinks, for pureeing fruit and vegetables, for preparing mayonnaise, for cutting fruit, nuts, for crushing ice cubes.
MUZ5MM1 For chopping herbs, vegetables, apples and meat, for Multi-mixer shredding carrots, radishes and cheese, for grating nuts
and cooled chocolate.
If an accessory is not included in the product package, it can be purchased via the trade or from customer service.
15

ms Untuk keselamatan anda
Tahniah atas pembelian perkakas Bosch baru anda.
Dengan ini, anda telah memilih perkakas domestik yang moden dan bermutu tinggi. Anda boleh mendapatkan maklumat lanjut tentang produk kami di halaman web kami.
Kandungan
Untuk keselamatan anda 16 Sistem keselamatan 19 Gambaran Keseluruhan 19 Pengendalian 21 Mangkuk dan alat 21 Pembersihan dan servis 25 Penyimpanan 25 Penyelesaian masalah 26 Contoh penggunaan 26 Arahan tentang pelupusan 28 Syarat-syarat waranti 28 Aksesori pilihan 29
Untuk keselamatan anda
Sebelum penggunaan, sila baca arahan ini dengan teliti untuk membiasakan diri dengan arahan penting tentang keselamatan dan pengendalian perkakas ini.
Jika arahan bagi penggunaan perkakas yang betul tidak dipatuhi, liabiliti pengeluar bagi apa-apa kerosakan yang terjadi akan dikecualikan. Perkakas ini direka bentuk untuk memproses kuantiti isi rumah biasa di rumah atau kuantiti yang serupa dalam penggunaan bukan perindustrian. Penggunaan bukan perindustrian termasuklah umpamanya penggunaan dalam dapur pekerja di kedai, pejabat, pertanian dan perniagaan komersial yang lain, dan juga digunakan oleh tetamu di rumah penginapan, hotel kecil dan tempat kediaman yang serupa. Penggunaan perkakas untuk memproses kuantiti makanan yang biasa untuk kegunaan domestik. Jangan melebihi kuantiti maksimum yang dibenarkan (lihat “Contoh aplikasi”). Perkakas ini sesuai untuk mengadun, menguli dan memukul makanan. Ia tidak boleh digunakan untuk memproses objek atau bahan yang lain. Penggunaan lain boleh dilakukan jika aksesori yang diluluskan oleh pengeluar digunakan. Gunakan perkakas dengan aksesori asal sahaja.Apabila menggunakan aksesori, ikuti arahan pengendalian yang dilampirkan. Sila simpan Arahan pengendalian di tempat yang selamat. Jika menyerahkan perkakas kepada pihak ketiga, jangan lupa memasukkan arahan Pengendalian sekali.
16
Untuk keselamatan anda |
ms |
Arahan keselamatan am
AARisiko kejutan elektrik
Perkakas tidak harus digunakan oleh kanak-kanak.
Perkakas dan kord kuasa mesti dijauhkan daripada kanak-kanak. Perkakas boleh digunakan oleh orang yang kurang keupayaan fizikal, deria atau mental atau kurang berpengalaman dan pengetahuan jika mereka telah diberi penyeliaan atau arahan berkenaan penggunaan perkakas dengan cara yang selamat dan jika mereka memahami bahaya yang terlibat.
Kanak-kanak tidak harus bermain dengan perkakas.
Jangan tinggalkan perkakas bergerak tanpa dijaga.
Sambung dan kendalikan perkakas hanya mengikut spesifikasi pada plat kadaran. Gunakan di dalam bangunan sahaja.
Jangan menggunakan perkakas jika kord kuasa dan / atau perkakas telah rosak.
Sebelum menggantikan aksesori atau alat ganti tambahan, yang bergerak semasa operasi, matikan perkakas dan putuskan sambungan bekalan kuasa. Sentiasa cabut palam perkakas dari bekalan jika ia ditinggalkan tanpa dijaga dan sebelum memasang, menyahpasang atau membersihkannya.
Jangan meletakkan kord kuasa pada pinggir yang tajam atau permukaan yang panas. Untuk mengelakkan kecederaan, kord kuasa yang rosak mestilah digantikan oleh pengeluar atau perkhidmatan pelanggannya atau orang yang sama kelayakannya.
Hanya perkhidmatan pelanggan kami boleh membaiki perkakas.
Arahan keselamatan untuk perkakas ini
AARisiko kecederaan
AARisiko kejutan elektrik!
Jangan memasukkan palam sesalur sehingga semua persiapan untuk bekerja dengan perkakas telah lengkap. Jangan sekali-kali merendam unit asas dalam cecair atau memegangnya di bawah air yang mengalir. Jangan gunakan pembersih stim. Jangan melaraskan lengan pemutar ayun semasa perkakas sedang hidup. Tunggu sehingga pemacu telah berhenti sepenuhnya. Jangan menukar alat / aksesori sehingga pemacu telah berhenti sepenuhnya – apabila perkakas dimatikan, pemacu akan terus bergerak sejenak. Hanya gunakan suis putar untuk menghidupkan atau mematikan perkakas. Apabila perkakas ini tidak digunakan, tarik keluar palam sesalur.
Sebelum membaiki kerosakan, tarik keluar palam sesalur.
17

ms Untuk keselamatan anda
AARisiko kecederaan daripada alat yang berputar!
Jauhi tangan dari bahagian berputar. Semasa perkakas sedang dikendalikan, jauhi jari dari mangkuk adun. Pasang penutup (12) sebelum mengendalikan perkakas! Jangan menukar alat sehingga pemacu telah berhenti sepenuhnya – apabila perkakas dimatikan, pemacu akan terus bergerak sejenak dan berhenti di kedudukan pertukaran alat. Jangan menggerakkan lengan pengayun putar sehingga alat telah berhenti sepenuhnya. Atas sebab-sebab keselamatan, perkakas tidak boleh dikendalikan kecuali pemacu yang tidak digunakan ditutup dengan adang pemacu (5, 8). Sebelum memasang / menanggalkan pemayang suapan berterusan, tunggu sehingga pemacu telah berhenti sepenuhnya dan cabut palam sesalur. Jangan mencapai tangan ke dalam tiub suapan.
AARisiko kecederaan daripada bilah tajam!
Jangan menggenggam bilah tajam atau pinggir cakera pemotong. Pegang cakera pemotong pada pinggirnya sahaja. Jangan menyentuh bilah pengadun dengan tangan terdedah.
AARisiko kecederaan daripada bilah tajam / pemacu berputar!
Jangan sekali-kali meletakkan jari dalam pengadun yang terpasang! Jangan menanggalkan / memasang pengadun sehingga pemacu telah berhenti sepenuhnya! Kendalikan pengadun yang terpasang sahaja dan dengan tudung terkepil.
AARisiko melecur!
Apabila memproses cecair panas, stim keluar melalui corong pada tudung. Masukkan 0,5 liter maksimum cecair panas atau menggelegak.
AAPenting!
Gunakan perkakas dengan aksesori asal sahaja. Apabila menggunakan aksesori, ikuti arahan pengendalian yang dilampirkan. Gunakan hanya satu alat atau aksesori pada satu-satu masa.
AAPenjelasan tentang simbol pada perkakas atau aksesori
 Ikuti arahan dalam arahan pengendalian.
  Peringatan! Bilah berputar.
Peringatan!Alat berputar.
Jangan meletakkan jari dalam tiub suapan.
18

Sistem keselamatan
Mulakan lock-out
Lihat jadual “Kedudukan pengendalian”. Perkakas boleh dihidupkan ked. 1 dan 3 sahaja:
■■apabila mangkuk (11) telah dimasukkan dan dipusingkan sehingga ia terkunci pada kedudukannya dan
■■penutup pemacu pengadun telah dipasang (8).
Mulakan semula kunci sekat
Jika bekalan kuasa terganggu, perkakas masih hidup tetapi motor tidak mula bergerak semula apabila kuasa dipulihkan. Untuk menghidupkan perkakas sekali lagi, putar suis putar kepada 0/off, kemudian hidupkan.
Perlindungan beban lampau
Jika motor mati dengan sendiri semasa perkakas sedang digunakan, ciri perlindungan beban lampau telah diaktifkan. Kemungkinan punca adalah terlalu banyak makanan diproses pada satu-satu masa.
Jika sistem keselamatan diaktifkan, lihat “Penyelesaian Masalah”.
Arahan pengendalian menerangkan beberapa model, lihat juga gambaran keseluruhan model (Rajah M). Perkakas tidak memerlukan penyelenggaraan.
Sistem keselamatan ms
Gambaran Keseluruhan
Sila lipat keluar halaman ilustrasi. Rajah A
Unit asas
1Butang pelepas
2Lengan pemutar ayun
Fungsi “EasyArmlift” untuk menyokong pergerakan menaik lengan (lihat “Kedudukan kerja”).
3Suis putar
Apabila perkakas dimatikan (kedudukan 0/off), perkakas bergerak secara automatik ke kedudukan optimum untuk menukar alat.
0/off = Henti
M = Penukaran seketika pada kelajuan maksimum, tahan suis untuk tempoh adunan yang dikehendaki.
Pengesetan 1-7, Kelajuan pengendalian: 1 = kelajuan rendah – perlahan,
7 = kelajuan tinggi – laju.
4Penunjuk kendalian
Menyala semasa perkakas sedang dikendalikan (suis putar pada M atau 1-7). Berkelip jika perkakas telah dikendalikan secara tidak betul, fius elektronik telah terbelantik atau perkakas rosak – lihat bahagian “Penyelesaian Masalah”.
5Penutup pemacu
Untuk menanggalkan penutup pemacu, tekan pada bahagian belakang dan tanggalkan penutup.
6Pemacu untuk
–pemayang suapan berterusan dan
–penekan sitrus (aksesori pilihan*). Apabila tidak digunakan, sarungkan penutup pemacu.
7Pemacu untuk alat
(pengacau, pemukul, cangkuk uli) dan pengisar (aksesori pilihan*)
8Penutup pemacu pengadun
9Pemacu untuk pengadun
(aksesori pilihan*)
Apabila tidak digunakan, sarungkan penutup pengadun.
10Penggulung kord automatik
19

ms Gambaran Keseluruhan
Mangkuk dengan aksesori
11Mangkuk kacau keluli tahan karat
12Tudung
Alat
13Pemukul aduk lentur profesional
14Pemukul profesional
15Cangkuk uli dengan pemesong doh
16Beg aksesori
Untuk penyimpanan alat dan cakera pemotong.
Pemayang suapan berterus
17Penolak
18Penutup dengan corong isian
19Cakera pemotong
a)Cakera boleh terbalik Supercut profesional – kasar / halus
b)Cakera mayang boleh terbalik – kasar / halus
c)Cakera parut – sederhana-halus
d)Cakera parut – kasar *
e)Cakera sayur-sayuran Asia *
20Pemegang cakera
21Selongsong dengan saluran keluar
Pengadun*
22Jag pengadun
23Tudung
24Corong
*Jika aksesori tidak disertakan dalam pakej produk, ia boleh dibeli melalui perkhidmatan perdagangan atau pelanggan.
Kedudukan pengendalian
Rajah B:
Perhatian!
Sebelum mengendalikan perkakas, pasang alat / aksesori kepada pemacu yang betul dan dalam kedudukan dan tempat yang betul dalam kedudukan pengendalian mengikut jadual ini. Lengan pengayun putar mesti dikenakan dalam setiap kedudukan pengendalian.
Perhatian:
Lengan pengayun menampilkan fungsi “EasyArmlift” untuk menyokong pergerakan menaik lengan pengayun.
Memilih kedudukan pengendalian:
■■Tekan butang Pelepas dan gerakkan lengan pengayun putar. Sokong pergerakan dengan tangan anda.
■■Gerakkan lengan pengayun putar sehingga ia berada pada kedudukan yang dikehendaki.
Kedudukan |
Pemacu |
Alat / |
Kelajuan |
|
|
aksesori |
pengendalian |
|
|
|
1-5 |
|
|
|
|
|
|
|
1-7 |
1 |
7 |
|
|
|
|
|
1-3 |
|
|
|
|
|
|
* |
– |
2 |
7 |
|
|
|
|
|
3-7 |
|
|
|
|
3 |
6 |
|
3-5 |
|
|
||
|
|
|
|
|
|
|
5-7 |
|
9 |
|
|
4 |
|
|
5-7 |
|
|
|
|
|
7 |
|
|
*Masukkan / tanggalkan pemukul, pengacau atau cangkuk uli. Tambah kuantiti bahan yang besar.
20
Pengendalian
WWRisiko kecederaan!
Jangan memasukkan palam sesalur sehingga semua persiapan untuk bekerja dengan perkakas telah lengkap.
WWPerhatian!
Jangan mengendalikan perkakas tanpa aksesori / alat berada pada kedudukan pengendaliannya. Jangan mengendalikan perkakas yang kosong. Jangan mendedahkan perkakas atau aksesori kepada punca haba. Bahagian-bahagiannya tidak sesuai untuk gelombang mikro.
■■Sebelum mengendalikan perkakas dan aksesori untuk kali pertama, bersihkannya dengan teliti, lihat “Pembersihan dan servis”.
Maklumat penting
Arahan kendalian ini mengandungi pelekat dengan nilai rujukan bagi kelajuan kendalian perkakas apabila menggunakan alat atau aksesori. Kami mengesyorkan pelekat ini dilekatkan pada perkakas (Rajah C).
Persediaan
■■Letakkan unit asas pada permukaan yang rata dan bersih.
■■Tarik kord sekali gus kepada panjang yang diperlukan (maks. 100 cm) dan lepaskan perlahan-lahan; kord dikunci
(Rajah D).
■■Mengurangkan panjang kord: Tarik kord perlahan-lahan dan biarkannya menggulung panjang yang dikehendaki. Kemudian perlahan-lahan tarik kord sekali lagi dan lepaskan perlahanlahan; kabel dikunci.
Amaran!
Jangan pulas kord semasa memasukkannya. Jika perkakas mempunyai penggulung kord automatik, jangan memasukkan kord secara manual. Jika kord tersangkut, tarik keluar kord sepenuhnya dan kemudian biarkannya menggulung.
■■ Masukkan palam sesalur.
Pengendalian ms
Mangkuk dan alat
WWRisiko kecederaan daripada alat yang berputar
Semasa perkakas sedang dikendalikan, jauhi jari dari mangkuk adun. Pasang penutup (12) sebelum mengendalikan perkakas! Jangan menukar alat sehingga pemacu telah berhenti sepenuhnya – apabila perkakas dimatikan, pemacu akan terus bergerak sejenak dan berhenti di kedudukan pertukaran alat. Jangan menggerakkan lengan pengayun putar sehingga alat telah berhenti sepenuhnya.Atas sebab-sebab keselamatan, perkakas hanya boleh dikendalikan apabila pemacu yang tidak digunakan telah ditutup dengan pengadang pemacu (5, 8).
Perhatian!
Gunakan mangkuk dengan perkakas ini sahaja.
Pemukul aduk lentur profesional (13)
untuk mengacau doh, contohnya adunan kek
Pemukul profesional (14)
untuk memukul putih telur, krim dan doh ringan, contohnya campuran span
Cangkuk uli (15)
untuk menguli doh berat dan mengadun bahan yang tidak perlu
dipotong (contohnya kismis dan cip coklat)
Maklumat penting mengenai penggunaan pemukul
Rajah E:
Pemukul seharusnya hampir-hampir menyentuh dasar mangkuk untuk memastikan bahan-bahan diadunkan secara optimum. Jika tidak, melaraskan ketinggian pemukul seperti berikut:
■■Cabut palam sesalur.
■■Tekan butang Pelepas dan gerakkan lengan pengayun putar ke kedudukan 2.
■■Masukkan pemukul ke dalam pemacu sehingga pemukul terkunci pada kedudukannya.
21

ms Mangkuk dan alat
■■Pegang pemukul di tempatnya dan longgarkan nat mengikut arah jam menggunakan perengkuh hujung terbuka (saiz 8).
■■Setkan pemukul kepada ketinggian optimum dengan memutarkan pemukul:
–Putar mengikut arah jam: Naikkan
–Putar mengikut arah lawan jam: Turunkan
■■Tekan butang Pelepas dan gerakkan lengan pengayun putar ke kedudukan 1.
■■Periksa ketinggian pemukul dan jika perlu, betulkan.
■■Apabila ketinggian telah disetkan dengan betul, tekan butang Pelepas dan gerakkan lengan pengayun ke kedudukan 2.
■■Pegang pemukul di tempatnya dan ketatkan nat mengikut arah lawan jam menggunakan perengkuh hujung terbuka (saiz 8).
Bekerja dengan mangkuk dan alat
Rajah F:
■■Tekan butang Pelepas dan gerakkan lengan pengayun putar ke kedudukan 2.
■■Masukkan mangkuk:
–Sendengkan mangkuk ke hadapan dan kemudian tetapkannya ke bawah.
–Pusing dalam arah lawan jam sehingga ia terkunci pada kedudukannya.
■■Bergantung pada tugas pemprosesan, masukkan pengacau, pemukul atau cangkuk uli sehingga ia terkunci pada kedudukannya.
Perhatian:
Jika menggunakan cangkuk uli, putar pemesong doh sehingga cangkuk uli dapat dikunci pada kedudukannya (Rajah E-4b).
■■Letakkan bahan-bahan yang hendak diproses ke dalam mangkuk.
■■Tekan butang Pelepas dan gerakkan lengan pengayun putar ke kedudukan 1.
■■Pasang penutup.
■■Setkan suis putar pada pengesetan yang dikehendaki.
Cadangan kami:
–Pemukul aduk lentur profesional: Mula-mula adunkan pada pengesetan 1-2, kemudian pengesetan 3-5 seperti yang diperlukan
–Pemukul profesional:
pengesetan 7, campurkan dalam pada pengesetan 1
–Cangkuk uli:
mula-mula kacau pada pengesetan 1, uli pada pengesetan 3
Menambah lebih banyak bahan
■■Matikan perkakas dengan menggunakan suis putar.
■■Tambah lebih banyak bahan melalui tiub suapan pada penutup.
atau
■■Tanggalkan tudung.
■■Tekan butang Pelepas dan gerakkan lengan pengayun putar ke kedudukan 2.
■■Tambah bahan.
Selepas menggunakan perkakas
■■Matikan perkakas dengan menggunakan suis putar.
■■Cabut palam sesalur.
■■Tanggalkan tudung.
■■Tekan butang Pelepas dan gerakkan lengan pengayun putar ke kedudukan 2.
■■Keluarkan alat dari pemacu.
■■Tanggalkan mangkuk.
■■Bersihkan semua bahagian, lihat “Pembersihan dan servis”.
Pemayang suapan berterusan
WWRisiko kecederaan
Jangan menggenggam bilah tajam atau pinggir cakera pemotong. Pegang cakera pemotong pada pinggirnya sahaja. Sebelum memasang / menanggalkan pemayang suapan berterusan, tunggu sehingga pemacu telah berhenti sepenuhnya dan cabut palam sesalur. Jangan mencapai tangan ke dalam tiub suapan.
22

Amaran!
Pemayang suapan berterusan mestilah dipasang dengan sebelum digunakan. Jangan sekali-kali memasang pemayang suapan berterusan pada unit asas. Kendalikan pemayang suapan berterusan dalam kedudukan pengendalian yang ditunjukkan sahaja.
Takat putus pratentu Rajah G:
Takat putus pratentu terbina dalam melindungi pemacu perkakas. Jika berlaku beban lampau, aci pacu pemayang suapan berterusan patah. Walau bagaimanapun, aci pacu ini boleh diganti dengan mudah.
Pemegang cakera baru dengan aci pacu boleh didapati daripada perkhidmatan pelanggan.
Cakera boleh terbalik Supercut profesional – kasar / halus
Untuk menghiris buah-buahan dan sayursayuran. Proses pada pengesetan 5.
Penentuan pada cakera hiris boleh terbalik: “Grob” untuk sisi potong kasar
“Fein” untuk sisi potong halus
Amaran!
Cakera hiris boleh terbalik tidak sesuai untuk menghiris keju keras, roti, rol atau coklat. Hiris kentang rebus yang berlilin hanya apabila ia telah sejuk.
Cakera mayang boleh terbalik – kasar / halus
untuk memayang sayur-sayuran, buahbuahan, keju, kecuali keju keras (misalnya Parmesan).
Proses pada pengesetan 3 atau 4.
Penentuan pada cakera mayaang boleh terbalik:
“2” untuk sisi mayang kasar “4” untuk sisi mayang halus
Mangkuk dan alat ms
Amaran!
Cakera mayang boleh terbalik tidak sesuai untuk memayang kekacang. Mayang keju lembut dengan sisi kasar hanya pada pengesetan 7.
Cakera parut – sederhana-halus
untuk memarut kentang mentah, keju keras (misalnya Parmesan), coklat sejuk dan kekacang.
Proses pada pengesetan 7.
Amaran!
Cakera parut tidak sesuai untuk memarut keju lembut dan hirisan keju.
Cakera parut – kasar
untuk memarut kentang mentah, contohnya untuk penkek kentang atau ladu. Proses pada pengesetan 7.
Cakera sayur-sayuran Asia
Menghiris buah-buahan dan
sayursayuran menjadi kepingan halus untuk hidangan sayur-sayuranAsia.
Proses pada pengesetan 5.
Bekerja dengan pemayang suapan berterusan
Rajah H:
■■Tekan butang Pelepas dan gerakkan lengan pengayun putar ke kedudukan 2.
■■Masukkan mangkuk:
–Sendengkan mangkuk ke hadapan dan kemudian tetapkannya ke bawah.
–Pusing dalam arah lawan jam sehingga ia terkunci pada kedudukannya.
■■Tekan butang Pelepas dan gerakkan lengan pengayun putar ke kedudukan 3.
■■Tanggalkan penutup pemacu dari pemacu pemayang suapan berterusan
(Rajah H-5a).
■■Pegang pemegang cakera pada hujung bahagian bawah, pastikan kedua-dua hujung menghadap ke atas.
23

ms Mangkuk dan alat
■■Dengan teliti letakkan cakera hiris atau cakera mayang yang dikehendaki ke atas hujung pemegang cakera (Rajah H-6a). Dalam hal cakera boleh terbalik, pastikan sisi yang dikehendaki menghadap ke atas.
■■Genggam pemegang cakera pada hujung bahagian atas dan masukkan ke dalam selongsong (Rajah H-6b).
■■Pasang penutup (perhatikan tanda) dan putar masuk sepenuhnya mengikut arah pusingan jam.
■■Tempatkan pemayang suapan berterusan pada pemacu dan putar masuk sepenuhnya mengikut arah pusingan jam, seperti yang digambarkan dalam Rajah H-8.
■■Putar suis putar kepada pengesetan yang disyorkan.
■■Letak makanan yang hendak diproses dalam tiub suapan dan tolak ke bawah dengan penolak.
WWAmaran!
Elakkan bahan yang dipotong daripada terkumpul dalam bukaan saluran keluar.
Petua: Untuk memastikan hasil potongan yang sama rata, proses bahan yang nipis seikat-seikat.
Perhatian: Jika makanan yang diproses melekat dalam pemayang suapan berterusan, matikan pemproses makanan, cabut palam sesalur, tunggu sehingga pemacu berhenti sepenuhnya, tanggalkan penutup dari pemayang suapan berterusan dan kosongkan tiub suapan.
Selepas menggunakan perkakas
■■Matikan perkakas dengan menggunakan suis putar.
■■Putar pemayang suapan berterusan dalam arah lawan jam dan tanggalkannya.
■■Putar tudung dalam arah lawan jam dan tanggalkannya.
■■Tanggalkan pemegang cakera dengan cakera. Untuk melakukan ini, tekan jari pada aci pacu dari bawah (Rajah J).
■■Bersihkan bahagian.
Pengadun
WWRisiko kecederaan daripada bilah tajam / pemacu berputar!
Jangan sekali-kali meletakkan jari dalam pengadun yang terpasang! Jangan menanggalkan / memasang pengadun sehingga pemacu telah berhenti sepenuhnya! Kendalikan pengadun yang terpasang sahaja dan dengan tudung terkepil.
WWRisiko melecur!
Apabila memproses cecair panas, stim keluar melalui corong pada tudung. Masukkan 0.5 liter maksimum cecair panas atau menggelegak.
Amaran!
Pengadun boleh rosak. Jangan memproses bahan sejuk beku lampau (kecuali kiub ais). Jangan mengendalikan pengadun yang kosong.
Bekerja dengan pengadun
Rajah K:
■■Tekan butang Pelepas dan gerakkan lengan pengayun putar ke kedudukan 4.
■■Tanggalkan penutup pemacu pengadun.
■■Pasang jag pengadun (tanda pada pemegang di atas tanda pada unit asas) dan putar masuk sepenuhnya mengikut arah lawan jam.
■■Tambah bahan.
Kapasiti maksimum – cecair = 1.25 liter; kapasiti maksimum cecair menggelegak atau panas maks. 0.5 liter;
kapasiti pemprosesan optimum – pepejal = 50-100 g;
■■Pasang penutup dan putar sepenuhnya mengikut arah lawan jam ke dalam pemegang pengadun. Penutup mestilah dikunci pada kedudukannya.
■■Setkan suis putar pada pengesetan yang dikehendaki.
24
 Loading...