


MUM6N1

R
R
R
E
E
E
P
P
P
A
A
A
I
I
I
R
R
R
I
I
I
N
N
N
S
S
S
T
T
T
R
R
R
U
U
U
C
C
C
T
T
T
I
I
I
O
O
O
N
N
N
Küchenmaschine Universal Plus
58300000129491_en_a.doc – 04.04.08 Seite 1 von 24
1 SAFETY........................................................2
1.1 Safety instructions..............................................................2
1.2 Repair instructions .............................................................2
2 INSTALLATION............................................3
2.1 Installation...........................................................................3
2.2 Scope of delivery................................................................ 3
3 OPERATION.................................................4
3.1 Operations and controls.....................................................4
3.2 Working with the bowl and the tools................................. 5
3.3 Working with the blender................................................... 7
3.4 Cleaning............................................................................... 9
4 COMPONENTS...........................................11
5 FUNCTIONS ...............................................12
5.1 Wiring and connecting diagram ...................................... 12
5.2 Safety systems.................................................................. 13
6 REPAIR.......................................................15
6.1 General disassembly........................................................15
6.2 Replacing the lid switch and the housing.......................17
6.3 Replacing motor and belt.................................................18
7 FAULT DIAGNOSTICS...............................19
8 TECHNICAL SPECIFICATIONS.................20
8.1 Rating plate....................................................................... 20
8.2 Power................................................................................. 21
8.3 Dimensions and weights.................................................. 21
8.4 Speeds...............................................................................21
8.5 Processing quantities ...................................................... 22
8.6 Features............................................................................. 22
8.7 Accessories ...................................................................... 22
8.8 Usable system accessories............................................. 23
58300000129491_en_a.doc – 04.04.08 Seite 2 von 24
1 SAFETY
1.1 Safety instructions
DANGER
Risk of injury!
►
Connect and operate the appliance only in
accordance with the
specifications on the rating
plate.
► The blades are very sharp. When the appliance is
switched off, the drive continues running briefly!
► Do not change accessories and tools until the
appliance is at a standstill (rotary switch to 0/off).
► Repairs may be carried out by a qualified electrician
only!
► The user may be put at considera ble risk and injured
by improper repairs!
► Electric shock may occur if live components are
touched in-side the appliance!
► Do not touch components in the appliance. Even the
modules can be live!
►
Before commencing repairs, ALWAYS disconnect the
appliance
from the power supply!
► If tests have to be conducted while the appliance is
live, ALWAYS use a residual-current-operated
circuit-breaker!
► The protective conductor connection must not
exceed the standardised values! This is essential for
personal safety and appliance function!
► When repairs are complete, conduct a test in
accordance with VDE 0701 or the corresponding
national regulations as well as a performance test!
► Disable appliances which cannot be repaired.
1.2 Repair instructions
CAUTION
► NEVER attempt repairs by randomly replacing
components!
► ALWAYS proceed systematically and comply with
the technical documentation for the appliance!
► As a rule, printed-circuit boards ar e not repaired but
are completely replaced with original spare parts.
Exceptions are documented separately.

58300000129491_en_a.doc – 04.04.08 Seite 3 von 24
2 INSTALLATION
2.1 Installation
► Thoroughly clean the appliance before using for the first time!
► Connect and operate the appliance only in accordance with
the specifications on the rating plate.
► If the power cord and/or appliance are damaged, do not
switch on the appliance!
► Operate the appliance indoors and at room temperature only.
► Always pull out the plug after use, before cleaning, before
leaving the room or if a fault occurs!
► Do not immerse the base unit in water or clean under running
water!
► Do not change accessories and tools until the appliance is at
a standstill (rotary switch to 0/off)!
2.2 Scope of delivery
The product package varies depending on the appliance model. All
models contain:
► Twin beating whisk with plastic support
► Blender jug, 1,5 l
► Protective cover for blender drive
► Dough scraper
► Operating instructions
2.2.1 MUM6N1. (800-watt motor)
Specific accessories:
► Mixing bowl with splash ring and
cover, 6,2 l
► Stainless steel / aluminium
kneading hook with dough
divider
2.2.2 MUM6N2. (1000-watt motor)
Specific accessories:
► Stainless-steel mixing bowl with
splash ring and cover, 6,2 l
► Kneading hook made entirely of
stainless steel with dough
divider
58300000129491_en_a.doc – 04.04.08 Seite 4 von 24
3 OPERATION
3.1 Operations and controls
Note:
► Before operating the appliance and accessories for
the first time, clean thoroughly!
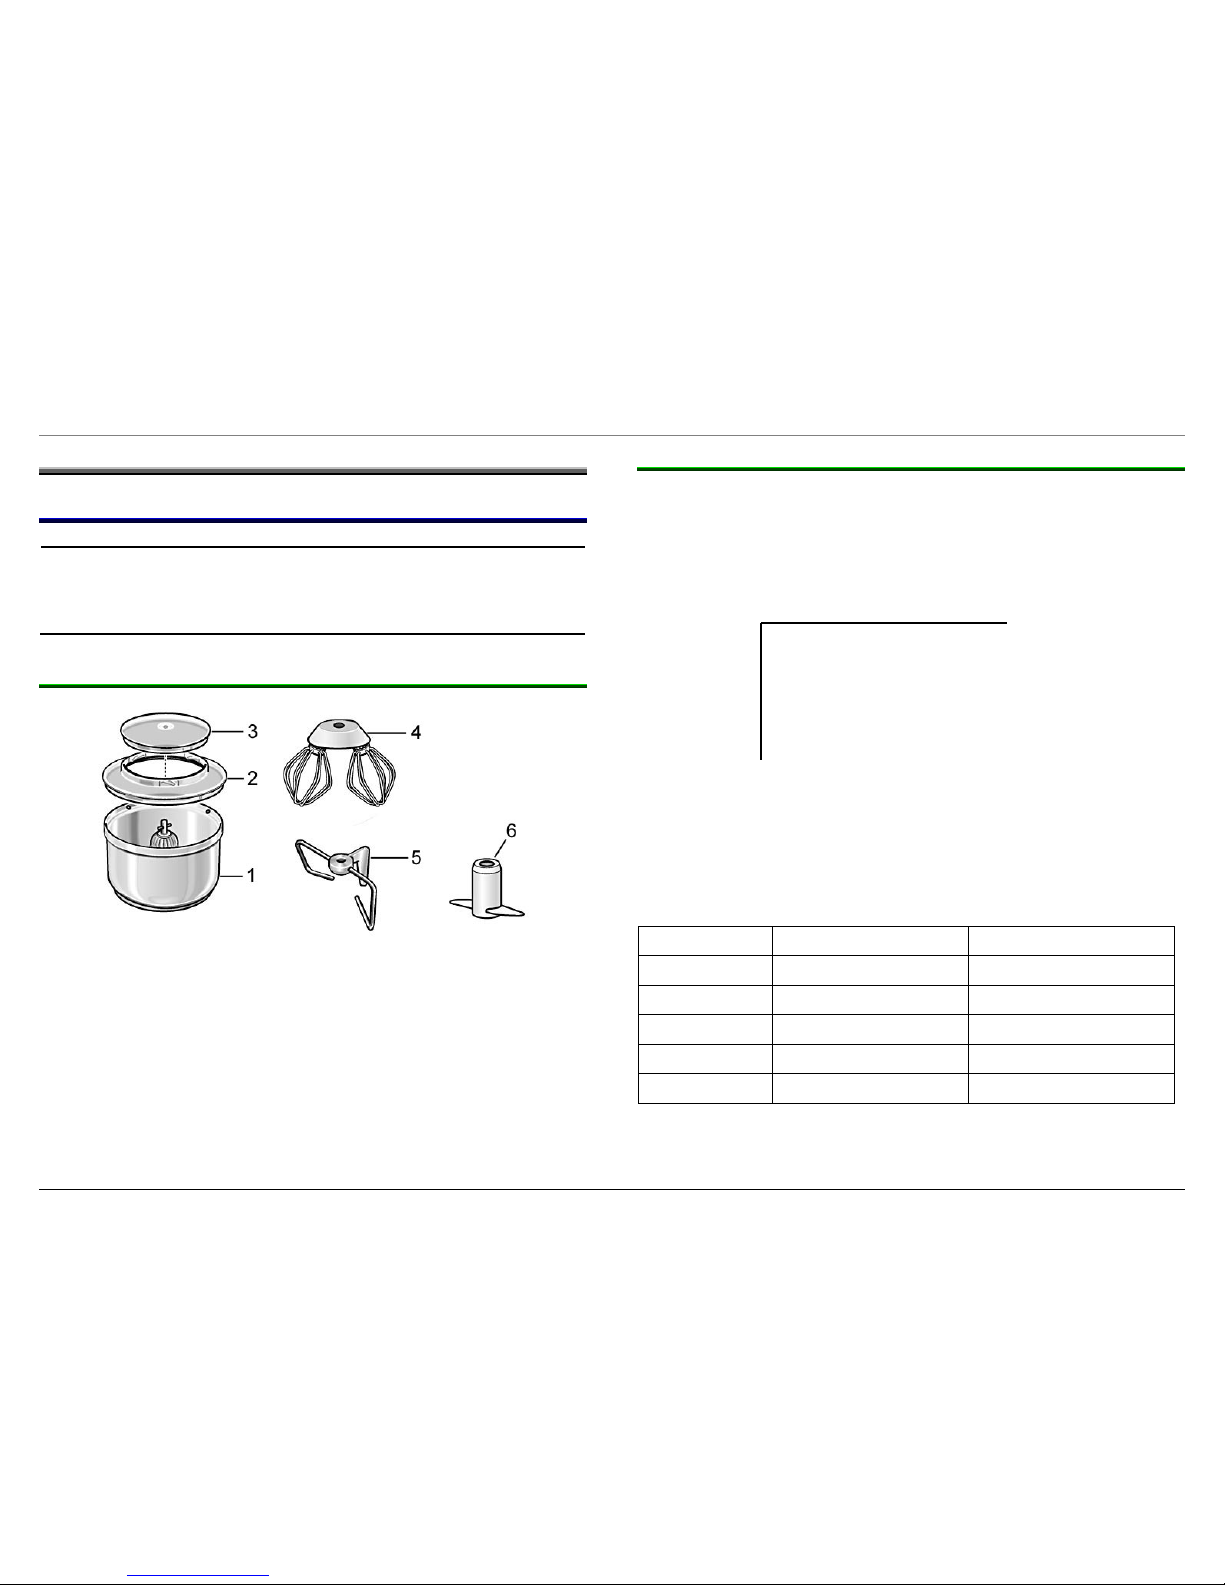
3.1.1 Standard attachments
1
Mixing bowl (plastic or stainless steal, depending on variant)
2
Lid rim
3
Lid
4
Twin beating whisk
5
Kneading hook
6
Dough devider
3.1.2 Selecting the setting
The appliance operates with 4 different speed setting selected with
the rotary switch.
Speed setting M is for momentary operation. The drive only runs for
as long as the rotary switch is held in position M.
Level
Blender drive r.p.m. Bowl drive r.p.m.
1
5.400 – 6.200 84 - 96
2
6.900 – 8.400 106 - 128
3
9.500 – 11.700 146 - 176
4
13.400 – 15.800 206 - 236
M
13.400 – 15.800 206 - 236
Rotary speeds measured at idle speed after the appliance has been
running for 2 minutes. Both drives turn anticlockwise.
M
O/off
1
2
3
4

58300000129491_en_a.doc – 04.04.08 Seite 5 von 24
3.2 Working with the bowl and the tools
DANGER
Risk of injury from rotating tools!
► While the appliance is operating, keep fingers
clear of the mixing bowl.
► Avoid cont act with moving parts. Keep hands, hair
and clothing, as well as spatulas, scrapers and
other utensils away from dough hook and whisks
during operation to prevent injury and/or damage
to the base unit or accessories.
► Do not c hange tools until the drive has come to a
standstill – when the appliance is switched off the
drive continues running briefly.
Note:
Appliance can be operated with the mixing bowl only
if the protective cover is placed on the blender drive.
If using the blender drive, place the protective cover
on the unused drive for the bowl.
► Pull the mains cable out of the
storage compartment on the rear
of the appliance
► If the mixing bowl is to be used,
place the protective cover on the
blender drive
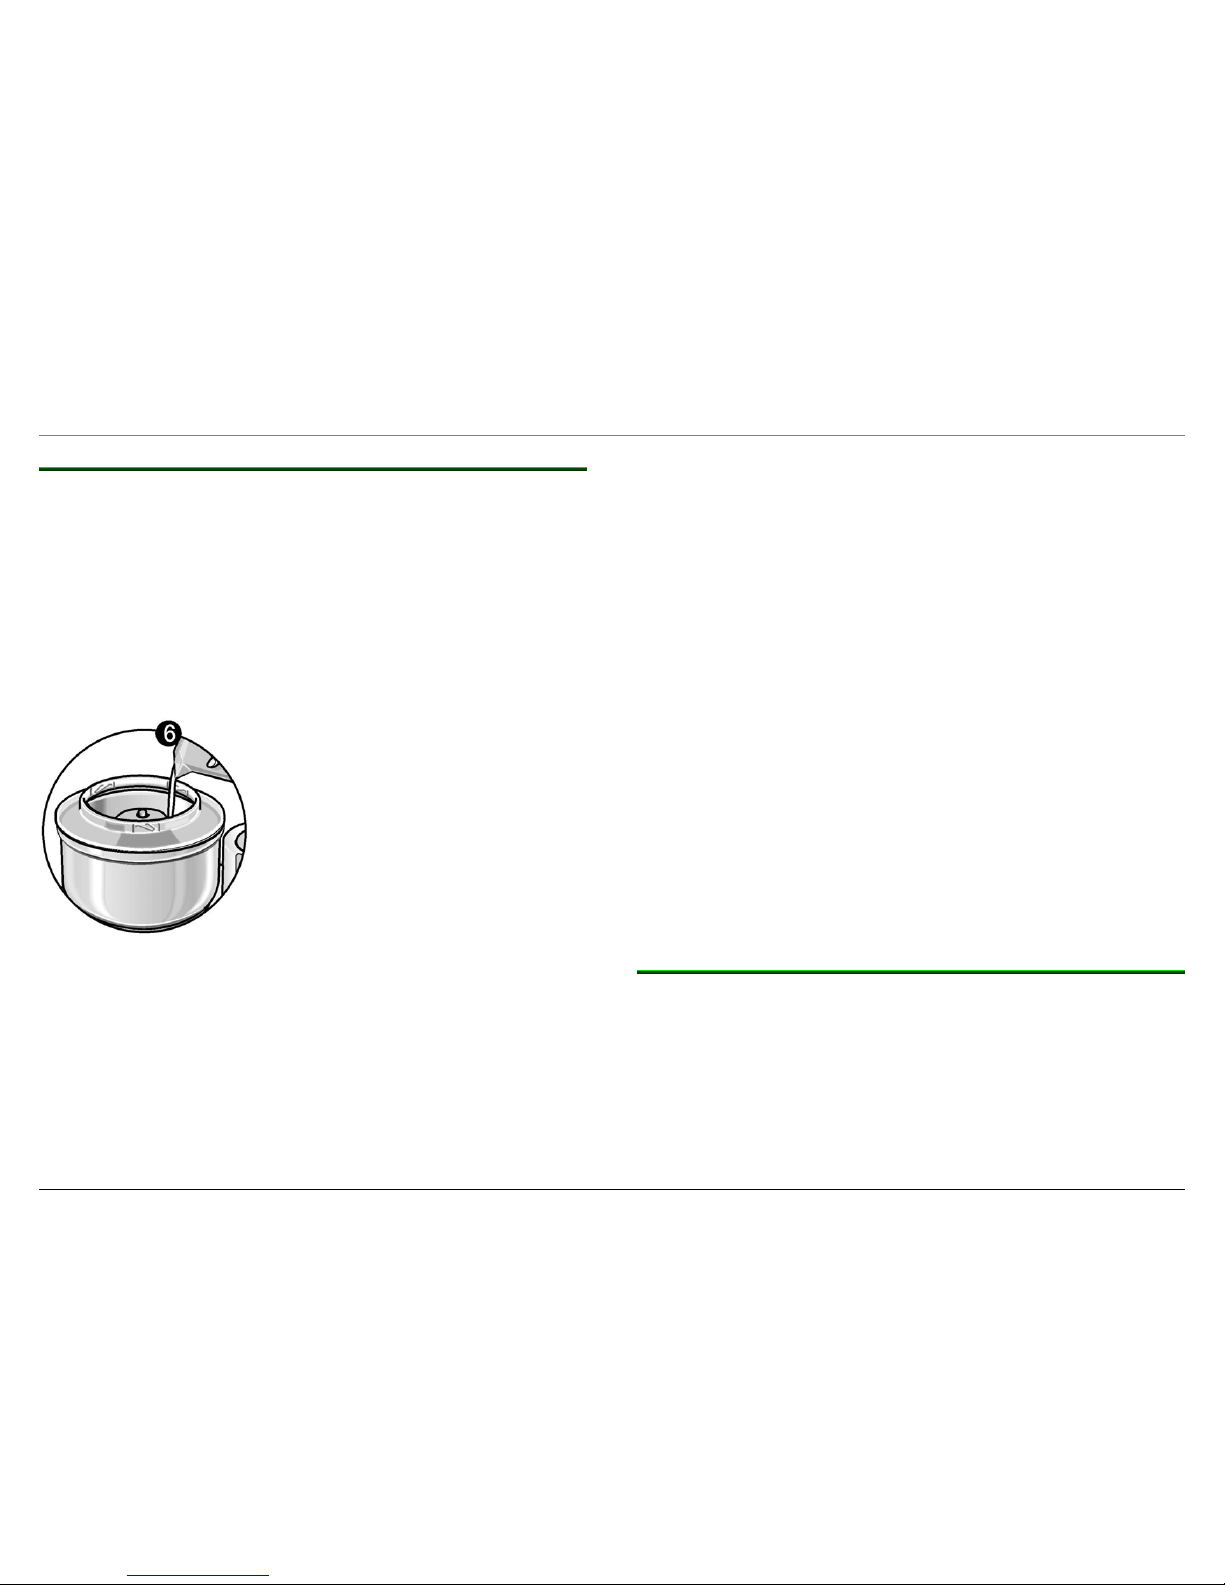
► Attach the mixing bowl and turn
it anticlockwise to the limit stop
Note:
Failure to make sure that the
bowl is properly seated on the
drive coupling before the base
unit is turned on can result in
damage to the bowl and/or
coupling
► Insert the required tool
Use the recommended tools for the
recipes
Double whisk:
For whisking egg, cream and light
dough, e.g. sponge mixture
Kneading hook:
For kneading heavy dough and
mixing-in ingredients that ought not
be cut, e.g. raisins and chocolate
chips
58300000129491_en_a.doc – 04.04.08 Seite 6 von 24
Working with the bowl and the tools
► Attach the lid rim and turn it
anticlockwise to the limit stop
► Put the ingredients to be processed
into the bowl
► Attach the cover
► Plug in the mains plug
► Set the rotary switch to the desired
setting
o/off Stop/Off
M Pulse switch
Hold rotary switch. The drive operates
at maximum speed.
1 – 4 Operating speed
► Set rotary switch to o/off to add
ingredients
3.2.1 After using the appliance
► Switch off the appliance with the rotary switch
► Pull out the mains plug
► Remove lid and lid rim by rotating them in a clockwise direction
► Take the tool out of the bowl
► Remove the bowl by rotating it in a clockwise direction
► Clean all parts
58300000129491_en_a.doc – 04.04.08 Seite 7 von 24
3.3 Working with the blender
DANGER
Risk of injury from sharp blades / rotating drive!!
► Never place fingers in the attached blender!
► Do not remove / attach the blender until the drive
is at a standstill!
DANGER
Risk of scalding!
If processing hot liquids, steam escapes through the
funnel in the lid.
► Process a maximum of 0, 5 litres (18 fluid ounces )
of hot or frothing liquid at a time!
WARNING
CAUTION! Possible damage to blender!
► Do not put deep-frozen fruit and vegetables into
the blender!
► Never operate the blender empty!
Blender will not work unless the cover has been
attached and locked.
3.3.1 Working with the blender
► Pull the mains cable out of the
storage compartment on the rear of
the appliance
► Remove the protective cover from
the blender drive
To do this, press the back of the
protective cover
► Place the protective cover on the
mixing bowl drive

58300000129491_en_a.doc – 04.04.08 Seite 8 von 24
Working with the blender
► Attach the blender
on the drive
► Turn the blender
anticlockwise to
the limit stop
► Note the markings
on the blender
and the appliance
► Add ingredients:
Maximum amount of
liquid ingredients
= 1,25 litres
Maximum amounts of
frothing or hot liquids
= 0,5 litres
Optimum processing
amount of solid
ingredients = 100 grams
► Put on the lid and
turn it anticlockwise
to the limit stop
The lug on the blender
lid must sit in the slot on
the blender handle, as
far as the limit stop
Blender will not work unless the cover has been
attached and locked.
► Set the rotary switch to the desired setting
Note:
When working, hold the blender cover by the edge!
3.3.2 Adding more ingredients
► Switch off the appliance with the rotary switch
► Remove the cover and add ingredients
or
► Take out the funnel on the blender cover and gradually add solid
ingredients via the feed tube
► Pour liquid through the funnel
3.3.3 After using the appliance
► Switch off the appliance with the rotary switch
► Pull out the mains plug
► Rotate the blender in a clockwise direction and remove
► Clean the blender and all parts immediately after use!
► Place protective cover on the blender drive
 Loading...