


MUM5...UC
Use and Care Manual
Notice d'utilisation et d'entretien
2
Use and Care Manual. . . . . . . . . . . . . . . . . . . . . . . . 4
READ THIS MANUAL thoroughly for important safety and operating instructions before using this appliance.
Notice d'utilisation et d'entretien . . . . . . . . . . . . . . . 35
Avant tout utilisation, LISEZ ATTENTIVEMENT ce manuel, vous y trouverez des consignes importantes portant sur la sécurité et le fonctionnement de votre appareil.
3

TABLE OF CONTENTS
IMPORTANT SAFEGUARDS . . . . . . . . . . . . . . . . . . . . . . . . . . . . . 5 ELECTRICAL REQUIREMENTS . . . . . . . . . . . . . . . . . . . . . . . . . . . 7 SPECIFIC SAFETY INSTRUCTIONS . . . . . . . . . . . . . . . . . . . . . . . 7 ABOUT YOUR KITCHEN MACHINE . . . . . . . . . . . . . . . . . . . . . . . . 9 BEFORE STARTING . . . . . . . . . . . . . . . . . . . . . . . . . . . . . . . . . . . . 11 GETTING TO KNOW YOUR KITCHEN MACHINE . . . . . . . . . . . . . 12 OPERATING POSITIONS . . . . . . . . . . . . . . . . . . . . . . . . . . . . . . . . 14 GETTING STARTED . . . . . . . . . . . . . . . . . . . . . . . . . . . . . . . . . . . . 15 WORKING WITH MIXING BOWL AND TOOLS . . . . . . . . . . . . . . . 16 WORKING WITH CONTINOUS-FEED SHREDDER . . . . . . . . . . . 19 CLEANING THE APPLIANCE . . . . . . . . . . . . . . . . . . . . . . . . . . . . . 24 TROUBLESHOOTING . . . . . . . . . . . . . . . . . . . . . . . . . . . . . . . . . . . 25 SAMPLE RECIPES . . . . . . . . . . . . . . . . . . . . . . . . . . . . . . . . . . . . . 26 SERVICE AND REPAIR . . . . . . . . . . . . . . . . . . . . . . . . . . . . . . . . . 31 STATEMENT OF LIMITED PRODUCT WARRANTY . . . . . . . . . . . 31
4

,IMPORTANT SAFEGUARDS
READ THIS MANUAL thoroughly for important safety and operating instructions before using this appliance.
HOUSEHOLD USE ONLY
Your safety and the safety of others are very important.
We have provided many important safety messages in this manual and on your appliance. Always read and obey all safety messages.
,This is the safety alert symbol. This symbol alerts you to potential hazards that can kill or hurt you and others.
All safety messages will follow the safety alert symbol and either the word WARNING or CAUTION.
These words mean:
,WARNING
,CAUTION
This indicates that death or serious injuries may occur as a result of non-observance of this warning.
This indicates that minor or moderate injuries may occur as a result of non-observance of this warning.
All safety messages will tell you what the potential hazard is, tell you how to reduce the chance of injury, and tell you what can happen if the instructions are not followed.
WARNING: A risk of fire and electrical shock exists in all electrical appliances and may cause personal injury or death.
When using electrical appliances, basic safety precautions should always be followed, including the following:
1.Read all instructions before using this appliance.
2.To protect against risk of electrical shock do not put the appliance in water or other liquid.
3.Close supervision is necessary when any appliance is used by or near children.
4.Do not allow children to use this appliance.
5.When children become old enough to operate the appliance, it is the responsibility of the parents or legal guardians to ensure that they are instructed in safe practices by qualified persons.
5
6.Unplug from the outlet when not in use, before putting on or taking off parts, and before cleaning.
7.Avoid contacting moving parts. Keep hands, hair, clothing, as well as spatulas and other utensils away from beater during operation to reduce the risk of injury to persons and/or damage to the appliance. Do not leave appliances unattended during operation.
8.Do not operate any appliance with a damaged cord or plug, or after the appliance malfunctions, or is dropped or damaged in any manner. Return appliance to the nearest Authorized Service Facility for examination, repair, or electrical or mechanical adjustment.
9.Do not use attachments that are not recommended or sold by Bosch. Using attachments not recommended by Bosch may cause fire, electric shock or injury.
10.Do not use outdoors.
11.Do not let cord hang over edge of table or counter or come in contact with hot surfaces.
12.Keep hands and utensils away from moving blades or discs while processing food to reduce the risk of severe injury to persons or damage to the appliance. A scraper may be used but must be used only when the appliance is not running and main plug removed.
13.Blades are sharp. Handle carefully due to risk of injury.
14.To reduce the risk of injury, never place cutting blade or discs on base without first putting bowl properly in place.
15.Be certain cover is securely locked in place before operating appliance.
16.Never feed food by hand. Always use the food pusher.
17.Do not attempt to override the cover interlock mechanism.
18.Do not remove warning or caution labels.
19.This product is designed for household use only.
ALSOBESURETOREADTHEWARNINGSANDCAUTIONSTHAT ARE PROVIDED BEFORE EACH ATTACHMENT'S OPERATING INSTRUCTION.
SAVE THESE INSTRUCTIONS
6
STATE OF CALIFORNIA PROPOSITION 65 WARNINGS
, WARNING: This product contains one or more chemicals known to the
State of California to cause cancer, birth defects or other reproductive harm.
ELECTRICAL REQUIREMENTS
, WARNING
Fire Hazard Do not use an extension cord.
Doing so can result in death or serious injury.
, WARNING
This appliance is equipped with
a polarized plug (one blade is wider than the other).
To reduce the risk of electrical shock, this plug will fit in a polarized outlet only one way.
If the plug does not fit fully in the outlet, reverse the plug. If it still does not fit, contact a qualified electrician.
Do not modify the plug in any way. Do not use an extension cord.
If the power supply cord is too short, have a qualified electrician or serviceman install an outlet near the appliance.
Volts: |
120 V.A.C. |
Hertz: |
60 Hz |
SPECIFIC SAFETY INSTRUCTIONS
, WARNING
To avoid risk of injury and electrical shock, follow these precautions:
1.Do not insert main plug until all preparations for working with the appliance are complete.
2.Never immerse the base unit in liquid or hold under running water.
3.Do not use a steam cleaner.
4.Do not adjust the swivel arm while the appliance is switched on. Wait until the drive has come to a standstill.
5.Do not change tool/accessory until the drive is at a standstill – when the appliance is switched off, the drive continues running briefly.
6.Use only the rotary switch to turn the appliance on or off.
7.When the appliance is not in use, unplug the power cord.
8.Turn off the appliance and unplug the power cord before resolving a problem.
, WARNING
Blades are sharp!
To avoid risk of injury, do not grip the sharp blades or cutting edges of the cutting discs. Take hold of cutting discs by the edge only.
7

, WARNING
To avoid risk of injury from the rotating tools, follow these precautions:
1.Keep hands clear of rotating parts. While the appliance is operating, never place fingers in the mixing bowl. Attach the cover before operating the appliance!
2.Do not change tools until the drive has come to a standstill – when the appliance is switched off, the drive continues running briefly and stops in the tool change position.
3.Do not move the swivel arm until the tool has come to a standstill.
4.For reasons of safety the appliance cannot be operated unless unused drives are covered with drive guards.
5.Before attaching/removing the continuous-feed shredder, wait until the drive has come to a standstill and unplug the power cord. Do not reach into the feed tube.
, CAUTION
Use the appliance with original acces- sories only. When using the accesso- ries, follow the enclosed operating instructions.
Use only one tool or accessory at any one time.
Explanationofthesymbolson the appliance or accessory
Follow the instructions in
the operating instructions.
, WARNING! Rotating blades.
, WARNING!
Rotatingtools!Donotplace
fingers in the feed tube.
Intended use
This appliance is suitable for mixing, kneadingandbeatingfood.Itmustnotbe used for processing other objects or substances. Other applications are possible if the accessories approved by the manufacturer are used.
Use the appliance with original accessories only. When using the accessories, follow the enclosed operating instructions.
Thisapplianceisdesignedforprocessing normal household quantities in the home or similar quantities in non-industrial applications.
Non-industrial applications include e.g. use in employee kitchens in shops, offices,agriculturalandothercommercial businesses, as well as use by guests in boardinghouses,smallhotelsandsimilar dwellings.
Use the appliance for processing normal quantities of food for domestic use.
Do not exceed permitted maximum quantities (see “Application examples”).
Before use, read these instructions carefully in order to become familiar with important safety and operating instructions for this appliance.
If the instructions for correct use of the appliance are not observed, the manufacturer’s liability for any resulting damage will be excluded.
Please keep the operating instructions in a safe place. If passing on the appliance to a third party, always include the operating instructions.
8

ABOUT YOUR KITCHEN MACHINE
Congratulations on having selected one of the Bosch Styline® Series Kitchen Machines. A series of kitchen machines that we, and-thankfully-cooking professionals the world over, feel are the best household-type kitchen machines available.
As you read through these instructions, please pay particular attention to the IMPORTANT SAFEGUARDS. Specific safeguards for the attachments, as well as warnings and cautions, are provided in each section describing the operation of that particular attachment.
Bosch Styline® Series Kitchen Machine
The MUM 5 is the highest functioning kitchen machine with: 450 watt motor, the three-dimensional mixing system MultiMotion Drive and the comfortable EasyArm lift providing strong performance and comfort.
Powerful engine and MultiMotion drive
The 450-watt motor and the new electronics provide plenty of power and high stirring speed. The advanced multidimensional stirring system MultiMotion Drive ensures that the kneading and mixing tools move in elliptical orbits. Thus, each angle is achieved within the bowl and mix the ingredients quickly and evenly.
Even heavy doughs, such as bread or pasta dough, are optimally blended thanks to the powerful engine and MultiMotion drive.
Electronic speed control
Six-positionrotaryswitchislocatedatthe sideof themultifunctionarmofthepower unit: 4 speeds plus a momentary speed position “M” plus a stop position “O/Off”.
Safety systems Start lock-out:
... to ensure that the appliance can be switched on in pos. 1 and 3 only, when the mixing bowl has been inserted and turned until it locks into place.
Restart lock-out:
If the power is interrupted, the appliance remains switched on but the motor does notstart runningagainwhenthepoweris restored.
Overload protection:
If the motor switches itself off while the appliance is being used, the overload protection feature has been activated. A possible cause may be that too much food was processed at one time.
The EasyArm lift
The EasyArm lift guarantees plenty of comfort. It supports the lifting and lowering of the multi-function arm to replace the tools and attachments.
Four locking positions place attachments in the most ergonomic position for their use.
9

Three accessory drives
–A high-speed drive used for blender and other attachments requiring highshaft speed
–A mid-speed drive used for continuous shredder attachment and other attachments requiring midrange shaft speeds
and
–The MultiMotion drive used for whisks, dough hook and other attachments requiring more torque.
Each of these drives is controlled by the electronic control to optimize the motor speed for different attachments with different loads.
Motor drive covers
Two covers are provided to cover highspeed and mid-speed drive when they are not in use.
Accessory bag
As a special Styline®-extra there is the practical accessory bag, stowable in the mixing bowl.
Useful tools and attachments
The Bosch Styline® Series Kitchen Machines are comprised of various attachments, depending on the system purchased.
All models of the Bosch Styline® Series Kitchen Machines are provided with
a four-quart Stainless steel mixing bowl with beating and stirring whisks and
a dough hook.
In addition, the following accessory can be included: a Continuous Shredder.
See specific instructions for these tools and attachments. Specific instructions are located on pages listed below:
Attachment |
Pages |
Mixing bowl with tools |
16 |
Continuous shredder |
19 |
Special accessories
To allow you to get the most service from your Bosch Styline® Series Kitchen Machine, Bosch engineers have designed a line of special accessories to expand the usefulness of your machine. In addition to the attachments that come with the various Styline® Series Kitchen Machines,thereareoptionalaccessories that can be ordered separately.
These accessories include a blender, a citrus juicer and a multi-function mixer (food processor). To view all currently available accessories, visit the website:
www.bosch-home.com www.lchef.com
10
BEFORE STARTING
Unpacking
Carefully remove the power unit from its packaging and place it on the counter so it is ready to use. As you remove the accessories from the carton, check them against Figure 1 to ensure that all the standard parts are present.
Electrical specifications
, WARNING
Electrical Shock Hazard Plug into a grounded 3 prong outlet. Do not remove ground prong.
Do not use an adapter.
Do not use an extension cord. Failure to follow these instructions can result in death, fire, or electrical shock.
Check to make sure that the voltage on which your kitchen machine is to operate is the same as specified on the rating plate.
Standard North American models have an electrical power rating of 450-watt maximum power rating with the accessory attachment that draws the most power (some accessory attachments may draw less power).
Cleaning before using for the first time
Before using any of the attachments for the first time it is recommended they be washed, rinsed well and dried. Of the attachments supplied, with the systems inthismanual,all parts,exceptthepower unit, are dishwasher safe:
The power unit and drive cover should be wiped with a damp cloth. If required, use a little detergent. Then dry the power unit.
Reference values for the operating speed
These instructions for use contain
a sticker with reference values for the operating speed of the appliance when using the tools or accessories.
We recommend attaching this sticker to the appliance.
11

GETTING TO KNOW YOUR KITCHEN MACHINE
Figure 1
12

Power unit
1Power unit
2 On / Off button
3Swivel arm
“Easy Armlift” function to support the upward movement of the arm (see “Operating positions”).
4 Release button
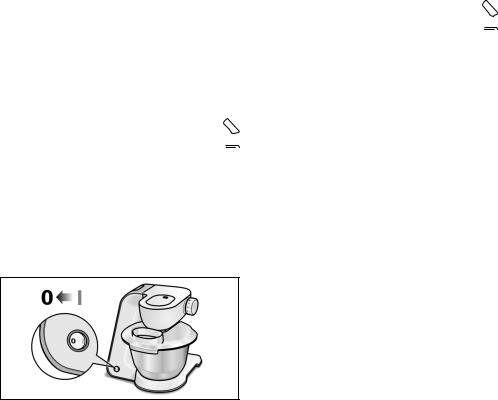
5Rotary switch 0/off = Stop
M = Pulse switch at maximum speed, grip switch for required blending duration.
Settings 1–4, Operating speed: 1 = low speed – slow,
4 = high speed – fast.
When the appliance has been switched off (position 0/off), the appliance runs automatically to the position for changing the tools.
6Illuminated ring
The illuminated ring flashes slowly (30 times per minute) when the unit is turned on with the On / Off button (Standby).
Thisindicatesreadytooperate.Avoid any contact with blades or moveable parts.
The illuminated ring is lit while the appliance is operating (rotary switch on M or 1–4).
If the illuminated ring flashes faster (60 times per minute) in switch position 1–4, there is an error: the appliance has been operated
incorrectly or the electronic fuse has tripped – see section entitled “Troubleshooting”.
7Drive for tools (stirring whisk, beating whisk, dough hook)
8Drive for continuous-feed shredder or citrus press.
When not in use, attach the drive cover.
9Drive cover
To remove the drive cover, press on the rear area and remove cover.
10Drive for blender or multi-function mixer
When not in use, attach the blender drive cover.
11Blender drive cover
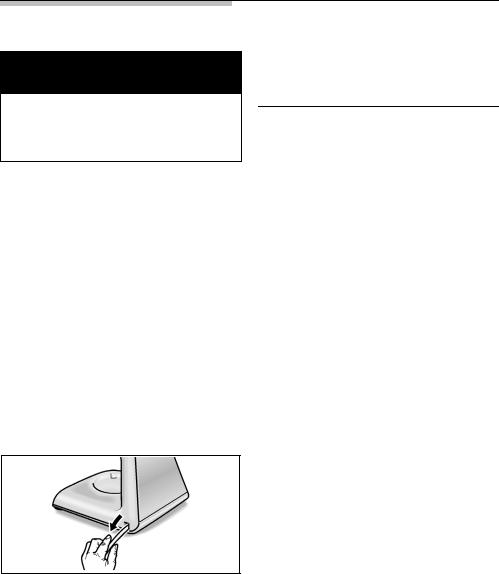
12Cord store
Stow the cord in the cord store.
Bowl with accessories
13Stainless steel mixing bowl
14Lid
Tools:
15Stirring whisk
16Beating whisk
17Kneading hook with dough deflector
18Accessories bag
For storage of the tools and cutting discs.
Attachments
19Continuous-feed shredder
20Blender *
21Citrus juicer *
22Multi-function mixer *
*For this attachment there is a separate user manual.
If an accessory is not included in the product package, it can be purchased your local Bosch retailer.
13
OPERATING POSITIONS
, CAUTION
Before operating the appliance, attach the tool/accessory to the correct drive and in the correct position and place in the operating position according to this section.
Do not operate at no load.
The swivel arm must be engaged in every operating position.
Theswivelarmfeaturesan“EasyArmlift” function which supports the upwards movement of the swivel arm.
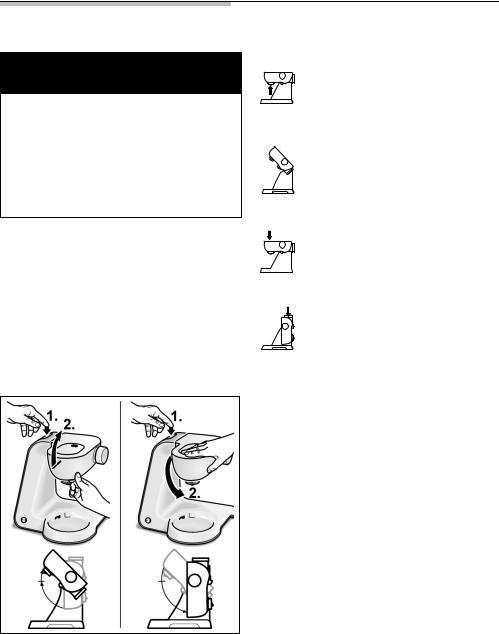
To move the swivel arm (figure 2):
1.Press the Release button.
2.Move the swivel arm.
Support movement with your hand.
Move the swivel arm until it engages in the required position.
Operating position 1:
To operate whisk, stirrer or
dough hook.
 Drive 7 (see figure 1) Operating position 2:
To insert/remove whisk, stirrer or
dough hook.
Add large quantities of ingredients.
Operating position 3:
Tooperate the continous shredder
or the citrus juicer.
 Drive 8 (see figure 1) Operating position 4:
To operate the blender or the multi-
function mixer.
Drive 10 (see figure 1)
Figure 2
14
GETTING STARTED
, WARNING
Do not insert main plug until all preparations for working with the appliance are complete. Risk of serious personal injury or death!
Place power unit on suitable work surface.
Before using the machine with any of the attachments, the power unit should be placed on a suitable work surface.
Thesurfaceshouldbesturdy,smooth and clean; make sure that there is no flour or oil on the surface. A clean, smooth surface will provide the best footing for the suction cup feet on the power unit and will limit slipping and/ or “walking”.
The installation location should be near the receptacle.
Pull the electrical cord to appropriate length.
Select attachment you wish to use.
Specific instructions are located on pages listed below:
Attachment |
Pages |
Mixing bowl with tools |
16 |
Continuous shredder |
19 |
15
WORKING WITH MIXING BOWL AND TOOLS
, WARNING
Do not insert main plug until all preparations for working with the appliance are complete. Risk of serious personal injury or death!
, WARNING
While the appliance is operating, keep fingers clear of the mixing bowl. Attach the lid before operating the appliance!
Do not change tools until the drive has come to a standstill – when the appliance is switched off, the drive continues running briefly and stops in the tool change position.
Do not move the swivel arm until the tool has come to a standstill.
For reasons of safety the appliance may only be operated when unused drives have been covered with drive guards.
Risk of injury from rotating tools!
Stirring whisk
forstirringthickerbatters,e.g.cake batter
Maximum amount of processing: 750 g (26 oz) of flour
Beating whisk
forwhiskingeggwhites,creamand  light batter, e.g. sponge mixture
Maximum amount of processing: 100–600 ml (3–20 fl. oz.) of cream
Dough hook
for kneading heavy dough and mixing-iningredientsthatoughtnot
be cut (e.g. raisins and chocolate chips)
Maximum amount of processing: 750 g (26 oz) of flour
Workingwiththebowlandthe tools
Observe the general operating instructions in the chapter “GETTING STARTED” on page 15.
Attach the drive covers.
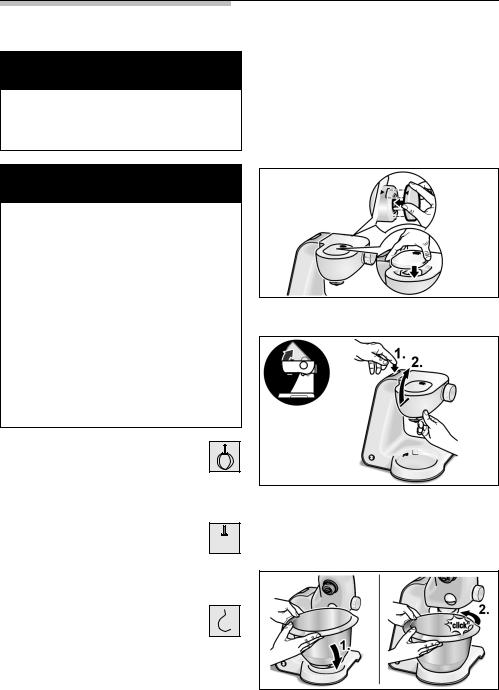
Press the Release button and move the swivel arm to position 2.
Insert the bowl:
–Tilt the bowl forwards and then set it down (1.),
–turncounter-clockwiseuntilitlocks into place (2.).
16

Depending on the processing task, insert the stirrer, whisk or kneading hook until it locks into position.
Note:
If using the kneading hook, rotate the dough deflector until the kneading hook can lock into position.
Put the ingredients to be processed into the bowl.
Press the Release button and move the swivel arm to position 1.
Move the swivel arm until it engages in the required position.
Attach the lid.
Plug the electrical cord into
a convenient nearby receptacle.
Switch the unit on.
Switch the On / Off button to the “I” (On) position.
The illuminated ring (6, figure 1) flashes.
Set the rotary switch to the desired speed setting.
Our recommendation:
Stirring whisk – first stir in at setting 1, then select setting 4
Beating whisk – first mix in at setting 1, then select setting 4
Kneading hook – first stir in at setting 1, knead at setting 2
17
Adding more ingredients
Switch off the appliance with the rotary switch.
Add more ingredients through the feed opening in the lid.
or
Remove lid.
Press the Release button and 
 move the swivel arm to position 2.
Add ingredients.
After using the appliance
Switch off the appliance with the rotary switch.
Switch the On / Off button to the “0” (Off) position.
Pull out the main plug.
Remove lid.
Press the Release button and 
 move the swivel arm to position 2.
Take the tool out of the drive.
Remove the bowl.
Clean all parts, see “Cleaning the appliance”.
18
WORKING WITH CONTINOUS-FEED SHREDDER
, WARNING
Do not insert main plug until all preparations for working with the appliance are complete.
Risk of serious personal injury or death!
, WARNING
Cut Hazard
Do not grip the sharp blades of the cutting discs. Take hold of cutting discs by the edge only.
Before attaching/removing the continuous-feed shredder, wait until the drive has come to a standstill and pull out the main plug.
Do not reach into the feed tube.
Moving Parts. Keep fingers out of outlet opening.
Risk of injury from sharp blades!
, CAUTION
The continuous-feed shredder must be completely assembled before use. Never assemble the continuous-feed shredder on the base unit.
Operate the continuous-feed shredder in the indicated operating position only.
Shredder may be damaged.
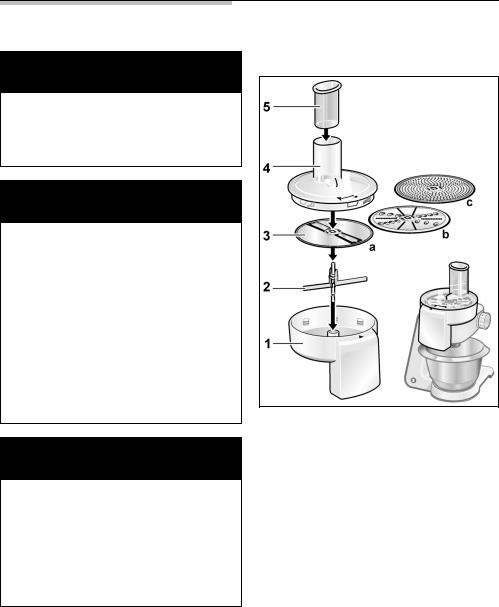
Overview
1 Housing with outlet opening
2 Disc holder
3Cutting discs
3a Reversible slicing disc – thick/thin
3b Reversible shredding disc – coarse/fine
3c Grating disc – medium-fine
4 Cover with filling shaft
5Pusher
19

Protection from overload
To prevent serious damage to your appliance if the continuous-feed shredder is overloaded, the drive shaft of the continuous-feed shredder has a notch (predetermined breaking point). If an overload occurs, the drive shafts breaks at this point.
A new disc holder with drive shaft is available from your local Bosch retailer.
Disc
Reversible slicing disc – thick/thin
for slicing fruit and vegetables. Process at setting 3.
Designationonthereversibleslicingdisc: “1” for the thick slicing side
“3” for the thin slicing side
Note: The reversible slicing disc is not suitable for slicing hard cheese, bread, rolls or chocolate. Slice boiled potatoes only when they are cold.
Reversible shredding disc – coarse/fine
for shredding vegetables, fruit, cheese, except for hard cheese (e.g. Parmesan). Processing at setting 2 or 3.
Designation on the reversible shredding disc:
“2” for the coarse shredding side “4” for the fine shredding side
Note:Thereversibleshreddingdiscisnot suitable for shredding nuts. Shred soft cheese with the coarse side only at setting 4.
Grating disc – medium-fine
for grating raw potatoes, hard cheese (e.g. Parmesan), cooled chocolate and nuts.
Process at setting 4.
Note: The grating disc is not suitable for grating soft cheese and cheese slices.
Working with the continuousfeed shredder
Observe the general operating instructions in the chapter “GETTING STARTED” on page 15.
Remove drive cover from the drive of the continuous-feed shredder. Attach blender drive cover.
Press the Release button and move the swivel arm to position 2.
20
Insert the bowl:
–Tilt the bowl forwards and then set it down (1.),
–turncounter-clockwiseuntilitlocks into place (2.).
Press the Release button and move the swivel arm to position 3.
Hold disc holder at the lower end, ensuring that the two tips are face up.
Carefully place the required slicing or shredding disc onto the tips of the disc holder. In the case of reversible discs, ensure that the required side is face up.
Grip disc holder at the upper end and insert into the housing.
Attach the cover (note mark) and rotate all the way in a clockwise direction.
Place continuous-feed shredder on the drive and rotate all the way in a clockwise direction.
Plug the electrical cord into
a convenient nearby receptacle.
21
 Loading...