


WML 61221 M |
Washing Machine |
User’s Manual |
Skalbimo mašina |
Vartotojo vadovas |
Пральна машина |
Посібник користувача |
Стиральная машина |
Инструкция по эксплуатации |
Document Number |
2820523007_EN/ 25-05-12.(14:33) |

1 Important instructions for safety and environment
This section contains safety instructions that will help protect from risk of personal injury or property damage. Failure to follow these instructions shall void any warranty.
1.1 General safety
•This product can be used by children at and above 8 years old and by persons whose physical,sensory or mental capabilities were not fully developed or who lack experience and knowledge provided that they are supervised or trained on the safe usage of the product and the risks it brings out.Children must not play with the product.Cleaning and maintenance works should not be performed by children unless they are supervised by someone.
•Never place the product on a carpet-covered floor. Otherwise,lack of airflow beneath the machine will cause electrical parts to overheat.This will cause problems with your product.
•If the product has a failure,it should not be operated unless it is repaired by theAuthorized ServiceAgent.
There is the risk of electric shock!
•This product is designed to resume operating in the event of powering on after a power interruption.If you wish to cancel the programme,see "Cancelling the programme" section.
•Connect the product to a grounded outlet protected by a 16A fuse.Do not neglect to have the grounding
installation made by a qualified electrician.Our company shall not be liable for any damages that will arise when the product is used without grounding in accordance with the local regulations.
•The water supply and draining hoses must be securely fastened and remain undamaged.Otherwise,there is the risk of water leakage.
•Never open the loading door or remove the filter while there is still water in the drum.Otherwise,risk of flooding and injury from hot water will occur.
•Do not force open the locked loading door.The loading door will be ready to open just a few minutes after the washing cycle comes to an end.In case of forcing the loading door to open,the door and the lock mechanism may get damaged.
•Unplug the product when not in use.
•Never wash the product by spreading or pouring water onto it! There is the risk of electric shock!
•Never touch the plug with wet hands! Never unplug by pulling on the cable,always pull out by grabbing the plug.
•Use detergents,softeners and supplements suitable for automatic washing machines only.
•Follow the instructions on the textile tags and on the detergent package.
•The product must be unplugged during installation, maintenance,cleaning and repairing procedures.
•Always have the installation and repairing procedures carried out by the Authorized Service Agent.
Manufacturer shall not be held liable for damages that may arise from procedures carried out by unauthorized persons.
•If the power cable is damaged,it must be replaced by the manufacturer,after sales service or a similarly qualified
person (preferably an electrician) or someone designated by the importer in order to avoid possible risks.
1.2 Intended use
•This product has been designed for domestic use.It is not suitable for commercial use and it must not be used out of its intended use.
•The product must only be used for washing and rinsing of laundry that are marked accordingly.
•The manufacturer waives any responsibility arisen from incorrect usage or transportation.
1.3 Children's safety
•Packaging materials are dangerous to children.Keep packaging materials in a safe place away from reach of the children.
•Electrical products are dangerous for the children.Keep children away from the product when it is in use.Do not let them to tamper with the product. Use child lock to prevent children from intervening with the product.
•Do not forget to close the loading door when leaving the room where the product is located.
•Store all detergents and additives in a safe place away from the reach of the children by closing the cover of the detergent container or sealing the detergent package.
1.4 Package information
•Packaging materials of the product are manufactured from recyclable materials in accordance with our National Environment Regulations.Do not dispose of the packaging materials together with the domestic or other wastes. Take them to the packaging material collection points designated by the local authorities.
1.5 Disposing of the waste product
•This product has been manufactured with high quality parts and materials which can be reused and are suitable for recycling.Therefore,do not dispose the product with normal domestic waste at the end of its service life. Take it to a collection point for the recycling of electrical and electronic equipment.Please consult your local authorities to learn the nearest collection point. Help protect the environment and natural resources by recycling used products.For children's safety,cut the power cable and break the locking mechanism of the loading door so that it will be non-functional before disposing of the product.
1.6 Compliance with WEEE Directive
This appliance’s packaging material is
recyclable.Help recycle it and protect the environment by dropping it off in the municipal
receptacles provided for this purpose. Your appliance also contains a great amount of

 recyclable material.It is marked with this label to indicate the used appliances that should not be mixed with other waste.This way,the appliance recycling
organised by your manufacturer will be done under the best possible conditions,in compliance with European Directive 2002/96/EC onWaste Electrical and Electronic Equipment. Contact your town hall or your retailer for the used appliance collection points closest to your home. We thank you doing your part to protect the environment.
2 / 76 EN |
Washing Machine / User’s Manual |
|
|

2 Installation
Refer to the nearestAuthorised ServiceAgent for installation of the product.To make the product ready for use,review the information in the user manual and make sure that the electricity,tap water supply and water drainage systems are appropriate before calling theAuthorized ServiceAgent.If they are not,call a qualified technician and plumber to have any necessary arrangements carried out.
C Preparation of the location and electrical,tap water and waste water installations at the place of installation is under customer's responsibility.
B warning: Installation and electrical connections of the product must be carried out by theAuthorized ServiceAgent.Manufacturer shall not be held liable for damages that may arise from procedures carried out by unauthorized persons.
A warning: Prior to installation,visually check if the product has any defects on it.If so,do not have it installed. Damaged products cause risks for your safety.
C Make sure that the water inlet and discharge hoses as well as the power cable are not folded,pinched or crushed while pushing the product into its place after installation or cleaning procedures.
2.1 Appropriate installation location
•Place the machine on a rigid floor.Do not place it on a long pile rug or similar surfaces.
•Total weight of the washing machine and the dryer -with full loadwhen they are placed on top of each other reaches to approx.180 kilograms.Place the product on a solid and flat floor that has sufficient load carrying capacity!
•Do not place the product on the power cable.
•Do not install the product at places where temperature may fall below 0ºC.
•Place the product at least 1 cm away from the edges of other furniture.
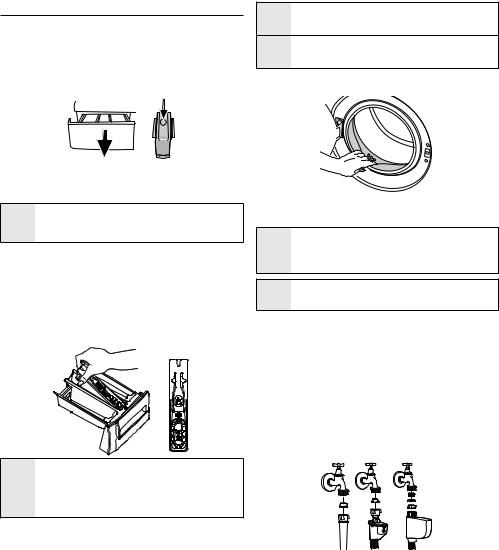
2.2 Removing packaging reinforcement
Tilt the machine backwards to remove the packaging reinforcement.Remove the packaging reinforcement by pulling the ribbon.
2.Remove transportation safety bolts by turning them gently.
3.Attach the plastic covers supplied in the User Manual bag into the holes on the rear panel. (P)
C Keep the transportation safety bolts in a safe place to reuse when the washing machine needs to be moved again in the future.
C Never move the product without the transportation safety bolts properly fixed in place!
2.4 Connecting water supply
C The water supply pressure required to run the product is between 1 to 10 bars (0.1 – 1 MPa).It is necessary to have 10 – 80 liters of water flowing from the fully open tap in one minute to have your machine run smoothly.
Attach a pressure reducing valve if water pressure is higher.
C If you are going to use the double water-inlet product as a single (cold) water-inlet unit,you must install the supplied stopper to the hot water valve before operating the product.(Applies for the products supplied with a blind stopper group.)
A warning: Models with a single water inlet should not be connected to the hot water tap.In such a case the laundry will get damaged or the product will switch to protection mode and will not operate.
A warning: Do not use old or used water inlet hoses on the new product.It may cause stains on your laundry.
1.Connect the special hoses supplied with the product to the water inlets on the product. Red hose (left) (max. 90
ºC) is for hot water inlet,blue hose (right) (max.25 ºC) is for cold water inlet.
2.3 Removing the transportation locks
Awarning: Do not remove the transportation locks before taking out the packaging reinforcement.
Awarning: Remove the transportation safety bolts before operating the washing machine! Otherwise,the product will be damaged.
1.Loosen all the bolts with a suitable spanner until they rotate freely (C).
Awarning: Ensure that the cold and hot water connections are made correctly when installing the product.
Otherwise,your laundry will come out hot at the end of the washing process and wear out.
2.Tighten all hose nuts by hand.Never use a tool when tightening the nuts.
3.Open the taps completely after making the hose connection to check for water leaks at the connection
3 / 76 EN |
Washing Machine / User’s Manual |
points.If any leaks occur,turn off the tap and remove the nut. Retighten the nut carefully after checking the seal. To prevent water leakages and damages caused by them, keep the taps closed when the machine is not in use.
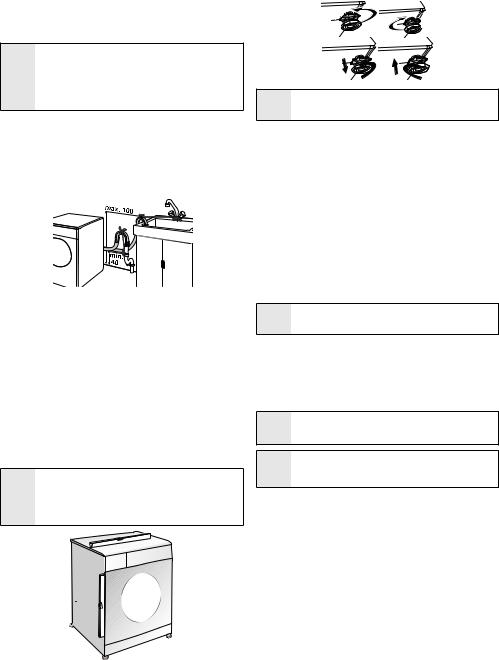
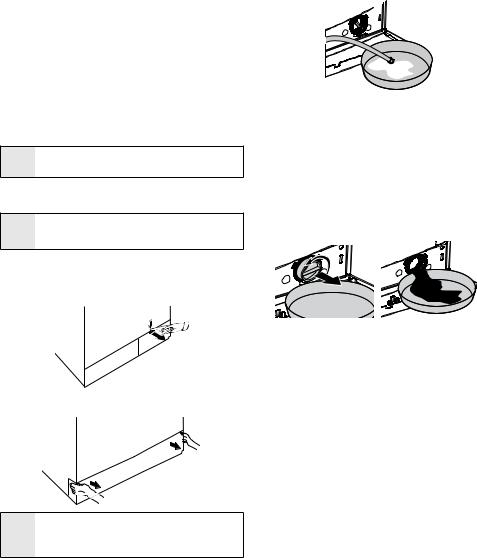
2.5 Connecting to the drain
•The end of the drain hose must be directly connected to the wastewater drain or to the washbasin.
Awarning: Your house will be flooded if the hose comes out of its housing during water discharge.Moreover,there is risk of scalding due to high washing temperatures!
To prevent such situations and to ensure smooth water intake and discharge of the machine,fix the end of the discharge hose tightly so that it cannot come out.
•The hose should be attached to a height of at least 40 cm,and 100 cm at most.
•In case the hose is elevated after laying it on the floor level or close to the ground (less than 40 cm above the ground),water discharge becomes more difficult and the laundry may come out excessively wet.Therefore,follow the heights described in the figure.
•To prevent flowing of dirty water back into the machine and to allow for easy discharge,do not immerse the hose end into the dirty water or do not drive it in the drain more than 15 cm.If it is too long,cut it short.
•The end of the hose should not be bent,it should not be stepped on and the hose must not be pinched between the drain and the machine.
•If the length of the hose is too short,use it by adding an original extension hose. Length of the hose may not be longer than 3.2 m.To avoid water leak failures, the connection between the extension hose and the drain hose of the product must be fitted well with an appropriate clamp as not to come off and leak.
2.6 Adjusting the feet
Awarning: In order to ensure that the product operates more silently and vibration-free,it must stand level and balanced on its feet.Balance the machine by adjusting the feet.Otherwise,the product may move from its place and cause crushing and vibration problems.
1.Loosen the lock nuts on the feet by hand.
2.Adjust the feet until the product stands level and balanced.
3.Tighten all lock nuts again by hand.
Awarning: Do not use any tools to loosen the lock nuts. Otherwise,they will get damaged.
2.7 Electrical connection
Connect the product to a grounded outlet protected by a 16 A fuse.Our company shall not be liable for any damages that will arise when the product is used without grounding in accordance with the local regulations.
•Connection must comply with national regulations.
•Power cable plug must be within easy reach after installation.
•If the current value of the fuse or breaker in the house is less than 16Amps,have a qualified electrician install a 16Amp fuse.
•The voltage specified in the "Technical specifications" section must be equal to your mains voltage.
•Do not make connections via extension cables or multiplugs.
Bwarning: Damaged power cables must be replaced by theAuthorized ServiceAgents.
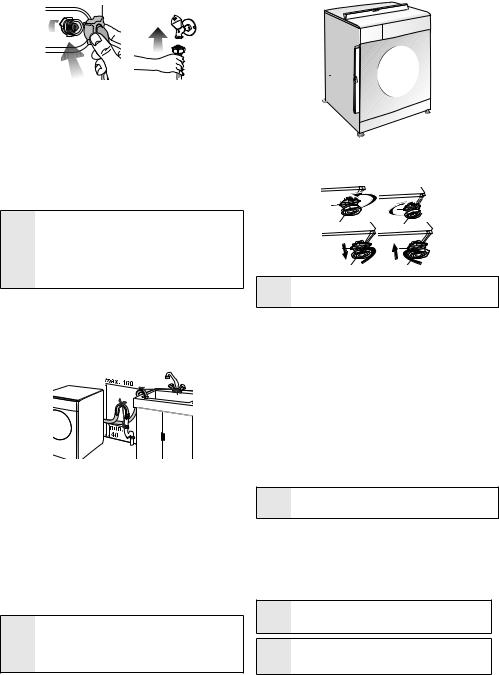
Transportation of the product
1.Unplug the product before transporting it.
2.Remove water drain and water supply connections.
3.Drain all water that has remained in the product.
4.Install transportation safety bolts in the reverse order of removal procedure;
C Never move the product without the transportation safety bolts properly fixed in place!
Awarning: Packaging materials are dangerous to children. Keep packaging materials in a safe place away from reach of the children.
4 / 76 EN |
Washing Machine / User’s Manual |
|
|
3 Preparation
3.1 Sorting the laundry
•Sort laundry according to type of fabric,colour,and degree of soiling and allowable water temperature.
•Always obey the instructions given on the garment tags.
3.2 Preparing laundry for washing
•Laundry items with metal attachments such as, underwired bras,belt buckles or metal buttons will damage the machine. Remove the metal pieces or wash the clothes by putting them in a laundry bag or pillow case.
•Take out all substances in the pockets such as coins, pens and paper clips,and turn pockets inside out and brush.Such objects may damage the product or cause noise problem.
•Put small size clothes such as infant's socks and nylon stockings in a laundry bag or pillow case.
•Place curtains in without compressing them.Remove curtain attachment items.
•Fasten zippers,sew loose buttons and mend rips and tears.
•Wash“machine washable”or“hand washable”labeled products only with an appropriate programme.
•Do not wash colours and whites together.New,dark coloured cottons release a lot of dye. Wash them separately.
•Tough stains must be treated properly before washing.If unsure,check with a dry cleaner.
•Use only dyes/colour changers and limescale removers suitable for machine wash.Always follow the instructions on the package.
•Wash trousers and delicate laundry turned inside out.
•Keep laundry items made ofAngora wool in the freezer for a few hours before washing.This will reduce pilling.
•Laundry that are subjected to materials such as flour, lime dust,milk powder,etc.intensely must be shaken off before placing into the machine.Such dusts and powders on the laundry may build up on the inner parts of the machine in time and can cause damage.
3.3 Things to be done for energy saving
Following information will help you use the product in an ecological and energy-efficient manner.
•Operate the product in the highest capacity allowed by the programme you have selected,but do not overload; see,"Programme and consumption table".
•Always follow the instructions on the detergent packaging.
•Wash slightly soiled laundry at low temperatures.
•Use faster programmes for small quantities of lightly soiled laundry.
•Do not use prewash and high temperatures for laundry that is not heavily soiled or stained.
•If you plan to dry your laundry in a dryer,select the highest spin speed recommended during washing process.
•Do not use detergent in excess of the amount recommended on the detergent package.
3.4 Initial use
Before starting to use the product,make sure that all preparations are made in accordance with the instructions in sections“Important safety instructions”and“Installation”. To prepare the product for washing laundry,perform first operation in Drum Cleaning programme.If your product
is not equipped with Drum Cleaning programme,perform the Initial Use procedure in accordance with the methods described under“5.2 Cleaning the loading door and the drum”section of the user manual.
C Use an anti-limescale suitable for the washing machines.
Some water might have remained in the product due to C the quality control processes in the production.It is not
harmful for the product.
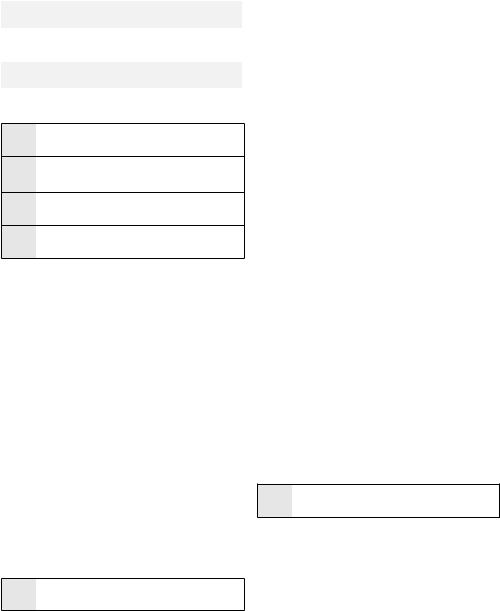
3.5 Correct load capacity
The maximum load capacity depends on the type of laundry, the degree of soiling and the washing programme desired. The machine automatically adjusts the amount of water according to the weight of the loaded laundry.
Awarning: Follow the information in the“Programme and consumption table”.When overloaded,machine's washing performance will drop.Moreover,noise and vibration problems may occur.
Laundry type |
Weight (g) |
Bathrobe |
1200 |
Napkin |
100 |
Duvet cover |
700 |
Bed Sheet |
500 |
Pillowcase |
200 |
Tablecloth |
250 |
Towel |
200 |
Hand towel |
100 |
Evening gown |
200 |
Underclothing |
100 |
Men’s overalls |
600 |
Men’s shirt |
200 |
Men’s pajamas |
500 |
Blouses |
100 |
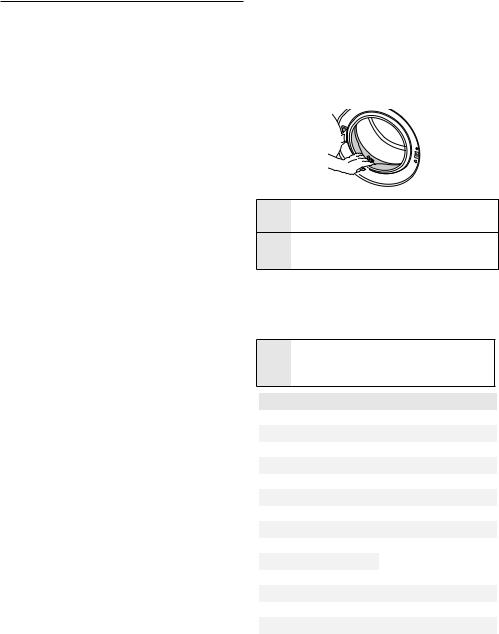
3.6 Loading the laundry
1.Open the loading door.
2.Place laundry items loosely into the machine.
3.Push the loading door to close until you hear a locking sound. Ensure that no items are caught in the door.
5 / 76 EN |
Washing Machine / User’s Manual |
|
|
The loading door is locked while a programme is running.
C Thecomesdoorto canan end.only be opened a while after the programme
Awarning: In case of misplacing the laundry,noise and vibration problems may occur in the machine.
3.7 Using detergent and softener
When using detergent,softener,starch,fabric dye,bleach
C or limescale remover read the manufacturer's instructions on the package carefully and follow the suggested dosage values.Use measuring cup if available.
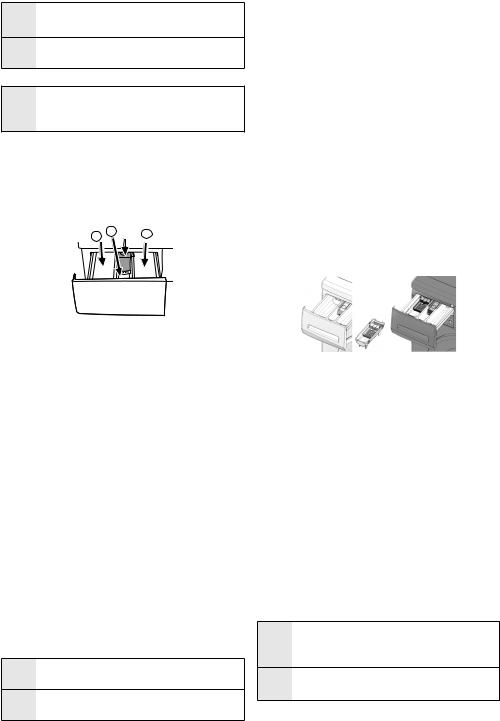
Detergent Drawer
The detergent drawer is composed of three compartments:
–(1) for prewash
–(2) for main wash
–(3) for softener
–(*) in addition,there is siphon piece in the softener compartment.
2 3  1
1
Detergent, softener and other cleaning agents
•Add detergent and softener before starting the washing programme.
•Never leave the detergent drawer open while the washing programme is running!
•When using a programme without prewash,do not put any detergent into the prewash compartment
(compartment nr."1").
•In a programme with prewash,do not put liquid detergent into the prewash compartment (compartment nr."1").
•Do not select a programme with prewash if you are using a detergent bag or dispensing ball.Place the detergent bag or the dispensing ball directly among the laundry in the machine.
•If you are using liquid detergent,do not forget to place the liquid detergent cup into the main wash compartment (compartment nr."2").
Choosing the detergent type
The type of detergent to be used depends on the type and colour of the fabric.
•Use different detergents for coloured and white laundry.
•Wash your delicate clothes only with special detergents (liquid detergent,wool shampoo,etc.) used solely for delicate clothes.
•When washing dark coloured clothes and quilts,it is recommended to use liquid detergent.
•Wash woolens with special detergent made specifically for woolens.
Awarning: Use only detergents manufactured specifically for washing machines.
Awarning: Do not use soap powder.
Adjusting detergent amount
The amount of washing detergent to be used depends on the amount of laundry,the degree of soiling and water hardness.
•Do not use amounts exceeding the dosage quantities recommended on the detergent package to avoid problems of excessive foam,poor rinsing,financial savings and finally,environmental protection.
•Use lesser detergent for small amounts or lightly soiled clothes.
Using softeners
Pour the softener into the softener compartment of the detergent drawer.
•Do not exceed the (>max<) level marking in the softener compartment.
•If the softener has lost its fluidity,dilute it with water before putting it in the detergent drawer.
Using liquid detergents
If the product contains a liquid detergent cup:
•Make sure that you have placed the liquid detergent cup in compartment nr."2".
•If the liquid detergent has lost its fluidity,dilute it with water before putting in the detergent cup.
If the product does not contain a liquid detergent cup:
•Do not use liquid detergent for the prewash in a programme with prewash.
•Liquid detergent stains your clothes when used with Delayed Start function.If you are going to use the Delayed Start function,do not use liquid detergent.
Using gel and tablet detergent
Apply the following instructions when using tablet,gel and similar detergents.
•If the gel detergent thickness is fluidal and your machine does not contain a special liquid detergent cup,put the gel detergent into the main wash detergent compartment during first water intake.If your machine contains a liquid detergent cup,fill the detergent into this cup before starting the programme.
•If the gel detergent thickness is not fluidal or in the shape of capsule liquid tablet,put it directly into the drum before washing.
•Put tablet detergents into the main wash compartment (compartment nr."2") or directly into the drum before washing.
Tablet detergents may leave residues in the detergent C compartment.If you encounter such a case,place the tablet detergent between the laundry,close to the lower
part of the drum in future washings.
C Use the tablet or gel detergent without selecting the prewash function.
6 / 76 EN |
Washing Machine / User’s Manual |
|
|

Using starch
•Add liquid starch,powder starch or the fabric dye into the softener compartment.
•Do not use softener and starch together in a washing cycle.
•Wipe the inside of the machine with a damp and clean cloth after using starch.
Using bleaches
•Select a programme with prewash and add the bleaching agent at the beginning of the prewash.Do not put detergent in the prewash compartment.As an alternative application,select a programme with extra rinse and add the bleaching agent while the machine is taking water from the detergent compartment during first rinsing step.
•Do not use bleaching agent and detergent by mixing them.
•Use just a little amount (approx.50 ml) of bleaching agent and rinse the clothes very well as it causes skin irritation.
Do not pour the bleaching agent onto the clothes and do not use it for coloured clothes.
•When using oxygen based bleaches,select a programme that washes at a lower temperature.
•Oxygen based bleaches can be used together with detergents; however,if its thickness is not the same with the detergent,put the detergent first into the compartment nr."2" in the detergent drawer and wait until the detergent flows while the machine is taking in water.Add the bleaching agent from the same compartment while the machine is still taking in water.
Using limescale remover
•When required,use limescale removers manufactured specifically for washing machines only.
3.8 Tips for efficient washing
Soiling Level
|
|
Clothes |
|
|
|
|
Light colours and whites |
Colours |
Dark colours |
Delicates/ |
|
|
Woolens/Silks |
||||
|
|
|
|
||
|
(Recommended temperature |
(Recommended temperature |
(Recommended |
(Recommended |
|
|
temperature range |
temperature range |
|||
|
range based on soiling level: |
range based on soiling level: |
|||
|
based on soiling level: |
based on soiling level: |
|||
|
40-90ºC) |
cold-40ºC) |
cold-40ºC) |
cold-30ºC) |
|
|
|
|
|||
|
It may be necessary to pre- |
Powder and liquid |
|
|
|
|
|
|
|||
|
treat the stains or perform |
|
|
||
|
detergents recommended |
|
|
||
|
prewash.Powder and liquid |
|
Prefer liquid |
||
Heavily Soiled |
for colours can be used at |
Liquid detergents |
|||
detergents recommended |
detergents produced |
||||
dosages recommended for |
suitable for colours |
||||
|
for whites can be used at |
for delicate clothes. |
|||
|
heavily soiled clothes.It is |
and dark colours can |
|||
(difficult stains such |
dosages recommended for |
Woolen and silk |
|||
recommended to use powder |
be used at dosages |
||||
heavily soiled clothes.It is |
clothes must be |
||||
as grass,coffee, |
detergents to clean clay and |
recommended for |
|||
recommended to use powder |
washed with special |
||||
fruits and blood.) |
soil stains and the stains that |
heavily soiled clothes. |
|||
detergents to clean clay and |
woolen detergents. |
||||
|
are sensitive to bleaches.Use |
|
|||
|
soil stains and the stains that |
|
|
||
|
are sensitive to bleaches. |
detergents without bleach. |
|
|
|
|
|
|
|
||
|
|
|
|
|
|
Normally Soiled |
|
Powder and liquid detergents |
Liquid detergents |
Prefer liquid |
|
Powder and liquid detergents |
detergents produced |
||||
|
recommended for whites |
recommended for colours |
suitable for colours |
for delicate clothes. |
|
|
can be used at dosages |
and dark colours can |
|||
(For example,stains |
can be used at dosages |
Woolen and silk |
|||
recommended for normally |
be used at dosages |
||||
caused by body on |
recommended for normally |
soiled clothes. Use detergents |
recommended for |
clothes must be |
|
collars and cuffs) |
soiled clothes. |
without bleach. |
normally soiled clothes. |
washed with special |
|
|
woolen detergents. |
||||
|
|
|
|
||
|
|
|
|
|
|
|
|
Powder and liquid detergents |
Liquid detergents |
Prefer liquid |
|
Lightly Soiled |
Powder and liquid detergents |
detergents produced |
|||
recommended for colours |
suitable for colours |
||||
|
recommended for whites |
can be used at dosages |
and dark colours can |
for delicate clothes. |
|
|
can be used at dosages |
Woolen and silk |
|||
(No visible stains |
recommended for lightly |
be used at dosages |
|||
recommended for lightly soiled |
clothes must be |
||||
soiled clothes. Use detergents |
recommended for lightly |
||||
exist.) |
clothes. |
washed with special |
|||
|
|
without bleach. |
soiled clothes. |
woolen detergents. |
|
|
|
|
|
||
|
|
|
|
|
7 / 76 EN |
Washing Machine / User’s Manual |
|
|
4 Operating the product
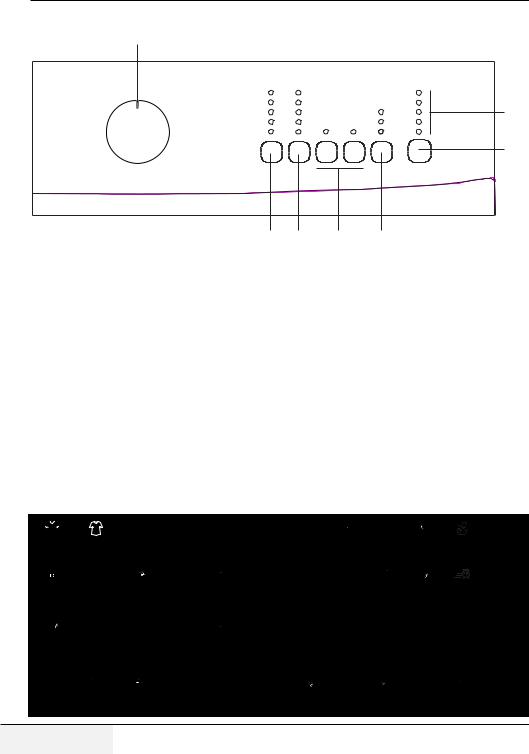
4.1 Control panel
1 |
|
|
|
|
|
|
2 |
|
|
|
7 |
3 |
4 |
5 |
6 |
1 |
- Programme Selection knob (Uppermost position On/Off) |
5 |
-Auxiliary Function buttons |
2 |
- Programme Follow-up indicator |
6 |
- Delayed Start button (in some models) |
3 |
-TemperatureAdjustment button |
7 |
- Start / Pause button |
4 |
- Spin Speed adjustment button |
|
|
|
|
|
|
Dark wash |
Dark wash |
Synthetics |
Cottons |
Pre-wash |
Main |
Rinse |
Wash |
Spin |
Delicate |
Pet hair |
Door Ready |
(Darkcare) |
(Darkcare) |
|
|
|
wash |
|
|
|
|
removal |
|
Drain |
Anti- |
Duvet |
Child- |
Hand |
BabyProtect |
Cotton |
Woollens expres 14 |
Daily |
mini 30 |
On/Off |
|
(Pump) |
creasing |
(Bedding) proof lock |
Wash |
|
Eco |
Super short |
|
|
|
||
|
|
|
|
|
|
|
express |
|
|
|
|
Daily |
Rinse hold |
Start/ |
No spin |
Quick |
Finished |
Cold |
Temperature |
Self |
Lingerie |
Eco Clean |
|
express |
|
Pause |
|
wash |
|
|
|
Clean |
|
|
|
Mixed 40 |
Super 40 |
Extra rinse |
Freshen |
Shirts |
Jeans |
Sport |
Time delay Intensive |
Fasion |
Anti- |
|
|
(Mix40) |
|
(Rinse Plus) up |
|
|
|
|
|
care |
allergic |
|
|
8 / 76 EN |
|
|
|
|
|
|
|
|
Washing Machine / User’s Manual |
||
4.2 Preparing the machine
Make sure that the hoses are connected tightly.Plug in your machine.Turn the tap on completely.Place the laundry in the machine. Add detergent and fabric softener.
4.3 Programme selection
Select the programme suitable for the type,quantity and soiling degree of the laundry in accordance with the
"Programme and consumption table" and the temperature table below.
90˚C |
Heavily soiled white cottons and linens.(coffee table |
|
covers,tableclothes,towels,bed sheets,etc.) |
||
|
||
|
|
|
|
Normally soiled,coloured,fade proof linens,cottons |
|
60˚C |
or synthetic clothes (shirt,nightgown,pajamas,etc.) |
|
|
and lightly soiled white linens (underwear,etc.) |
|
40˚C- |
Blended laundry including delicate textile (veil |
|
30˚C- Cold |
curtains,etc.),synthetics and woolens. |
Select the desired programme with the Programme Selection button.
C Programmes are limited with the highest spin speed appropriate for that particular type of fabric.
When selecting a programme,always consider the type C oftemperature.fabric,colour,degree of soiling and permissible water
C Always select the lowest required temperature.Higher temperature means higher power consumption.
C For further programme details,see "Programme and consumption table"
4.4 Main programmes
Depending on the type of fabric,use the following main
programmes.
• Cottons
Use this programme for your cotton laundry (such as bed sheets,duvet and pillowcase sets,towels,bathrobes, underwear,etc.).Your laundry will be washed with vigorous
washing action for a longer washing cycle.
• Synthetics
Use this programme to wash your synthetic clothes (shirts, blouses,synthetic/cotton blends,etc.).It washes with a gentle action and has a shorter washing cycle compared to the Cottons programme.
For curtains and tulle,use the Synthetic 40˚C programme with prewash and anti-creasing functions selected.As their meshed texture causes excessive foaming,wash the veils/ tulle by putting little amount of detergent into the main wash compartment.Do not put detergent in the prewash
compartment.
• Woollens
Use this programme to wash your woolen clothes.Select the appropriate temperature complying with the tags of your clothes. Use appropriate detergents for woolens.
4.5 Additional programmes
For special cases,additional programmes are available in the machine.
C Additional programmes may differ according to the model of the machine.
• Cotton Economic
You may wash your normally soiled durable cotton and linen laundry in this programme with the highest energy and water saving compared to all other wash programmes suitable for cottons.Actual water temperature may differ from the declared cycle temperature.Programme duration may automatically be shortened during later stages of the programme if you wash less amount (e.g. ½ capacity or less) of laundry.In this case energy and water consumption will be further decreased giving you the opportunity for a more economical wash.This feature is available for certain
models having remaining time display.
• BabyProtect
Use this programme to wash baby laundry,and the laundry that belongs to allergic persons.Longer heating time and an
additional rinsing step provide a higher level of hygiene.
• Hand wash
Use this programme to wash your woolen/delicate clothes that bear“not machinewashable”tags and for which hand wash is recommended.It washes laundry with a very gentle
washing action to not to damage clothes.
• Daily express
Use this programme to quickly wash your little amount of
lightly soiled cotton clothes.
• Darkcare
Use this programme to wash your dark coloured laundry,or the coloured laundry that you do not want them get faded. Washing is performed with less mechanical movements at low temperature.It is recommended to use liquid detergent
or wool shampoo for dark coloured laundry.
• Mixed 40 (Mix 40)
Use this programme to wash your cotton and synthetic
clothes together without sorting them.
4.6 Special programmes
For specific applications,select any of the following
programmes.
• Rinse
Use this programme when you want to rinse or starch
separately.
• Spin + Drain
Use this programme to apply an additional spin cycle for your laundry or to drain the water in the machine.
Before selecting this programme,select the desired spin speed and press Start / Pause button.First,the machine will drain the water inside of it.Then,it will spin the laundry with the set spin speed and drain the water coming out of them.
If you wish to drain only the water without spinning your laundry,select the Pump+Spin programme and then select the No Spin function with the help of Spin SpeedAdjustment button.Press Start / Pause button.
C Use a lower spin speed for delicate laundries.
9 / 76 EN |
Washing Machine / User’s Manual |
|
|

4.7 Temperature selection
Whenever a new programme is selected,the recommended temperature for the selected programme appears on the temperature indicator.
To decrease the temperature,press theTemperature Adjustment button.Temperature will decrease gradually.
If the programme has not reached the heating step,
C you can change the temperature without switching the machine to Pause mode.
4.8 Spin speed selection
Whenever a new programme is selected,the recommended spin speed of the selected programme is displayed on the spin speed indicator.
To decrease the spin speed,press the Spin Speed Adjustment button.Spin speed decreases gradually.Then, depending on the model of the product,"Rinse Hold" and "No Spin" options appear on the display.See "Auxiliary function selection" section for explanations of these options.
If the programme has not reached the spinning step,you
C canPausechangemode.the speed without switching the machine to
10 / 76 EN |
Washing Machine / User’s Manual |
|
|
4.9 Programme and consumption table
EN |
|
2 |
|
|
|
|
|
(kg)LoadMax. |
(~min) |
Programme |
|
|
DurationProgramme |
|
|
|
|
|
|
Cottons |
|
|
6 |
150 |
90 |
|
|||
Cottons |
60 |
|
6 |
122 |
Cottons |
40 |
|
6 |
102 |
Cotton Economic |
60** |
|
6 |
160 |
Cotton Economic |
60** |
|
3 |
130 |
Cotton Economic |
40** |
|
3 |
130 |
Daily express |
90 |
|
6 |
88 |
Daily express |
60 |
|
6 |
58 |
Daily express |
30 |
|
6 |
28 |
Darkcare |
40 |
|
2.5 |
107 |
Mixed 40 (Mix 40) |
40 |
|
3 |
115 |
Hand wash |
30 |
|
1 |
43 |
Woollens |
40 |
|
1.5 |
60 |
BabyProtect |
90 |
|
6 |
165 |
Synthetics |
60 |
|
2.5 |
116 |
Synthetics |
40 |
|
2.5 |
106 |
|
|
|
|
|
• Selectable
*Automatically selected,no canceling.
Water (l)Consumption
65
65
65
44
37
37
47
60
55
58
45
30
40
82
45
45
|
|
|
Auxiliary functions |
|
||||||||
(kWh) |
|
Speed***Max. |
Prewash |
|
WashQuick |
|
PlusRinse |
|
Creasing-Anti |
|
HoldRinse |
|
|
|
|
|
|
|
|||||||
ConsumptionEnergy |
|
|
|
|
|
Selectable |
||||||
|
|
|
|
|
|
|
|
|
|
|
|
|
|
|
|
|
|
|
|
|
|
|
|
|
temperature |
|
|
|
|
|
|
|
|
|
|
|
|
range °C |
2.00 |
|
1600 |
• |
|
• |
|
• |
|
• |
|
• |
Cold-90 |
1.35 |
|
1600 |
• |
|
• |
|
• |
|
• |
|
• |
Cold-90 |
0.70 |
|
1600 |
• |
|
• |
|
• |
|
• |
|
• |
Cold-90 |
1.01 |
|
1600 |
|
|
|
|
|
|
|
|
• |
40-60 |
0.82 |
|
1600 |
|
|
|
|
|
|
|
|
• |
40-60 |
0.64 |
|
1600 |
|
|
|
|
|
|
|
|
• |
40-60 |
1.70 |
|
1400 |
|
|
|
|
• |
|
|
|
• |
Cold-90 |
1.00 |
|
1400 |
|
|
|
|
• |
|
|
|
• |
Cold-90 |
0.20 |
|
1400 |
|
|
|
|
• |
|
|
|
• |
Cold-90 |
0.45 |
|
800 |
|
|
|
|
* |
|
|
|
• |
Cold-40 |
0.50 |
|
800 |
• |
|
• |
|
• |
|
• |
|
• |
Cold-40 |
0.15 |
|
600 |
|
|
|
|
|
|
|
|
|
Cold-30 |
0.30 |
|
600 |
|
|
|
|
• |
|
|
|
• |
Cold-40 |
2.00 |
|
1600 |
• |
|
|
|
* |
|
|
|
• |
30-90 |
0.90 |
|
800 |
• |
|
• |
|
• |
|
• |
|
• |
Cold-60 |
0.42 |
|
800 |
• |
|
• |
|
• |
|
• |
|
• |
Cold-60 |
|
|
|
|
|
|
|
|
|
|
|
|
|
**Energy Label programme (EN 60456 Ed.3)
**“Cotton Economic 40°C and Cotton Economic 60°C are the standard programmes.”These programmes are referred to as‘standard 40°C cotton programme’ and‘standard 60°C cotton programme’
***If maximum spin speed of the machine is lower then this value,you can only select up to the maximum spin speed.
C The auxiliary functions in the table may vary according to the model of your machine.
C Water and power consumption may vary subject to the changes in water pressure,water hardness and temperature,ambient temperature,type and amount of laundry,selection of auxiliary functions and spin speed,and changes in electric voltage.
C You can see the washing time of the programme you have selected on the display of the machine.It is normal that small differences may occur between the time shown on the display and the real washing time.
11 / 76 EN |
Washing Machine / User’s Manual |
|
|

4.10 Auxiliary function selection
Use the following auxiliary functions according to your daily needs.Select the desired auxiliary functions before starting the programme.Furthermore,you may also select or cancel auxiliary functions that are suitable to the running programme without pressing the Start / Pause button when the machine is operating.For this,the machine must be in a step before the auxiliary function you are going to select or cancel.
If the auxiliary function cannot be selected or canceled,light of the relevant auxiliary function will blink 3 times to warn the user.
Some functions cannot be selected together.If a second
C auxiliary function conflicting with the first one is selected before starting the machine,the function selected
first will be canceled and the second auxiliary function selection will remain active.For example,if you want to select QuickWash after you have selected the Prewash, Prewash will be canceled and QuickWash will remain active.
An auxiliary function that is not compatible with the C programme cannot be selected.(See“Programme and
consumption table”)
C Auxiliary Function buttons may vary according to the model of the machine.
• Prewash
A Prewash is only worthwhile for heavily soiled laundry.Not using the Prewash will save energy,water,detergent and time.
C Prewash without detergent is recommended for tulle and curtains.
• Quick Wash
This function can be used in Cottons and Synthetics programmes.It decreases the washing times and also the number of rinsing steps for lightly soiled laundry.
When you select this function,load your machine with
C halftable.of the maximum laundry specified in the programme
• Rinse Plus
This function enables the machine to make another rinsing in addition to the one already made after the main wash.
Thus,the risk for sensitive skins (babies,allergic skins,etc.) to be effected by the minimal detergent remnants on the
laundry can be reduced.
• Anti-Creasing
This function creases the clothes lesser when they are being washed.Drum movement is reduced and spinning speed is limited to prevent creasing.In addition,washing is done with a higher water level. Use this function for delicate laundry
that creases easily.
• Rinse Hold
If you are not going to unload your clothes immediately after the programme completes,you may use rinse hold function to keep your laundry in the final rinsing water in order to prevent them from getting wrinkled when there is no water
in the machine.Press Start / Pause button after this process if you want to drain the water without spinning your laundry.
Programme will resume and complete after draining the water.
If you want to spin the laundry held in water,adjust the Spin Speed and press Start / Pause button.
The programme resumes.Water is drained,laundry is spun
and the programme is completed.
Delayed Start (In some models only)
With the Delayed Start function the startup of the programme may be delayed up to 3,6 or 9 hours.
C Do not use liquid detergents when you set Delayed Start!
There is the risk of staining of the clothes.
Open the loading door,place the laundry and put detergent, etc.Select the washing programme,temperature,spin speed and,if required,the auxiliary functions.Set the desired time by pressing the Delayed Start button.When the button is pressed once,3 hours delayed start is selected. When the same button is pressed again,6 hours delay is selected,and when it is pressed for the third time,9 hours delayed start is selected.If you press the Delayed Start button once again,Delayed Start function will be canceled. Press Start / Pause button.Previous delayed start time light turns off and next delayed start time light turns on after every 3 hours. At the end of the countdown,all delayed start lights will turn off and the selected programme will start.
C Additional laundry may be loaded during the delayed start period.
Changing the Delayed Start period
Press Delayed Start button.Every time the button is pressed, the period will change in 3-hour increments and the light of
the selected delayed start time will turn on.
Canceling the Delayed Start function
If you want to cancel the delayed start countdown and start the programme immediately:
Set the Delayed Start period to zero (all delayed start period lights will turn off) or turn the Programme Selection knob to any programme.Thus,Delayed Start function will be canceled.The End/Cancel light flashes continuously. Then, select the programme you want to run again.Press Start / Pause button to start the programme.
4.11 Starting the programme
Press Start / Pause button to start the programme. Programme follow-up light showing the startup of the programme will turn on.
If no programme is started or no key is pressed within C 1 minute during programme selection process,the
machine will switch to Pause mode and the illumination level of the temperature,speed and loading door indicator lights will decrease. Other indicator lights and indicators will turn off.Once the Programme Selection knob is rotated or any button is pressed,indicator lights and indicators will turn on again.
4.12 Child Lock
Use child lock function to prevent children from tampering with the machine. Thus you can avoid any changes in a running programme.
12 / 76 EN |
Washing Machine / User’s Manual |
|
|

If the Programme Selection knob is turned when the C Child Lock is active,“Con”appears on the display.
The Child Lock does not allow any change in the programmes and the selected temperature,speed and auxiliary functions.
Even if another programme is selected with the
C Programme Selection knob while the Child Lock is active,previously selected programme will continue running.
When the Child Lock is active and the machine is C running,you can switch the machine to Pause mode
without deactivating the Child Lock by turning the Programme Selection knob to On / Off position.When you turn the Programme Selection knob afterwards,the programme will resu
To activate the Child Lock:
Press and hold 1st and 2ndAuxiliary Function buttons for 3 seconds.The lights on the 1st and 2ndAuxiliary Function buttons will flash while you keep the buttons pressed for 3
seconds.
To deactivate the Child Lock:
Press and hold 1st and 2nd auxiliary function buttons for 3 seconds while any programme is running. The lights on the
1st and 2ndAuxiliary Function buttons will flash while you keep the buttons pressed for 3 seconds.
In addition to the method above,to deactivate the Child C Lock,switch the Programme Selection knob to On /
Off position when no programme is running,and select another programme.
When the power is restored after a power failure or after
C your machine is unplugged and plugged in again,the Child Lock will not be deactivated when the machine resumes operating.
4.13 Progress of programme
Progress of a running programme can be followed from the Programme Follow-up indicator.At the beginning of every programme step,the relevant indicator light will turn on and light of the completed step will turn off.
You can change the auxiliary functions,speed and temperature settings without stopping the programme flow while the programme is running.To do this,the change you are going to make must be in a step after the running programme step.If the change is not compatible,relevant lights will flash for 3 times.
If the machine does not pass to the spinning step, C Rinse Hold function might be active or the automatic unbalanced load detection system might be activated due to the unbalanced distribution of the laundry in the
machine.
4.14 Loading door lock
There is a locking system on the loading door of the machine that prevents opening of the door in cases when the water level is unsuitable.
Loading door light will start flashing when the machine is switched to Pause mode.Machine checks the level of
the water inside.If the level is suitable,Loading Door light illuminates steadily within 1-2 minutes and the loading door can be opened.
If the level is unsuitable,Loading Door light turns off and the loading door cannot be opened.If you are obliged to open
the Loading Door while the Loading Door light is off,you have to cancel the current programme; see "Canceling the programme".
4.15 Changing the selections after programme has started
Switching the machine to pause mode
Press the Start / Pause button to switch the machine to pause mode while a programme is running. The light of the step which the machine is in starts flashing in the
Programme Follow-up indicator to show that the machine has been switched to the pause mode.
Also,when the loading door is ready to be opened,Loading Door light will also illuminate continuously in addition to the
programme step light.
Changing the speed and temperature settings for auxiliary functions
Depending on the step the programme has reached,you may cancel or activate the auxiliary functions; see,"Auxiliary function selection".
You may also change the speed and temperature settings; see,"Spin speed selection" and "Temperature selection".
C |
If no change is allowed,the relevant light will flash for |
3 times. |
|
|
|
Adding or taking out laundry
Press the Start / Pause button to switch the machine to pause mode. The programme follow-up light of the relevant step during which the machine was switched into the pause mode will flash.Wait until the Loading Door can be opened. Open the Loading Door and add or take out the laundry. Close the Loading Door.Make changes in auxiliary functions, temperature and speed settings if necessary. Press Start / Pause button to start the machine.
4.16 Canceling the programme
To cancel the programme,turn the Programme Selection knob to select another programme.Previous programme will be canceled.End / Cancel light will flash continuously to notify that the programme has been canceled.
Your machine will end the programme when you turn the
Programme Selection knob; however,it does not drain the water inside.When you select and start a new programme, the newly selected programme will start depending on the step the previous programme was canceled in.For example, it may take in additional water or continue to wash with the water inside.
Depending on the step where the programme was C canceled in,you may have to put detergent and softener again for the programme you have selected anew.
13 / 76 EN |
Washing Machine / User’s Manual |
|
|
5 Maintenance and cleaning
Service life of the product extends and frequently faced problems decrease if cleaned at regular intervals.
5.1 Cleaning the detergent drawer
Clean the detergent drawer at regular intervals (every 4-5 washing cycles) as shown below in order to prevent accumulation of powder detergent in time.
1.Press the dotted point on the siphon in the softener compartment and pull towards you until the compartment is removed from the machine.
If more than normal amount of water and softener C mixture starts to gather in the softener compartment,the
siphon must be cleaned.
2.Wash the detergent drawer and the siphon with plenty of lukewarm water in a washbasin.Wear protective gloves or use an appropriate brush to avoid touching of the residues in the drawer with your skin when cleaning.
3.Insert the drawer back into its place after cleaning and make sure that it is seated well.
If your detergent drawer is the one indicated in the following figure:
Lift the rear part of the siphon to remove it as illustrated.
C After performing the above mentioned cleaning procedures,replace the siphon back to its seating and push its front section downwards to make sure that the locking tab engages.
5.2 Cleaning the loading door and the drum
Residues of softener,detergent and dirt may accumulate in your machine in time and may cause unpleasant odours
and washing complaints.To avoid this,use the Drum Cleaning programme.If your machine is not featured with Drum Cleaning programme,use Cottons-90 programme and select Additional Water or Extra Rinse auxiliary
functions as well.Run theBefore starting the programme, put max. 100 g of powder anti-limescale into the main wash detergent compartment (compartment nr.2).If the anti-limescale is in tablet form,put only one tablet into compartment nr.2.Dry the inside of the bellow with a clean piece of cloth after the programme has come to an end.
C Repeat Drum Cleaning process in every 2 months.
C Use an anti-limescale suitable for the washing machines.
After every washing make sure that no foreign substance is left in the drum.
If the holes on the bellow shown in the figure is blocked, open the holes using a toothpick.
Foreign metal substances will cause rust stains in the C drum.Clean the stains on the drum surface by using cleaning agents for stainless steel. Never use steel wool
or wire wool.
Awarning: Never use sponge or scrub materials.These will damage the painted and plastic surfaces.
5.3 Cleaning the body and control panel
Wipe the body of the machine with soapy water or noncorrosive mild gel detergents as necessary,and dry with a soft cloth.
Use only a soft and damp cloth to clean the control panel.
5.4 Cleaning the water intake filters
There is a filter at the end of each water intake valve at the rear of the machine and also at the end of each water intake hose where they are connected to the tap. These filters prevent foreign substances and dirt in the water to enter the washing machine.Filters should be cleaned as they do get dirty.
1.Close the taps.
2.Remove the nuts of the water intake hoses to access the filters on the water intake valves.Clean them with an
appropriate brush.If the filters are too dirty,take them out by means of pliers and clean them.
3.Take out the filters on the flat ends of the water intake hoses together with the gaskets and clean thoroughly under running water.
4.Replace the gaskets and filters carefully in their places and tighten the hose nuts by hand.
14 / 76 EN |
Washing Machine / User’s Manual |
|
|
5.5 Draining remaining water and cleaning the pump filter
The filter system in your machine prevents solid items such as buttons,coins and fabric fibers clogging the pump impeller during discharge of washing water.Thus,the water will be discharged without any problem and the service life of the pump will extend.
If the machine fails to drain water,the pump filter is clogged. Filter must be cleaned whenever it is clogged or in every 3 months.Water must be drained off first to clean the pump filter.
In addition,prior to transporting the machine (e.g.,when moving to another house) and in case of freezing of the water,water may have to be drained completely.
Awarning: Foreign substances left in the pump filter may damage your machine or may cause noise problem.
In order to clean the dirty filter and discharge the water:
1. Unplug the machine to cut off the supply power.
Awarning: Temperature of the water inside the machine may rise up to 90 ºC.To avoid burning risk,filter must be cleaned after the water in the machine cools down.
2.Open the filter cap.
If the filter cap is composed of two pieces,press the tab on the filter cap downwards and pull the piece out towards yourself.
If the filter cap is one piece,pull the cap from both sides at the top to open.
You can remove the filter cover by slightly pushing C downwards with a thin plastic tipped tool,through the
gap above the filter cover.Do not use metal tipped tools to remove the cover.
3.Some of our products have emergency draining hose and some does not have.Follow the steps below to discharge the water.
Discharging the water when the product has an emergency draining hose:
a.Pull the emergency draining hose out from its seat
b.Place a large container at the end of the hose.Drain the water into the container by pulling out the plug at the end of the hose.When the container is full,block the inlet
of the hose by replacing the plug.After the container is emptied,repeat the above procedure to drain the water in the machine completely.
c.When draining of water is finished,close the end by the plug again and fix the hose in its place.
d.Turn the pump filter to take it out.
Discharging the water when the product does not have an emergency draining hose:
a.Place a large container in front of the filter to catch water from the filter.
b.Loosen pump filter (anticlockwise) until water starts to flow. Fill the flowing water into the container you have placed in front of the filter.Always keep a piece of cloth handy to absorb any spilled water.
c.When the water inside the machine is finished,take out
the filter completely by turning it.
4.Clean any residues inside the filter as well as fibers,if any,around the pump impeller region.
5.Install the filter.
6.If the filter cap is composed of two pieces,close the filter cap by pressing on the tab.If it is one piece,seat the tabs in the lower part into their places first,and then press the upper part to close.
15 / 76 EN |
Washing Machine / User’s Manual |
|
|

6 Technical specifications
Models (EN) |
WML 61221 M |
|
|
Maximum dry laundry capacity (kg) |
6 |
Height (cm) |
84 |
Width (cm) |
60 |
|
|
Depth (cm) |
45 |
Net weight (±4 kg.) |
62 |
Electrical input (V/Hz) |
230 V / 50Hz |
|
|
Total current (A) |
10 |
Total power (W) |
2200 |
Spin speed (rpm max.) |
1200 |
|
|
Stand-by mode power (W) |
1.35 |
|
|
Off-mode power (W) |
0.25 |
|
|
Main model code |
929 |
Single Water inlet / Double Water inlet |
• / - |
• Available
C Technical specifications may be changed without prior notice to improve the quality of the product.
C Figures in this manual are schematic and may not match the product exactly.
C Values stated on the product labels or in the documentation accompanying it are obtained in laboratory conditions in accordance with the relevant standards.Depending on operational and environmental conditions of the product,these values may vary.
16 / 76 EN |
Washing Machine / User’s Manual |
|
|

7 Troubleshooting
Programme cannot be started or selected.
•Washing machine has switched to self protection mode due to a supply problem (line voltage,water pressure,etc.).>>> To cancel the programme, turn the Programme Selection knob to select another programme. Previous programme will be cancelled. (See “Canceling the programme”)
Water in the machine.
• Some water might have remained in the product due to the quality control processes in the production.>>> This is not a failure; water is not harmful to the machine.
Machine vibrates or makes noise.
•Machine might be standing unbalanced.>>> Adjust the feet to level the machine.
•A hard substance might have entered into the pump filter.>>> Clean the pump filter.
•Transportation safety bolts are not removed.>>> Remove the transportation safety bolts.
•Laundry quantity in the machine might be too little.>>> Add more laundry to the machine.
•Machine might be overloaded with laundry.>>> Take out some of the laundry from the machine or distribute the load by hand to balance it homogenously in the machine.
•Machine might be leaning on a rigid item.>>> Make sure that the machine is not leaning on anything.
Machine stopped shortly after the programme started.
• Machine might have stopped temporarily due to low voltage.>>> It will resume running when the voltage restores to the normal level.
Programme time does not countdown. (On models with display)
•Timer may stop during water intake.>>> Timer indicator will not countdown until the machine takes in adequate amount of water. The machine will wait until there is sufficient amount of water to avoid poor washing results due to lack of water. Timer indicator will resume countdown after this.
•Timer may stop during heating step.>>> Timer indicator will not countdown until the machine reaches the selected temperature.
•Timer may stop during spinning step.>>> Automatic unbalanced load detection system might be activated due to the unbalanced distribution of the laundry in the drum.
•Machine does not switch to spinning step when the laundry is not evenly distributed in the drum to prevent any damage to the machine and to its surrounding environment.Laundry should be rearranged and re-spun.
Foam is overflowing from the detergent drawer.
•Too much detergent is used.>>> Mix 1 tablespoonful softener and ½ l water and pour into the main wash compartment of the detergent drawer.
•Put detergent into the machine suitable for the programmes and maximum loads indicated in the“Programme and consumption table”. When you use additional chemicals (stain removers,bleachs and etc),reduce the amount of detergent.
Laundry remains wet at the end of the programme
•Excessive foam might have occurred and automatic foam absorption system might have been activated due to too much detergent usage.
>>> Use recommended amount of detergent.
•Machine does not switch to spinning step when the laundry is not evenly distributed in the drum to prevent any damage to the machine and to its surrounding environment.Laundry should be rearranged and re-spun.
Awarning: If you cannot eliminate the problem although you follow the instructions in this section,consult your dealer or the Authorized ServiceAgent.Never try to repair a nonfunctional product yourself.
17 / 76 EN |
Washing Machine / User’s Manual |
|
|

PRODUCT FICHE
Complying Commission Delegated Regulation (EU) No 1061/201
Supplier name or trademark |
|
Beko |
|
|
|
Model name |
|
WML 61221 M |
|
|
|
Rated capacity (kg) |
|
6 |
|
|
|
Energy efficiency class (1) |
|
A+ |
Annual Energy Consumption (kWh) (2) |
|
194 |
Energy consumption of the standard 60°C cotton programme at full load (kWh) |
1.014 |
|
|
|
|
Energy consumption of the standard 60°C cotton programme at partial load |
(kWh) |
0.820 |
|
|
|
Energy consumption of the standard 40°C cotton programme at partial load |
(kWh) |
0.640 |
|
|
|
Power consumption in‘off-mode’ (W) |
|
0.250 |
|
|
|
Power consumption in‘left-on mode’ (W) |
|
1.350 |
|
|
|
AnnualWater Consumption (l) (3) |
|
8800 |
Spin-drying efficiency class (4) |
|
B |
Maximum spin speed (rpm) |
|
1200 |
|
|
|
Remaining moisture Content (%) |
|
53 |
|
|
|
Standard cotton programme(5) |
|
Cotton Eco 60°C and 40°C |
Programme time of the standard 60°C cotton programme at full load (min) |
|
160 |
|
|
|
Programme time of the standard 60°C cotton programme at partial load (min) |
130 |
|
|
|
|
Programme time of the standard 40°C cotton programme at partial load (min) |
130 |
|
|
|
|
Duration of the left-on mode (min) |
|
N/A |
|
|
|
Airborne acoustical noise emissions washing/spinning (dB) |
|
59/72 |
|
|
|
Built-in |
|
No |
|
|
|
(1)Scale fromA+++ (Highest Efficiency) to D (Lowest Efficiency)
(2)Energy Consumption based on 220 standard washing cycles for cotton programmes at 60°C and 40°C at full and partial load,and the consumption of the low-power modes.Actual energy consumption will depend on how the appliance is used.
(3)Water consumption based on 220 standard washing cycles for cotton programmes at 60°C and 40°C at full and partial load.Actual water consumption will depend on how the appliance is used.
(4)Scale fromA (Highest Efficiency) to G (Lowest Efficiency)
(5) “Standard 60°C cotton programme”and the“standard 40°C cotton programme”are the standard washing programmes to which the information in the label and the fiche relates and these programmes are suitable to clean normally soiled cotton laundry and that they are the most efficient programmes in terms of combined energy and water consumption.
18 / 76 EN |
Washing Machine / User’s Manual |
|
|
Dokumentu Nr
2820523007_LT / 25-05-12.(14:44)

1 Svarbūs nurodymai dėl saugos ir aplinkosaugos
Šiame skyriuje pateikta saugos informacija,kuri padės apsisaugoti nuo susižeidimo arba materialinės žalos.Jeigu nesivadovausite šiais nurodymais,gali nebegalioti jokia garantija.
1.1 Bendri saugos reikalavimai
•Šį gaminį galima naudoti vaikams nuo 8 metų amžiaus ir asmenims,turintiems psichinių,jutiminių arba protinių negalių arba patirties bei žinių trūkumo,jeigu jie yra prižiūrimi arba instruktuojami,kaip saugiai naudoti
šį gaminį,ir supranta atitinkamus pavojus.Neleiskite vaikams žaisti su šiuo gaminiu.Vaikams draudžiama valyti ir techniškai prižiūrėti šį gaminį,nebent juos prižiūrėtų už jų saugą atsakingas suaugęs.
•Niekad nestatykite gaminio ant kilimu išklotų grindų. Kitaip po mašina nepakankamai cirkuliuoja oras,ir todėl elektrinės dalys gali perkaisti.Tai gali sukelti gaminio gedimą.
•Jeigu gaminys turi defektų,jo negalima naudoti,kol jo nepataisys įgaliotojo techniniio aptarnavimo centro atstovas.Kyla elektros smūgio pavojus!
•Gaminys sukurtas taip,kad nutrūkus elektros tiekimui ir vėl jam atsiradus,jis toliau veiktų.Jeigu pageidaujate atšaukti programą,žr.skyrių „Programos atšaukimas“.
•Prijunkite šį gaminį prie įžeminto elektros lizdo,apsaugoto 16A saugikliu.Būtinai pasirūpinkite,kad kvalifikuotas elekrtikas įžemintų instaliaciją.Mūsų bendrovė nėra atsakinga už jokią žalą,kuri gali atsirasti naudojant gaminį,kuris nėra įžemintas atsižvelgiant į vietos reglamentus.
•Vandens įleidimo ir išleidimo žarnos visuomet turi būti saugiai pritvirtintos ir nepažeistos.Kitaip kyla vandens nuotėkio pavojus.
•Niekad neatidarykite mašinos durelių ar nebandykite ištraukti filtro,kol būgne dar yra vandens.Kitaip kyla užliejimo ir nusiplikymo karštu vandeniu pavojai.
•Nebandykite jėga atidaryti užblokuotų durelių. Dureles galėsite atidaryti praėjus kelioms minutėms nuo sklabimo ciklo pabaigos.Bandant jėga atidaryti
užblokuotas dureles,gali būti sugadintas durelių užrakto mechanizmas.
•Išjunkite gaminį,jei jo nenaudojate.
•Niekada neplaukite gaminio,purkšdami arba pildami ant jo vandenį! Kyla elektros smūgio pavojus!
•Niekada nelieskite kištukinio lizdo šlapiomis rankomis! Išjungdami niekuomet netraukite už elektros laido, ištraukite laikydami už kištuko.
•Galima naudoti tik automatinėms skalbyklėms tinkamas skalbimo priemones,audinių minkštiklius ir priedus.
•Vadovaukitės drabužių etiketėse ir ant skalbimo priemonės pakuotės pateiktais nurodymais.
•Atliekant montavimo,techninės priežiūros ir remonto darbus,šis gaminys privalo būti atjungtas nuo maitinimo tinklo.
•Įrengimo ir remonto darbus visada privalo atlikti
įgaliotasis techninio aptarnavimo centro atstovas.
Gamintojas nėra atsakingas už žalą,kilusią dėl darbų, kuriuos atliko neįgaliotieji asmenys.
•Jei maitinimo kabelis pažeistas,jį turi pakeisti gamintojas, jo įgaliotas aptarnavimo darbuotojas arba kvalifikuotas asmuo (pageidautina elektrikas) arba importuotojo paskirtasis meistras – taip išvengsite pavojaus
1.2 Naudojimas pagal paskirtį
•Šis gaminys skirtas tik naudojimui namuose.Jis netinkamas naudoti komerciniams tikslams ir jo negalima naudoti jokiems kitiems tikslams.
•Gaminį galima naudoti tik atitinkamai paženklintų tekstilės dirbinių skalbimui ir skalavimui.
•Gamintojas atsisako bet kokios atsakomybės už žalą dėl netinkamo naudojimo arba gabenimo.
1.3 Vaikų sauga
•Pakavimo medžiagos gali būti pavojingos vaikams. Pakavimo medžiagas laikykite vaikams nepasiekiamoje vietoje.
•Elektriniai prietaisai gali būti pavojingi vaikams.Mašinai veikiant,neleiskite artyn vaikų.Neleiskite jiems žaisti su mašina.Naudokite apsaugos nuo vaikų funckciją,kad vaikai nežaistų su šiuo gaminiu.
•Išėję iš patalpos,kurioje stovi prietaisas,nepamirškite uždaryti prietaiso durelių.
•Visas skalbimo priemones ir papildomas priemones laikykite saugioje,vaikams nepasiekiamoje vietoje; skalbimo priemonių dėžutes uždenkite dangteliais arba laikykite jas sandarioje pakuotėje.
1.4 Informacija apie pakuotę
•Šio gaminio pakavimo medžiagos pagamintos iš pakartotinai panaudojamų medžiagų,atsižvelgiant į mūsų nacionalinius aplinkosaugos reglamentus.Neišmeskite pakavimo medžiagų kartu su kitomis buitinėmis atliekomis arba kitomis šiukšlėmis.Išmeskite pakavimo medžiagas į tam skirtą vietos atliekų surinkimo punktą.
1.5 Seno gaminio išmetimas
•Šis gaminys pagamintas iš aukštos kokybės medžiagų ir dalių,kurias galima perdirbti ir pakartotinai panaudoti. Todėl pasibaigus gaminio tarnavimo laikui,neišmeskite jo kartu su įprastomis buitinėmis atliekomis.Atiduokite jį į surinkimo punktą,kad elektros ir elektronikos įranga būtų perdirbta.Artimiausio surinkimo punkto adresą sužinosite vietos savivaldybėje.Pakartotinis medžiagų panaudojimas padės tausoti gamtos išteklius.Vaikų saugai užtikrinti, prieš išmesdami gaminį,nupjaukite maitinimo kabelį ir sugadinkite durelių užrakto mechanizmą,kad jis neveiktų.
1.6 WEEE Direktyvą Atitikimas
Šis gaminys paženklintas elektros ir
elektroninės įrangos rūšiavimo ir atrankos
(WEEE) ženklu.
Tai reiškia,kad,norint šį gaminį perdirbti arba išmontuoti ir taip sumažinti jo poveikį aplinkai,jį reikia tvarkyti pagal 2002/96/
EB Europos direktyvą.Dėl papildomos informacijos susisiekite su savo vietos arba regiono valdžios institucijomis.Dėl elektronikos gaminiuose esančių pavojingų medžiagų,neįtraukus jų rūšiavimo ir atrankos procesą, pastarieji kelia potencialų pavojų aplinkai ir žmonių sveikatai.
20 / 76 LT |
Skalbimo mašina /Vartotojo vadovas |
|
|
2 Montavimas
Dėl šio gaminio instaliacijos kreipkitės į artimiausią įgaliotąjį techninio aptarnavimo centro atstovą.Norėdami paruošti gaminį naudojimui,prieš iškviesdami įgaliotąjį techninės priežiūros atstovą,įsitikinkite,ar įrengtos tinkamos elektros,vandentiekio ir kanalizacijos sistemos.Jeigu šios sąlygos nėra patenkintos,iškvieskite kvalifikuotą meistrą ir santechniką,kad jis atliktų tinkamus instaliacijos darbus.
C Vartotojas yra atsakingas už vietos,elektros,vandentiekio ir dujų instaliacijos paruošimą šiam gaminiui.
BĮSPĖJIMAS: Įrengimo ir elektros prijungimo darbus privalo atlikti įgaliotasis techninio aptarnavimo centro atstovas.Gamintojas nėra atsakingas už žalą,kilusią dėl darbų,kuriuos atliko neįgaliotieji asmenys.
AĮSPĖJIMAS:Prieš pradedant instaliaciją,apžiūrėkite šį gaminį,ar jis neturi kokių nors defektų.Jeigu turi, neinstaliuokite jo.Sugadinti gaminiai kelia pajovų jūsų saugai.
Labai svarbu,kad po įrengimo arba valymo statant buitinį C prietaisą į vietą,vandens įleidimo ir išleidimo žarnos
nebūtų perlenktos,suspaustos arba prakiurę.
2.1 Įrengimui tinkama vieta
•Statykite mašiną ant tvirtų grindų.Nestatykite jos ant minkšto pūkuoto kilimo arba panašių paviršių.
•Bendras visiškai priklautos skalbyklės ir džiovyklės svoris, kai jos pastatytos viena ant kitos,siekia 180 kilogramų. Statykite gaminį ant tvirtų,stabilių grindų,kurios gali atlaikyti šį krūvį!
•Nestatykite gaminio ant maitinimo laido.
•Neįrenkite prietaiso ten,kur temperatūra būna žemesnė nei 0 °C.
•Tarp gaminio ir kitų baldų kraštų reikia palikti bent 1 cm tarpus.
3.Į galinėje plokštėje esančias skyles įtaisykite plastikinius gaubtelius,esančius maišelyje su naudojimo instrukcija.
(P)
Transportavimui skirtus saugos varştus laikykite saugioje C vietoje,kad galėtumėte juos vėl panaudoti,kai kitą kartą
prireiks gabenti skalbimo mağiną.
C Niekada negabenkite gaminio,jeigu jame tinkamai neįtaisyti transportavimui skirti saugos varžtai!
2.4 Vandens tiekimo prijungimas
Norint naudoti šį gaminį,būtinas 1–10 barų (0,1–1 MPa) C vandens slėgis.Norint,kad mašina tinkamai veiktų,reikia,
kad per minutę iš čiaupo išbėgtų 10–80 litrų vandens. Jeigu vandens slėgis yra didesnis,pritvirtinkite slėgio mažinimo vožtuvą.
Jeigu ketinate naudoti dvigubo vandens įleidimo gaminį C kaip viengubo (šalto) vandens įleidimo angos gaminį, prieš pradėdami naudoti šį gaminį,ant karšto vandens sklendės privalote sumontuoti pateiktą stabdiklį.(Taikytina
gaminiams,pateiktiems su sandarinimo stabdiklio rinkiniu.)
AĮSPĖJIMAS:Modelius su viena vandens įleidimo anga reikia prijungti prie ğalto vandens čiaupo.Kitaip skalbiniai bus sugadinti arba gaminys gali persijungti į apsauginį režima ir neveikti.
AĮSPĖJIMAS:Nenaudokite nusidėvėjusių arba naudotų vandens įleidimo žarnų su nauju gaminiu.Dėl to ant skalbinių gali likti dėmių.
2.2 Pakavimo sutvirtinimo nuėmimas
Paverskite mašiną atgal,kad galėtumėte nuimti pakavimo sutvirtinimus.Patraukite uş juostos ir nuimkite pakavimo sutvirtinimą.
2.3 Gabenimo kaiščių išėmimas
AĮSPĖJIMAS:Neišimkite gabenimo kaiščių,prieš tai nenuėmę pakavimo sutvirtinimų.
AĮSPĖJIMAS:Išimkite gabenimo kaiščius prieš pradėdami naudoti skalbimo mašiną! Kitaip galite ją sugadinti.
1.Veržliarakčiu atsukite visus varžtus,kad jie laisvai suktųsi
(C).
2.Atsargiai sukdami ištraukite transportavimui skirtus saugos varžtus.
1.Prijunkite prie mašinos vandens įleidimo vožtuvų specialias kartu su mašina pristatytas žarnas.Raudonai pažymėta žarna (kairėje) (maks.90 ºC) skirta šiltam vandeniui,o mėlynai pažymėta žarna (dešinėje) (maks.25 ºC) – šaltam įleidžiamam vandeniui.
AĮSPĖJIMAS:Instaliuodami mašiną patikrinkite,ar tinkamai atliktas šalto ir karšto vandens pajungimas. Kitaip,pabaigus skalbimo procesą,skalbiniai bus karšti ir gali būti susidėvėję.
2.Užsukite visas žarnų veržles ranka.Verždami veržles, niekada nenaudokite veržliarakčio.
21 / 76 LT |
Skalbimo mašina /Vartotojo vadovas |
3.Prijungę žarnas,iki galo atsukite vandens čiaupus, kad patikrintumėte jungimo taškų sandarumą.Jeigu pastebite nuotėkį,užsukite čiauspą ir atsukite veržlę. Patikrinę tarpiklį,vėl atsargiai užsukite veržlę.Norint, kad vanduo nepratekėtų ir nepridarytų žalos,kai mašina nenaudojama,čiaupai turi būti užsukti.
2.5 Prijungimas prie kanalizacijos vamzdşio
•Vandens iğleidimo şarną reikia tiesiogiai prijungti prie kriauklės kanalizacijos vamzdşio arba pritaisyti ją prie kriauklės krağto.
AĮSPĖJIMAS:Jeigu vandens išleidimo metu žarna nukris nuo korpuso,jūsų namai bus užlieti vandeniu.Skalbiant aukštoje temperatūroje,gali kilti pavojus apsiplikinti karštu vandeniu! Norėdami išvengti tokių situacijų ir užtikrinti sklandų vandens įleidimą ir išleidimą iš mašinos, tvirtai pritvirtinkite išleidimo žarnos galą,kad jis negalėtų nukristi.
•Şarną reikia pritaisyti maşiausiai 40 cm ir daugiausia 100 cm aukğtyje.
•Jeigu žarna bus paguldyta ant grindų ir po to pakelta arba jeigu ji bus arti žemės ( žemiau nei 40 cm aukštyje), vandenį bus sunkiau išleisti ir skalbiniai gali likti šlapi. Todėl vadovaukitės paveikslėlyje pateiktais aukščiais.
•Norint apsaugoti,kad purvinas vanduo ne tekėtų atgal į mašiną,o būtų lengvai išleistas,nenardinkite žarnos galo į purviną vandenį ir neįleiskite jo į nuotėkų vamzdį daugiau nei 15 cm.Jeigu žarna per ilga,sutrumpinkite ją.
•Žarnos galo negalima sulenkti,ant jos negalima atsistoti, negalima sulankstyti tarp išleidimo vamzdžio ir mašinos.
•Jeigu žarna per trumpa,pailginkite ją,pridėdami originalią ilginimo žarną.Žarnos ilgis neturi viršyti 3,2 m.Norint išvengti vandens nuotėkių,ilginimo žarna ir mašinos išleidimo žarna turi būti tvirtai sujungtos,naudojant tinkamą spaustuką,kad jos neatsijungtų ir nenukristų.
2.6 Kojelių reguliavimas
AĮSPĖJIMAS:Norint užtikrinti,kad mašina veiktų tyliau ir nevibruotų,ji turi stovėti tiesiai,išlaikant pusiausvyrą kojelių pagalba.Pastatykite mašiną tiesiai, pareguliuodami kojeles.Kitaip gaminys gali pajudėti iš vietos ir ką nors prispausti arba pradėti vibruoti.
1.Ranka atsukite kojelių antveržles.
2.Reguliuokite kojeles tol,kol mašina stovės tiesiai ir tvirtai.
3.Vėl ranka užsukite visas antveržles.
AĮSPĖJIMAS:Fiksavimo veržles atsukite tik rankomis, nenaudokite jokių įrankių.Kitaip galite jas sugadinti.
2.7 Elektros įvado prijungimas
Prijunkite šį gaminį prie įžeminto elektros lizdo,apsaugoto 16A saugikliu.Mūsų bendrovė nėra atsakinga už jokią žalą, kuri gali atsirasti naudojant gaminį,kuris nėra įžemintas atsižvelgiant į vietos reglamentus.
•Pajungiant reikia vadovautis nacionaliniais reglamentais.
•Po sumontavimo maitinimo laido kištukas turi būti lengvai pasiekiamas.
•Jeigu namuose naudojamas saugiklis yra 16 amperų, kreipkitės į kvalifikuotą elektriką,kad jis instaliuotų16 amperų saugiklį.
•Įtampa,nurodyta skyriuje „Techniniai duomenys“,privalo atitikti jūsų namų elektros tinklo įtampą.
•Draudžiama pajungti naudojant laidų ilgintuvus arba daugiaviečius lizdus.
BĮSPĖJIMAS:Pažeistus maitinimo laidus privalo pakeisti įgaliotieji techninio aptarnavimo centro atstovai.
Gaminio gabenimas
1.Prieš gabendami,išjunkite prietaisą iš elektros tinklo.
2.Atjunkite vandens išleidimo žarną ir vandentiekio jungtis.
3.Visiškai išleiskite iš gaminio likusį vandenį.Žr.5.5
4.Sumontuokite gabenimo saugos varžtus išėmimui atvirkščia eilės tvarka; žr.2.3
C Niekada negabenkite gaminio,jeigu jame tinkamai neįtaisyti transportavimui skirti saugos varžtai!
AĮSPĖJIMAS:Pakavimo medžiagos gali būti pavojingos vaikams.Pakavimo medžiagas laikykite vaikams nepasiekiamoje vietoje.
22 / 76 LT |
Skalbimo mašina /Vartotojo vadovas |
|
|
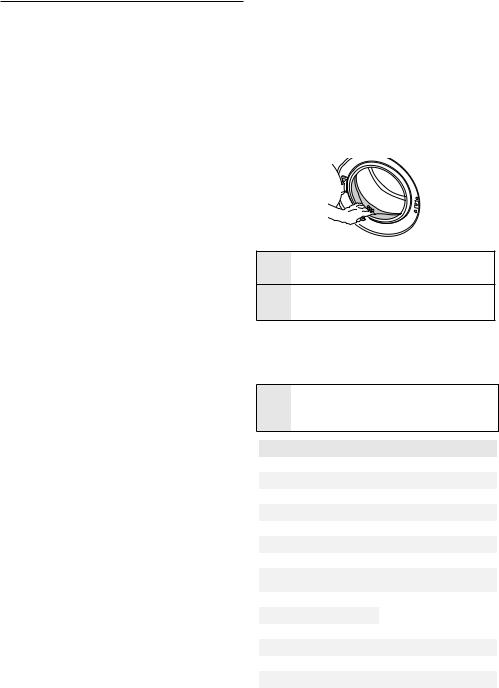
3 Paruošimas
3.1 Skalbinių rūšiavimas
•Išrūšiuokite skalbinius pagal audinių rūšis,spalvą, sutepimo laipsnį ir leistiną vandens temperatūrą,kurioje juos galima skalbti.
•Visuomet vadovaukitės gaminio etiketėje pateiktais nurodymais.
3.2 Skalbinių paruošimas skalbimui
•Skalbiniai su metalinėmis detalėmis,pavyzdžiui, liemenėlės,diržų sagtys ir metalinės sagos gadina mašiną.Ištraukite metalines dalis arba tokius skalbinius sudėkite į skalbinių maišelį,pagalvės užvalkalą ar pan.
•Iškraustykite kišenes ir išimkite iš jų visus pašalinius daiktus,pavyzdžiui,monetas,rašiklius ir popieriaus sąvaržėles.Tokie daiktai gali sugadinti gaminį arba kelti triukšmą.
•Mažus skalbinius,pavyzdžiui,kūdikių kojinaites,nailonines kojines ir kt.sudėkite į skalbinių maišelį,pagalvės užvalkalą ar pan.
•Užuolaidas į mašiną dėkite laisvai,nespausdami.Nuimkite užuolaidų segtukus.
•Užsekite spaustukus,įsiūkite pamestas sagas,užadykite skyles.
•Skalbiant gaminius,kurių etiketėse nurodyta „Skalbti mašinoje“ arba „Skalbti rankomis“ reikia pasirinkti atitinkamas programas.
•Spalvotus ir baltus gaminius skalbkite atskirai.Nauji ryškūs medvilniniai gaminiai gali stipriai nudažyti kitus skalbinius.Skalbkite juos atskirai.
•Prieš skalbimą reikia tinkamai pašalinti sunkiai pašalinamas dėmes.Jeigu nesate tikri,kaip jas pašalinti, pasiteiraukite cheminio valymo punkte.
•Naudokite tik skalbimo mašinai tinkamus dažus/spalvų keitimo priemones ir kalkių nuosėdų šalinimo priemones. Būtinai vadovaukitės ant pakuočių esančiais nurodymais.
•Kelnes ir skalbimui jautrius skalbinius išverskite į blogąją pusę.
•Kelias valandas prieš skalbimą skalbinius,pagamintus iš angoros vilnos,palaikykite šaldiklyje.Jie mažiau susivels.
•Skalbinius,labai suteptus tokiomis medžiagomis kaip miltai,kalkės,pieno milteliai ir pan.,prieš dedant į skalbyklę reikia išpurtyti.Laikui bėgant,tokios ant skalbinių likę dulkės ir milteliai gali susikaupti ant vidinių mašinos dalių ir sukelti gedimą.
3.3 Kaip taupyti elektros energiją
Ši informacija padės jums ekologiškiau naudoti šį buitinį prietaisą ir taupyti energiją.
•Naudokite gaminį esant didžiausiam pajėgumui,kurį leidžia pasirinkta programa,bet be perkrovos; žr.skyrių „Programų ir sąnaudų lentelė“.
•Visuomet vadovaukitės ant skalbimo priemonės pakuotės pateiktais nurodymais.
•Mažai suteptus skalbinius skalbkite nustatę žemą temperatūrą.
•Mažam nesmarkiai suteptų skalbinių kiekiui skalbti naudokite trumpesnes programas.
•Nenaudokite nuskalbimo programos ir aukštos temperatūros skalbiniams,kurie nėra smarkiai sutepti arba dėmėti,skalbti.
•Jeigu skalbinius planuojate džiovinti džiovyklėje,nustatant skalbimo programą,rekomenduojama pasirinkti didesnį gręžimo greitį.
•Naudokite tik ant skalbimo priemonės pakuotės nurodytą skalbimo priemonės kiekį.
3.4 Naudojant pirmą kartą
Prieš pradėdami naudoti gaminį,užtikrinkite,kad visi parengiamieji darbai būtų atlikti pagal nurodymus,pateiktus skyriuose „Svarbūs saugos nurodymai“ ir „Įrengimas“. Norėdami paruošti gaminį skalbiniams skalbti,atlikite pirmą veiksmą būgno valymo programoje.Jeigu gaminyje nėra būgno valymo programos,atlikite pradinio naudojimo procesūrą,vadoovaudamiesi metodais,aprašytais vartotojo vadovo skyriuje „5.2 Įkrovos durelių ir būgno valymas“.
C Naudokite skalbyklėms tinkamas kalkių nuosėdų šalinimo priemones.
C Gamybos metu,dėl kokybės kontrolės procesų, mašinoje gali būti likę vandens.Jis nekenkia gaminiui.
3.5 Nepridėkite per daug skalbinių
Maksimalus skalbinių kiekis priklauso nuo skalbinių rūšies,jų sutepimo laipsnio ir pasirinktos skalbimo programos. Vandens kiekis mašinoje automatiškai nustatomas pagal į ją sudėtų skalbinių svorį.
AĮSPĖJIMAS: Vadovaukitės „Programų ir sąnaudų lentelėje“ pateikta informacija.Jeigu mašina bus pernelyg prikrauta,sumažės skalbimo kokybė.Be to,gali kilti triukšmas ir vibracija.
Skalbinių tipas |
Svoris (g) |
|
Chalatas |
1200 |
|
Servetėlė |
100 |
|
Antklodė |
700 |
|
Paklodė |
500 |
|
Pagalvės užvalkalas |
200 |
|
Staltiesė |
250 |
|
Rankšluostis |
200 |
|
Mažas rankšluostėlis |
100 |
|
(rankoms nusivalyti) |
||
|
||
Vakarinė suknelė |
200 |
|
Apatiniai drabužiai |
100 |
|
Vyriški darbo drabužiai |
600 |
|
Vyriški marškiniai |
200 |
|
Vyriškos pižamos |
500 |
|
Palaidinės |
100 |
23 / 76 LT |
Skalbimo mašina /Vartotojo vadovas |
|
|
 Loading...