


 Loading...
QUICKSTART GUIDE
ENGLISH ( 1 – 3 )
MANUAL DE INICIO RÁPIDO
ESPAÑOL ( 5 – 7 )
GUIDE D’UTILISATION RAPIDE
FRANÇAIS ( 9 – 11 )
KURZANLEITUNG
DEUTSCH ( 13 – 15 )
GUIDA RAPIDA
ITALIANO ( 17 – 19 )


INTRODUCTION
Welcome to the Alesis ProTrack iPod Recorder! We designed this device to be easy to use, but you can refer to this manual when necessary if you have any questions about how it works. Here are just a few features you’ll come to love about your new ProTrack iPod Recorder:
Compatible with iPod Classics, 5th Generation iPods, and 2nd and 3rd Generation iPod Nanos *
44.1kHz, 16-bit Recording Capability
2 Built-In Condenser Stereo Microphones
BOX CONTENTS
ProTrack iPod Recorder
AC Power Adapter
2 Sleds (one for regular iPods, one for iPod Nanos)
Foam Pads (for use with sleds)
2 Combo Mic / Line Inputs – Connect 1 stereo or 2 mono sound sources such as XLR or 1/4” microphones and other line sources
Analog Input Limiter – Prevents hard digital “clipping” of the recorded signal in your iPod
Direct Monitoring – Monitor your recording with zero latency
Headphone output with dedicated volume control
Switchable 48V Phantom Power for Microphones
External Power Supply (AC Adapter) or Battery Power (4 AAA) for 2.5 hours
*iPod is a trademark of Apple Inc., registered in the U.S.A. and other countries
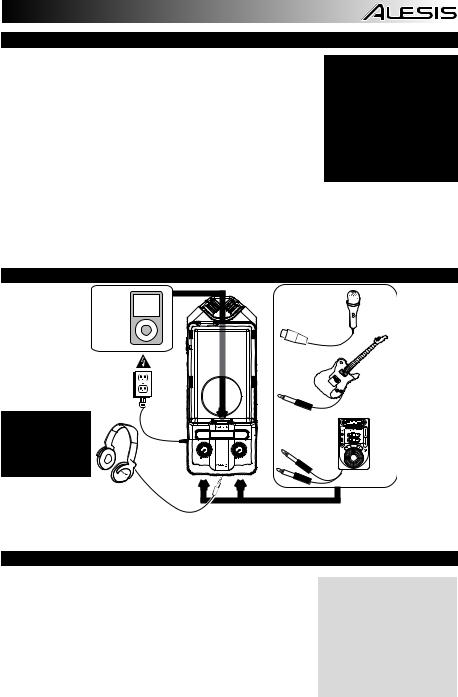
CONNECTION DIAGRAM
iPod
Power Supply
(or 4 AAA batteries on back panel)
WARNING: Turn the
HEADPHONE VOLUME all the way down before turning on the unit to prevent the power-on “click” noise in your headphones.
Headphones
(1/8” stereo)
Mic (XLR)
or
Guitar **
(1/4” mono)
or
CD player, sampler, drum machine, etc.
(1/4” stereo)
** When using a high-impedance instrument like a guitar, we recommend using a direct box or a preamp to lower the signal’s impedance for the recorder.
USING BATTERY POWER
Inserting Batteries:
1.Remove the battery compartment cover on the back panel.
2.Insert 4 AAA batteries into the compartment. Make sure they are inserted with the positive (+) and negative (-) poles positioned correctly.
3.Close the cover until it clicks into place.
Precautions:
Always be sure batteries are inserted with the positive (+) and negative (-) poles positioned correctly.
Use batteries of the same type. Do not use different types of batteries together at once.
Though you may use the recorder’s phantom power feature while using batteries, this will drain your battery power more quickly, depending on the type of microphones you are using.
You may only charge your iPod with the recorder while it is powered by the included AC adapter or an external battery pack.
You may use rechargeable or non-rechargeable batteries. Please refer to the precautions on their labels before using them.
When not in use for long periods of time, remove the batteries to prevent them from leaking. If they leak, wipe away the liquid from inside the battery compartment.
Do not heat, disassemble, or dispose of batteries by throwing them into a fire.
1

BOTTOM, TOP & BACK PANEL FEATURES
1.CH 1/2 INPUTS – Connect your external sound sources to these inputs. Each input can accept a 1/4” or XLR connection. This allows for several connection options:
a.2 microphones
b.1 stereo source (such as a CD player, sampler, or drum machine).
Bottom |
1 |
1 |
2
c.1 or 2 mono sources (such as guitars). (Note: When using a highimpedance instrument like a guitar, we recommend using a preamp to lower the signal’s impedance for the recorder.)
If you only use one of these two inputs, you may want to set the RECORD MODE switch to “Mono” and turn down the gain knob of the unused input.
The recorder’s built-in microphones will not be used while something is connected to one or both of the CH 1/2 INPUTS.
2.HEADPHONE OUTPUT – Connect your headphones using a 1/8” stereo connector to this output. The headphone volume is controlled by the HEADPHONE VOLUME wheel on the right side panel. During playback only the iPod will be heard. All other times, the inputs will be heard.
WARNING: Turn the HEADPHONE VOLUME all the way down before turning on the unit to prevent the power-on “click” noise in your headphones.
3.MICROPHONES – Record your source with these built-in condenser microphones if you are not using the CH 1/2 INPUTS.
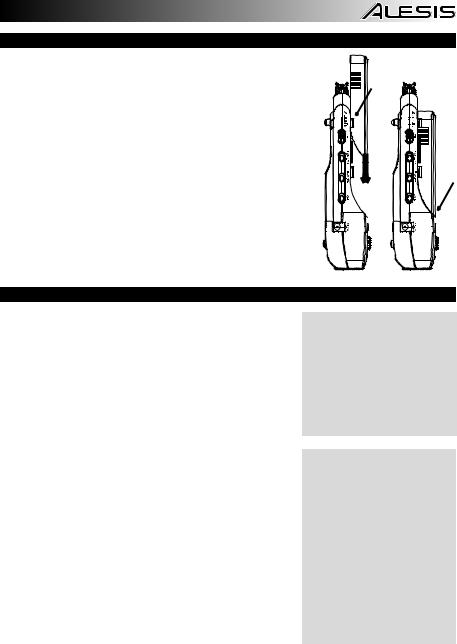
4.SLED – This plastic cover slides and snaps onto the recorder to protect and secure the iPod while it is docked.
5.DOCK – Connect your iPod here before attaching the SLED.


 3
3


4 |
5 |
11 |
|
6 |
8 |
7 |
|
12 |
|
|
|
|
9 |
|
10 |
|
Top |
Back |
6.MENU – Acts as the “Menu” button of your iPod.
7.ENTER – Acts as the “Enter” button of your iPod.
8.LED METERS – Measures audio signal levels. While recording, these meters measure the input levels of the CH 1/2 INPUTS or built-in MICROPHONES. (If the LIMITER is on, these readings are taken after the LIMITER has processed the signal.) During playback, these meters measure the iPod playback level. Also, the top two red LEDs will flash simultaneously when the batteries are getting low.
9.CHANNEL 1/L GAIN – Adjusts the input gain for Channel 1.
10.CHANNEL 2/R GAIN – Adjusts the input gain for Channel 2.
11.BATTERY COMPARTMENT – Insert 4 AAA batteries here for up to 2.5 hours of power. The top two red LEDs will flash simultaneously when the batteries are getting low.
12.STAND MOUNT – You can use this hole to mount the iPod Recorder on a stand, such as a standard camera stand, allowing for hands-free recording.
SIDE PANEL FEATURES
1. |
HEADPHONE VOLUME – Adjusts the level of the headphone output. |
Right |
Left |
|
||
|
Note: Feedback can occur if the CHANNEL GAIN knobs are turned up high with the |
|
|
|
|
|
|
headphones connected. Decrease the gain or HEADPHONE VOLUME if this happens. |
|
|
|
|
|
2. |
LIMITER – Engages the stereo limiter. This prevents hard “clipping” of the recorded |
|
|
|
|
|
|
signal in your iPod. However, it is still possible to overdrive the LIMITER with too hot of |
|
|
|
|
|
|
a signal, resulting in an unpleasant “pumping” sound or even distortion. Decrease the |
|
|
|
5 |
|
|
CHANNEL GAIN levels if you experience noticeable Limiter artifacts. |
|
|
|
|
|
3. |
RECORD MODE – Specifies whether the two analog inputs will be recorded to the iPod |
|
|
4 |
6 |
|
|
in stereo or mono (summed). When recording mono input sources, such as a guitar or |
|
|
|||
|
|
|
|
|
||
|
microphone, we recommend setting this switch to “Mono”. |
|
|
3 |
7 |
|
4. |
KENSINGTON LOCK SLOT – You may use this Kensington lock slot to secure the |
|
|
|||
|
|
|
|
|||
|
iPod Recorder to a table or other surface. |
|
|
2 |
8 |
|
5. |
OPEN – Pull this switch towards the bottom of the recorder to unlock and remove the |
|
|
|||
|
|
|
|
|||
|
plastic sled from the recorder when you want to remove your iPod. |
|
|
1 |
|
|
6. |
PHANTOM POWER – This switch activates and deactivates phantom power. When |
|
|
|
||
|
|
|
9 |
|||
|
activated, phantom power supplies +48V to both XLR mic inputs. Most dynamic |
|
|
|
||
|
|
|
|
|
||
|
microphones do not require phantom power, but most condenser microphones do. |
|
|
|
|
|
|
Consult your microphone’s documentation to find out whether it needs phantom power. |
|
|
|
|
|
|
WARNING: Do not turn on PHANTOM POWER unless your microphones require it. |
|
|
|
|
|
7. |
iPOD CHARGE ON/OFF – Enables or disables the iPod Recorder’s ability to charge |
|
We recommend leaving the |
|||
|
your iPod while it is docked. You may only charge your iPod with the recorder while it is |
|
iPOD CHARGE feature off |
|||
|
powered by the included AC adapter or an external battery pack. |
|
while |
recording. |
Charging |
|
8. |
POWER SWITCH – Turns the iPod Recorder on and off. Be sure to turn off your |
may introduce low-level |
||||
noise into your recordings. |
||||||
|
recorder when not in use to conserve battery power. |
|
||||
|
|
|
|
|
||
9.POWER INPUT – This is where you may plug in the included power adapter. Connect it to the recorder before you plug the power adapter into an electrical outlet.
Note: If you are using an external power adapter, such as a battery pack, its polarity must be center positive. See TECHNICAL SPECIFICATIONS for more information on external battery packs.
2
ATTACHING & REMOVING THE SLED
Before getting started, follow these simple steps to prepare the ProTrack for use with your iPod:
1.Apply the proper foam backing for your iPod. Use the thicker pad for a regularsized iPod (Classic or 5th Generation) or the thinner one for an iPod nano (2nd or 3rd Generation).
2.Place the foam pad on the center of the flat surface above the DOCK. This will help secure your iPod while it is docked.
3.Connect your iPod to the DOCK by gently inserting the DOCK’s connector into the slot at the base of your iPod.
4.Slide the SLED over the recorder so it covers the iPod. The edges of the SLED should slide under the tabs on both edges of the recorder.
Note: We have included two different sleds for use with the iPod Recorder: one fits the regular iPod while the other fits the iPod Nano.
5.Snap the SLED into place at the bottom.
6.To remove the SLED, pull the OPEN switch on the left panel towards the bottom of the recorder (see SIDE PANEL FEATURES), then slide it off the recorder.
7.To remove your iPod, gently rock it back and forth until it is loose from the DOCK.
RECORDING
The iPod Recorder is compatible with the following iPod models:
iPod Classic
5th Generation iPod
3rd Generation iPod Nano
2nd Generation iPod Nano
You can record to the iPod Recorder using the built-in condenser microphones, external microphones, or other audio sources connected to the recorder’s CH 1/2 INPUTS. There are a few important factors and suggestions you should consider before diving into recording:
Take some time to balance the levels of your sources by monitoring the LED METERS on the top panel. We recommend that the levels enter the top (red) LED lights only occasionally, if at all, to ensure the recording does not “clip” or distort.
Use the built-in LIMITER to prevent hard “clipping” of the recorded signal in your iPod. However, be careful when using the LIMITER – if your input levels are too high, it can cause unwanted audio artifacts or even distortion. There is a fine line between a good, loud recording, and a recording which is overly limited, resulting in poor dynamic range and clarity. Be careful when you set your levels, and decrease the CHANNEL GAIN if necessary.
We recommend leaving the iPOD CHARGE feature off while recording. Charging may introduce low-level noise into your recordings.
Use the RECORD MODE switch to select stereo vs. mono recording. If you are using mono input sources, such as guitars and microphones, you may wish to record in mono.
If you are only using one input, you should decrease the CHANNEL GAIN of the unused input to reduce unwanted noise.
Your recordings will be stored as “Voice Memo” files on your iPod.
Once you have finished recording a “memo,” it will be placed in Main Menu > Extras > Voice Memos.
After you connect to your computer and transmit the Voice Memos, they will be located in Main Menu > Music > Playlists > Voice Memos.
Out of the box, your iPod is formatted to work with a Mac, rather than a Windows computer. If you want to transfer your recordings to a Windows computer, connect your iPod to your Windows computer and allow iTunes to format it BEFORE you record for the first time.
If you record to your iPod before you ever connect it to iTunes, your recordings will be stored in Mac’s HFS format. They will only be readable by plugging your iPod into a Mac, not a Windows computer.
Note that, if you reformat your iPod for the Windows or Mac platform, you may lose any recordings prior to this.
3

4
INTRODUCCIÓN
¡Bienvenido al grabador para iPod Alesis ProTrack! Diseñamos este dispositivo para que sea fácil de usar, pero puede consultar este manual cuando sea necesario si tiene alguna pregunta acerca de cómo funciona. He aquí algunas de las características de su nuevo grabador para iPod ProTrack que le encantarán:
Compatible con iPod Classics, iPod de 5ta Generación e iPod Nanos de 2da y 3ra
Generación *
Capacidad de grabación a 44.1 kHz, 16 bits
2 micrófonos estéreo de condensador incorporados
2 entradas de micrófono y línea combinadas – Coneect 1 fuente de sonido estéreo o 2 mono tales como micrófonos XLR o de 1/4” y otras fuentes de línea
CONTENIDO DE LA CAJA
Grabador para iPod ProTrack
Adaptador de alimentación de CA
2 trineos (uno para los iPod normales y otro para los iPod Nano)
Almohadillas de espuma (para usar con los trineos)
Limitador de entrada analógico – Evita el “recorte” digital duro de la señal grabada en su iPod
Monitoreo directo – Monitoree su grabación con cero latencia
Salida para auriculares con control de volumen dedicado.
Alimentación fantasma conmutable de 48 V para micrófonos
Fuente de alimentación externa (Adaptador de CA) o de batería (4 AAA) para 2.5 horas
*iPod es una marca registrada de Apple Inc., registrada en EE.UU. y otros países.
DIAGRAMA DE CONEXIÓN
iPod
Fuente de alimentación
(o 4 baterías AAA en el panel trasero)
ADVERTENCIA:
Conecte los auriculares sólo después de encender el grabador. De lo contrario, puede dañar sus oídos.
Auriculares
(1/8” estéreo)
Micrófono
(XLR)
o
Guitarra **
(1/4” mono)
o
Reproductor de CD, muestreador, caja de ritmos, etc.
(1/4” estéreo)
** Cuando se usa un instrumento de alta impedancia como una guitarra, recomendamos utilizar una caja directa o amplificador para reducir la impedancia de entrada al grabador.
CÓMO USAR LA ALIMENTACIÓN DE BATERÍA
Cómo insertar las baterías:
1.Retire la tapa del compartimiento de baterías del panel trasero.
2.Inserte 4 baterías AAA en el compartimiento. Asegúrese de insertarlas con los polos positivo (+) y negativo (-) correctamente posicionados.
3.Cierre la tapa hasta que calce con un “clic” en su sitio.
Si bien es posible usar la característica de alimentación fantasma del grabador cuando usa baterías, de esta forma se le agotarán más rápido, dependiendo del tipo de micrófonos que use.
Precauciones:
Asegúrese siempre de insertar las baterías con los polos positivo (+) y negativo (-) correctamente posicionados.
Use baterías del mismo tipo. No use tipos diferentes de baterías al mismo tiempo.
Es posible cargar el iPod con el grabador sólo cuando está alimentado desde el adaptador de CA incluido o un bloque de baterías externo.
Puede usar baterías recargables o no recargables. Lea las precauciones indicadas en sus etiquetas antes de usarlas.
Cuando no las use durante períodos prolongados, retire las baterías para evitar que tengan fugas. Si tienen fugas, limpie el líquido del interior del compartimiento de baterías.
No caliente, desarme o deseche las baterías arrojándolas al fuego.
5

CARACTERÍSTICAS DE LOS PANELES INFERIOR, SUPERIOR Y TRASERO
1.ENTRADAS DE CANALES 1 Y 2 – Conecte sus fuentes de sonido externas a estas entradas. Cada entrada puede aceptar una conexión de ¼” o XLR. Esto permite varias opciones de conexión:
Parte
1

 1
1
inferior
a. 2 micrófonos
2
b. 1 fuente estéreo (como un reproductor de CD, muestreador o caja de
|
ritmos). |
|
3 |
|
|
|
c. 1 ó 2 fuentes mono (tales como guitarras). (Nota: Cuando se usa un |
|
|
|
|
|
|
|
|
|
|
|
instrumento de alta impedancia como una guitarra, recomendamos |
|
|
|
|
|
utilizar un amplificador para reducir la impedancia de la señal |
4 |
|
|
|
|
aplicada al grabador). |
|
|
|
|
|
Si sólo usa una de estas dos entradas, es conveniente que coloque el |
|
|
|
|
|
conmutador RECORD MODE en “Mono” y baje la ganancia con la perilla de la |
|
|
|
|
|
entrada sin usar. |
|
|
|
|
|
Los micrófonos incorporados del grabador no se usan cuando se conecta algo a |
|
|
|
|
|
una o ambas entradas CH 1/2 |
|
|
|
|
2. |
SALIDA PARA AURICULARES – Conecte sus auriculares a esta salida con |
|
|
|
11 |
|
un conector estéreo de 1/8”. El volumen de los auriculares se controla con |
|
5 |
|
|
|
|
|
|
||
|
la rueda HEADPHONE VOLUME del panel del lado derecho. Durante la |
|
|
|
|
|
reproducción, sólo se oirá el iPod. En todo el resto del tiempo, se oirán las |
6 |
8 |
7 |
|
|
entradas. |
|
|
12 |
|
|
9 |
|
10 |
||
|
|
|
|
||
|
ADVERTENCIA: Baje el VOLUMEN DE AURICULARES totalmente antes de |
|
|
|
|
|
encender la unidad para evitar el ruido “clic” de encendido en sus auriculares. |
|
|
|
|
3. |
MICRÓFONOS – Graba su fuente con estos micrófonos de condensador |
Parte superior |
Atrás |
||
|
incorporados si no está usando las entradas CH 1/2 (Canales 1 y 2). |
|
|
|
|
4.TRINEO – Esta tapa plástica se desliza y calza a presión en el grabador para proteger y asegurar el iPod mientras está acoplado.
5.ESTACIÓN DE ACOPLAMIENTO – Conecte su iPod aquí antes de colocar el TRINEO.
6.MENÚ – Actúa como el botón “Menu” del iPod.
7.ENTER – Actúa como el botón “Enter” del iPod.
8.LED MEDIDORES – Miden los niveles de señal de audio. Durante la grabación, estos medidores miden los niveles de las entradas CH 1/2 o de los MICRÓFONO incorporados. (Si el LIMITADOR está activado, estas lecturas se toman después de que el mismo haya procesado la señal). Durante la reproducción, estos medidores miden el nivel de reproducción del iPod. Asimismo, los dos LED rojos superiores destellan simultáneamente cuando se están agotando las baterías.
9.GANANCIA DE CANAL 1/I – Ajusta la ganancia de entrada del canal 1.
10.GANANCIA DE CANAL 2/D – Ajusta la ganancia de entrada del canal 2.
11.COMPARTIMIENTO DE BATERÍAS – Inserte 4 baterías AAA aquí para tener hasta 2.5 horas de alimentación. Los LED rojos superiores destellan simultáneamente cuando se están agotando las baterías.
12.MONTAJE DEL SOPORTE – Puede usar este orificio para montar el grabador para iPod en un soporte, tal como el de una cámara estándar, para permitir la grabación con manos libres.
CARACTERÍSTICAS DEL PANEL LATERAL
1.VOLUMEN DE AURICULARES - Ajusta el nivel de la salida para auriculares.
Nota: Puede producirse realimentación si las perillas CHANNEL GAIN se giran para aumentar la ganancia con los auriculares conectados. Reduzca la ganancia o el control HEADPHONE VOLUME si esto ocurre.
2.LIMITADOR - Activa el limitador estéreo. De esta forma se evita el “recorte” duro de la señal grabada en su iPod. No obstante, aun así es posible sobreexcitar el LIMITADOR con una señal muy caliente, produciendo un desagradable sonido de "bombeo" o incluso distorsión. Reduzca los niveles de CHANNEL GAIN (Ganancia de canal) si experimenta artefactos significativos del limitador.
3.MODO DE GRABACIÓN – Especifica si las dos entradas analógicas se graban en el iPod en estéreo o mono (sumadas). Para grabar fuentes de entrada mono, tales como una guitarra o un micrófono, recomendamos colocar este conmutador en “Mono”.
4.RANURA PARA BLOQUEO KENSINGTON – Puede usar esta ranura de bloqueo Kensington a fin de sujetar el grabador para iPod a una mesa u otra superficie.
5.ABRIR – Tire de este interruptor hacia la parte inferior del grabador para desbloquear y desmontar el trineo plástico del mismo cuando desee retirar el iPod.
6.ALIMENTACIÓN FANTASMA – Este interruptor activa y desactiva la alimentación fantasma. Cuando se activa, la alimentación fantasma suministra +48 V a ambas entradas de micrófono XLR. La mayoría de los micrófonos dinámicos no requieren alimentación fantasma, mientras que la mayoría de los micrófonos de condensador la requieren. Consulte la documentación de su micrófono para averiguar si necesita alimentación fantasma.
Lado Lado derecho 


 izquierdo


 5
5


4 |
6 |


 3 7
3 7


 2 8
2 8


 1
1 


 9
9 

ADVERTENCIA: No encienda la ALIMENTACIÓN FANTASMA a menos que su micrófono lo requiera.
6
Loading...