


User Guide
English ( 2– 5 )
Guía del usuario
Español ( 6 – 10 )
Guide d’utilisation
Français ( 11 – 14 )
Guida per l'uso
Italiano ( 15 – 18 )
Benutzerhandbuch
Deutsch ( 19 – 22 )
Appendix
English ( 23 )

User Guide (English)
Box Contents
MultiMix 4 USB FX
USB Cable
Power Adapter
Cubase® 7 LE (Download)
User Guide
Safety & Warranty Manual
Connection Diagram
Computer* |
Monitor Speakers* |
|||||||||||||
|
|
|
|
|
|
|
|
|
|
|
|
|
|
|
|
|
|
|
|
|
|
|
|
|
|
|
|
|
|
|
|
|
|
|
|
|
|
|
|
|
|
|
|
|
|
|
|
|
|
|
|
|
|
|
|
|
|
|
|
Microphone* 
Power
Headphones*
Guitar*
System Requirements
Note: Computer not required for mixer operation.
•Mac: OS X 10.6-10.9*
•PC: Windows 8, Windows 7, Windows Vista, or Windows XP**
•USB port
*Requirements for the included Mac software: OS X 10.9, 10.8 **Requirements for the included PC software: Windows 8 or Windows 7
Synth*
* Sold separately
Audio Setup
The MultiMix 4 USB FX is a classcompliant device that can be used with virtually any digital audio workstation or recording software that supports USB audio. If you want to use the included Cubase® 7 LE software, follow the directions on the included software download card that is included in the MultiMix 4 USB FX box.
Notes:
When recording a guitar or bass with an active pickup, set the MultiMix 4 USB FX's GUITAR SWITCH to the up/raised position. If your instrument uses a passive pickup, engage the switch.
To reduce electrical hum at high gain settings, keep the MultiMix 4 USB FX's power supply away from your guitar cable and the MultiMix 4 USB FX's channel inputs.
2

To enable your MultiMix 4 USB FX to send and receive audio to and from your computer, follow the instructions below for your computer's operating system:
WINDOWS 8:
1.Use the included cable to connect the MultiMix 4 USB FX to your computer.
2.From the Start menu, click the lower-left corner of the screen to bring yourself to the Desktop.
3.In the bottom-right corner of the Taskbar, locate the Volume Control "Speaker" icon.
4.Right-click the speaker and select Playback Devices. The Windows Sound control panel should appear set on the
Playback tab.
5.If your computer’s soundcard does not have a green "check mark" symbol next to it, right-click it and select "Set as Default Device".
WINDOWS 7:
1.Use the included cable to connect the MultiMix 4 USB FX to your computer.
2.Go to Start Menu Control Panel Hardware and Sound Sound.
3.Click the Playback tab and select USB Audio Codec* as the default device.
4.Click the Recording tab and select USB Audio Codec* as the default device.
5.Click Properties in the lower right-hand corner.
6.In the new window, click the Advanced tab and select 2- channel, 16-bit, 44100 Hz (CD Quality) as the default format.
7.Uncheck both boxes under Exclusive Mode.
8.Click the Levels tab and set the slider to "4."
9.Click OK to close the Properties window.
10.Click OK to close the Sound control panel.
WINDOWS VISTA:
Be sure your audio software program is set up to receive audio via the MultiMix 4 USB FX. This can usually be done in your software's "Preferences" or "Device Setup." Please consult your software manual for more information.
If you experience too much latency after adjusting your software latency settings, we recommend the free ASIO4ALL (Audio Stream Input/Output) driver for PC at asio4all.com. ASIO drivers generally perform better and with lower latency since they create a more efficient communication between audio devices and software.
*If you have other USB audio devices connected to your computer, which may have identical names, you may need to try selecting each one until the MultiMix 4 USB FX is recognized.
1.Use the included cable to connect the MultiMix 4 USB FX to your computer.
2.Go to Start Menu Control Panel Sound. (If you do not see Sound, select Switch to Classic View, and the Sound Control Panel should become available.)
3.Click the Playback tab and select USB Audio Codec* as the default device.
4.Click the Recording tab and select USB Audio Codec* as the default device.
5.Click Properties in the lower right-hand corner.
6.In the new window, click the Advanced tab and select 2-channel, 16-bit, 44100 Hz (CD Quality) as the default format.
7.Uncheck both boxes under Exclusive Mode.
8.Click OK to close the Properties window.
9.Click OK to close the Sound control panel.
WINDOWS XP:
1.Use the included cable to connect the MultiMix 4 USB FX to your computer.
2.Go to Start Menu Control Panel Sounds and Audio Devices.
3.Click the Audio tab.
4.Under Sound Playback and Sound Recording, select USB Audio Codec* as the default device.
5.Click OK.
MAC OS X:
1.Use the included cable to connect the MultiMix 4 USB FX to your computer.
2.Go to your Applications directory and open System Preferences.
3.Click the Sound icon.
4.In the Input and Output tabs select USB Audio Codec.
5.Close the window.
3

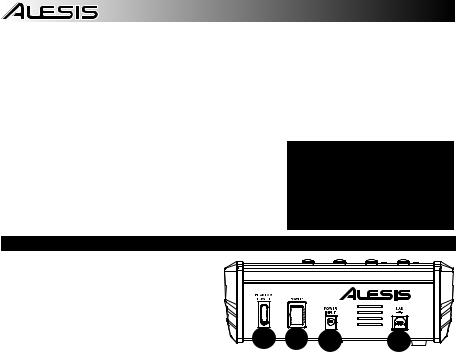
Rear Panel Features
1.PHANTOM POWER – This switch activates and deactivates phantom power. When
|
activated, phantom power supplies +48V to the |
|
|
|
|
|
XLR mic inputs. Please note that most dynamic |
|
|
|
|
|
microphones do not require phantom power, |
|
|
|
|
|
while most condenser microphones do. Consult |
|
|
|
|
|
your microphone’s documentation to find out |
1 |
2 |
3 |
4 |
|
whether it needs phantom power. |
||||
2. |
POWER SWITCH – Turns the MultiMix 4 USB |
FX on and off. Turn on the MultiMix 4 USB FX
after all input devices have been connected and before you turn on amplifiers or powered speakers. Turn off amplifiers or power speakers before you turn off the MultiMix 4 USB FX.
3.POWER IN – Use the included power adapter (18V DC, 800 mA, center-positive) to connect the MultiMix 4 USB FX to a power outlet. While the power is switched off, plug the power adapter into the MultiMix 4 USB FX first, and then plug the power adapter into a power outlet.
4.USB PORT – Use the included cable to connect the MultiMix 4 USB FX to a computer. MultiMix 4 USB FX requires a USB 1.1 or higher (e.g. USB 2.0) connection.
Top Panel Features
1. |
MIC INPUT – Connect a microphone to these inputs |
|
|
|
|
|
|
with an XLR cable. |
|
|
|
|
|
2. |
LINE INPUT – Connect line-level devices to these |
|
1 |
1 |
|
|
|
inputs with 1/4" cables. |
|
|
|
||
3. |
LO CUT SWITCH – When this button is depressed, |
|
2 |
2 |
2 |
20 |
|
the channel's high-pass filter will engage, reducing |
|
||||
|
|
|
|
|
||
|
frequencies below 80 Hz to reduce any low-level |
3 |
|
|
|
19 |
|
noise. |
5 |
3 |
2 |
||
4. |
GAIN – Adjusts the channel audio level (pre-fader |
|
||||
|
and pre-EQ gain). Adjust this so that the PEAK LED |
4 |
|
4 |
|
21 |
|
just barely lights up during the loudest parts of the |
|
|
|
||
|
song. |
|
|
|
|
|
5.GUITAR SWITCH – When this switch is in the down
|
position, Channel 2 will serve as a high-impedance |
|
|
|
|
|
|
|
|
input for connecting guitar or bass instruments. When |
6 |
6 |
|
6 |
|
13 |
|
|
the switch is in the up position, Channel 2 will accept |
|
|
|
||||
|
mic or line-level signals. |
7 |
7 |
|
7 |
|
|
|
|
|
|
|
|
|
|
|
|
6. |
HI EQ (TREBLE) – Adjusts the high (treble) |
8 |
8 |
8 |
|
|
|
|
|
frequencies of the channel. |
|
14 |
|
||||
7. |
LO EQ (BASS) – Adjusts the low (bass) frequencies |
|
16 |
|||||
|
of the channel. |
9 |
9 |
10 |
15 |
|||
8. |
FX SEND LEVEL – Adjusts the channel audio level |
|
||||||
|
that is sent to MultiMix 4 USB FX's internal effects |
|
12 |
12 |
12 |
|
|
|
|
processor. Turn this up for the channels that you want |
11 |
|
|
|
|||
|
internal effects applied to. |
17 |
18 |
|||||
9. |
CHANNEL PAN – Adjusts the position in the stereo |
|
11 |
11 |
||||
|
|
|
|
|
|
|
||
|
field for Channels 1 and 2. |
|
|
|
|
|
|
|
10.CHANNEL BALANCE – On Channels 3/4, this adjusts the channel balance.
11.CHANNEL VOLUME – Adjusts the audio level on the channel.
12.PEAK LED – The LED will flash red if the signal is clipping. If this happens, decrease the setting of the GAIN knob or CHANNEL VOLUME knob.
13.EFFECTS SELECTOR – Selects the effect that MultiMix 4 USB FX's internal effects processor will apply to the various channels. Each channel can send different levels of audio to the processor by adjusting their FX POST SEND knobs. See the EFFECTS section for an explanation of the available effects.
14.FX RETURN LEVEL – Adjusts the volume of the MultiMix 4 USB FX's internal effects processor.
15.EXT/USB TO MAIN – Engage this switch to route the audio from the "Ext In" input and USB audio from the computer to the mixer's Main Outs and Phones Out.
16.LED METERS – Shows the audio level of the main mix. Turn the Main Volume down if the CLIP LED lights up excessively.
17.PHONES VOLUME – Adjusts the volume of your headphones.
18.MAIN VOLUME – Adjusts the volume of the MAIN OUT.
19.MAIN OUT – Use standard 1/4" TRS cables to connect this output to the power speakers, amplifiers, or recorder. Control the level of this output using the MAIN volume knob.
20.EXT IN – Connect sources such as tape decks, CD players, and MP3 players to this 1/8" TRS input whose signal is sent to the Main Out and Phones Out when the EXT USB TO MAIN switch is engaged.
21.PHONES OUT – Connect headphones to this stereo 1/4” output.
4

Effects
TO HEAR THE EFFECTS ON A CHANNEL: Turn up the FX Send for the channel. Then, turn up the FX Return LEVEL knob. Use the EFFECTS SELECTOR knob to choose one of the effects below:
REVERB EFFECTS
•HALL 1: A large, bright concert hall reverberation effect suitable for vocals and instruments.
•HALL 2: A large, warm concert hall reverberation effect suitable for drums, piano and other instruments.
•ROOM 1: A medium-sized, moderately bright reflective room reverberation effect suitable for vocals, lead guitars and other instruments.
•ROOM 2: A small, very reflective bright room reverberation effect suitable for drums and percussion as well as electric guitars and other instruments.
•ROOM 3: A large, warm room reverberation effect suitable for acoustic instruments.
•PLATE 1: A lush, smooth vocal plate reverb with a long decay time and warm tonality.
•PLATE 2: An emulation of vintage plate reverb with bright, slightly tinny tonality and a medium-length decay.
•PLATE 3: A short, bright plate reverb effective for creating subtle spaces.
MODULATION EFFECTS
•CHORUS: A complex, 6-voice chorus ensemble effect with short delays often referred to as a "Chorus / Doubler". Discrete stereo signal path. Slow and watery.
•FLANGE: Classic stereo flange: a slow, slightly metallic sweep with a discrete stereo signal path.
•ROTARY: Fast rotary speaker simulator creates the classic, lush Doppler effect of an organ’s spinning horn. Effective on guitars, vocals, keyboards and other instruments.
DELAY EFFECTS
•DELAY 1: A simple slap-back echo with no feedback particularly effective on vocals and rhythm guitars.
•DELAY 2: Medium-length poly-rhythmic delay with crossover feedback. 3 to 4 ratio between L and R delay times (291 to 388ms) for 3/4 vs. 4/4 feel. Useful for solo instruments where a long, trailing echo effect is desired.
MULTI EFFECTS
•CHORUS – ROOM 1: Room reverb into a slow flanging modulation creates a spacey effect.
•CHORUS – ROOM 2: Fast modulation provides a dramatic chorus effect in a small room for a very lush chorus + reverb sound with a discrete stereo signal path.
BYPASS: Bypasses the effects processor – no effects will be heard.
5

Guía del usuario (Español)
Contenido de la caja
MultiMix 4 USB FX
Cable USB
Adaptador de Alimentación
Cubase® 7 LE (Descargar)
Guía del Usuario
Manual sobre la seguridad y garantía
Diagrama de conexión
Computadora*
Micrófono* 
 Suministro
eléctrico
Altavoces del monitor*
Auriculares*
Guitarra*
Sintetizador*
* Se vende por separado
Requisitos de sistema
Nota: El ordenador no es necesario para el funcionamiento del mezclador.
•Mac: OS X 10.6-10.9*
•PC: Windows 8, Windows 7, Windows Vista, ó Windows XP**
•Puerto USB
*Requisitos del software para Mac incluido: OS X 10.9, 10.8 **Requisitos del software para PC incluido: Windows 8 y Windows 7
6

Configuración de audio
MultiMix 4 USB FX es un dispositivo que cumple especificaciones de clase y que se puede usar virtualmente con cualquier estación de trabajo o software de grabación de audio digital compatible con el audio USB. Si desea utilizar el software Cubase® 7 LE incluido, siga las instrucciones de la tarjeta de descarga de software incluida en la caja del MultiMix 4 USB FX.
Notas:
Cuando grabe guitarra o bajo con un captor activo, coloque el CONMUTADOR GUITAR (de guitarra) del MultiMix 4 USB FX en la posición hacia arriba/levantada. Si su instrumento utiliza un captor pasivo, accione el conmutador
Para reducir el zumbido eléctrico cuando se usan ajustes altos de ganancia, mantenga la fuente de alimentación de MultiMix 4 USB FX alejada del cable de su guitarra y de las entradas de los canales del equipo.
Para permitir que MultiMix 4 USB FX envíe y reciba audio hacia y desde la computadora, siga las instrucciones de más abajo correspondientes al Sistema operativo de la misma:
WINDOWS 8:
1.Utilice el cable incluido para conectar el MultiMix 4 USB FX a su ordenador.
2.Desde el menú Start (Inicio), haga clic en la esquina inferior izquierda de la pantalla para entrar al escritorio.
3.En la esquina inferior derecha de la barra de tareas, localice el icono del "Altavoz" de control de volumen.
4.Haga clic derecho en el altavoz y seleccione Playback Devices (Dispositivos de reproducción). El panel de control Windows Sound (Sonido de Windows) debe aparecer en la pestaña Playback (Reproducción).
5.Si la tarjeta de sonido de su ordenador no tiene el símbolo de la "marca de verificación" verde junto a ella, haga clic derecho en la misma y seleccione "Set as Default Device" (Configurar como dispositivo predeterminado).
WINDOWS 7:
1.Use el cable incluido para conectar el MultiMix 4 USB FX a su computadora.
2.Vaya al menú Start Control Panel Hardware and Sound
Sound (Inicio Panel de Control Hardware y sonido Sonido).
3.Haga clic en la pestaña Playback (Reproducción) y seleccione USB Audio Codec* (Códec de audio USB) como dispositivo predeterminado.
4.Haga clic en la pestaña Recording (Grabación) y seleccione USB Audio Codec* (Códec de audio USB) como dispositivo predeterminado.
5.Haga clic en Properties (Propiedades) en la esquina inferior derecha.
6.En la nueva ventana, haga clic en la pestaña Advanced
(Avanzadas) y seleccione 2-channel, 16-bit, 44100 Hz (CD Quality) [2 canales, 16 bits, 44100 Hz (calidad de CD)] como formato predeterminado.
7.Deseleccione ambas casillas debajo de Exclusive Mode (Modo exclusivo).
8.Haga clic en la pestaña Levels (Niveles) y ajuste el cursor a "4".
9.Haga clic en OK (Aceptar) para cerrar la ventana Properties (Propiedades).
10.Haga clic en OK (Aceptar) para cerrar el panel de control Sound (Sonido).
WINDOWS VISTA:
Asegúrese también de que su programa de software de audio esté configurado para recibir audio por MultiMix 4 USB FX. Esto se puede hacer habitualmente en “Preferences” (Preferencias) o “Device Setup” (Configuración de dispositivos) del software. Para más información, consulte el manual del software.
Si experimenta demasiada latencia después de ajustar los parámetros de latencia de su computadora, recomendamos el driver ASIO4ALL (Entrada/salida de streaming de audio) para PC de asio4all.com. En general, los drivers ASIO funcionan mejor y con menor latencia, dado que crean una comunicación más eficiente entre los dispositivos de audio y el software.
1.Use el cable incluido para conectar el MultiMix 4 USB FX a su computadora.
2.Vaya al menú Start Control Panel Sound (Inicio Panel de control Sonido). (Si no ve Sound, seleccione Switch to Classic View (Cambiar a vista clásica). Debe aparecer el panel de control Sound.)
3.Haga clic en la pestaña Playback (Reproducción) y seleccione USB Audio Codec* (Códec de audio USB) como dispositivo predeterminado.
4.Haga clic en la pestaña Recording (Grabación) y seleccione USB Audio Codec* (Códec de audio USB) como dispositivo predeterminado.
5.Haga clic en Properties (Propiedades) en la esquina inferior derecha.
6.En la nueva ventana, haga clic en la pestaña Advanced (Avanzadas) y seleccione 2-channel, 16-bit, 44100 Hz (CD Quality) [2 canales, 16 bits, 44100 Hz (calidad de CD)] como formato predeterminado.
7.Deseleccione ambas casillas debajo de Exclusive Mode (Modo exclusivo).
8.Haga clic en OK (Aceptar) para cerrar la ventana Properties (Propiedades).
9.Haga clic en OK (Aceptar) para cerrar el panel de control Sound (Sonido).
7
WINDOWS XP:
1.Use el cable incluido para conectar el MultiMix 4 USB FX a su computadora.
2.Vaya al menú Start Control Panel Sounds and Audio Devices (Inicio Panel de control Dispositivos de sonido y audio).
3.Haga clic en la pestaña Audio.
4.En Sound Playback (Reproducción de sonido) y Sound Recording (Grabación de sonido), seleccione USB Audio Codec* (Códec de audio USB) como dispositivo predeterminado.
5.Haga clic en OK.
MAC OS X:
1.Use el cable incluido para conectar el MultiMix 4 USB FX a su computadora.
2.Vaya al directorio Applications (Aplicaciones) y abra System Preferences (Preferencias del sistema).
3.Haga clic en el icono Sound (Sonido).
4.En las pestañas Input (Entrada) y Output (Salida), seleccione USB Audio Codec (Códec de audio USB).
5.Cierre la ventana.
* Si tiene conectados a su computadora otros dispositivos de audio USB que puedan tener nombres idénticos, puede ser necesario que pruebe a seleccionar cada uno hasta que se reconozca el MultiMix 4 USB FX.
Características del panel trasero
1.ALIMENTACIÓN FANTASMA – Este
interruptor activa y desactiva la alimentación fantasma. Cuando se activa, la alimentación fantasma suministra +48 V a las entradas de micrófono XLR. Tenga en cuenta que la mayoría de los micrófonos dinámicos no requieren alimentación fantasma, mientras que la mayoría de los micrófonos de condensador la requieren. Consulte la documentación de su micrófono para averiguar si necesita alimentación fantasma.
1 |
2 |
3 |
4 |
2.INTERRUPTOR DE ENCENDIDO – Enciende y apaga el MultiMix 4 USB FX. Encienda el MultiMix 4 USB FX después de desconectar todos los dispositivos de entrada y antes de encender los amplificadores o altavoces alimentados. Apague los amplificadores o altavoces alimentados antes de apagar el MultiMix 4 USB FX.
3.ENTRADA DE ALIMENTACIÓN – Use el adaptador de alimentación incluido para conectar el MultiMix 4 USB FX a un tomacorriente alimentado. Con la alimentación eléctrica (18VCC, 800 mA, centro positivo) desconectada, enchufe la fuente de alimentación al MultiMix 4 USB FX primero y luego al tomacorriente.
4.PUERTO USB – Use el cable incluido para conectar el MultiMix 4 USB FX a una computadora. MultiMix 4 USB FX requiere una conexión USB 1.1 o superior (por ej. USB 2.0).
8
 Loading...