


24-BIT USB RECORDING INTERFACE
QUICKSTART GUIDE
ENGLISH ( 1 – 3 )
MANUAL DE INICIO RÁPIDO
ESPAÑOL ( 4 – 6 )
GUIDE D'UTILISATION RAPIDE
FRANÇAIS ( 7 – 9 )
GUIDA RAPIDA
ITALIANO ( 10 – 12 )
KURZANLEITUNG
DEUTSCH ( 13 – 15 )

REGISTRATION
Please go to http://www.alesis.com to register your iO2 EXPRESS. Registering your product ensures that we can keep you up-to-date with any new product developments and provide you with world-class technical support, should you run into any problems.
CONNECTION DIAGRAM
BOX CONTENTS
yiO2 EXPRESS
yUSB cable
ySoftware CD
yQuickstart Guide
ySafety Instructions & Warranty Information booklet
Notes:
yWhen recording a guitar or bass with an active pickup, set the iO2 EXPRESS's MIC/LINE / GUITAR SWITCH to "MIC/LINE." If your instrument uses a passive pickup, set the switch to "GUITAR."
yDo not use the MIC INPUT and GUITAR/LINE INPUT at the same time on one channel. This may overload the channel and cause distortion.
yPlug the iO2 EXPRESS directly into your computer, and avoid using a USB hub. Hubs can interfere with the iO2 EXPRESS's audio and MIDI timing signals.
yTo reduce electrical hum at high gain settings, keep the iO2 EXPRESS's power supply away from your guitar cable and the iO2 EXPRESS's channel inputs.
1

SYSTEM REQUIREMENTS
Minimum PC Requirements: |
Minimum Macintosh Requirements: |
||
• Pentium III 450 MHz Processor |
• Any Apple computer with native USB support |
||
• |
128 MB RAM |
• |
Mac OS X "Jaguar" version 10.2 or later |
• |
Available USB 1.1 Port |
• |
128 MB RAM |
•Windows XP (with Service Pack 2 installed)
|
|
Recommended Macintosh Requirements: |
|
Recommended PC Requirements: |
• G4 733-MHz Processor or faster |
||
• Pentium 4 or Athlon Processor |
• 7,200 RPM Hard Disk Drive |
||
• |
512 MB RAM |
• |
Mac OS X "Jaguar" version 10.2 or later |
• |
7,200 RPM Hard Disk Drive |
• |
512 MB RAM |
•Available USB 1.1 Port
•Windows XP (with Service Pack 2 installed)
AUDIO SETUP
The iO2 EXPRESS is a class-compliant device that can be used with any digital audio workstation or recording software that supports USB audio. To enable your iO2 EXPRESS to send and receive audio to and from your computer, follow the instructions below for your computer's operating system:
WINDOWS 7:
1.Use the included cable to connect the iO2 EXPRESS to your computer.
2. Go to |
Start Menu |
Control Panel |
Hardware and |
Sound |
Sound. |
|
|
3.Click the Playback tab and select USB Audio Codec* as the default device.
4.Click the Recording tab and select USB Audio Codec* as the default device.
5.Click Properties in the lower right-hand corner.
6.In the new window, click the Advanced tab and select 2- channel, 16-bit, 44100 Hz (CD Quality) as the default format.
7.Uncheck both boxes under Exclusive Mode.
8.Click the Levels tab and set the slider to "4."
9.Click OK to close the Properties window.
10.Click OK to close the Sound control panel.
WINDOWS VISTA:
1.Use the included cable to connect the iO2 EXPRESS to your computer.
2. |
Go to Start Menu Control Panel Sound. (If you don't |
|
the Sound Control Panel should become available.) |
Be sure your audio software program is set up to receive audio via the iO2 EXPRESS. This can usually be done in your software's "Preferences" or "Device Setup." Please consult your software manual for more information.
* If you have other USB audio devices connected to your computer, which may have identical names, you may need to try selecting each one until the iO2 EXPRESS is recognized.
If you experience too much latency after adjusting your software latency settings, we recommend the free ASIO4ALL (Audio Stream Input/Output) driver for PC at www.asio4all.com. ASIO drivers generally perform better and with lower latency since they create a more efficient communication between audio devices and software.
see Sound, select Switch to Classic View, and
3.Click the Playback tab and select USB Audio Codec* as the default device.
4.Click the Recording tab and select USB Audio Codec* as the default device.
5.Click Properties in the lower right-hand corner.
6.In the new window, click the Advanced tab and select 2-channel, 16-bit, 44100 Hz (CD Quality) as the default format.
7.Uncheck both boxes under Exclusive Mode.
8.Click OK to close the Properties window.
9.Click OK to close the Sound control panel.
WINDOWS XP:
1.Use the included cable to connect the iO2 EXPRESS to your computer.
2. Go to Start Menu Control Panel Sounds and Audio Devices.
3.Click the Audio tab.
4.Under Sound Playback and Sound Recording, select USB Audio Codec* as the default device.
5.Click OK.
MAC:
1.Use the included cable to connect the iO2 EXPRESS to your computer.
2. |
Go to Applications Utilities Audio MIDI Setup. |
3.In the Audio Devices tab under System Settings, select USB Audio Codec* as your Default Input and Default Output.
4.Close the window.
2
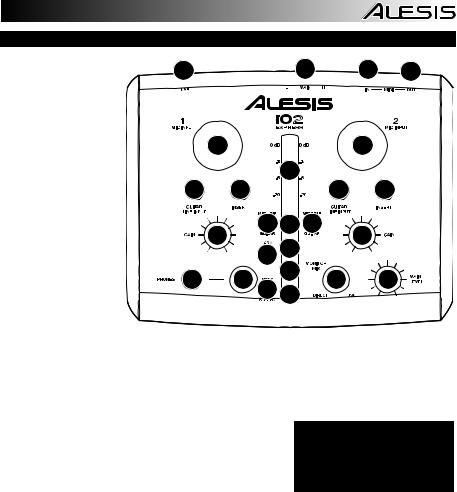
FEATURES
1.USB PORT – Use the included cable to connect the iO2 EXPRESS to a computer. iO2 EXPRESS requires a USB 1.1 or higher (e.g. USB 2.0) connection.
2.MAIN OUT – Use standard 1/4" cables to connect this output to a speaker or amplifier system. The level of this output is controlled by the MAIN VOL knob.
3.MIDI IN – Use a standard five-pin MIDI cable to connect this input to the MIDI OUT of an external MIDI device.
1 |
2 |
3 |
4 |
|
10 |
|
|
10 |
|
|
9 |
|
|
11 |
14 |
|
11 |
14 |
|
12 |
8 |
12 |
|
|
13 |
|
|
13 |
|
15 7 |
|
|
|
19 |
20 16 |
6 |
17 |
18 |
5 |
||||
4.MIDI OUT – Use a
standard five-pin MIDI cable to connect this output to the MIDI IN of an external MIDI device.
5.PHANTOM POWER LED – Lights up when phantom power is engaged.
6.MIDI OUT LED – Flashes whenever MIDI data is sent out of the iO2 EXPRESS.
7.MIDI IN LED – Flashes whenever MIDI data is received from an external MIDI controller.
8.USB LED – Lights up when a USB connection has been established with your computer.
9.LED METERS – Monitors the audio level of the MAIN OUT.
10.MIC INPUT – Connect a microphone to this input with an XLR
cable. |
NOTE: Do not use the MIC INPUT |
11. GUITAR / LINE INPUT – Connect a line-level device or guitar |
and GUITAR/LINE INPUT at the |
|
to this input with a 1/4" cable. |
same time on one channel. This |
|
may overload the channel and |
||
12. MIC/LINE / GUITAR SWITCH – When this switch is in the |
||
cause distortion. |
||
"GUITAR" position, the channel will serve as a high- |
||
|
||
impedance input for connecting guitar or bass instruments. |
|
|
When the switch is in the "MIC/LINE" position, the channel will accept mic or line-level signals. |
||
13.GAIN – Adjusts the channel audio pre-fader and pre-EQ gain level.
14.INSERT – The insert jack allows you to insert a compressor, EQ, or any other signal processor in between the iO2 EXPRESS's preamplifier and A/D converter.
15.PHANTOM POWER SWITCH – This switch activates and deactivates phantom power. When activated, phantom power supplies +48V to both XLR mic inputs. Please note that most dynamic microphones do not require phantom power, while most condenser microphones do. Consult your microphone's documentation to find out whether it needs phantom power.
16.MONO / STEREO – Adjusts the headphone mix for mono or stereo operation.
17.MONITOR MIX – Blend in any amount of zero-latency signal from your inputs with the output of your computer.
18.MAIN VOLUME – Adjusts the output volume of the MAIN OUT.
19.HEADPHONES – Connect your 1/4" headphones to this output.
20.HEADPHONE VOLUME – Adjusts the volume level of the headphone output.
3

REGISTRO
Visite http://www.alesis.com y registre su iO2 EXPRESS. El registro de su producto asegura que podamos mantenerle actualizado con los nuevos desarrollos de productos y brindarle apoyo técnico de categoría mundial en caso de que tenga algún problema.
DIAGRAMA DE CONEXIÓN
CONTENIDO DE LA CAJA
yiO2 EXPRESS
yCable USB
yCD software
yGuía de inicio rapido
yFolleto de información sobre la seguridad y la garantía
Notas:
yCuando grabe una guitarra o bajo con captor activo, ajuste el CONMUTADOR MICROFÓNO/LÍNEA / GUITARRA de iO2 EXPRESS a "MIC/LINE". Si su instrumento usa un captor pasivo, ajuste el conmutador a "GUITAR".
yNo utilice la ENTRADA DE MICROFONO (Microphone) y la ENTRADA DE GUITARRA / LÍNEA (Guitar / Line) al mismo tiempo en el mismo canal. Esto puede saturar el canal y causar distorsión.
yEnchufe la iO2 EXPRESS directamente a su computador y evite usar un hub USB. Los hubs pueden interferir con las señales de sincronización de audio y MIDI de la interfaz iO2 EXPRESS.
yPara reducir el zumbido eléctrico cuando se usan ajustes altos de ganancia, mantenga la fuente de alimentación de iO2 EXPRESS alejada del cable de su guitarra y de las entradas de los canales del equipo.
4
 Loading...