


 Loading...
User Guide
English ( 3 – 9 )
Guía del usuario
Español ( 10 – 16 )
Guide d'utilisation
Français ( 17 – 23 )
Guida per l'uso
Italiano ( 24 – 30 )
Benutzerhandbuch
Deutsch ( 31 – 37 )
Appendix
English ( 38 – 39 )
User Guide (English)
Introduction
Box Contents
DM7X Module; Cable Snake; Power Adapter; User Guide; Safety & Warranty Manual
Support
For the latest information about this product (system requirements, compatibility information, etc.) and product registration, visit alesis.com.
For additional product support, visit alesis.com/support.
Quick Start / Connection Diagram
Setup and Playing
* sold separately Tom 4 Drum Pad* 


 Crash 2 Cymbal Pad*
Computer* |
|
|
|
|
Power |
|
|
|
|
Smartphone, |
|
|
|
|
|
|
|
|
|||
|
|
|
|
|
|
|
|
|
|
MP3 player, |
|
|
|
|
|
|
|
|
|
|
etc.* |
|
|
|
|
|
|
|
|
|||
|
|
|
|
|
|
|
|
|
|
|
Headphones*
MIDI |
USB |
TOM 4 |
CRASH 2 |
R |
L / MONO AUX IN |
OUT |
IN |
|
|
|
External |
Monitors* |
|
|
sound |
|
module* |
|
MIDI 


 keyboard*


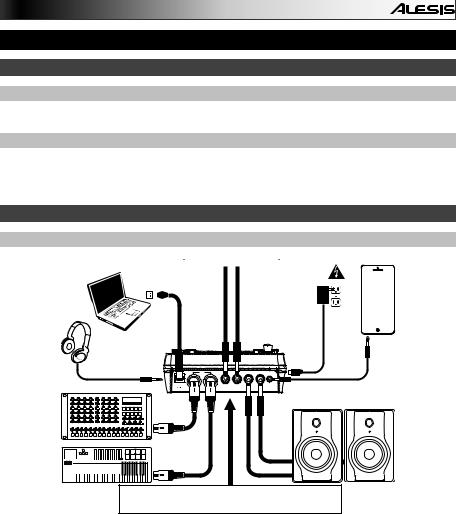
Use the cable snake to connect the drum module to the drum/cymbal pads of your electronic drum kit.
1.Connect your electronic drum kit's pads to the cable snake, then connect the cable snake to the Cable Snake Input on the module's rear panel.
2.Optional: If you have any additional pads (e.g., an extra tom, an extra crash cymbal), connect them to the module's Tom 4 Input or Crash 2 Input.
3.Connect speakers (sold separately) to the Outputs and/or connect 1/8" stereo headphones (sold separately) to the Phones output. Turn the Volume knob all the way down (counterclockwise).
4.Connect the module to a power source, using the included power adapter (9 VDC, 500 mA, center positive).
5.Press the Power Switch to turn the module on.
6.Adjust the Volume knob to an appropriate level and play some drums!
Selecting a Drum Kit: After powering on the module, or after pressing the Kit button, you will see the Kit indicator and NUM in the display. Use the < and > buttons to select a drum kit, and start playing! You can also preview the sounds (at a fixed velocity) by pressing the Pad Select buttons. Kits 01-24 are Preset Kits. Kits 25-40 are User Kits (see Editing and Saving Drum Kits for more information).
Note: If the LED above the Song/Pattern button is not lit, press and hold Page/Select until it is.
Using the Metronome: You can turn the metronome ("click track") on or off by pressing the Click button. Adjust its tempo by pressing Tempo and using the < and > buttons to set the new BPM (beats per minute). See Adjusting The Metronome for more information about metronome features.
3
Features
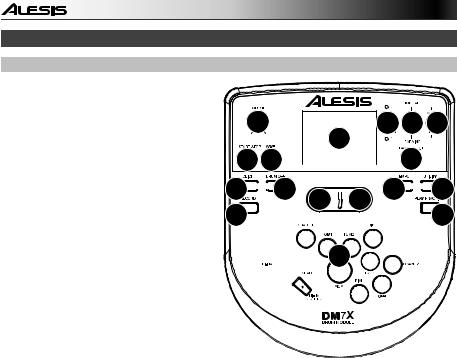
Front Panel
1.Display: Shows the module's current settings and functions.
2.Song/Pattern: In Normal Mode, press this button to enter the Song Menu, where you can select a song or adjust song-related settings. In Learning Mode, press this button to enter the Pattern Menu, where you can select a pattern (full kit plus accompaniment) to play along to or adjust pattern-related settings.
Note: The LEDs above and below this button indicate whether the module is in Normal Mode or Learning Mode, respectively.
3.Kit/Rhythm: In Normal Mode, press this button to enter the Kit Menu, where you can select a kit or adjust kit-related settings. In Learning Mode, press this button to select a rhythm (full kit) to play along to or adjust pattern-related settings.
6 |
2 3 4 |
|
1 |
7
 8
8
 5
5
10 


 11 9
11 9
 9 13
9 13 
 14
14
12 |
15 |

 16
16
4. Voice/Beat: In Normal Mode, press this button to enter the Voice Menu, where you
can select a voice (drum sound) or adjust voice-related settings. In Learning Mode,
press this button to select a beat (snare drum only) to play along to or adjust pattern-related settings.
5.Page/Select: Press this button to cycle through the available settings for the current mode/menu. Press and hold this button for one second to switch the three buttons above it between Normal Mode and Learning Mode.
6.Volume: Adjusts the output volume of the Main Out and Phones.
7.Start/Stop: Press this to start/stop playback or recording.
8.Save: Press this to save your current kit settings.
9.< / >: Use these arrow buttons to change the value of the setting shown in the display. (Usually, this adjusts numerical values, such as kit numbers or effects levels.)
10.Click: Press this to turn the metronome ("click track") on/off. See the Adjusting the Metronome section for more information.
11.Drum Off: When this button is on, its LED will be lit and the pre-recorded drum part will be muted so you can hear only your performance and any accompaniment (backing music). Press it again to hear the pre-recorded drum part. (This button will automatically be on while recording.)
12.Record: Press this button once to record-arm the module. Its LED will flash. To start recording, press Start/Stop or hit a pad. When recording, its LED will light solid. (To stop recording, press Start/Stop again.) See the Recording section for more information.
13.Tempo: Press this to show the current tempo in BPM (beats per minute) in the display. Use the < or > buttons to change the tempo.
14.Utility: Press this button to access advanced settings for the pads as well as the module's MIDI settings. See the Adjusting Utility Settings section for more information.
15.Play/Practice: In Normal Mode, press this button to hear a recorded performance. In Learning Mode, press this button to start playing the beat, rhythm, or pattern; you can then play along to it without being scored. Press and hold this button for 2 seconds to hear the playback of your practice (every practice is automatically recorded). Press it again to stop playback.
16.Pad Select Buttons: Press these buttons to preview the voices (drum sounds) used for each part of the kit, represented by the buttons. (After pressing the Snare button or any of the Tom buttons, you can press the Rim button to hear the voice used as the rim sound of that drum.)
4
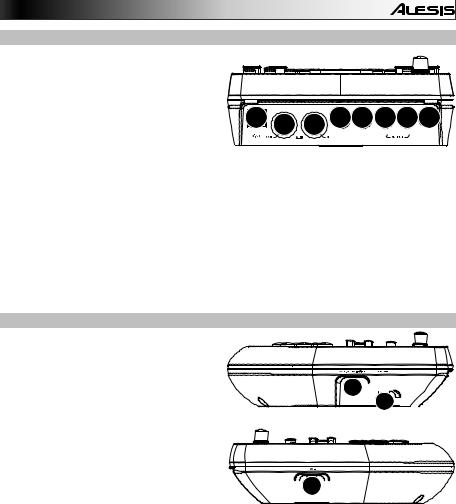
Top Panel
1.Outputs: Use standard 1/4" TRS cables to connect these outputs to a speaker or amplifier system. The level of these outputs is controlled by the Volume knob.
2. Aux In: Use a standard 1/8" stereo cable to |
7 5 |
6 4 3 1 1 2 |
connect this input to an optional audio player |
(e.g,. MP3 player, CD player, etc.). This 


 audio will be heard in the Outputs and


 Phones output. During recording, the audio from this input will not be recorded.
3.Tom 4 Input: Use a standard 1/4" TRS cable to connect this input to an optional drum pad, which will trigger the Tom 4 sound.
4.Crash 2 Input: Use a standard 1/4" TS cable to connect this input to an optional cymbal pad, which will trigger the Crash 2 sound.
5.MIDI Out: Use a standard five-pin MIDI cable to connect this output to the MIDI In of an external MIDI device.
6.MIDI In: Use a standard five-pin MIDI cable to connect this input to the MIDI Out of an external MIDI device.
7.USB: This connection will allow you to send MIDI information to a computer. Use a USB cable (sold separately) to connect the module to an available USB port on your computer.
Note: Only MIDI information is sent over the USB connection, not audio.
Side Panels
1.Power Connection: Connect the included power adapter (9V DC, 500mA, center pinpositive) here, then connect the adapter to wall power.
2.Power Button: Press this button to turn the module on. Press and hold it for a second then release it to power the module off.
3.Phones: Connect a set of 1/8" stereo headphones to this output.
1 
 2
2 


 3
3 


Note: To save energy, the drum module will shut down automatically after 30 minutes of no activity. If you do not need this feature or want to adjust the shutdown time, do the following:
1.Power on the drum module.
2.Press Utility.
3.Use the < / > buttons to select the Power Page (POW).
4.Use the < / > buttons to adjust the shutdown time (30 – 60 minutes, or OFF).
5

Basic Functions
Editing and Saving Drum Kits
IMPORTANT:
•To edit and save your kits, you must be in Normal Mode. If the LED above the Song/Pattern button is not lit, press and hold Page/Select until it is.
•Remember to save your kits after you have entered the settings you want!
First, press Kit until NUM appears in the display. Use the < and > buttons to select your desired kit. Once you've selected your kit, you can edit its settings:
To adjust the kit settings:
1.Press Kit, then press Page/Select until the desired setting appears in the display:
•VOL: Kit volume
•REV*: Kit reverb
•EQH*: Equalization, high frequencies
•EQM*: Equalization, mid frequencies
•EQL*: Equalization, low frequencies
2.Use the < and > buttons to adjust the value.
* The reverb and equalization affect the sound of the kit, song, and the output of a connected MIDI device when that kit is selected.
To adjust the pad settings:
1.Hit the pad whose settings you want to adjust, or press its corresponding Pad Select button.
2.Press Voice, then press Page/Select until the desired setting appears in the display:
•NUM / H-C**: Pad voice (drum sound)
•VOL: Pad volume
•PAN: Pad panning
•PIT: Pad pitch
•REV: Pad reverb
•MID: MIDI note. See the Appendix for a list of the default MIDI note numbers for each pad.
•P-S: Pad song switch (selects whether or not a song will play when that pad is struck)
•P-N***: Pad song number (selects which song will play when that pad is struck, if P-S is set to
ON)
3.Use the < and > buttons to adjust the value.
**If the selected pad is the Hi-Hat, you can choose one of the combinations of open and closed hi-hat sounds (H-C, 001-007).
***Songs 61-80 are pitched, nondrum samples (e.g., bass, piano, vibraphone, etc.) rather than actual songs, so they're ideal for assigning to a pad, when selecting the "pad song number." They will change pitch with each hit. Songs 1-60 are actual songs
To save your settings:
1.Press Save.
2.Use the < and > buttons to select the User Kit slot you want to save it to (25-40).
3.Press Save again.
6

Playing Along With Songs
IMPORTANT: To play songs, you must be in Normal Mode. If the LED above the Song/Pattern button is not lit, press and hold Page/Select until it is.
To select and play a song:
1.Press Song until NUM appears in the display.
2.Use the < and > buttons to select the song.
3.Press Start/Stop to start playback.
Note: During playback, the Pad Select buttons will light up to indicate which drums are playing. To disable/re-enable this feature, press the "Kick" Pad Select button.
Adjust the tempo by pressing Tempo and using the < and > buttons to set the new BPM. Press both < and > buttons simultaneously to reset the tempo to its default value.
Adjust the volume of the music (not the drum part) by pressing Song, then pressing Page/Select until ACC appears in the display. Use the < and > buttons to adjust the volume. (It will return to its default setting if you power the module off.)
Adjust the volume of the drum part by pressing Song, then pressing Page/Select until DRM appears appears in the display. Use the < and > buttons to adjust the volume. To mute/unmute the drum part entirely, press Drum Off. (It will return to its default setting if you power the module off.)
Playing Along With Beats, Rhythms, and Patterns
IMPORTANT: To play along with patterns, you must be in Learning Mode. If the LED under the Song/Pattern button is not lit, press and hold Page/Select until it is.
1.Press one of the Learning Mode buttons to select how you want to play:
•Beat (BEA): Snare drum only
•Rhythm (RHM): Full kit
•Pattern (PTN): Full kit plus musical accompaniment
2.Use the < and > buttons to select the beat, rhythm, or pattern you want to practice.
3.To practice without being scored, press Play/Practice (PRA will appear on the display). After a count-in, the beat, rhythm, or pattern will repeat so you can practice it.
To play and be scored, press Start/Stop. After a count-in (EXM will appear on the display), the beat, rhythm, or pattern will play once without the drum part. Play the drum part as accurately as possible. At the end, you will receive a score (SCO) based your accuracy. To improve your score, practice the beat, rhythm, or pattern without being scored (see above) and try again!
Every practice is automatically recorded. Press and hold Play/Practice for 2 seconds to hear the playback of your practice (PLY). Press Play/Practice again to stop playback.
Notes:
•If EPY appears on the display, it means the memory is empty because no recording was made. Play while scoring your performance (as described above) to record.
•If FUL appears on the display, it means the module's memory became full while recording. You can clear/overwrite the memory by simply making a new recording.
To adjust the Learning Mode settings:
Each Learning Mode has different adjustable settings. Press the desired Learning Mode button (Beat, Rhythm, or Pattern), then keep pressing Page/Select to cycle through the settings, and use the < and > buttons to adjust their values:
•Beat (BEA): (DRM) Drum volume
•Rhythm (RHM): (LEV) Difficulty level; (DRM) Drum volume
•Pattern (PTN): (LEV) Difficulty level; (ACC) Accompaniment; (DRM) Drum volume
7

Advanced Functions
Adjusting Utility Settings
The Utility settings let you further customize your pad settings and adjust the module's MIDI settings.
To adjust the Utility settings:
1.Hit the pad whose settings you want to adjust, or press its corresponding Pad Select button.
2.Press Utility, then press Page/Select until the desired setting appears in the display:
•SEN (Pad sensitivity): Controls how responsive a pad is when you hit it. The higher the value, the less forcefully you need to play to generate a loud hit.
•THR (Pad threshold): Controls how forcefully you have to hit the pad to generate a sound. The higher the value, the harder you have to hit it.
•CRO (Pad crosstalk): Crosstalk is the unintentional triggering of a pad when an adjacent pad is hit. The higher the value, the less likely the pad will be triggered by crosstalk.
•CUR (Pad velocity curve): Controls the pad's dynamic response relative to the force (velocity) of your hit. The curves are shown in the Appendix.
•R-S (Pad rim sensitivity): Controls how responsive a pad's rim is when you hit it.
•S-S (Hi-Hat "splash" sensitivity): Controls how responsive the hi-hat "splash" effect is when you hit the pedal. (To create this sound, tap your foot on the pedal but lift it up immediately instead of leaving your foot down.)
•LOC (Local Mode): See MIDI Settings for more information.
•GM (General MIDI Mode): See MIDI Settings for more information.
3.Use the < and > buttons to adjust the value.
To save the settings, press Save. Otherwise, they will return to their default settings when you power the module off.
Adjusting the Metronome
The module's built-in metronome can be used when practicing, performing, recording, or playback.
Using the metronome:
You can turn the metronome ("click track") on or off by pressing the Click button. Adjust its tempo by pressing Tempo and using the < and > buttons to set the new BPM (beats per minute).
To adjust the metronome settings:
1.Turn on the metronome (by pressing Click), then press Page/Select until the desired setting appears in the display:
•SIG (Time signature): The time signature the metronome is counting. (When a "0" is selected as the first number, the first beat will not be indicated by a different metronome sound; every beat will have the same sound.)
•INT (Interval): The subdivisions that the metronome will play.
•VOL (Volume): The metronome volume.
•VOC (Voice): The metronome sound.
2.Use the < and > buttons to adjust the value. The settings will be automatically saved.
Recording
To record:
1.If the LED above the Song/Pattern button is not lit, press and hold Page/Select until it is.
2.Press Record. The button's LED will flash and the metronome will turn on automatically. This means the module is record-armed.
3.To start recording, press Start/Stop, or hit any pad. The Record LED will light solid. (To cancel recording instead, press Record again.)
4.To stop recording, press Start/Stop, or press Record. The Record LED will turn off.
5.To play the recording, press Play/Practice. Press it again to stop playback.
Notes:
•In Learning Mode, your performances are automatically recorded.
•If FUL appears on the display, it means the module's memory became full while recording. You can clear/overwrite the memory by simply making a new recording.
8

To record your performance with a Song:
1.Adjust the Song number (SNG) (as described in the To adjust the recording settings section below).
2.Start recording (as described in the To record section above).
3.To play the recording, press Play/Practice. Press it again to stop playback.
To adjust the recording settings:
1.If the LED above the Song/Pattern button is not lit, press and hold Page/Select until it is.
2.Press Record. The button's LED will flash and the metronome will turn on automatically. This means
3.the module is record-armed.
4.Press Page/Select until the desired setting appears in the display:
•SNG (Song number): The song that will play in the background.
•KIT (Kit): The drum kit that will be recorded.
•BPM (Tempo): The recording tempo.
•SIG (Time signature): The recording time signature.
•INT (Interval): The subdivisions that the metronome will play.
•DRM (Drum off): When not set to a song (---) or when set to Song 61-80, this setting is disabled because an actual song is not selected (Songs 61-80 are actually just samples that can be assigned to the pads). When set to Song 1-60, you can set this to ON or OFF to turn the original drum part on or off. Alternatively, you can press the Drum Off button.
•PRC (Pre-count): When set to ON, there will be a one-measure count-in before the recording starts. When set to OFF, the recording will start immediately after you press Start/Stop or hit a pad.
5.Use the < and > buttons to adjust the value. The settings will be automatically saved.
MIDI Settings
You can connect the drum module to an external MIDI module or device, allowing you to:
•use a connected electronic drum kit to trigger sounds in the external module
•use another MIDI device to trigger sounds in the drum module
To change the MIDI note number sent by each pad, see the To adjust the pad settings section under Editing and Saving Drum Kits.
To adjust the MIDI settings:
1.Hit the pad whose settings you want to adjust, or press its corresponding Pad Select button.
2.Press Utility, then press Page/Select until the desired setting appears in the display:
• LOC (Local Mode):
o When set to ON, playing your electronic drum kit will trigger the sounds in the drum module.
oWhen set to OFF, playing your electronic drum kit will trigger sounds in a sound module connected to the module's MIDI Out, bypassing the drum module's sound library.
•GM (General MIDI Mode): See Accessing the module's programs below for more information.
oWhen set to ON, Channel 10 in the drum module will use General MIDI percussion sounds.
oWhen set to OFF, Channel 10 in the drum module will use the module's internal drum sounds.
3.Use the < and > buttons to adjust the value.
Accessing the module's programs: You can use an external MIDI device (e.g., a MIDI keyboard or sequencer) to access the drum module's other sound libraries ("programs"), such as piano, bass, strings, etc. Select a different program by sending a Program Change message from your external device. Each program uses a dedicated MIDI channel (1-16). Channel 10 is reserved for the drum sounds.
To record to an external sequencer:
1.Use a standard MIDI cable (sold separately) to connect the drum module's MIDI Out to your sequencer's MIDI In. Use another MIDI cable to connect the sequencer's MIDI Out to your module's MIDI In.
2.Set the active track of your sequencer to Channel 10, and start recording.
3.Play your electronic drum kit!
4.Stop recording on your sequencer. Your performance has been recorded.
Notes:
•Pressing Start/Stop to start/stop Song playback generates the MIDI message FA (start) or FC (stop).
•When syncing the module with another MIDI device, the DM7X module can only be the master, not the slave.
9

Guía del usuario (Español)
Introducción
Contenido de la caja
Módulo DM7X; multicable; adaptador de alimentación; guía del usuario; manual sobre la seguridad y garantía
Soporte
Para obtener la información más completa acerca de este product (los requisitos del sistema, compatibilidad, etc) y registro del producto, visite alesis.com.
Para soporte adicional del producto, visite alesis.com/support.
Inicio rápido y diagrama de conexión
Cómo instalarlo y tocar
* se vende por |
Tom 4 pad de tambor* |
Crash 2 pad de platillos* |
|
|
separado |
|
|
Teléfono |
|
|
|
|
||
|
|
Suministro |
inteligente, |
|
Computadora* |
reproductor |
|||
eléctrico |
||||
|
|
de MP3 |
||
|
|
|
||
|
|
|
player, etc* |
|
Auriculares* |
|
|
|
|
|
MIDI |
|
|
|
|
USB |
TOM 4 |
CRASH 2 |
R |
L / MONO |
AUX IN |
OUT |
IN |
|
|
|
|
Monitores*
Módulo de
sonido externo*
Teclado
MIDI*
Use el multicable para conectar el módulo a los pads de tambor/platillos de su kit de batería electrónica.
1.Conecte los pads del kit de batería electrónica al multicable y luego este último a la Entrada del multicable del panel trasero de módulo.
2.Opcional: Si tiene pads adicionales (como un tom o platillos crash adicionales) conéctelos a las entradas Tom 4 o Crash 2.
3.Conecte los altavoces (que se venden por separado) a los conectores Output (Salida) y/o conecte auriculares estéreo de 1/8 pulg. (que se venden por separado) a la salida Phones (Auriculares). Gire la perilla Volume (Volumen) al mínimo (en sentido antihorario).
4.Conecte el módulo al suministro eléctrico, usando el adaptador de alimentación incluido (9 V CC, 500 mA, pin central positivo).
5.Pulse el interruptor On/Off (Encendido) para encender el módulo.
6.Ajuste la perilla Volume a un nivel apropiado y ¡toque algunos tambores!
Cómo seleccionar un kit de batería: Después de encender el módulo o de pulsar el botón Kit, verá los indicadores Kit y NUM en la pantalla. Use los botones < y > para seleccionar un kit de batería y ¡comience a tocar! Puede también hacer una prueba previa de los sonidos (a velocidad fija) pulsando los botones Pad Select (Selección de pad). Los kits 01-24 son kits preprogramados. Los kits 25-40 son kits del usuario (para más información, consulte
Cómo editar y guardar los kits de batería.
Nota: Si el LED que está arriba del botón Song/Pattern (Tema/Patrón) no está encendido, mantenga pulsado Page/Select (Página/Selección) hasta que se encienda.
Cómo usar el metrónomo: Puede activar o desactivar el metrónomo ("clics de guía") pulsando el botón Click. Ajuste su tempo pulsando Tempo y use los botones < y > para ajustar el nuevo valor de BPM (beats por minuto). Para más información acerca de las características del metrónomo, consulte Cómo ajustar el metrónomo.
10
Características
Panel frontal
1.Pantalla: Muestra los parámetros y funciones
actuales del módulo.
2.Tema/Patrón: En modo normal, pulse este botón para abrir el menú Song (Tema), en el que puede seleccionar un tema o ajustar parámetros relacionados con el tema. En modo de aprendizaje, pulse este botón para abrir el menú Pattern (Patrón), en el que puede seleccionar un patrón (kit completo más acompañamiento) para tocar o ajustar parámetros relacionados con el patrón.
Nota: Los LED que están arriba y abajo de este botón indican si el módulo está en modo normal o de aprendizaje, respectivamente.
3.Kit/Ritmo: En modo normal, pulse este botón para abrir el menú Kit, en el que puede seleccionar un kit o ajustar parámetros relacionados con el kit. En modo de aprendizaje, pulse este botón para seleccionar un ritmo (kit completo) para tocar como acompañamiento o ajustar parámetros relacionados con el patrón.
|
6 |
|
|
2 3 4 |
|
|
|
|
1 |
|
|
7 8 |
|
|
|
5 |
|
10 |
11 |
9 |
9 |
13 |
14 |
12 |
|
|
|
|
15 |
|
|
|
16 |
|
|
4.Voz/Beat: En modo normal, pulse este botón para abrir el menú Voice (Voz), en el que puede seleccionar una voz (sonido de tambores) o ajustar parámetros relacionados con la voz. En modo de aprendizaje, pulse este botón para seleccionar un beat (sólo redoblante [snare]) para tocar como acompañamiento o ajustar parámetros relacionados con el patrón.
5.Página/Selección: Pulse este botón para recorrer los parámetros disponibles para el modo o menú actuales. Mantenga pulsado este botón durante un segundo para conmutar los tres botones de arriba entre los modos normal y de aprendizaje.
6.Volumen: Ajusta el volumen de la salidas Principal y Phones (Auriculares).
7.Inicio/Parada: Pulse este botón para iniciar o parar la reproducción o la grabación.
8.Guardar: Pulse este botón para guardar los parámetros actuales de su kit.
9.< / >: Use estos botones de flecha para cambiar el valor del parámetro que se muestra en la pantalla. (Habitualmente, de esta forma se ajustan los valores numéricos, como números de kit o niveles de efectos).
10.Clic: Pulse este botón para activar o desactivar el metrónomo ("clics de guía"). Para más información, consulte la sección Cómo ajustar el metrónomo.
11.Desactivar batería: Cuando este botón está activado, su LED se enciende y la parte de bacteria queda silenciada, de modo que usted oye sólo su interpretación y el acompañamiento (música de fondo). Púlselo nuevamente para oír la parte de batería pregrabada. (Este botón se enciende automáticamente durante la grabación).
12.Grabar: Pulse este botón una vez para preparar el módulo para grabar. Su LED destella. Para comenzar a grabar, pulse Start/Stop (Inicio/Parada) o toque un pad. Cuando se graba, su LED se enciende permanentemente. (Para detener la grabación, pulse otra vez Start/Stop). Para más información, consulte la sección Cómo grabar.
13.Tempo: Pulse este botón para mostrar en la pantalla el tempo actual en BPM (beats por minuto). Use los botones < o > para modificar el tempo.
14.Utilidad: Pulse el botón para acceder a los parámetros avanzados de los pads, como también a los parámetros MIDI del módulo. Para más información, consulte la sección Cómo ajustar los parámetros de la utilidad.
15.Reproducir/Practicar: En modo normal, pulse este botón para oír una interpretación grabada. En modo de aprendizaje, púlselo para comenzar a reproducir el beat, ritmo o patrón. Usted puede tocar con eso como acompañamiento sin ser calificado con puntaje. Mantenga pulsado este botón durante 2 segundos para oír la reproducción de su práctica (se graban automáticamente todas las prácticas). Púlselo nuevamente para detener la reproducción.
16.Botones de selección de pad: Pulse estos botones para realizar una escucha previa de las voces (sonidos de tambor) usadas para cada parte del kit, representadas por los botones. (Después de pulsar el botón Snare (Redoblante) o cualquiera de los botones Tom, puede pulsar el botón Rim (Borde) para oír la voz usada como sonido del borde de ese tambor).
11
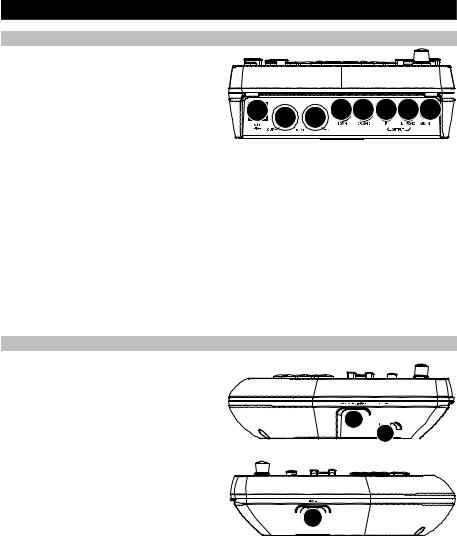
Panel superior
1. |
Salidas: Use cables estándar TRS de 1/4 |
|
|
|
|
pulg. para conectar estas salidas a un |
|
|
|
|
altavoz o sistema de amplificador. El nivel |
|
|
|
|
de estas salidas se controla con la perilla |
|
|
|
|
Volume. |
7 |
5 |
6 4 3 1 1 2 |
2. |
Entrada auxiliar: Use un cable estéreo |
|||
|
estándar de 1/8 pulg. para conectar esta |
|
|
|
|
entrada a un reproductor de audio opcional |
|
|
|
|
(como un reproductor de MP3, reproductor de CD, etc,). Este audio se oye en las salidas Output y |
|||
|
Phones. Durante la grabación el audio proveniente de esta entrada no se graba. |
|||
3.Entrada de tom 4: Use un cable TRS estándar de 1/4 pulg. para conectar esta entrada a un pad de tambor adicional, que disparará el sonido del Tom 4.
4.Entrada de crash 2: Use un cable TRS estándar de 1/4 pulg. para conectar esta entrada a un pad de platillos adicional, que disparará el sonido del Crash 2.
5.Salida MIDI: Use un cable MIDI estándar de cinco pines para conectar esta salida a la Entrada MIDI de un dispositivo MIDI externo.
6.Entrada MIDI: Use un cable MIDI estándar de cinco pines para conectar esta entrada a la Salida MIDI de un dispositivo MIDI externo.
7.USB: Esta conexión le permite enviar información MIDI hacia o desde una computadora. Use un cable USB (que se vende por separado) para conectar el módulo a un puerto USB disponible de su computadora.
Nota: Por la conexión USB sólo se envía información MIDI y no audio.
Paneles laterales
1.Conexión de alimentación: Conecte aquí el adaptador de alimentación incluido (9 V CC, 500 mA, pin central positivo) y luego conecte el adaptador al tomacorriente de pared.
2.Botón de encendido: Pulse este botón para encender el módulo. Manténgalo pulsado durante un segundo y luego suéltelo para apagar el módulo.
3.Auriculares: Conecte un juego de auriculares estéreo de ¼ pulg. a esta salida.
1 
 2
2 


 3
3 


Nota: Para ahorrar energía, el módulo de batería se apaga automáticamente después de 30 minutos de inactividad. Si no necesita esta característica o desea ajustar el tiempo de apagado, haga lo siguiente:
1.Encienda el módulo de batería.
2.Pulse Utility (Utilidad).
3.Use los botones < / > para seleccionar la página de encendido (POW).
4.Use los botones < / > para ajustar el tiempo de apagado (30 minutos, 60 minutos u OFF (Desactivado)).
12
Loading...