


Quick Start Owner’s Manual
Box Contents:
Spitfire Guitar Amplifier
User Manual
Important Safety Instructions
Manual de inicio rápido para el usuario (Spanish)
Contenido de la caja:
Amplificador de guitarra Spitfire
Manual de usuario
Instrucciones de seguridad importantes
Guide d’installation rapide (Français)
Contenue de la boîte :
Amplificateur de guitare Spitfire
Guide de l’utilisateur
Consignes de sécurité importantes
Schnelles Hinweisbuch (Deutsch)
Schachtelinhalt:
Spitfire Gitarrenverstärker
Gebrauchsanleitung
Wichtige Sicherheitshinweise
Manuale rapido di utilizzazione (Italiano)
Contenuto della Confezione:
Amplificatore Chitarra Spitfire
Manuale d’Uso
Importanti Istruzioni di Sicurezza
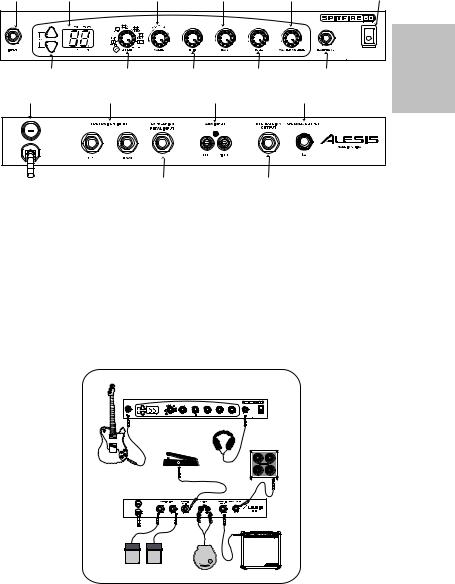
Quick Start Owner's Manual (English)
Input |
Display |
VALUE Knob |
BASS Knob |
MASTER VOLUME Knob |
Power Switch |
|||||
Panel |
|
|
|
|
|
|
|
|
|
Note: |
Front |
|
|
|
|
|
|
|
|
|
|
|
|
|
|
|
|
|
|
|
Spitfire 60 is |
|
|
|
|
|
|
|
|
|
|
pictured. Some |
|
|
|
|
|
|
|
|
|
|
of the front |
|
Program Up/Down |
EFFECT Knob |
DRIVE Knob |
TREBLE Knob |
HEADPHONES Jack |
panel features |
|||||
|
|
|
|
|
|
|
|
|
|
are not found |
Fuse |
FOOTSWITCH UP/DOWN INPUTS |
AUX INPUT |
SPEAKER OUTPUT |
|
on the Spitfire |
|||||
|
15 and 30. |
|||||||||
Rear Panel
 Power Cord
EXPRESSION PEDAL INPUT |
STEREO LINK OUTPUT |
Quick Setup for the Spitfire
1.Make sure all items listed on the front of this guide are in the Spitfire's box.
2.Read the Important Safety Instructions document included with the Spitfire.
3.Study the Hookup Diagram below.
4.Make sure all equipment is turned off and all gain knobs are set to zero.
5.Connect your guitar and other equipment to the Spitfire in the manner illustrated below. Refer to the Features section for details on which cables and equipment to use.
6.Plug in all devices and turn them on.
7.Experiment with the Spitfire's effect combinations. Refer to the Effect Quick Reference on the next page.
8.When finished, turn off the amp before disconnecting any equipment to prevent damage to the speaker.
9.Go to http://www.alesis.com to register the Spitfire.
Spitfire Hookup Diagram
Front Panel
Expression
Pedal
Rear Panel
Amp
CD 

Footswitches Player
Features of the Spitfire
1.Input – plug your guitar into this 1/4" unbalanced input using a TS cable.
2.Program Up/Down Buttons – these change the program number; when pressed together, they put the unit in Bypass and Mute modes and access the tuner.
3.Display – indicates bank and program, shows parameter values and displays pitch in tuner mode.
4.EFFECT Knob – puts the Spitfire in PLAY mode or EDIT mode. You are in EDIT mode when you select a module or parameter with this knob.
5.VALUE Knob – adjusts parameter values, program numbers and master volume; stores changes.
6.DRIVE Knob – gives direct control of the DRIVE parameter found in the effect processor.
7.BASS Knob – adjusts the bass in your signal independently of the EQ effect.
8.TREBLE Knob – adjusts the treble in your signal independently of the EQ.
9.MASTER VOLUME Knob – controls the volume of the signal sent to the speaker, headphones, STEREO LINK OUTPUT and SPEAKER OUTPUT.
10.HEADPHONES Jack – plug in your headphones using a 1/4" stereo plug.
11.Power Switch – turns the Spitfire on and off.
12.Fuse – Replaceable fuse. See the rear panel of the Spitfire for details.
13.Power Cord – Plug this cord into a proper AC outlet. See the rear panel for details.
14.FOOTSWITCH UP/DOWN INPUT – Plug footswitches into these 1/4" jacks. Footswitches serve the same functions as the Program Up and Down buttons.
15.EXPRESSION PEDAL INPUT – Plug an expression pedal into this 1/4" jack for easy control over effect parameters.
16.AUX INPUT – Plug a CD player or other audio device into these RCA jacks and play along!
17.STEREO LINK OUTPUT – Use a 1/4" TS cable to connect this jack to the input of another amplifier for true stereo.
18.SPEAKER OUTPUT – Use a 1/4" TS cable to connect this jack to an external 8-ohm speaker.
Effect Quick Reference
Refer to chapter 10 of the User Manual for more details on effect modules.
1.COMP/LIMIT – provides increasing levels of compression (C1-C9) and limiting (L1-L9).
2.DIST – various types of distortion.
3.DRIVE – controls the drive/gain for the DIST module; expression pedal may be used.
4.EQ – 50 separate values that cover a wide variety of EQ settings. See page 31 of the User Manual for details.
5.NR – noise reduction and hum elimination working together. The left digit of the display shows the level of hum elimination and the right digit shows the level of noise reduction.
6.CAB – settings C1 – C3 simulate 1 x 12", 2 x 12" and 4 x 10" cabinets respectively.
7.FX1 – various mono effects; most have a separate setting for pedal control.
8.PARAM – direct-control parameter for FX1; for most effects, can be set to pedal control independently of the FX1 setting.
9.FX2 – stereo versions of the effects found in FX1, with several additions; these also have settings for pedal control.
10.PARAM – direct-control parameter for FX2; for most effects, can be set to pedal control independently of the FX2 setting.
11.FX3 – various delay-based effects; most have pedal-controlled versions.
12.PARAM – direct-control parameter for FX3; for most effects, can be set to pedal control independently of the FX3 setting.
13.DIGIFX – a couple of digital-sampling effects with pedal-controlled versions.
14.LEVEL – the level of the current program.
15.ROUTE – eight variations of the routing order of all nine effect modules.
Selecting, Editing and Storing Programs
1.In PLAY mode, use the Program Up and Down buttons, footswitches or VALUE knob to select a program.
2.Turn the EFFECT knob to the module or parameter you wish to edit.
3.Turn the VALUE knob to change the value of the module or parameter.
4.To store your changes, press the VALUE knob and then turn the knob to select a store location. Press the VALUE knob again to store the program.
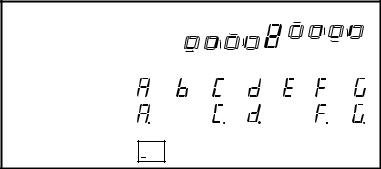
Using the Tuner
1.In PLAY mode, activate the tuner by pressing the Program Up and Down buttons or both footswitches at the same time to enter Bypass mode, or hold them down for more than half a second to enter Mute mode.
2.Play the open string you wish to tune. Use the following guide when tuning:
Visual Guide to Tuning
The bottom four segments |
Low |
In tune |
High |
|
rotate counterclockwise if pitch |
||||
|
|
|
||
is low. The top four rotate |
|
|
|
|
clockwise if pitch is high. An 8 |
|
|
|
|
means pitch is in tune. |
|
|
|
The twelve possible pitches (a decimal point indicates a sharp):
= no pitch detected

Manual de inicio rápido para el usuario (Spanish)
Input |
Display |
VALUE Knob |
BASS Knob |
MASTER VOLUME Knob |
Power Switch |
|||||
Panel |
|
|
|
|
|
|
|
|
|
Nota: |
Front |
|
|
|
|
|
|
|
|
|
|
|
|
|
|
|
|
|
|
|
Spitfire 60 se |
|
|
|
|
|
|
|
|
|
|
encuentra |
|
|
|
|
|
|
|
|
|
|
ilustrado en |
|
Program Up/Down |
EFFECT Knob |
DRIVE Knob |
TREBLE Knob |
HEADPHONES Jack |
este manual. |
|||||
|
|
|
|
|
|
|
|
|
|
Algunas de las |
Fuse |
FOOTSWITCH UP/DOWN INPUTS |
AUX INPUT |
SPEAKER OUTPUT |
|
características |
|||||
|
del panel |
|||||||||
Panel |
|
|
|
|
|
|
|
|
|
frontal no se |
|
|
|
|
|
|
|
|
|
encuentran en |
|
|
|
|
|
|
|
|
|
|
los Spitfire 15 |
|
|
|
|
|
|
|
|
|
|
y 30. |
|
Rear |
|
|
|
|
|
|
|
|
|
|
|
|
|
|
|
|
|
|
|
|
|
 Power Cord
EXPRESSION PEDAL INPUT |
STEREO LINK OUTPUT |
Instalación rápida del Spitfire
1.Asegúrese de que todos los artículos incluidos al inicio de este manual están incluidos en la caja del Spitfire.
2.Lea las instrucciones importantes de seguridad incluidas en el Spitfire.
3.Estudie el Diagrama de conexión que aparece más abajo.
4.Asegúrese de que todos los equipos están apagados y de que todos los controles de ganancia están en posición “cero”.
5.Conecte su guitarra y el resto del equipo al Spitfire de la manera siguiente. Consulte la sección de Características para detalles sobre los cables y equipos que debe utilizar.
6.Enchufe todos los dispositivos y enciéndalos.
7.Experimente con las combinaciones de efectos del Spitfire. Consulte la Referencia rápida de efectos en la página siguiente.
8.Cuando termine, apague el amplificador antes de desconectar cualquier equipo para evitar daños al bafle.
9.Visite http://www.alesis.com para registrar el Spitfire.
Diagrama de conexión de Spitfire
Panel frontal |
|
Pedal de |
Caja acústica |
expresión |
Panel trasero
Amp
CD
Footswitches Player
 Loading...