


User Guide
English ( 3 – 5 )
Guía del usuario
Español ( 6 – 8 )
Guide d'utilisation
Français ( 9 – 11 )
Guida per l'uso
Italiano ( 12 – 14 )
Benutzerhandbuch
Deutsch ( 15 – 17 )
Appendix
English ( 18 )
User Guide (English)
Box Contents
•iO Dock II
•Power adapter
•Adapter for iPad 2, iPad (3rd generation), and iPad (4th generation)
•Apple 30-Pin Connector
•Apple LightningTM Connector
•User Guide
•Safety & Warranty Manual
Support
For the latest information about this product (system requirements, compatibility information, accessories, etc.) and product registration, visit alesis.com/io-dock-II.
iO Dock II is compatible with the following devices (not included):
•iPad (4th generation)
•iPad (3rd generation)
•iPad 2
•iPad
For additional product support, visit alesis.com/support.
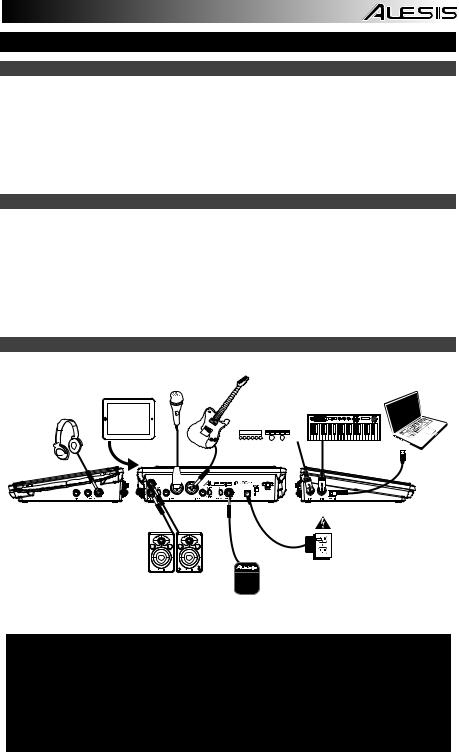
Connection Diagram
|
GUITAR* |
|
MICROPHONE* |
|
iPad* |
|
EXTERNAL |
HEADPHONES* |
SOUND |
|
MODULE* |
SPEAKERS*
FOOTSWITCH*
COMPUTER*
MIDI
KEYBOARD*
POWER
* not included
•WARNING: Only put on your headphones or turn on your speakers AFTER turning on the iO Dock II.
•When recording a guitar or bass with an active pickup, set the iO Dock II's GUITAR / MIC/LINE SWITCH to "MIC/LINE." If your instrument uses a passive pickup, set the switch to "GUITAR."
•To reduce electrical hum at high gain settings, keep the iO Dock II's power supply away from your guitar cable and the iO Dock II's channel inputs.
•You can upgrade iO Dock II's firmware yourself. Visit alesis.com/io-dock-ii and click on "Docs and Downloads" to see if there are any available firmware updates.
3
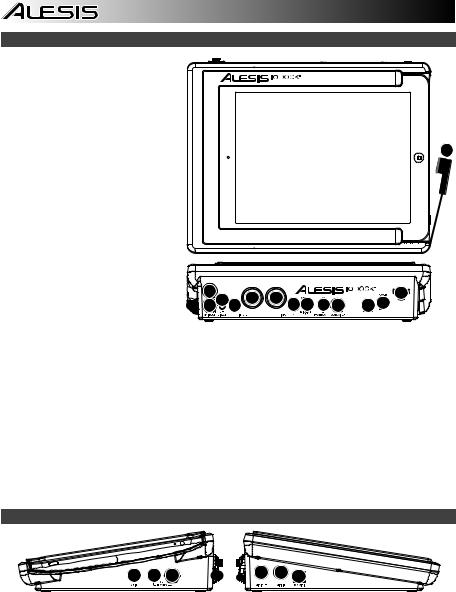
Top & Rear Panel Features
1. DOCK – Connect your iPad here with the appropriate 30-pin or Lightning™ connector for your iPad.
2. |
DC INPUT – Connect the included |
|
|
power adapter (12V DC, 2A, |
|
|
center-positive) here, then connect |
|
|
the adapter to wall power. |
1 |
3. |
POWER SWITCH – Turns the iO |
Dock II on and off.
4.CABLE RESTRAINT – To prevent accidentally unplugging, wrap the power adapter cable around this restraint.
5. MAIN OUT – Use standard 1/4" TRS cables to connect these outputs to a speaker or amplifier system. The level of these outputs is controlled by the MAIN knob.
6. DIRECT MONITORING SWITCH – |
5 |
|
|
|
4 |
Set this switch to "ON" to listen |
6 10 |
7 8 10 9 11 12 |
2 3 |
||
directly to your input sources |
5 |
|
|||
without any processing from the |
|
|
|
|
|
iPad. |
|
|
|
|
|
7.MIC/LINE INPUT – Connect a microphone or line-level device to this input with an XLR or 1/4" TRS cable.
8.GUITAR / MIC/LINE INPUT – Connect a microphone, line-level device or guitar to this input with an XLR or 1/4" TRS cable.
9.GUITAR / MIC/LINE SWITCH – When this switch is in the "GUITAR" position, the channel will serve as a high-impedance input for connecting guitar or bass instruments. When the switch is in the "MIC/LINE" position, the channel will accept mic or line-level signals.
10.GAIN – Adjusts the input's gain level.
11.PHANTOM POWER SWITCH – This switch activates and deactivates phantom power. When activated, phantom power supplies +48V to both XLR mic inputs. Please note that most dynamic microphones do not require phantom power, while most condenser microphones do. Consult your microphone's documentation to find out whether it needs phantom power.
12.FOOTSWITCH – Use a standard 1/4" TS or 1/4" TRS dual-button footswitch to send CC Toggle messages to the iPad. See the Footswitch section of this manual for more details.
Side Panel Features
1 |
2 |
3 |
4 |
5 |
6 |
1.MAIN VOLUME – Adjusts the output volume of the MAIN OUT.
2.PHONES VOLUME – Adjusts the output volume of the PHONES output.
3.PHONES – Connect a set of 1/4" TRS headphones to this output.
4.MIDI OUT – Use a standard five-pin MIDI cable to connect this output to the MIDI input of an external MIDI device.
5.MIDI IN – Use a standard five-pin MIDI cable to connect this input to the MIDI output of an external MIDI device.
6.USB MIDI – This connection will allow you to send MIDI information to/from a computer. Use a USB cable to connect the iO Dock II to a computer. iO Dock II requires a USB 1.1 or higher (e.g. USB 2.0) connection. (Note: Audio will not pass over this connection.)
4

Footswitch
Connect a singleor dual-button footswitch to iO Dock II to send CC Toggle messages that can be assigned in your software. (Refer to your software's manual for more information on assigning these CC messages.)
Single-Button Footswitch:
If you are using a single-button footswitch, pressing the footswitch for the first time sends a data value of 127 for CC
#14 over Channel 1. Pressing the footswitch for the second time sends a data value of 0 for CC #14 over Channel 1.
Dual-Button Footswitch:
If you are using the first button of a dual-button footswitch, pressing the first button for the first time sends a value of 127 for CC #15 over Channel 1. Pressing the first button for the second time sends a value of 0 for CC #15 over Channel 1.
If you are using the second button of a dual-button footswitch, pressing the second button for the first time sends a value of 127 for CC #14 over Channel 1. Pressing the second button for the second time sends a value of 0 for CC
#14 over Channel 1.
5

Guía del usuario (Español)
Contenido de la caja
•iO Dock II
•Adaptador de alimentación
•Adaptador de iPad 2, iPad (3a generación), y iPad (4ta generación)
•Conector Apple de 30 pines
•Connector Apple LightningTM
•Guía del usuario
•Manual sobre la seguridad y garantía
Soporte
Para obtener la información más completa acerca de este product (los requisitos del sistema, compatibilidad, accesorios, etc) y registro del producto, visite alesis.com/io-dock-ii.
iO Dock II es compatible con los siguientes dispositivos (no incluidos):
•iPad (4ta generación)
•iPad (3ra generación)
•iPad 2
•iPad
Para soporte adicional del producto, visite alesis.com/support.
Diagrama de conexión
GUITARRA*
MICROFÓNO*
|
iPad* |
|
AURICULARES* |
MÓDULO MIDI |
|
EXTERNO* |
||
|
COMPUTADORA*
TECLADO
MIDI*
SUMINISTRO
ELÉCTRICO
ALTAVOCES*
INTERRUPTOR DE
PEDAL*
* Se vende por separado
•ADVERTENCIA: Colóquese los auriculares o encienda los altavoces sólo DESPUÉS de encender el iO Dock II.
•Cuando grabe una guitarra o bajo con captor activo, ajuste el CONMUTADOR GUITARRA / MICROFÓNO/LÍNEA de iO Dock II a "MIC/LINE". Si su instrumento usa un captor pasivo, ajuste el conmutador a "GUITAR".
•Para reducir el zumbido eléctrico cuando se usan ajustes altos de ganancia, mantenga la fuente de alimentación de iO Dock II alejada del cable de su guitarra y de las entradas de los canales del equipo.
•Puede actualizar el firmware de iO Dock II usted mismo. Visite alesis.com/io-dock-ii y haga clic en "Docs and Downloads" (Documentos y descargas) para ver si hay alguna actualización de firmware disponible.
6
 Loading...