

Electronic Drum Kit
Quick Start Owner’s Manual
1
2 3
Stand Assembly Instructions
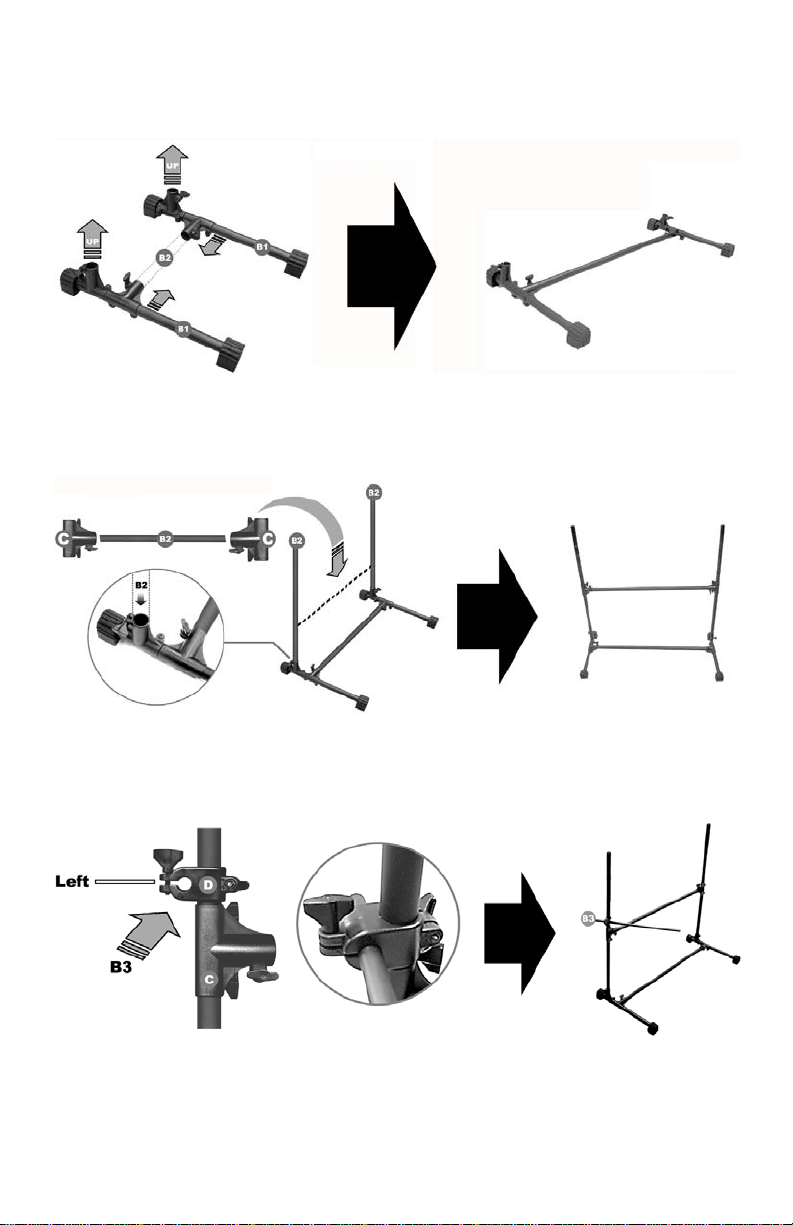
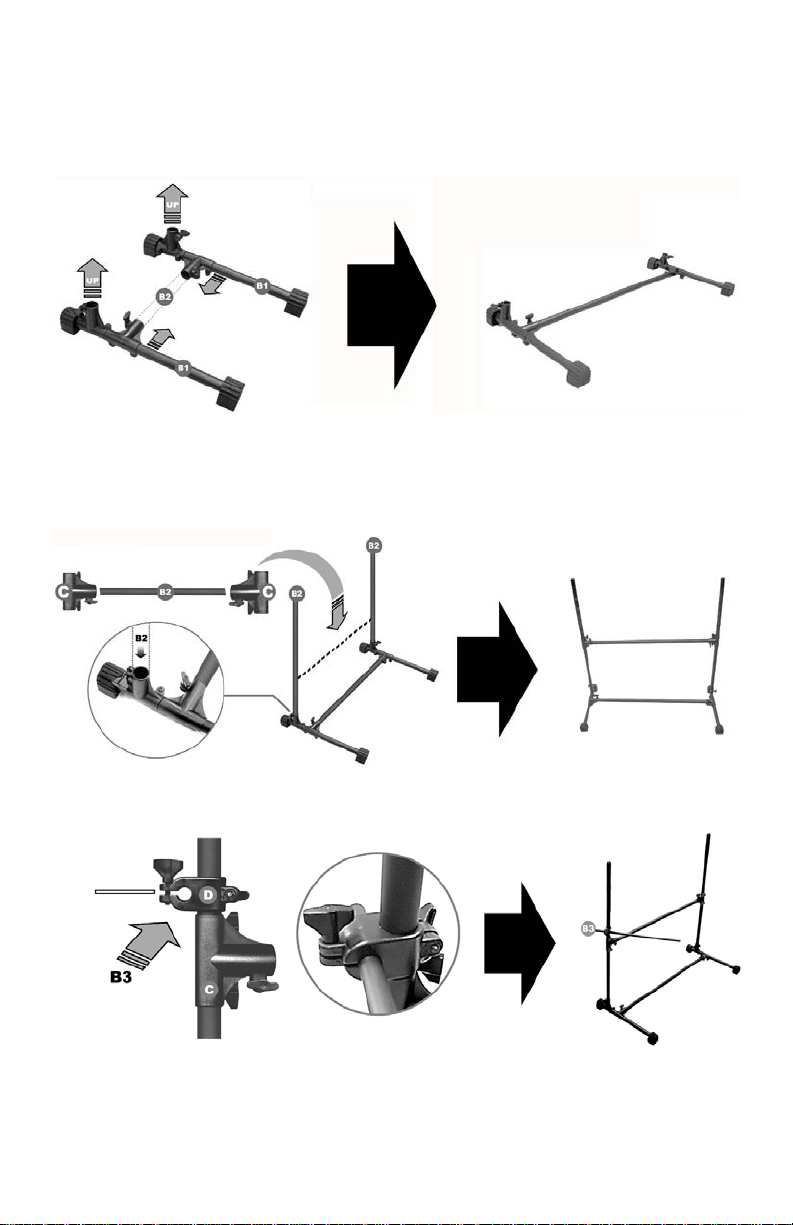
1. Install rubber feet (A1) to the end of each stand base bar (B1). The flat part of the rubber faces the
floor. Install one horizontal bar (B2) to the preinstalled horizontal clamp (C) as shown in the
picture.
2. Insert two vertical bars (B2) to the remaining slots facing up as shown. Insert two clamps (C) to
the ends of one horizontal bar (B2). Slide on the two vertical bars as shown.
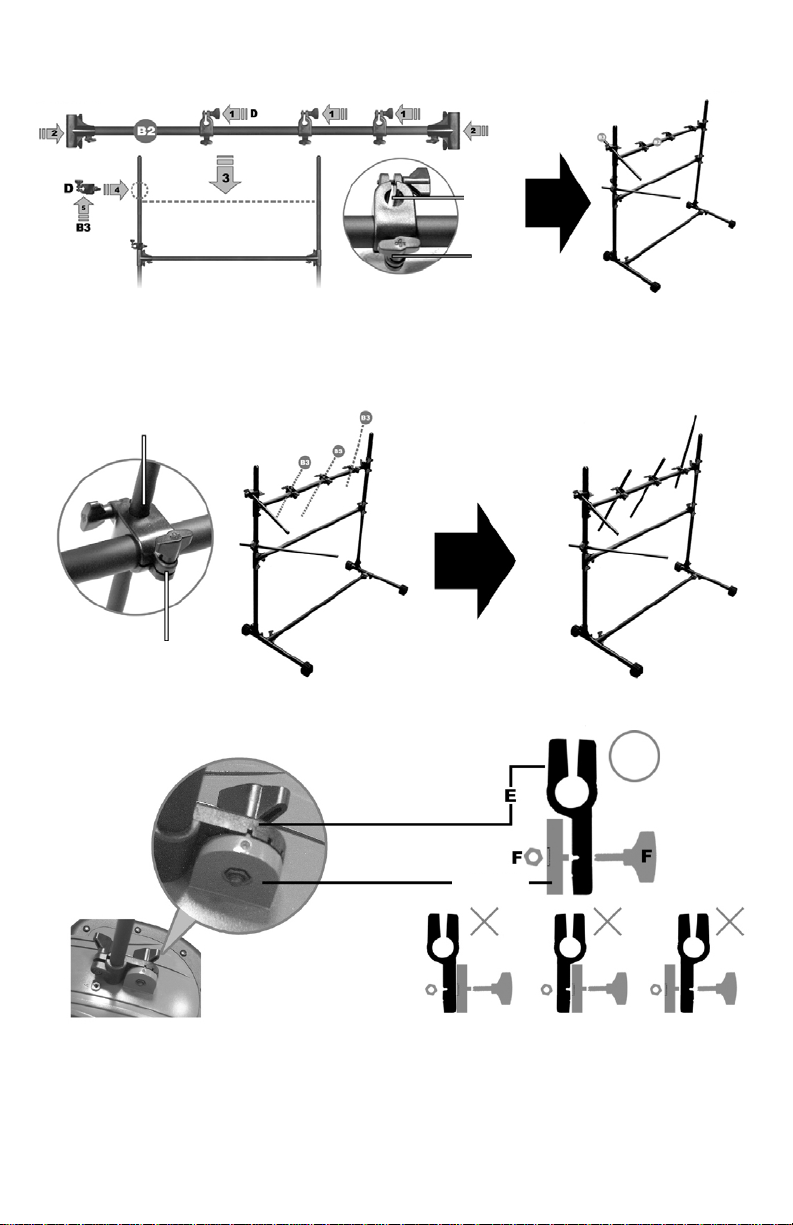
3. Slide one clamp (D) down the left hand vertical bar which will be used for snare-drum pad. Slide
one small bar (B3) into the clamp (D) as shown in the figure.
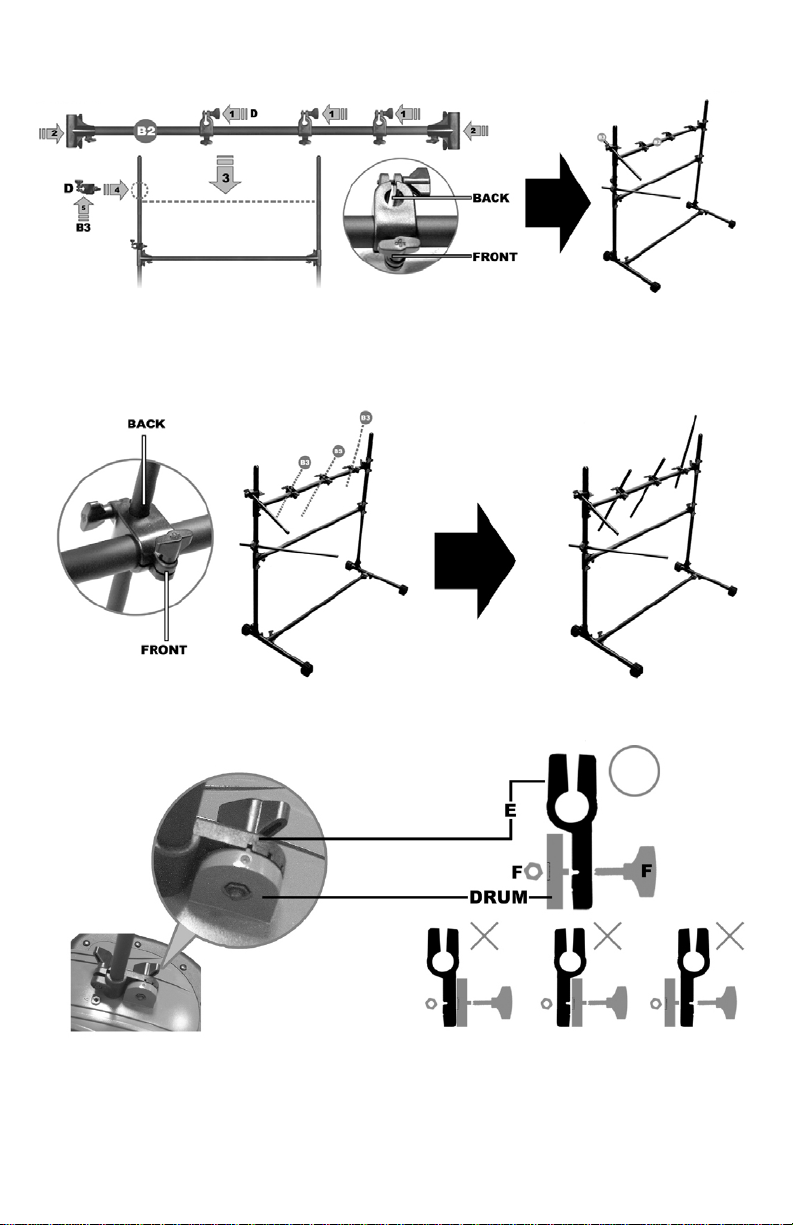
4. Insert three clamps (D) on to a horizontal bar (B2) and put two horizontal clamps (C) on the end.
Slide the assembly onto the two vertical bars as shown. Now slide another clamp (D) down the left
hand vertical bar which is going to be used for the Hi-Hat. Then slide one small bar (B3) into the
clamp (D) as shown.
5. Insert three small bars (B3) in the remaining clamps (C) on the top horizontal bar.
6. Attach five part (A3) to each of the five drum pads. Attach the bolt and nut (F) as shown.
4
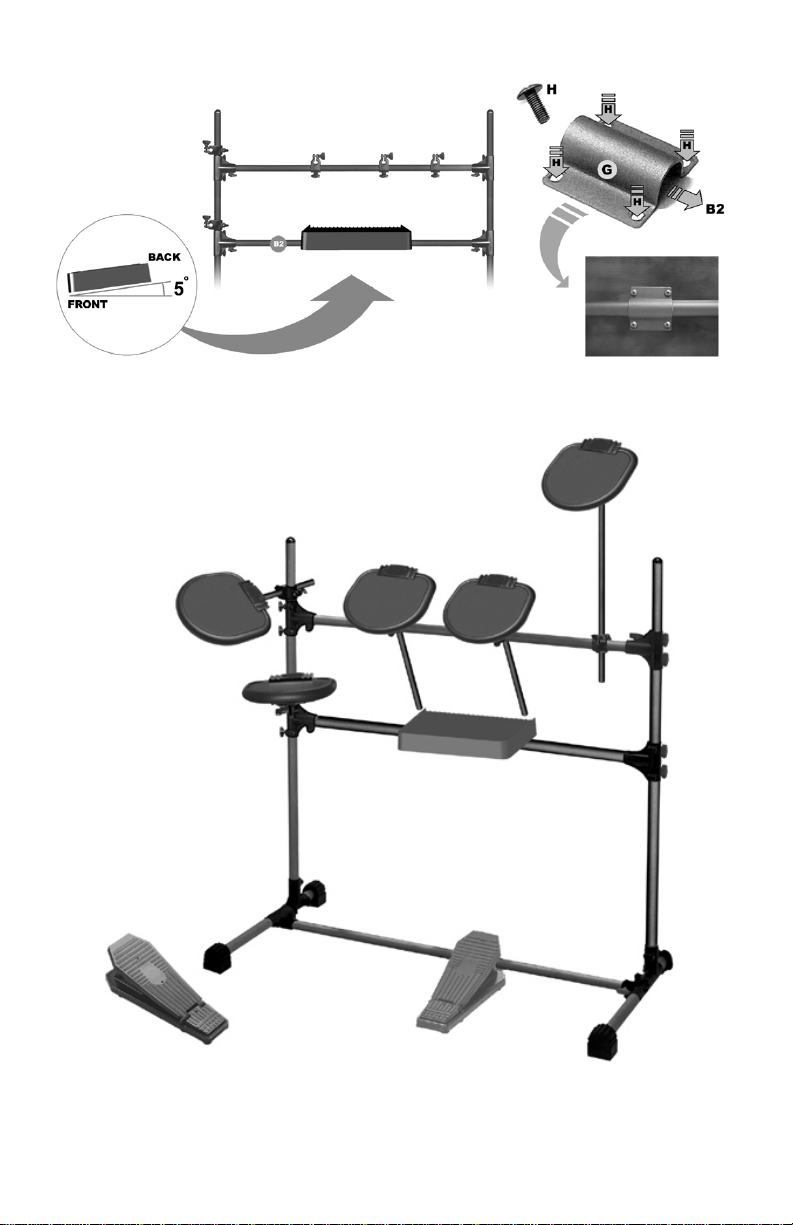
7. Attache the mounting bracket (G) to the back of the iET01 Trigger Box as shown in the figure.
Attach to lower horizontal bar as shown in figure and angle accordingly. The iDM01 Drum Machine
will rest on top of this.
8. This is how the finished assembly will look.
9. Attach the iDM01 Drum Machine on top of the iET01 Trigger Box using the velcro strips.
5
Quick Setup Guide
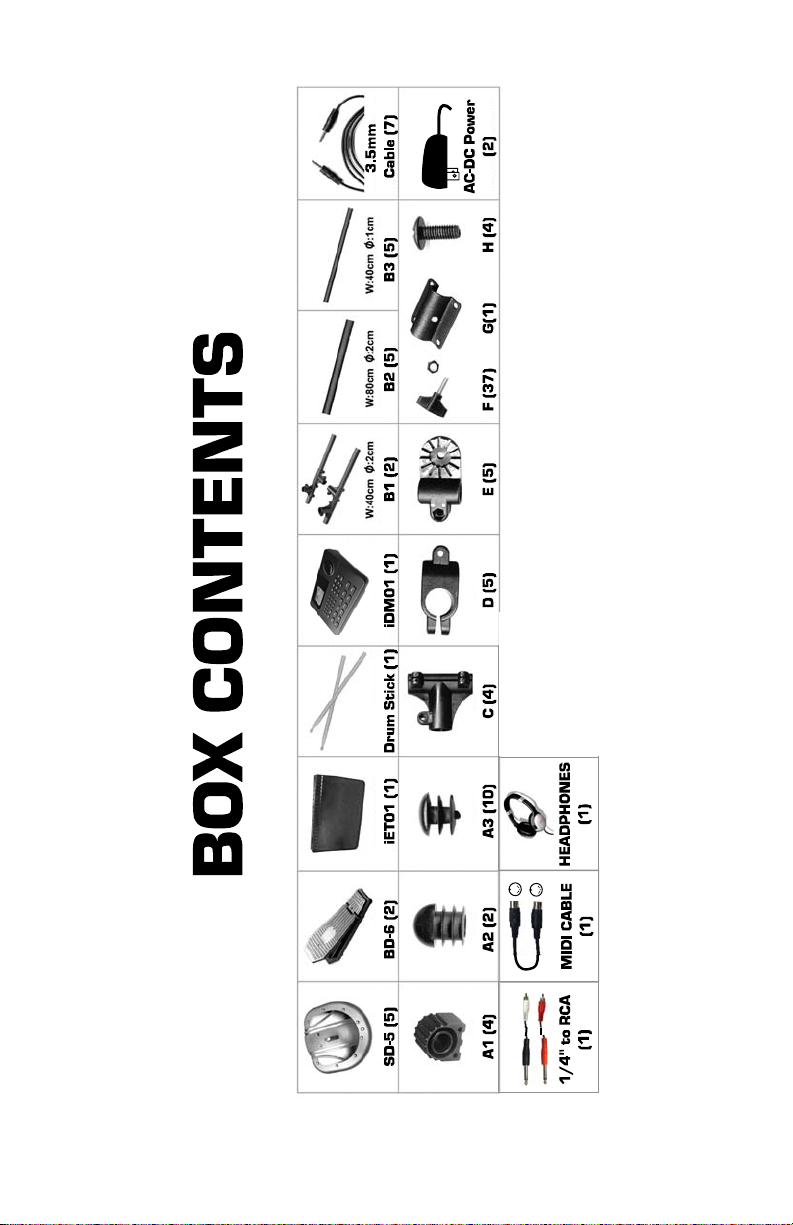
1. Make sure all items listed on the front of this guide are included in the box.
2. READ SAFETY INSTRUCTION BOOKLET BEFORE USING THE PRODUCT
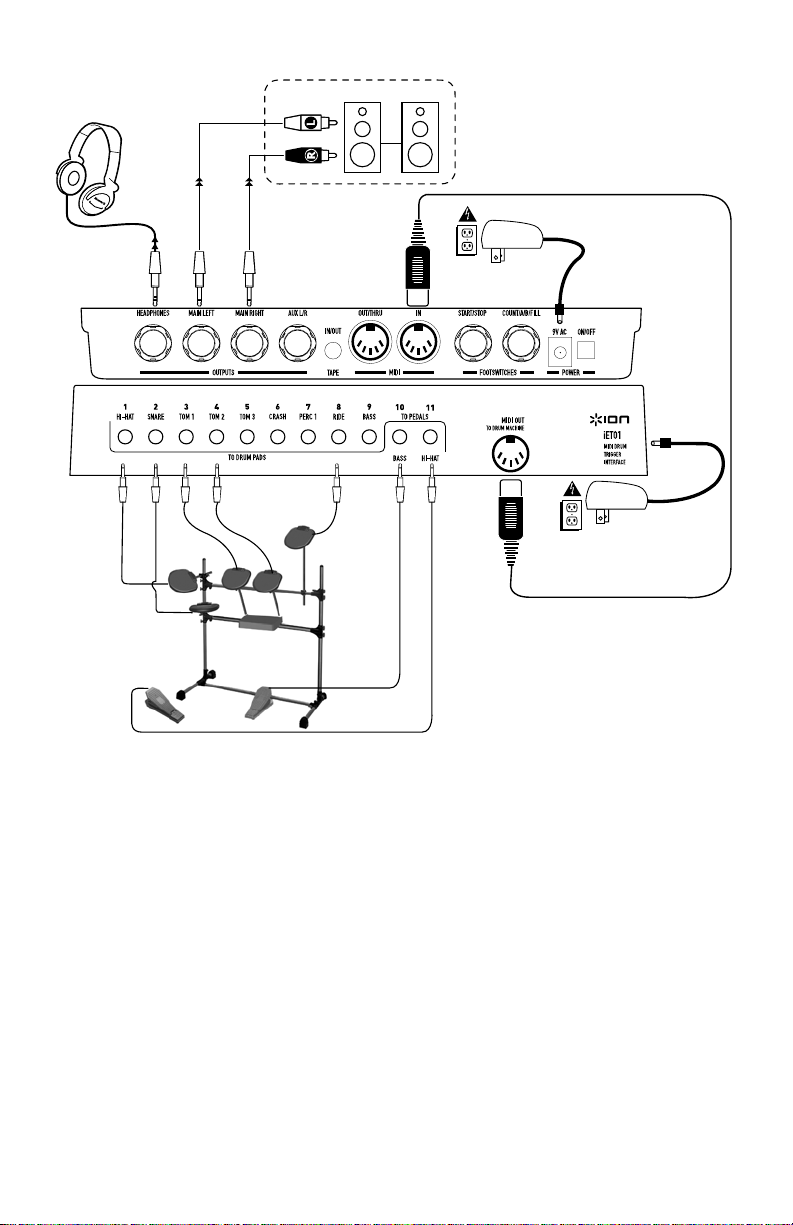
3. Study this setup diagram.
4. Place drum set in an appropriate position for operation.
5. Make sure all speaker devices are turned off and all volume/faders are at “zero.”
6. Connect all input sources as indicated in the diagram.
7. Connect the outputs to headphones, and/ or powered amplifier stereo system.
8. Plug in both power adapters and other devices into AC power.
9. Switch everything on in the following order.
10. When turning off, always reverse this operation by,
NOTE: Speakers are NOT included. As shown in the above figure, the supplied RCA cable is used to
connect to an external amplifier, mixer, or a home stereo systems.
a. iET01 Drum Trigger Box.
b. iDM01 Drum Machine.
c. Any external speakers.
a. Any external speakers.
b. iDM01 Drum Machine.
c. iET01 Drum Trigger Box.
6
Getting St arted
This section will cover how to begin using your electronic drum kit. Be sure that your electronic drum kit
setup matches the diagram shown in the Quick Setup Guide as previously shown.
• Be sure that both the iET01 Trigger Box and the iDM01 Drum Machine are both powered on.
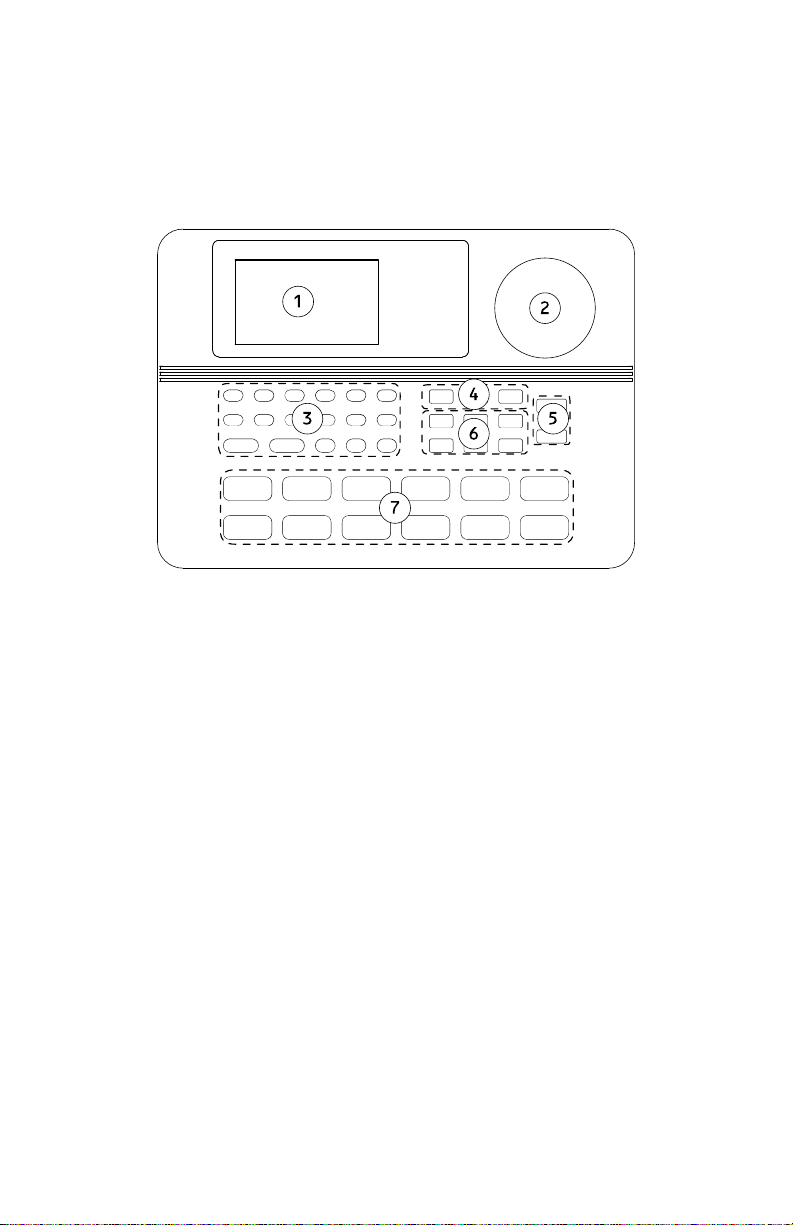
I. While the unit is powered on, turn the volume up on the headphones half way. The volume
control is (2) on the diagram.
II. Striking the electronic dr um pads with the included sticks should produce sounds in the
headphones.
III. To change the drum kit:
IV. To play along to preset patterns:
V. To record a drum pattern:
VI. To reset the unit, erasing all stored values to return to the default modes, hold down
a. Press “DRUM SET” in section (6) as shown on the diagram.
b. The display (1) will show the current drumset number.
c. To change the sounds, press the up and down arrows in section (3).
a. Press the “STOP” button in section (3) on the diagram.
b. Press the button labeled “PRESET/USER” listed in section (4). The display
will then show the current preset (‘Rock 1’ by default).
c. Use the up and down arrows in section (3) to shuffle through the 50
different patters.
d. Press “PLAY” in section (3) to hear the preset pattern.
e. Tempo can be adjusted by the tempo up and down buttons in section (5)
shown on the above diagram.
f. You can play along with the preset samples on the drum kit. To add a fill
press the “FILL” button in section (3) while the sample is playing.
a. Press the “PERFORM/COMPOSE” button in section (4) of the diagram untili
the display says “COMPOSE”.
b. Press “PLAY” to start recording. You will hear a click sound correspo nding to
the tempo of the current pattern. The recording will continually loop through
the pattern so that you may add drum parts one at a time.
c. You can enter drum beats by pressing the drum buttons in section (7) or by
hitting the drum pads with the sticks.
d. Press “STOP” to stop the recording.
“ERASE” and “PLAY” while powering the unit on.
7

Kit de Batería Electrónica
Manual de inicio rápido del usuario
8

ALIMENTACION
BAQUETAS
AURICULARES
CONTENIDO DE LA CAJA
CABLE MIDI
9
Instrucciones del ensamblaje del
soporte
1. Instale las patas de goma (A1) al extremo de cada barra (B1) de la base del soporte. La parte plana
de la goma va hacia el piso. Instale una barra horizontal (B2) en la abrazadera de fijación
horizontal (C) preinstalada como se muestra en la foto.
2. Inserte dos barras verticales (B2) en las ranuras restantes hacia arriba, como se muestra en la
figura. Introduzca dos abrazaderas de fijación (C) en los extremos de una barra horizontal (B2).
Deslice las dos barras verticales como se muestra en la figura.
IZQUIERDA
3. Deslice una abrazadera de fijación (D) a lo largo de la barra vertical izquierda que será usada para
el pad de la batería de snare. Deslice una barra pequeña (B3) en la abrazadera de fijación (D) como
se muestra en la figura.
10
ATRAS
ADELANTE
4. Inserte tres abrazaderas de fijación (D) en una barra horizontal (B2) y coloque dos abrazaderas
horizontales (C) en el extremo. Deslice las dos barras verticales como se muestra en la figura.
Ahora deslice otra abrazadera de fijación (D) hacia debajo de la barra vertical izquierda que será
usada para el Hi-Hat. Luego, deslice una barra pequeña (B3) en la abrazadera de fijación (D) como
se muestra en la figura.
ATRAS
ADELANTE
5. Inserte las tres barras pequeñas (B3) en las abrazaderas de fijación (C) restantes en la barra
horizontal superior.
BATERIA
6. Fije las cinco partes (A3) a cada uno de los cinco pads de la batería. Fije el perno y la tuerca (F)
como se muestra.
11

ADELANTE
ATRAS
7. Fije la mediacaña de montaje (G) a la parte posterior de la caja de disparo del iET01 como se
muestra en la figura. Fíjela a la barra horizontal inferior como se muestra en la figura e inclínela
adecuadamente. La máquina de ritmos iDM 01 se colocará sobre esto.
8. Ésta es la manera en que se verá el ensambl aj e terminado.
9. Fije la máquina de ritmos iDM01 en la parte superior de la caja de disparo iET01 usando los broches
de velcro.
12

Guía de instalación rápida
1. Asegúrese de que todos los elementos incluidos al inicio d e este manual estén en la caja.
2. LEA EL FOLLETO DE INSTRUCCIONES DE SEGURIDAD ANTES DE UTILIZAR EL PRODUCTO.
3. Estudie este diagrama de instalación.
4. Coloque la batería en una posición adecuada para su funcionamiento.
5. Asegúrese de que todos los dispositivos están apagados y de que todos los faders y controles de
volumen estén en la posición «c ero».
6. Conecte todas las fuentes de entrada como se indica en el diagrama.
7. Conecte las salidas a los auriculares y/o al sistema estéreo de amplificador alimentado.
8. Enchufe los adaptadores de potencia y otros dispositivos a la alimentación de corriente alterna.
9. Encienda todo en el siguiente orden:
10. Al apagar, realice siempre esta operación en sent ido inverso:
NOTA: NO se incluyen los altavoces. Como se muestra en la figura de arriba, el cable RCA incluido se usa
para conectar a un amplificador externo, mezclador o a sistemas estéreo.
d. Caja de disparo de batería iET01.
e. Máquina de ritmos iDM01.
f. Los altavoces externos.
g. Los altavoces externos.
h. Máquina de ritmos iDM01.
i. Caja de disparo de batería iET01.
13

Para Comenzar
Esta sección explica la manera a comenzar a usar su kit de batería electrónica. Asegúrese de que la
instalación de su kit de batería electrónica concuerda con el diagrama que se muestra en la Guía de
instalación rápida, que se mostró anteriormente.
• Asegúrese de que tanto la caja de disparo iET01 como la máquina de ritmos iDM01 es tén
encendidas.
I. Mientras está encendida la unidad, aumente el volumen de los auriculares hasta la mitad.
El control del volumen es (2) en el diagrama.
II. Al tocar los pads de la batería electrónica con las baquetas incluidas se deben producir
sonidos en los auriculares.
III. Para cambiar la batería:
IV. Para tocar con los patrones predeterminados :
V. Para grabar un patrón de batería:
VI. Para resetear la unidad y borrar todos los valores almacenados a fin de volver a los modos
a. Presione “DRUM SET” (conjunto de batería) en la sección (6) como se
muestra en el diagrama.
b. El visualizador (1) mostrará el número actual del conjunto de batería.
c. Para cambiar los sonidos, presione las flechas de arriba y abajo en la sección
(3).
d. Presione el botón “STOP” (parar) en la sección (3) en del diagrama.
e. Presione el botón “PRESET/USER” (usuario/predeterminado) indicado en la
sección (4). El visualizador mostrará entonces el valor predeterminado
actual (“Rock 1” es el predeterminado).
f. Use las flechas de arriba y abajo en la sección (3) para visualizar los 50
patrones diferentes.
g. Presione “PLAY” en la sección (3) para escuchar el patrón predeterminado.
h. Se puede ajustar el tempo con los botones de arriba/abajo de tempo de la
sección (5) que se muestra en el diagrama de arriba.
i. Puede tocar con las muestras predeterminadas en el kit de la batería. Para
añadir un llenado presione el botón “FILL” en la secci ón (3) mientras la
muestra se está reproduciendo.
j. Presione el botón “PERFORM/COMPOSE” (tocar/componer) de la sección (4)
del diagrama hasta que el visualizador indique “COMPOSE”.
k. Presione PLAY para comenzar a grabar. Escuchará un “clic” que le
corresponde al tempo del patrón actual. La grabación se reproducirá de
manera continua a lo largo del patrón para que pueda añadir partes de
batería una por una.
l. Puede entrar ritmos de batería presionando los botones de la batería en la
sección (7) o golpeando los pads de la batería con las baquetas.
m. Presione “STOP” para parar la grabación.
predeterminados, mantenga presion ados “ERASE” (borrar) y “PLAY” mientras enciende la
unidad.
14

Ensemble de batterie
électronique
Guide d’utilisation simplifié
15

BAGUETTE
CA/AC
ALIMENTATION
ECOUTE
CASQUE D’
CONTENU DE LA BOÎTE
CABLE MIDI
16

Guide d’assemblage pour support
1. Fixez les pieds en caoutchouc (A1) sur l’extrémité des barres (B1) à la base du support. Le côté plat
du pied en caoutchouc face au plancher. Fixez une barre horizontale (B2) dans la fixation
horizontale préinstallée (C), tel qu’illustré.
2. Insérez deux barres verticales (B2) dans l’emplacement prévu sur l es fixations, tel qu’indiqué.
Insérez deux bagues à angle droit (C) aux extrémités d’une barre horizontale (B2). Insérez et faites
glisser les bagues sur les deux barres verticales, tel qu’illustré.
GAUCHE
3. Faites glisser une bague de fixation (D) le long de la barre verticale gauche qui servira pour le pad
de la caisse claire. Faites glisser une petite barre (B3) dans la bague (D), tel qu'illustré.
17

ARRIERE
AVANT
4. Insérez trois bagues de fixation (D) sur une barre horizontale (B2) et fixez deux bagues à angle
droit (C) aux extrémités. Faites glisser l'assemblage sur les deux barres verticales, tel qu’illustré.
Faites glisser ensuite une autre bague de fixation (D) le long de la barre verticale gauche qui servira
pour le pad de charleston. Faites glisser ensuite une petite barre (B3) dans la bague de fixation (D),
tel qu'illustré.
ARRIERE
AVANT
5. Insérez trois petites barres (B3) dans les bagues de fixation restantes (C) de la barre horizontale
supérieure.
PAD
6. Fixez une bague à cinq élément s (A3) à chacun des cinq pads. Fixez l'écrou et le verrou (F) tel
qu’indiqué.
18

AVANT
ARRIERE
7. Fixez le support de montage (G) à l’arrière du module de déclenchement (Trigger Box) iET01 tel
qu’illustré. Fixez à la barre horizontale inférieure et formez un angle de 5° tel qu’indiqué dans
l’illustration. La boîte à rythmes iDM01 doit reposer sur ce module.
8. Voici à quoi ressemble le support une fois assemblé.
9. Fixez la boîte à rythmes iDM01 sur le module de déclenchement (Trigger Box) iET01 à l ’ aide des
bandes velcro.
19

Guide d'installation rapide
1. Assurez-vous que tous les articles énumérés sur la page couverture de ce guide sont inclus dans la
boîte.
2. VEUILLEZ LIRE LE LIVRET DES CONSIGNES DE SÉCURITÉ AVANT D'UTILISER LE PRODUIT.
3. Examinez bien le schéma d'installation.
4. Placez l’ensemble de batterie en position de fonctionnement.
5. Assurez-vous que tous les haut-parleurs sont hors tension et que le volume et tous les atténuateurs
sont réglés à « zéro ».
6. Branchez toutes les sources tel qu'indiqué sur le schéma.
7. Reliez les sorties aux casque d'écoute et/ou au système d’amplificateurs de puissance stéréo.
8. Branchez les deux adaptateurs de courant et les autres appareils dans une prise d’alimentation CA.
9. Mettre tous les appareils sous tension dans l'ordre suivant.
10. Pour mettre hors tension, toujours inverser l'opération :
NOTE : Les haut-parleurs NE SONT PAS inclus. Tel qu’illustré dans le schéma ci-dessus, le câble RCA
fourni est utilisé pour brancher u n amplificateur externe, une console de mixage ou un système stéréo.
j. Module de déclenchement (Trigger Box) iET01.
k. Boîte à rythme iDM01.
l. Tous haut-parleurs externes.
m. Tous haut-parleurs externes.
n. Boîte à rythme iDM01.
o. Module de déclenchement (Trigger Box) iET01.
20

Guide de démarrage
Cette section couvre la mise en marche de votre batterie électronique. Veuillez vous assurer que
l’installation de votre ensemble de batterie électronique ressemble à celle du schéma du Guide d'utilisation
simplifié. Veillez à ce que le module de déclenchement (Trigger box) iDM01 et la boîte à rythmes iET01
sont sous tension.
I. Avec l'appareil sous tension, augmenter le volume de moitié. Le réglage du volume est
représenté par (2) sur le schéma.
II. Frapper sur les pads de la batterie électronique à l'aide des baguettes devrait produire des
sons que vous pouvez entendre avec le casque d’écoute.
III. Pour modifier l'ensemble des sons de percussion (drum kit) :
IV. Pour jouer avec des programmes :
V. Pour sauvegarder un rythme de batterie :
VI. Pour réinitialiser l’appareil, effaçant toutes les paramètres sauvegardés pour retourner aux
n. Appuyer sur la touche DRUM SET (6) tel qu'indiqué sur le schéma.
o. Le numéro du rythme de batterie en cour apparaît à l’écran (1).
p. Utiliser les flèches de sélection (3) pour modifier les sons.
q. Appuyer sur la touche d'arrêt (STOP) dans la section (3) tel qu’indiqué sur le
schéma.
r. Appuyer sur la touche de préréglage/utilisateur (PRESET/USER) située dans
la section (4) du schéma.Le préréglage en cour devrait apparaître à l’écran
(Rock 1 par défaut).
s. Utiliser les flèches de sélection dans la section (3) pour faire défiler les 50
programmes différents.
t. Appuyer sur la touche de mise en marche (PLAY) dans la section (3) pour
entendre les programmes :
u. Le tempo peut être réglé à l’aide des touches de sélection dans la section (5)
tel qu’indiqué dans le schéma ci-dessus.
v. Il est possible de jouer sur des échantillons de programme. Appuyer sur la
touche de rythme de fond (FILL) située dans la section (3) pour ajouter un
rythme de fond à un échantillon de programme.
w. Appuyer sur la touche de lecture/composition (PERFORM/COMPOSE) dans la
section (4) tel qu’indiqué sur le schéma jusqu’à ce que le mot «COMPOSE»
soit affiché.
x. Appuyez sur la touche de lecture (PLAY) pour lancer l’enregistrement. Vous
entendrez un clic correspondant au tempo du programme en cours.
L'enregistrement bouclera continuellement durant le programme afin de
permettre l’ajout de rythmes de batterie, une partie à la fois.
y. Pour ajouter des rythmes de batterie, appuyer sur les touches de batterie
dans la section (7) ou frapper sur les pads de la batterie électronique à l'aide
des baguettes.
z. Appuyez sur la touche d'arrêt (STOP) pour arrêter l’enregistrement.
réglages d'usine, enfoncer les touches d'effacement (ERASE) et de lecture (PLAY) lors de la
mise en marche de l’appareil.
21

Elektronisches Trommelset
Schnellaufbauanleitung
22

R
GLEICHSTROM
TROMMEL
SCHLAGEL
PACKUNGSINHALT
KOPFHORE
MIDI-KABEL
23

Zusammenbau des Ständers
1. Befestigen Sie die Gummifüße (A1) an den Enden jeder Basisstange (B1), mit dem flachen Teil des
Fußes zum Boden hin. Befestigen Sie d ie Querstange (B2) an der bereits installierten horizontalen
Klemme (C), wie in der Abbildung gezeigt.
2. Schieben Sie die zwei senkrechten Stangen (B2) in die verbleibenden Aussparungen, wie in der
Abbildung gezeigt, nach oben gerichtet ein. Schieben Sie zwei Klemmen (C) auf die Enden der
Querstange (B2). Schieben Sie diese dann, wie gezeigt, auf die zwei senkrechten Stangen.
LINKS
3. Schieben Sie eine Klemme (D) auf die linke, senkrechte Stange. Diese wird für die
Schnarrentrommel verwendet. Schieben Sie eine kleine Stange (B3) in die Klemme (D), wie in der
Abbildung gezeigt.
24

HINTEN
VORN
4. Schieben Sie drei Klemmen (D) auf die Querstange (B2) und zwei horizontale Klemmen (C) auf die
beiden Enden. Schieben Sie diese Konstruktion, wie gezeigt, auf die zwei senkrechten Stangen.
Schieben Sie nun eine weitere Klemme (D) auf die linke senkrechte Stange, diese wird für das
Pedalbecken verwendet. Schieben Sie dann eine kleine Stange ( B3), wie gezeigt, in die Klemme
(D).
HINTEN
VORN
5. Schieben Sie drei kleine Stangen (B3) in die verbleibenden Klem men (C) entlang der oberen
Querstange.
6. Montieren Sie die fünf Teile (A3) an jede der fünf Schlagflächen. Bringen Sie den Bolzen und die
Mutter (F) wie gezeigt an.
25

VORN
HINTEN
7. Bringen Sie die Halteklammer (G) an der Rückseite der iET01-Trigger Box wie in der Abbildung
gezeigt an. Montieren Sie diese an die untere Querstange wie in der Abbildung gezeig t und richten
Sie diese im angegebenen Winkel ein. Sie dient als Basis für den iDM01 Schlagzeugcomputer.
8. So sieht die fertige Konstruktion aus.
9. Bringen Sie den iDM01-Schlagzeug computer mit Velcrostoffstreifen oben auf der iET01-Trigger Box
an.
26

Schnellaufbauanleitung
1. Überprüfen Sie, dass sich al le auf der Vorderseite dieser Anleitung aufgeführten Teile in der
Verpackung befinden.
2. LESEN SIE DAS BÜCHLEIN MIT DEN SICHERHEITSHINWEISEN, BEVOR SIE DAS GERÄT VERWENDEN
3. Sehen Sie sich dieses Aufbaudiagramm genau an.
4. Stellen Sie das Schlagzeugset an eine für den Betrieb geeignete Stel le.
5. Stellen Sie sicher, dass alle Lautsprecher ausgeschaltet sind und alle Lautstärkenregler/Fader auf
“Null” stehen.
6. Schließen Sie alle Eingabequellen wie im Diagramm gezeigt an.
7. Schließen Sie die Ausgänge an den Kopfhörer und/oder an eine Stereoanlage mit Verstärker an.
8. Schließen Sie beide Netzadapter und die anderen Geräte an das (Wechsel-)Stromnetz an.
9. Schalten Sie alle Geräte in der fol genden Reihenfolge ein.
10. Beim Ausschalten drehen Sie diese Reihenfolge jeweils um, indem Sie
HINWEIS: Lautsprecher sind NICHT beinhaltet. Wie in der oberen Abbildung gezeigt, dient das
mitgelieferte RCA-Kabel zum Anschluss an einen externen Verstärker, ein Mischpult oder
Heimstereoanlagen.
p. iET01-Schlagzeug-Trigger Box,
q. iDM01-Schlagzeugcomputer
r. und zuletzt vorhandene externe Lautsprecher.
s. zunächst vorhandene externe Lautsprecher,
t. dann den iDM01-Schlagzeugcomputer
u. und zuletzt die iET01-Schlagzeug-Trigger Box ausschalten.
27

Inbetriebnahme
Dieser Abschnitt enthält Hinwei se zur Inbetriebnahme Ihres elektronischen Schlagzeugsets. Überprüfen
Sie, dass der Aufbau Ihres elektronischen Schlagzeugsets dem vorher in der Schnellaufbauanleitung
gezeigten Diagramm entspricht.
• Stellen Sie sicher, dass sowohl die iET01-Trigger Box und der iDM01-S chlagzeugcomputer
eingeschaltet sind.
I. Bei eingeschaltetem Gerät gehen Sie auf halbe Kopfhörerlautstärke. Der Lautstärkeregler
ist im Diagramm mit (2) markiert.
II. Werden die elektronischen Trommelflächen mit den beiliegenden Trommelstöcken
geschlagen, sollte dies im Kopfhörer Töne erzeugen.
III. Wechsel des Schlagzeugsets:
IV. Begleitung von vorhandenen Vorlagen:
V. Aufnahme einer Schlagzeugvorlage:
VI. Um das Gerät zurückzusetzen, also alle gespeicherten Werte auf die vom Werk
aa. Drücken Sie “DRUM SET” in Abschnitt (6), wie im Diagramm gezeigt.
bb. In der Anzeige (1) erscheint die Nummer des momentanen Schlagzeugsets.
cc. Drücken Sie die Auf- und Ab-Pfeile in Abschnitt (3), um die Töne zu
verändern.
dd. Drücken Sie die “STOP”-Taste im auf dem Diagramm mit (3) bezeichneten
Abschnitt.
ee. Drücken Sie die im Abschnitt (4) befindliche, mit “PRESET/USER”
bezeichnete Taste. In der Anzeige erscheint dann die momentane
Voreinstellung (‘Rock 1’ als Werksvorgabe).
ff. Mit den Auf- und Ab-Pfeilen können Sie die 50 verschiedenen Vorlagen
durchlaufen.
gg. Um eine Vorlage zu hören, drücken Sie “PLAY” in Abschnitt (3).
hh. Das Tempo kann durch die Tempo-Auf und –Ab-Tasten in Abschnitt (5)
(siehe Diagramm) verändert werden.
ii. Sie können die Vorlagen auf dem Schlagzeugset begleiten. Um einen
rhythmischen Einwurf hinzuzufügen, drücken Sie die “FILL”-Taste in
Abschnitt (3) während die Vorlage gespielt wird.
jj. Drücken Sie die “PERFORM/ COMPOSE”-Taste in Abschnitt (4) (siehe
Diagramm), bis auf der Anzeige “COMPOSE” erscheint.
kk. Drücken Sie “PLAY”, um mit der Aufnahme zu beginnen. Sie werden ein
dem momentanen Tempo angepasstes Klicken vernehmen. Die Aufnahme
durchläuft die gesamte Vorlage fortlaufend ohne Ende, sodass Sie eine
Schlagzeugsequenz nach der anderen hinzufügen können.
ll. Sie können Trommelschläge eingeben, indem Sie die Trommeltasten in
Abschnitt (7) drücken oder die Trommelflächen mit den Stöcken schlagen.
mm. Drücken Sie “STOP”, um die Aufnahme zu beenden.
vorgegebenen zu setzen, halten Sie die Tasten “ERASE” und “PLAY” während des
Einschaltens des Geräts gedrückt.
28

Kit batteria elettronica
Manuale rapido di utilizzazione
29

BACCHETTE CAVO
ALIMENTAZIONE
CUFFIE
CAVO MIDI
CONTENUTO DELLA CONFEZIONE
30

Istruzioni per l’assemblaggio del
supporto
10. Inserire i piedini in gomma (A1) ai capi di ciascuna barra alla base del supporto (B1). La parte
piatta della gomma è rivolta al suolo. Installare una barra orizzontale (B2) sul morsetto orizzontale
predisposto (C) come da illustrazione.
11. Inserire due barre verticali (B2) negli alloggiam enti rimanenti rivolte verso l’alto come illustrato.
Inserire due morsetti (C) ai capi di una barra orizzontale (B2). Far scorrere sulle due barre verticali
come illustrato.
SINISTRA
12. Far scorrere un morsetto (D) lungo la barra verticale sinistra, che verrà impiegata per il rullante.
Far scorrere una barra piccola (B3) nel morsetto (D) come illustrato in figura.
31

RETRO
FRONTE
13. Inserire tre morsetti (D) su di una barra orizzontale (B2) ed inserire due morsetti orizzontali (C) alla
fine. Far scorrere l’insieme sulle due barre verticali come illustrato. Far scorrere ora un altro
morsetto (D) lungo la barra verticale sinistra, che verrà impiegato per l ’Hi-Hat. Quindi far scorrere
una barra piccola (B3) nel morsetto (D) come illustrato.
RETRO
FRONTE
14. Inserire le tre barre piccole (B3) nei morsetti rimanenti (C) sul la barra orizzontale superiore.
BATTERIA
15. Attaccare le cinque parti (A3) a ciascuno dei cinque pad della batteria. Attaccare la vite e il dado (F)
come indicato.
32

FRONTE
RETRO
16. Attaccare il supporto di montaggio (G) alla parte posteriore dell’iET01 Trigger Box come illustrato in
figura. Attaccarlo alla barra orizzontale inferiore come illustrato in figura ed angolare di
conseguenza. La Drum Machine iDM01 verrà a trovarsi su di esso.
17. Ecco come apparirà l’insieme finito.
18. Attaccare la Drum Machine iDM01 sull’iET01 Trigger Box servendosi delle fasce di velcro.
33

Guida d’impostazione rapida
11. Verificare che tutti gli elementi elencati sul frontespizio di questo manuale siano contenuti nella
confezione.
12. PRIMA DI UTILIZZARE IL PRODOTTO LEGGERE IL LIBRETTO DELLE ISTRUZIONI DI SICUREZZA
13. Esaminare attentamente lo schema di montaggio.
14. Porre la batteria in una posizione adeguata all’uso.
15. Assicurarsi che tutti i dispositivi altoparlanti siano spenti e che il volume e i fader siano su “zero.”
16. Collegare tutte le sorgenti d’ingresso come indicato nel diagramma.
17. Collegare le uscite alle cuffie e/o al sistema di amplificatore stereo.
18. Collegare entrambi gli adattatori di alimentazione e gli altri dispositivi all’alimentazione C.A.
19. Accendere tutto nel seguente ordine:
20. Al momento dello spegnimento, invertire sempre questa operazione, spegnendo:
NOTA: gli altoparlanti NON sono inclusi. Come illustrato nella figura soprastante, il cavo RCA in dotazione
serve al collegamento di un amplificatore esterno, di un mixer o di un sistema home stereo.
a. iET01 Drum Trigger Box.
b. iDM01 Drum Machine.
c. Altoparlanti esterni.
a. Gli altoparlanti esterni.
b. iDM01 Drum Machine.
c. iET01 Drum Trigger Box.
34

Per iniziare
Questo paragrafo introduce all’uso del kit di batteria elettronica. Assicurarsi che l’impostazione del kit di
batteria elettronica corrisponda allo schema illustrato in precedenza nella guida d’impostazione rapida.
• Assicurarsi che sia l’iET01 Trigger Box che la Drum Machine iDM01 siano accesi.
VII. Quando il dispositivo è acceso, alzare il volume sulle cuffie in posizione intermedia. Il
comando del volume è il numero (2) sullo schema.
VIII. Suonando i pad della batteria elettronica con le bacchette in dotazione, si dovrebbero
produrre suoni nelle cuffie.
IX. Per cambiare il kit della batteria:
X. Per suonare contemporaneamente a schemi predefiniti:
XI. Per registrare uno schema di batteria:
XII. Per resettare il dispositivo, cancellando tutti i valori immagazzinati ritornando alle modalità
a. Premere “DRUM SET” nella sezione (6) come illustrato nel diagramma.
b. Il display (1) mostrerà il numero dell’impostazione attuale della batteria.
c. Per modificare i suoni, premere le frecce su e giù nella sezione (3).
a. Premere il tasto “STOP” nella sezione (3) del diagramma.
b. Premere il tasto contrassegnato “PRESET/USER” elencato nella sezione (4).
Il display mostrerà quindi la impostazione corrente (‘Rock 1’ è predefinito).
c. Servirsi delle frecce su e giù nella sezione (3) per scorrere attraverso i 50
schemi diversi.
d. Premere “PLAY” nella sezione (3) per ascoltare lo schema predefinito.
e. Il tempo può essere regolato servendosi dei tasti tempo up e down nella
sezione (5) illustrata nel diagramma.
f. È possibile suonare a tempo con i campioni predefiniti del kit della batteria.
Per aggiungere un fill premere il tasto “FILL” nella sezione (3) durante la
riproduzione del campione.
a. Premere il tasto “PERFORM/COMPOSE” nella sezione (4) dello schema fino a
quando a display non compare “COMPOSE”.
b. Premere “PLAY” per iniziare a registrare. Si sentirà un suono corrispondente
al tempo dello schema attuale. La registrazione passerà in modo continuo
lungo lo schema, sarà quindi possibile aggiungere le parti di batteria uno alla
volta.
c. È possibile inserire il beat di batteria premendo i tasti della batteria nella
sezione (7) oppure suonando i pad della batteria con le bacchette.
d. Premere “STOP” per interrompere la registrazione.
predefinite, mantenere la pressione s u “ERASE” e “PLAY” durante l’accensione
dell’apparecchio.
35
 Loading...