


User Guide
English ( 3 – 29 )
Appendix
English ( 30 – 31 )

Table of Contents
Introduction................................................. |
3 |
Box Contents.......................................... |
3 |
Support................................................... |
3 |
Setup ...................................................... |
3 |
Features....................................................... |
4 |
Top Panel................................................ |
4 |
Rear Panel .............................................. |
6 |
Operation..................................................... |
7 |
Navigation............................................... |
7 |
Controls ............................................ |
7 |
Overview ........................................... |
8 |
Kit Menu ...................................... |
8 |
Kit FX Mode ................................. |
9 |
Voice Mode.................................. |
9 |
Trigger Mode ............................... |
9 |
Mixer Mode................................ |
10 |
Sample Mode ............................ |
10 |
Utility Menu ................................ |
10 |
Kits........................................................ |
11 |
Selecting Kits .................................. |
11 |
Editing Kits...................................... |
12 |
Assigning Instruments ................ |
12 |
Using Kit FX ............................... |
13 |
Editing Voices ............................ |
15 |
Saving Kits ...................................... |
18 |
Trigger Mode ........................................ |
19 |
About Crosstalk (XTalk) .................. |
20 |
Hi-Hat Pedal Setup ........................ |
21 |
Metronome ........................................... |
22 |
Sample Mode ....................................... |
23 |
Recording Samples ........................ |
23 |
Editing Samples ............................. |
24 |
Saving Samples.............................. |
25 |
Assigning Samples ......................... |
26 |
Playing Loops................................. |
26 |
Utility Menu .......................................... |
27 |
Metronome (Metro)......................... |
27 |
MIDI ................................................ |
28 |
Trigger ............................................ |
29 |
SysEx.............................................. |
29 |
OS................................................... |
29 |
Factory Reset / Restore Defaults ......... |
29 |
Appendix ................................................... |
30 |
Effects .................................................. |
30 |
Technical Specifications ...................... |
31 |
Trademarks & Licenses ........................ |
31 |
2

Introduction
Thank you for purchasing the Strike Performance Drum Module. At Alesis, we know how serious music is to you. That’s why we design our equipment with only one thing in mind—to make your performance the best it can be.
Box Contents
Strike Performance Drum Module |
Quickstart Guide |
16 GB SDHC Card (in module’s SD card slot) |
Safety & Warranty Manual |
Power Adapter |
|
Support
For the latest information about this product (documentation, technical specifications, system requirements, compatibility information, etc.) and product registration, visit alesis.com.
For additional product support, visit alesis.com/support.
Setup
Items not listed in Introduction > Box Contents are sold separately.
Connect the inputs to the triggers of your electronic drum kit.
 Ride 1
Ride 2
Connect the Ride 1 &
Ride 2 inputs to your ride cymbal as shown here.
External audio device
(tablet, smartphone, etc.) Powered monitors
|
|
|
|
|
|
|
|
|
|
|
|
|
|
|
|
|
|
|
|
|
|
|
|
|
|
|
|
|
|
|
|
|
|
|
|
|
|
|
|
|
|
|
|
|
|
|
|
|
|
|
|
|
|
|
|
|
|
|
|
|
|
|
|
|
|
|
|
|
|
|
|
|
|
|
|
|
|
|
|
|
|
|
|
|
|
|
|
|
|
|
|
|
|
|
|
|
|
|
|
|
|
|
|
|
|
|
|
|
|
|
|
|
|
|
|
|
|
|
|
|
|
|
|
|
|
|
|
|
|
|
|
|
|
|
|
|
|
|
|
|
|
|
|
|
|
|
|
|
|
|
|
|
|
|
|
|
|
|
|
|
|
|
|
|
|
|
|
|
|
|
|
|
|
|
|
|
|
|
|
|
|
|
|
|
|
|
|
|
|
|
|
|
|
|
|
|
|
|
|
|
|
|
|
|
|
|
|
|
|
|
|
|
|
|
|
|
|
|
|
|
|
|
|
|
|
|
|
|
|
|
|
|
|
|
|
|
|
|
|
|
|
|
|
|
|
|
|
|
|
|
|
|
Power Outlet |
|
|
|
|
|
|
|
|
|
|
|
|
|
|
|
|
|
|
|
|
|
|
|
|
|
|
|
|
|
|
|
|
|
|||||||||||||
|
|
|
|
|
|
|
|
|
|
|
|
|
|
|
|
|
|
|
|
|
|
|
|
|
|
|
|
|
|
|
|
|
|
|
|
||||||||||||||
|
|
|
|
|
|
|
|
SD Card |
|
|
|
|
|
|
|
|
|
|
|
|
|
|
|
|
|
|
|||||||||||||||||||||||
|
|
|
|
|
|
|
|
|
|
|
|
|
|
|
|
|
|
|
|
|
|
|
|
|
|||||||||||||||||||||||||
|
|
|
|
|
|
|
|
|
|
|
|
|
|
|
|
|
|
|
|
|
|
|
|
|
|||||||||||||||||||||||||
|
|
|
|
|
|
|
|
|
|
|
|
|
|
|
|
|
|
|
|
|
|
|
|
|
|
|
|
|
|
|
|
|
|
|
|
|
|
|
|
|
|
|
|
|
|
|
|
|
|
|
|
|
|
|
|
|
|
|
|
|
|
|
|
|
|
|
|
|
|
|
|
|
|
|
|
|
|
|
|
|
|
|
|
|
|
|
|
|
|
|
|
|
|
|
|
|
|
|
|
Computer
3

Features
Top Panel
|
|
|
7 |
|
8 |
|
12 |
13 |
14 |
15 |
16 |
|
1 |
|
|
|||||
17 |
18 |
19 |
20 |
21 |
22 |
2 |
|
|
|
|
|
|
4 |
5 |
|
|
|
3 |
||
|
|
||
11 |
6 |
|
|
9 |
10 |
||
|
1.Display: This full-color display shows the current kit, settings, and other information. Use the cursors to move through the menus and lists shown here. Use the Data Dial to scroll through available options. Use the Function Buttons (F1–F6) to select tabs shown at the bottom edge of the display.
2.Function Buttons (F1–F6): Press one of these 6 buttons to select the corresponding tab shown above it (at the bottom edge of the display).
3.Data Dial: Turn this dial to scroll through available options shown in the display.
4.Cursors: Use these buttons to select different areas shown in the current page in the display.
5.Enter: Press this button to confirm a selection shown in the display.
6.Kit: Press this button to enter the Kit menu (the default view when you power on the drum module).
7.Main Vol: Turn this knob to adjust the volume level of the Main Out on the rear panel. This level is independent from the volume level of each voice or the overall kit.
8.Aux In: Turn this knob to adjust the volume level of the Aux In on the rear panel. This also controls the input recording level of Sample Mode.
9.Headphone Out (1/4”/6.35 mm): Connect your stereo headphones to this input. Adjust the volume with the Headphone Vol knob.
10.Headphone Vol: Turn this knob to adjust the volume level of the Headphone Out.
11.Sliders: Use these sliders to adjust the independent volume level of each sound in your current kit. The sound’s name is shown under the slider.
4

12.Note Chase: Press this button to activate or deactivate the Note Chase feature. When active, hitting a trigger will automatically select it in the drum module. This is useful for quickly making changes to multiple sounds on your kit, like selecting new instruments, editing voice parameters, etc.
Alternatively, your Strike module’s menus allow you to select the current trigger using the cursors and data dial.
13.Mixer: Press this button to enter Mixer Mode.
14.Sample: Press this button to enter Sample Edit Mode. This requires you to have an SD card inserted into the Strike module’s SD card slot. If your SD card doesn’t already have any WAV files, pressing this button will enter Sample Record Mode.
15.Utility: Press this button to show the Utility menu.
16.Save: Press this button to save the current kit or global settings (depending on the current mode). When you’re in Kit Mode, pressing this button allows you to name/rename and save the current kit to your SD card. When you’re in Trigger Mode or the Utility menu, pressing this button allows you to save all of your current trigger, metronome, and global MIDI settings.
17.Edit > Kit FX: Press this button to enter Kit Effects Mode where you can set the reverb and other effects for each kit.
18.Edit > Voice: Press this button to enter Voice Mode where you can edit the assigned instruments, reverb/FX Amount, MIDI output, and other settings for each drum or cymbal pad.
19.Edit > Triggers: Press this button to enter Trigger Mode where you can adjust the sensitivity and overall feel of each drum or cymbal pad. Strike’s default settings are optimized for a wide range of playing styles and kit configurations. While trigger settings normally don’t need any adjustment, you can still adjust the sensitivity of your triggers here.
20.Metro > On/Off: Press this button to turn the metronome on or off. Metronome settings can be found in the Utility menu, in the Metro tab.
21.Metro > Tempo: Press this button 3 or more times in succession at the desired rate to change the tempo of the metronome (in BPM). Alternatively, you can press and hold this button and turn the data dial to change the BPM. The light above this button will flash at the current tempo.
22.Transport Buttons: Use these buttons to control sample playback. These buttons work even when the drum module is not in Sample Mode.
•Rewind/Fast-Forward ( / ): Press and hold one of these buttons to “scrub” backward or forward (respectively) through the sample.
•Play (): Press this button to start sample playback or recording.
•Stop (): Press this button to stop sample playback or recording.
•Record (): Press this button to show the Sample Record screen. Press it again to begin recording the signal from the Aux In, and then press it once more to stop the recording. You will then be in Sample Edit Mode where you can edit and save your new sample.
5
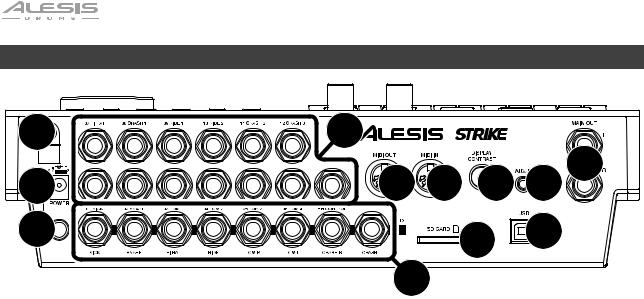
Rear Panel
2 |
4 |
|
|
|
6 |
1 |
9 |
8 |
12 |
5 |
3 |
11 |
10 |
|
|
7
1.Power Input: Connect the included power adapter (12 V, 2 A, center-positive) to this input.
2.Cable Restraint: You can secure the cable of the power adapter to this restraint to help prevent disconnecting it accidentally.
3.Power Switch: Press this button to power the drum module on or off. Power it on only after you have connected all of your input devices and before you power on any connected loudspeakers. Power off your loudspeakers before powering off the drum module.
4.Trigger Inputs (1/4”/6.35 mm, TRS): Connect these inputs to the triggers of your Strike Pro Special Edition. The cable snake included with your Strike Pro Special Edition is labeled to match these inputs. When connected, hitting a trigger will send an electric signal to the drum module, which will trigger the corresponding sound.
5.Aux In (1/8”/3.5 mm, TRS): Connect this input to an optional external audio device (computer, tablet, smartphone, etc.). Turn the Aux In knob on the top panel to adjust the volume level. You can then listen and play long to your favorite backing tracks or record the incoming audio signal in Sample Mode.
6.Main Out (1/4”/6.35 mm, TRS): Connect these outputs to your loudspeakers, audio interface, etc. Turn the Main Vol knob on the top panel to adjust the volume level.
7.Direct Audio Outs (1/4”/6.35 mm, TRS or TS): Connect these mono outputs to your external mixer, audio interface, etc. The independent audio signals of these triggers will be sent out of these outputs: kick, snare, hi-hat, ride, the left and right channels for all toms, and the left and right channels for the crash cymbals. The signal sent from these outputs is fixed and without any effects applied.
8.MIDI In (5-pin DIN): Connect this input to the MIDI output of an external MIDI device (synthesizer, drum machine, etc.).
9.MIDI Out (5-pin DIN): Connect this output to the MIDI input of an external MIDI device (synthesizer, drum machine, etc.).
10.USB Port: Use a standard USB cable (included) to connect this USB port to an available USB port on your computer. This connection sends and receives MIDI information to and from the computer.
11.SD Card Slot: You can insert a standard SDHC card into this slot (a 16 GB card is already included). An SD card is required to save kits, samples, or global settings. The SDHC card must be Class 10, use a FAT32 file system, and have a capacity of no more than 64 GB.
12.Display Contrast: Turn this knob to adjust the contrast of the display.
6

Operation
This chapter contains information on how to use your Strike Performance Drum Module.
Navigation
Controls
The Strike module’s display shows information about its current mode and operations. You can navigate its different modes, pages, etc. by using the following controls:
•Data Dial: Use this dial to scroll through a menu or to change the selected parameter value, setting, etc. in the display.
•Cursors: Use these buttons to select different areas shown in the current page in the display.
•Enter: Press this button to confirm a selection shown in the display.
•Function Buttons (F1–F6): Press one of these 6 buttons to select the corresponding tab shown above it (at the bottom edge of the display).
• Mode Buttons (not shown): Press one of these buttons to enter its mode: Kit, Mixer, Sample,
Utility, Save, Kit FX, Voice, or Triggers. When you power on the drum module, it’ll always start in Kit Mode.
7

Overview
This section provides an overview of each page shown in the display.
To learn how to perform specific operations in the drum module, see the Kits, Trigger Mode, Metronome,
Sample Mode, and Utility Menu chapters.
Kit Menu
This is the main menu where you can select kits or select individual triggers to edit within the kit.
To view the Kit menu, press Kit.
To select a kit, do one of the following:
•Press F3/Preset to choose from your preset kits or F4/User to choose from the user kits on your SD card.
Turn the data dial to scroll through the list (the current kit name is shown at the top of the page). After you stop moving the data dial, the kit will load automatically.
•Press F1/List to choose from a list of available kits.
Press F3/Preset to choose from your preset kits or F4/User to choose from your user kits.
Use the cursors to switch between the kit categories (left panel) and kits (right panel).
Turn the data dial to scroll through the list. After you stop moving the data dial, the kit will load automatically.
If you select a kit category in the list and then return to the main Kit menu, you’ll then be viewing the kits in that category only.
To save a kit, see Kits > Saving Kits.
Important: If you edit a preset kit and then save it, the saved kit will be stored onto your SD card, while the original preset kit remains unchanged on the module’s internal memory. You must have your SD card inserted into the SD card slot in order to save changes to preset kits.
8

Kit FX Mode
Kit FX Mode lets you adjust the settings for the Reverb, EQ, Comp (compressor), and FX processors. You can then how much of each to apply to each voice in the kit (see Kits > Editing Kits > Editing Voices).
To enter Kit FX Mode, press Edit > Kit FX.
See Kits > Editing Kits for more information about Kit
FX Mode.
Voice Mode
Voice Mode shows the settings for each voice within the kit. A voice is the sound produced by each trigger of your Strike Pro Special Edition.
Each tab in this screen lets you edit different settings of each voice.
To enter Voice Mode, press Edit > Voice.
To select a trigger, do one of the following:
•Press Note Chase so it’s on. Strike the desired trigger on your Strike Pro Special Edition.
•Use the cursors to select the Trig field in the upper-right corner. Turn the data dial to select the desired trigger.
See Kits > Editing Kits for more information about Voice
Mode settings.
Trigger Mode
Trigger Mode shows the settings for each trigger of your Strike Pro Special Edition including its sensitivity, threshold, velocity curve, and crosstalk settings.
To enter Trigger Mode, press Edit > Trigger.
To select a trigger, do one of the following:
•Press Note Chase so it’s on. Strike the desired trigger on your Strike Pro Special Edition.
•Use the cursors to select the Trig field in the upper-right corner. Turn the data dial to select the desired trigger.
See Kits > Editing Kits for more information about
Trigger Mode settings.
9
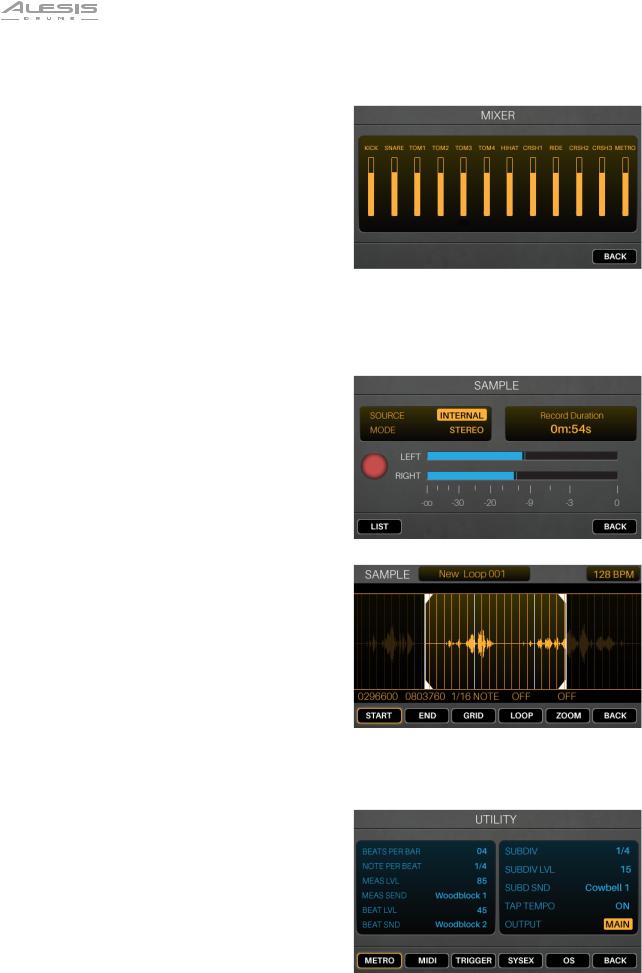
Mixer Mode
Mixer Mode shows you the output levels of each trigger, represented by 12 channel faders.
To enter Mixer Mode, press Mixer.
To adjust the level of each trigger, move its slider on the module up or down.
Sample Mode
Sample Record Mode contains controls for recording samples (before recording) and editing samples (after recording).
To enter Sample Record Mode, press the Record
() button.
To start recording, press the Record () button. The button in the display will light red and the Time Remaining counter will start counting.
To stop recording and show the Sample Edit page, press the Record () button again.
See Sample Mode > Recording Samples to learn more.
Sample Edit Mode lets you edit the sample you just recorded. See Sample Mode > Editing Samples for more information about this.
Utility Menu
The Utility menu contains settings that determine the module’s overall operation, including global metronome functions, global trigger settings, and system information.
To view the Utility menu, press Utility.
See Utility Menu for more information about this.
10
 Loading...