


QUICKSTART GUIDE
::: ENGLISH ( 1 – 2 ) :::
MANUAL DE INICIO RÁPIDO
::: ESPAÑOL ( 3 – 4 ) :::
GUIDE D’UTILISATION RAPIDE
::: FRANÇAIS ( 5 – 6 ) :::
GUIDA RAPIDA
::: ITALIANO ( 7 – 8 ) :::
KURZANLEITUNG
::: DEUTSCH ( 9 – 10 ) :::

CONNECTION DIAGRAM
BOX CONTENTS
yMultiMix 4 USB
yUSB cable
yPower adapter
yQuickstart Guide
ySafety Instructions & Warranty
Information booklet |
Computer |
Power
Mic
Headphones
Guitar
Speakers
CD Player
Notes:
yWhen recording a guitar or bass with an active pickup, set the MultiMix 4 USB's GUITAR / LINE SWITCH to "LINE." If your instrument uses a passive pickup, connect it to LINE INPUT 1 and set the switch to "GTR." (You may use a line-level mono source connected to LINE INPUT 2 at the same time.)
yTo reduce electrical hum at high gain settings, keep the MultiMix 4 USB's power supply away from your guitar cable and the MultiMix 4 USB's channel inputs.
AUDIO SETUP
The MultiMix 4 USB is a class-compliant device that can be used with any digital audio workstation or recording software that supports USB audio. To enable your MultiMix 4 USB to send and receive audio to and from your computer, follow the instructions below for your computer's operating system:
WINDOWS VISTA:
1. Go to Start Menu Control Panel Sound. (If you don’t see Sound, select
Switch to Classic View, and the Sound Control Panel should become available.)
2.Click the Playback tab and select USB Audio Codec* as the default device.
3.Click the Recording tab and select USB Audio Codec* as the default device.
4.Click Properties in the lower right-hand corner.
5.In the new window, click the Advanced tab and select 2-channel, 16-bit, 44100 Hz (CD Quality) as the default format.
6.Uncheck both boxes under Exclusive Mode.
7.Click OK to close the Properties window.
8.Click OK to close the Sound control panel.
WINDOWS XP:
1. Go to Start Menu Control Panel Sounds and Audio Devices.
Be sure your audio software program is set up to receive audio via the MultiMix 4 USB. This can usually be done in your software’s "Preferences" or "Device Setup." Please consult your software manual for more information.
* If you have other USB audio devices connected to your computer, which may have identical names, you may need to try selecting each one until the MultiMix 4 USB is recognized.
2.Click the Audio tab.
3.Under Sound Playback and Sound Recording, select USB Audio Codec* as the default device.
4.Click OK.
MAC:
1. Go to Applications Utilities Audio MIDI Setup.
2.In the Audio Devices tab under System Settings, select USB Audio Codec* as your Default Input and Default Output.
3.Close the window.
1
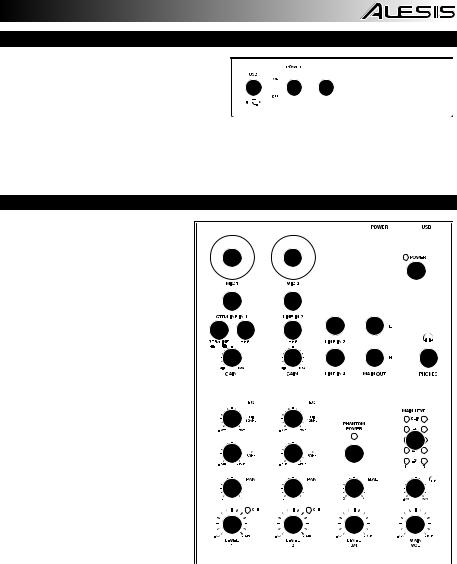
REAR PANEL FEATURES
1.POWER IN – Use the included power adapter
to connect the MultiMix 4 USB to a power |
|
|
|
|
|
|
|
|
2 |
1 |
|
outlet. While the power is switched off, plug |
|
3 |
|
||
|
|
|
|
|
|
the power supply into the MultiMix 4 USB first, |
|
|
|
|
|
|
|
|
|
|
|
then plug the power supply into a power |
|
|
|
|
|
|
|
|
|
|
|
outlet. |
|
|
|
|
|
|
|
|
|
|
2.POWER SWITCH – Turns the MultiMix 4 USB on and off. Turn on the MultiMix 4 USB after all input devices have been connected and before you turn on amplifiers. Turn off amplifiers before you turn off the MultiMix 4 USB.
3.USB PORT – Use the included cable to connect the MultiMix 4 USB to a computer. MultiMix 4 USB requires a USB 1.1 or higher (e.g. USB 2.0) connection.
TOP PANEL FEATURES
1. |
POWER LED – Illuminates when the |
|
|
|
|
|
|
|
|
|||||
|
MultiMix 4 USB is on. |
|
|
|
|
|
|
|
|
|
|
|
||
|
|
|
|
|
|
|
|
|
|
|
|
|||
2. |
MIC INPUT – Connect a microphone |
2 |
2 |
|
|
|
|
|
||||||
|
to these inputs with an XLR cable. |
|
|
|
1 |
|
||||||||
3. |
LINE INPUT – Connect line-level |
|
|
|
|
|
|
|||||||
|
devices to |
these |
inputs |
with |
1/4" |
|
3 |
3 |
|
|
|
|
|
|
|
cables. |
|
|
|
|
|
|
|
|
|
|
|
||
|
|
|
|
|
|
|
|
|
|
|
|
|
|
|
4. |
HPF (High-Pass Filter) – When this |
5 4 |
4 |
3 |
|
6 |
|
|
||||||
|
button is depressed, the channel's |
|
|
|
||||||||||
|
high-pass |
filter |
|
will |
engage, |
|
|
|
||||||
|
eliminating frequencies below 75 Hz |
8 |
8 |
3 |
|
6 |
7 |
|
||||||
|
to reduce any low-level noise. |
|
|
|
|
|||||||||
|
|
|
|
|
|
|
|
|
|
|||||
5. |
GTR / LINE SWITCH – When this |
|
|
|
|
|
|
|
||||||
|
switch is in the down position, |
|
|
|
|
|
|
|
|
|||||
|
|
|
|
|
|
|
|
|
||||||
|
Channel 1 will serve as a high- |
|
|
|
|
|
|
|
||||||
|
impedance |
input |
for |
connecting |
12 |
12 |
|
|
|
|
|
|||
|
guitar or bass instruments. When the |
|
|
|
|
|
||||||||
|
|
|
|
|
|
|
|
|||||||
|
switch is in the up position, Channel |
|
|
|
|
|
17 |
|
||||||
|
1 will accept mic or line-level signals. |
|
|
|
|
|
|
|||||||
|
|
|
|
|
|
|
|
|||||||
6. |
MAIN OUT |
– Use |
standard |
1/4" |
|
11 |
11 |
14 |
|
|
|
|||
|
cables to connect this output to a |
|
|
|
|
|
|
|
||||||
|
speaker or amplifier |
system. |
The |
10 |
10 |
13 |
|
16 |
|
|||||
|
level of this output is controlled by |
|
|
|||||||||||
|
|
|
|
|
|
|
|
|||||||
|
the MAIN VOL knob. |
|
|
|
|
|
|
|
|
|
|
|
||
7. |
HEADPHONES – Connect your ¼” |
|
|
|
|
|
|
|
||||||
9 |
9 |
9 |
|
15 |
|
|||||||||
|
headphones to this output. |
|
|
|
|
|
||||||||
|
|
|
|
|
|
|
|
|
|
|
||||
8. |
GAIN – Adjusts the channel audio |
|
|
|
|
|
|
|
||||||
|
pre-fader and pre-EQ gain level. |
|
|
|
|
|
|
|
|
|
||||
9.CHANNEL VOLUME – Adjusts the  audio level on the channel.
10.CHANNEL PAN – Adjusts the left-to-right balance of the channel's audio.
11.CHANNEL EQ (BASS) – Adjusts the low (bass) frequencies of the channel.
12.CHANNEL EQ (TREBLE) – Adjusts the high (treble) frequencies of the channel.
13.BALANCE (CH 3 & 4) – Adjusts the balance between Channels 3 and 4.
14.PHANTOM POWER – This switch activates and deactivates phantom power. When activated, phantom power supplies +48V to both XLR mic inputs. Please note that most dynamic microphones do not require phantom power, while most condenser microphones do. Consult your microphone’s documentation to find out whether it needs phantom power.
15.MAIN VOLUME – Adjusts the output volume of the MAIN OUT.
16.HEADPHONE VOLUME – Adjusts the volume level of the headphone output.
17.LED METERS – Monitors the audio level of the MAIN OUT.
2
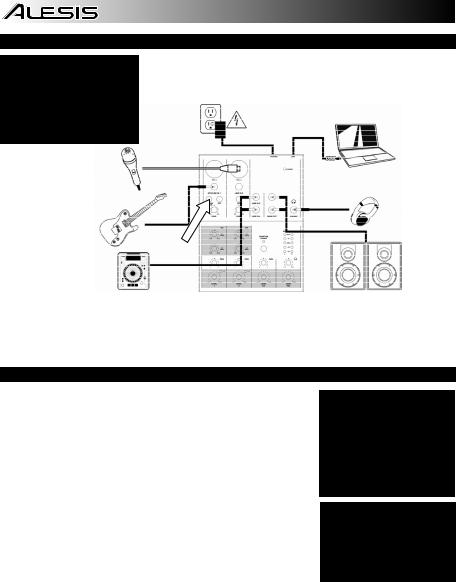
DIAGRAMA DE CONEXIÓN
CONTENIDO DE LA CAJA
y |
MultiMix 4 USB |
|
|
y |
Cable USB |
Alimentación |
|
y |
Adaptadora de alimentación |
||
|
y Guía de inicio rapido
y Folleto de información sobre la seguridad y la garantía
Micrófono
Guitarra
Reproductor
de CD
Notas:
Computadora
Auriculares
Altavoces
yCuando grabe una guitarra o bajo con captor activo, ajuste el CONMUTADOR GUITARRA / LÍNEA de MultiMix 4 USB a "LINE". Si su instrumento usa un captor pasivo, conéctelo a la ENTRADA DE LÍNEA 1 y ajuste el conmutador a "GTR". (Puede usar al mismo tiempo una fuente mono de nivel de línea conectada a la ENTRADA DE LÍNEA 2.)
yPara reducir el zumbido eléctrico cuando se usan ajustes altos de ganancia, mantenga la fuente de alimentación de MultiMix 4 USB alejada del cable de su guitarra y de las entradas de los canales del equipo.
CONFIGURACIÓN DE AUDIO
MultiMix 4 USB es un dispositivo que cumple especificaciones de clase y que se puede usar con cualquier estación de trabajo o software de grabación de audio digital compatible con el audio USB. Para permitir que MultiMix 4 USB envíe y reciba audio hacia y desde la computadora, siga las instrucciones de más abajo correspondientes al sistema operativo de la misma:
WINDOWS VISTA:
1.Vaya al menú Start f Control Panel f Sound (Inicio > Panel de control > Sonido). (Si no ve Sound, seleccione Switch to Classic View (Cambiar a vista clásica) —el panel de control Sound debe aparecer.)
2.Haga clic en la pestaña Playback (Reproducción) y seleccione USB Audio Codec* (Códec de audio USB) como dispositivo predeterminado.
Asegúrese de que su programa de software de audio esté configurado para recibir audio por MultiMix 4 USB. Esto se puede hacer habitualmente en “Preferences” o “Device Setup” (Configuración de dispositivos) de su software. Para más información, consulte el manual de su software.
3.Haga clic en la pestaña Recording (Grabación) y7 seleccione USB Audio Codec* (Códec de audio USB) como dispositivo predeterminado.
4.Haga clic en Properties (Propiedades) en la esquina inferior derecha.
5.En la nueva ventana, haga clic en la pestaña Advanced (Avanzadas) y seleccione 2-channel, 16-bit, 44100 Hz (CD Quality) [2 canales, 16 bits, 44100 Hz (calidad de CD)] como formato predeterminado.
6.Deseleccione ambas casillas debajo de Exclusive Mode (Modo exclusivo).
7.Haga clic en OK (Aceptar) para cerrar las ventana Properties.
8.Haga clic en OK para cerrar el panel de control Sound.
WINDOWS XP:
* Si tiene conectados a su computadora otros dispositivos de audio USB que puedan tener nombres idénticos, puede ser necesario que pruebe a seleccionar cada uno hasta que se reconozca el MultiMix 4 USB.
1.Vaya al menú Start f Control Panel f Sounds and Audio Devices (Inicio > Panel de control > Dispositivos de sonido y audio).
2.Haga clic en la pestaña Audio.
3.En Sound Playback (Reproducción de sonido) y Sound Recording (Grabación de sonido) seleccione USB Audio Codec* (Códec de audio USB) como dispositivo predeterminado.
4.Haga clic en OK (Aceptar).
MAC:
1.Vaya a Applications f Utilities f Audio MIDI Setup (Aplicaciones -> Utilidades -> Configuración de audio MIDI).
2.En la pestaña Audio Devices (Dispositivos de audio), bajo System Settings (Configuración del sistema), seleccione USB Audio Codec* (Códec de audio USB) como Default Input (Entrada predeterminada) y Default Output (Salida predeterminada).
3.Cierre la ventana.
3
 Loading...