


DM8
HIGH-DEFINITION DRUM MODULE WITH DYNAMIC ARTICULATION
QUICKSTART GUIDE
::: ENGLISH ( 3 – 6 ) :::
MANUAL DE INICIO RÁPIDO
::: ESPAÑOL ( 7 – 10 ) :::
GUIDE D’UTILISATION RAPIDE
::: FRANÇAIS ( 11 – 14 ) :::
GUIDA RAPIDA
::: ITALIANO ( 15 – 18 ) :::
KURZANLEITUNG
::: DEUTSCH ( 19 – 22 ) :::

CONNECTION DIAGRAM
DRUM KIT |
MIDI KEYBOARD |
HEADPHONES iPod* |
POWER
WARNING: Use only the included Alesis power supply with the DM8 module.
COMPUTER
HOUSE AMP
Headphones, iPod*, keyboard, amp, and computer not included.
*iTunes and iPod are trademarks of Apple, Inc., registered in the U.S.A. and other countries.
•Connect the 1/4" cables of your kit's cable snake to the drum pads and cymbal pads of your kit. Each cable is labeled with its proper trigger.
•If you have additional drum pads, cymbal pads, or other triggers, you can use standard 1/4" cables to connect them to the "RIDE 2/PERC1" or "PERC2" TRIGGER INPUTS on the module's rear panel. Dual-zone pads or cymbals (e.g., a drum with head and rim triggers or a cymbal that can produce bow and bell sounds) will require TRS cables to trigger both zones.
•Plug 1/4” TRS cables from the MAIN OUT to an amplifier, mixer, or speaker system. (For mono sound, connect a cable to the Left output.)
•You can connect a set of 1/4” TRS headphones to the PHONES output.
•You can connect another audio device to the AUX IN using a standard 1/8" stereo cable.
See the included assembly poster for further instructions on setting up the DM8 Kit and connecting it to the DM8 module.
NOTE: Out of the box, the DM8 module is write-protected, so you will be unable to save any changes you make to the Kits, Instruments, Sequences, etc. To turn write protection off:
1.Press UTILITY.
2.Press SYS (F4).
3.Press O/S (F3).
4.Press MEM (F4).
5.Press VALUE DOWN or move the VALUE DIAL counterclockwise until the "WriteProt" field says "OFF."
6.Press DRUM KIT to return to the main page.
IMPORTANT: THE DM8 MODULE MAY BE AFFECTED BY STATIC ELECTRICITY. IF THIS OCCURS, SIMPLY TURN THE MODULE OFF AND WAIT AT LEAST A FEW SECONDS BEFORE TURNING IT ON AGAIN.
3
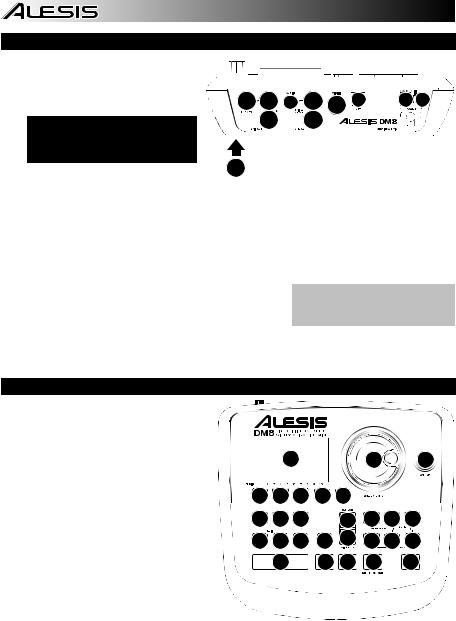
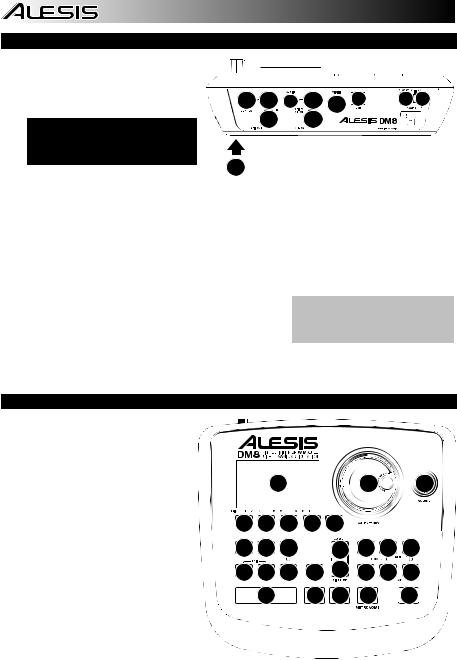
REAR PANEL FEATURES
1.POWER SWITCH – Turns the module on and off.
2.POWER IN – Connect the included AC
adapter to this input, then connect the adapter to a power source.
WARNING: Use only the included Alesis power supply with the DM8 module.
9 |
3 |
4 |
8 |
6 |
5 |
2 |
1 |
 3
3
 8
8
3. MAIN OUT – Use 1/4" TRS cables to |
7 |
connect these outputs to an amplifier or
speaker system. The volume of these outputs is controlled by the VOLUME knob on the top panel.
4.AUX IN – Connect an external sound source, such as a CD player, to this input using a stereo 1/8" cable.
5.USB – Use a standard USB cable to connect the module to your computer via this USB port. This connection allows the module to send MIDI messages via USB to an external drum software module. You can also transmit SysEx files over this connection.
6.MIDI IN – Use a standard five-pin MIDI cable to connect this input to the MIDI OUT of an external MIDI device.
7.CABLE SNAKE CONNECTION – Connect the included cable snake to this connector, then connect the cables to their respective triggers.
8.TRIGGER INPUTS – If you have additional drum pads, cymbal pads, or other triggers, you can use standard 1/4" cables to connect them to the "RIDE 2/PERC1" or "PERC2" TRIGGER INPUTS. Dual-zone pads or cymbals (e.g., a drum with head and rim triggers or a cymbal that can produce bow and bell sounds) will require TRS cables to trigger both zones.
Note: The module's HI-HAT CONTROL TRIGGER INPUT does not support keyboard-style expression pedals.
9.HEADPHONES OUTPUT – Connect your 1/4" headphones to this output. You can adjust the volume of this output with the VOLUME knob on the module's top panel.
TOP PANEL FEATURES
1.VOLUME – Adjusts the volume level of the MAIN OUT and HEADPHONES OUTPUT.
2.METRONOME ON / OFF – Turns the metronome on or off.
3.LCD – Displays system menus, parameters, and other settings as you use the DM8.
4.F-BUTTONS (1-4) – These buttons allow you to navigate the menus shown in the LCD. Press an F-BUTTON to select the "virtual" button or tab shown above it in the LCD.
5.CURSOR UP / DOWN – Use these buttons to move (vertically) through the available parameters shown in menus in the LCD.
Note: Pressing CURSOR DOWN from the Main Screen allows you to adjust overall parameters for the current Kit.
6.VALUE DIAL – Turn this wheel to increase and decrease values and settings shown in the LCD.
|
|
3 |
|
|
6 |
1 |
4 |
4 |
4 |
4 |
8 |
|
|
10 11 12 |
|
5 |
17 18 19 |
|||
13 14 15 |
16 |
5 |
20 21 22 |
|||
|
9 |
|
7 |
7 |
2 |
23 |
7. VALUE UP / DOWN – Use these buttons to
increase and decrease values and settings shown in the LCD. These may be easier to use than the VALUE DIAL when making incremental adjustments to your parameters.
8.EXIT – Press this button to return to the previous menu shown in the LCD.
9.DRUM KIT – Returns the LCD to the Main Screen. From here, you can select the current Kit with the VALUE DIAL or VALUE UP / DOWN buttons.
10.UTILITY – Enters the Utility Menu, which allows you to set certain "global" parameters that affect the DM8's overall operation (e.g., tempo, MIDI, output routing, trigger sensitivity, etc.). (See the Reference Manual for more information.)
11.EXT TRIG – Allows you to adjust parameters related to triggering. Customizing these parameters changes the feel and responsiveness of the Kit.
Note: Changes to these parameters will affect ALL Kits.
4
12.NOTE CHASE – Turns Note Chase on or off. When Note Chase is on, striking a trigger automatically selects it for editing. Alternatively, you can select a trigger by highlighting the trigger field in the LCD with the CURSOR UP / DOWN buttons then using the VALUE UP / DOWN buttons or VALUE DIAL.
13.EDIT INST – Press this button to edit the Instrument assigned to a trigger input. While editing, pressing it toggles between the two Layers of the trigger. The current Layer (A or B) will be highlighted on the top-right corner of the LCD.
14.EDIT ACCOMP – Press this button to adjust the settings for your Accompaniment. The adjustable parameters will be shown in the LCD.
15.PREVIEW – Press this button to preview the sound of the current trigger. This can be useful when programming the DM8 if it is not connected to your drum kit, if it is not convenient to strike the pads, etc.
16.STORE – Press this button to save changes made to the current Kit, Sequence, trigger settings, or global settings. Use the VALUE DIAL or VALUE UP / DOWN buttons to select a destination where the current Kit or Sequence will be stored. When saving a Kit, its Instruments and all its parameters will also be stored. When saving a Sequence, it will remember its corresponding Kit and Accompaniment.
17.SEQ – Press this button to access the module's Sequencer where you can create and edit drum and accompaniment patterns.
18.MUTE DRUMS – Press this button to mute the drum track of a Sequence.
19.MUTE ACCOMP – Press this button to mute the Accompaniment track of a Sequence.
20.STOP – Stops playback of the current Sequence. Hold down STOP and turn the VALUE DIAL to "scrub" forwards and backwards through the Sequence. Hold down STOP and press VALUE UP / DOWN to "step" forwards or backwards through each "event" in the Sequence. While navigating the Sequence in these ways, you will hear the Sequence play as you move through it.
21.PLAY / – Plays the current Sequence. You can also hold down STOP and press this button to move back to the previous bar in the Sequence.
22.RECORD / – Records a new Sequence. You can also hold down STOP and press this button to move to the next bar in the Sequence.
23.TAP TEMPO – Tap this button at the desired rate to enter a new tempo for the Sequence. You can also change the tempo by holding down the TAP TEMPO button and using the VALUE DIAL or VALUE UP / DOWN buttons.
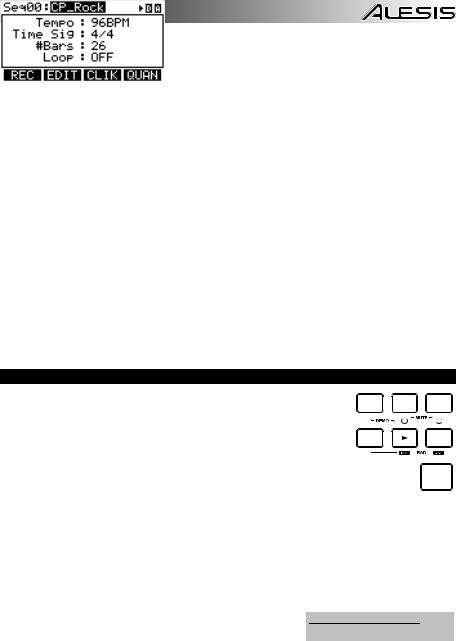
PLAYING SEQUENCES
A Sequence is a recorded pattern stored in the DM8 module that includes drums and
|
SEQ |
DRUMS |
ACCOMP |
||||
Accompaniment. The drum part of the Sequence includes the Kit sounds (Instruments) |
|
|
|
|
|||
as well the recorded pattern itself. Sequences can be recorded, edited, and looped, and |
|
|
|
|
|||
you can mute the drum part and/or Accompaniment while playing a Sequence. See the |
|
|
|
|
|||
|
|
|
|
||||
Operator's Manual for more information on Sequences and Accompaniment. |
|
|
|
|
REC |
||
To play a Sequence: |
|
|
|
|
|||
1. |
Press SEQ to enter the main screen of the Sequencer. |
|
|
TAP |
|||
2. |
The Sequence field should be highlighted. Use the VALUE UP / DOWN buttons or |
|
|
TEMPO |
|||
|
|
|
|
||||
VALUE DIAL to select a Sequence.
3. The Sequence's tempo (in BPM or beats per minute) will be shown on the LCD. Use the CURSOR UP / DOWN buttons to select the Tempo field, then use the use the VALUE UP / DOWN buttons or VALUE DIAL to set the new tempo. (You can also press the TAP TEMPO button several times at the desired tempo.)
4. To allow the Sequence to play continuously, use the CURSOR UP / DOWN buttons to select the Loop field, then use the use the VALUE UP / DOWN buttons or VALUE DIAL to turn Loop "On."
5. Press PLAY to play the Sequence.
To mute the drums or Accompaniment in the Sequence, press the
To play the Demo Sequence: Simply
MUTE DRUMS or MUTE ACCOMP button, respectively. (This is a hold down SEQ and press PLAY. useful tool when you want to play your own drum patterns to the
Accompaniment or vice versa.)
5

SELECTING AND EDITING KITS
The DM8 Module has 100 Preset Kits and 100 User Kits, which you can select from the Main Screen. You can adjust the sounds, tuning, volume, panning, etc. for each Kit as well as their individual pad sounds. In addition, you may choose a different Accompaniment for each Kit.
To select a Kit:
1.Press the DRUM KIT button to bring up the Main Screen.
2.Use the VALUE UP / DOWN buttons or the VALUE DIAL to select a Kit.
3.Hit the triggers to try out the sounds of the Kit.
To edit the drum Instruments (trigger voices) in a Kit:
a |
|
b |
|
|
|
c
d
#2 |
#3 |
1.Press DRUM KIT to go to the Main Screen.
2.Press EDIT INST. The top of the screen will show the number and name of the Kit whose Instruments (drum voices) you will be editing.
3.Press INST (F1). The new screen will show:
a.the trigger you are editing (the Kit number and name of the trigger)
b.the Layer (each trigger sound consists of two layers, each with its own Instrument)
c.the Category (the type or "class" of drum voice currently assigned to that Layer)
d.the Instrument (the drum voice for that Layer)
4.Select the trigger input whose Instrument you want to change by pressing NOTE CHASE then striking the trigger. Alternatively, you can highlight the trigger (next to the Kit number) using the CURSOR UP / DOWN buttons and use the VALUE UP / DOWN buttons or VALUE DIAL to select a trigger to edit.
5.Select which Layer of that trigger you will edit by pressing EDIT INST. It will toggle between Layer A and B.
6.Select the Category you want to assign to that trigger by pressing CURSOR UP / DOWN to highlight the Category field, then use the VALUE UP / DOWN buttons or VALUE DIAL to change it.
7.Select the Instrument for that Layer by pressing CURSOR UP / DOWN to highlight the Instrument field, then use the VALUE UP / DOWN buttons or VALUE DIAL to change it. To hear the currently selected sound, strike the trigger or press PREVIEW on the module.
Note: For Layer A of the hi-hat and ride cymbal triggers, you can not select a different Category. Also, the available Instruments for that Category are a predefined set of sounds designed to work together (since the hi-hat and ride can trigger a variety of different sounds). However, you can assign Layer B to a Category or Instrument you like for those triggers.
8.To edit other trigger settings, use the other F-BUTTONS (F2, F3, etc.)
to access additional tabs and adjust their parameters with the VALUE UP / DOWN buttons or VALUE DIAL. For more information, please see the Reference Manual.
6
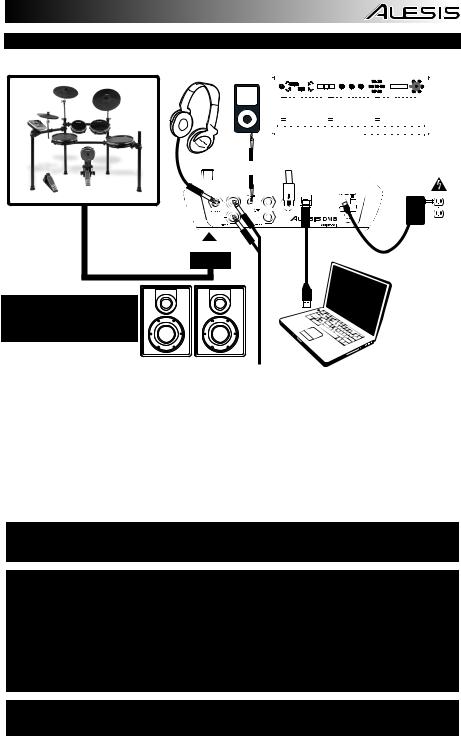
DIAGRAMA DE CONEXIÓN
BATERÍA |
AURICULARES iPod* |
|
|
|
|
|
|
|
|
|
TECLADO MIDI |
|
||||||||||||||||||||||||||||||||
|
|
|
|
|
|
|
|
|
|
|
|
|
|
|
|
|
|
|
|
|
|
|
|
|
|
|
|
|
|
|
|
|
|
|
|
|
|
|
|
|
|
|
|
|
|
|
|
|
|
|
|
|
|
|
|
|
|
|
|
|
|
|
|
|
|
|
|
|
|
|
|
|
|
|
|
|
|
|
|
|
|
|
|
|
|
|
|
|
|
|
|
|
|
|
|
|
|
|
|
|
|
|
|
|
|
|
|
|
|
|
|
|
|
|
|
|
|
|
|
|
|
|
|
|
|
|
|
|
|
|
|
|
|
|
|
|
|
|
|
|
|
|
|
|
|
|
|
|
|
|
|
|
|
|
|
|
|
|
|
|
|
|
|
|
|
|
|
|
|
|
|
|
|
|
|
|
|
|
|
|
|
|
|
|
|
|
|
|
|
|
|
|
|
|
|
|
|
|
|
|
|
|
|
|
|
|
|
|
|
|
|
|
|
|
|
|
|
|
|
|
|
|
|
|
|
|
|
|
|
|
|
|
|
|
|
|
|
|
|
|
|
|
|
|
|
|
|
|
|
|
|
|
|
|
|
|
|
|
|
|
|
|
|
|
|
|
|
|
|
|
|
|
|
|
|
|
|
|
|
|
|
|
|
|
|
|
|
|
|
|
|
|
|
|
|
|
|
|
|
|
|
|
|
|
|
|
|
|
|
|
|
|
|
|
|
|
|
|
|
|
|
|
|
|
|
|
|
|
|
|
|
|
|
|
|
|
|
|
|
|
|
|
|
|
|
|
|
|
|
|
|
|
|
|
|
|
|
|
|
|
|
|
|
|
|
|
|
|
|
|
|
|
|
|
|
|
|
|
|
|
|
|
|
|
|
|
|
|
|
|
|
|
|
|
|
|
|
|
|
|
|
|
|
|
|
|
|
|
|
|
|
|
|
|
|
|
|
|
|
|
|
|
|
|
|
|
|
|
|
|
|
|
|
|
|
|
|
|
|
|
|
|
|
|
|
|
|
|
|
|
|
|
|
|
|
|
|
|
|
|
|
|
|
|
|
|
|
|
|
|
|
|
|
|
|
|
|
|
|
|
|
|
|
|
|
|
|
|
|
|
|
|
|
|
|
|
|
|
|
|
|
|
|
|
|
|
|
|
|
|
|
|
|
|
|
|
|
|
|
|
|
|
|
|
|
|
|
|
|
|
|
|
|
|
|
|
|
|
|
|
|
|
|
|
|
|
|
|
|
|
|
|
|
|
|
|
|
|
|
|
|
|
|
|
|
|
|
|
|
|
|
|
|
|
|
|
|
|
|
|
|
|
|
|
|
|
|
|
|
|
|
|
|
|
|
|
|
|
|
|
|
|
|
|
|
|
|
|
|
|
|
|
|
|
|
|
|
|
|
|
|
|
|
|
|
|
|
|
|
|
|
|
|
|
|
|
|
|
|
|
|
|
|
|
|
|
|
|
|
|
|
|
|
|
|
|
|
|
|
|
|
|
|
|
|
|
|
|
|
|
|
|
|
|
SUMINISTRO
ELÉCTRICO
ADVERTENCIA: Use únicamente la fuente de alimentación Alesis suministrada con el módulo DM8.
AMPLIFICADOR DE |
|
|
COMPUTADORA |
AUDITORIO |
|
|
|
|
No incluye auriculares, iPod*, teclado, amplificador ni computadora. |
||
*iTunes e iPod son marcas registradas de Apple, Inc., registradas en EE.UU. y otros países.
•Conecte los cables de 1/4" del cables del multicable “snake” de su kit a los pads de tambor y platillos del kit. Cada cable está rotulado con su disparador apropiado.
•Si tiene pads de tambor o platillos adicionales u otros disparadores, puede usar cables de 1/4" estándar para conectarlos a las ENTRADAS DE DISPARO "RIDE 2/PERC1" o "PERC2" del panel trasero del módulo. Los pads o platillos de dos zonas (por ej., un tambor con disparadores de parche y borde o un platillo que puede producir sonidos de arco y campana) requieren cables TRS para disparar ambas zonas.
•Enchufe los cables TRS de ¼” de las salidas MAIN OUT (Principal) a un amplificador, mezclador o sistema de altavoces. (Para lograr sonido monofónico, conecte un cable a la salida izquierda.)
•Es posible conectar a la salida HEADPHONES (Auriculares) un juego de auriculares TRS de 1/4".
•Puede conectar otro dispositivo de audio a la entrada AUX IN (Auxiliar) mediante un cable estéreo de 1/8" estándar.
VEA EL PÓSTER DE ARMADO INCLUIDO PARA OBTENER INSTRUCCIONES ADICIONALES SOBRE LA INSTALACIÓN DEL KIT DM8 Y SU CONEXIÓN AL MÓDULO DM8.
NOTA: El módulo DM8 se entrega protegido contra escritura, de modo que no es posible guardar los cambios que se hagan a los kits, instrumentos, secuencias, etc. Para desactivar la protección contra escritura:
1.Pulse UTILITY.
2.Pulse SYS (F4).
3.Pulse O/S (F3).
4.Pulse MEM (F4).
5.Pulse DOWN (Disminuir valor) o mueva el CUADRANTE VALUE en sentido antihorario hasta que en el campo "WriteProt" (Protección contra escritura) aparezca "OFF" (Desactivado).
6.Pulse DRUM KIT para volver a la pantalla principal.
IMPORTANTE: LA ELECTRICIDAD ESTÁTICA PUEDE AFECTAR AL MÓDULO DM8. SI ESTO OCURRE, SIMPLEMENTE APAGUE EL MÓDULO Y ESPERE UNOS SEGUNDOS ANTES DE ENCENDERLO NUEVAMENTE.
7
CARACTERÍSTICAS DEL PANEL TRASERO
1.INTERRUPTOR DE ENCENDIDO – Enciende y apaga el módulo.
2.ENTRADA DE ALIMENTACIÓN – Conecte a esta entrada el adaptador de CA incluido y luego conecte el adaptador al suministro eléctrico.
ADVERTENCIA: Use únicamente la fuente de alimentación Alesis suministrada con el módulo DM8.
9 |
3 |
4 |
8 |
6 |
5 |
2 |
1 |
 3
3
 8
8
3. |
SALIDA PRINCIPAL – Use cables TRS de |
7 |
|
1/4" para conectar estas salidas a un amplificador o sistema de altavoces. El volumen de estas salidas se controla mediante la perilla de volumen (VOLUME) del panel superior.
4.ENTRADA AUXILIAR – Conecte a esta entrada un dispositivo de sonido externo, tal como un reproductor de CD, mediante un cable estéreo de 1/8" estándar.
5.USB – Use un cable USB estándar para conectar el módulo a la computadora por este puerto USB. Esta conexión permite que el módulo envíe mensajes MIDI por USB a una biblioteca de sonidos externa. Por esta conexión se pueden transmitir también archivos SysEx.
6.ENTRADA MIDI – Use un cable MIDI estándar de cinco pines para conectar esta entrada a la SALIDA MIDI de un dispositivo MIDI externo.
7.CONEXIÓN DEL MULTICABLE – Conecte a este conector el multicable (“snake”) incluido y luego los cables a sus disparadores respectivos.
8.ENTRADAS DE DISPARO - Si tiene pads de tambor o platillos adicionales u otros disparadores, puede usar cables de 1/4" estándar para conectarlos a las ENTRADAS DE DISPARO "RIDE 2/PERC1" o "PERC2". Los pads o platillos de dos zonas (por ej., un tambor con disparadores de parche y borde o un platillo que puede producir sonidos de arco y campana) requieren cables TRS para disparar ambas zonas.
Nota: La ENTRADA DE DISPARO DE CONTROL DE HI-HAT CONTROL del módulo no es compatible con pedales de expresión tipo teclado.
9.SALIDA PARA AURICULARES – Conecte sus auriculares de ¼” a esta salida. Es posible ajustar el volumen de esta salida con la perilla de volumen (VOLUME) del panel superior del módulo.
CARACTERÍSTICAS DEL PANEL SUPERIOR
1.VOLUME – Ajusta el nivel de volumen de la SALIDA PRINCIPAL y la SALIDA PARA AURICULARES.
2.METRÓNOMO SÍ / NO – Activa y desactiva el metrónomo.
3.LCD – Muestra menús, parámetros y otros ajustes del sistema cuando se usa el DM8.
4.BOTONES F (1-4) – Estos botones permiten navegar por los menús que aparecen en la pantalla LCD. Pulse un botón F para acceder al botón o pestaña "virtual" mostrado arriba del mismo en la pantalla LCD.
5.CURSOR ARRIBA / ABAJO – Use estos botones para moverse (verticalmente) por los parámetros disponibles mostrados en los menús de la pantalla LCD. (Nota: Al pulsar
CURSOR ABAJO en la pantalla principal, es posible ajustar los parámetros generales del kit actual.)
6.CUADRANTE DE VALORES – Gire esta rueda para aumentar y disminuir los valores y parámetros mostrados en la pantalla LCD.
|
|
3 |
|
|
|
6 |
1 |
|
4 |
4 |
4 |
4 |
8 |
|
|
|
|
10 11 12 |
|
5 |
17 18 19 |
|||||
|
|
|
5 |
|
|
|||
13 14 15 |
16 |
|
|
|
||||
|
|
|
||||||
20 21 22 |
||||||||
|
9 |
|
|
7 |
7 |
2 |
23 |
|
7. AUMENTAR / DISMINUIR VALOR – Use estos botones para aumentar y disminuir los
valores y parámetros mostrados en la pantalla LCD. Estos botones permiten hacer ajustes incrementales más precisos a sus parámetros que el CUADRANTE VALUE (Valores).
8.SALIR – Pulse este botón para volver al menú anterior mostrado en la pantalla LCD.
9.KIT DE SONIDOS – Regresa la LCD a la pantalla principal. Desde aquí, es posible seleccionar el kit actual con el CUADRANTE VALUE o los botones UP / DOWN.
10.UTILIDADES – Para entrar al menú Utility, que permite ajustar los valores de tempo (secuencias globales o individuales), los valores de parámetros MIDI, el enrutamiento de salida, la sensibilidad de disparo y otros parámetros, así como enviar datos SysEx. (Para más información consulte el Manual de referencia.)
8
 Loading...