


ALESIS
NanoVerb
Reference Manual

Introduction
Thank you for purchasing the Alesis NanoVerb Effects Processor. To take full advantage of the NanoVerb’s functions, and to enjoy long and trouble-free use, please read this user’s manual carefully.
How To Use This Manual
This manual is divided into the following sections describing the various modes of the NanoVerb. Though we recommend you take time to read through the entire manual once carefully, those having general knowledge about effects devices should use the table of contents to reference specific functions.
Chapter 1: Your First Session with the NanoVerb. A basic introduction on operating the NanoVerb, auditioning the factory programs, and adjusting levels.
Chapter 2: Connections. This chapter explains how to connect the NanoVerb to an instrument, mixing console or an amplifier.
Chapter 3: Overview of Programs. A summary of the 16 programs in the NanoVerb, including the function of the Adjust knob.
Chapter 4: Description of Controls. An explanation of all connectors and knobs on the NanoVerb. Use this chapter as a quick reference guide when searching for specific information.
Chapter 5: Troubleshooting. This chapter contains troubleshooting tips and service information should problems occur.
Conventions
The knobs and rear panel connectors are referred to in this manual just as their names appear on the NanoVerb, using all capital letters and in brackets (Example: [INPUT] Knob, [ADJUST] Knob, etc.).
J |
When something important appears in the manual, an icon (like the one on the left) |
|
will appear in the left margin. This symbol indicates that this information is vital when |
||
|
operating |
the NanoVerb. |
NanoVerb Reference Manual |
1 |

2 |
NanoVerb Reference Manual |

Contents
CONTENTS |
|
Your First Session with the NanoVerb............................................................... |
7 |
Unpacking and Inspection .................................................................................................... |
7 |
Basic Connections ................................................................................................................ |
7 |
Powering Up ......................................................................................................................... |
8 |
Setting Levels ....................................................................................................................... |
8 |
What’s on the Front Panel? .................................................................................................. |
8 |
Auditioning Programs ........................................................................................................... |
10 |
Adjusting Effects Mix Levels .................................................................................... |
10 |
Editing Programs .................................................................................................................. |
10 |
Bypassing Effects ................................................................................................................. |
10 |
Placement and Installation.................................................................................................... |
10 |
Rack Mounting ......................................................................................................... |
10 |
Connections ...................................................................................................... |
11 |
AC Power Hookup ................................................................................................................ |
11 |
Line Conditioners and Protectors ............................................................................ |
11 |
Audio Connections ............................................................................................................... |
11 |
Typical Applications ................................................................................................. |
12 |
Input Jack Wiring ..................................................................................................... |
12 |
Connecting Directly to an Instrument ................................................................ ...... |
13 |
Interfacing to a Mixing Console ............................................................................... |
14 |
Using Aux Sends ........................................................................................ |
14 |
Using Inserts............................................................................................... |
16 |
Using Main Outputs .................................................................................... |
17 |
Avoiding Ground Loops ........................................................................................... |
18 |
Footswitch ............................................................................................................................ |
19 |
Overview of Programs ....................................................................................... |
21 |
Reverb Effects ...................................................................................................................... |
21 |
Concert Hall ............................................................................................................. |
21 |
Real Room............................................................................................................... |
21 |
Plate Reverb ............................................................................................................ |
21 |
Nonlinear ................................................................................................................. |
22 |
Reverb Parameter Adjust ................................................................................................ ..... |
22 |
Decay....................................................................................................................... |
22 |
Pitch Based Effects .............................................................................................................. |
22 |
Chorus ..................................................................................................................... |
22 |
Flange ...................................................................................................................... |
23 |
Rotary ...................................................................................................................... |
23 |
Chorus/Room 1 ....................................................................................................... |
24 |
Chorus/Room 2 ....................................................................................................... |
24 |
Pitch Based Parameter Adjust.............................................................................................. |
24 |
Delay Effects ........................................................................................................................ |
24 |
Delay ....................................................................................................................... |
24 |
Delay Parameter Adjust ....................................................................................................... |
24 |
Time......................................................................................................................... |
24 |
Description of Controls ...................................................................................... |
25 |
Front Panel ........................................................................................................................... |
25 |
Input Level ............................................................................................................... |
25 |
Mix Level.................................................................................................................. |
25 |
Output Level ............................................................................................................ |
25 |
Signal Level LED ..................................................................................................... |
25 |
Program Select Knob .............................................................................................. |
25 |
Adjust Knob ............................................................................................................. |
26 |
NanoVerb Reference Manual |
3 |

Contents
Rear Panel............................................................................................................................ |
26 |
Power....................................................................................................................... |
26 |
Bypass ..................................................................................................................... |
26 |
Input (Left/Mono & Right) ........................................................................................ |
26 |
Output (Left & Right) ................................................................................................ |
26 |
Troubleshooting................................................................................................. |
27 |
Trouble-Shooting Index ........................................................................................................ |
27 |
Maintenance/Service ............................................................................................................ |
27 |
Cleaning................................................................................................................... |
27 |
Refer All Servicing To Alesis ................................................................................... |
27 |
Obtaining Repair Service......................................................................................... |
28 |
Customers in the USA and Canada............................................................ |
28 |
Customers outside the USA and Canada ................................................... |
28 |
Specifications .................................................................................................... |
29 |
4 |
NanoVerb Reference Manual |

Contents
NanoVerb Reference Manual |
5 |
Your First Session with the NanoVerb– Chapter 1
CHAPTER 1
YOUR FIRST SESSION WITH THE
NANOVERB
Unpacking and Inspection
Your NanoVerb was packed carefully at the factory, and the shipping carton was designed to protect the unit during shipping. Please retain this container in the highly unlikely event that you need to return the NanoVerb for servicing.
The shipping carton should contain the following items:
•This instruction manual
•Alesis NanoVerb with the same serial number as shown on shipping carton
•AC Power Supply Adapter (Alesis P3)
•NanoVerb Quick Guide/Program Chart
•Alesis warranty card
J |
It is important to register your purchase; if you have not already filled out your |
warranty card and mailed it back to Alesis, please take the time to do so now. |
Basic Connections
The NanoVerb will work in many different applications, whether you are connecting an instrument directly into it, or connecting it with a mixing console. Briefly described here are the basic connections to get you up and running quickly. For more information on connections, please refer to Chapter 2.
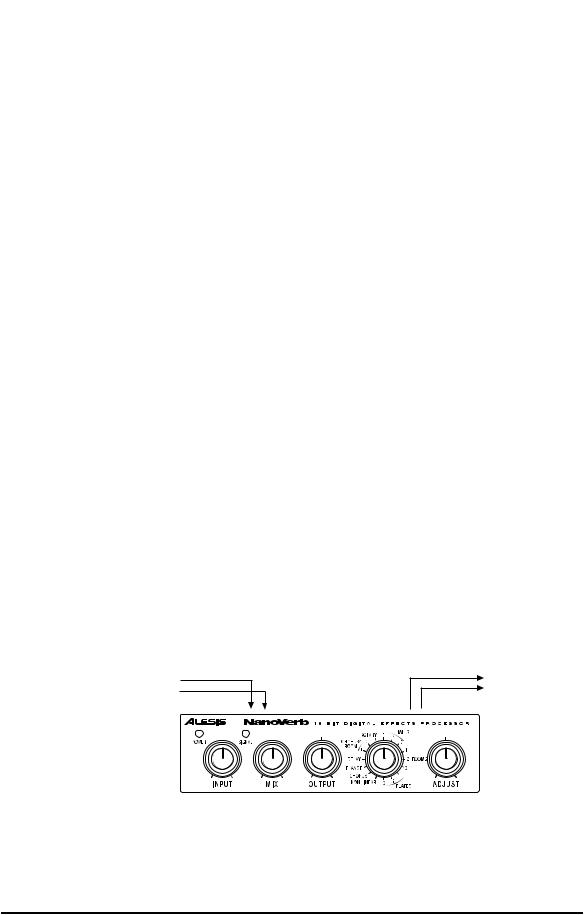
•Mono In, Mono or Stereo Out. Connect a 1/4" phone cord to the [LEFT/MONO] INPUT of the NanoVerb from a mono source. (The Left input will then feed both inputs.) Connect another 1/4" phone cord from the [LEFT] OUTPUT of the NanoVerb to an amplification system or mixer input. Additionally, you could connect a second 1/4" phone cord to the [RIGHT] OUTPUT for use with a stereo amplification system, or two mixer inputs.
•Stereo. Connect two 1/4" phone cords to the [LEFT/MONO] & [RIGHT] INPUTS of the NanoVerb from a stereo source , and two 1/4" phone cords from the [LEFT/MONO] & [RIGHT] OUTPUTS of the NanoVerb to a stereo amplification
system or two mixer inputs.
FROM INSTRUMENT OR EFFECTS SEND |
|
|
|
LEFT INPUT |
RIGHT INPUT |
LEFT OUTPUT |
RIGHT OUTPUT |
If connecting to a mixing console’s aux sends/returns, you will want to turn the [MIX] knob fully clockwise so that the NanoVerb outputs only wet (effected) signal.
Powering Up
After making your connections, turn on the system’s power using this procedure:
NanoVerb Reference Manual |
7 |

Chapter 1 – Your First Session with the NanoVerb
¿Before turning on the NanoVerb’s power, check the following items:
•Have all connections been made correctly?
•Are the volume controls of the amplifier or mixer turned down?
¡Insert the Power jack into the [POWER] input on the rear panel of the NanoVerb and plug the power adapter into an AC outlet.
Upon power-up, the Power On LED will illuminate.
¬Turn on the power of the amplifier/mixer, and adjust the volume.
Setting Levels
Proper setting of the input and output levels is crucial in order to achieve the maximum signal-to-noise ratio. As a good rule of thumb, it is usually best to set both input and output level controls at 3/4 or 75% of full. This will decrease the possibility of overload distortion and keep the amount of background noise to a minimum.
If the Signal LED on the NanoVerb begins to clip (turn red), turn down the Input level or decrease the volume of the source (instrument, mixer send, etc.). If the NanoVerb’s level is causing the mixer or amp to distort, turn the Output Level down. For more detail on level setting, see page 25.
What’s on the Front Panel?
4 |
5 |
6 |
7 |
|
|
|
|
|
|
|
|
1 |
2 |
3 |
The NanoVerb’s front panel contains the following:
¨Input. The Input level control sets the level going into the NanoVerb. This should be adjusted so that the Signal LED (• ) is green when signal is going into the unit. It controls both the Left and Right Input levels simultaneously.
¡Mix. The Mix control adjusts the balance between the direct signal coming into the input and the effects generated by the NanoVerb.
¬Output. The Output level control sets the level going to the amplifier or mixer from the NanoVerb.
÷Power LED. The Power LED is illuminated whenever the NanoVerb's power adapter is plugged in.
8 |
NanoVerb Reference Manual |

Your First Session with the NanoVerb– Chapter 1
•Signal LED. The Signal LED displays the signal level coming into the Input. During normal operation, this LED should turn green whenever there is signal coming into the inputs. If the signal level is at the maximum, this LED will turn red and you will begin to hear the signal distort.
±Program Select. The Program Select Knob is used to choose the program you wish to use.
£Adjust. Each program on the NanoVerb has one parameter which can be adjusted. Depending on the type of program selected, this knob might alter reverb decay, chorus depth, etc.
Auditioning Programs
The NanoVerb has 16 programs. These programs have been chosen to be the most useful effects available for a large variety of music styles. To audition the internal effect programs, turn the Program Select knob to scroll through each of the 16 presets.
Adjusting Effects Mix Levels
Whether a program contains a single effect or two or three effects, you can adjust the NanoVerb’s [MIX] control to obtain a desirable balance between the original, uneffected signal and each effect’s output. The [MIX] Knob controls the balance between the input signal and the effects generated by the NanoVerb. By turning [MIX] to the right allows you to hear more effects; turning it to the left lets you hear more of the source signal.
When hooked up to an instrument setup, such as a guitar amp, the Mix setting will typically be somewhere in the middle, balancing the effects with the sound of the source instrument. If the NanoVerb is connected to a mixing console’s Aux Send, the [MIX] control should be set all the way to the right (effects only) so that the balance can be controlled from the board. When the [MIX] control is turned all the way to the left, you will only hear the direct signal (effects will be bypassed).
Editing Programs
|
Any of the internal programs on the NanoVerb may be editing using the [ADJUST] |
|
knob. The function of this knob will change depending on the Program selected. For |
|
example, it will adjust reverb decay on a Hall program and lezlie speed on the Rotary |
|
program. |
J |
The Adjust knob is always active, so when you change to a new program it will |
automatically read the Adjust knob setting. |
Bypassing Effects
At any time you can bypass the effects, thereby allowing the direct signal to pass through the NanoVerb unchanged. This can be done in two ways:
•by turning the MIX knob all the way to the left,
•by connecting a footswitch to the [BYPASS] jack and pressing the footswitch.
Each time the footswitch connected to the [BYPASS] jack is pressed, Bypass mode is toggled on and off again. For more information about the Footswitch, see page 20.
NanoVerb Reference Manual |
9 |
 Loading...