


KMR 1250 D
KMR 1250 D
1.091-114
1.091-134
www.karcher.com 5.956-834 A2003105 (06/02)

Deutsch
Betriebsanleitung für Anwender Seite 3
Ersatzteilliste Seite171
English
Français
Nederlands
Italiano
Svenska
ЕллзнйкЬ
User Instructions Page 27
Spare Parts List Page171
Notice d’instructions pour l´utilisateur Page 51
Liste des pièces de rechange Page171
Gebruiksaanwijzing Pagina 75
Onderdelenlijst Pagina171
Istruzioni per l’uso per utilizzatori Pàgina 99
Lista dei ricambi Pàgina171
Instruktionsbok för användaren Sida123
Reservdelslista Sida171
ПдзгЯет чейсйумпэ гйб фпхт чсЮуфет УелЯдб 147
КбфЬлпгпт бнфбллбкфйкюн УелЯдб 171

KMR 1250 D User Instructions English
Contents
For your safety ..........................................................................................................................................28
On behalf of the environment ....................................................................................................................29
Intended usage..........................................................................................................................................30
Sweeper functions ....................................................................................................................................30
Main components......................................................................................................................................30
Prior to initial start-up ................................................................................................................................31
Unloading procedure ............................................................................................................................................31
Pushing the sweeper by hand ..............................................................................................................................31
After moving the machine .....................................................................................................................................31
Operating controls ....................................................................................................................................32
Preparing the sweeper for use..................................................................................................................33
Adjusting the driver’s seat ....................................................................................................................................33
Filling the fuel tank...............................................................................................................................................33
Open fuel tap .......................................................................................................................................................33
Starting the sweeper .................................................................................................................................34
Initial driving trials.................................................................................................................................................34
Braking ................................................................................................................................................................35
Stopping the sweeper and s witching off ................................................................................................................35
Cleaning the filter .................................................................................................................................................35
Automatic cleaning ..............................................................................................................................................35
Manual cleaning ............................................................................................................................... ....................35
Emptying the waste hopper..................................................................................................................................36
Typical applications...................................................................................................................................37
Sweeping on dry ground .......................................................................................................................................37
Sweeping on damp or wet ground.........................................................................................................................37
Shutting the sweeper down for longer periods..........................................................................................38
Transporting the sweeper .........................................................................................................................39
Cleaning and care.....................................................................................................................................39
Maintenance ..............................................................................................................................................40
First engine oil change .........................................................................................................................................40
Initial inspection after 8 operating hours................................................................................................................40
Daily maintenance ...............................................................................................................................................40
Maintenance intervals...........................................................................................................................................40
Maintenance tasks...............................................................................................................................................41
Opening/closing the unit cover .............................................................................................................................41
Disconnecting the battery ....................................................................................................................................41
Checking tyre pressures ......................................................................................................................................42
Checking the oil level ...........................................................................................................................................42
Filling up with oil ..................................................................................................................................................42
Changing the engine oil ........................................................................................................................................42
Cleaning or replacing the air cleaner.....................................................................................................................43
Clean fuel filter .....................................................................................................................................................43
Checking the hydraulic system ............................................................................................................................43
Checking the level of electrolyte in the battery......................................................................................................44
Charging the battery.............................................................................................................................................44
Replacing the sealing skirts .................................................................................................................................45
Replacing the side brush......................................................................................................................................45
Replace light unit .................................................................................................................................................45
Adjusting the sweeping pattern ............................................................................................................................46
Replacing the main brush roller ............................................................................................................................47
Replacing fuses ...................................................................................................................................................48
Replacing the dust filters......................................................................................................................................48
Troubleshooting.........................................................................................................................................49
Technical specifications............................................................................................................................50
27

English User Instructions KMR 1250 D
For your safety
Before you use this machine for the first time, please read
the following:
– these operating instructions
– the enclosed leaflet Safety Information No. 5.956-250.
Make sure that all information contained therein is complied
with.
!
Explosion hazard while refuelling!
n Do not fill up with fuel
– in an enclosed space
– while the engine is running.
n Do not smoke while refuelling the vehicle.
n Fuel expands as it becomes warmer.
Do not fill the tank right up to the top. Leave a gap of at
least 1 cm under the bottom edge of the filler neck.
n Wipe up any fuel they may have been spilt and ensure
that the cap is replaced firmly on the tank.
!
Fire hazard while sweeper is operating!
n Keep highly inflammable materials away from the engine
and the exhaust while the sweeper is operating.
!
Danger of toppling over on steep slopes!
The sweeper could topple over while it is being driven
across or turning round on a sleep slope.
n The maximum gradient up or down which the sweeper
can be driven is 18%.
n Do not drive at right angles to a slope with a gradient
steeper than 10%.
!
Danger of toppling over if bends are negotiated at
high speed!
n The sweeper could topple over if it is driven round a bend
at high speed. Drive slowly round bends.
!
Caution when carrying out maintenance or repairs!
In order to prevent the engine from being started unintentionally, proceed as follows:
n Remove the ignition key.
n Disconnect the battery at the negative terminal.
28
!
Caution while handling the battery!
Observe the safety information provided by the battery
manufacturer.
Always use batteries and chargers recommended by KÄRCHER, otherwise your warranty could be rendered invalid.
KMR 1250 D User Instructions English
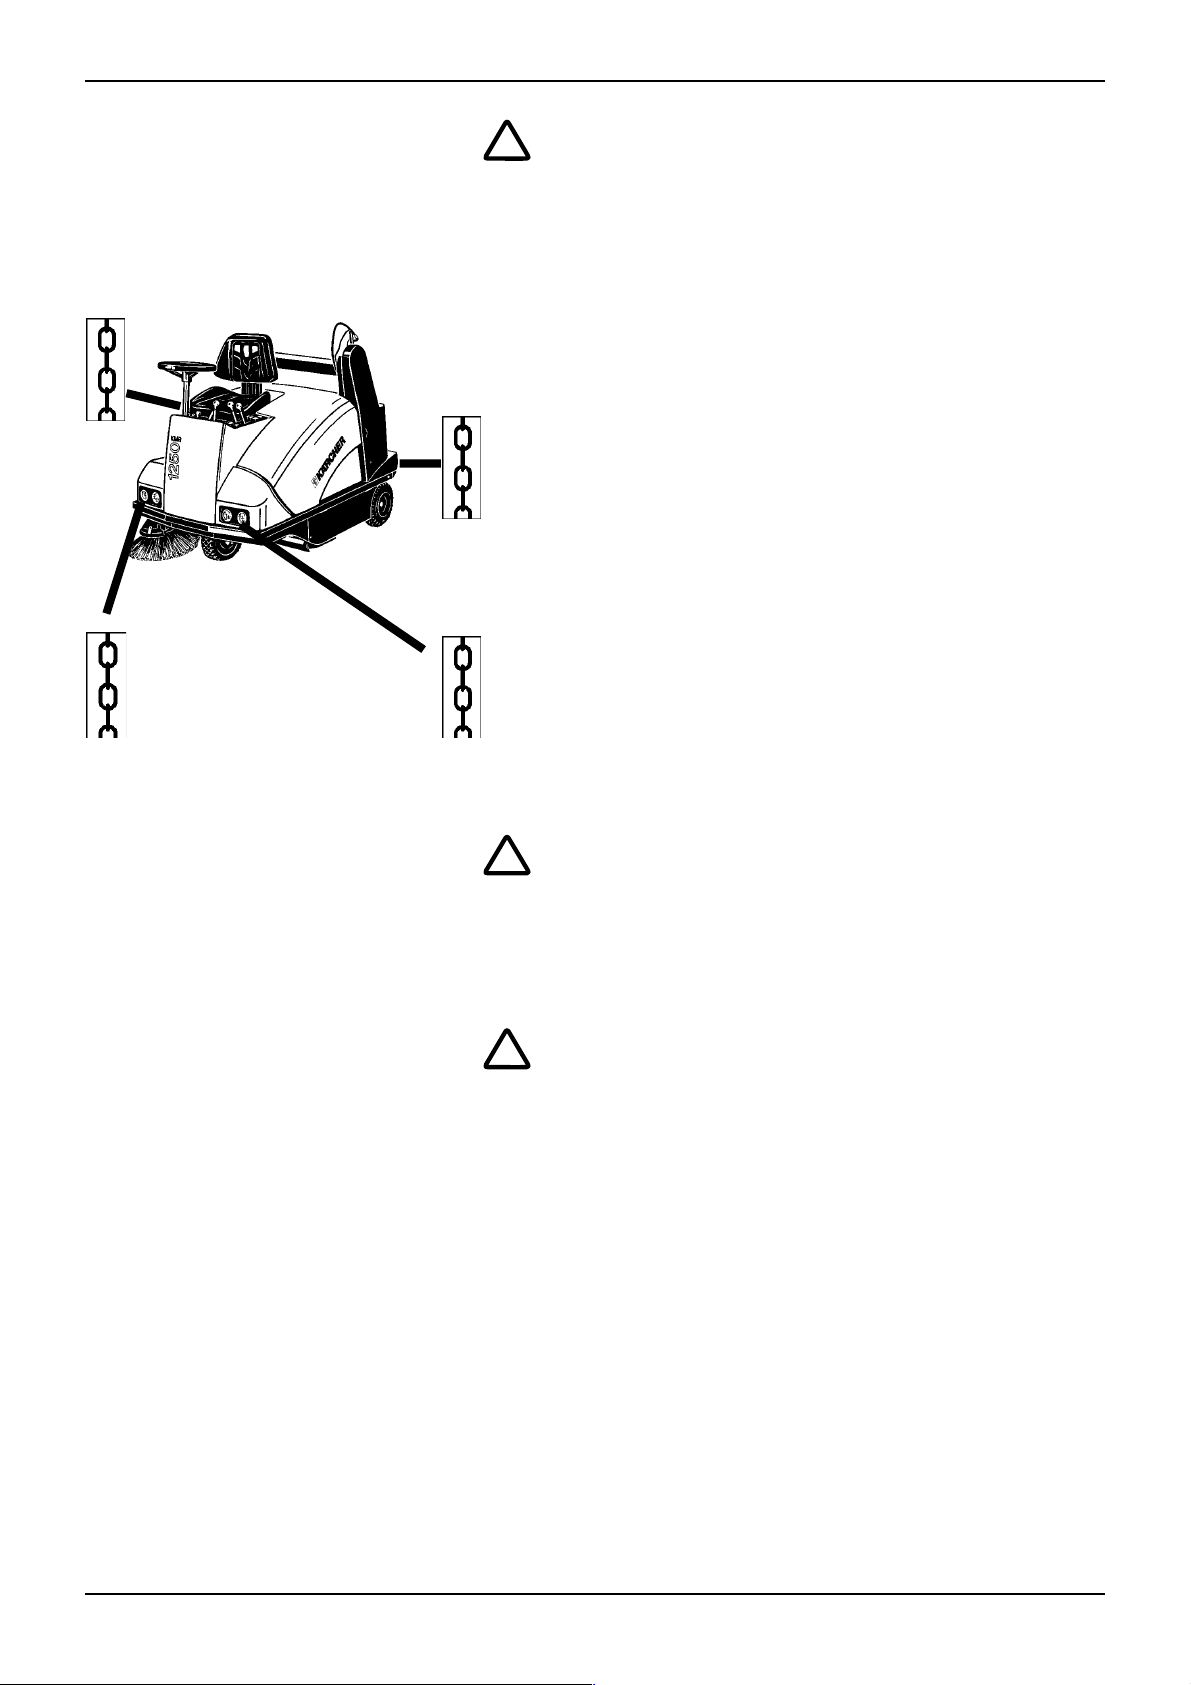
!
Caution while transporting the sweeper!
Make sure that the sweeper is secured properly if you are
going to transport it to a different location.
Do not use a forklift truck for loading purposes as it could
damage the sweeper.
n Apply the parking brake.
n Secure the sweeper as shown in the illustration, using
– web belts
or
– ropes
or
– chains.
On behalf of the
environment
!
Caution, environmental hazard due to exhausted
batteries!
Exhausted batteries should not be treated as domestic
refuse. Make sure that are disposed of in an environmentally
appropriate manner.
!
Caution, environmental hazard due to engine oil or
hydraulic fluid!
After you have changed the engine oil or hydraulic fluid, take
the waste product to a recognised collection point or to a
waste disposal company.
29
English User Instructions KMR 1250 D
Intended usage
Sweeper functions
This sweeper
– is intended to be used for sweeping outdoor surfaces,
– corresponds to Usage Category “U” for dust that is not
injurious to health,
– should not be used in enclosed spaces,
– can only be used on public paths and highways if it has
been fitted with the StVZO Accessory Kit.
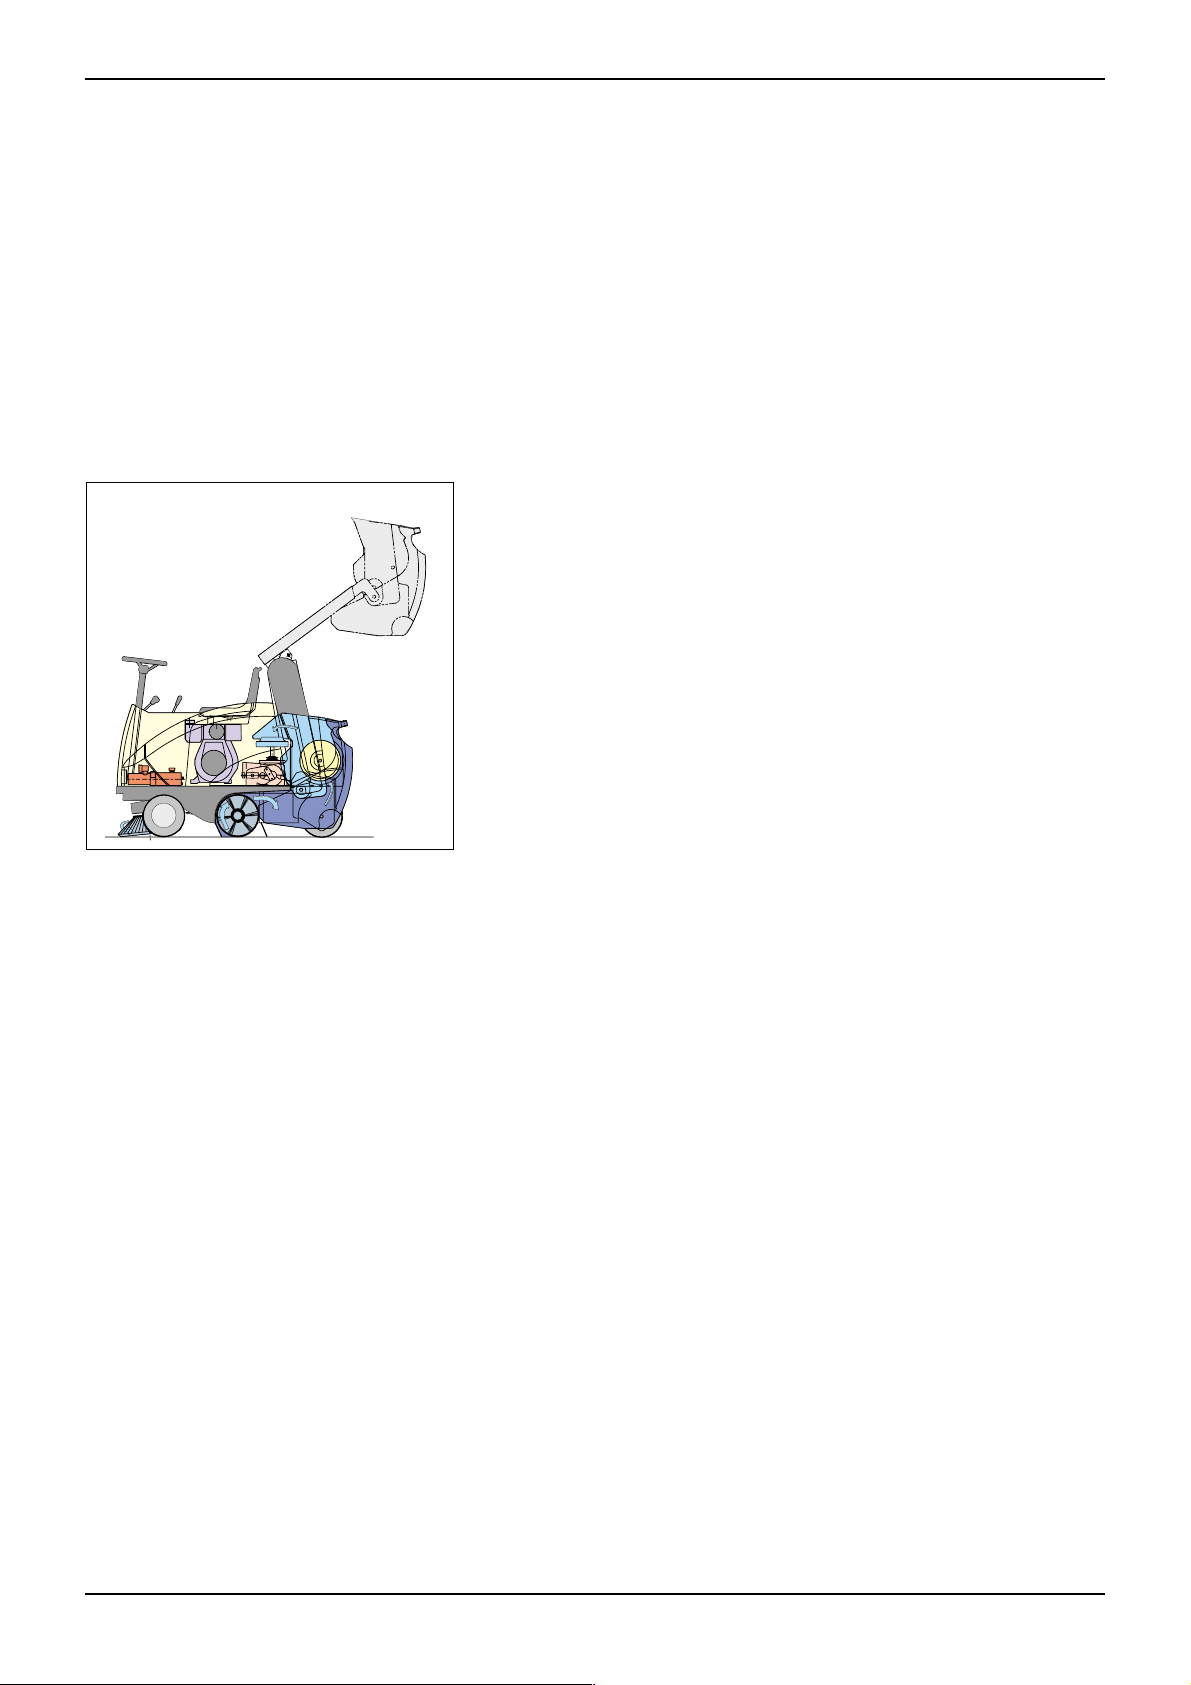
Main components
Drive unit
– single-cylinder diesel engine
– continuously-adjustable hydraulic drive to rear wheels
– main brush and side brush driven via belts
– hydraulically controlled emptying of waste hopper
– high-performance generator
Sweeping mechanism
– main brush employing throw-over principle for particularly
effective filling of waste hopper
– floating main brush roller with adjustable height above
ground
– quick-change mechanism for main brush
– side brush can be raised and swivels automatically
– bulk waste flap for picking up larger items (e.g. cigarette
packs or drink cans)
Filter system
– integrated dust extraction for main roller by means of
radial turbine
2
– 2 circular filters with 2 x 3 m
effective surface area
– electric filter cleaner with automatic shaking mechanism
30
KMR 1250 D User Instructions English
Prior to initial start-up
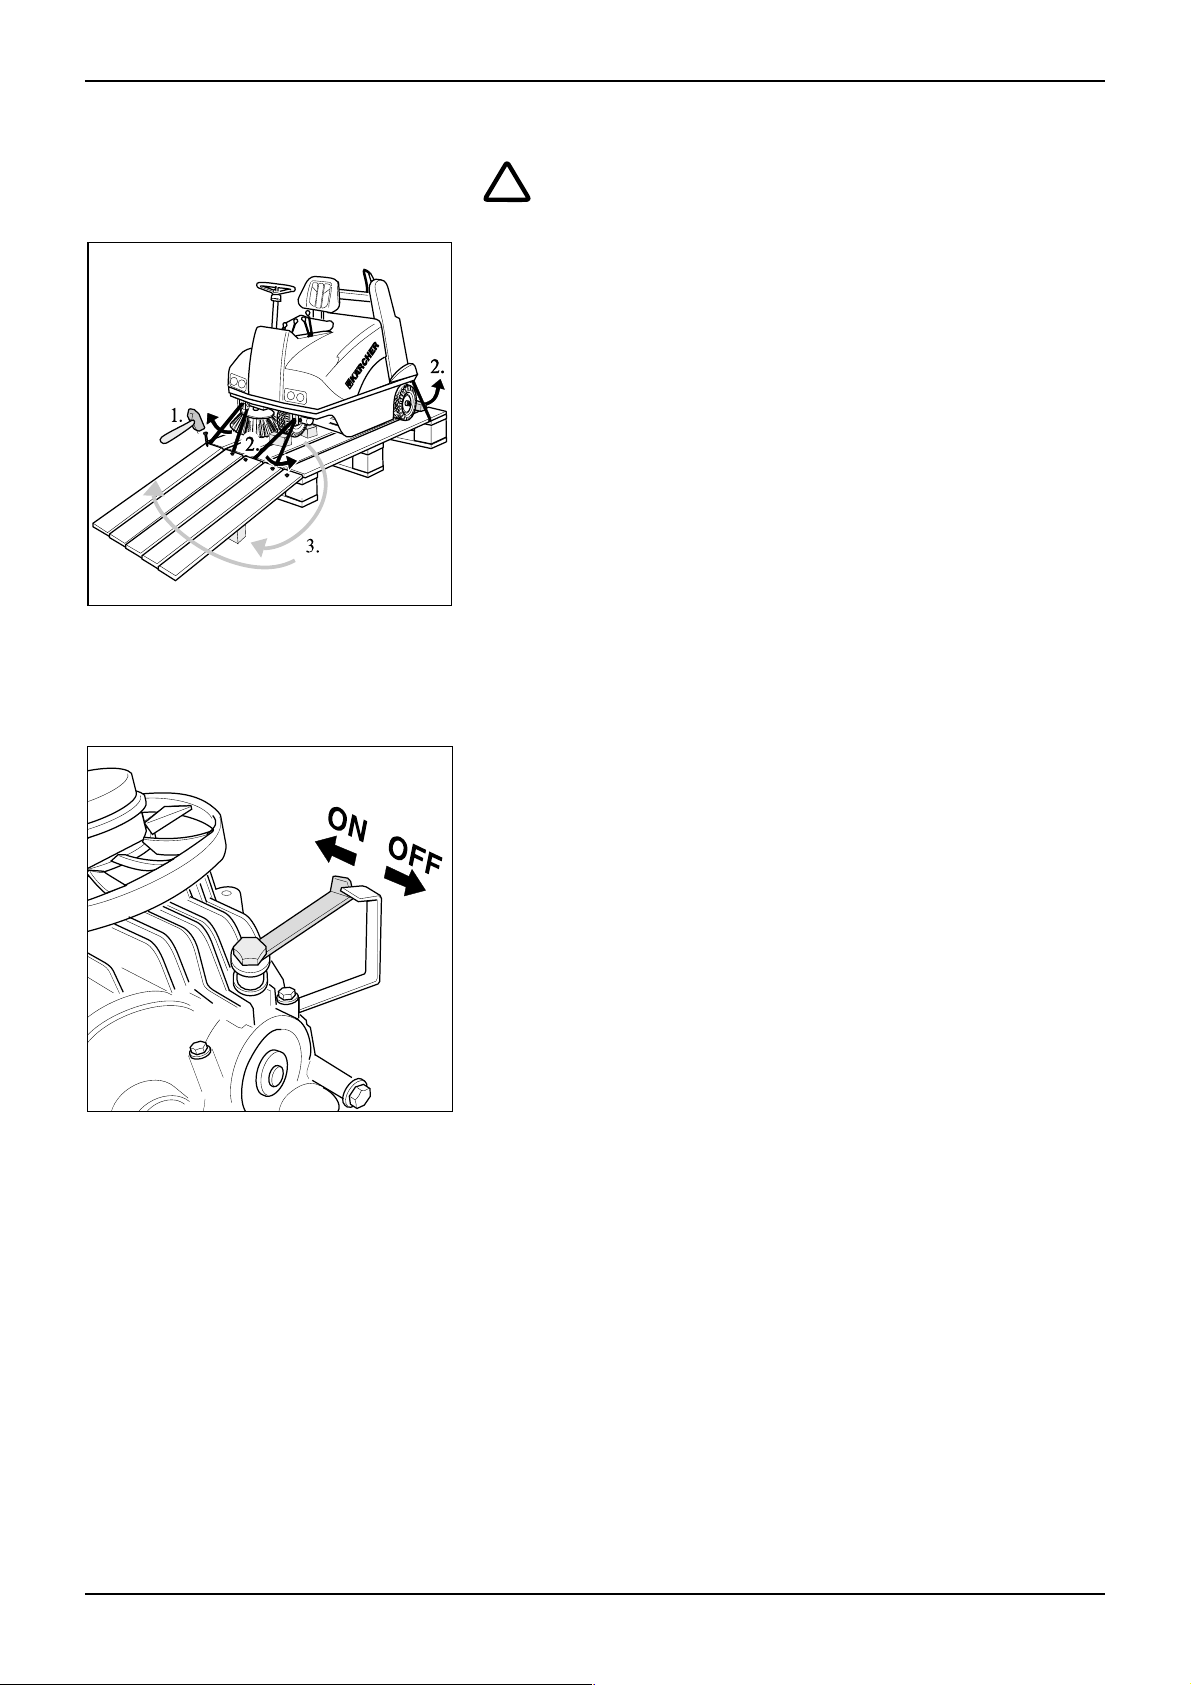
Unloading procedure
Do not use a forklift truck for unloading as it could
!
cause damage to the sweeper.
The sweeper has been lashed onto a pallet to ensure that
it can be transported safely. The procedure for unpacking
the sweeper is as follows:
1. Remove the wooden boards from the pallet and nail
them onto the end of the pallet (in front of the sweeper).
2. Detach the wires holding the sweeper in place at the
ends of the pallet.
3. Knock away the blocks used for locking the wheels and
use them for the support of the wooden planks on the left
and right.
4. Drive the sweeper off the pallet and down the ramp
made from the boards.
5. The side brush has been tied to the chassis for trans-
port. Undo the cord holding it in place.
Pushing the sweeper by hand
If you wish to move the sweeper without using its own drive:
n Open the engine cover.
n Fold the cover towards the rear; it will be held in place by
the pneumatic spring.
ç Turn the lever for allowing freewheeling to position "OFF".
n Release the handbrake.
n Push the sweeper to the required destination.
Note:
Do not push the sweeper over long distances or move it at a
speed greater than 10 km/h (e.g. when it is being towed).
After moving the machine
n Put the parking brake on.
n Set free-wheeling lever to position ”ON”.
31
English User Instructions KMR 1250 D
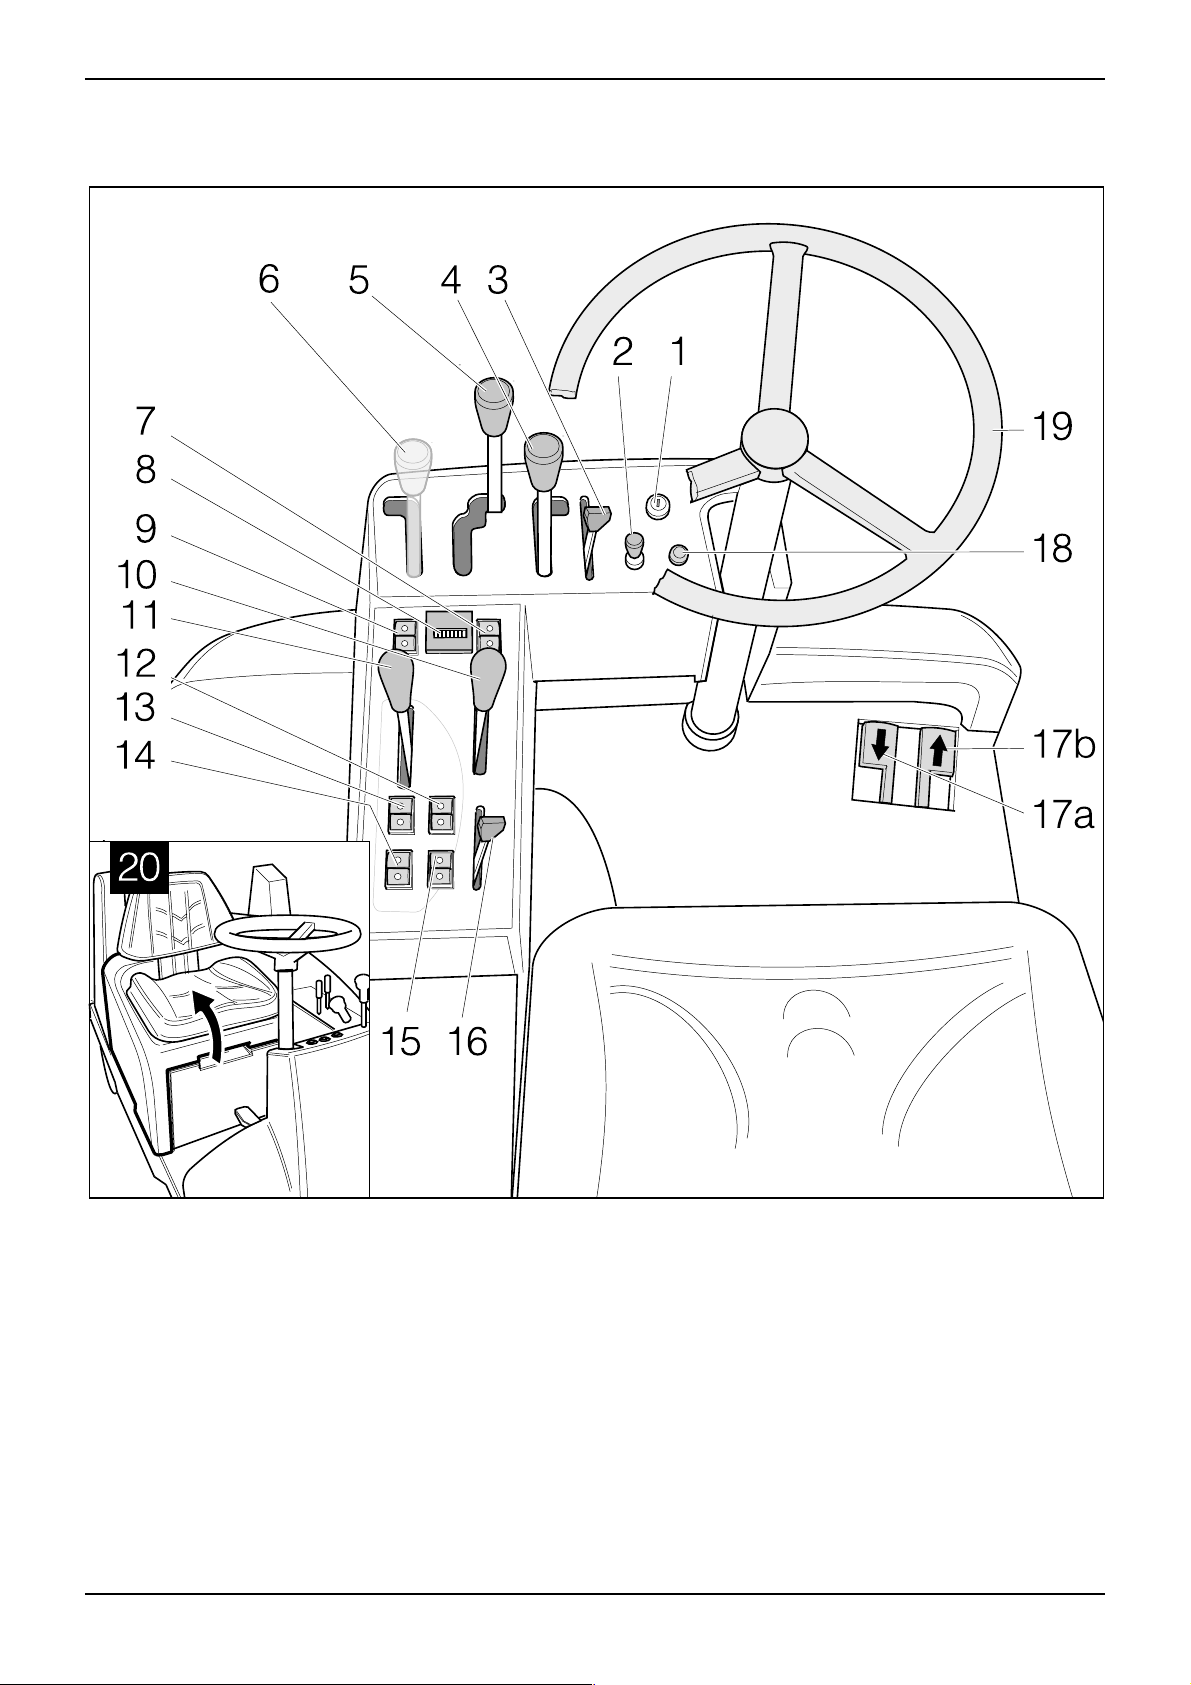
Operating controls
1. Ignition lock
3. Throttle lever
4. Raise / lower RH side brush
5. Raise / lower main brush
6. Raise / lower LH side brush (optional)
7. Switch for two-handed operation
8. Operating hour counter
9. Lights
10. Bulk waste flap
11. Parking brake / Driving brake
* Function only operative in conjunction with 7 (two-handed operation).
32
12. Tip waste hopper *
13. Raise waste hopper *
14. Lower waste hopper *
15. Filter cleaning
16. Sweeping mode, wet / dry
17a. Driving pedal backwards
17b. Driving pedal forwards
18. Horn
19. Steering wheel
20. Open/close unit cover
KMR 1250 D User Instructions English
Preparing the sweeper for
use
All directions given (left/right, front/rear) are as seen from
the driver’s seat.
n Check the oil level in the engine (see Chapter: “Mainte-
nance”).
n Check the amount of fuel in the tank and fill up, if required
(see below).
n Check the level of hydraulic fluid and top up, if required
(see Chapter: “Maintenance”).
n Check the air pressure in the tyres (see Chapter:
“Maintenance”).
n Inspect the brush roller and remove any string, rope, etc.,
that may be caught up in the brushes.
n Check the dust filter. If it is very dirty, operate the shaker
to clean it off.
n Empty the waste container.
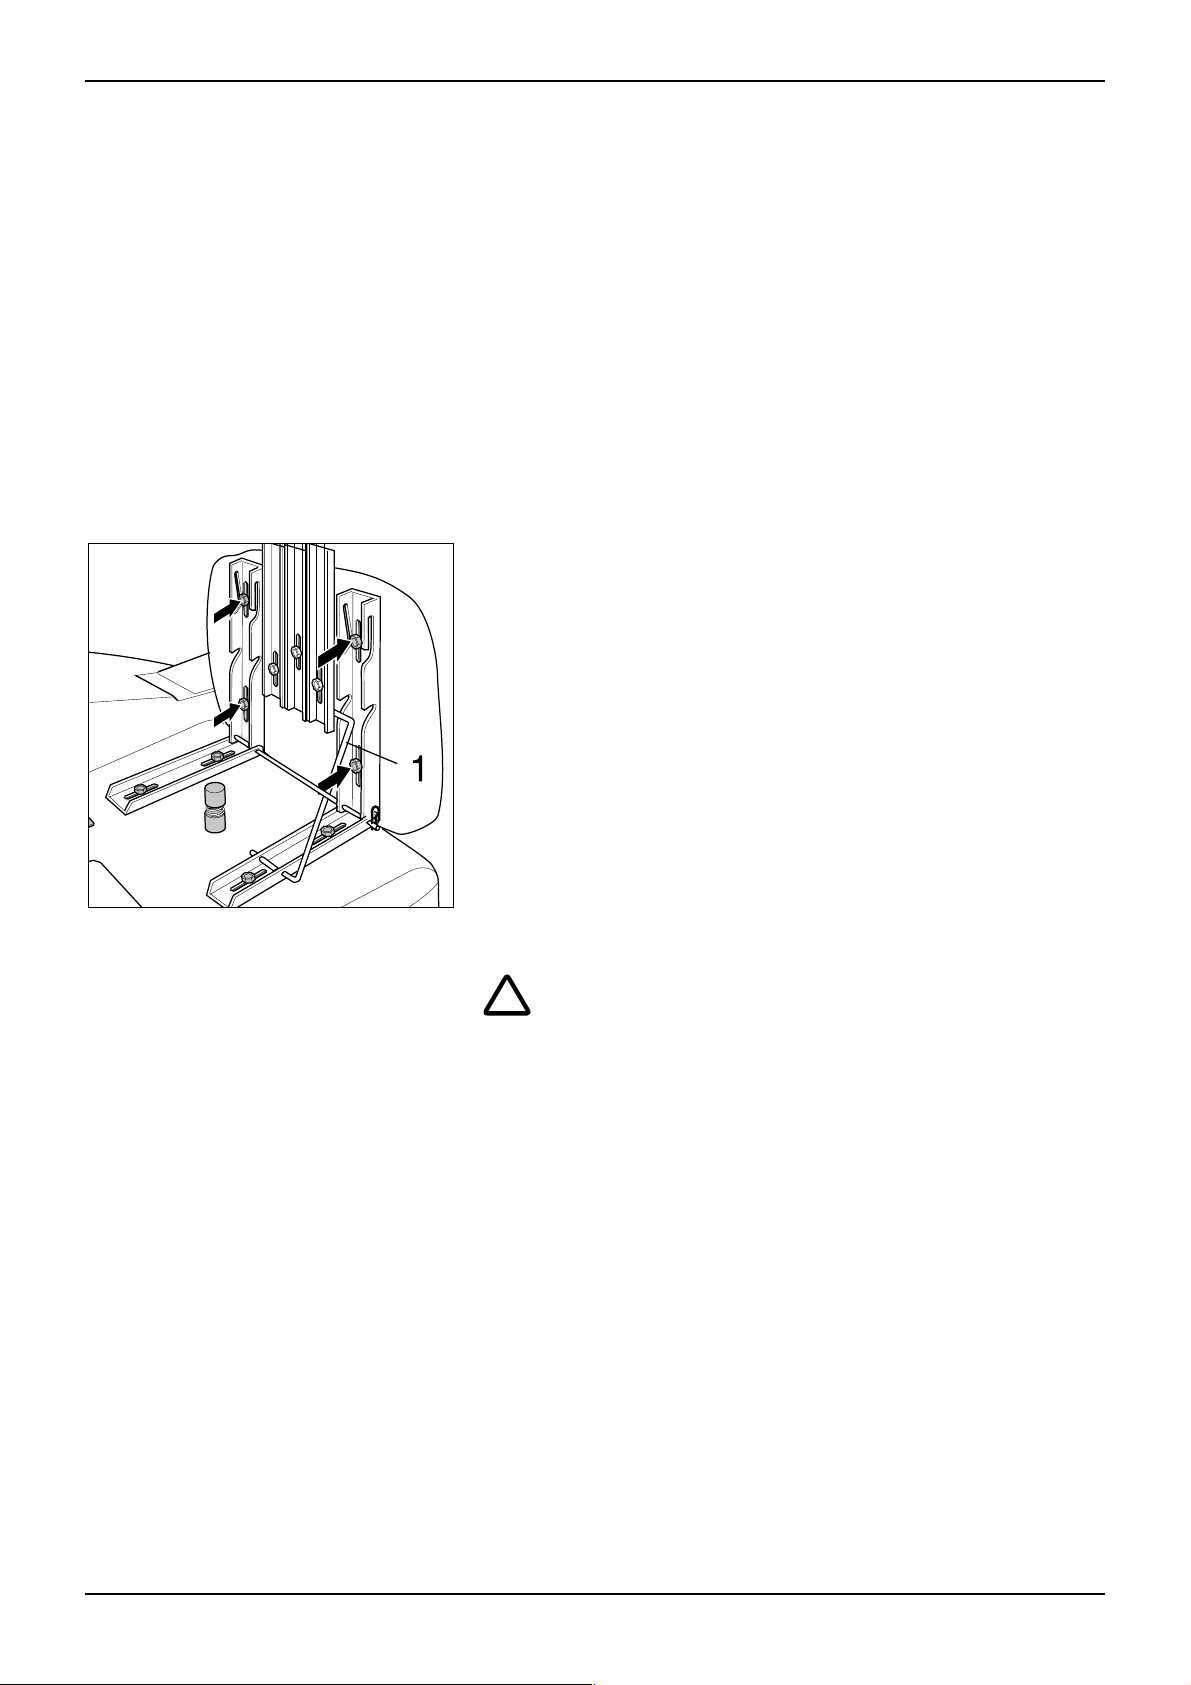
Adjusting the driver’s seat
The driver’s seat can be adjusted to suit persons of various
heights.
n Unhook the rods
ç Undo the 4 screws.
n Move the seat to the desired position.
n Tighten the screws and hook the rods back into the tilting
device.
1 in the seat tilting device.
Filling the fuel tank
!
Explosion hazard while refuelling!
n Do not fill up with fuel
– in an enclosed space
– while the engine is running.
n Do not smoke while refuelling the vehicle.
n Fuel expands as it becomes warmer.
Do not fill the tank right up to the top. Leave a gap of at
least 1 cm under the bottom edge of the filler neck.
n Wipe up any fuel they may have been spilt and ensure
that the cap is replaced firmly on the tank.
n Use only diesel.
Open fuel tap
n Open unit cover
ç Open fuel tap at position 0 (OPEN)
Lever points downwards
n Close unit cover
33
 Loading...