


 Loading...
K 5 Compact
|
|
|
|
|
|
|
Deutsch |
5 |
|||||||
|
|
|
|
|
|
|
|||||||||
|
|
|
|
|
|
|
|||||||||
|
|
|
|
|
|
|
English |
10 |
|||||||
|
|
|
|
|
|
|
Français |
15 |
|||||||
|
|
|
|
|
|
|
Italiano |
20 |
|||||||
|
|
|
|
|
|
|
Nederlands |
25 |
|||||||
|
|
|
|
|
|
|
Español |
30 |
|||||||
|
|
|
|
|
|
|
Português |
35 |
|||||||
|
|
|
|
|
|
|
Dansk |
40 |
|||||||
|
|
|
|
|
|
|
Norsk |
45 |
|||||||
|
|
|
|
|
|
|
Svenska |
50 |
|||||||
|
|
|
|
|
|
|
Suomi |
55 |
|||||||
|
|
|
|
|
|
|
Ελληνικά |
60 |
|||||||
|
|
|
|
|
|
|
Türkçe |
65 |
|||||||
|
|
|
|
|
|
|
Русский |
70 |
|||||||
|
|
|
|
|
|
|
Magyar |
76 |
|||||||
|
|
|
|
|
|
|
Čeština |
81 |
|||||||
|
|
|
|
|
|
|
Slovenščina |
86 |
|||||||
|
|
|
|
|
|
|
Polski |
91 |
|||||||
|
|
|
|
|
|
|
Româneşte |
96 |
|||||||
|
|
|
|
|
|
|
Slovenčina |
101 |
|||||||
|
|
|
|
|
|
|
Hrvatski |
106 |
|||||||
|
|
|
|
|
|
|
Srpski |
111 |
|||||||
|
|
|
|
|
|
|
Български |
116 |
|||||||
|
|
|
|
|
|
|
Eesti |
121 |
|||||||
|
|
|
|
|
|
|
Latviešu |
126 |
|||||||
|
|
|
|
|
|
|
Lietuviškai |
131 |
|||||||
|
|
|
|
|
|
|
Українська |
136 |
|||||||
|
|
|
|
|
|
|
Қазақша |
141 |
|||||||
|
|
|
|
|
|
|
ήόϠ |
146 |
|||||||
|
|
|
|
|
|
|
|
|
|
|
|
|
|
|
|
|
|
|
|
|
|
|
|
|
|
|
|
|
|
|
|
|
|
|
|
|
|
|
|
|
|
|
|
|
|
|
|
|
|
|
|
|
|
|
|
|
|
|
|
|
|
|
|
|
|
|
|
|
|
|
|
|
|
|
|
|
|
|
|
|
|
|
|
|
|
|
|
|
|
|
|
|
|
|
|
001 |
59672000 (11/16) |
|

2
3

4 |

Inhaltsverzeichnis |
|
|
Sicherheit . . . . . . . . . . . . . . . . . . . . . . . . . . . |
DE |
5 |
Umweltschutz . . . . . . . . . . . . . . . . . . . . . . . . |
DE |
5 |
Gerätebeschreibung . . . . . . . . . . . . . . . . . . . |
DE |
6 |
Montage . . . . . . . . . . . . . . . . . . . . . . . . . . . . |
DE |
6 |
Inbetriebnahme . . . . . . . . . . . . . . . . . . . . . . . |
DE |
6 |
Betrieb . . . . . . . . . . . . . . . . . . . . . . . . . . . . . . |
DE |
7 |
Transport . . . . . . . . . . . . . . . . . . . . . . . . . . . . |
DE |
7 |
Lagerung . . . . . . . . . . . . . . . . . . . . . . . . . . . . |
DE |
8 |
Pflege und Wartung. . . . . . . . . . . . . . . . . . . . |
DE |
8 |
Ersatzteile . . . . . . . . . . . . . . . . . . . . . . . . . . . |
DE |
8 |
Hilfe bei Störungen . . . . . . . . . . . . . . . . . . . . |
DE |
8 |
Garantie. . . . . . . . . . . . . . . . . . . . . . . . . . . . . |
DE |
9 |
Technische Daten . . . . . . . . . . . . . . . . . . . . . |
DE |
9 |
EU-Konformitätserklärung . . . . . . . . . . . . . . . |
DE |
9 |
Sicherheit |
|
|
Lesen Sie vor der ersten Benutzung Ihres Gerätes diese Originalbetriebsanleitung und die beiliegenden Sicherheitshinweise.
Handeln Sie danach. Bewahren Sie beide Hefte für späteren Gebrauch oder für Nachbesitzer auf.
Bestimmungsgemäße Verwendung
Verwenden Sie diesen Hochdruckreiniger ausschließlich für den Privathaushalt.
–zum Reinigen von Maschinen, Fahrzeugen, Bauwerken, Werkzeugen, Fassaden, Terrassen, Gartengeräten usw. mit Hochdruck-Wasserstrahl (bei Bedarf mit Zusatz von Reinigungsmitteln).
–mit von KÄRCHER zugelassenen Zubehörteilen, Ersatzteilen und Reinigungsmitteln. Beachten Sie die Hinweise, die den Reinigungsmitteln beigegeben sind.
Gefahrenstufen
GEFAHR
Hinweis auf eine unmittelbar drohende Gefahr, die zu schweren Körperverletzungen oder zum Tod führt.
WARNUNG
Hinweis auf eine möglicherweise gefährliche Situation, die zu schweren Körperverletzungen oder zum Tod führen kann.
VORSICHT
Hinweis auf eine möglicherweise gefährliche Situation, die zu leichten Verletzungen führen kann.
ACHTUNG
Hinweis auf eine möglicherweise gefährliche Situation, die zu Sachschäden führen kann.
Symbole auf dem Gerät
Das Gerät darf nicht unmittelbar an das öffentliche Trinkwassernetz angeschlossen werden.


 Gerät darf nur in liegender Position (horizontal) betrieben werden.


 Hochdruckstrahl nicht auf Personen, Tiere, aktive elektrische Ausrüstung oder auf das Gerät selbst richten.


 Gerät vor Frost schützen.
Sicherheitseinrichtungen
VORSICHT
Sicherheitseinrichtungen dienen dem Schutz des Benutzers und dürfen nicht verändert oder umgangen werden.
Geräteschalter
Der Geräteschalter verhindert den unbeabsichtigten Betrieb des Gerätes.
Verriegelung Handspritzpistole
Die Verriegelung sperrt den Hebel der Handspritzpistole und verhindert den unbeabsichtigten Start des Gerätes.
Überströmventil mit Druckschalter
Das Überströmventil verhindert eine Überschreitung des zulässigen Arbeitsdrucks.
Wird der Hebel an der Handspritzpistole losgelassen, schaltet der Druckschalter die Pumpe ab, der Hochdruckstrahl stoppt. Wird der Hebel gezogen, schaltet die Pumpe wieder ein.
Motorschutzschalter
Bei zu hoher Stromaufnahme schaltet der Motorschutzschalter das Gerät ab.
Umweltschutz
Hinweise zu Inhaltsstoffen (REACH)
Aktuelle Informationen zu Inhaltsstoffen finden Sie unter: www.kaercher.de/REACH
Die Verpackungsmaterialien sind recyclebar. Bitte

 Verpackungen umweltgerecht entsorgen.
Elektrische und elektronische Geräte enthalten oft Bestandteile, die bei falschem Umgang oder falscher Entsorgung eine potentielle Gefahr für die menschliche Gesundheit und die Umwelt darstel-
len können. Für den ordnungsgemäßen Betrieb des Gerätes sind diese Bestandteile jedoch notwendig. Mit diesem Symbol gekennzeichnete Geräte dürfen nicht mit dem Hausmüll entsorgt werden.
Altgeräte enthalten wertvolle recyclebare Materialien, die einer Verwertung zugeführt werden sollten. Batterien und Akkus enthalten Stoffe, die nicht in die Umwelt gelangen dürfen. Bitte Altgeräte sowie Batterien oder Akkus umweltgerecht entsorgen.
Reinigungsarbeiten, bei denen ölhaltiges Abwasser entsteht z. B. Motorenwäsche, Unterbodenwäsche dürfen nur an Waschplätzen mit Ölabscheider durchgeführt werden.
Arbeiten mit Reinigungsmitteln dürfen nur auf flüssigkeitsdichten Arbeitsflächen mit Anschluss an die Schmutzwasserkanalisation durchgeführt werden. Reinigungsmittel nicht in Gewässer oder Erdreich eindringen lassen.
Die Entnahme von Wasser aus öffentlichen Gewässern ist in einigen Ländern nicht erlaubt.
DE – 5 |
5 |

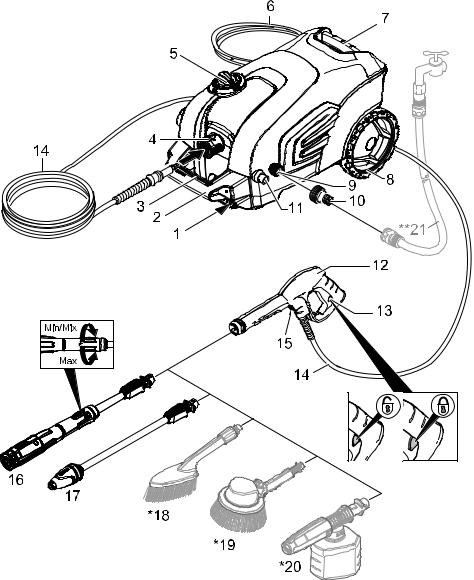
Gerätebeschreibung
In dieser Betriebsanleitung wird die maximale Ausstattung beschrieben. Je nach Modell gibt es Unterschiede im Lieferumfang (siehe Verpackung).
Abbildungen siehe Ausklappseite 3
1Aufbewahrung für Zubehör
2Transportgriff, ausziehbar
3Tragegriff
4Schnellkupplung für Hochdruckschlauch
5Geräteschalter „0/OFF“ / „I/ON“
6Netzanschlussleitung mit Netzstecker
7Tragegriff
8Transportrad
9Wasseranschluss mit eingebautem Sieb
10Kupplung für Wasseranschluss
11Saugschlauch für Reinigungsmittel (mit Filter)
12Handspritzpistole
13Verriegelung Handspritzpistole
14Hochdruckschlauch
15Taste zum Trennen des Hochdruckschlauches von der Handspritzpistole
16Strahlrohr mit Druckregulierung (Vario Power) Für die gängigsten Reinigungsaufgaben. Der Arbeitsdruck ist stufenlos zwischen „Min“ und „Max“ regelbar. In Stellung „Mix“ kann Reinigungsmittel zudosiert werden.
Zum Verstellen des Arbeitsdrucks, Hebel der Handspritzpistole loslassen und Strahlrohr auf gewünschte Stellung drehen.
17Strahlrohr mit Dreckfräser
Für hartnäckige Verschmutzungen.
*Optionales Zubehör
18Waschbürste
Zum Arbeiten mit Reinigungsmittel geeignet.
19Rotierende Waschbürste
Besonders geeignet für die Autoreinigung.
20Schaumdüse mit Reinigungsmittelbehälter Reinigungsmittel wird aus dem Behälter angesaugt und es entsteht ein kraftvoller Reinigungsmittelschaum.
**Zusätzlich erforderlich
21Gewebeverstärkter Wasserschlauch mit handelsüblicher Kupplung
–Durchmesser mindestens 1/2 Zoll (13 mm)
–Länge mindestens 7,5 m
Montage
Dem Gerät lose beigelegte Teile vor Inbetriebnahme montieren.
Abbildungen siehe Ausklappseite 4
Abbildung 
Kupplung auf Wasseranschluss des Gerätes schrauben.
Abbildung 
Hochdruckschlauch in Handspritzpistole stecken, bis dieser hörbar einrastet.
Hinweis: Auf richtige Ausrichtung des Anschlussnippels achten.
Sichere Verbindung durch Ziehen am Hochdruckschlauch prüfen.
Inbetriebnahme
Gerät horizontal auf eine ebene Fläche legen.
Abbildung 
Hochdruckschlauch in Schnellkupplung stecken, bis dieser hörbar einrastet.
Netzstecker in Steckdose stecken.
Wasserversorgung
Anschlusswerte siehe Typenschild/Technische Daten.
ACHTUNG
Verunreinigungen im Wasser können die Hochdruckpumpe und das Zubehör beschädigen. Zum Schutz wird die Verwendung des KÄRCHER-Wasserfilters (Sonderzubehör, Bestellnummer 4.730-059) empfohlen.
Wasserversorgung aus Wasserleitung
Vorschriften des Wasserversorgungsunternehmens beachten.
ACHTUNG
Schlauchkupplungen aus Metall mit Aquastop können zur Beschädigung der Pumpe führen! Bitte Schlauchkupplung aus Kunststoff oder KÄRCHER Schlauchkupplung aus Messing verwenden.
Abbildung 
Wasserzulaufschlauch auf Kupplung am Wasseranschluss stecken.
Wasserzulaufschlauch an die Wasserversorgung anschließen.
Wasserhahn vollständig öffnen.
Wasser aus offenen Behältern ansaugen
Dieser Hochdruckreiniger ist mit dem KÄRCHER-Saug- schlauch mit Rückschlagventil (Sonderzubehör, Bestellnr. 4.440-238) zum Ansaugen von Oberflächenwasser z. B. aus Regentonnen oder Teichen geeignet (Maximale Ansaughöhe siehe technische Daten).
Kupplung vom Wasseranschluss entfernen.
Saugschlauch mit Wasser füllen.
Saugschlauch auf Wasseranschluss des Gerätes schrauben und in Wasserquelle (zum Beispiel Regentonne) hängen.
Gerät vor dem Betrieb entlüften.
Gerät einschalten „I/ON“.
Hebel der Handspritzpistole entsperren.
Hebel ziehen, das Gerät schaltet ein.
Gerät laufen lassen (max. 2 Minuten), bis Wasser blasenfrei an der Handspritzpistole austritt.
Hebel der Handspritzpistole loslassen.
Hinweis: Wird der Hebel losgelassen, schaltet das Gerät ab. Der Hochdruck im System bleibt erhalten.
Hebel der Handspritzpistole verriegeln.
6 |
DE – 6 |

Betrieb
ACHTUNG
Trockenlauf von mehr als 2 Minuten führt zu Beschädigungen an der Hochdruckpumpe. Baut das Gerät innerhalb von 2 Minuten keinen Druck auf, Gerät abschalten und gemäß Hinweisen im Kapitel „Hilfe bei Störungen“ verfahren.
ACHTUNG
Beschädigungsgefahr! Gerät darf nur in liegender Position (horizontal) betrieben werden.
Betrieb mit Hochdruck
VORSICHT
Mindestens 30 cm Strahlabstand bei der Reinigung von lackierten Oberflächen einhalten, um Beschädigungen zu vermeiden.
ACHTUNG
Autoreifen, Lack oder empfindliche Oberflächen wie Holz nicht mit dem Dreckfräser reinigen, Gefahr der Beschädigung.
Abbildung 
Strahlrohr in Handspritzpistole einstecken und durch 90° Drehung fixieren.
Gerät einschalten „I/ON“.
Hebel der Handspritzpistole entsperren.
Hebel ziehen, das Gerät schaltet ein.
Hinweis: Wird der Hebel losgelassen, schaltet das Gerät ab. Der Hochdruck im System bleibt erhalten.
Betrieb mit Waschbürste
ACHTUNG
Gefahr von Lackschäden
Bei Arbeiten mit der Waschbürste muss diese frei von Schmutzoder sonstigen Partikeln sein.
Waschbürste in Handspritzpistole einstecken und durch 90° Drehung fixieren.
Hinweis: Bei Bedarf können auch die Waschbürsten zum Arbeiten mit Reinigungsmittel verwendet werden.
Betrieb mit Reinigungsmittel
Hinweis: Reinigungsmittel kann nur im Niederdruck zugemischt werden.
GEFAHR
Bei Verwendung von Reinigungsmitteln ist das Sicherheitsdatenblatt des Reinigungsmittel-Herstellers zu beachten, insbesondere die Hinweise zur persönlichen Schutzausrüstung.
Abbildung 
Saugschlauch für Reinigungsmittel in gewünschter Länge aus dem Gehäuse ziehen.
Saugschlauch für Reinigungsmittel in einen Behälter mit Reinigungsmittellösung hängen.
Strahlrohr mit Druckregulierung (Vario Power) verwenden.
Strahlrohr auf Stellung „Mix“ drehen.
Hinweis: Dadurch wird bei Betrieb die Reinigungsmittellösung dem Wasserstrahl zugemischt.
Empfohlene Reinigungsmethode
Reinigungsmittel sparsam auf die trockene Oberfläche sprühen und einwirken (nicht trocknen) lassen.
Gelösten Schmutz mit Hochdruckstrahl abspülen.
Optional
Schaumdüse
Reinigungsmittellösung in Reinigungsmittelbehälter der Schaumdüse füllen (Dosierungsangabe auf Gebinde der Reinigungsmittel beachten).
Schaumdüse mit dem Reinigungsmittelbehälter verbinden.
Schaumdüse in Handspritzpistole einstecken und durch 90° Drehung fixieren.
Betrieb unterbrechen
Hebel der Handspritzpistole loslassen.
Hebel der Handspritzpistole verriegeln.
Bei längeren Arbeitspausen (über 5 Minuten) zusätzlich das Gerät ausschalten „0/OFF“.
Betrieb beenden
VORSICHT
Den Hochdruckschlauch nur von der Handspritzpistole oder dem Gerät trennen, wenn kein Druck im System vorhanden ist.
Nach Arbeiten mit Reinigungsmittel: Gerät etwa 1 Minute zum klarspülen betreiben.
Hebel der Handspritzpistole loslassen.
Gerät ausschalten „0/OFF“.
Netzstecker aus der Steckdose ziehen.
Wasserhahn schließen.
Hebel der Handspritzpistole drücken, um den noch vorhandenen Druck im System abzubauen.
Hebel der Handspritzpistole verriegeln.
VORSICHT
Beim Trennen von Zulauf– oder Hochdruckschlauch kann nach dem Betrieb heißes Wasser aus den An-
schlüssen austreten.
Gerät von der Wasserversorgung trennen.
Transport
VORSICHT
Verletzungsund Beschädigungsgefahr! Gewicht des Gerätes beim Transport beachten.
Transport von Hand
Abbildung 


Gerät an den Tragegriffen hochheben und tragen.
Abbildung 
Transportgriff ausziehen, er rastet hörbar ein. Gerät am Transportgriff ziehen.
Transport in Fahrzeugen
Gerät gegen Verrutschen und Kippen sichern.
DE – 7 |
7 |

Lagerung
VORSICHT
Verletzungsund Beschädigungsgefahr! Gewicht des Gerätes bei der Lagerung beachten.
Gerät aufbewahren
Gerät auf einer ebenen Fläche abstellen.
Trenntaste an der Handspritzpistole drücken und Hochdruckschlauch von der Handspritzpistole trennen.
Gehäuse der Schnellkupplung für Hochdruckschlauch in Pfeilrichtung drücken und Hochdruckschlauch herausziehen.
Abbildung 
Handspritzpistole in Aufbewahrung für Handspritzpistole stecken.
Strahlrohr in die Aufbewahrung für Strahlrohr einrasten.
Hochdruckschlauch und Netzanschlussleitung am Gerät verstauen.
Frostschutz
ACHTUNG
Nicht vollständig entleerte Geräte und Zubehör können von Frost zerstört werden. Gerät und Zubehör vollstän-
dig entleeren und vor Frost schützen.
Um Schäden zu vermeiden:
Gerät vollständig von Wasser entleeren: Gerät ohne angeschlossenen Hochdruckschlauch und ohne angeschlossene Wasserversorgung einschalten (max. 1 min) und warten, bis kein Wasser mehr am Hochdruckanschluss austritt. Gerät ausschalten.
Gerät mit komplettem Zubehör in einem frostsiche-
ren Raum aufbewahren.
Vor längerer Lagerung, z.B. im Winter zusätzlich die Hinweise im Kapitel Pflege beachten.
Pflege und Wartung
GEFAHR
Gefahr eines Stromschlags.
Vor allen Arbeiten am Gerät, Gerät ausschalten und Netzstecker ziehen.
Sieb im Wasseranschluss reinigen
ACHTUNG
Sieb darf nicht beschädigt werden.
Kupplung vom Wasseranschluss entfernen. Abbildung 
Sieb mit einer Flachzange herausziehen.
Sieb unter fließendem Wasser reinigen.
Sieb wieder in den Wasseranschluss einsetzen.
Reinigungsmittelfilter reinigen
Abbildung 
Filter vom Saugschlauch für Reinigungsmittel abziehen und unter fließendem Wasser reinigen.
Ersatzteile
Verwenden Sie ausschließlich Original KÄRCHER Ersatzteile. Eine Ersatzteilübersicht finden Sie am Ende dieser Betriebsanleitung.
Hilfe bei Störungen
Kleinere Störungen können Sie mit Hilfe der folgenden Übersicht selbst beheben.
Im Zweifelsfall wenden Sie sich bitte an den autorisierten Kundendienst.
GEFAHR
Gefahr eines Stromschlags.
Vor allen Arbeiten am Gerät, Gerät ausschalten und Netzstecker ziehen.
Gerät läuft nicht
Hebel der Handspritzpistole ziehen, das Gerät schaltet ein.
Prüfen ob die angegebene Spannung auf dem Typenschild mit der Spannung der Stromquelle übereinstimmt.
Netzanschlussleitung auf Beschädigung prüfen.
Motor überlastet, der Motorschutzschalter hat aus-
gelöst.
–Gerät ausschalten „0/OFF“.
–Gerät eine Stunde abkühlen lassen.
–Gerät einschalten und wieder in Betrieb nehmen. Tritt die Störung mehrmalig auf, Gerät durch Kundendienst prüfen lassen.
Gerät läuft nicht an, Motor brummt
Spannungsabfall wegen schwachem Stromnetz oder bei Verwendung eines Verlängerungskabels.
Beim Einschalten zuerst den Hebel der Handspritzpistole ziehen, dann den Geräteschalter auf „I/ON“ stellen.
Gerät kommt nicht auf Druck
Wasserversorgung auf ausreichende Fördermenge überprüfen.
Sieb im Wasseranschluss mit einer Flachzange herausziehen und unter fließendem Wasser reinigen.
Gerät entlüften: Gerät ohne angeschlossenen Hochdruckschlauch einschalten und warten (max. 2 Minuten), bis Wasser blasenfrei am Hochdruckanschluss austritt. Gerät ausschalten und Hochdruckschlauch wieder anschließen.
Ansaughöhe 0,5 m beim Ansaugen aus offenem Behälter überschritten.
Starke Druckschwankungen
Hochdruckdüse reinigen: Verschmutzungen aus der Düsenbohrung mit einer Nadel entfernen und von vorne mit Wasser ausspülen.
Wasserzulaufmenge überprüfen.
Gerät undicht
Eine geringe Undichtheit des Gerätes ist technisch bedingt. Bei starker Undichtheit den autorisierten Kundendienst beauftragen.
Reinigungsmittel wird nicht angesaugt
Strahlrohr mit Druckregulierung (Vario Power) verwenden.
Strahlrohr auf Stellung „Mix“ drehen.
Filter am Saugschlauch für Reinigungsmittel reinigen.
Saugschlauch für Reinigungsmittel auf Knickstellen überprüfen.
8 |
DE – 8 |

Garantie
In jedem Land gelten die von unserer zuständigen Vertriebsgesellschaft herausgegebenen Garantiebedingungen. Etwaige Störungen an Ihrem Gerät beseitigen wir innerhalb der Garantiefrist kostenlos, sofern ein Materialoder Herstellungsfehler die Ursache sein sollte. Im Garantiefall wenden Sie sich bitte mit Kaufbeleg an Ihren Händler oder die nächste autorisierte Kundendienststelle.
Adressen finden Sie unter: www.kaercher.com/dealersearch
Technische Daten
Elektrischer Anschluss
Spannung |
230 |
V |
|
1~50 Hz |
|
|
|
|
Anschlussleistung |
2,1 kW |
|
|
|
|
Schutzgrad |
IP X5 |
|
|
|
|
Schutzklasse |
I |
|
|
|
|
Netzabsicherung (träge) |
10 |
A |
|
|
|
Wasseranschluss |
|
|
Zulaufdruck (max.) |
0,8 |
MPa |
|
|
|
Zulauftemperatur (max.) |
40 |
°C |
|
|
|
Zulaufmenge (min.) |
10 l/min |
|
|
|
|
Max. Ansaughöhe |
0,5 m |
|
|
|
|
Leistungsdaten |
|
|
Arbeitsdruck |
12,5 |
MPa |
|
|
|
Max. zulässiger Druck |
14,5 |
MPa |
|
|
|
Fördermenge, Wasser |
7,5 l/min |
|
|
|
|
Fördermenge maximal |
8,3 l/min |
|
|
|
|
Fördermenge, Reinigungsmittel |
0,3 l/min |
|
|
|
|
Rückstoßkraft der Handspritzpistole |
20 |
N |
|
|
|
Maße und Gewichte |
|
|
Länge |
516 mm |
|
|
|
|
Breite |
295 mm |
|
|
|
|
Höhe |
282 mm |
|
|
|
|
Gewicht, betriebsbereit mit Zubehör |
13,1 |
kg |
|
|
|
Ermittelte Werte gemäß EN 60335-2-79 |
|
|
Hand-Arm Vibrationswert |
<2,5 m/s2 |
|
Unsicherheit K |
0,3 m/s2 |
|
Schalldruckpegel LpA |
77 dB(A) |
|
Unsicherheit KpA |
3 dB(A) |
|
Schallleistungspegel LWA + |
92 dB(A) |
|
Unsicherheit KWA |
|
|
Technische Änderungen vorbehalten.
EU-Konformitätserklärung
Hiermit erklären wir, dass die nachfolgend bezeichnete Maschine aufgrund ihrer Konzipierung und Bauart sowie in der von uns in Verkehr gebrachten Ausführung den einschlägigen grundlegenden Sicherheitsund Gesundheitsanforderungen der EU-Richtlinien entspricht. Bei einer nicht mit uns abgestimmten Änderung der Maschine verliert diese Erklärung ihre Gültigkeit.
Produkt: Hochdruckreiniger Typ: 1.630-xxx
Einschlägige EU-Richtlinien
2000/14/EG
2014/30/EU
2006/42/EG (+2009/127/EG) 2011/65/EU
Angewandte harmonisierte Normen
EN 50581
EN 55014–1: 2006+A1: 2009+A2: 2011 EN 55014–2: 2015
EN 60335–1 EN 60335–2–79
EN 61000–3–2: 2014
EN 61000–3–3: 2013 EN 62233: 2008
Angewandtes Konformitätsbewertungsverfahren
2000/14/EG: Anhang V
Schallleistungspegel dB(A)
Gemessen: 88
Garantiert: 92
Die Unterzeichnenden handeln im Auftrag und mit Vollmacht der Geschäftsführung.
CEO |
Head of Approbation |
Dokumentationsbevollmächtigter:
S. Reiser
Alfred Kärcher GmbH & Co. KG
Alfred-Kärcher-Str. 28 - 40
71364 Winnenden (Germany)
Tel.: +49 7195 14-0
Fax: +49 7195 14-2212
Winnenden, 2016/04/01
DE – 9 |
9 |

Contents |
|
|
Safety . . . . . . . . . . . . . . . . . . . . . . . . . . . . . . |
EN |
5 |
Environmental protection. . . . . . . . . . . . . . . . |
EN |
5 |
Description of the Appliance . . . . . . . . . . . . . |
EN |
6 |
Assembly. . . . . . . . . . . . . . . . . . . . . . . . . . . . |
EN |
6 |
Start up . . . . . . . . . . . . . . . . . . . . . . . . . . . . . |
EN |
6 |
Operation. . . . . . . . . . . . . . . . . . . . . . . . . . . . |
EN |
7 |
Transport . . . . . . . . . . . . . . . . . . . . . . . . . . . . |
EN |
7 |
Storage . . . . . . . . . . . . . . . . . . . . . . . . . . . . . |
EN |
8 |
Care and maintenance . . . . . . . . . . . . . . . . . |
EN |
8 |
Spare parts . . . . . . . . . . . . . . . . . . . . . . . . . . |
EN |
8 |
Troubleshooting. . . . . . . . . . . . . . . . . . . . . . . |
EN |
8 |
Warranty . . . . . . . . . . . . . . . . . . . . . . . . . . . . |
EN |
9 |
Technical specifications. . . . . . . . . . . . . . . . . |
EN |
9 |
EU Declaration of Conformity . . . . . . . . . . . . |
EN |
9 |
Safety |
|
|
Please read and comply with these original operating instructions and the enclosed safety instructions. Proceed ac-
cordingly. Keep both booklets for future reference or subsequent owners.
Proper use
This high pressure cleaner is designed for domestic use only.
–for cleaning machines, vehicles, buildings, tools, facades, terraces, gardening tools, etc. by means of a high-pressure water jet (if necessary, with additional cleaning agents).
–with accessories, replacement parts and cleaning agents approved by KÄRCHER. Please observe the information accompanying the cleaning agents.
Hazard levels
DANGER
Pointer to immediate danger, which leads to severe injuries or death.
WARNING
Pointer to a possibly dangerous situation, which can lead to severe injuries or death.
CAUTION
Pointer to a possibly dangerous situation, which can lead to minor injuries.
ATTENTION
Pointer to a possibly dangerous situation, which can lead to property damage.
Symbols on the machine
The appliance must not be directly connected to the public drinking water network.


 The appliance must only be operated laying down (horizontal).


 The high pressure jet must not be directed at persons, animals, live electrical equipment or at the appliance itself.


 Protect the appliance against frost.
Safety Devices
CAUTION
Safety installations serve the protection of the user and may not be modified or bypassed.
Appliance switch
The appliance switch prevents unintentional operation of the appliance.
Lock trigger gun
This lock locks the lever of the trigger gun and prevents the inadvertent start of the appliance.
Overflow valve with pressure switch
The overflow valve prevents the permissible working pressure from being exceeded.
If the lever on the trigger gun is released the pressure switch turns off the pump, the high pressure jet is stopped. If the lever is pulled the pump is turned on again.
Motor protection switch
The motor protection switch switches off the device if the power consumption is high.
Environmental protection
Notes about the ingredients (REACH)
You will find current information about the ingredients at:
www.kaercher.com/REACH
The packaging material can be recycled. Please

 arrange for the environmentally appropriate disposal of the packaging.
Electrical and electronic devices often contain components which could potentially pose a dan-
ger to human health and the environment if handled or disposed of incorrectly. However, these components are necessary for the proper operation of the device. Devices marked with this symbol must not be disposed of with regular household rubbish.
Old appliances contain valuable recyclable materials that should be recycled properly. Batteries and accumulators contain substances that must not enter the environment. Please dispose of old devices and batteries or accumulators in an environmentally friendly way.
Cleaning operations which produce oily waste water, e.g. engine washes, underbody washes, may only be carried out using washing stations equipped with an oil separator.
Work with detergents must only be performed on liquid-tight work surfaces with a connection to the sewer system. Do not let release detergent into waters or earth.
The extraction of water from public waters is prohibited in some countries.
10 |
EN – 5 |
Description of the Appliance
These operating instructions describe the maximum equipment. Depending on the model, there are differences in the scopes of delivery (see packaging).
See fold-out page 3 for illustrations
1Storage for accessories
2Transport handle, detachable
3Carrying handle
4Quick coupling for high pressure hose
5Appliance switch „0/OFF“ / „I/ON“
6Mains cable with mains plug
7Carrying handle
8Bearing wheel
9Water connection with integrated sieve
10Coupling element for water connection
11Detergent suction hose (with sieve)
12Trigger gun
13Lock trigger gun
14High pressure hose
15Key to detach the high pressure hose from the trigger gun
16Spray lance with pressure regulation (Vario Power) Carrying out the most common cleaning tasks. The work pressure can be stagelessly regulated between "Min" and "Max". You can add detergent when "Mix" is selected.
In order to adjust the working pressure, release the lever of the trigger gun and turn the spray lance to the desired position.
17Spray lance with Dirtblaster For strong contaminations
*Optional accessories
18Washing brush
Suitable for use with detergents.
19Rotary washing brush
Especially suitable for cleaning cars.
20Foam nozzle with detergent container With powerful foam for effortless cleaning.
**Additionally required
21Fabric-reinforced water hose with commercially available coupling.
–Minimum diameter, 1/2 inches (13 mm).
–Minimum length 7.5 m.
Assembly
Mount loose parts delivered with appliance prior to startup.
See fold-out page 4 for illustrations
Illustration 
Screw the coupling element to the water connection on the appliance.
Illustration 
Push the high pressure hose into the trigger gun until it locks audibly.
Note: Make sure the connection nipple is aligned correctly.
Check the secure connection by pulling on the high pressure hose.
Start up
Park the appliance laying down (horizontal) on an even surface.
Illustration 
Push the high pressure hose into the quick coupling until it locks audibly.
Insert the mains plug into the socket.
Water supply
For connection values, see type plate/technical data.
ATTENTION
Impurities in the water can damage the high-pressure pump and the accessories. For protection, the use of the KÄRCHER water filter (optional accessory, order no. 4.730-059) is recommended.
Water supply from mains
Observe regulations of water supplier.
ATTENTION
Hose couplings made of metal with aquastop can damage the pump! Please use plastic couplings or KÄRCHER brass couplings.
Illustration 
Attach the water supply hose to the coupling on the water connection.
Connect the water supply hose to the water supply.
Completely open the water tap.
Drawing in water from open reservoirs
This high-pressure cleaner is suited to work with the KÄRCHER suction hose with backflow valve (Optional accessory, order no. 4.440-238) to draw in surface water, e.g. from water butts or ponds (see specifications for max. suction height).
Remove coupling from the water connection.
Fill the suction hose with water.
Screw the suction hose into the water connection of the appliance and insert it into the water source (e.g. rainwater drum).
Remove air from appliance before operation.
Turn on the appliance “I/ON”.
Unlock the lever on the trigger gun.
Pull on the lever of the trigger gun; the device will switch on.
Let the appliance work until the water exits at the hand spray gun without bubbles (max. 2 minutes).
Release the lever on the trigger gun.
Note: Release the lever of the trigger gun; the device will switch off again. High pressure remains in the system.
Lock the lever on the trigger gun.
EN – 6 |
11 |

Operation
ATTENTION
Dry running of more than 2 minutes leads to damage of the high-pressure pump. If the appliance does not build up pressure within 2 minutes, switch the appliance off and proceed in accordance with the instructions in Chapter "Troubleshooting".
ATTENTION
Risk of damage! The appliance must only be operated laying down (horizontal).
High pressure operation
CAUTION
Keep a distance of at least 30 cm when using the jet for cleaning painted surfaces to avoid damage.
ATTENTION
Car tyres, paint or sensitive surfaces such as wood should not be cleaned with the dirt blaster, as there is a risk of damage.
Illustration 
Push the spray lance into the trigger gun and fasten it by turning it through 90°.
Turn on the appliance “I/ON”.
Unlock the lever on the trigger gun.
Pull on the lever of the trigger gun; the device will switch on.
Note: Release the lever of the trigger gun; the device will switch off again. High pressure remains in the system.
Operation with washing brush
ATTENTION
Risk of damage to the paintwork
When working with the washing brush, it must be free of dirt or other particles.
Push the washing brush into the trigger gun and fasten it by a 90° turn.
Note: If required, the washing brushes can be used to work with detergent.
Operation with detergent
Note: Detergent can only be added when the device is operated in low pressure mode.
DANGER
When using detergents, the material data safety sheet issued by the detergent manufacturer must be adhered to, especially the instructions regarding personal protective equipment.
Illustration 
Pull detergent suction hose as far as is required out of the housing.
Suspend end of detergent suction hose in a container filled with detergent.
Use spray lance with pressure regulation (Vario Power).
Turn the spray lance to "Mix" position.
Note: This will mix the detergent with the water stream.
Recommended cleaning method
Spray the detergent sparingly on the dry surface and allow it to react, but not to dry.
Spray off loosened dirt with the high pressure jet.
Optional
Foam nozzle
Fill the detergent solution in the detergent tank of the foam nozzle (observe dosage instructions on the packaging of the detergent).
Connect the detergent tank to the foam nozzle.
Connect the foam nozzle to the trigger gun.
Interrupting operation
Release the lever on the trigger gun.
Lock the lever on the trigger gun.
During longer breaks (more than 5 minutes), also turn the appliance off using the "0/OFF" switch.
Finish operation
CAUTION
Only separate the high-pressure hose from the hand spray gun or the appliance when there is no pressure in the system.
After operation with detergent: Run the machine for approximately 1 minute for a clear rinse.
Release the lever on the trigger gun.
Turn off the appliance "0/OFF".
Disconnect the mains plug from the socket.
Turn off tap.
Press the lever on the trigger gun to release any remaining pressure in the system.
Lock the lever on the trigger gun.
CAUTION
When disconnecting the supply or high pressure hose, hot water may leak from the connections after opera-
tion.
Detach the appliance from the water supply.
Transport
CAUTION
Risk of personal injury or damage!
Mind the weight of the appliance during transport.
When transporting by hand
Illustration 
Lift appliance by the carrying handles and carry it.
Illustration 
Pull out the transport handle until it audibly snaps into place.
Pull the appliance by its transport handle.
When transporting in vehicles
Secure the appliance against shifting and tipping over.
12 |
EN – 7 |

Storage
CAUTION
Risk of personal injury or damage!
Consider the weight of the appliance when storing it.
Storing the Appliance
Park the machine on an even surface.
Press the disconnect on the trigger gun and remove the high pressure hose from the trigger gun.
Push the casing of the quick coupling for the high pressure hose toward the rear and disconnect the high pressure hose from the appliance.
Illustration 
Insert the trigger gun in its holder.
Engage the spray lance in its compartment.
Stow away the mains cable and the high-pressure hose on the appliance.
Frost protection
ATTENTION
Appliances and accessories that are not completely drained can be destroyed by frost. Completely drain ap-
pliance and accessories and protect them against frost.
To avoid damage:
Completely drain all water from the appliance: Switch the appliance on with detached high pressure hose and detached water supply (max. 1 minute) and wait, until no more water exits at the high pressure connection. Turn off the appliance.
Store the appliance and the entire accessories in a frost free room.
Prior to extended storage periods, as during the winter, also observe the instructions in the Care section.
Care and maintenance
DANGER
Risk of electric shock.
Prior to all work on the appliance, switch off the appliance and pull the power plug.
Clean the sieve in the water connection
ATTENTION
The sieve must not be damaged.
Remove coupling from the water connection. Illustration 
Pull the sieve out using flat pliers.
Clean the sieve under running water.
Reinsert the sieve into the water connection.
Cleaning the detergent filter
Illustration 
Remove filter from suction hose for detergent and clean under running water.
Spare parts
Use only original KÄRCHER spare parts. You will find a list of spare parts at the end of these operating instructions.
Troubleshooting
You can rectify minor faults yourself with the help of the following overview.
If in doubt, please consult the authorized customer service.
DANGER
Risk of electric shock.
Prior to all work on the appliance, switch off the appliance and pull the power plug.
Appliance is not running
Pull on the lever of the trigger gun; the device will switch on.
Check whether the voltage indicated on the type plate corresponds to the voltage of the mains supply.
Check the mains connection cable for damages.
Motor overloaded, the motor circuit breaker has tripped.
–Turn off the appliance "0/OFF".
–Allow the device to cool down for one hour.
–Switch on the device and put it into operation again. If the malfunction occurs repeatedly, have the device checked by the customer service.
Appliance does not start, motor hums
Voltage reduction due to weak mains supply or when using an extension cable.
When switching on, first pull the lever of the trigger gun and then switch the appliance switch to "I/ON".
Pressure does not build up in the appliance
Check water supply for adequate delivery rate.
Pull out the sieve in the water connection using flatnose pliers and clean under running water.
Appliance ventilation: Switch the appliance on with the high-pressure hose detached and operate (max. 2 minutes) until the water exits the high-pres- sure connection without bubbles. Switch off appliance and reconnect high-pressure hose.
Suction height of 0.5 m when vacuuming from open container has been exceeded.
Strong pressure fluctuations
Clean high-pressure nozzle: Remove dirt and debris from the nozzle bore, using a needle and rinse through with water from the front.
Check water flow quantity.
Appliance is leaking
Slight leakage from the appliance pump is normal. If the leakage increases contact the authorized customer service.
No detergent infeed
Use spray lance with pressure regulation (Vario Power).
Turn the spray lance to "Mix" position.
Clean the detergent suction hose filter.
Check the detergent suction hose for kinks.
EN – 8 |
13 |
Warranty
The warranty terms published by the relevant sales company are applicable in each country. We will repair potential failures of your appliance within the warranty period free of charge, provided that such failure is caused by faulty material or defects in manufacturing. In the event of a warranty claim please contact your dealer or the nearest authorized Customer Service centre. Please submit the proof of purchase.
Addresses can be found under: www.kaercher.com/dealersearch
Technical specifications
Electrical connection
Voltage |
230 |
V |
|
1~50 Hz |
|
|
|
|
Connected load |
2,1 kW |
|
|
|
|
Protection class |
IP X5 |
|
|
|
|
Protective class |
I |
|
|
|
|
Mains fuse (slow-blow) |
10 |
A |
|
|
|
Water connection |
|
|
Max. feed pressure |
0,8 |
MPa |
|
|
|
Max. feed temperature |
40 |
°C |
|
|
|
Min. feed volume |
10 l/min |
|
|
|
|
Max. Suction height |
0,5 m |
|
|
|
|
Performance data |
|
|
Working pressure |
12,5 |
MPa |
|
|
|
Max. permissible pressure |
14,5 |
MPa |
|
|
|
Water flow rate |
7,5 |
l/min |
|
|
|
Max. flow rate |
8,3 |
l/min |
|
|
|
Detergent flow rate |
0,3 |
l/min |
|
|
|
Recoil force of trigger gun |
20 |
N |
|
|
|
Dimensions and weights |
|
|
Length |
516 mm |
|
|
|
|
Width |
295 mm |
|
|
|
|
Height |
282 mm |
|
|
|
|
Weight, ready to operate with acces- |
13,1 kg |
|
sories |
|
|
Values determined as per EN 60335-2-79 |
|
|
Hand-arm vibration value |
<2,5 m/s2 |
|
Uncertainty K |
0,3 m/s2 |
|
Sound pressure level LpA |
77 dB(A) |
|
Uncertainty KpA |
3 dB(A) |
|
Sound power level LWA + Uncertainty |
92 dB(A) |
|
KWA |
|
|
Subject to technical changes.
EU Declaration of Conformity
We hereby declare that the machine described below complies with the relevant basic safety and health requirements of the EU Directives, both in its basic design and construction as well as in the version put into circulation by us. This declaration shall cease to be valid if the machine is modified without our prior approval.
Product: High pressure cleaner Type: 1.630-xxx
Relevant EU Directives
2000/14/EC
2014/30/EU
2006/42/EC (+2009/127/EC) 2011/65/EU
Applied harmonized standards
EN 50581
EN 55014–1: 2006+A1: 2009+A2: 2011 EN 55014–2: 2015
EN 60335–1 EN 60335–2–79
EN 61000–3–2: 2014
EN 61000–3–3: 2013 EN 62233: 2008
Applied conformity evaluation method
2000/14/EC: Appendix V
Sound power level dB(A)
Measured: 88
Guaranteed: 92
The undersigned act on behalf and under the power of attorney of the company management.
CEO |
Head of Approbation |
Authorised Documentation Representative
S. Reiser
Alfred Kärcher GmbH Co. KG
Alfred-Kärcher-Str. 28 - 40
71364 Winnenden (Germany)
Phone: +49 7195 14-0
Fax: +49 7195 14-2212
Winnenden, 2016/04/01
14 |
EN – 9 |
Table des matières |
|
|
Sécurité . . . . . . . . . . . . . . . . . . . . . . . . . . . . . |
FR |
5 |
Protection de l’environnement. . . . . . . . . . . . |
FR |
5 |
Description de l’appareil . . . . . . . . . . . . . . . . |
FR |
6 |
Montage . . . . . . . . . . . . . . . . . . . . . . . . . . . . |
FR |
6 |
Mise en service . . . . . . . . . . . . . . . . . . . . . . . |
FR |
6 |
Fonctionnement. . . . . . . . . . . . . . . . . . . . . . . |
FR |
7 |
Transport . . . . . . . . . . . . . . . . . . . . . . . . . . . . |
FR |
7 |
Entreposage . . . . . . . . . . . . . . . . . . . . . . . . . |
FR |
8 |
Entretien et maintenance . . . . . . . . . . . . . . . |
FR |
8 |
Pièces de rechange. . . . . . . . . . . . . . . . . . . . |
FR |
8 |
Assistance en cas de panne . . . . . . . . . . . . . |
FR |
8 |
Garantie. . . . . . . . . . . . . . . . . . . . . . . . . . . . . |
FR |
9 |
Caractéristiques techniques . . . . . . . . . . . . . |
FR |
9 |
Déclaration UE de conformité . . . . . . . . . . . . |
FR |
9 |
Sécurité |
|
|
Avant la première utilisation de votre appareil, lire attentivement ce manuel d'instructions original et les consignes de sécu-
rité qu'il contient. Respecter l'ensemble de ces instructions. Conservez les deux livrets pour une utilisation ultérieure ou pour le futur propriétaire.
Utilisation conforme
Ce nettoyeur haute pression ne doit être utilisé que pour un usage privé:
–pour le nettoyage de machines, véhicules, bâtiments, outils, façades, terrasses, outils de jardinage etc. avec un jet d'eau sous pression (et si besoin en ajoutant des détergents).
–avec des accessoires, pièces de rechange et détergents homologués par KÄRCHER. Veuillez respecter les consignes livrées avec les détergents.
Niveaux de danger
DANGER
Signale la présence d'un danger imminent entraînant de graves blessures corporelles et pouvant avoir une issue mortelle.
AVERTISSEMENT
Signale la présence d'une situation éventuellement dangereuse pouvant entraîner de graves blessures corporelles et même avoir une issue mortelle.
PRÉCAUTION
Remarque relative à une situation potentiellement dangereuse pouvant entraîner des blessures légères.
ATTENTION
Remarque relative à une situation éventuellement dangereuse pouvant entraîner des dommages matériels.
Symboles sur l'appareil
L'appareil ne doit pas être directement raccordé au réseau publique d'eau potable.


 L'appareil ne doit être utilisé qu'en position horizontale.


 Ne pas diriger le jet haute pression sur des personnes, des animaux, un équipement électrique actif ou sur l'appareil luimême.


 Mettre l'appareil à l'abri du gel.
Dispositifs de sécurité
PRÉCAUTION
Le but des dispositifs de sécurité est de protéger l'utilisateur. Ils ne doivent en aucun cas être transformés ou désactivés.
Interrupteur principal
L'interrupteur principal empêche un fonctionnement involontaire de l'appareil.
Verrouillage poignée-pistolet
Le verrouillage verrouille le levier de la poignée-pistolet et empêche un démarrage non désiré de l'appareil.
Clapet de décharge avec pressostat
Le clapet de décharge évite un dépassage de la pression de service admissible.
Si vous relâchez la gâchette, la pompe est éteinte par un manu contacteur, le jet haute pression est interrompu. Si vous appuyez à nouveau sur le levier, la pompe est remise en marche.
Disjoncteur-protecteur moteur
Si la consommation de courant est trop élevée, le disjoncteur de protection moteur met l’appareil hors marche.
Protection de l’environnement
Instructions relatives aux ingrédients (REACH)
Les informations actuelles relatives aux ingrédients se trouvent sous :
www.kaercher.com/REACH
Les matériels d'emballage sont recyclables. Élimi-

 nez l'emballage d'une manière respectueuse de l'environnement.
Les appareils électriques et électroniques renferment souvent des composants qui peuvent repré-
senter un danger potentiel pour l'intégrité physique et l'environnement s'ils sont mal utilisés ou éliminés. Ces composants sont pourtant nécessaires au bon fonctionnement de l'appareil. Les appareils qui présentent ce symbole ne doivent pas être jetés avec les déchets ménagers.
Les appareils ancien modèle contiennent des matériaux précieux recyclables qui doivent être amenés à un système de recyclage. Les batteries et les accumulateurs contiennent des substances ne devant pas être tout simplement jetées. Veuillez éliminer les anciens appareils ainsi que les batteries ou les accumulateurs d'une manière respectueuse de l'environnement.
Tous travaux de nettoyage produisant des eaux usées contenant de l’huile, par exemple un nettoyage de moteur ou de bas de caisse, doivent uniquement être effectués à des postes de lavage équipés d’un séparateur d’huile.
Les travaux avec du détergent ne doivent être faits que sur des plans de travail étanches aux liquides, avec raccord à la canalisation d'eaux usées. Ne pas laisser le détergent s'infiltrer dans les eaux ou dans le sol.
Il est dans certains pays interdit de prélever de l'eau dans les cours d'eau publiques.
FR – 5 |
15 |

Description de l’appareil
Ces instructions de service décrivent l'équipement maximum. Suivant le modèle, la fourniture peut varier (voir l'emballage).
Illustrations, voir page dépliante 3
1Support pour accessoires
2Poignée de transport, amovible
3Poignée de transport
4Accouplement rapide pour flexible haute pression
5Interrupteur principal "0/OFF" / "I/ON"
6Câble d'alimentation secteur avec fiche secteur
7Poignée de transport
8Roulette de transport
9Arrivée d'eau avec tamis intégré
10Raccord pour l'arrivée d'eau
11Flexible d'aspiration du détergent (avec filtre)
12Poignée-pistolet
13Verrouillage poignée-pistolet
14Flexible haute pression
15Touche pour séparer le tuyau à haute pression de la poignée-pistolet
16Lance avec réglage de la pression (Vario Power) Pour les travaux courants de nettoyage. La pression de travail peut être réglée de manière continue entre « mini » et « maxi » En position « Mix » le détergent peut être dosé.
Pour régler la pression de travail, relâcher le levier de la poignée pistolet et tourner la lance sur la position souhaitée.
17Lance avec rotabuse
Pour les salissures tenaces
*Accessoire en option
18Brosse de lavage
Approprié pour le travail avec du détergent.
19Brosse de lavage rotative
Particulièrement adapté pour l'auto-nettoyage.
20Buse de mousse avec récipient de détergent
Le détergent est aspiré hors du récipient et mousse fortement.
**Nécessaire en supplément
21Flexible renforcé avec raccord standard.
–Diamètre minimal 1/2 pouce (13 mm)
–Longueur minimale 7,5 m
Montage
Monter les pièces jointes en vrac à l'appareil avant la mise en service.
Illustrations, voir page dépliante 4
Figure : 
Visser le raccord à l'arrivée d'eau de l'appareil.
Figure : 
Enficher le flexible haute pression dans la poignéepistolet jusqu'à ce qu'il s'enclenche de manière audible.
Remarque : Veiller à un alignement correct du nipple de raccordement.
Contrôler que la connexion est bien fixée en tirant sur le flexible haute pression.
Mise en service
Garer l'appareil horizontalement sur une surface plane.
Figure : 
Enficher le flexible haute pression dans le raccord rapide jusqu'à son enclenchement audible.
Brancher la fiche secteur dans une prise de courant.
Alimentation en eau
Données de raccordement, voir plaque signalétique / caractéristiques techniques
ATTENTION
Des impuretés dans l'eau peuvent endommager la pompe haute pression et les accessoires. Il est recommandé d'utiliser le filtre à eau KÄRCHER (accessoires spéciaux, référence 4.730-059).
Raccordement à la conduite d'eau du réseau public
Respecter les prescriptions de votre société distributrice en eau.
ATTENTION
Les coupleurs de flexibles en métal avec Aquastop peuvent être à l'origine d'un endommagement de la pompe ! N'utiliser par conséquent qu'un coupleur de flexible en plastique ou le coupleur de flexible en liaison de KÄRCHER.
Figure : 
Enficher le flexible d'arrivée d'eau sur le raccord sur le raccord d'alimentation en eau.
Raccorder le flexible d'eau à l'alimentation en eau.
Ouvrir le robinet d'eau complètement.
Aspiration d'eau depuis des réservoirs ouverts
Ce nettoyeur haute pression est approprié pour l'aspiration de l'eau de surface, par ex. des cuves d'eau de pluie ou étangs (hauteur manométrique maximale cf. caractéristiques techniques) avec le flexible d'aspiration avec soupape antiretour Kärcher ® (accessoires spéciaux, référence 4.440-238).
Retirer le raccord du raccord d'alimentation en eau.
Remplir d'eau le flexible d'aspiration.
Visser le flexible d'aspiration sur le raccord d'eau de l'appareil et l'accrocher dans la source d'eau (par ex. réservoir de pluie).
Purger l'appareil avant l'utilisation.
Interrupteur principal sur "I/ON".
Déverrouiller la manette de la poignée-pistolet.
Tirer le levier, l'appareil se met en service.
Laisser l'appareil en service (2 minutes au maximum) jusqu'à ce que l'eau ressorte sans bulles au niveau de la poignée-pistolet.
Relâcher la manette de la poignée-pistolet. Remarque : Si le levier est relâché, l'appareil se met hors service. La haute pression est conservée dans le système.
Verrouiller le levier de la poignée-pistolet.
16 |
FR – 6 |

Fonctionnement
ATTENTION
Une marche à sec de plus de 2 minutes entraîne des endommagements de la pompe haute pression. Si l'appareil n'établit pas de pression dans les deux minutes, le mettre hors service et procéder de la manière indiquée dans les instructions du chapitre "Aide en cas de défauts".
ATTENTION
Risque d'endommagement! L'appareil ne doit être utilisé qu'en position horizontale.
Fonctionnement à haute pression
PRÉCAUTION
Une distance d'au moins 30 cm entre la lance et les surfaces peintes est nécessaire pour éviter tout endommagement
ATTENTION
Ne pas nettoyer les pneus, la carrosserie ou les surfaces sensibles telles que le bois avec la rotabuse pour éviter tout endommagement.
Figure : 
Raccorder la lance à la poignée-pistolet et la fixer en effectuant une rotation à 90°.
Interrupteur principal sur "I/ON".
Déverrouiller la manette de la poignée-pistolet.
Tirer le levier, l'appareil se met en service. Remarque : Si le levier est relâché, l'appareil se met hors service. La haute pression est conservée dans le système.
Fonctionnement avec brosse de lavage
ATTENTION
Risque d'endommagement de la peinture
Lors des travaux avec la brosse de lavage, celle-ci doit être exempte de salissures et d'autres particules.
Insérer la brosse de lavage dans la poignée pistolet et fixer avec une rotation de 90°.
Remarque : Si nécessaire, il est également possible d'utiliser les broches de lavage pour le nettoyage avec détergent.
Fonctionnement avec détergent
Remarque : L'addition de détergents est uniquement possible en mode basse pression.
DANGER
Lors de l'utilisation de détergents, la fiche de données de sécurité du fabricant du détergent doit être respectée, notamment les remarques relatives à l'équipment de protection personnel.
Figure : 
Tirer le flexible d'aspiration pour le détergent du logement à la longueur souhaitée.
Plonger le flexible d’aspiration pour le détergent dans un récipient contenant une solution de détergent.
Utiliser la lance avec réglage de la pression (Vario Power).
Tourner la lance sur la position "Mix".
Remarque : Ainsi, la solution de détergent est mélangée au jet d'eau lors du fonctionnement.
Méthode de nettoyage conseillée
Pulvériser le détergent sur la surface sèche et laisser agir sans toutefois le laisser sécher complètement.
Retirer les saletés dissoutes au moyen du jet haute pression.
Option
Buse à mousse
Remplir la solution de détergent dans le récipient de détergent de la buse à mousse (en respectant le dosage indiqué sur le conditionnement du détergent).
Relier la buse à mousse au récipient de détergent.
Insérer la buse à mousse dans la poignée-pistolet et la fixer en effectuant une rotation de 90 °.
Interrompre le fonctionnement
Relâcher la manette de la poignée-pistolet.
Verrouiller le levier de la poignée-pistolet.
En cas de pauses de longue durée (plus de 5 minutes), mettre en plus l'appareil hors service avec l'interrupteur "0/OFF".
Fin de l'utilisation
PRÉCAUTION
Séparer le tuyau haute pression de la poignée-pistolet ou de l'appareil uniquement quand il n'y a pas de pression dans le système.
Après le travail avec le détergent : exploiter l'appareil pendant 1 minute environ pour le rincer.
Relâcher la manette de la poignée-pistolet.
Mettre l'appareil hors service "0/OFF".
Retirer la fiche secteur de la prise de courant.
Fermer le robinet d'eau.
Actionner la gachette de la poignée-pistolet afin de faire échapper la pression restante dans le système.
Verrouiller le levier de la poignée-pistolet.
PRÉCAUTION
En cas de séparation du flexible d'amenée ou haute pression, de l'eau chaude peut s'échapper des raccords
pendant le fonctionnement.
Séparer l'appareil de l'alimentation en eau.
Transport
PRÉCAUTION
Risque de blessure et d'endommagement ! Respecter le poids de l'appareil lors du transport.
Transport manuel
Figure : 


Soulever l'appareil avec les poignées de transport et le porter.
Figure : 
Sortir la poignée de transport ; elle s'enclenche de manière audible.
Tirer l'appareil à l'aide de la poignée de transport.
Transport dans des véhicules
Freiner l'appareil pour l'empêcher de glisser et de basculer.
FR – 7 |
17 |

Entreposage
PRÉCAUTION
Risque de blessure et d'endommagement !
Tenir compte du poids de l'appareil lors du stockage.
Ranger l’appareil
Garer l'appareil sur une surface plane.
Appuyer sur la touche de séparation de la poignéepistolet et séparer le flexible haute pression de celle-ci.
Pousser le logement du couplage rapide pour le flexible haute pression dans le sens de la flèche et sortir le flexible haute pression.
Figure : 
Enficher la poignée-pistolet dans le support de poi- gnée-pistolet.
Enclencher le tube d'acier uniquement dans le support de tube d'acier.
Ranger le flexible haute pression et le câble d'alimentation électrique sur l'appareil.
Protection antigel
ATTENTION
Des appareils et des accessoires qui n'ont pas été complètement vidés peuvent être détruits par le gel. Vider complètement l'appareil et les accessoires et les mettre
à l'abri du gel.
Pour éviter des dommages :
Vider complètement l'eau de l'appareil : Mettre l'appareil en service sans le flexible haute pression raccordé et sans alimentation d'eau raccordé (max. 1 min.) et attendre jusqu'à ce qu'il ne sorte plus d'eau du raccord haute pression. Désactiver l'appareil.
Conserver l'appareil et l'intégralité des accessoires
dans un endroit à l'abri du gel.
En cas de stockage prolongé, par ex. en hiver, respecter en plus les recommandations fournies au chapitre Entretien.
Entretien et maintenance
DANGER
Risque d'électrocution.
Avant d'effectuer des travaux sur l'appareil, couper l'interrupteur principal et débrancher la fiche secteur.
Nettoyer le tamis de l'arrivée d'eau
ATTENTION
Le tamis ne doit pas être endommagé.
Retirer le raccord du raccord d'alimentation en eau. Figure : 
Enlever le tamis avec une pince plate.
Nettoyer le tamis sous l'eau courante.
Remettre en place le tamis dans le raccord d'alimentation en eau.
Nettoyer le filtre pour détergent
Figure : 
Retirer le filtre du flexible d'aspiration pour détergent et le nettoyer à l'eau courante.
Pièces de rechange
Utiliser uniquement des pièces de rechange de la marque Kärcher ®. Vous trouverez une liste des pièces de rechanges à la fin de cette notice.
Assistance en cas de panne
Il est possible de résoudre des pannes sans trop grande gravité en utilisant la liste suivante.
En cas de doute, s'adresser au service après-vente agréé.
DANGER
Risque d'électrocution.
Avant d'effectuer des travaux sur l'appareil, couper l'interrupteur principal et débrancher la fiche secteur.
L'appareil ne fonctionne pas
Tirer le levier de la poignée pistolet, l'appareil se met en service.
Vérifier que la tension indiquée sur la plaque signalétique correspond à la tension de la prise de courant.
Vérifier si le câble d'alimentation est endommagé
Le moteur est surchargé, la protection thermique du moteur s'est déclenchée.
–Mettre l'appareil hors service "0/OFF".
–Faire refroidir l'appareil pendant une heure.
–Mettre l'appareil sous tension et le remettre en service.
Si la panne apparaît à plusieurs reprises, faire vérifier l'appareil par le service après-vente.
L'appareil ne démarre pas, le moteur ronronne
Chute de tension en raison d'un réseau électrique faible ou dans le cas de l'utilisation d'un câble de rallonge.
Lors de la mise en service, tirer en premier sur le levier de la poignée-pistolet, puis mettre l'interrupteur principal sur "I/ON".
L'appareil ne monte pas en pression
Vérifier la présence d'un débit suffisant au niveau de l'alimentation en eau.
Enlever le tamis de l'arrivée d'eau à l'aide d'une pince et le nettoyer à l'eau courante.
Purger l'appareil : Mettre l'appareil en service sans flexible haute pression et attendre (max. 2 minutes) jusqu'à ce qu'il s'écoule de l'eau sans bulle du raccord haute pression. Mettre l'appareil hors tension et raccorder le flexible haute pression.
Hauteur d'aspiration de 0,5 m franchie lors de l'aspiration depuis un réservoir ouvert.
Fluctuations de pression importantes
Nettoyer la buse à haute pression : Ôtez les salissures situées dans l'orifice de la buse à l'aide d'une aiguille et rincez-la avec de l'eau.
Contrôler la quantité d'eau alimentée.
Appareil non étanche
Une fuite minime au niveau de l'appareil peut survenir sous certaines conditions techniques. Si la fuite est importante, contacter le service aprèsvente agréé.
Le détergent n'est pas aspirée
Utiliser la lance avec réglage de la pression (Vario Power).
Tourner la lance sur la position "Mix".
Nettoyer le filtre situé sur le flexible d'aspiration du détergent.
18 |
FR – 8 |
Vérifier que le flexible d’aspiration à détergent n’est plié en aucun endroit.
Garantie
Dans chaque pays, les conditions de garantie en vigueur sont celles publiées par notre société de distribution responsable. Les éventuelles pannes sur l’appareil sont réparées gratuitement dans le délai de validité de la garantie, dans la mesure où celles-ci relèvent d'un défaut matériel ou d'un vice de fabrication. En cas de recours en garantie, adressez-vous à votre revendeur ou au service après-vente agréé le plus proche munis de votre preuve d'achat.
Vous trouverez les adresses sous : www.kaercher.com/dealersearch
Caractéristiques techniques
Branchement électrique
Tension |
230 |
V |
|
1~50 Hz |
|
|
|
|
Puissance de raccordement |
2,1 kW |
|
|
|
|
Degré de protection |
IP X5 |
|
|
|
|
Classe de protection |
I |
|
|
|
|
Protection du réseau (à action retar- |
10 |
A |
dée) |
|
|
Arrivée d'eau |
|
|
Pression d'alimentation (max.) |
0,8 |
MPa |
|
|
|
Température d'alimentation (max.) |
40 |
°C |
|
|
|
Débit d'alimentation (min.) |
10 |
l/min |
|
|
|
Hauteur max. de l'aspiration |
0,5 m |
|
|
|
|
Performances |
|
|
Pression de service |
12,5 |
MPa |
|
|
|
Pression maximale admissible |
14,5 |
MPa |
|
|
|
Débit (eau) |
7,5 |
l/min |
|
|
|
Débit maximum |
8,3 l/min |
|
|
|
|
Débit (détergent) |
0,3 |
l/min |
|
|
|
Force de réaction sur la poignée-pis- |
20 |
N |
tolet |
|
|
Dimensions et poids |
|
|
Longueur |
516 mm |
|
|
|
|
Largeur |
295 mm |
|
|
|
|
Hauteur |
282 mm |
|
|
|
|
Poids, opérationnel avec acces- |
13,1 kg |
|
soires |
|
|
Valeurs définies selon EN 60335-2-79 |
|
|
Valeur de vibrations bras-main |
<2,5 m/s2 |
|
Incertitude K |
0,3 |
m/s2 |
Niveau de pression acoustique LpA |
77 dB(A) |
|
Incertitude KpA |
3 |
dB(A) |
Niveau de pression acoustique LWA + |
92 dB(A) |
|
incertitude KWA |
|
|
Sous réserve de modifications techniques.
Déclaration UE de conformité
Nous certifions par la présente que la machine spécifiée ci-après répond de par sa conception et son type de construction ainsi que de par la version que nous avons mise sur le marché aux prescriptions fondamentales stipulées en matière de sécurité et d’hygiène par les directives européennes en vigueur. Toute modification apportée à la machine sans notre accord rend cette déclaration invalide.
Produit: Nettoyeur haute pression Type: 1.630-xxx
Directives européennes en vigueur :
2000/14/CE
2014/30/UE
2006/42/CE (+2009/127/CE) 2011/65/UE
Normes harmonisées appliquées :
EN 50581
EN 55014–1: 2006+A1: 2009+A2: 2011 EN 55014–2: 2015
EN 60335–1 EN 60335–2–79
EN 61000–3–2: 2014
EN 61000–3–3: 2013 EN 62233: 2008
Procédures d'évaluation de la conformité
2000/14/CE: Annexe V
Niveau de puissance acoustique dB(A)
Mesuré: 88
Garanti: 92
Les soussignés agissent sur ordre et sur procuration de la Direction commerciale.
CEO |
Head of Approbation |
Responsable de la documentation:
S. Reiser
Alfred Kärcher GmbH Co. KG
Alfred-Kärcher-Str. 28 - 40
71364 Winnenden (Germany)
Téléphone : +49 7195 14-0
Télécopieur : +49 7195 14-2212
Winnenden, 2016/04/01
FR – 9 |
19 |

Indice |
|
|
Sicurezza. . . . . . . . . . . . . . . . . . . . . . . . . . . . |
IT |
5 |
Protezione dell’ambiente . . . . . . . . . . . . . . . . |
IT |
5 |
Descrizione dell’apparecchio. . . . . . . . . . . . . |
IT |
6 |
Montaggio . . . . . . . . . . . . . . . . . . . . . . . . . . . |
IT |
6 |
Messa in funzione . . . . . . . . . . . . . . . . . . . . . |
IT |
6 |
Funzionamento . . . . . . . . . . . . . . . . . . . . . . . |
IT |
7 |
Trasporto . . . . . . . . . . . . . . . . . . . . . . . . . . . . |
IT |
7 |
Supporto . . . . . . . . . . . . . . . . . . . . . . . . . . . . |
IT |
8 |
Cura e manutenzione . . . . . . . . . . . . . . . . . . |
IT |
8 |
Ricambi . . . . . . . . . . . . . . . . . . . . . . . . . . . . . |
IT |
8 |
Guida alla risoluzione dei guasti . . . . . . . . . . |
IT |
8 |
Garanzia . . . . . . . . . . . . . . . . . . . . . . . . . . . . |
IT |
9 |
Dati tecnici. . . . . . . . . . . . . . . . . . . . . . . . . . . |
IT |
9 |
Dichiarazione di conformità UE . . . . . . . . . . . |
IT |
9 |
Sicurezza |
|
|
Prima di utilizzare l'apparecchio per la prima volta, leggere queste istruzioni per l'uso originali e le avvertenze di sicurezza
in allegato. Agire corrispondentemente e conservare entrambi i libretti per un uso futuro o per un successivo proprietario.
Uso conforme a destinazione
Utilizzate questa idropulitrice esclusivamente nell'uso domestico:
–per la pulizia di macchine, veicoli, edifici, attrezzi, facciate, terrazzi, attrezzi da giardinaggio ecc. con getto d'acqua ad alta pressione (se necessario con l'aggiunta di detergenti).
–con accessori, ricambi e detergenti omologati da KÄRCHER. Rispettate le indicazioni allegate ai detergenti.
Livelli di pericolo
PERICOLO
Indica un pericolo imminente che determina lesioni gravi o la morte.
AVVERTIMENTO
Indica una probabile situazione pericolosa che potrebbe determinare lesioni gravi o la morte.
PRUDENZA
Indica una probabile situazione pericolosa che potrebbe causare lesioni leggere.
ATTENZIONE
Indica una probabile situazione pericolosa che potrebbe determinare danni alle cose.
Simboli riportati sull’apparecchio
L'apparecchio non deve essere collegato direttamente alla rete idrica pubblica.


 L'apparecchio deve essere fatto funzionare solo in posizione giacente (orizzontale).


 Il getto ad alta pressione non va mai puntato su persone, animali, equipaggiamenti elettrici attivi o sull'apparecchio stesso.


 Proteggere l'apparecchio dal gelo.
Dispositivi di sicurezza
PRUDENZA
I dispositivi di sicurezza servono alla protezione dell'utente e non devono essere modificati o essere raggirati.
Interruttore dell'apparecchio
L'interruttoredell'apparecchio impedisce l'azionamento accidentale dell'apparecchio.
Blocco della pistola a spruzzo
Il dispositivo di blocco inibisce la leva della pistola a spruzzo ed impedisce l'azionamento accidentale dell'apparecchio.
Valvola di troppopieno con pressostato
La valvola di troppo pieno impedisce che venga superata la pressione di esercizio massima consentita.
Se si allenta la leva della pistola a spruzzo, il pressostato spegne la pompa, il getto ad alta pressione si ferma. Se si tira la leva, si riattiva la pompa.
Salvamotore
In caso di eccessivo assorbimento di corrente il salvamotore provvede a disattivare l’apparecchio.
Protezione dell’ambiente
Avvertenze sui contenuti (REACH)
Informazioni aggiornate sui contenuti sono disponibili all'indirizzo:
www.kaercher.com/REACH
I materiali d'imballaggio sono riciclabili. Smaltire a

 regola d'arte gli imballaggi.
Gli apparecchi elettrici ed elettronici contengono spesso componenti che, con un utilizzo o smaltimento non corretti, possono costituire un potenziale pericolo per la salute umana e per l'ambiente. Questi componenti sono tuttavia necessari per
un corretto funzionamento dell'apparecchio. Gli apparecchi contrassegnati con questo simbolo non devono essere smaltiti con i rifiuti domestici. Gli apparecchi dismessi contengono preziosi materiali riciclabili che devono essere consegnati al riciclaggio. Sia le batterie che gli accumulatori contengono sostanze che non devono essere disperse nell’ambiente. Smaltire gli apparecchi dismessi nonché le batterie e gli accumulatori nel rispetto delle norme ambientali.
I lavori di pulizia durante i quali si produce acqua di scarico contenente olio, per es. alla pulizia di motori o di sottoscocche vanno effettuati esclusivamente in luoghi di lavaggio provvisti di separatori d'olio.
Gli interventi con detergenti possono essere eseguiti solo su superfici di lavoro impermeabili con collegamento alla canalizzazione dell'acqua sporca. Non fare infiltrare il detergente nelle acque di scarico o nel terreno.
Il prelievo di acqua da impianti di acque pubbliche in alcuni paesi non è consentito.
20 |
IT – 5 |
Descrizione dell’apparecchio
In questo manuale d'uso è descritta la dotazione massima. In base al modello si possono verificare delle differenze nella fornitura (vedi imballaggio).
Per le figure vedi lato pieghevole 3
1Custodia degli accessori
2Maniglia per trasporto, estraibile
3Maniglia di trasporto
4Giunto rapido per tubo flessibile di alta pressione
5Interruttore dell'apparecchio „0/OFF“ / „I/ON“
6Cavo di allacciamento alla rete con connettore
7Maniglia di trasporto
8Ruota trasporto
9Collegamento dell'acqua con filtro montato
10Giunto per collegamento dell'acqua
11Tubo flessibile di aspirazione per detergente (con filtro)
12Pistola a spruzzo
13Blocco della pistola a spruzzo.
14Tubo flessibile alta pressione
15Tasto per scollegare il tubo flessibile di alta pressione dalla pistola a spruzzo
16Lancia con regolazione della pressione (Vario Power)
Per i compiti di pulizia più comuni. La pressione di esercizio può essere regolata in continuo tra "Min“ e "Max“. In posizione „Mix“ è possibile aggiungere del detergente.
Per regolare la pressione di lavoro, rilasciare la pistola a spruzzo e girare la lancia alla posizione desiderata.
17Lancia con fresa per lo sporco Per lo sporco più resistente
*Accessorio opzionale
18Spazzola di lavaggio
Adatto per interventi con detergenti.
19Spazzola di lavaggio rotante
Particolarmente indicata per la pulizia/lavaggio dell'auto.
20Ugello per schiumatura con contenitore del detergente
Il detergente viene aspirato dal serbatoio e si crea una potente schiuma detergente.
**Aggiuntivamente necessario
21Tuble flessibile acqua PVC in fibra-tela con raccordo commerciale.
–Diametro minimo 1/2 pollice (13 mm)
–Lunghezza minima 7,5 m
Montaggio
Prima della messa in funzione montare i componenti singoli dell'apparecchio.
Per le figure vedi lato pieghevole 4
Figura 
Avvitare il giunto fornito sul collegamento acqua dell'apparecchio.
Figura 
Introdurre il tubo di alta pressione alla pistola a spruzzo fino al suo aggancio.
Avviso: Verificare la corretta posizione del nipplo di raccordo.
Accertarsi del corretto aggancio tirando il tubo flessibile di alta pressione.
Messa in funzione
Posizionare l'apparecchio orizzontalmente su una superficie piana.
Figura 
Introdurre il tubo di alta pressione nel giunto rapido fino al suo aggancio.
Inserire la spina in una presa elettrica.
Alimentazione dell'acqua
Valori di collegamento: vedi targhetta e Dati tecnici.
ATTENZIONE
Impurità nell'acqua possono danneggiare la pompa ad alta pressione e gli accessori. Consigliamo come protezione di utilizzare il filtro per l'acqua KÄRCHER (accessorio speciale, codice d'ordine 4.730-059).
Alimentazione da rete idrica
Rispettare le disposizioni fornite dalla società per l'approvvigionamento idrico.
ATTENZIONE
I giunti dei tubi flessibili di metallo con il dispositivo Aquastop possono causare il danneggiamento della pompa! Si prega di utilizzare giunti dei tubi flessibili di plastica oppure quelli della KÄRCHER in ottone.
Figura 
Infilare il tubo flessibile di mandata dell'acqua sul giunto dell'attacco d'acqua.
Collegare il tubo flessibile acqua all'alimentazione idrica.
Aprire completamente il rubinetto.
Aspirazione di acqua da contenitori aperti
Questa idropulitrice con il tubo di aspirazione KÄRCHER con valvola di non ritorno (accessoro speciale, N. ordine 4.440-238) è adatta all'aspirazione di acqua di superficie per es. da raccoglitori di acqua piovana o da stagni (altezza di aspirazione max. vedi Dati tecnici).
Rimuovere il giunto dall'attacco dell'acqua.
Riempire il tubo flessibile di aspirazione con acqua.
Avvitare il tubo flessibile di aspirazione al raccordo dell'acqua dell'apparecchio ed agganciarlo alla fonte (ad es. raccoglitore di acqua piovana).
Sfiatare l'aria eventualmente presente all'interno dell'apparecchio prima dell'utilizzo.
Accendere l'apparecchio „I/ON“.
Sbloccare la leva della pistola a spruzzo.
Tirare la leva e l'apparecchio si attiva.
Fare funzionare l'apparecchio (max. 2 minuti), finché l’acqua fuoriesce priva di bolle d’aria dalla pistola a spruzzo manuale.
Rilasciare la leva della pistola a spruzzo. Avviso: Quando si rilascia la leva, l'apparecchio si
spegne. L’alta pressione nel sistema resta invariata.
Bloccare la leva della pistola a spruzzo.
IT – 6 |
21 |

Funzionamento
ATTENZIONE
Un funzionamento a secco di oltre 2 minuti determina dei danneggiamenti sulla pompa ad alta pressione. Nel caso in cui l'apparecchio non produca alcuna pressione entro 2 minuti, spegnere l'apparecchio e procedere secondo le indicazioni riportate al capitolo „Guida alla risoluzione dei guasti“.
ATTENZIONE
Rischio di danneggiamento! L'apparecchio deve essere fatto funzionare solo in posizione stesa (orizzontale).
Funzionamento ad alta pressione
PRUDENZA
Mantenere una distanza minima di 30 cm dal getto durante la pulizia di superfici verniciate, in modo da evitare danneggiamenti.
ATTENZIONE
Non usare la fresa per pulire pneumatici di auto, vernici o superfici sensibili, rischio di danneggiamento.
Figura 
Inserire la lancia sulla pistola a spruzzo e fissarla con una rotazione di 90°.
Accendere l'apparecchio „I/ON“.
Sbloccare la leva della pistola a spruzzo.
Tirare la leva e l'apparecchio si attiva.
Avviso: Quando si rilascia la leva, l'apparecchio si spegne. L’alta pressione nel sistema resta invariata.
Funzionamento con spazzola di lavaggio
ATTENZIONE
Pericolo di danni alla vernice
Per lavori con spazzola di lavaggio, questa deve essere esente da sporco o altre particelle.
Infilare la spazzola di lavaggio sulla pistola a spruzzo e fissarla con una rotazione di 90°.
Nota: Se necessario, è possibile utilizzare le spazzole di lavaggio per lavorare con detergenti.
Funzionamento con detergente
Indicazione: Il detergente può essere aggiunto solo con bassa pressione.
PERICOLO
All'impiego di detergenti va osservato la scheda tecnica di sicurezza del produttore del detergente, in particolare le indicazioni riguardo all'equipaggiamento di protezione individuale.
Figura 
Estrarre dall'alloggiamento il tubo flessibile di aspirazione per detergente necessario.
Appendere il tubo flessibile di aspirazione per detergente in un contenitore con una soluzione detergente.
Utilizzare la lancia con regolazione della pressione (Vario Power).
Ruotare la lancia in posizione „Mix“.
Avviso: In questo modo durante il funzionamento al getto d'acqua viene aggiunta la soluzione detergente.
Metodo di pulizia consigliato
Spruzzare misuratamente il detergente e lasciare agire (non asciugare) sulla superficie asciutta.
Sciacquare lo sporco sciolto con il getto alta pressione.
in opzione
Ugello per schiumatura
Versare la soluzione di detergente nel serbatoio dell'ugello per schiumatura (osservare le indicazioni sul dosaggio riportate sulla confezione del detergente).
Collegare l'ugello per schiumatura al servatoio del detergente.
Inserire l'ugello per schiumatura sulla pistola a spruzzo e fissarla con una rotazione di 90°.
Interrompere il funzionamento
Rilasciare la leva della pistola a spruzzo.
Bloccare la leva della pistola a spruzzo.
Durante pause di lavoro prolungate (più di 5 min.) spegnere anche l'apparecchio „0/OFF“.
Terminare il lavoro
PRUDENZA
Scollegare il tubo flessibile ad alta pressione dalla pistola a spruzzo o dall'apparecchio, solo quando la pressione è scaricata dal sistema.
Dopo gli interventi con il detergente: Sciacquare l'apparecchio in funzione per circa 1 minuto.
Rilasciare la leva della pistola a spruzzo.
Spegnere l'apparecchio „0/OFF“.
Togliere la spina di alimentazione dalla presa.
Chiudere il rubinetto.
Premere la leva della pistola a spruzzo in modo da scaricare la pressione ancora presente nel sistema.
Bloccare la leva della pistola a spruzzo.
PRUDENZA
Quando si scollega il tubo flessibile di mandata o di alta pressione, dopo il funzionamento potrebbe fuoriuscire
dell'acqua scottante dai raccordi.
Scollegare l'apparecchio dall'alimentazione idrica.
Trasporto
PRUDENZA
Pericolo di lesioni e di danneggiamento!
Per il trasporto osservare il peso dell'apparecchio.
Posizione manuale
Figura 


Sollevare l'apparecchio dai manici e trasportarlo.
Figura 
Estrarre il manico di trasporto finché si aggancia udibilmente.
Sollevare l'apparecchio dal manico di trasporto.
Posizione in veicoli
Bloccare l'apparecchio in modo tale che non possa scivolare o ribaltarsi.
22 |
IT – 7 |

Supporto
PRUDENZA
Pericolo di lesioni e di danneggiamento!
Osservare il peso dell'attrezzo quando lo si mette a magazzino.
Deposito dell’apparecchio
Depositare la spazzatrice su una superficie piana.
Premere il tasto di sblocco sulla pistola a spruzzo e scollegare il tubo flessibile di alta pressione dalla pistola a spruzzo.
Premere l'alloggiamento del giunto rapido per il tubo flessibile di alta pressione nella direzione della freccia ed estrarre il tubo flessibile di alta pressione.
Figura 
Introdurre la pistola a spruzzo nella custodia per la pistola a spruzzo.
Far innestare la lancia nell'apposito alloggiamento.
Conservare il tubo flessibile di alta pressione e il cavo di allacciamento alla rete all'apparecchio.
Antigelo
ATTENZIONE
Apparecchi e accessori non completamente svuotati potrebbero venire danneggiati dal gelo. Svuotare completamente l'apparecchio e gli accessori e proteggerli
dal gelo.
Per evitare danni:
Svuotare completamente l'acqua dall'apparecchio: accendere l'apparecchio senza il tubo flessibile di alta pressione collegato e senza l'alimentazione idrica collegata (max. 1 min) ed attendere fino a quando dal raccordo di alta pressione non fuoriesce più dell'acqua. Spegnere l’apparecchio.
Conservare l'apparecchio e tutti gli accessori in un
ambiente protetto dal gelo.
Prima di depositi di lunga durata, per es. in inverno, rispettare anche le avvertenze riportate al capitolo Cura.
Cura e manutenzione
PERICOLO
Pericolo di scossa elettrica.
Prima di eseguire qualsiasi lavoro, spegnere l'apparecchio e staccare la spina.
Pulizia del filtro nel raccordo dell'acqua
ATTENZIONE
Non danneggiare il filtro.
Rimuovere il giunto dall'attacco dell'acqua. Figura 
Estrarre il filtro con una pinza piatta.
Pulire il filtro sotto acqua corrente.
Inserire il filtro di nuovo nel raccordo dell'acqua.
Pulizia filtro del detergente
Figura 
Staccare il filtro dal tubo flessibile di aspirazione per detergente e lavarlo sotto acqua corrente.
Ricambi
Impiegare solamente ricambi originali KÄRCHER. La lista dei pezzi di ricambio è riportata alla fine del presente manuale d'uso.
Guida alla risoluzione dei guasti
Piccoli guasti o disfunzioni possono essere eliminati seguendo le seguenti istruzioni.
In caso di dubbi si prega di rivolgersi al servizio assistenza autorizzato.
PERICOLO
Pericolo di scossa elettrica.
Prima di eseguire qualsiasi lavoro, spegnere l'apparecchio e staccare la spina.
L'apparecchio non funziona
Tirare la leva della pistola a spruzzo e l'apparecchio si attiva.
Controllare se la tensione dichiarata sulla targhetta coincide con la tensione della fonte di energia.
Verificare la presenza di eventuali danni sul cavo di allacciamento alla rete.
Motore sovraccarico, il salvamotore è scattato.
–Spegnere l'apparecchio „0/OFF“.
–Lasciare raffreddare l'apparecchio per un'ora.
–Accendere l'apparecchio e rimetterlo in funzione. Se il guasto si presenta più volte, rivolgersi al servizio di assistenza clienti per un controllo.
L'apparecchio non si accende, il motore emette un ronzio
Calo della tensione a causa di una bassa corrente o in caso di utilizzo di una prolunga.
All'attivazione tirare prima la leva della pistola a spruzzo, quindi posizionare l'interruttore dell'apparecchio su „I/ON“.
L'apparecchio non raggiunge pressione
Verificare l'alimentazione dell'acqua su sufficiente portata.
Estrarre il filtro nel raccordo dell'acqua con una pinza piatta e lavarlo sotto acqua corrente.
Eliminare l'aria dall' apparecchio: Accendere l'apparecchio senza il tubo flessibile di alta pressione collegato ed attendere (max. 2 minuti) finché l’acqua che fuoriesce sia priva di bolle d’aria dal raccordo di alta pressione. Spegnere l'apparecchio e collegare il tubo flessibile di alta pressione.
Altezza di aspirazione di 0,5 m superata durante l'aspirazione da un contenitore aperto.
Forti variazioni di pressione
Pulire l’ugello ad alta pressione: Rimuovere con un ago lo sporco dai fori degli ugelli e sciacquare con acqua dalla parte anteriore.
Controllare l'afflusso di acqua.
L'apparecchio perde
Alcune cause tecniche fanno sì che ci sia una lieve permeabilità dell'apparecchio. In caso di permeabilità elevata rivolgersi al servizio clienti autorizzato.
Il detergente non viene aspirato
Utilizzare la lancia con regolazione della pressione (Vario Power).
Ruotare la lancia in posizione „Mix“.
Pulire il filtro sul tubo flessibile di aspirazione per detergente.
Controllare se il tubo flessibile di aspirazione per detergente presenti delle incrinature.
IT – 8 |
23 |
Garanzia
Le condizioni di garanzia valgono nel rispettivo paese di pubblicazione da parte della nostra società di vendita competente. Entro il termine di garanzia eliminiamo gratuitamente eventuali guasti all’apparecchio, se causati da difetto di materiale o di produzione. Nei casi previsti dalla garanzia si prega di rivolgersi al proprio rivenditore, oppure al più vicino centro di assistenza autorizzato, esibendo lo scontrino di acquisto.
Gli indirizzi li trovate sotto:
www.kaercher.com/dealersearch |
|
|
|
|
|
Dati tecnici |
|
|
|
|
|
Attacco elettrico |
|
|
Tensione |
230 |
V |
|
1~50 Hz |
|
Potenza allacciata |
2,1 kW |
|
|
|
|
Grado di protezione |
IP X5 |
|
|
|
|
Classe di protezione |
I |
|
|
|
|
Protezione rete (fusibile ritardato) |
10 |
A |
|
|
|
Collegamento idrico |
|
|
Pressione in entrata (max.) |
0,8 |
MPa |
|
|
|
Temperatura in entrata (max.) |
40 |
°C |
|
|
|
Portata (min.) |
10 |
l/min |
|
|
|
Max. altezza di aspirazione |
0,5 m |
|
|
|
|
Dati potenza |
|
|
Pressione di esercizio |
12,5 |
MPa |
|
|
|
Pressione max. consentita |
14,5 |
MPa |
|
|
|
Portata, acqua |
7,5 |
l/min |
|
|
|
Portata massima |
8,3 l/min |
|
|
|
|
Portata, detergente |
0,3 |
l/min |
|
|
|
Forza repulsiva della pistola a spruz- |
20 |
N |
zo |
|
|
Dimensioni e Pesi |
|
|
Lunghezza |
516 mm |
|
|
|
|
Larghezza |
295 mm |
|
|
|
|
Altezza |
282 mm |
|
|
|
|
Peso, pronto all'uso con accessori |
13,1 |
kg |
|
|
|
Valori rilevati secondo EN 60335-2-79 |
|
|
Valore di vibrazione mano-braccio |
<2,5 m/s2 |
|
Dubbio K |
0,3 m/s2 |
|
Pressione acustica LpA |
77 dB(A) |
|
Dubbio KpA |
3 dB(A) |
|
Pressione acustica LWA + Dubbio KWA |
92 dB(A) |
|
Con riserva di modifiche tecniche.
Dichiarazione di conformità UE
Con la presente si dichiara che la macchina qui di seguito indicata, in base alla sua concezione, al tipo di costruzione e nella versione da noi introdotta sul mercato, è conforme ai requisiti fondamentali di sicurezza e di sanità delle direttive UE. In caso di modifiche apportate alla macchina senza il nostro consenso, la presente dichiarazione perde ogni validità.
Prodotto: Idropulitrice
Modelo: 1.630-xxx
Direttive UE pertinenti
2000/14/CE
2014/30/UE
2006/42/CE (+2009/127/CE) 2011/65/UE
Norme armonizzate applicate
EN 50581
EN 55014–1: 2006+A1: 2009+A2: 2011 EN 55014–2: 2015
EN 60335–1 EN 60335–2–79
EN 61000–3–2: 2014
EN 61000–3–3: 2013 EN 62233: 2008
Procedura di valutazione della conformità applicata
2000/14/CE: Allegato V
Livello di potenza sonora dB(A)
Misurato: 88
Garantito: 92
I firmatari agiscono su incarico e con la procura dell’amministrazione.
CEO |
Head of Approbation |
Responsabile della documentazione:
S. Reiser
Alfred Kärcher GmbH & Co. KG
Alfred-Kärcher-Str. 28 - 40
71364 Winnenden (Germany)
Tel.: +49 7195 14-0
Fax: +49 7195 14-2212
Winnenden, 2016/04/01
24 |
IT – 9 |
Inhoud |
|
|
Veiligheid . . . . . . . . . . . . . . . . . . . . . . . . . . . . |
NL |
5 |
Zorg voor het milieu. . . . . . . . . . . . . . . . . . . . |
NL |
5 |
Beschrijving apparaat . . . . . . . . . . . . . . . . . . |
NL |
6 |
Montage . . . . . . . . . . . . . . . . . . . . . . . . . . . . |
NL |
6 |
Inbedrijfstelling . . . . . . . . . . . . . . . . . . . . . . . |
NL |
6 |
Werking . . . . . . . . . . . . . . . . . . . . . . . . . . . . . |
NL |
7 |
Vervoer . . . . . . . . . . . . . . . . . . . . . . . . . . . . . |
NL |
7 |
Opslag . . . . . . . . . . . . . . . . . . . . . . . . . . . . . . |
NL |
8 |
Onderhoud . . . . . . . . . . . . . . . . . . . . . . . . . . |
NL |
8 |
Reserveonderdelen . . . . . . . . . . . . . . . . . . . . |
NL |
8 |
Hulp bij storingen. . . . . . . . . . . . . . . . . . . . . . |
NL |
8 |
Garantie. . . . . . . . . . . . . . . . . . . . . . . . . . . . . |
NL |
9 |
Technische gegevens . . . . . . . . . . . . . . . . . . |
NL |
9 |
EU-conformiteitsverklaring . . . . . . . . . . . . . . |
NL |
9 |
Veiligheid |
|
|
Lees voor het eerste gebruik van uw apparaat deze veiligheidsinstructies en de originele gebruiksaanwijzing. Neem deze
in acht. Bewaar beide documenten voor later gebruik of volgende eigenaars.
Reglementair gebruik
Deze hogedrukreiniger is uitsluitend bestemd voor huishoudelijk gebruik:
–voor het reinigen van machines, voertuigen, gebouwen, gereedschap, gevels, terrassen, tuintoestellen, enz. met een hogedrukwaterstraal (indien nodig met toevoeging van reinigingsmiddelen);
–met door KÄRCHER vrijgegeven toebehoren, reserveonderdelen en reinigingsmiddelen. Neem de instructies in acht die bij de reinigingsmiddelen horen.
Gevarenniveaus
GEVAAR
Verwijzing naar een onmiddellijk dreigend gevaar dat tot ernstige en zelfs dodelijke lichaamsverwondingen leidt.
WAARSCHUWING
Verwijzing naar een mogelijke gevaarlijke situatie die tot ernstige en zelfs dodelijke lichaamsverwondingen kan leiden.
VOORZICHTIG
Verwijzing naar een mogelijk gevaarlijke situatie die tot lichte verwondingen kan leiden.
LET OP
Verwijzing naar een mogelijke gevaarlijke situatie die tot materiële schade kan leiden.
Symbolen op het toestel
Het apparaat mag niet onmiddellijk aangesloten worden op het openbare drinkwaternet.


 Het apparaat mag enkel in liggende positie (horizontaal) gebruikt worden.


 Richt de hogedrukstraal niet op personen, dieren, actieve elektrische uitrusting of het apparaat zelf.


 Apparaat tegen vorst beschermen.
Veiligheidsinrichtingen
VOORZICHTIG
Veiligheidsinrichtingen dienen ter bescherming van de gebruiker en mogen niet veranderd of omzeild worden.
Apparaatschakelaar
De hoofdschakelaar van het apparaat verhindert de onvoorziene werking van het apparaat.
Vergrendeling handspuitpistool
De vergrendeling blokkeert de hendel van het handspuitpistool en verhindert de onvoorziene start van het apparaat.
Overstroomklep met drukschakelaar
De omloopklep verhindert de overschrijding van de toegelaten werkdruk.
Wordt de hendel van het handspuitpistool losgelaten, dan schakelt de drukschakelaar de pomp uit en stopt de hogedrukstraal. Wordt de hendel aangetrokken, dan schakelt de drukschakelaar de pomp weer in.
Motorveiligheidsschakelaar
Bij een te hoge stroomopname schakelt de motorveiligheidsschakelaar het apparaat uit.
Zorg voor het milieu
Aanwijzingen betreffende de inhoudsstoffen (REACH)
Huidige informatie over de inhoudsstoffen vindt u onder: www.kaercher.com/REACH
Het verpakkingsmateriaal is recyclebaar. Gelieve

 verpakkingen op milieuvriendelijke manier te verwijderen.
Elektrische en elektronische apparaten bevatten vaak onderdelen die een potentieel gevaar kun-
nen vormen voor de menselijke gezondheid en het milieu als ze foutief worden gebruikt of niet correct worden afgevoerd. Deze onderdelen zorgen er desalniettemin voor dat het apparaat naar behoren functioneert. Apparaten die dit symbool dragen, mogen niet met het huisvuil worden afgevoerd.
Oude apparaten bevatten waardevolle recyclebare materialen die moeten worden hergebruikt. Batterijen en accu's bevatten stoffen die niet in het milieu mogen terechtkomen. Gelieve oude apparaten en batterijen en accu's op milieuvriendelijke manier te verwijderen.
Reinigingswerkzaamheden waarbij oliehoudend afvalwater ontstaat, bv. motorof bodemwas, mogen enkel uitgevoerd worden in wasplaatsen met olieafscheider.
Werkzaamheden met reinigingsmiddelen mogen enkel uitgevoerd worden op vloeistofdichte oppervlakken die aangesloten zijn op de vuilwaterafvoer. Laat reinigingsmiddel niet in waterlopen of de grond dringen.
De afname van water uit openbare waterlopen is in bepaalde landen niet toegestaan.
NL – 5 |
25 |

Beschrijving apparaat
In deze gebruiksaanwijzing staat de maximale uitrusting omschreven. Afhankelijk van het model zijn er verschillen in de leveringspakketten (zie verpakking).
Afbeeldingen zie uitklappagina 3
1Bewaarplaats voor accessoires
2Transportgreep, uittrekbaar
3Handgreep
4Snelkoppeling voor hogedrukslang
5Hoofdschakelaar „0/OFF“ / „I/ON“
6Stroomleiding met stekker
7Handgreep
8Transportwiel
9Wateraansluiting met ingebouwde zeef
10Koppelinggedeelte voor wateraansluiting
11Zuigslang voor reinigingsmiddel(met filter)
12Handpistool
13Vergrendeling handspuitpistool
14Hogedrukslang
15Toets voor het scheiden van de hogedrukslang van het handspuitpistool
16Spuitlans met drukregeling (Vario Power)
Voor de meest gangbare reinigingstaken. De werkdruk kan traploos tussen „Min“ en „Max“ ingesteld worden. In de stand "Mix" kan een dosis reinigingsmiddel toegevoegd worden.
Om de werkdruk te verstellen, laat u de hendel van het handspuitpistool los en draait u de straalbuis in de gewenste stand.
17Spuitlans met vuilfrees Voor hardnekkig vuil
*Optionele toebehoren
18Wasborstel
Niet geschikt voor de werking met reinigingsmiddelen.
19Roterende wasborstel
Uiterst geschikt voor de reiniging van auto's.
20Schuimsproeier met reinigingsmiddeltank Reinigingsmiddel wordt uit de tank gezogen en er ontstaat een krachtig schuim van reinigingsmiddel.
**Extra vereist
21Versterkte waterslang met courante koppeling
–Diameter minstens 1/2 inch (13 mm)
–Lengte minstens 7,5 m
Montage
Losse onderdelen die bij het apparaat geleverd werden, moeten voor de inbedrijfstelling gemonteerd worden.
Afbeeldingen zie uitklappagina 4
Afbeelding 
De meegeleverde koppeling aan het wateraansluitpunt van het apparaat schroeven.
Afbeelding 
Hogedrukslang in handspuitpistool steken tot die hoorbaar vastklikt.
Instructie: Letten op een correcte uitrichting van de aansluitnippel.
Veilige verbinding controleren door aan de hogedrukslang te trekken.
Inbedrijfstelling
Zet het apparaat horizontaal op een effen oppervlak.
Afbeelding 
Hogedrukslang in snelkoppeling steken tot die hoorbaar vastklikt.
Netstekker in het stopcontact steken.
Watertoevoer
Aansluitwaarden zie typeplaatje/Technische gegevens.
LET OP
Verontreinigingen in het water kunnen de hogedrukpomp en de toebehoren beschadigen. Ter bescherming wordt het gebruik van de KÄRCHER-waterfilter (bijzondere toebehoren, bestelnummer 4.730-059) aanbevolen.
Watertoevoer vanuit de waterleiding
Voorschriften van de watermaatschappij in acht nemen.
LET OP
Slangverbindingen van metaal met aquastop kunnen leiden tot beschadiging aan de pomp! Gebruik een slangverbinding van kunststof of een KÄRCHER-slang- verbinding van messing.
Afbeelding 
Watertoevoerslang op koppeling aan de wateraansluiting steken.
Waterslang aan de watertoevoer aansluiten.
Waterkraan volledig opendraaien.
Water aanzuigen uit open reservoirs
Deze hogedrukreiniger is met de KÄRCHER-zuigslang met terugslagklep (speciale accessoires, bestelnr. 4.440-238) geschikt voor het opzuigen van oppervlaktewater bv. uit regentonnen of vijvers (max. aanzuighoogte zie technische gegevens).
Verwijder de koppeling van de wateraansluiting.
Zuigslang met water vullen.
Zuigslang op de wateraansluiting van het apparaat schroeven en in een waterbron (bijvoorbeeld regenton) hangen.
Apparaat voor de werking ontluchten.
Apparaat inschakelen "I/ON".
Hefboom van het handspuitpistool ontgrendelen.
Hendel aantrekken, het apparaat wordt ingeschakeld.
Apparaat laten draaien (max. 2 minuten), tot water zonder bellen uit het handspuitpistool komt.
Hefboom van het handspuitpistool loslaten. Instructie: Wanneer de hendel opnieuw wordt losgelaten, schakelt het apparaat opnieuw uit. Hogedruk blijft in het systeem behouden.
Hefboom van het handspuitpistool vergrendelen.
26 |
NL – 6 |

Werking
LET OP
Een droogloop van meer dan 2 minuten leidt tot beschadigingen van de hogedrukpomp. Indien het apparaat binnen 2 minuten geen druk opbouwt, schakelt u het apparaat uit en gaat u te werk volgens de instructies in het hoofdstuk „Hulp bij storingen“.
LET OP
Beschadigingsgevaar! Apparaat mag enkel in liggende positie (horizontaal) gebruikt worden.
Werken met hoge druk
VOORZICHTIG
Respecteer bij de reiniging van gelakte oppervlakken een minimumstraalafstand van 30 cm om beschadigingen te vermijden.
LET OP
Autobanden, lak of gevoelige oppervlakken zoals hout mogen niet met de vuilfrees gereinigd worden wegens beschadigingsgevaar.
Afbeelding 
Straalpijp in het handspuitpistool steken en vastschroeven door hem 90° te draaien.
Apparaat inschakelen "I/ON".
Hefboom van het handspuitpistool ontgrendelen.
Hendel aantrekken, het apparaat wordt ingeschakeld.
Instructie: Wanneer de hendel opnieuw wordt losgelaten, schakelt het apparaat opnieuw uit. Hogedruk blijft in het systeem behouden.
Werking met wasborstel
LET OP
Gevaar van lakschade
Bij werkzaamheden met wasborstel moet deze vrij van vuil en andere deeltjes zijn.
Steek de wasborstel in het handspuitpistool en zet vast door 90° te draaien.
Aanwijzing: Indien nodig kunnen ook de wasborstels voor het werken met reinigingsmiddelen gebruikt worden.
Werken met reinigingsmiddel
Instructie: Reinigingsmiddel kan in lage druk toegevoegd worden.
GEVAAR
Bij gebruik van reinigingsmiddelen moet het veiligheidsgegevensblad van de reinigingsmiddelfabrikant in acht genomen worden, in het bijzonder de instructies betreffende de persoonlijke veiligheidsuitrusting.
Afbeelding 
De zuigslang voor reinigingsmiddel tot de gewenste lengte uit de behuizing trekken.
Reinigingsmiddel-zuigslang in een reservoir met reinigingsmiddeloplossing hangen.
Straalpijp met drukregeling (Vario Power) gebruiken.
Straalpijp in stand „Mix“ draaien.
Instructie: Daardoor wordt tijdens de werking de reinigingsmiddeloplossing bij de waterstraal gemengd.
Aanbevolen reinigingsmethode
Reinigingsmiddel in geringe hoeveelheid op het droge oppervlak sproeien en laten inwerken (niet laten opdrogen!).
losgekomen vuil met hogedrukstraal afspoelen.
Optioneel
Schuimsproeier
Reinigingsmiddeloplossing in reinigingsmiddeltank van de schuimsproeier vullen (doseringsindicatie op de verpakking van het reinigingsmiddel in acht nemen).
Schuimsproeier verbinden met de reinigingsmiddeltank.
Schuimsproeier in handspuitpistool steken en vastzetten door 90°-draaiing.
Werking onderbreken
Hefboom van het handspuitpistool loslaten.
Hefboom van het handspuitpistool vergrendelen.
Bij langere werkonderbrekingen (langer dan 5 minuten) het apparaat tevens uitschakelen "0/OFF".
Werking stopzetten
VOORZICHTIG
Scheid de hogedrukslang enkel van het handspuitpistool of het apparaat wanneer geen druk in het systeem voorhanden is.
Na het werken met reinigingsmiddel: Apparaat ongeveer 1 minuut laten werken om schoon te spoelen.
Hefboom van het handspuitpistool loslaten.
Apparaat uitschakelen "0/OFF"
Trek de stekker uit het stopcontact.
Draai de waterkraan dicht.
Druk de hendel van het handspuitpistool in, om de nog aanwezige druk in het systeem af te laten nemen.
Hefboom van het handspuitpistool vergrendelen.
VOORZICHTIG
Bij het scheiden van toevoerof hogedrukslangen kan
na de werking heet water uit de aansluitingen komen.
Apparaat scheiden van de watertoevoer.
Vervoer
VOORZICHTIG
Verwondingsen beschadigingsgevaar!
Neem bij het transport het gewicht van het apparaat in acht.
Transport met de hand
Afbeelding 
Til het apparaat op en draag het aan de handgrepen.
Afbeelding 
Transportgreep uittrekken, hij klikt hoorbaar vast. Apparaat aan de transportgreep verplaatsen.
Transport in voertuigen
Apparaat beveiligen tegen verschuiven en kantelen.
NL – 7 |
27 |

Opslag
VOORZICHTIG
Verwondingsen beschadigingsgevaar!
Neem bij de opslag het gewicht van het apparaat in acht.
Apparaat opslaan
Apparaat op een egaal oppervlak neerzetten.
Ontgrendelknop op het handspuitpistool induwen en hogedrukslang van het handspuitpistool scheiden.
Behuizing van de snelkoppeling voor hogedrukslang in pijlrichting duwen en hogedrukslang eruit trekken.
Afbeelding 
Handspuitpistool in houder voor handspuitpistool steken.
Straalpijp laten vastklikken in de houder voor de straalpijp.
Berg de hogedrukslang en de stroomaansluitleiding op aan het apparaat.
Vorstbescherming
LET OP
Niet volledig leeggemaakte apparaten en toebehoren kunnen door vorst vernield worden. Maak het apparaat en de toebehoren volledig leeg en bescherm ze tegen
vorst.
Om schade te vermijden:
Water volledig uit het apparaat aflaten: Apparaat zonder aangesloten hogedrukslang en zonder aangesloten watertoevoer inschakelen (max. 1 min) en wachten tot geen water meer uit de hogedrukaansluiting komt. Apparaat uitschakelen.
Apparaat met alle accessoires in een vorstvrije ruimte bewaren.
Voor langdurige opslag, bv. tijdens de wintermaanden, moeten tevens de instructies in het hoofdstuk Onderhoud in acht genomen worden.
Onderhoud
GEVAAR
Gevaar van stroomschok
Voor alle werkzaamheden aan het apparaat moet het apparaat uitgeschakeld en de stekker uitgetrokken worden.
Zeef in de wateraansluiting reinigen
LET OP
De zeef mag niet beschadigd worden.
Verwijder de koppeling van de wateraansluiting. Afbeelding 
Trek de zeef met een platte tang eruit.
Reinig de zeef onder stromend water.
Zet de zeef opnieuw in de wateraansluiting.
Reinigingsmiddelfilter reinigen
Afbeelding 
Filter van de reinigingsmiddel-zuigslang trekken en onder stromend water reinigen.
Reserveonderdelen
Gebruik uitsluitend originele KÄRCHER-onderdelen. Een overzicht van de onderdelen vindt u aan het eind van deze gebruiksaanwijzing.
Hulp bij storingen
Kleinere storingen kunt u zelf oplossen met behulp van het volgende overzicht.
Bij twijfel neemt u contact op met de bevoegde klantenservice.
GEVAAR
Gevaar van stroomschok
Voor alle werkzaamheden aan het apparaat moet het apparaat uitgeschakeld en de stekker uitgetrokken worden.
Apparaat draait niet
Trek hendel van het handspuitpistool aan, het apparaat wordt ingeschakeld.
Controleren of de aangegeven spanning op het typeplaatje overeenkomt met de spanning van de stroombron.
Stroomleiding op beschadiging controleren.
Motor overbelast, de motorveiligheidsschakelaar is
in werking getreden.
–Apparaat uitschakelen "0/OFF"
–Laat het apparaat een uur afkoelen.
–Schakel het apparaat in en neem het opnieuw in bedrijf.
Als de storing meermaals optreedt, moet het apparaat door de klantendienst nagezien worden.
Apparaat start niet, motor bromt
Spanningsdaling door zwak stroomnet of bij gebruik van een verlengsnoer.
Bij het inschakelen eerst de hendel van het handspuitpistool aantrekken en dan de apparaatschakelaar op „I/ON“ stellen.
Apparaat komt niet op druk
Watertoevoer op voldoende volume controleren.
De zeef in het wateraansluitpunt er met een platte tang uittrekken en onder stromend water reinigen.
Apparaat ontluchten: Apparaat zonder aangesloten hogedrukslang inschakelen en wachten (max. 2 minuten) tot water zonder bellen uit de hogedrukaansluiting komt. Apparaat uitschakelen en hogedrukslang opnieuw aansluiten.
Aanzuighoogte 0,5 m bij het zuigen uit een open reservoir overschreden.
Sterke drukschommelingen
Hogedruksproeier reinigen: Verontreinigingen met een naald uit het gat van de sproeier verwijderen en met water naar voren toe uitspoelen.
Watertoevoervolume controleren.
Apparaat ondicht
Een geringe ondichtheid van het apparaat is technisch bepaald. Als de pomp echter erg lekt, moet contact worden opgenomen met de bevoegde klantenservice.
Reinigingsmiddel wordt niet aangezogen
Straalpijp met drukregeling (Vario Power) gebruiken.
Straalpijp in stand „Mix“ draaien.
Filter aan de reinigingsmiddel-zuigslang reinigen.
Zuigslang voor reinigingsmiddel controleren op knikplaatsen.
28 |
NL – 8 |

Garantie
In ieder land zijn de door ons bevoegde verkoopkantoor uitgegeven garantiebepalingen van toepassing. Eventuele storingen aan het apparaat verhelpen wij zonder kosten binnen de garantietermijn, mits een materiaal of fabrieksfout de oorzaak van deze storing is. Neem bij klachten binnen de garantietermijn contact op met uw leverancier of de dichtstbijzijnde klantenservicewerkplaats en neem uw aankoopbewijs mee.
Adressen vindt u onder: www.kaercher.com/dealersearch
Technische gegevens
Elektrische aansluiting
Spanning |
230 |
V |
|
1~50 Hz |
|
|
|
|
Aansluitvermogen |
2,1 kW |
|
|
|
|
Veiligheidsklasse |
IP X5 |
|
|
|
|
Beschermingsklasse |
I |
|
|
|
|
Netzekering (traag) |
10 |
A |
|
|
|
Wateraansluiting |
|
|
Toevoerdruk (max.) |
0,8 |
MPa |
|
|
|
Toevoertemperatuur (max.) |
40 |
°C |
|
|
|
Toevoerhoeveelheid (min.) |
10 l/min |
|
|
|
|
Max. aanzuighoogte |
0,5 m |
|
|
|
|
Vermogensgegevens |
|
|
Werkdruk |
12,5 |
MPa |
|
|
|
Maximaal toegestane druk |
14,5 |
MPa |
|
|
|
Opbrengst, water |
7,5 |
l/min |
|
|
|
Volume maximaal |
8,3 l/min |
|
|
|
|
Opbrengst, reinigingsmiddel |
0,3 |
l/min |
|
|
|
Reactiekracht van het pistool |
20 |
N |
|
|
|
Afmetingen en gewichten |
|
|
Lengte |
516 mm |
|
|
|
|
Breedte |
295 mm |
|
|
|
|
Hoogte |
282 mm |
|
|
|
|
Gewicht, bedrijfsklaar met accessoi- |
13,1 |
kg |
res |
|
|
Bepaalde waarden conform EN 60335-2-79 |
|
|
Hand-arm vibratiewaarde |
<2,5 m/s2 |
|
Onzekerheid K |
0,3 m/s2 |
|
Geluidsdrukniveau LpA |
77 dB(A) |
|
Onzekerheid KpA |
3 dB(A) |
|
Geluidskrachtniveau LWA + onveilig- |
92 |
dB(A) |
heid KWA |
|
|
Technische wijzigingen voorbehouden.
EU-conformiteitsverklaring
Hierbij verklaren wij dat de hierna vermelde machine door haar ontwerp en bouwwijze en in de door ons in de handel gebrachte uitvoering voldoet aan de betreffende fundamentele veiligheidsen gezondheidseisen, zoals vermeld in de desbetreffende EU-richtlijnen. Deze verklaring verliest haar geldigheid wanneer zonder overleg met ons veranderingen aan de machine worden aangebracht.
Product: Hogedrukreiniger Type: 1.630-xxx
Van toepassing zijnde EU-richtlijnen
2000/14/EG
2014/30/EU
2006/42/EG (+2009/127/EG) 2011/65/EU
Toegepaste geharmoniseerde normen
EN 50581
EN 55014–1: 2006+A1: 2009+A2: 2011 EN 55014–2: 2015
EN 60335–1 EN 60335–2–79
EN 61000–3–2: 2014
EN 61000–3–3: 2013 EN 62233: 2008
Toegepaste conformiteitsbeoordelingsprocedure
2000/14/EG: Bijlage V
Geluidsvermogensniveau dB(A)
Gemeten: 88
Gegarandeerd: 92
De ondergetekenden handelen in opdracht en met volmacht van de bedrijfsleiding.
CEO |
Head of Approbation |
Gevolmachtigde voor de documentatie:
S. Reiser
Alfred Kärcher GmbH & Co. KG
Alfred Kärcher-Str. 28 - 40
71364 Winnenden (Germany)
Tel.: +49 7195 14-0
Fax: +49 7195 14-2212
Winnenden, 2016/04/01
NL – 9 |
29 |

Índice de contenidos |
|
|
Seguridad . . . . . . . . . . . . . . . . . . . . . . . . . . . |
ES |
5 |
Protección del medio ambiente . . . . . . . . . . . |
ES |
5 |
Descripción del aparato. . . . . . . . . . . . . . . . . |
ES |
6 |
Montaje . . . . . . . . . . . . . . . . . . . . . . . . . . . . . |
ES |
6 |
Puesta en marcha . . . . . . . . . . . . . . . . . . . . . |
ES |
6 |
Funcionamiento. . . . . . . . . . . . . . . . . . . . . . . |
ES |
7 |
Transporte . . . . . . . . . . . . . . . . . . . . . . . . . . . |
ES |
7 |
Almacenamiento . . . . . . . . . . . . . . . . . . . . . . |
ES |
8 |
Cuidados y mantenimiento . . . . . . . . . . . . . . |
ES |
8 |
Piezas de repuesto . . . . . . . . . . . . . . . . . . . . |
ES |
8 |
Ayuda en caso de avería. . . . . . . . . . . . . . . . |
ES |
8 |
Garantía . . . . . . . . . . . . . . . . . . . . . . . . . . . . |
ES |
9 |
Datos técnicos. . . . . . . . . . . . . . . . . . . . . . . . |
ES |
9 |
Declaración UE de conformidad . . . . . . . . . . |
ES |
9 |
Seguridad |
|
|
Antes de poner en marcha por primera vez el aparato, lea el manual de instrucciones original y las indicaciones de segu-
ridad suministradas. Actúe de acuerdo a ellas. Conserve estos dos manuales para su uso posterior o para propietarios ulteriores.
Uso previsto
Utilice esta limpiadora de alta presión, exclusivamente, en el ámbito doméstico:
–para limpiar máquinas, vehículos, obras, herramientas, fachadas, terrazas, herramientas de jardinería etc. con chorro de agua de alta presión (si es necesario agregar detergente).
–con accesorios autorizados por KÄRCHER, recambios y detergentes. Respetar las indicaciones de los detergentes.
Niveles de peligro
PELIGRO
Aviso sobre un riesgo de peligro inmediato que puede provocar lesiones corporales graves o la muerte.
ADVERTENCIA
Aviso sobre una situación propablemente peligrosa que puede provocar lesiones corporales graves o la muerte.
PRECAUCIÓN
Indicación sobre una situación que puede ser peligrosa, que puede acarrear lesiones leves.
CUIDADO
Aviso sobre una situación probablemente peligrosa que puede provocar daños materiales.
Símbolos en el aparato
El aparato no se puede conectar directamente al abastecimiento de agua potable público.


 El aparato solo se puede operar en posición horizontal.


 No dirija el chorro de alta presión hacia personas, animales, equipamiento eléctrico activo, ni apunte con él al propio aparato.


 Proteger el aparato de las heladas.
Dispositivos de seguridad
PRECAUCIÓN
Los dispositivos de seguridad sirven para proteger al usuario y no se pueden modificar o sortear.
Interruptor del equipo
El interruptor del aparato impide el funcionamiento involuntario del mismo.
Bloqueo de la pistola pulverizadora manual
El bloqueo bloquea la palanca de la pistola pulverizadora manual e impide que el aparato se ponga en marcha de forma involuntaria.
Válvula de derivación con presostato
La válvula de derivación evita sobrepasar la presión de trabajo permitida.
Cuando se suelta la palanca de la pistola pulverizadora manual, un presostato desconecta la bomba y el chorro de alta presión se para. Cuando se acciona la palanca, se conecta la bomba nuevamente.
Interruptor de guardamotor
Si el consumo de corriente es demasiado alto, el guardamotor desconecta el aparato.
Protección del medio ambiente
Indicaciones sobre ingredientes (REACH)
Encontrará información actual sobre los ingredientes en:
www.kaercher.com/REACH
Los materiales empleados para el embalaje son

 reciclables y recuperables. Rogamos elimine los envases de forma que no se dañe el medio ambiente.
Los equipos eléctricos y electrónicos contienen a menudo componentes que pueden representar un peligro potencial para la salud de las personas y para el medio ambiente en caso de que se manipulen o se eliminen de forma errónea. Estos componentes son necesarios para el correcto funcionamiento del equipo. Los equipos marcados con este símbolo no pueden eliminarse con la basura
doméstica.
Los aparatos viejos contienen materiales valiosos reciclables que deberán ser entregados para su aprovechamiento posterior. Las baterías y los acumuladores contienen sustancias que no deben entrar en contacto con el medio ambiente. Eliminar los aparatos usados, batería o acumuladores ecológicamente.
Los trabajos de limpieza que producen aguas residuales que contienen aceite (p. ej., el lavado de motores o el lavado de los bajos) solo se deben realizar en zonas de lavado que dispongan de separador de aceite.
Solo se pueden realizar trabajos con detergentes en superficies herméticas con una conexión al desagüe de agua sucia. No permitir que se entre el detergente en las aguas naturales ni penetre en el suelo.
El uso de agua de aguas naturales públicas no está permitido en algunos países.
30 |
ES – 5 |
Loading...