


DX-LDVD19-10A_09-0340.book Page 1 Tuesday, April 28, 2009 4:43 PM
19" LCD TV/DVD Combo
DX-LDVD19-10A
USER GUIDE

DX-LDVD19-10A_09-0340.book Page ii Tuesday, April 28, 2009 4:43 PM
ii
Dynex DX-LDVD19-10A
19" LCD TV/DVD Combo
Contents
Important safety instructions . . . . . . . . . . . . . . . . . . . . . . . . . . . . . . . . . . 2
Warnings . . . . . . . . . . . . . . . . . . . . . . . . . . . . . . . . . . . . . . . . . . . . . . . . . . . . . . . . . . . . . .2
Cautions . . . . . . . . . . . . . . . . . . . . . . . . . . . . . . . . . . . . . . . . . . . . . . . . . . . . . . . . . . . . . . .2
Installing the stand . . . . . . . . . . . . . . . . . . . . . . . . . . . . . . . . . . . . . . . . . . . 3
Removing the stand . . . . . . . . . . . . . . . . . . . . . . . . . . . . . . . . . . . . . . . . . . 3
Removing the stand . . . . . . . . . . . . . . . . . . . . . . . . . . . . . . . . . . . . . . . . . . . . . . . . . . .4
Installing a wall-mount bracket . . . . . . . . . . . . . . . . . . . . . . . . . . . . . . . . . . . . . . . . .4
TV components . . . . . . . . . . . . . . . . . . . . . . . . . . . . . . . . . . . . . . . . . . . . . . . 4
Front and side panels . . . . . . . . . . . . . . . . . . . . . . . . . . . . . . . . . . . . . . . . . . . . . . . . . .4
Back . . . . . . . . . . . . . . . . . . . . . . . . . . . . . . . . . . . . . . . . . . . . . . . . . . . . . . . . . . . . . . . . . . .4
Remote control . . . . . . . . . . . . . . . . . . . . . . . . . . . . . . . . . . . . . . . . . . . . . . . . . . . . . . . .5
Using the remote control . . . . . . . . . . . . . . . . . . . . . . . . . . . . . . . . . . . . . 6
Installing remote control batteries . . . . . . . . . . . . . . . . . . . . . . . . . . . . . . . . . . . . .6
Aiming the remote control . . . . . . . . . . . . . . . . . . . . . . . . . . . . . . . . . . . . . . . . . . . . .7
Programming a universal remote control to work with your TV . . . . . . . . . .7
Making connections . . . . . . . . . . . . . . . . . . . . . . . . . . . . . . . . . . . . . . . . . . 7
Connecting the power . . . . . . . . . . . . . . . . . . . . . . . . . . . . . . . . . . . . . . . . . . . . . . . . .7
Connecting an antenna or cable TV . . . . . . . . . . . . . . . . . . . . . . . . . . . . . . . . . . . .8
Connecting a VCR . . . . . . . . . . . . . . . . . . . . . . . . . . . . . . . . . . . . . . . . . . . . . . . . . . . . . .8
Connecting a camcorder or game . . . . . . . . . . . . . . . . . . . . . . . . . . . . . . . . . . . . . .9
Connecting an HDMI device . . . . . . . . . . . . . . . . . . . . . . . . . . . . . . . . . . . . . . . . . . . .9
Connecting a component video device . . . . . . . . . . . . . . . . . . . . . . . . . . . . . . . . .9
Connecting a computer . . . . . . . . . . . . . . . . . . . . . . . . . . . . . . . . . . . . . . . . . . . . . . . .9
Turning on your TV for the first time . . . . . . . . . . . . . . . . . . . . . . . . . .10
Understanding the basics . . . . . . . . . . . . . . . . . . . . . . . . . . . . . . . . . . . .11
Turning your TV on or off . . . . . . . . . . . . . . . . . . . . . . . . . . . . . . . . . . . . . . . . . . . . |
11 |
On-screen menu overview . . . . . . . . . . . . . . . . . . . . . . . . . . . . . . . . . . . . . . . . . . . |
11 |
Navigating the menus . . . . . . . . . . . . . . . . . . . . . . . . . . . . . . . . . . . . . . . . . . . . . . . |
11 |
Selecting a channel . . . . . . . . . . . . . . . . . . . . . . . . . . . . . . . . . . . . . . . . . . . . . . . . . . |
11 |
Adjusting the volume . . . . . . . . . . . . . . . . . . . . . . . . . . . . . . . . . . . . . . . . . . . . . . . . |
12 |
Adjusting basic settings . . . . . . . . . . . . . . . . . . . . . . . . . . . . . . . . . . . . . . . . . . . . . . |
12 |
Displaying additional information . . . . . . . . . . . . . . . . . . . . . . . . . . . . . . . . . . . . |
12 |
Adjusting the picture . . . . . . . . . . . . . . . . . . . . . . . . . . . . . . . . . . . . . . . .12
Adjusting the TV picture . . . . . . . . . . . . . . . . . . . . . . . . . . . . . . . . . . . . . . . . . . . . . 12
Adjusting the computer image . . . . . . . . . . . . . . . . . . . . . . . . . . . . . . . . . . . . . . . 13
Adjusting the sound . . . . . . . . . . . . . . . . . . . . . . . . . . . . . . . . . . . . . . . . .13
Adjusting the sound . . . . . . . . . . . . . . . . . . . . . . . . . . . . . . . . . . . . . . . . . . . . . . . . . 13
Changing channel settings . . . . . . . . . . . . . . . . . . . . . . . . . . . . . . . . . . .14
Automatically scanning for channels . . . . . . . . . . . . . . . . . . . . . . . . . . . . . . . . . 14
Adding or skipping channels . . . . . . . . . . . . . . . . . . . . . . . . . . . . . . . . . . . . . . . . . 14
Setting up a favorite channel list . . . . . . . . . . . . . . . . . . . . . . . . . . . . . . . . . . . . . 15
Adding or changing a channel label . . . . . . . . . . . . . . . . . . . . . . . . . . . . . . . . . . 15
Checking the DTV signal strength . . . . . . . . . . . . . . . . . . . . . . . . . . . . . . . . . . . . 16
Listening to audio only . . . . . . . . . . . . . . . . . . . . . . . . . . . . . . . . . . . . . . . . . . . . . . . 16
Turning on Auto Zoom . . . . . . . . . . . . . . . . . . . . . . . . . . . . . . . . . . . . . . . . . . . . . . . 16
Setting parental controls . . . . . . . . . . . . . . . . . . . . . . . . . . . . . . . . . . . . .17
Changing parental control settings . . . . . . . . . . . . . . . . . . . . . . . . . . . . . . . . . . . 17
DX-LDVD19-10A_09-0340.book Page iii Tuesday, April 28, 2009 4:43 PM
iii
Setting or changing the password . . . . . . . . . . . . . . . . . . . . . . . . . . . . . . . . . . . . 17
Setting parental control levels . . . . . . . . . . . . . . . . . . . . . . . . . . . . . . . . . . . . . . . . 18
Downloading rating information . . . . . . . . . . . . . . . . . . . . . . . . . . . . . . . . . . . . . 19
Using closed captioning . . . . . . . . . . . . . . . . . . . . . . . . . . . . . . . . . . . . . .20
Turning closed captioning on or off . . . . . . . . . . . . . . . . . . . . . . . . . . . . . . . . . . . 20
Adjusting time settings . . . . . . . . . . . . . . . . . . . . . . . . . . . . . . . . . . . . . .20
Setting the clock . . . . . . . . . . . . . . . . . . . . . . . . . . . . . . . . . . . . . . . . . . . . . . . . . . . . . 20 Setting the sleep timer . . . . . . . . . . . . . . . . . . . . . . . . . . . . . . . . . . . . . . . . . . . . . . . 21
Adjusting menu settings . . . . . . . . . . . . . . . . . . . . . . . . . . . . . . . . . . . . .21
Selecting the menu language and transparency . . . . . . . . . . . . . . . . . . . . . . . 21 Labeling an input source . . . . . . . . . . . . . . . . . . . . . . . . . . . . . . . . . . . . . . . . . . . . . 22
DVD Playback . . . . . . . . . . . . . . . . . . . . . . . . . . . . . . . . . . . . . . . . . . . . . . . .22
Basic playback . . . . . . . . . . . . . . . . . . . . . . . . . . . . . . . . . . . . . . . . . . . . . . . . . . . . . . . 22 Advanced playback . . . . . . . . . . . . . . . . . . . . . . . . . . . . . . . . . . . . . . . . . . . . . . . . . . 23 JPEG disc playback . . . . . . . . . . . . . . . . . . . . . . . . . . . . . . . . . . . . . . . . . . . . . . . . . . . 23 Screen saver . . . . . . . . . . . . . . . . . . . . . . . . . . . . . . . . . . . . . . . . . . . . . . . . . . . . . . . . . 23 DVD system setup . . . . . . . . . . . . . . . . . . . . . . . . . . . . . . . . . . . . . . . . . . . . . . . . . . . . 23 Playable discs . . . . . . . . . . . . . . . . . . . . . . . . . . . . . . . . . . . . . . . . . . . . . . . . . . . . . . . . 24
Troubleshooting . . . . . . . . . . . . . . . . . . . . . . . . . . . . . . . . . . . . . . . . . . . . .25
Video and audio . . . . . . . . . . . . . . . . . . . . . . . . . . . . . . . . . . . . . . . . . . . . . . . . . . . . . 25
Remote control . . . . . . . . . . . . . . . . . . . . . . . . . . . . . . . . . . . . . . . . . . . . . . . . . . . . . . 25
General . . . . . . . . . . . . . . . . . . . . . . . . . . . . . . . . . . . . . . . . . . . . . . . . . . . . . . . . . . . . . . 25
Maintenance . . . . . . . . . . . . . . . . . . . . . . . . . . . . . . . . . . . . . . . . . . . . . . . .25
Cleaning . . . . . . . . . . . . . . . . . . . . . . . . . . . . . . . . . . . . . . . . . . . . . . . . . . . . . . . . . . . . . 25 Care and handling of discs . . . . . . . . . . . . . . . . . . . . . . . . . . . . . . . . . . . . . . . . . . . . 25 Servicing . . . . . . . . . . . . . . . . . . . . . . . . . . . . . . . . . . . . . . . . . . . . . . . . . . . . . . . . . . . . . 26
Specifications . . . . . . . . . . . . . . . . . . . . . . . . . . . . . . . . . . . . . . . . . . . . . . . .26 Legal notices . . . . . . . . . . . . . . . . . . . . . . . . . . . . . . . . . . . . . . . . . . . . . . . .26 One-year limited warranty . . . . . . . . . . . . . . . . . . . . . . . . . . . . . . . . . . .27

DX-LDVD19-10A_09-0340.book Page iv Tuesday, April 28, 2009 4:43 PM
iv
DX-LDVD19-10A_09-0340.book Page 1 Tuesday, April 28, 2009 4:43 PM
1
CHILD SAFETY
It makes a difference how and where you use your flat panel display
As you enjoy your new product, keep these safety tips in mind
The issue
The home theater entertainment experience is a growing trend, and larger TVs are popular purchases. However, TVs are not always supported on the proper stands or installed according to the manufacturer’s recommendations. We and the consumer electronics industry are committed to making home entertainment enjoyable and safe.
TVs that are inappropriately placed on dressers, bookcases, shelves, desks, speakers, chests, or carts may fall over and cause injury.
Tune into safety
•
•
•
•
•
•
One size of TV stand does not fit all. Use only a TV stand rated for the weight of your TV.
Carefully read and understand all enclosed instructions for proper use of this product.
Don’t let children climb on or play with entertainment system furniture and TVs.
Don’t place TVs on furniture that can easily be used as steps, such as a chest of drawers.
Remember that children can become excited while watching a program, especially on a “larger-than-life” TV. Make sure that you place or install the TV where it cannot be pushed, pulled over, or knocked down.
Make sure that you route all cords and cables so that they cannot be pulled or grabbed by curious children.
Wall mounting
If you decide to wall mount your TV, always remember:
•Use only a wall mount rated for the weight of your TV and that has been recommended by this TV manufacturer, listed in this manual, or otherwise listed by an independent laboratory as suitable for your TV. One size of wall mount does not fit all.
•Follow all instructions supplied by the TV and wall mount manufacturers.
•If you have any doubts about your ability to safely wall mount your TV, get help from a professional installer.
•Make sure that the wall where you are mounting the TV is appropriate. Some wall mounts are not designed to be mounted to walls backed with steel studs or cinder blocks. If you are
unsure, ask a professional installer.
•TVs can be heavy. At least two people are required for safe wall mount installation.
DX-LDVD19-10A_09-0340.book Page 2 Tuesday, April 28, 2009 4:43 PM
|
|
|
|
|
|
|
|
|
2 |
DX-LDVD19-10A |
Important safety instructions |
|
|
||
|
|
|
|
|
|
|
|
Important safety instructions
CAUTION
RISK OF ELECTRIC
SHOCK
DO NOT OPEN
This symbol indicates that dangerous voltage constituting a risk of electric shock is present within your TV. This label is located on the back of your TV.
This symbol indicates that there are important operating and maintenance instructions in the literature accompanying your TV.
1 Read these instructions.
2 Keep these instructions.
3 Heed all warnings.
4 Follow all instructions.
5 Do not use this apparatus near water.
6 Clean only with dry cloth.
7Do not block any ventilation openings. Install in accordance with the manufacturer's instructions.
8Do not install near any heat sources such as radiators, heat registers, stoves, or other apparatus (including amplifiers) that produce heat.
9Do not defeat the safety purpose of the polarized or grounding-type plug. A polarized plug has two blades with one wider than the other. A grounding type plug has two blades and a third grounding prong. The wide blade or the third prong are provided for your safety. If the provided plug does not fit into your outlet, consult an electrician for replacement of the obsolete outlet.
10Protect the power cord from being walked on or pinched particularly at plugs, convenience receptacles, and the point where they exit from the apparatus.
11Only use attachments/accessories specified by the manufacturer.
12Use only with a cart, stand, tripod, bracket, or table specified by the manufacturer, or sold with
the apparatus. When a cart is used, use caution
when moving the cart/apparatus combination to S3125A avoid injury from tip-over.
13Unplug this apparatus during lightning storms or when unused for long periods of time.
14Refer all servicing to qualified service personnel. Servicing is required when the apparatus has been damaged in any way, such as power-supply cord or plug is damaged, liquid has been spilled or objects have fallen into the apparatus, the apparatus has been exposed to rain or moisture, does not operate normally, or has been dropped.
15The wall plug is the disconnecting device. The plug must remain readily operable.
17Remote control batteries should not be exposed to excessive heat such as sunshine, fire, or the like.
18The apparatus should not be exposed to dripping or splashing, and no objects filled with liquids, such as vases, should be placed on the apparatus.
Warnings
Electric shock hazard
To reduce the risk of electric shock, do not remove any cover or expose the device to rain or moisture. No user-serviceable parts are inside. Refer servicing to qualified service technicians.
Lightning
For added protection for your device receiver during a lightning storm, or when it is left unattended and unused for long periods of time, unplug it from the power outlet and disconnect any antenna or cable system. This helps prevent property damage and personal injury from lightning and power line surges.
Power lines
An outside antenna system should not be located in the vicinity of overhead power lines or other electric light or power circuits, or where it can fall into such power lines or circuits. When installing an outside antenna system, extreme care should be taken to keep from touching such power lines or circuits as contact with them might be fatal.
Handling the LCD panel
•Your TV’s screen is made of glass. Do not drop your TV or hit, jolt, or press hard against the LCD panel. If the screen breaks, be careful of broken glass.
•If the LCD panel is broken, make absolutely sure that you do not touch the liquid in the panel. This may cause skin inflammation.
•If the liquid gets in your mouth, immediately gargle, rinse, and consult with your doctor. Also, if the liquid gets in your eyes or touches your skin, consult with your doctor after rinsing for at least 15 minutes or longer in clean water.
Replacement parts
When replacement parts are required, make sure that the service technician uses replacement parts specified by the manufacturer that have the same characteristics as the original part. Unauthorized substitutions may result in fire, electric shock, personal injury, or other hazards.
Safety check
After completing any service or repair to this device, ask the service technician to perform routine safety checks to determine that your TV is in correct operating condition.
Power source
Operate your TV only from the type of power source indicated on the marking label. If you are not sure of the type of power supplied to your home, consult an electrician or your local power company.
Cautions
Damage requiring service
16An apparatus with a three-prong, grounding-type plug is a Class I apparatus, which needs to be grounded to prevent possible electric shock. Make sure that you connect the Class I television to a grounding-type, three-prong outlet.
Unplug this TV from the power outlet and refer servicing to qualified service personnel under the following conditions:
•When the power supply cord or plug is damaged or frayed.
•If liquid has been spilled or objects have fallen into your TV.
•If your TV has been exposed to rain or water.
DX-LDVD19-10A_09-0340.book Page 3 Tuesday, April 28, 2009 4:43 PM
|
|
Installing the stand |
DX-LDVD19-10A |
3 |
|
|
|
|
|
|
|
|
|||
|
|
|
|
|
|
|
|
•If your TV does not operate normally by following the operating instructions. Adjust only those controls that are covered by the operating instructions because incorrect adjustment of other controls may result in damage and will often require extensive work by a qualified technician to restore your TV to its normal operation.
•If your TV has been dropped or damaged in any way.
•When your TV exhibits a distinct change in performance.
Attachments
Use only attachments recommended by Dynex.
Outdoor antenna grounding
If an outside antenna or cable system is connected to your TV, make sure that the antenna or cable system is grounded to provide some protection against voltage surges and built-up static charges. Article 810 of the National Electrical Code, ANSI/NFPA No. 70, provides information with respect to correct grounding of the mast and supporting structure, grounding of the lead-in wire to an antenna discharge unit, size of grounding conductors, location of the antenna-discharge unit, connection to grounding electrodes, and requirements for the grounding electrode.
|
1 |
|
2 |
|
3 |
|
4 |
|
5 |
7 |
6 |
1Antenna lead-in wire
2Grounding clamp
3Antenna discharge unit
4Grounding conductors
5Ground clamps
6Power service grounding electrode system
7Electric service equipment
Note to CATV system installer
Article 820 of the National Electrical Code, ANSI/NFPA No. 40 provides guidance for correct grounding. Specifically, it states that the cable ground must be connected to the grounding system of the building as close to the point of cable entry as practical.
Condensation
Moisture will form on the TV if the TV is brought from cool surroundings into a warm room or if the temperature of the room rises suddenly. When this happens, the TV's performance may be impaired. To prevent this, let the TV stand in its new surroundings for about an hour before switching it on, or make sure that the room temperature rises gradually. Condensation may also form during the summer if the TV is exposed to the breeze from an air conditioner. In such cases, change the location of the TV.
Mobile telephone warning
To avoid interference with your TV picture and sound, operating problems, or even damage, keep your cordless and cellular telephones away from the TV.
End of life directives
Your TV contains tin-lead solder and a fluorescent lamp containing a small amount of mercury. Disposal of these materials may be regulated for environmental reasons. Your TV also contains material that can be recycled and reused. For disposal or recycling information, contact your local authorities or the Electronic Industries Alliance at www.eia.org to find a recycler in your area.
Non-active pixels
The LCD panel contains almost 3 million thin film transistors, which provide exceptionally sharp video quality. Occasionally, a few non-active pixels may appear on the screen as a fixed blue, green, or red point. These non-active pixels do not adversely affect the performance of your TV, and are not considered defects.
Installing the stand
To install the stand:
1Position the base stand with the Front label positioned facing the LCD screen.
Front
2 Push the TV onto the base until the clips snap into place. 3 Secure the base to the TV with four (4) ST4x8 screws.
Screws
Screws
Removing the stand
If you intend to mount your TV on a wall or other vertical surface, you must remove the stand.
Warning: Before attempting removal of the stand, unplug the AC power cord.
Cautions:
Read these instructions thoroughly before attempting this installation.

DX-LDVD19-10A_09-0340.book Page 4 Tuesday, April 28, 2009 4:43 PM
|
|
|
|
|
|
|
|
|
4 |
DX-LDVD19-10A |
TV components |
|
|
||
|
|
|
|
|
|
|
|
Make sure that you handle your TV very carefully when attempting removal of the stand. If you are not sure of your ability to do this, or to use the tools necessary to complete this job, refer to a professional installer or service personnel. The manufacturer is not responsible for any damages or injuries that occur due to mishandling or improper assembly.
When using a table or bench as an aid to assembly, make sure that you place the TV on a soft cushion or covering to prevent accidental scratching or damage to your TV’s finish.
The speaker is not intended to support the weight of your TV. Do not move or handle your TV by the speaker. This can cause damage to your TV that is not covered by the manufacturer’s warranty.
Removing the stand
To remove the stand from the stand column:
1Lay your TV face down on a table or bench. Make sure that you put down a soft cushion or cloth so that your TV is not scratched.
2Adjust the stand so that the angle between the stand and the TV is 90°.
3Remove the two (2) M4 screws that secure your TV to the stand, then pull the stand off the TV.
Remove screws
Installing a wall-mount bracket
If you want to attach the TV to a wall-mount bracket (not provided), you should first remove the stand.
To attach your TV to a wall-mount bracket:
Warning: These servicing instructions are for use by qualified service personnel only. To reduce the risk of hazards, do not perform any servicing other than that contained in the operating instructions unless you are qualified to do so.
•Secure the wall-mount bracket to the back of your TV using the four M4 screws provided with the bracket.
TV components
Front and side panels
MENU INPUT VOL+ VOLCH+ CHPOWER
# |
Component |
Description |
||
|
|
|
|
|
1 |
MENU |
Press to open the on-screen menu. |
||
|
|
|
|
|
2 |
INPUT |
Press to select the video input source. |
||
|
|
|
|
|
3 |
VOL+/VOL- |
Press to increase or decrease the volume. |
||
|
|
|
|
|
4 |
CH+/CH- |
Press to go to the next or previous channel |
||
|
|
|
|
in the channel list. |
|
|
|
|
|
5 |
POWER |
|
button |
Press to turn on your TV. Press again to put |
|
||||
|
||||
|
|
|
|
your TV in standby mode. |
6 |
Power indicator |
Lights blue when your TV is turned on. |
||
|
|
|
|
Lights red when your TV is in standby mode. |
|
|
|
|
Not lit when the power cord is unplugged. |
|
|
|
|
|
7 |
Remote sensor |
Receives signals from the remote control. Do |
||
|
|
|
|
not block. |
|
|
|
|
|

DX-LDVD19-10A_09-0340.book Page 5 Tuesday, April 28, 2009 4:43 PM
|
|
TV components |
DX-LDVD19-10A |
5 |
|
|
|
|
|
|
|
|
|||
|
|
|
|
|
|
|
|
Back
HDMI |
|
PC AUDIO IN |
|
VGA IN |
|
SERVICE |
|
VIDEO IN |
|
L |
|
AUDIO IN |
|
R |
|
AUDIO IN L S-VIDEO IN |
Pb Y COMPONENT IN |
R |
Pr |
|
|
ANT/CABLE IN |
|
|
|
## |
Component |
Description |
|
|
|
|
|
|
|
1 |
HDMI jack |
Connect an HDMI device, such as a cable |
|
|
|
|
box or DVD player, to this jack. An HDMI |
|
|
|
|
cable carries both video and audio, so you |
|
|
|
|
do not need to make an audio connection. |
|
|
|
|
For more information, see “Connecting an |
|
|
|
|
HDMI device” on page 9. |
|
|
|
|
|
|
|
2 |
PC AUDIO jack |
Connect the audio output from your |
|
|
|
|
computer to this jack. For more |
|
|
|
|
information, see “Connecting a computer” |
|
|
|
|
on page 10. |
|
|
|
|
|
|
|
3 |
VGA jack |
Connect the video output from your |
|
|
|
|
computer to this jack. For more |
|
|
|
|
information, see “Connecting a computer” |
|
|
|
|
on page 10. |
|
|
|
|
|
|
|
4 |
SERVICE |
For firmware update only. |
|
|
|
|
|
|
|
5 |
VIDEO IN jack |
Connect the video output from an AV |
|
|
|
|
device to this jack. For more information, |
|
|
|
|
see “Connecting a VCR” on page 9. |
|
|
|
|
|
|
|
6 |
AUDIO IN jacks |
Connect the audio output (L and R) from an |
|
|
|
|
AV device to these jacks. For more |
|
|
|
|
information, see “Connecting a VCR” on |
|
|
|
|
page 9. |
|
|
|
|
|
|
|
7 |
S-VIDEO jack |
Connect an S-Video device to this jack. |
|
|
|
|
S-Video does not carry an audio signal, so |
|
|
|
|
you will need to connect audio cables from |
|
|
|
|
the device to the AUDIO IN jacks. |
|
|
|
|
|
|
|
8 |
COMPONENT IN |
Connect a component video device to |
|
|
|
jacks |
these jacks. For more information, see |
|
|
|
|
“Connecting a component video device” on |
|
|
|
|
page 10. |
|
|
|
|
|
|
|
|
|
|
|
|
|
|
|
|
|
|
|
|
## |
Component |
Description |
|
|
|
9 |
(Component) |
Connect the audio output (L and R) from a |
|
AUDIO IN jacks |
component device to these jacks. For more |
|
|
information, see “Connecting a component |
|
|
video device” on page 10. |
|
|
|
10 |
Headphone jack |
Plug headphones into this jack. |
|
|
|
11 |
ANT/CABLE IN jack |
Connect the 75 ohm cable from an antenna |
|
|
or cable box to this jack. |
|
|
|
Remote control
POWER |
INPUT |
DVD |
OPEN/CLOSE |
CCD |
MTS/SAP |
SLEEP |
PICTURE |
1 |
2 |
3 |
|
4 |
5 |
6 |
0 |
|
|
9 |
GUIDE |
7 |
8 |
|
|
RECALL |
|
CH+ |
MUTE |
|
|
VOL ENTER VOL
-+
MENU |
CH- |
INFO |
|
|
|
|
|
||
CH.LIST FAVORITE |
ZOOM |
EXIT |
|
|
TITLE |
DISPLAY |
SETUP |
SUBTITLE |
31 |
|
|
|
|
32 |
REV |
|
PREV |
NEXT |
33 |
|
|
|||
|
|
|
|
34 |
MENU |
|
STOP |
PAUSE |
35 |
|
|
|
|
|
|
|
|
|
36 |
|
PLAY/ENTER |
|
SLOW |
37 |
|
|
|
|
38 |
ANGLE |
|
ZOOM |
T.SEARCH |
|
|
|
|
|
39 |
AUDIO |
PROGRAM REPEAT |
A-B |
40 |
|
|
|
|
|
41 |
|
|
|
|
42 |
10+ |
|
|
|
43 |
|
|
|
|
|
# |
Button |
Description |
|
|
|||
|
|
|
|
|
|
|
|
1 |
POWER |
|
|
Press to turn on your TV. Press again to put |
|
|
|
|
|
|
|||||
|
|
|
|||||
|
|
|
|
your TV in Standby mode. |
|
|
|
2 |
INPUT |
Press to select the input source. |
|
|
|||
|
|
|
|
|
|
|
|
3 |
CCD |
Press to turn closed captioning on or off. For |
|
|
|||
|
|
|
|
more information, see “Using closed |
|
|
|
|
|
|
|
captioning” on page 20. |
|
|
|
|
|
|
|
|
|
|
|
|
|
|
|
|
|
|
|
|
|
|
|
|
|
|
|
|
|
|
|
|
|
|
|
DX-LDVD19-10A_09-0340.book Page 6 Tuesday, April 28, 2009 4:43 PM
|
|
|
|
|
|
|
|
|
6 |
DX-LDVD19-10A |
Using the remote control |
|
|
||
|
|
|
|
|
|
|
|
|
|
# |
Button |
Description |
||
|
|
|
|
|
|
|
|
|
4 |
MTS/SAP |
Press to select the audio mode. For analog |
||
|
|
|
|
|
|
channels, you can select STEREO, SAP |
|
|
|
|
|
|
(secondary audio program), or MONO. |
|
|
|
|
|
|
For digital channels, you can select the audio |
|
|
|
|
|
|
track (if more than one track is available). For |
|
|
|
|
|
|
more information, see “Adjusting the sound” |
|
|
|
|
|
|
on page 14. |
|
|
|
|
|
|
|
|
|
5 |
Numbers |
Press to enter channel numbers or the |
||
|
|
|
|
|
|
parental control password. |
|
|
|
|
|
|
|
|
|
6 |
RECALL |
Press to go to the last viewed channel. |
||
|
|
|
|
|
|
|
|
|
7 |
CH+/CH- |
Press CH+ or CHto go to the next or |
||
|
|
|
VOL+/VOL– |
previous channel in the channel list. For more |
||
|
|
|
information, see “Selecting a channel” on |
|||
|
|
|
|
|
|
|
|
|
|
|
|
|
page 12. |
|
|
|
|
|
|
Press VOL+ or VOLto increase or decrease |
|
|
|
|
|
|
the volume. |
|
|
|
|
|
|
|
|
|
8 |
ENTER |
Press to confirm selections in an on-screen |
||
|
|
|
|
|
|
menu or to open a submenu. |
|
|
|
|
|
|
|
|
|
9 |
MENU |
Press to open the on-screen menu. |
||
|
|
|
|
|
|
|
|
|
10 |
CH.LIST |
Press to open the channel list. For more |
||
|
|
|
|
|
|
information, see “Selecting a channel” on |
|
|
|
|
|
|
page 12. |
|
|
|
|
|
|
|
|
|
11 |
FAVORITE |
Press to display the favorite channel list. For |
||
|
|
|
|
|
|
more information, see “Setting up a favorite |
|
|
|
|
|
|
channel list” on page 15. |
|
|
|
|
|
|
|
|
|
12 |
TITLE |
Press to display the DVD title menu (when |
||
|
|
|
|
|
|
available). |
|
|
|
|
|
|
|
|
|
13 |
DISPLAY |
Press to cycle through information about the |
||
|
|
|
|
|
|
DVD, including Time Elapsed, Time |
|
|
|
|
|
|
Remaining, Chapter Elapsed, Chapter |
|
|
|
|
|
|
Remaining, and Display off. |
|
|
|
|
|
|
|
|
|
14 |
REV |
Press to fast reverse a DVD. |
||
|
|
|
|
|
|
|
|
|
15 |
FWD |
Press to fast forward a DVD. |
||
|
|
|
|
|
|
|
|
|
16 |
MENU |
Press to go to the root menu on a DVD. |
||
|
|
|
|
|
|
|
|
|
17 |
PLAY/ENTER |
Press to play a DVD. |
||
|
|
|
|
|
|
|
|
|
18 |
, , , and |
Press to navigate in the on-screen DVD |
||
|
|
|
Arrow keys |
menus. |
||
|
|
|
|
|
|
|
|
|
19 |
ANGLE |
Press to change the viewing angle of a DVD |
||
|
|
|
|
|
|
(when available). |
|
|
|
|
|
|
|
|
|
20 |
AUDIO |
Press to select the audio track of a DVD. |
||
|
|
|
|
|
|
|
|
|
21 |
PROGRAM |
Press to program DVD playback. |
||
|
|
|
|
|
|
|
|
|
22 |
OPEN/CLOSE |
Press to eject the DVD. |
||
|
|
|
|
|
|
|
|
|
23 |
DVD |
Press to go to DVD mode. |
||
|
|
|
|
|
|
|
|
|
24 |
PICTURE |
Press to select the picture mode. You can |
||
|
|
|
|
|
|
select Vivid, Standard, Energy Savings, |
|
|
|
|
|
|
Theater, Sports, or Custom. For more |
|
|
|
|
|
|
information, see “Adjusting the picture” on |
|
|
|
|
|
|
page 13. |
|
|
|
|
|
|
|
|
|
25 |
SLEEP |
Press to set the sleep timer. For more |
||
|
|
|
|
|
|
information, see “Setting the sleep timer” on |
|
|
|
|
|
|
page 21. |
|
|
|
|
|
|
|
|
|
26 |
• (Dot) |
Press to enter a digital sub-channel. |
||
|
|
|
|
|
|
|
|
|
27 |
GUIDE |
Press to display EPG OSD of the channel, |
||
|
|
|
|
|
|
including program name. channel number, |
|
|
|
|
|
|
program description, channel label and |
|
|
|
|
|
|
program show time. |
|
|
|
|
|
|
|
|
|
28 |
MUTE |
Press to turn off the sound. Press again to |
||
|
|
|
|
|
|
turn on the sound. Does not affect |
|
|
|
|
|
|
headphones. |
|
|
|
|
|
|
|
|
|
|
|
|
|
|
|
|
|
|
|
|
|
|
|
|
|
|
|
|
# |
Button |
Description |
||||||||||
|
|
|
|
|
|
|
|
|
|
|
|
|
29 |
INFO |
Press to display information about the |
||||||||||
|
|
|
|
|
|
|
|
|
|
|
|
current program. For more information, see |
|
|
|
|
|
|
|
|
|
|
|
|
“Displaying additional information” on page |
|
|
|
|
|
|
|
|
|
|
|
|
13. |
|
|
|
|
|
|
|
|
|
|
|
|
|
30 |
EXIT |
Press to close the on-screen menu. |
||||||||||
|
|
|
|
|
|
|
|
|
|
|
|
|
31 |
ZOOM |
Press to select the aspect ratio of the picture. |
||||||||||
|
|
|
|
|
|
|
|
|
|
|
|
You can select Normal, Zoom, Wide, |
|
|
|
|
|
|
|
|
|
|
|
|
Cinema, or Auto Zoom. For more |
|
|
|
|
|
|
|
|
|
|
|
|
information, see “Adjusting the TV picture” |
|
|
|
|
|
|
|
|
|
|
|
|
on page 13. |
|
|
|
|
|
|
|
|
|
|
|
|
|
32 |
SUBTITLE |
Press to turn on DVD sub-titles and select the |
||||||||||
|
|
|
|
|
|
|
|
|
|
|
|
subtitle language. |
|
|
|
|
|
|
|
|
|
|
|
|
|
33 |
SETUP |
Press to open the DVD General Setup Page. |
||||||||||
|
|
|
|
|
|
|
|
|
|
|
|
Press twice to open the DVD Preference Page. |
|
|
|
|
|
|
|
|
|
|
|
|
|
34 |
NEXT |
|
|
|
|
|
|
Press to go to the next chapter on a DVD. |
||||
|
|
|
||||||||||
|
|
|
|
|
|
|
|
|
|
|
|
|
35 |
PREV |
|
|
|
|
|
|
|
|
Press to go to the previous chapter on a DVD. |
||
|
|
|||||||||||
|
|
|
|
|
|
|
|
|
|
|
|
|
36 |
PAUSE |
|
|
|
|
|
Press to pause DVD playback. |
|||||
|
|
|||||||||||
|
|
|
|
|
|
|
|
|
|
|
|
|
37 |
STOP |
|
|
Press to stop DVD playback. |
||||||||
|
||||||||||||
|
||||||||||||
|
|
|
|
|
|
|
|
|
|
|
|
|
38 |
SLOW |
Press to play a DVD in slow motion. Each time |
||||||||||
|
|
|
|
|
|
|
|
|
|
|
|
this button is pressed, the setting changes. |
|
|
|
|
|
|
|
|
|
|
|
|
|
39 |
T.SEARCH |
Press to display the DVD search menu. |
||||||||||
|
|
|
|
|
|
|
|
|
|
|
|
|
40 |
ZOOM |
Press to zoom in on the DVD picture. |
||||||||||
|
|
|
|
|
|
|
|
|
|
|
|
|
41 |
A-B |
Press to replay a selected portion of the DVD. |
||||||||||
|
|
|
|
|
|
|
|
|
|
|
|
|
42 |
REPEAT |
Press to repeat a DVD chapter. Press again to |
||||||||||
|
|
|
|
|
|
|
|
|
|
|
|
repeat a DVD title. Press again to repeat the |
|
|
|
|
|
|
|
|
|
|
|
|
entire DVD. Press again to cancel. |
|
|
|
|
|
|
|
|
|
|
|
|
|
43 |
DVD 10+ |
If a chapter or track number is over 10, press |
||||||||||
|
|
|
|
|
|
|
|
|
|
|
|
this button, then press the number for last |
|
|
|
|
|
|
|
|
|
|
|
|
digit in the chapter or track number. |
|
|
|
|
|
|
|
|
|
|
|
|
|
Using the remote control
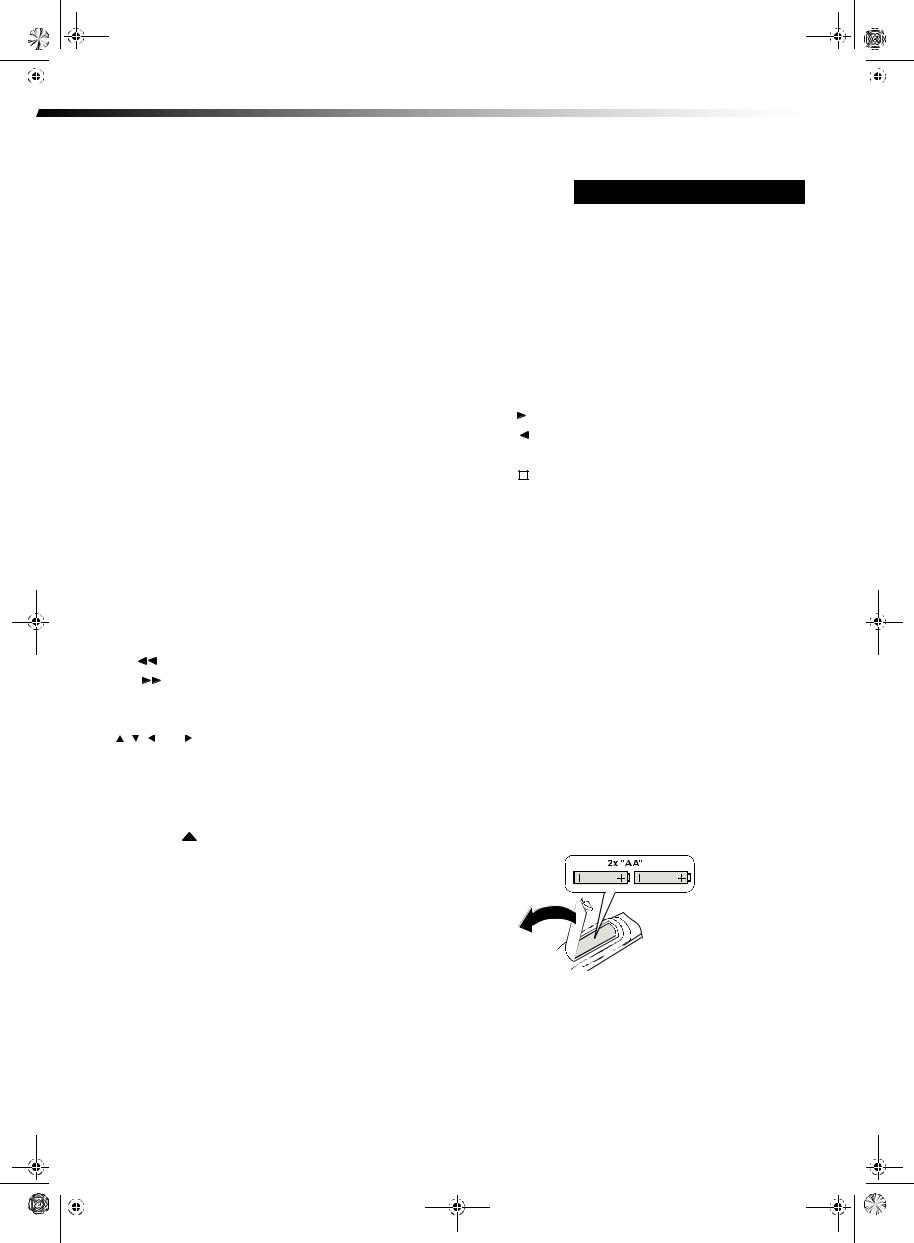
Installing remote control batteries
To install remote control batteries:
1Open the battery compartment cover by pressing the release button.
2Insert two AA batteries into the battery compartment. Make sure that the + and – symbols on the batteries match the + and – symbols in the battery compartment.
3Replace the cover.
Notes:
Do not mix different types of batteries. Do not mix old and new batteries.
Remove batteries when they no longer have a charge. Chemicals may leak into the battery compartment. Battery chemicals can cause a rash. If chemicals leak, clean the battery compartment with a cloth.
DX-LDVD19-10A_09-0340.book Page 7 Tuesday, April 28, 2009 4:43 PM
|
|
Using the remote control |
DX-LDVD19-10A |
7 |
|
|
|
|
|
|
|
|
|||
|
|
|
|
|
|
|
|
Remove the batteries if you do not intend to use the remote control for an extended amount of time.
Do not dispose of batteries in a fire. Dispose of them as hazardous waste.
Aiming the remote control
To use the remote control:
•Point the remote control towards the remote sensor on the front of your TV. The remote control’s range is about 26 ft. (8 m).
Notes:
Do not expose the remote control to shock or liquids.
Do not use the remote control in an area with high humidity.
Do not place the remote control in direct sunlight.
Do not place objects, such as furniture, between the remote control and the remote sensor.
The remote control may not work if direct sunlight or bright light shines on the remote sensor. Either move your TV or change the angle at which you use the remote control.
Programming a universal remote control to work with your TV
You can operate your TV with a new or existing universal remote control.
To program a universal remote control:
1Find the code for your universal remote control by identifying its model (or your set-top box’s remote control manufacturer and model) on the charts below, then make note of the numbered code below it. You will use the numbered code to program your remote control to work with your TV.
Dynex TV codes for universal remote controls
(for all Dynex TVs manufactured after Jan. 1, 2007)
Universal remote control manufacturer and model |
|
||||
|
|
|
|
|
|
Philips |
RCA |
One for All |
Sony |
|
|
PHDVD5, |
RCU807 |
URC-6690 |
RM-VL600 |
|
|
PH5DSS, |
|
||||
|
|
|
|
||
PMDVR8, |
|
|
|
|
|
PDVR8 |
|
|
|
|
|
115 |
135 |
0464 |
8043 |
|
|
|
|
|
|
||
|
|
|
|||
Set-top box manufacturer and model |
|
|
|||
|
|
|
|
|
|
Comcast |
Dish |
Motorola |
TIVO |
DirectTV |
|
M1057 |
Network |
DRC800 |
Series 3, HD RC23 |
||
VIP508, |
|||||
|
|
|
|
||
|
VIP622 |
|
|
|
|
|
|
|
|
|
|
0463 |
720 |
0463 |
0091 |
10463 |
|
|
|
|
|
|
|
Codes for other remote controls are available online at:
www.dynexproducts/universalcontrolcodes.aspx
Tips:
•The brand name is often visible on the front of the universal remote control, and the model number is often visible on the back.
•If your universal remote control isn’t listed on the chart, refer to your universal remote control’s instructions and try codes for the brands Orion, Emerson, Memorex, Sansui, Sylvania, or Zenith. You may need to try several codes before finding a match.
2Follow your universal remote control’s instructions to enter the code you found in Step 1.
Tips:
•If your universal remote control has a code search feature, run a code search to identify a code that matches your TV. See your universal remote control’s instructions for details.
•If your universal remote control has a “Learn” feature, you can manually program it using your TV remote to “teach” the commands one at a time. See your universal remote control’s instructions for details.
3If all else fails, you must use a different universal remote control that can operate both your set-top box and your TV. Five such remotes are listed on the chart, but many other compatible models are available in the market.
For more help, call technical support for your universal remote control or set-top box manufacturer, or call the Dynex Customer Care Center at 1-800-305-2204.
 Loading...