


DX-HDEN20-combo.fm Page 1 Monday, July 11, 2005 5:18 PM
USB External Hard Drive Enclosure
Boîtier pour disque dur externe USB
Alojamiento USB externo para disco duro
DX-HDEN20
USER GUIDE • GUIDE DE L’UTILISATEUR • GUÍA DEL USUARIO
DX-HDEN20-combo.fm Page 2 Monday, July 11, 2005 5:18 PM
2
USB External Hard Drive
Enclosure
Introduction
This enclosure allows you to build a USB external hard drive. The USB external hard drive is a portable, compact hard drive that provides a fast and easy way to add more storage space to your computer. The drive is Plug & Play, which means you can connect the drive to your computer while the computer is running.
Contents |
|
Introduction ..................................................................................... |
2 |
System requirements ....................................................................... |
2 |
Components..................................................................................... |
2 |
Installing the hard drive ................................................................... |
2 |
Using the drive ................................................................................. |
2 |
Legal notices .................................................................................... |
4 |
Français ....................................................... |
5 |
Español ........................................................ |
8 |
System requirements |
|
Hardware
• Notebook or desktop computer with a USB 1.0, 1.1, or 2.0 port.
Operating system
•Windows XP, Windows ME, Windows 2000, or Windows 98SE or
•Mac OS 8.60 or later
Components
•LED—Indicates power and data access status.
•USB port—Connects to the USB data cable.
•DC jack—Connects to the USB power cable.
•USB data cable—Connects the USB hard drive to a USB port on your computer.
•USB power cable—Connects the USB hard drive to an additional USB port on your computer for power.
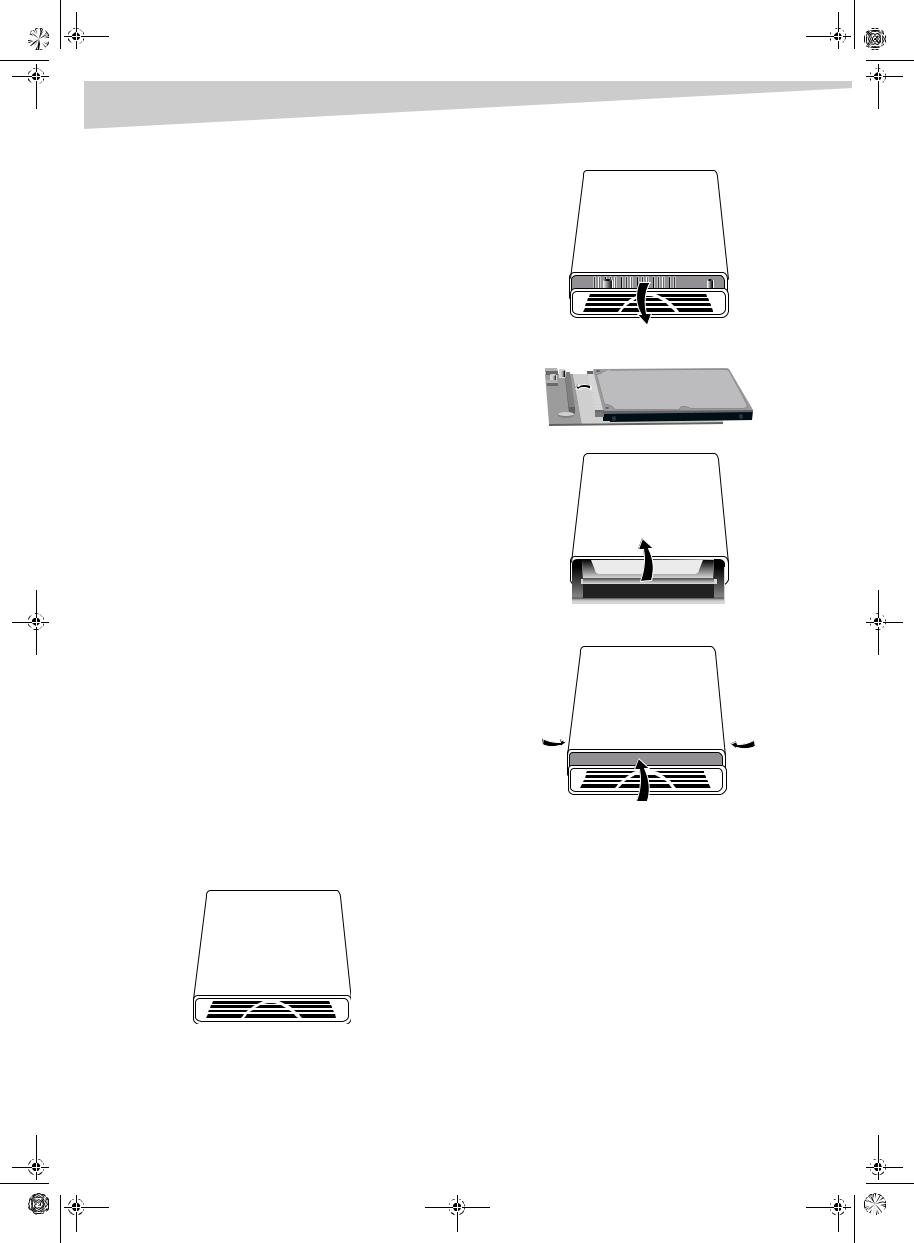
Installing the hard drive
To install the hard drive into the case:
1 Remove the hard drive case from the package.
Introduction
2Remove the front cover, then remove the circuit board from the case.
3Plug the hard drive into the IDE connector. Make sure it is firmly connected.
4 Insert the circuit board with the hard drive into the case.
5Attach the front cover to the case, then tighten the screws as shown below.
Screw |
Screw |
Using the drive
Connecting the drive to your computer
To connect the USB hard drive to your computer:
1 Turn on your computer.
2Plug the USB data cable into the hard drive’s USB port and into a USB port on your computer.
3Plug the USB power cable into the hard drive’s DC jack and into a different USB port on your computer.
Installing the driver
If your computer uses Windows XP, Windows ME, Windows 2000, or a Mac OS version above 8.6, you do not need to install a driver.
If you are using Windows 98SE, you must install a USB driver. The driver is found on the CD that is included with the hard drive.

DX-HDEN20-combo.fm Page 3 Monday, July 11, 2005 5:18 PM
Using the drive |
3 |
If you are using Mac OS 8.6, you must install Mass Storage Support 1.3.5. You can download USB Mass Storage Support 1.3.5 from the Apple Software Updates Web site at www.apple.com/support.
WINDOWS 98SE
To install the Windows 98SE driver:
1Plug the hard drive into your computer. The Add New Hardware Wizard opens.
2 Insert the CD into your CD or DVD drive, then click Next.
3Click Search for the best driver for your device, then click Next.
4 Click CD ROM drive, then click Next. 5 After the driver is installed, click Finish.
6Double-click the My Computer icon on your desktop. A new removable drive appears.
WINDOWS ME AND WINDOWS 98SE
You can partition and format your hard drive by either using the control panel or by using FDISK.
To partition the hard drive the Control Panel:
1 Turn on your Windows ME or Windows 98SE computer. 2 Plug the USB hard drive into your computer.
3 Click Start, then click Control Panel.
4 Double-click System.
5 Click Disk drives.
6 Right-click the USB hard drive, then click Properties.
7 Click Settings.
Partitioning the USB hard drive
Before your USB hard drive can be used, it needs to be partitioned and formatted.
WINDOWS XP AND WINDOWS 2000
To partition the hard drive using Windows XP or Windows 2000:
1 Plug the USB hard drive into your computer.
2 Click Start, Settings, then Control Panel.
3Click Administrative Tools, then double-click Computer Management.
4Click Disk Management in the left pane of this window. All connected disk drives are listed in the right pane.
5 Find the USB hard drive that you added in the right pane.
6Right-click on the USB hard drive, then click Create Partition. The Create Partition wizard opens.
7Follow the on-screen instructions to partition and format your USB hard drive. Now that you have built a partition in the USB hard drive, you can store files on it.
8 Click Removable.
9 Restart the computer.
10Double-click My Computer.
11Right-click the removable hard drive.
12Click format to format your USB hard drive. The USB hard drive can have only one partition using this method.
To partition the hard drive using FDISK:
1 Turn on your Windows ME or Windows 98SE computer. 2 Plug the USB hard drive into your computer.
3 Click Start, Programs, then click MS-DOS Prompt.
4 At the DOS prompt, type FDISK, then press Enter.
DX-HDEN20-combo.fm Page 4 Monday, July 11, 2005 5:18 PM
4 |
Legal notices |
Important: If FDISK quits without any message, click the X to go back to the Windows 98 screen. Unplug the USB hard drive, restart the computer, plug in the USB hard drive, then repeat this process starting with step 3.
5In the first screen of FDISK, answer the question: Do you want to enable large disk support?
[Y]if you want to build a partition larger than 2 GB.
[N] if you want to build a partition smaller than 2 GB.
6In the FDSIK OPTIONS screen, type 5 to select the drive.
Important: You must type 5 in this screen to change the current fixed drive to build a partition. The default fixed drive set by FDISK is your internal hard drive. If you don’t change the fixed drive to the USB hard drive, the data of your internal hard drive will be destroyed.
7In Change Current Fixed Disk Drive, type the drive number that is assigned to the USB hard drive.
You are returned to the FDISK OPTITIONS screen. You can create or delete the partition of the USB hard drive.
8 After you finish FDISK, return to the Windows screen.
9Unplug the USB hard drive, then plug it in again to activate these changes.
10Double-click on the My Computer icon. The USB hard drive that you partitioned appears.
Disconnecting the drive from your computer
CAUTION: Do not unplug the USB hard drive from your computer while copying files to or from the hard drive or while files or applications stored on the USB hard drive are in use. Doing so may result in loss of data.
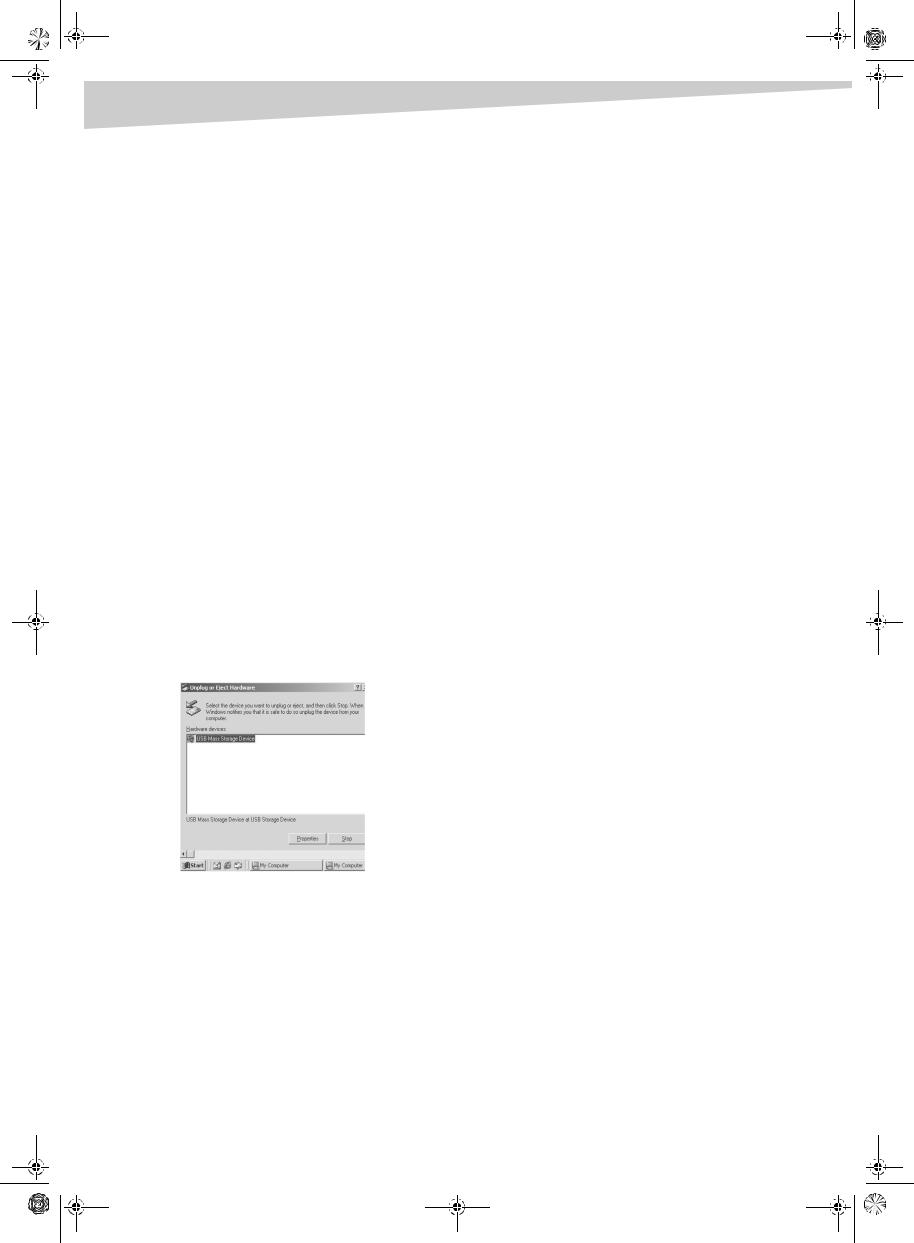
WINDOWS XP, WINDOWS ME, AND WINDOWS 2000
To disconnect the USB hard drive in Windows XP, Windows ME, and Windows 2000:
1Double-click on the remove hardware icon in the system tray. The
Unplug or Eject Hardware dialog box opens.
2 Click USB Mass Storage Device, then click Stop.
3 Click the USB device that you want to disconnect, then click Stop.
4Wait for few seconds. The computer prompts You may safely remove this device.
5 Disconnect the USB cable from the computer’s USB port.
WINDOWS 98SE
To disconnect the USB hard drive in Windows 98SE:
• Remove the USB cable from the computer’s USB port.
MACINTOSH
To disconnect the USB hard drive in Mac OS:
1Close all windows and quit all running applications stored on the USB drive.
2 Drag the USB hard drive’s icon into the trash can.
3 Disconnect the USB cable from the computer’s USB port.
Legal notices
FCC compliance statements
This equipment has been tested and found to comply with the limits for a class B digital device, pursuant to part 15 of the FCC Rules. These limits are designed to provide reasonable protection against harmful interference in a residential installation. This equipment generates, uses and can radiate radio frequency energy and, if not installed and used in accordance with the instructions, there is no guarantee that interference will not occur in a particular installation. if this equipment does cause harmful interference to equipment off add on, the user is encouraged to try to correct the interference by one or more of the following measures:
•Reorient or relocate the receiving antenna.
•Increase the distance between the equipment and receiver.
•Connect the equipment into an outlet on a circuit different form that to which the receiver is connected.
•Consult the dealer or an experienced radio/TV technician for help.
Trademarks
MS-DOS, Windows, Windows 98SE, Windows 2000, Windows ME, and Windows XP are trademarks of Microsoft Corporation.
Macintosh and Mac are trademarks of Apple computer.
All third-party brands and names are the property of their respective owners.
Copyright
© 2005 Dynex. DYNEX and the DYNEX logo are trademarks of Best Buy Enterprise Services, Inc. Other brands and product names are trademarks or registered trademarks of their respective holders. Specifications and features are subject to change without notice or obligation.
 Loading...