


 Loading...
English
Application for iPhone/iPod touch/iPad
Disklavier Controller
User’s Guide
Disklavier Mark IV Series
Disklavier E3
Disklavier Control Unit DKC-850
Introduction
Thank you for downloading the Disklavier Controller!
This exciting application allows you to control many of the basic functions of your Disklavier Mark IV, Disklavier E3 or Disklavier Control Unit DKC-850. Please read this guide before operating this application.
Compatible devices (as of September 1, 2010)
This application is compatible with the following Apple products (iOS 3.0 or later is required).
•iPhone
•iPod touch
•iPad
Requirements
•The firmware of your Disklavier must be as follows. Refer to the Disklavier operating manual and update the firmware.
-For Disklavier Mark IV : Version 4.00 or later
-For Disklavier E3 : Version 3.00 or later
-For Disklavier Control Unit DKC-850 : Version 3.10 or later
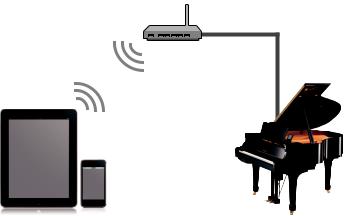
•Your iPhone/iPod touch/iPad must be connected to the Disklavier through a wireless router.
Wireless router
Wireless LAN |
LAN cable |
iPhone/iPod touch/iPad |
Disklavier |
Introduction ii
Table of Contents
Chapter 1 Getting Started
2Screen Menu Structure
3Starting the Application
4Searching for a Piano
5Connecting to a Piano
6Entering Your Passcode
7Putting the Disklavier in Standby Mode
8Reactivating from Standby Mode
Chapter 2 Song Playback
10 Selecting a Song
13 Operation during Playback
Chapter 3 DisklavierRadio Playback
16 Selecting a Channel
18 Operation during DisklavierRadio Playback
Chapter 4 Recording Songs
20Starting Recording
21Stopping Recording
22Titling a Song
Chapter 5 Other Functions
24Adjusting Sound Source Volume Balance
25Transposing Songs
26Changing Song Tempo
27Cancelling Parts
28Using Shortcuts
Chapter 6 Related Information
30Notes on the Passcode Setting
31Troubleshooting
32Trademarks and Copyrights
Table of Contents |
iii |

1
Getting Started
Introduction 1

Screen Menu Structure
The following is an approximate representation of the screen menus.
Start application
Opening |
When a connection has previously been established |
|
|
|
|
|
|
When first started |
|
|
|
|
|
Passcode* |
Authentication |
|
|
|
|
|
Piano Search |
[Piano Search] |
|
|
|
|
|
|
Standby Mode |
[Standby] |
|
|
|
|
|
Main (horizontal) |
Change device orientation |
|
|
|
|
|
|
|
Main (vertical) |
|
|
Top |
|
|
|
[Select] |
Source/Media |
Album |
Song |
|
|||
[Balance] |
Balance |
|
|
|
|
|
|
[More] |
More |
|
|
|
|
|
|
|
[Record] |
Record |
|
|
|
|
|
|
[Play Function] |
Play Function |
|
|
|
|
|
|
[Short Cut] |
Short Cut |
|
|
|
|
|
* This screen appears when connecting to a piano with the passcode set.
Chapter 1 Getting Started |
2 |
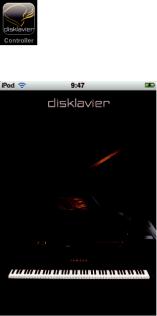
Starting the Application
Tap on the application icon.
The opening screen appears.
When you have previously connected to a piano:
The application connects to that piano automatically.
 Operation during playback (page 13)
When connecting to a piano for the first time:
The application searches for a piano.
 Searching for a piano (page 4)
Chapter 1 Getting Started |
3 |

Searching for a Piano
When connecting to a piano for the first time, you must first find the piano to which you want to connect.
Tap on [Piano Search].
 Language switch
Switches the language displayed in this screen between English and Japanese.
[Piano Search]
Starts searching for pianos.
Once the search is complete, select the piano to which you want to connect.
 Connecting to a piano (page 5)
Chapter 1 Getting Started |
4 |
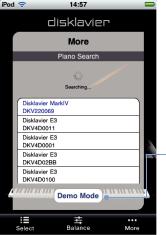
Connecting to a Piano
A list of pianos the application found appears.
Select from the list the piano to which you wish to connect.
Tap on the piano you wish to connect to.
 Piano list
[Demo Mode]*
Switches to the demonstration mode, in which you can check the operations on the Disklavier Controller even when no pianos are found.
* Operations in demonstration mode are the same as those when connected to the Disklavier Mark IV.
After completion, perform passcode authentication if required.
 Entering your passcode (page 6)
  Setting the passcode (page 30)
Otherwise, start song playback.
 Operation during playback (page 13)
Chapter 1 Getting Started |
5 |
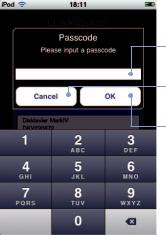
Entering Your Passcode
After connection is complete, carry out authentication by entering your 4-digit passcode. Enter the passcode you set on the Disklavier.
Enter 4-digit passcode and tap on [OK].
Passcode entry field
[Cancel]
Returns to piano search.
[OK]
Begins passcode authentication.
 Numeric keys
Chapter 1 Getting Started |
6 |

Putting the Disklavier in Standby Mode
Tap on [More] in the toolbar, then on [Standby] in the More screen that appears.
To reactivate your Disklavier…
 Reactivating from Standby Mode (page 8)
Chapter 1 Getting Started |
7 |
Reactivating from Standby Mode
Use the following screen to reactivate your Disklavier from Standby mode.
Slide the switch to the right.
Switch
Reactivates your Disklavier from Standby mode.
Chapter 1 Getting Started |
8 |
Loading...