

Page 1
English
Starting
Listening
Page 2
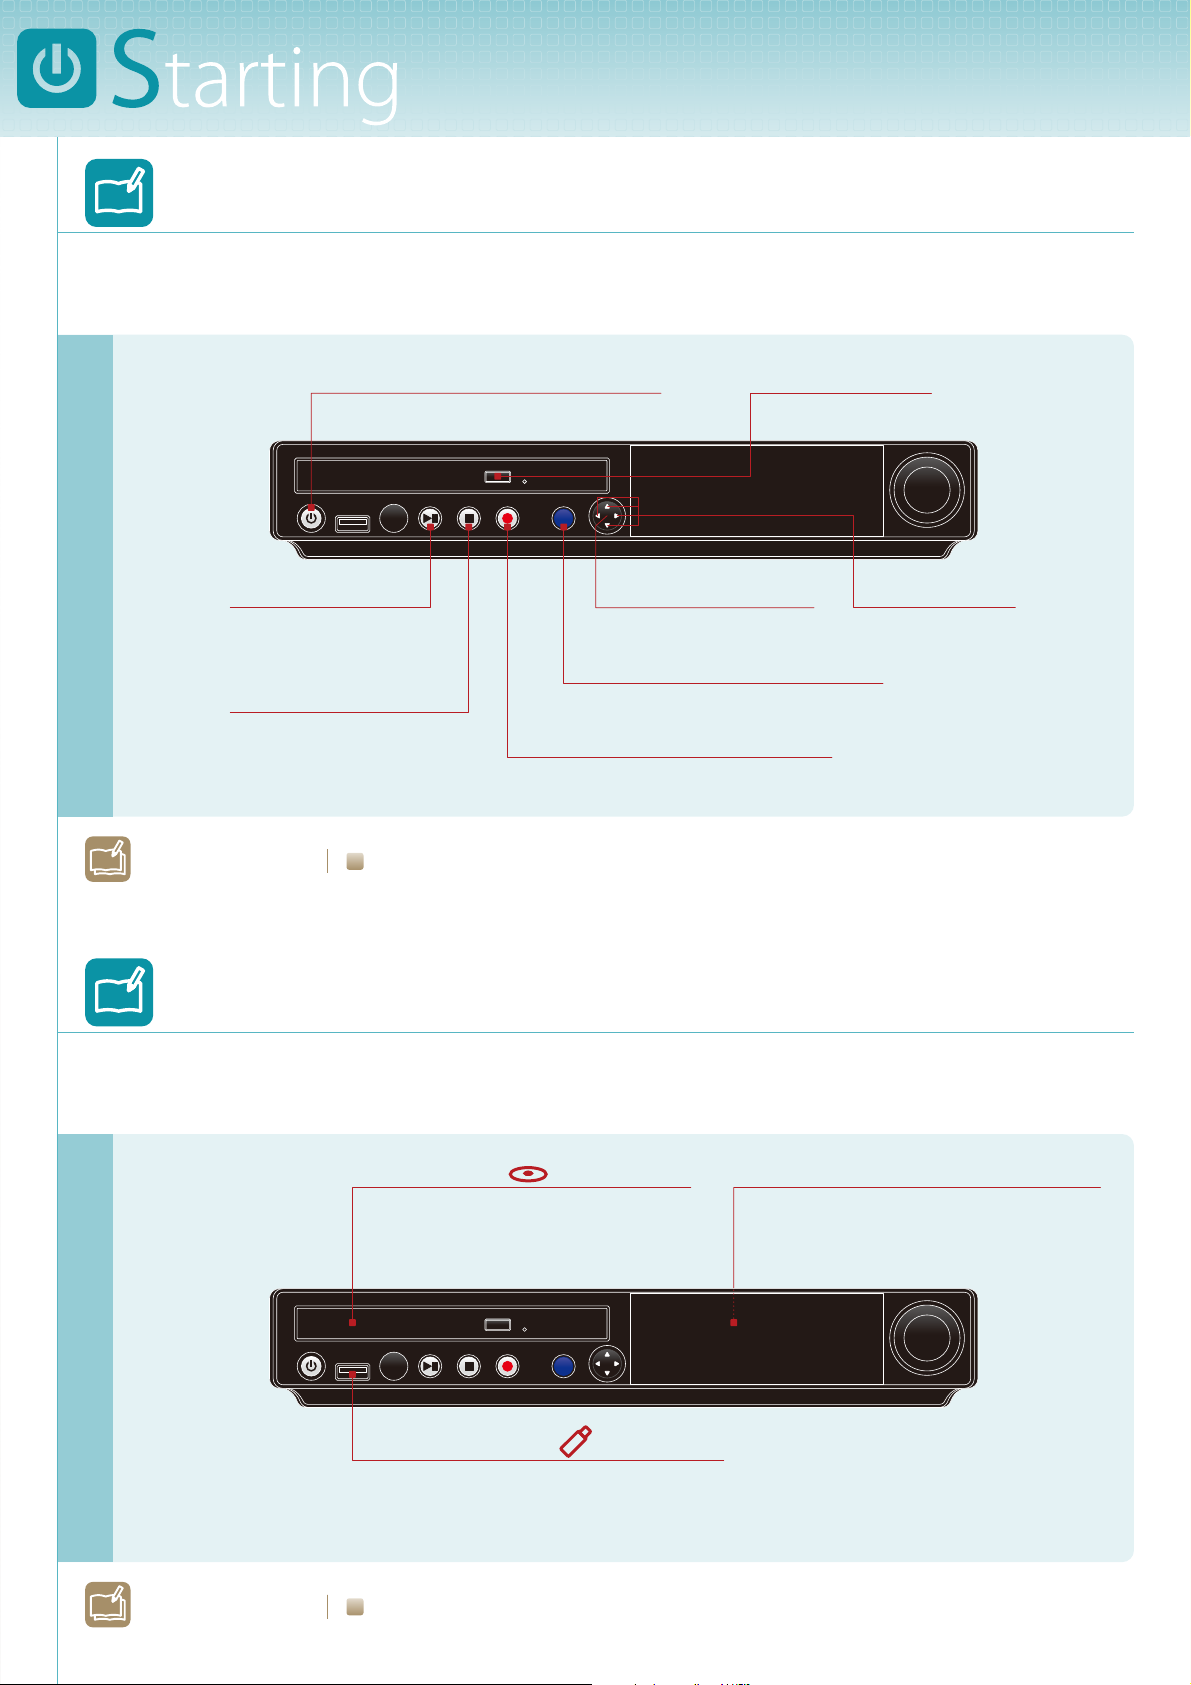
Learning about the Control Unit
Buttons that you will use for playback and recording.
PLAY/PAUSE
Starts and pauses
playback/recording.
STOP
Stops playback/recording.
L
earn More?
ON/OFF
Turns on or shuts down the Disklavier.
SELECT
ENTER
Executes the selection.
SELECT
Opens the media selection screen.
RECORD
Gets the Disklavier ready to record.
See page 2 on Operation Manual.
(center)
EJECT
Opens the CD tray.
CURSOR
Selects the item.
Learning about Media
Media that you can use on the Disklavier.
Compact Disc
The Disklavier can play songs on
commercial audio CDs and data CDs
(such as PianoSoft•PlusAudio, etc)
SELECT
USB Flash Memory
You can also use commercially available
USB ash memory to store song data.
Internal Flash Memory
The Disklavier comes with a total of 128
megabytes of internal ash memory
that allows you to store song data.
Note: Yamaha does not assure the operation of
commercially available USB ash
memories. For a list of compatible
products, please visit:
www.yamaha.com/disklavier/
L
earn More?
See page 14 on Operation Manual.
Page 3
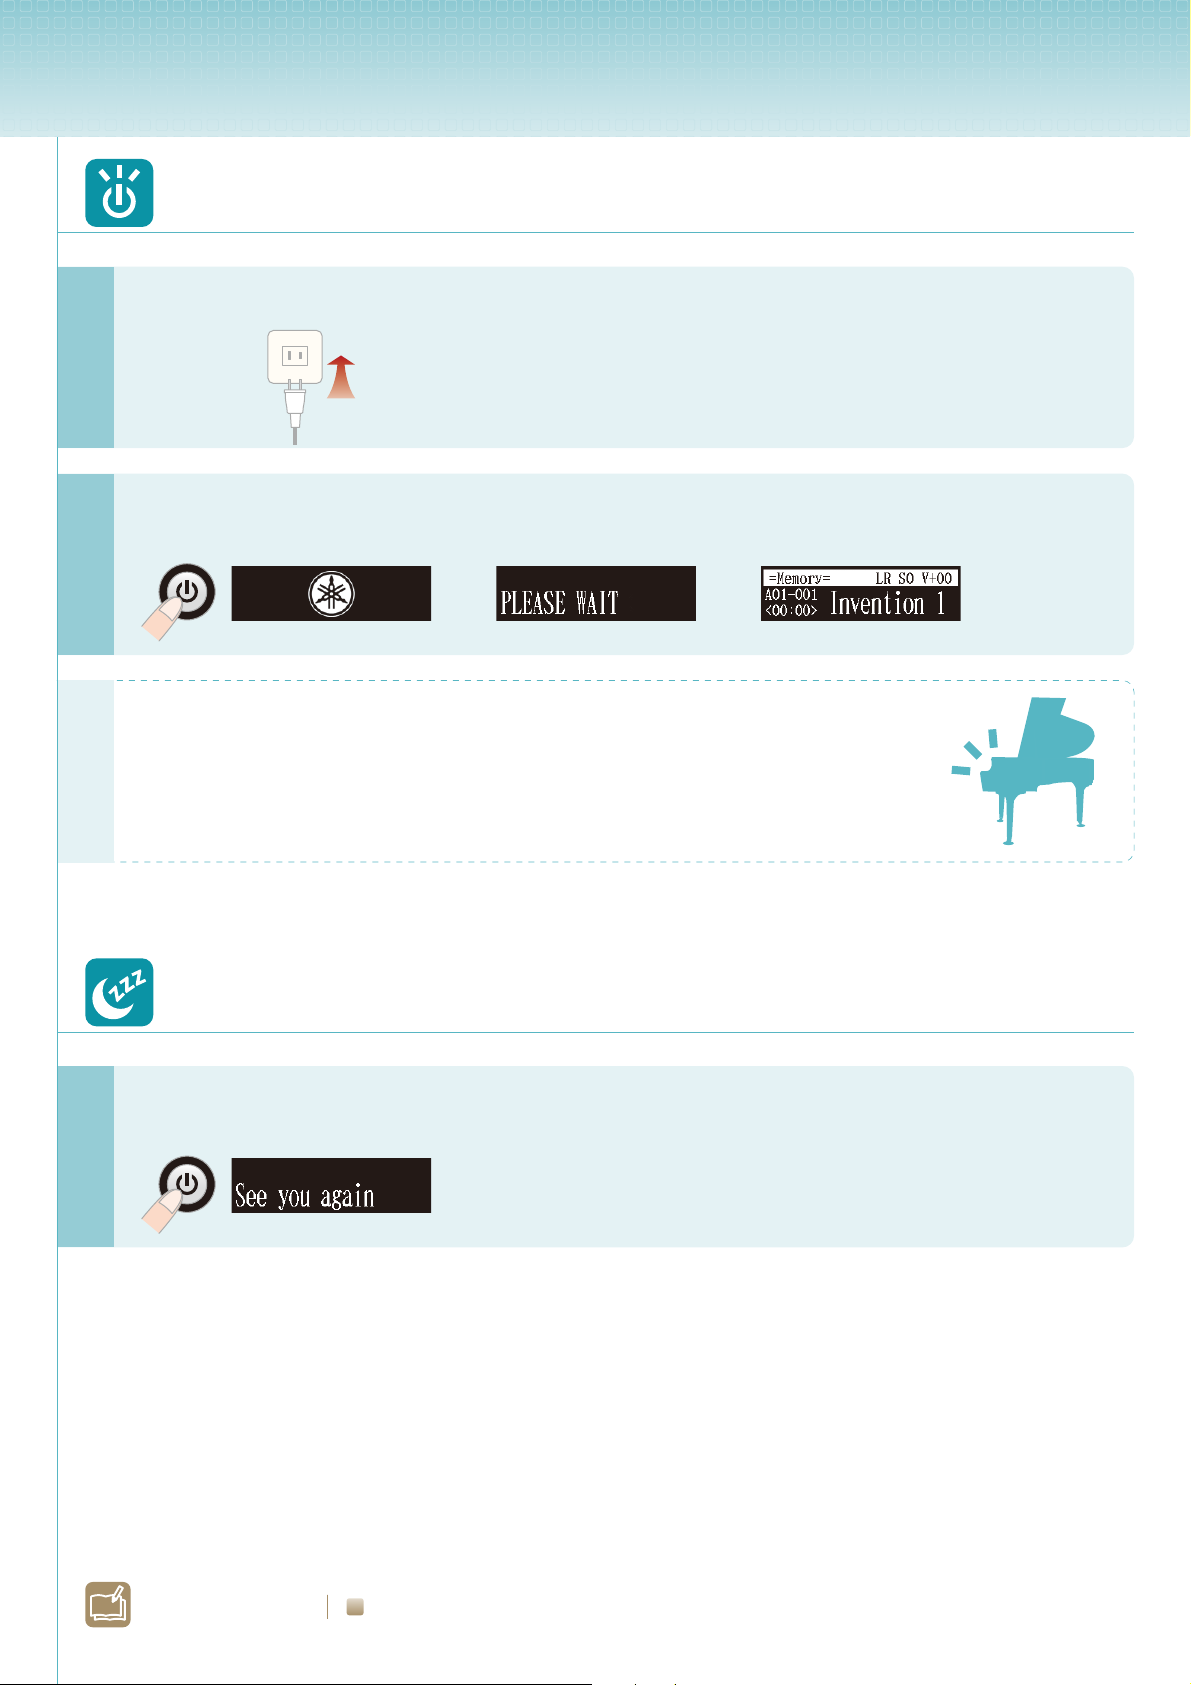
Turning Your Disklavier On
1
2
Connect the Disklavier to mains.
Turn your Disklavier on.
[
ON/OFF
]
>> >>
Your Disklavier is now ready for use!
When You Finish …
Shut your Disklavier down.
[
ON/OFF
]
L
earn More?
To put the Disklavier into the standby mode >> See page 14 on Operation Manual.
Page 4
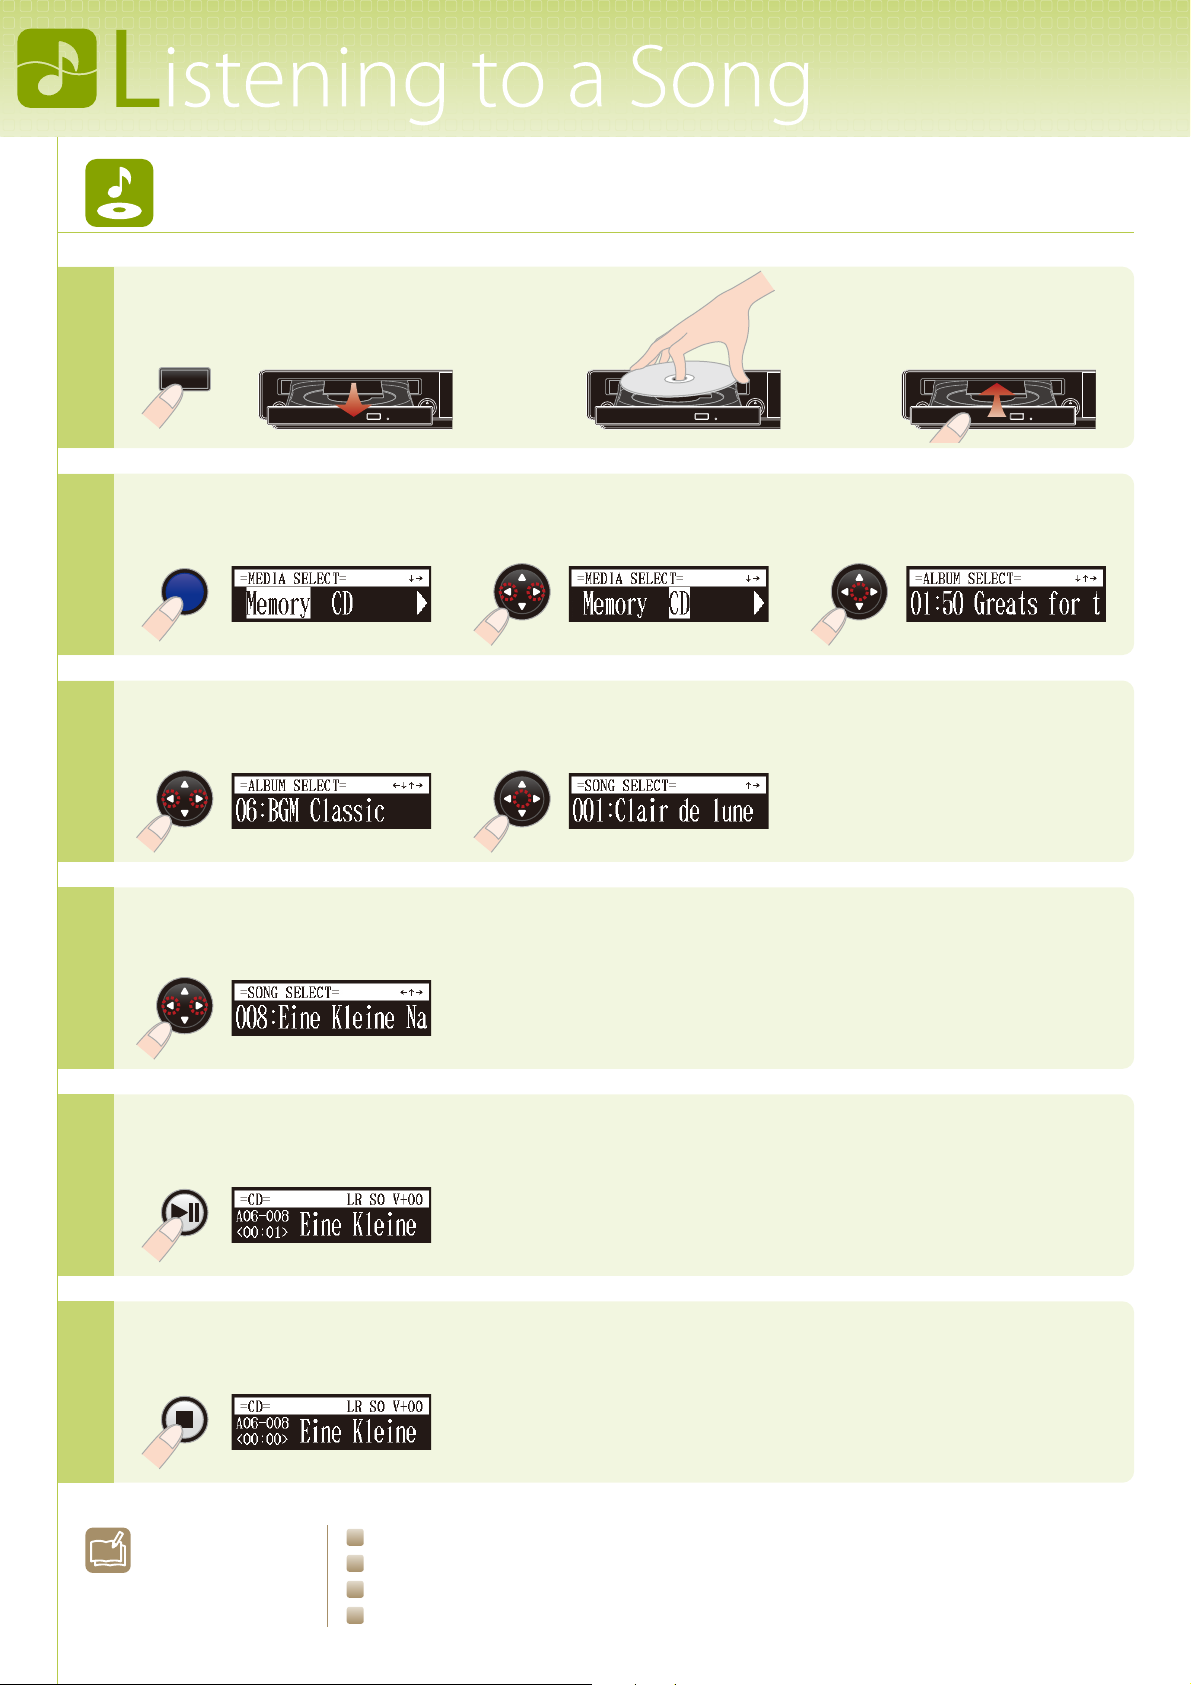
Listening to a CD included with the Disklavier
1
2
3
Load a CD.
[
]
EJECT
>>
CD tray on the Media Center
Select “CD” as the playback source.
[
SELECT
]
[
CURSOR
>>
] [
Select an album.
[
[
CURSOR
]
>>
ENTER
]
>>
>>
ENTER
]
4
5
6
Select a song.
[
CURSOR
]
Start song playback.
[
]
PLAY
Stop song playback.
[
]
STOP
L
earn More?
To change the playback tempo >> See page 27 on Operation Manual.
To play in a dierent key (transposition) >> See page 27 on Operation Manual.
To repeat playback >> See page 28 on Operation Manual.
To use the timer >> See page 35 on Operation Manual.
Page 5
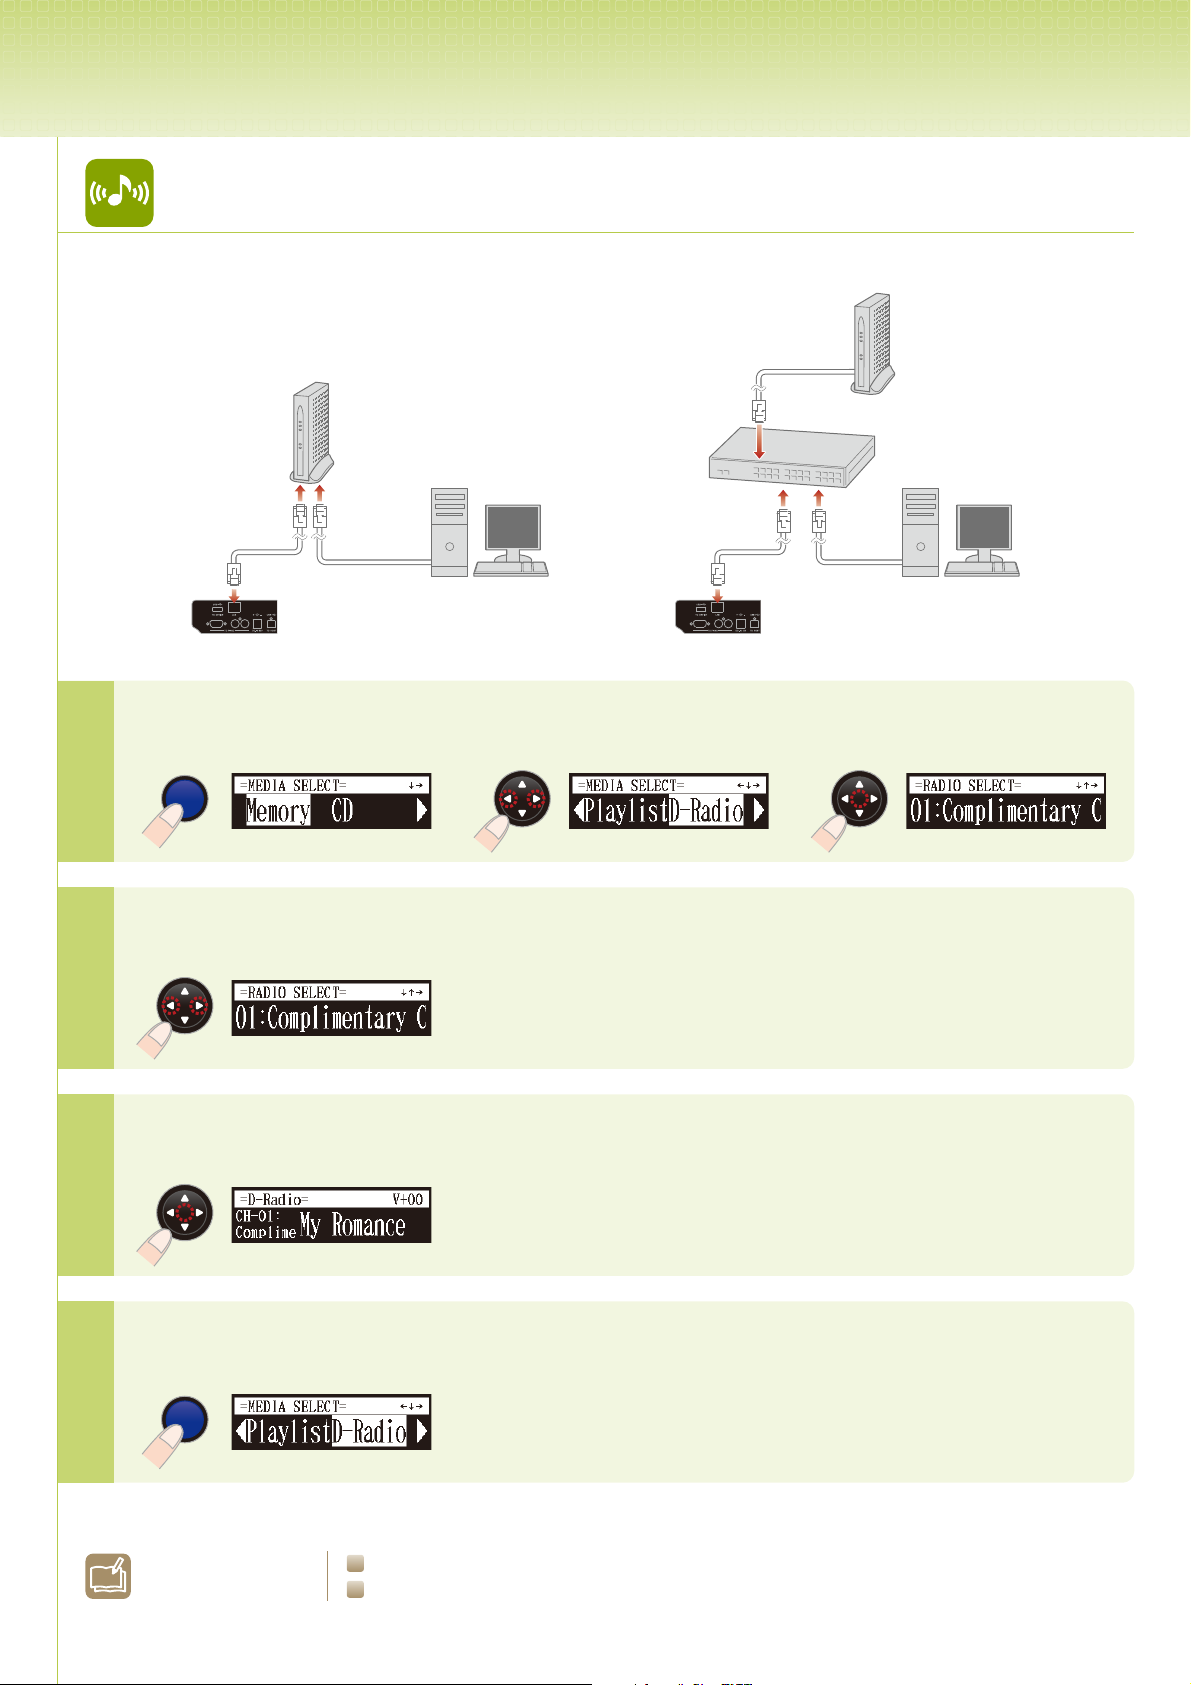
Listening to a Free DisklavierRadio Channel
Before operating…
Connect the Disklavier to a router or a modem equipped
with a router that is connected to the Internet.
Modem
(with router function)
Other device
(such as computer)
LAN cable
Control unit
(left side)
For more details on connections, see page 94 on Operation Manual.
1
Select “D-Radio” as the playback source.
[
SELECT
]
[
CURSOR
] [
>>
LAN cable
Control unit
(left side)
>>
Router
ENTER
Modem
(without router function)
Other device
(such as computer)
]
2
3
4
Select a free channel.
[
CURSOR
]
Turn the DisklavierRadio on!
[
]
ENTER
Turn the DisklavierRadio o...
[
SELECT
]
Note: The free channel is “CH-01”.
L
earn More?
To use a subscriber-only DisklavierRadio channel
To mute the DisklavierRadio >> See page 26 on Operation Manual.
>> See page 93 on Operation Manual.
Page 6
English
Recording
Copyright © 2010 by Yamaha Corporation
This document is printed on chlorine free (ECF) paper.
P. O. Box 1, Hamamatsu, 430-8650 Japan
Aug-10
X9758C0
N
Printed in Japan
Page 7
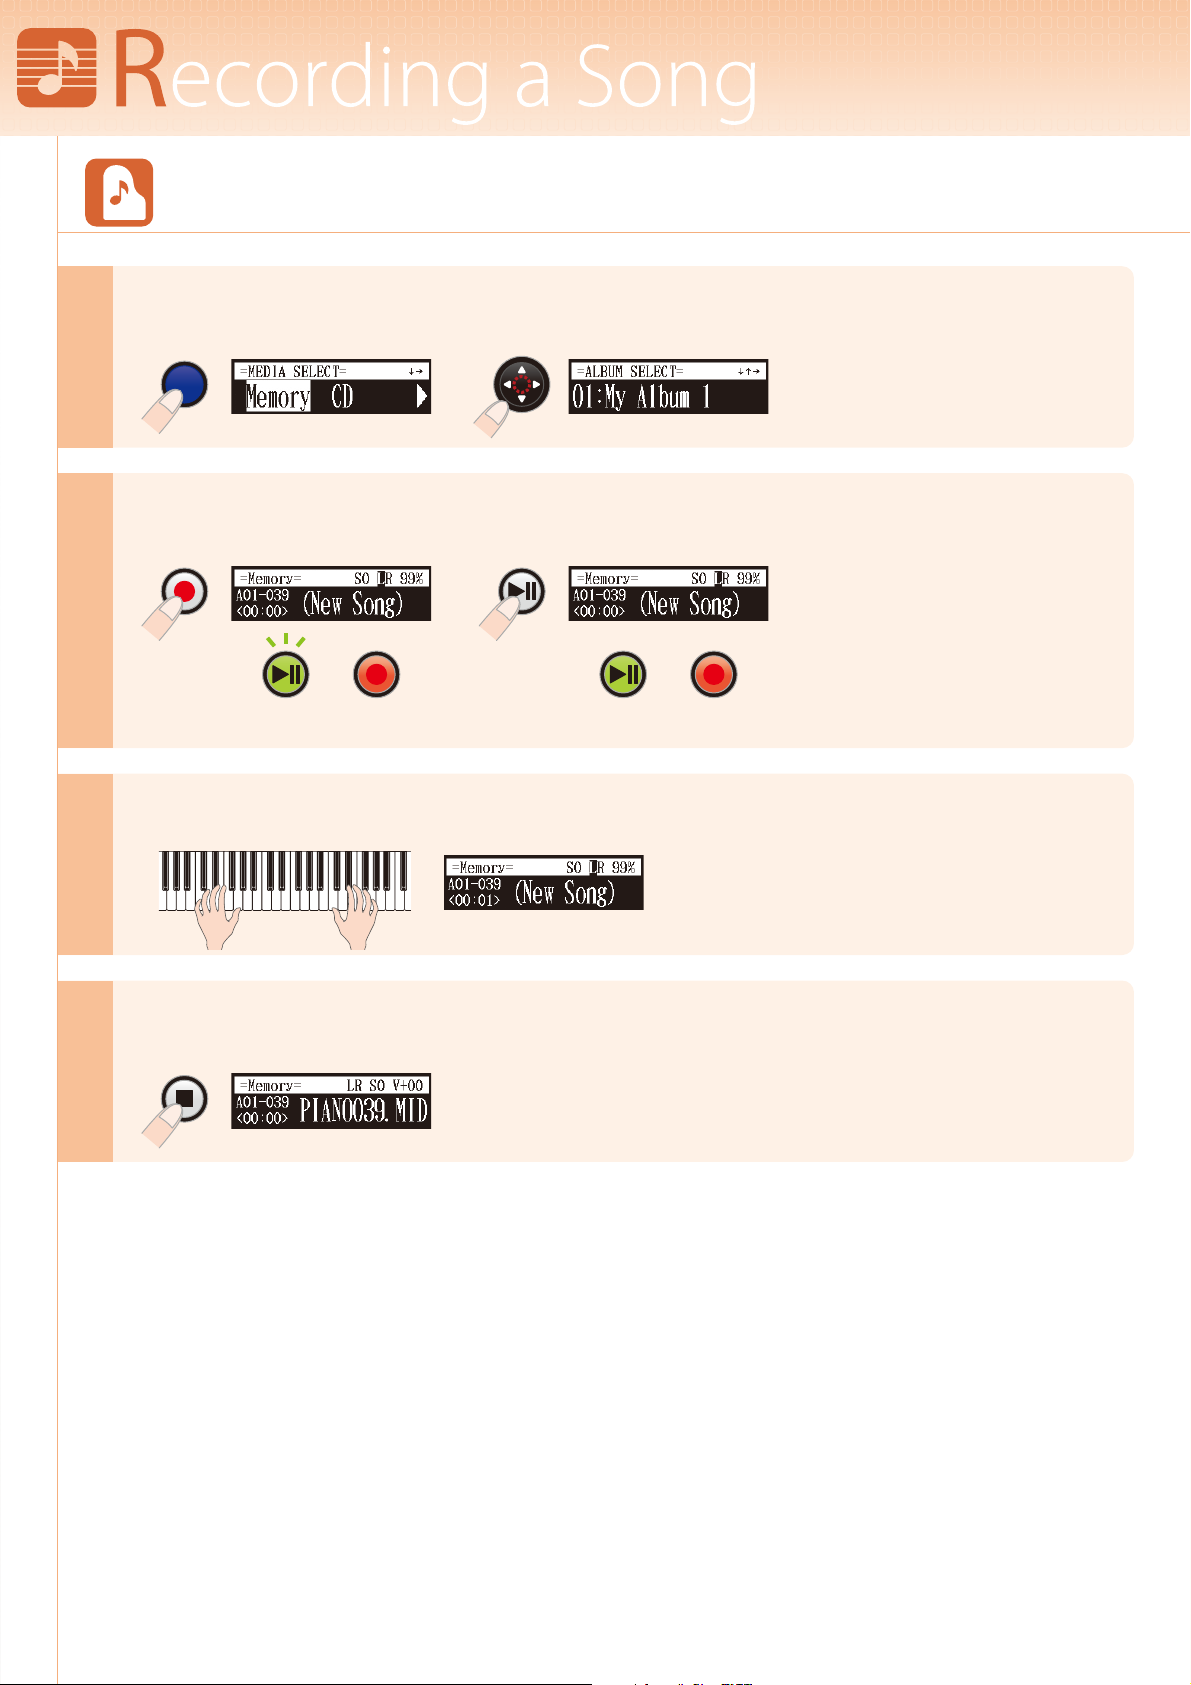
Recording to Internal Memory
1
2
3
Select “Memory” as the destination.
[
][
SELECT
ENTER
]
>>
Start recording.
[
[
RECORD
]
PLAY
]
>>
Flashes Lights Lights Lights
Start playing your song.
4
Stop recording.
[
]
STOP
Page 8

Listen to your performance right now?
[
]
PLAY
L
earn More?
To record along with the metronome >> See page 48 on Operation Manual.
To record L and R parts separately >> See page 50 on Operation Manual.
To record L and R parts with the split point set >> See page 52 on Operation Manual.
To change the recording tempo >> See page 55 on Operation Manual.
To manage albums >> See page 62 on Operation Manual.
Page 9
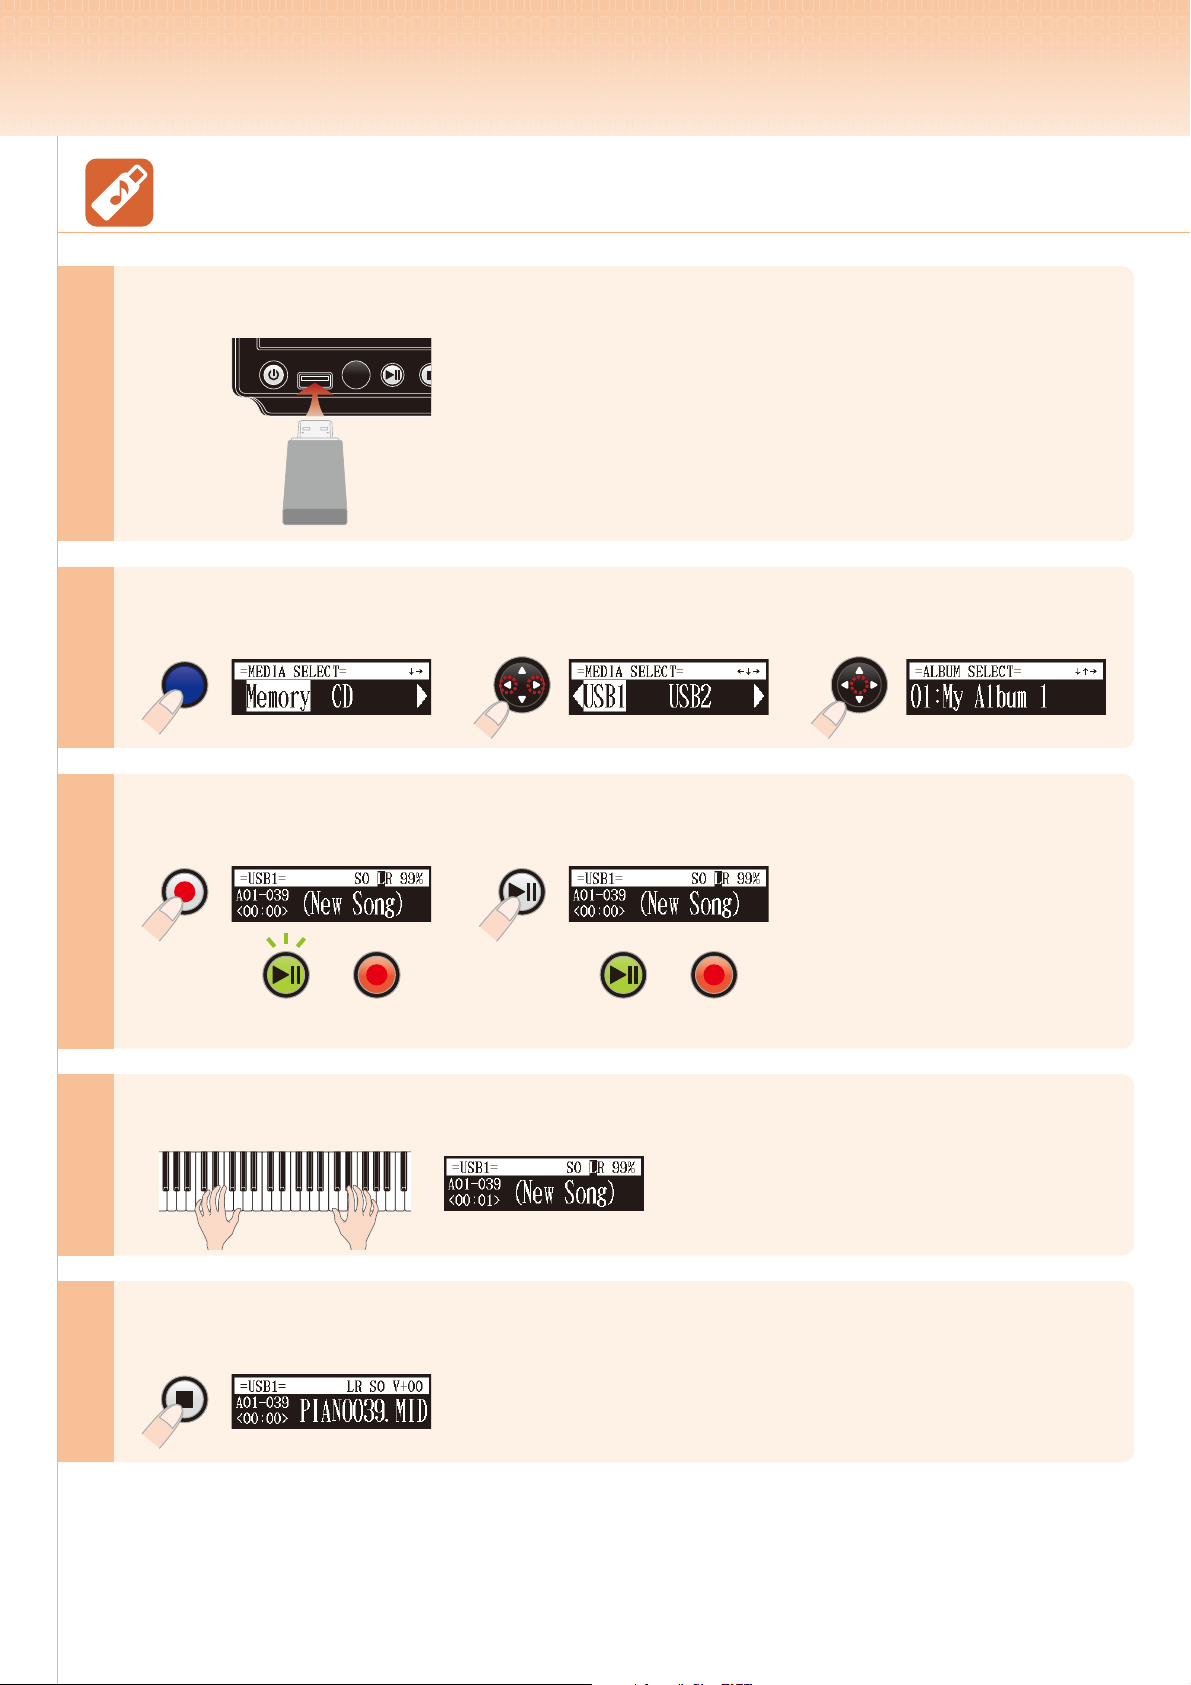
Recording to a USB Flash Memory
1
2
3
Insert a USB ash memory.
Select “USB1” as the destination.
[
SELECT
]
[
CURSOR
][
>>
Start recording.
[
[
RECORD
]
PLAY
]
Note: Yamaha does not assure the
operation of commercially available
USB ash memories. For a list of
compatible products, please visit:
www.yamaha.com/disklavier/
]
ENTER
>>
4
5
>>
Flashes Lights Lights Lights
Start playing your song.
Stop recording.
[
]
STOP
Page 10

Listen to your performance right now?
[
]
PLAY
L
earn More?
To record along with the metronome >> See page 48 on Operation Manual.
To record L and R parts separately >> See page 50 on Operation Manual.
To record L and R parts with the split point set >> See page 52 on Operation Manual.
To change the recording tempo >> See page 55 on Operation Manual.
To manage albums >> See page 62 on Operation Manual.
 Loading...