


DKC-850
Table of contents
 Loading...
powered by RemoteLive™
User’s Guide
This service is available for U.S. customers only.
For Disklavier E3 and DKC-850 Users
Ver.1.04 (9/17/2013)

2
DisklavierTV User’s Guide (For Disklavier E3 and DKC-850 Users)
Table of Contents
Introduction ..............................................................................................................4
Names of Parts and Their Functions .............................................................4
Control Unit (Front) ..........................................................................................4
Control Unit (Rear) ........................................................................................... 5
Remote Control ................................................................................................6
Connection Diagram (Basic) ..............................................................................8
Connecting the Disklavier to the Internet ..................................................... 8
Preparation ........................................................................................................8
Connecting the Control Unit to the Internet .................................................8
Notes on Network Security ............................................................................. 9
Watching on Your Computer .........................................................................10
Watching on Your TV .......................................................................................11
Preparation ............................................................................................................. 12
Turning on Your Disklavier .............................................................................12
Registration ........................................................................................................13
Updating Your Disklavier ................................................................................14
Logging into Your Account ............................................................................17
Entering Characters ....................................................................................... 19
Activating DisklavierTV .....................................................................................20
Receiving Test....................................................................................................20
Viewing Live Broadcast or On-demand Content ......................................22
Adjustments ...........................................................................................................24
Adjusting the Main Volume ............................................................................24
Adjusting the Audio Volume Balance ..........................................................25

3
DisklavierTV User’s Guide (For Disklavier E3 and DKC-850 Users)
Connection Diagram (Advanced) ................................................................... 26
Watching on Your Computer with External Speakers ............................26
Watching on Your TV with External Speakers ..........................................27
Watching Video with High Quality Audio and External Monitor ..........28
Appendix .................................................................................................................. 29
Windows 7 and 8 Audio Considerations ....................................................29
Adjusting the Delay ..........................................................................................30
Adjusting the Depth of the Sustain Pedal ..................................................31
Network Diagnostics ........................................................................................32
Checking the Broadcast Information and Error History ......................... 33
Troubleshooting ....................................................................................................34
Error Messages ..............................................................................................34
Table of Contents

4
DisklavierTV User’s Guide (For Disklavier E3 and DKC-850 Users)
Introduction
Names of Parts and Their Functions
■
Control Unit (Front)
1
[ON/OFF] button
Turns on or turns off the Disklavier.
Press once to turn it on, and once again
to turn it off.
2
USB port
Used to connect a USB flash memory,
etc.
3
Remote control sensor
When using the remote control, point it
toward this sensor.
4
CD drive
Insert a PianoSoft·PlusAudio or other
audio or audio/MIDI CD here.
5
CD eject button
Used to open the CD drive.
6
[PLAY/PAUSE] button
Used to start and pause playback.
7
[STOP] button
Used to stop playback and recording.
8
[RECORD] button
Used to engage the record standby
mode before recording starts.
9
[SELECT] button
Used to select media.
10
Cursor/[ENTER] buttons
Cursor: Used to select options and
parameters.
Press this button inclining
slightly upward/downward/left/
right.
[ENTER]: Used to execute the selection.
Press in the very center of this
button.
11
Display
Shows various information.
12
Dial
Used to adjust the volume, and to set
parameter values.
12 63
45
78 9101112
5
DisklavierTV User’s Guide (For Disklavier E3 and DKC-850 Users)
Introduction
■
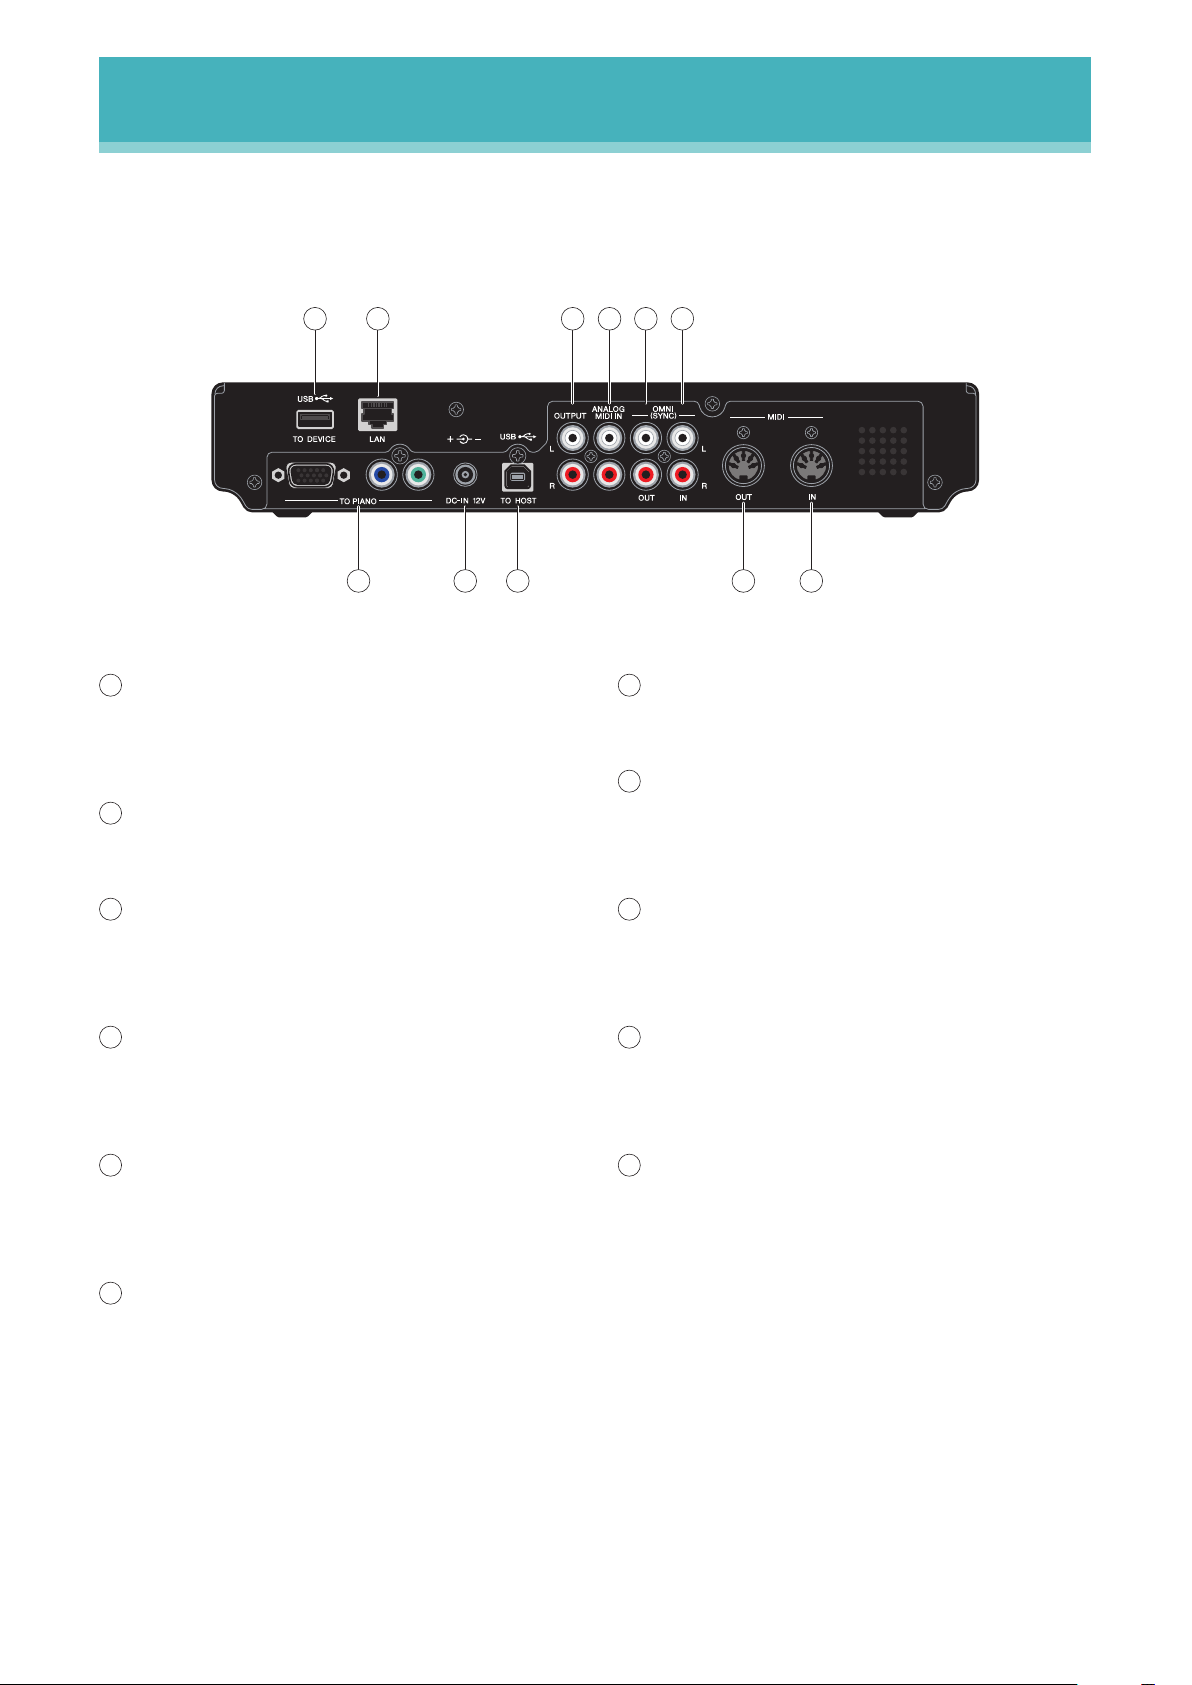
Control Unit (Rear)
1
USB TO DEVICE port
Used to connect a USB flash memory,
an optional USB floppy disk drive, etc.
2
LAN port
Used to connect to the Internet.
3
OUTPUT jacks
Used to connect speaker cables to
monitor speakers*
4
ANALOG MIDI IN jacks
Used to connect audio equipment such
as an external CD changer.
5
OMNI (SYNC) OUT jacks
Used to connect the microphone/line
input of a camcorder.
6
OMNI (SYNC) IN jacks
Used to connect the audio output of a
camcorder or computer.
7
TO PIANO connectors
Used to connect the piano.
8
DC-IN 12V connector
Used to connect to the power supply
unit.
9
USB TO HOST port
Used to connect the USB cable from a
computer.
10
MIDI OUT terminal
Used to connect external MIDI
equipment for outputting MIDI data.
11
MIDI IN terminal
Used to connect external MIDI
equipment for inputting MIDI data.
* Only for models supplied with monitor speakers.
7891011
12 4356
6
DisklavierTV User’s Guide (For Disklavier E3 and DKC-850 Users)
Introduction
1
[ON/STANDBY] button
Turns on the Disklavier or puts it in
standby mode.
2
Number keypad
Used for direct album/song selection and
to enter a start time for song playback.
3
[SYSTEM] button
Used to access the system menu.
4
[VOICE] button
Used to access the voice function.
5
[RECORD] button
Used to engage the record standby
mode before recording starts.
6
[PLAY] button
Used to start playback.
7
[REVERSE]/[FORWARD] buttons
In the play mode: used to fast preview
and review.
In the pause mode: used to fast forward
and rewind.
■
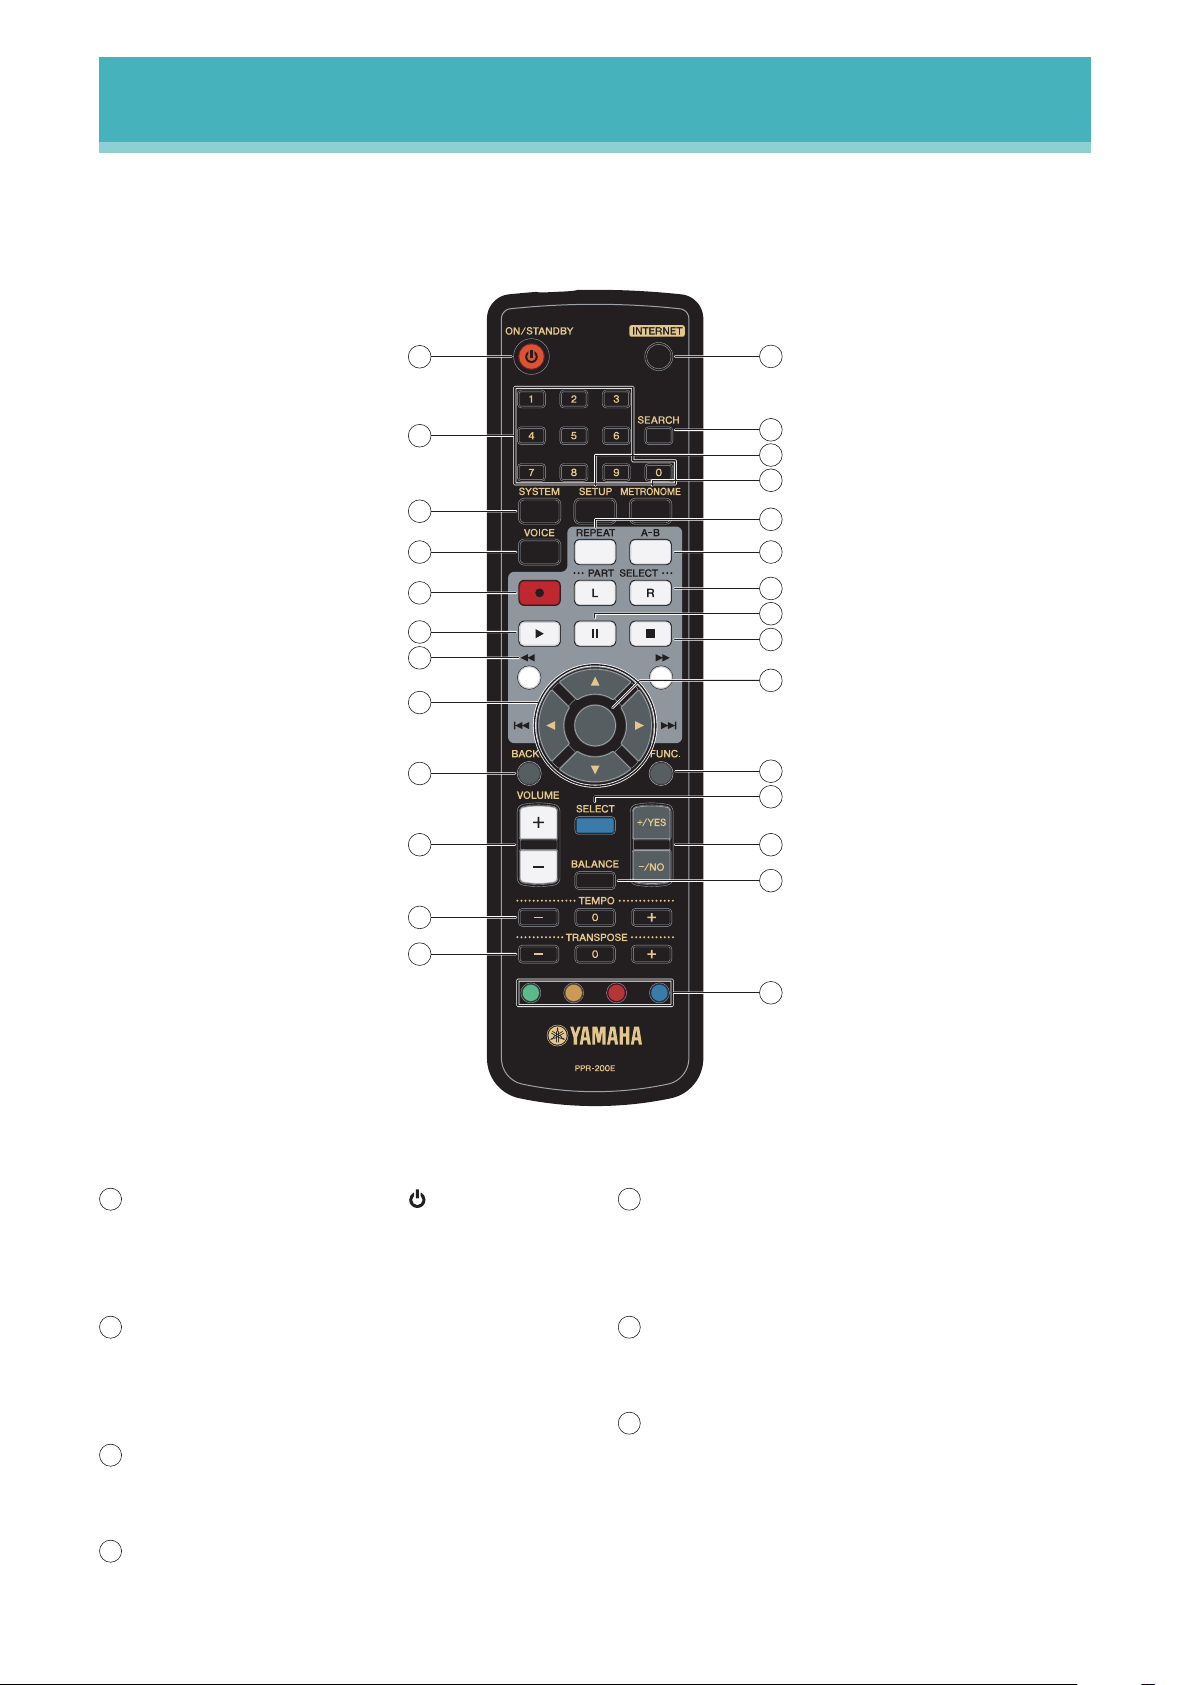
Remote Control
1
13
14
18
19
21
22
23
25
26
27
15
16
20
24
17
2
3
4
5
6
7
8
9
10
11
12

7
DisklavierTV User’s Guide (For Disklavier E3 and DKC-850 Users)
Introduction
8
Cursor buttons
Used to select options and parameters.
9
[BACK] button
Used to cancel the selection, and return
to the previous screen.
10
[VOLUME] buttons
Used to adjust the volume.
[–] lowers the volume, [+] raises the
volume.
11
[TEMPO] buttons
Used to change the playback tempo.
[–] decreases the tempo, [+] increases
the tempo, and [0] resets the tempo to
00.
12
[TRANSPOSE] buttons
Used to transpose song playback.
[–] transposes down, [+] transposes up,
and [0] resets the transposition value to
00.
13
[INTERNET] button
Used to access the Internet menu.
14
[SEARCH] button
Used to access the search function.
15
[SETUP] button
Used to access the setup menu.
16
[METRONOME] button
Used to access the metronome function.
17
[REPEAT] button
Used to select one of the repeat modes:
ALL, RPT, RND, or OFF.
18
[A-B] button
Used to enter A and B points for the A-B
repeat mode.
19
[PART SELECT] buttons
For L/R and ensemble songs, these
buttons are used to choose which part
will play: left-hand part, right-hand part,
or both parts.
They are also used to select a part for
recording.
20
[PAUSE] button
Used to pause playback.
21
[STOP] button
Used to stop playback and recording.
22
[ENTER] button
Used to execute the selection.
23
[FUNC.] button
Used to access the function menu.
24
[SELECT] button
Used to select media.
25
[+/YES]/[–/NO] buttons
Used to select parameters, adjust setting
values, and execute or cancel the
selected functions.
26
[BALANCE] button
Used to adjust the TG, audio and voice
balance.
27
Color buttons
Green : Used to execute the shortcut
assigned to the number keypad.
Yellow : Used to switch character types
when titling albums and songs.
Other : For future use.
8
DisklavierTV User’s Guide (For Disklavier E3 and DKC-850 Users)
Connection Diagram (Basic)
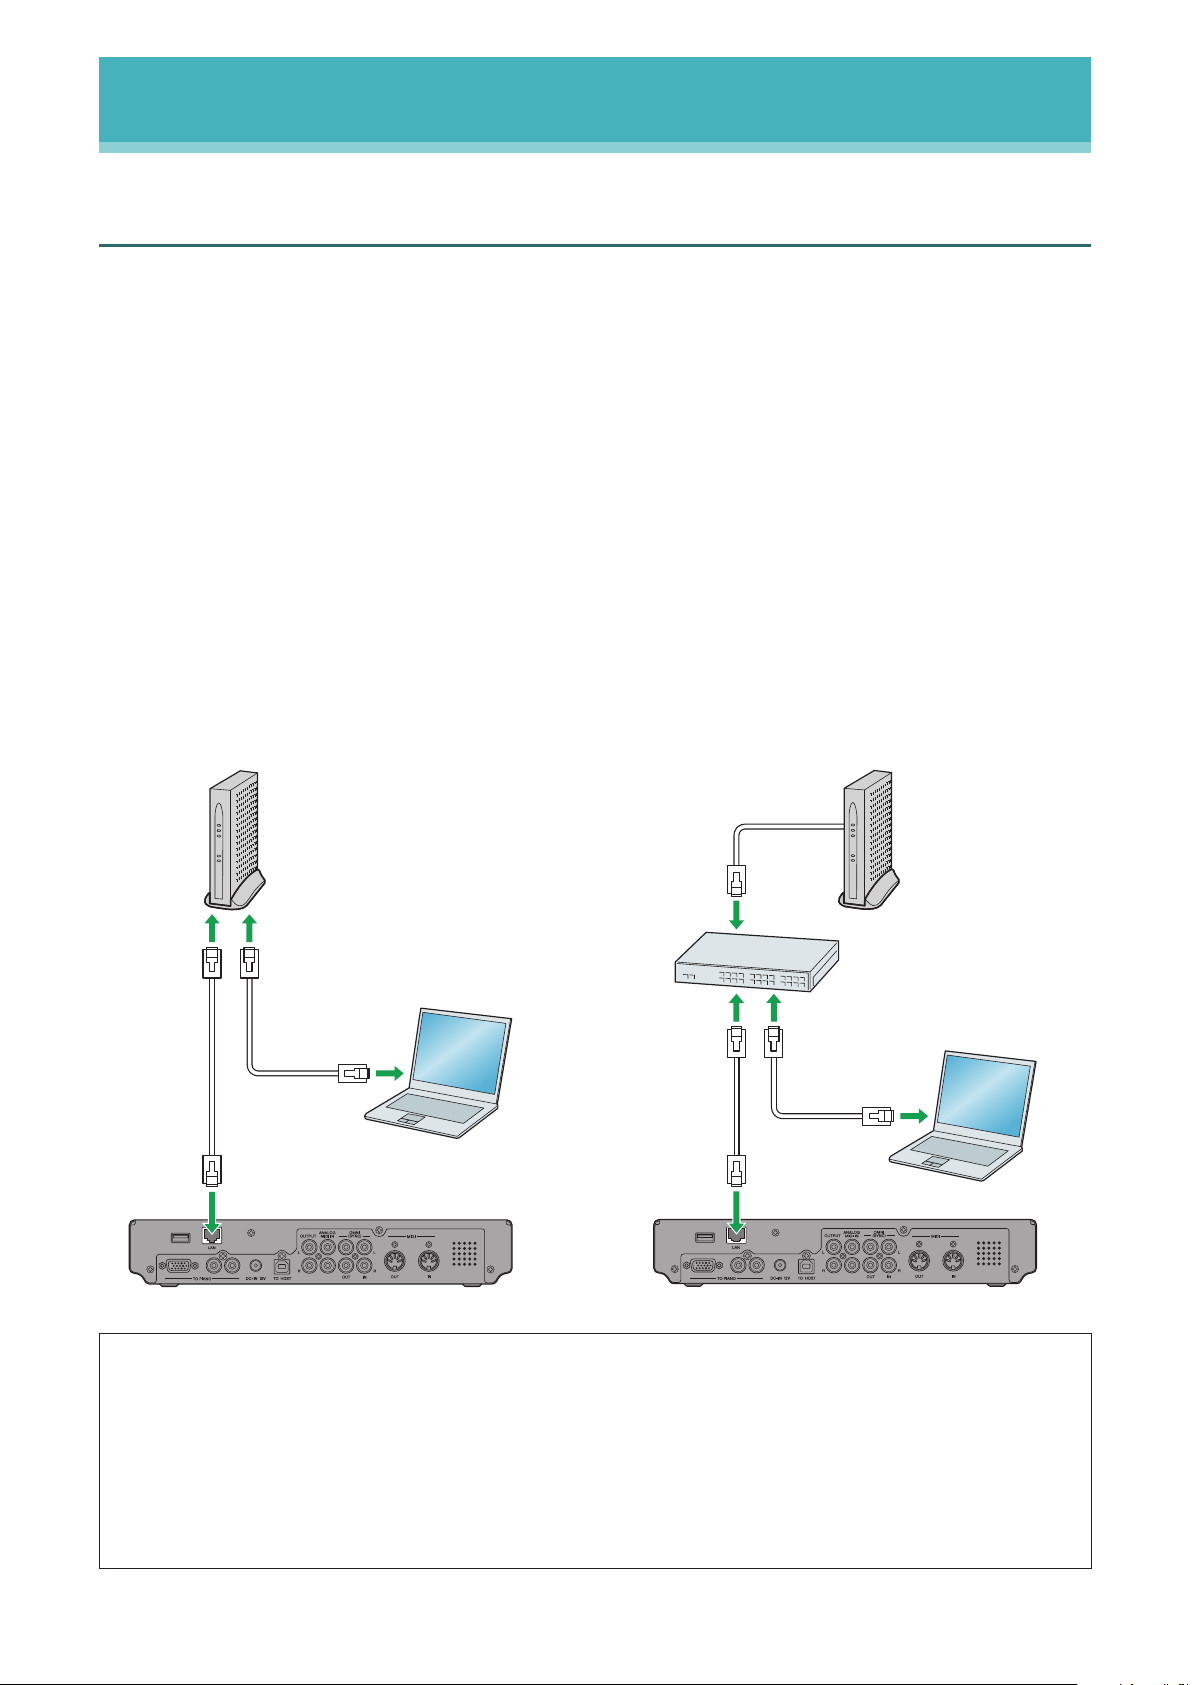
Connecting the Disklavier to the Internet
You can connect the Disklavier to a full-time online Internet connection (ADSL, optical fiber,
cable Internet, etc.) via a router or a modem equipped with a router.
■
Preparation
•To use the Internet connection, you will first need to subscribe to an Internet service or
provider.
•Use a computer to obtain and configure Internet service. You cannot obtain Internet service
or configure router settings on a local area network using the Disklavier itself.
•Use a standard LAN cable to connect the control unit and a router.
•Before connecting the LAN cable, make sure to turn off (or shut down) the Disklavier.
■
Connecting the Control Unit to the Internet
Connection example 1: Connection example 2:
Using a modem with router function Using a modem without router function
Note: •DependingonthecontractwithyourInternetprovider,youmaynotbeabletoconnecttwoor
more devices (for example, a computer and the Disklavier) to the Internet. Please check your
contract or contact your Internet provider for further information.
•Sometypesofmodems(suchasADSLmodemsorcablemodems)havemultipleportsfor
connecting two or more devices (such as computer, musical instrument, etc.). If your modem
has only one port, an optional router or hub is required in order to connect several devices
simultaneously.
Control unit (rear panel)
Modem
(with router function)
Other device
(such as computer)
LAN cable
Control unit (rear panel)
Router
Modem
(without router function)
Other device
(such as computer)
LAN cable

9
DisklavierTV User’s Guide (For Disklavier E3 and DKC-850 Users)
Connection Diagram (Basic)
For further information on the Internet connection (only a wired LAN connection is supported),
visit the Yamaha Disklavier website:
http://services.music.yamaha.com/radio/
■
Notes on Network Security
The Disklavier attempts to achieve a balance between security and usability in its network
implementation. However, a determined hacker may be able to defeat these security
measures and utilize the network of the purchaser in an unauthorized manner. Since each
network is different, only the purchaser can determine whether the security measures
discussed here will adequately protect their network.
The purchaser acknowledges that connection to the Internet and use of the Disklavier
Internet features is done at the risk of the purchaser. In no event shall Yamaha, its
subsidiaries or Yamaha’s and/or its subsidiaries’ directors, officers, or employees be
responsible for unauthorized access, loss or alteration of the data of the purchaser or be
liable for any damage from intrusions.
10
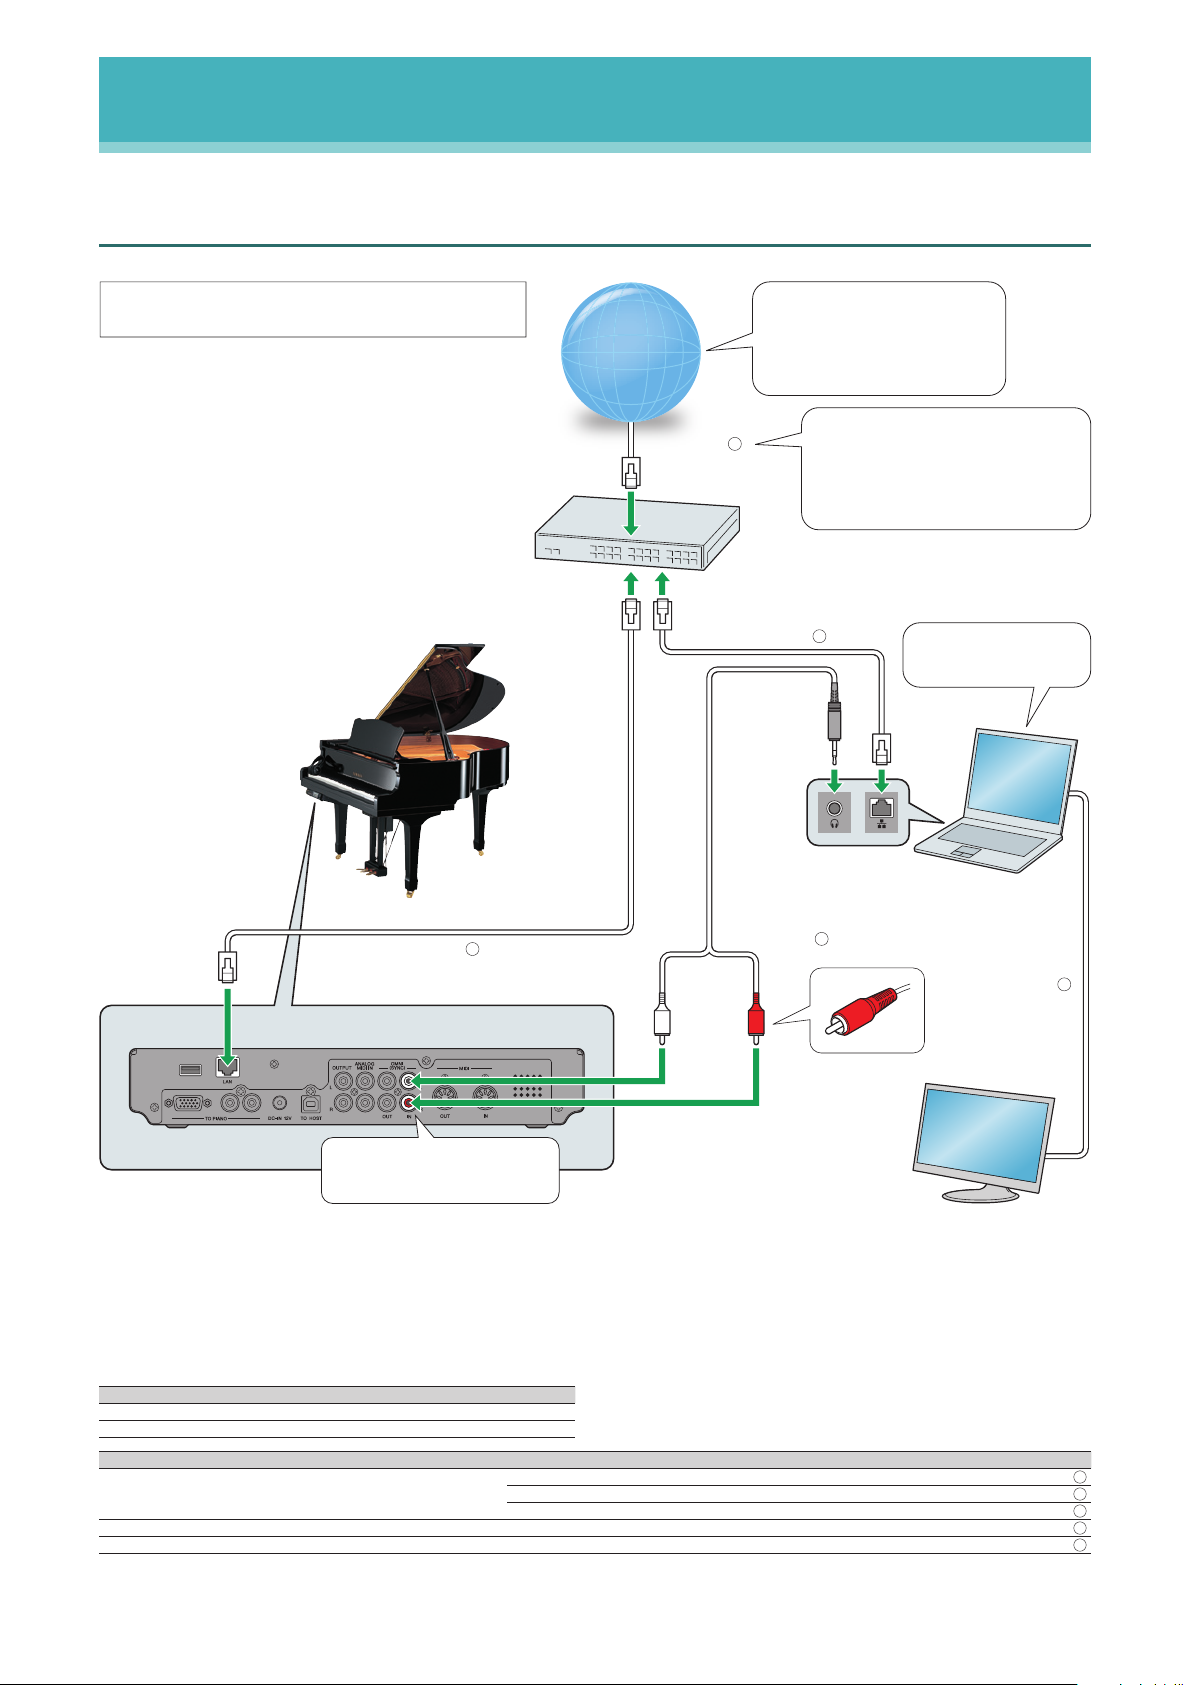
DisklavierTV User’s Guide (For Disklavier E3 and DKC-850 Users)
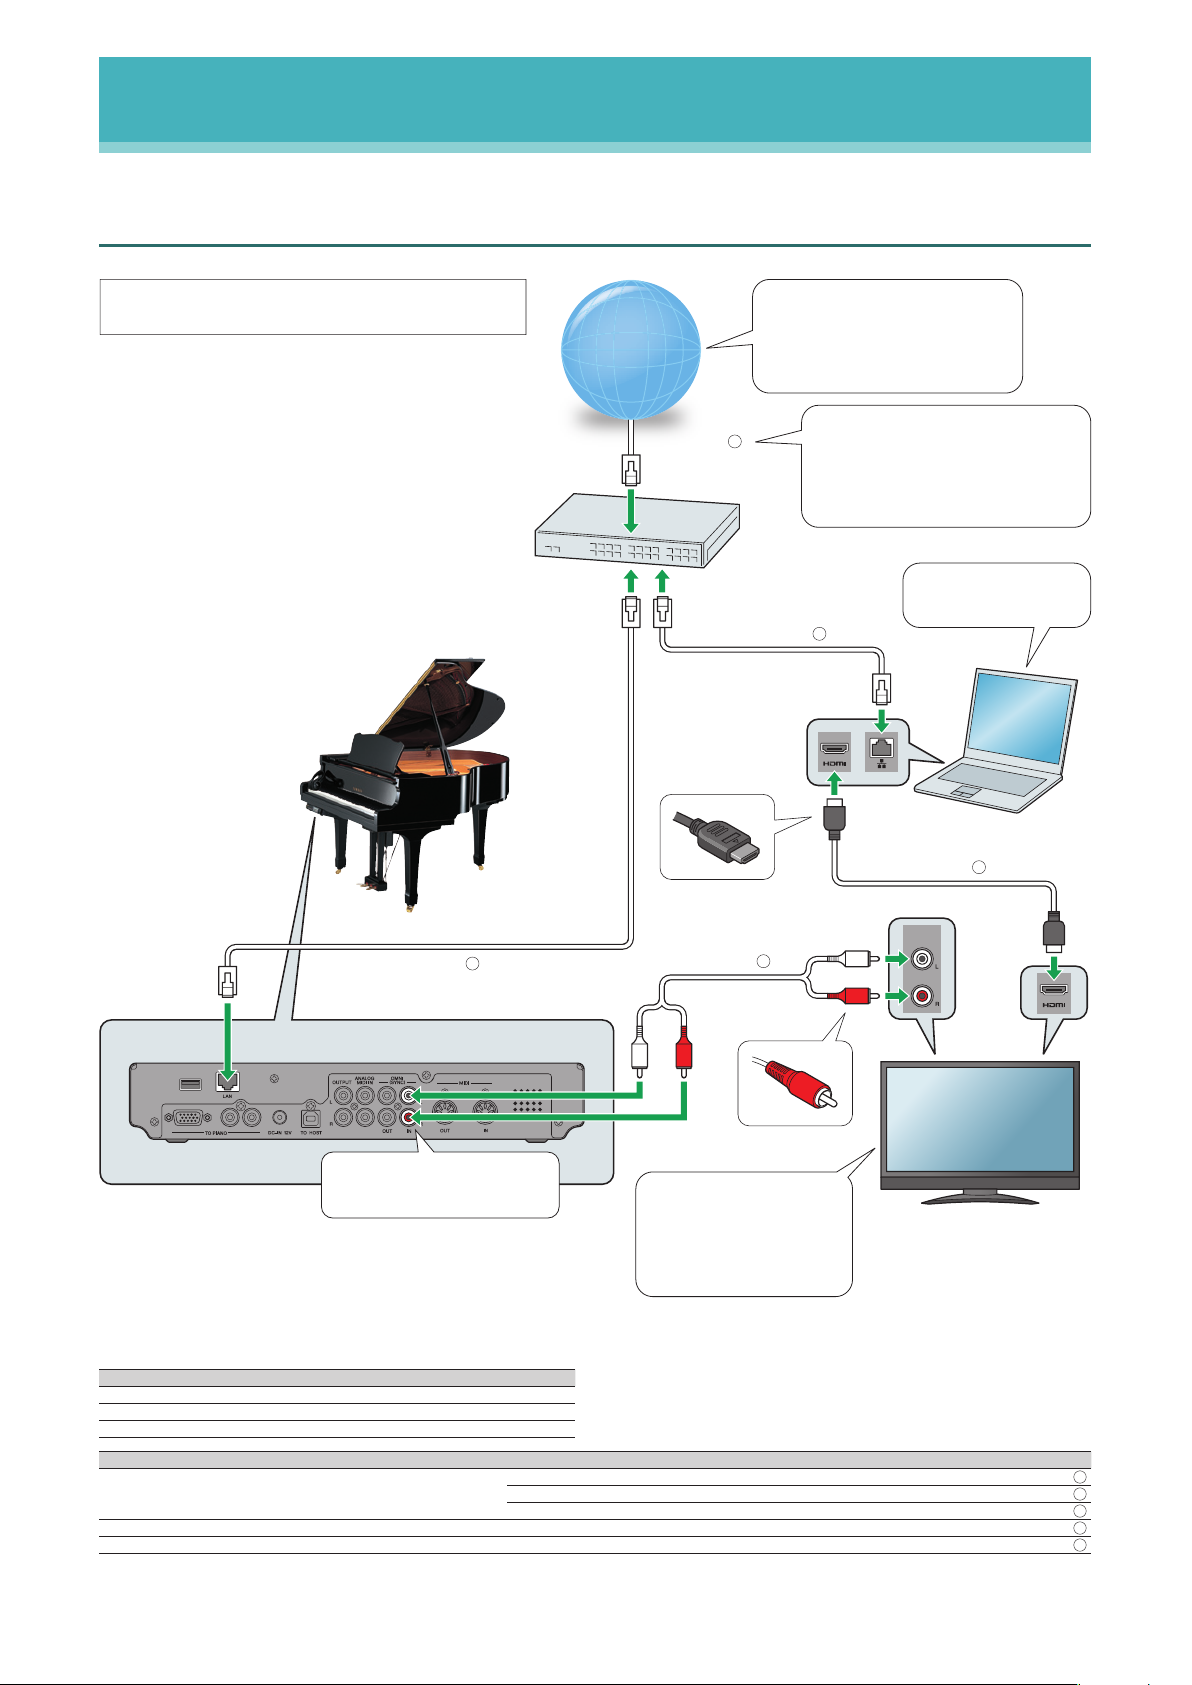
Connection Diagram (Basic)
Watching on Your Computer
LAN cable ( )
Switching
hub
Internet / LAN
Computer
LAN cable ( )
2
1
To check your bandwidth, visit
http://www.speedtest.net
Recommended:
Over 4 Mbps (download speed)
Recommended:
A wired LAN connection.
If you use a wireless connection,
communication might be unstable
depending on your environment.
Note: Turn the power off before connecting.
Control unit (rear)
Disklavier
LAN cable ( )
3
Audio cable ( )
4
Monitor
Display
cable ( )
5
Upper : white
Lower : red
Connect the cable firmly to the jack
Equipment
Computer (Windows or Mac) 1
Switching hub
*1
1
Requirements (These items are NOT supplied with Disklavier.)
Cables From To
LAN cable
1 Modem/router Switching hub
1 Switching hub Computer
1 Switching hub Disklavier
Audio cable (stereo mini pin - 2 RCA males)
*2
1 Computer Disklavier (OMNI IN)
Display cable 1 Computer Monitor
*1
You do not need the switching hub if your router has more than 2 empty LAN ports.
*2
DO NOT use cables with impedance changers.
1
2
3
4
5
For Windows 7 or 8
users: Check page 29.
11
DisklavierTV User’s Guide (For Disklavier E3 and DKC-850 Users)
Connection Diagram (Basic)
Watching on Your TV
AUDIO
OUT
LAN cable ( )
Switching
hub
Internet / LAN
Computer
LAN cable ( )
2
1
To check your bandwidth, visit
http://www.speedtest.net
Recommended:
Over 4 Mbps (download speed)
Set the volume as follows:
• TV: 0
• Audio output jacks: fixed
For details, refer to the
manual of your TV.
Note: Turn the power off before connecting.
HDMI cable ( )
4
TV
Audio cable ( )
5
Control unit (rear)
Disklavier
LAN cable ( )
3
Recommended:
A wired LAN connection.
If you use a wireless connection,
communication might be unstable
depending on your environment.
Upper : white
Lower : red
Connect the cable firmly to the jack
Equipment
Computer (Windows or Mac) 1
Switching hub
*1
1
TV (with HDMI input and audio output) 1
Requirements (These items are NOT supplied with Disklavier.)
Cables From To
LAN cable
1 Modem/router Switching hub
1 Switching hub Computer
1 Switching hub Disklavier
HDMI cable 1 Computer TV
Audio cable (2 RCA males - 2 RCA males)
*2
1 TV Disklavier (OMNI IN)
*1
You do not need the switching hub if your router has more than 2 empty LAN ports.
*2
Cable required depends on your TV.
1
2
3
4
5
For Windows 7 or 8
users: Check page 29.
12
DisklavierTV User’s Guide (For Disklavier E3 and DKC-850 Users)
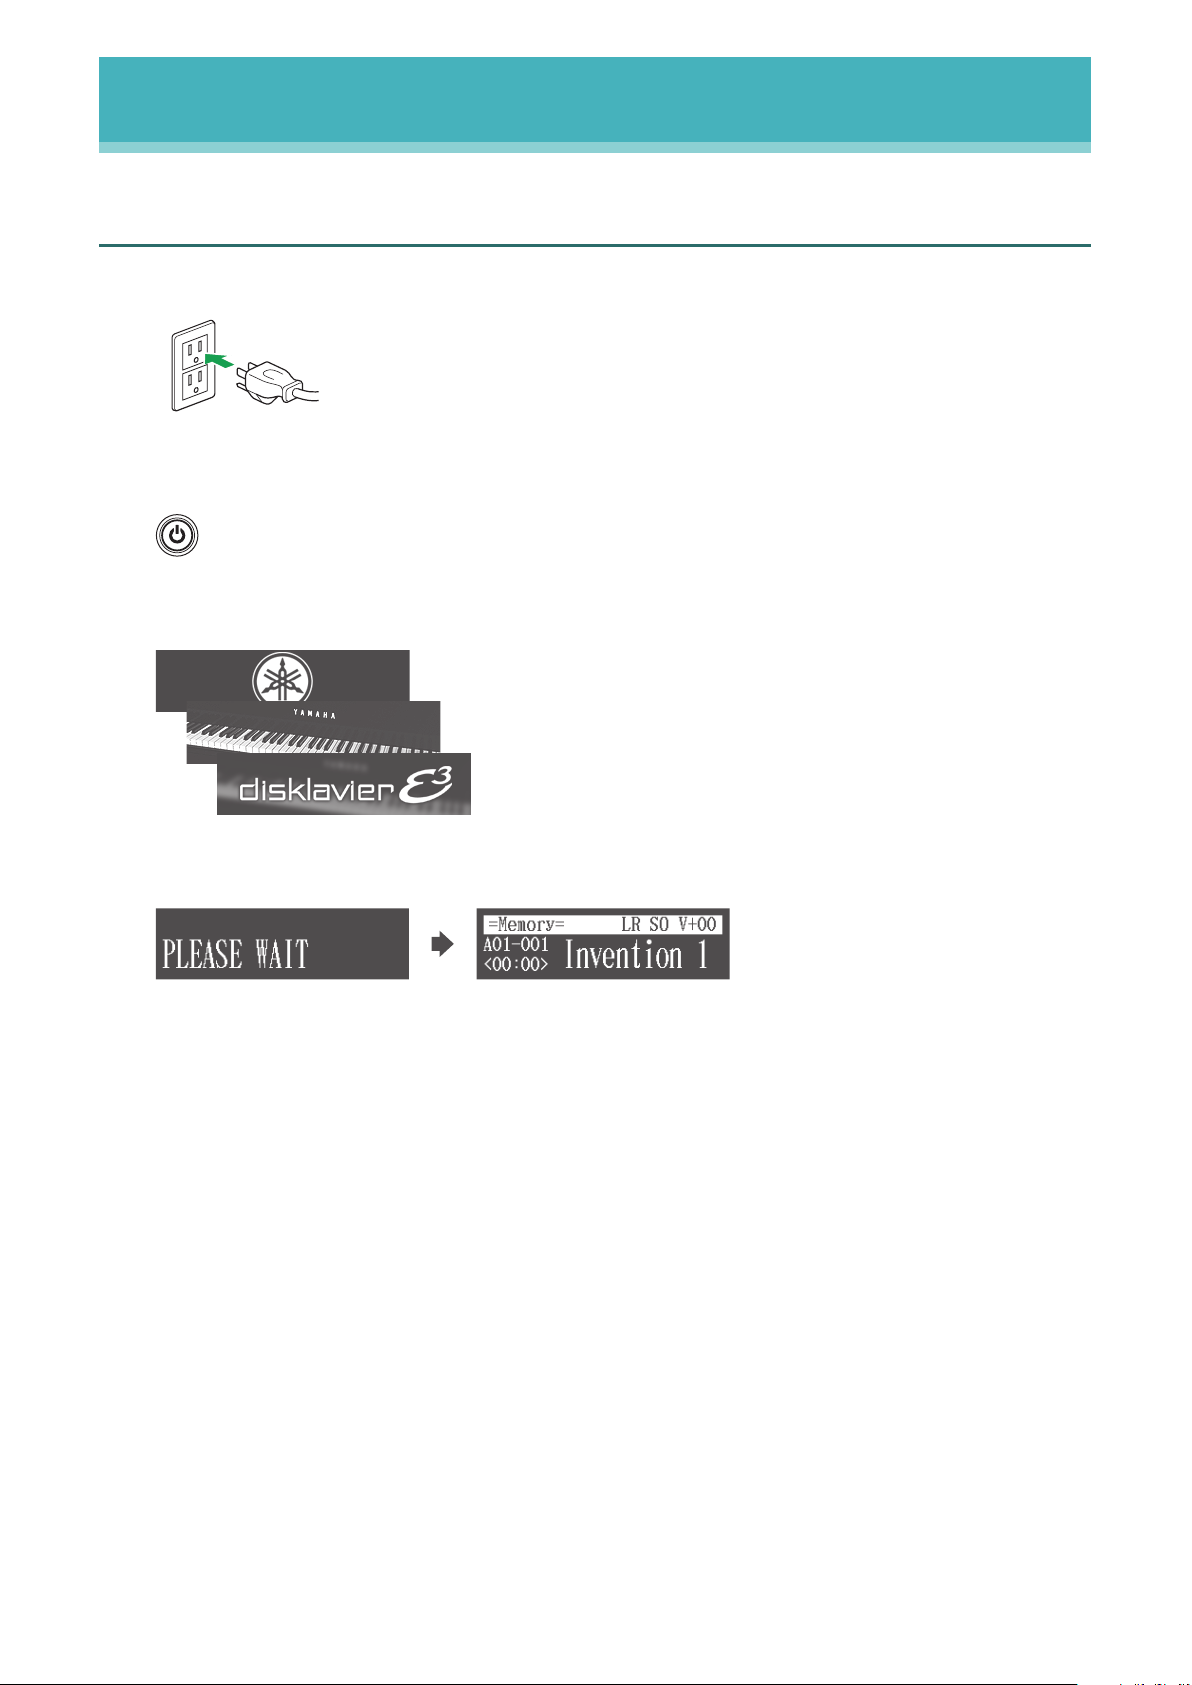
Preparation
Turning on Your Disklavier
1
Connect the AC power cable to the AC wall outlet.
2
Press [ON/OFF] on the control unit.
The following message appears on the display, and [ON/OFF] on the control unit lights
green.
(The illustration shows an example of Disklavier E3.)
After several seconds, the loading screen will appear, and last played song will be
loaded.
PLEASE WAIT
Invention 1
=Memory=
<00:00>
LR SO V+00
A01-001
Your Disklavier is now ready for use.
Loading...