TP-Link T1500G-10PS User manual

Installation Guide
JetStream 8-Port Gigabit Smart PoE Switch with 2 SFP Slots
T1500G-10PS (TL-SG2210P)
LED Explanation
PoE MAX |
|
|
|
Link/Act (port 1-8) |
|
|
||||||
|
|
PoE |
|
|
|
|
|
|||||
|
|
MAX |
|
Link/Act |
|
|||||||
On: 46W≤Total power supply<53W |
On(Green): Connected to a 1000Mbps device |
|||||||||||
Flashing: Total power supply keeps≥ |
On(Yellow): Connected to a 10/100Mbps |
|||||||||||
46W more than 2 minutes |
|
|
|
|
|
|
|
device |
|
|
|
|
Off:Total power supply<46W |
|
|
|
|
|
|
|
Flashing: Transmitting/receiving data |
|
|
|
|
Power |
|
|
|
|
|
System |
|
|
|
|
||
|
|
|
|
|
|
|
|
|
|
|||
|
|
Power |
System |
|||||||||
On: Power on |
|
|
|
|
|
|
|
Flashing: System running normally |
|
|
|
|
Off: Power off |
|
|
|
|
|
|
|
On/Off: System running abnormally |
|
|
|
|
SPF1/SFP2 |
|
|
|
PoE Status (port 1-8) |
PoE |
|
|
|
||||
|
|
|
|
|
|
|
|
|||||
SPF1 SPF2 |
|
Status |
||||||||||
On(Green): Connected to a 1000Mbps |
On: Providing PoE power |
|
|
|
|
|||||||
device |
|
|
|
|
|
|
|
Flashing: Current-overload/Short-circuit/ |
||||
On(Yellow): Connected to a 100Mbps |
Connected to a Non-standard PD/Power |
|||||||||||
device |
|
|
|
|
|
|
|
exceeded the user-defined value |
|
|
|
|
Flashing: Transmitting/receiving data |
Off: Not providing PoE Power |
|
|
|
|
|||||||
0.0.REV1 7106506648
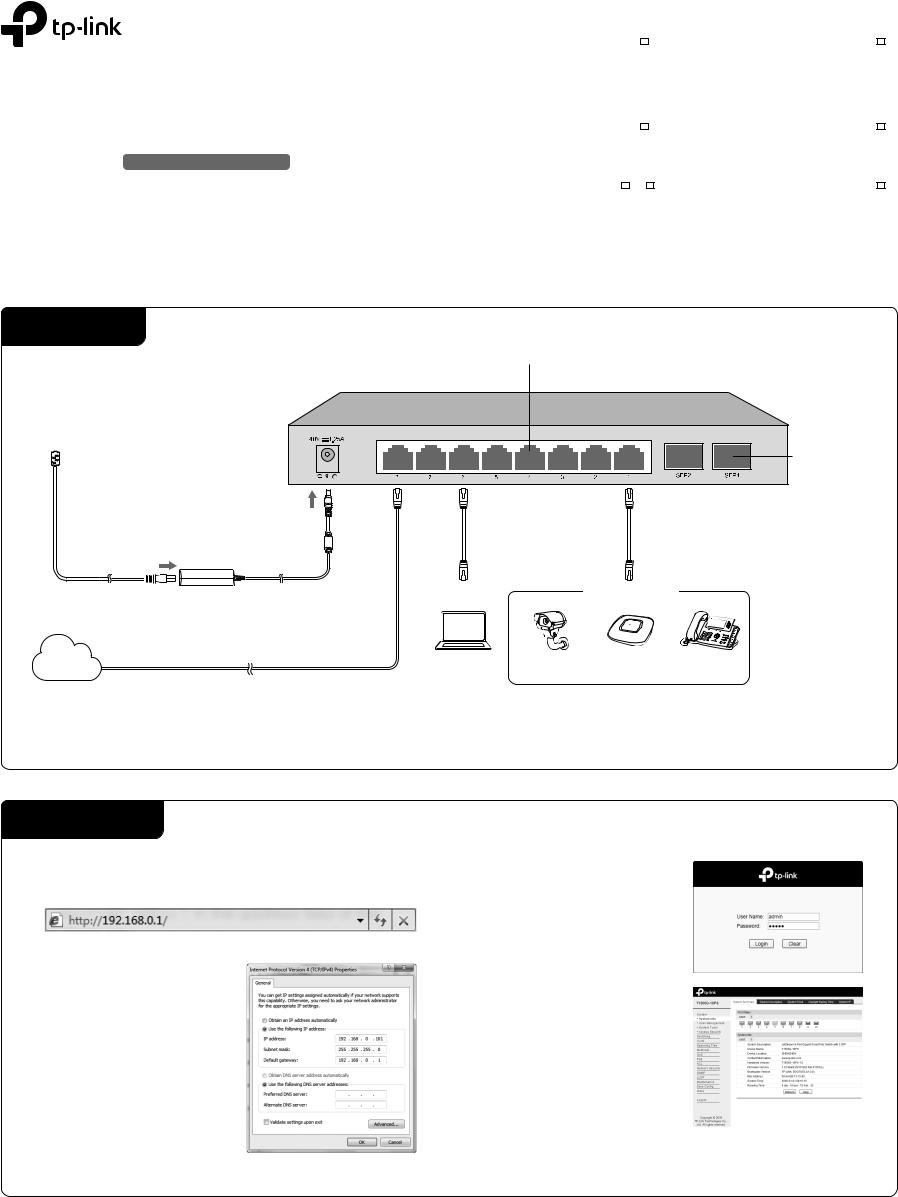
Connection
 3
3
AC Power Cord
2
DC Power Adapter
Internet
Ethernet Ports (1-8) |
SFP Slots |
1 |
PoE Devices
PC |
IP Camera |
AP |
IP Phone |
Note:
1.PoE ports can also connect to non-PoE devices, but only transmit data.
2.Maximum PoE power is 15.4W for each PoE port and 53W for all PoE ports.
Configuration
1.To access the GUI of the switch, open a browser and type the default management address http://192.168.0.1 in the address field of the browser, then press the Enter key.
Note:
To log in to the switch, the IP address of your PC should be set in the same subnet as that of the switch. The IP address is 192.168.0.x (”x” is any number from 2 to 254). Subnet Mask is 255.255.255.0. For details, please refer to Appendix B in the User Guide on the resource CD.
2.Enter admin for both the User Name and Password in the lower case letters. Then click the Login button or press the Enter key.
3.After a successful login, the main page will appear as follows, and you can click the menu on the left side to configure the corresponding functions.
Note:
For more details about how to configure the switch, see the User Guide on the resource CD.
 Loading...